Register Path to MS Word Templates
Explanation
The MS Word template functionality is a powerful tool for the HR Coordinator to create documents that should include current employee data from the database.
Use this function to register where the document templates are stored and to enter the document titles.
The possibility to create Word documents based upon a template and the data from the application gives the user an easy way to define documents that can be generated.
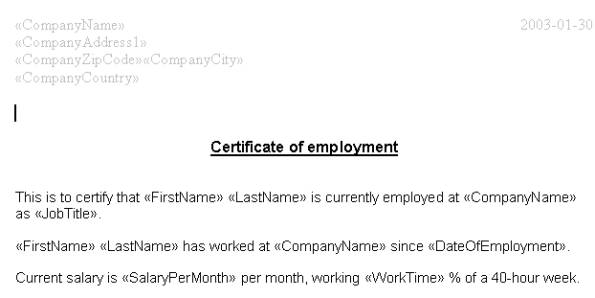
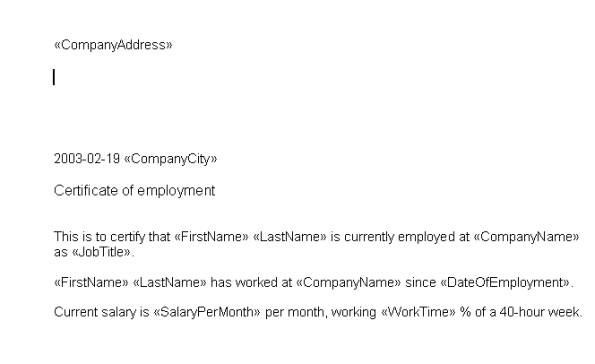
The available information that may be used in the document consists of a fixed number of fields that can be inserted inside the document text. There are 51 items defined and supplied in an employeedata.htm file that comes with the application. The file currently includes the following database items:
Company Information
Company Name, Association No, Company Address (all fields due to the company address presentation set up), Company Address1, Company Address2, Company Zip Code, Company City, Company State, Company County, Company Country, Company Phone, Company Fax, Company Email
Employees Personal Information
First Name, Last Name, Address, Address1, Address2, Zip Code, City, State, County, Country, Gender, Date of Birth, Place of Birth
Employment Related Information
Emp No, Date of Employment, Date of Leaving, Employment Comments, Work Time, Leaving Cause, Date Start Position, Date End Position, Position Title, Job Title, Manager Name, Manager Job Title, Salary per Year, Salary per Month, Salary per Hour, Salary Amount, Salary Period, Salary Pay Frequency, Salary Currency Code
Setup :
The basic data is set up in the Word Template Definition page. In this page, the document name including the file path is entered together with a description. Other columns determine where the document is used and what data can it fetch from the employeedata.htm file mentioned above.
Generating Documents :
Below is an example of a document template.
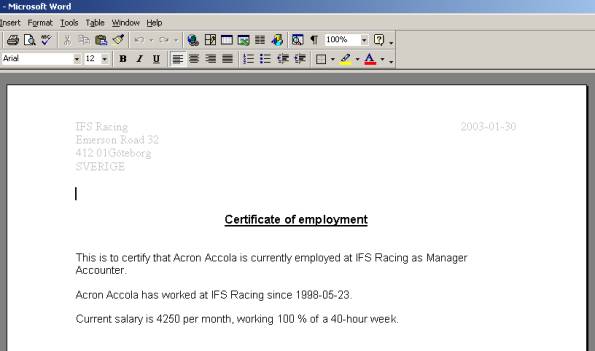
In order to generate this document for a specific employee you:
- Open the Employee page.
- Select an employee.
- Select Generate Document button.
- Select the appropriate document and press OK.
- Answer any questions that appear (varies between templates).
The result is a MS Word document.
Creating document templates:
To create a new document template, the user needs to do the following:
- Create a new blank Word document and prepare the document to use Mail Merge to the fixed employeedata.html document.
- Enter the text and Mail Merge objects.
- Add the Visual Basic Macro.
- Add the document to the client and test it.
Create and Prepare Document :
To create a document template, open the Microsoft Word and create a new document. Once a document is created you will have to access the Mail Merge options. Depending on the version of Microsoft Word, Mail Merge is accessible from different locations.
Mail Merge should be started for the current/active document (the document you have just created) and have form of a Letter (Form Letters in older Word versions). For a data source, select the employeedata.htm file in your computer.
For more information about performing a mail merge, please consult the documentation relevant for the Microsof Word version that you are currently using.
Add text and Mail Merge Objects :
To insert an field that will fetch information from the application, use the Insert Merge Field option. Clicking on it will allow you to select what information you want to appear in the merge field (e.g., a company address, Job Title, First and Last names).
Through selection of the appropriate fields that will appear in the running text, a template is created.
Add Visual Basic Macro :
For the document template to work, a Visual Basic macro has to be added. Depending on the version of Microsoft Word, there are various ways of accessing the macro edition. The macro menu can be accessed by pressing alt + F11 keys. For more information on macros, please read Microsoft documentation for the relevant Word version. In some versions, macro edition field for the document will appear automatically, and in others a relevant document has to be manually selected from the graphical document structure (a "tree" structure).
In the macro edition, add the following code (just copy the code and paste it in the code page):
Public Sub DoMailMerge(sFile As String)
    ActiveDocument.MailMerge.OpenDataSource Name:=sFile, _
        ConfirmConversions:=False, ReadOnly:=False, LinkToSource:=True, _
        AddToRecentFiles:=False, PasswordDocument:="", PasswordTemplate:="", _
        WritePasswordDocument:="", WritePasswordTemplate:="", Revert:=False, _
        Format:=wdOpenFormatAuto, Connection:="", SQLStatement:="", SQLStatement1 _
        :=""
    With ActiveDocument.MailMerge
        .Destination = wdSendToNewDocument
        .MailAsAttachment = False
        .MailAddressFieldName = ""
        .MailSubject = ""
        .SuppressBlankLines = True
        With .DataSource
            .FirstRecord = wdDefaultFirstRecord
            .LastRecord = wdDefaultLastRecord
        End With
        .Execute Pause:=False
    End With
End Sub
Add to client and test :
To test the newly ceated document, add it in the Word Template Definition page. select an appropiate document type and select what data should be included. Then, you can test the document by opening a relevant page (e.g., Employee), clicking on Generate Document button. In a dialog box that will appear, a document should be available for selection. Once you selected it and pressed OK, document should appear with all the relevant information entered.
Prerequisites
The templates should be available in the specified folder in your computer
System Effects
When the templates are defined and available in the specified folder, documents can be generated by clicking the Generate Document button in the Employee File page