Using OpenID Connect
The user credentials to logon to the Scheduling Workbench can be supplied by using OpenID Connect.
Warning
This manual does not provide an in-depth tutorial of OpenID Connect. Consult an OpenID Connect expert if you do not understand the terms used in this section.
The following parameters control how OpenID Connect interfaces with the Scheduling Workbench Users.
- OpenIdAuthority
If this value is not empty, OpenID Connect is enabled. When OpenID Connect is enabled, this value identifies the OpenID Provider. OpenIdAuthority is a base URI and it is used to obtain the Discovery document for the OpenID Provider at OpenIdAuthority/.well-known/openid-configuration. The Discovery document contains an "issuer" value which must match OpenIdAuthority. - OpenIdAuthorityThumbprint
The certificate thumbprint for the OpenID Authority URL. See the section on Certificate Thumbprints for more information. - OpenIdClientId
When OpenID Connect is enabled, this value identifies the App that has been registered with the OpenID Provider. The parameter value must not be empty and is often a GUID. - OpenIdClientSecret
A client secret is a confidential key used by an application to authenticate itself to an authorization server, ensuring secure communication and verification of its identity during OpenID Connect flows. For confidential clients, the parameter value must not be empty. - OpenIdResourceId
When OpenID Connect is enabled, this value identifies a Web API for the App that has been registered with the OpenID Provider. The parameter value is optional and is often a GUID. UserNameClaim (Default: unique_name)
The OpenID Provider returns a collection of claims about the authenticated end-user, signed by the provider. These claim values can be used to identify an existing Scheduling user. This parameter identifies the name of the claim(s) that will be checked to find the user based on the user's ID. Multiple claim names can be specified as a comma-separated list. If a claim is not found, the system will move to the next claim in the list.
Warning
Ensure users are not able to freely select the values of the used claims returned by the OpenID Provider. If they do, it can be possible to impersonate other users in the system. Especially so when using multiple claims. An example situation: This parameter is set to "username,sub". A Scheduling user with the user ID of "A123" exists. When this user logs in the OpenID Provider returns a claim "sub" with the value "A123" but no "username" claim. They will be correctly mapped to the A123 user. If another user then manages to create a user in the OpenID Provider with the "username" claim value of "A123" they will also be mapped to the same user even though they have a different "sub" claim.
UserIgnorePrefix
This parameter can be used to remove a common prefix from the username claim value. For example, it can be used to remove the prefix "mydomain\" from claim values like "mydomain\administrator"- UserIgnoreSuffix
This parameter can be used to remove a common suffix from the username claim value. For example, it can be used to remove the suffix "@mydomain.net" from claim values like "administrator@mydomain.net".
Note
Do not change the OpenID parameters immediately. Prepare an input file with all the OpenID parameter changes you require. Submit that input file after you have created all the Scheduling users that need to use the PSO or Scheduling Workbench.
- Choose the OpenID Provider (OP) that you wish to use for authentication. The parameter OpenIdAuthority must be set to the "issuer" value in the Discovery document for the OP. For example, OpenIdAuthority could be set to https://my.ifs.apps.server:58080/openid-connect-provider if you choose to use the IFS Applications Identity Provider.
- Register an App in the OpenID Provider (OP). The OP will create a Client ID (often a GUID) for this app. The parameter OpenIdClientId is set to this value.
- Add the PSO Workbench Default/token page as a valid Redirect URI for the Registered App within the OpenID Provider (OP). The Redirect URI value will resemble "https://servername/pso/workbench/Default/token". The servername part of the URI will depend on your installation. In a multi-tenant system, "Default" in the URI (the account ID of the head organization) is replaced by the account ID of the tenant organization.
- Optionally, register a Web API in the OpenID Provider. The OP will create a Client ID for this API. The parameter OpenIdResourceId is set to this value.
- Identify the claim from the OpenID Provider that can be mapped onto a Scheduling user. The parameter UserNameClaim is set to the name of this claim.
- Identify any common prefix or suffix that you wish to remove from the UserNameClaim value. Set the parameters UserIgnorePrefix and UserIgnoreSuffix accordingly.
- Logon to the Scheduling Workbench as Administrator.
- Create the users as normal; ensuring the names match the user claim values from the OpenID Provider as adjusted by the configured prefix and suffix parameters. A password will still be required but this will not be used if OpenID Connect is enabled.
- Once all the users have been defined, set the OpenID parameter values.
Warning
Make sure you give at least one of the users administrative rights before switching to OpenID Connect. The default Administrator user will not work unless you can logon as a user that maps to Administrator. Also make sure you have permissions to see the Administration workspace on the Scheduling Workbench.
Note
Once OpenID Connect is enabled, if the OpenID user is not set up as a Scheduling user then the automatic logon (without a password) will fail and (if the Authentication Gateway is disabled) it is not possible to logon as a normal user (supplying the password). To logon in the normal way, with a password, OpenID Connect mode must be disabled (i.e. unset the parameter value). To do this, you may send in the "Reset OpenIdAuthority.xml" file which is included in the Setup Files directory of the distribution.
Authentication Gateway
If the parameter AllowAuthenticationGateway is true, it is possible to login to an OpenID-enabled system using the standard PSO username and password screen by specifying "authgateway=true" in the query string for the Workbench URI. If the parameter is false, the Authentication Gateway is disabled.
For the PSO Workbench, browse to "https://servername/pso/workbench/Default/login?authGateway=true".
The servername part of the URI is dependent on your installation. In a multi-tenant system, "Default" in the URI (the account ID of the head organization) is replaced by the account ID of the tenant organization. The query string parameter name "authGateway" is case-sensitive.
Integrations to PSO
When integrating an application with PSO where OIDC has been configured, there are two options for calls to the PSO Gateway:
- OIDC can be used by first acquiring an authentication token (in the calling application) and passing it as the password in the logon request to PSO (to acquire a session token), ensuring to leave the username field blank in the logon request. Further details of interface calls can be found in the Interface Guide.
- If the parameter "OpenIdAllowLegacyAuthentication" is set to True then calls to the PSO Gateway can use a PSO user and password in the logon request and there is no need to acquire an OIDC token.
Example implementation using Microsoft Entra ID
PSO supports the use of Microsoft Entra ID (ME-ID) as the OpenID authority in an OIDC authentication setup. In this section we will provide step-by-step details of how to acquire the required PSO parameter values, and required changes in the target ME-ID. Details of the parameters that must be configured within PSO to enable OIDC authentication are listed towards the beginning of this section. Note that the guidelines given in this section are intended purely for assistance in setting up a working OIDC implementation for PSO - should the reader require detailed OIDC advice they should seek advice from an OIDC expert.
- Setting up PSO Users: please ensure that you have mapped users from ME-ID to PSO users and ensured that at least one user has administrator permissions. For example, if a user in your ME-ID has a User name of "joe.bloggs@really.com" then you will need to have a PSO user with the ID field set to this. Note that the exception to this is if you intend to set the PSO parameters "UserIgnorePrefix" or "UserIgnoreSuffix" which will filter the ME-ID user name. Note also that this depends on the selected value for "UserNameClaim" - essentially, which part of the ME-ID User's details will be validated against the PSO User record - which is "unique_name" by default (corresponding to the "User name" field in ME-ID).
Setting up an App Registration in ME-ID: to be able to wire up PSO with your ME-ID you will need an App Registration. This can be created through the Azure Portal by first browsing to your ME-ID resource and then to the App Registrations blade. Once there, click on "New Registration" and enter a Name, then choose the "Supported account types" (the choice for this option is up to the user) and finally under the Redirect URI, choose the type of platform depending on the application, the web option is recommended, and in the redirect URIs field enter the token URI for your Workbench. For example, for the PSO Workbench this is of the form:
https://{servername}/pso/workbench/Default/tokenClick on "Register" button to register an application.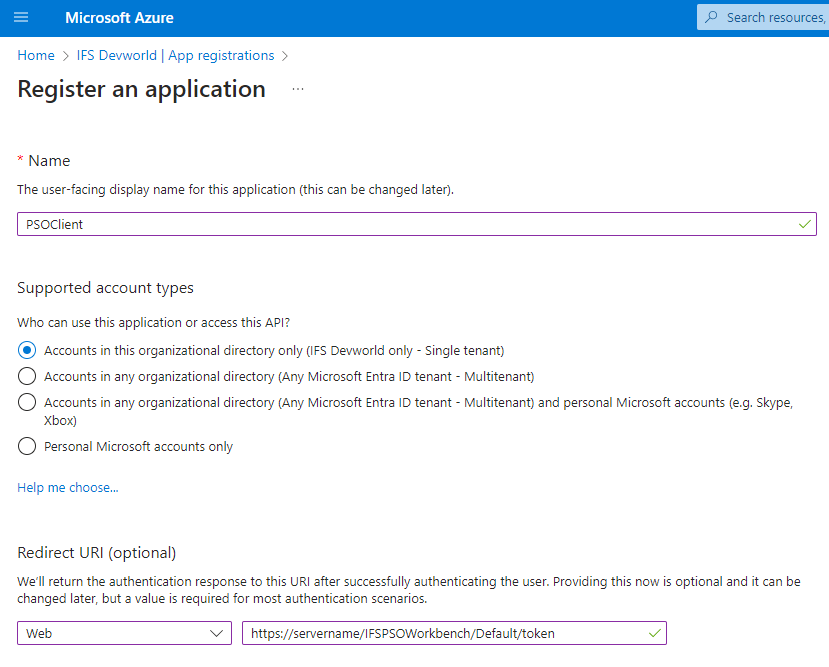
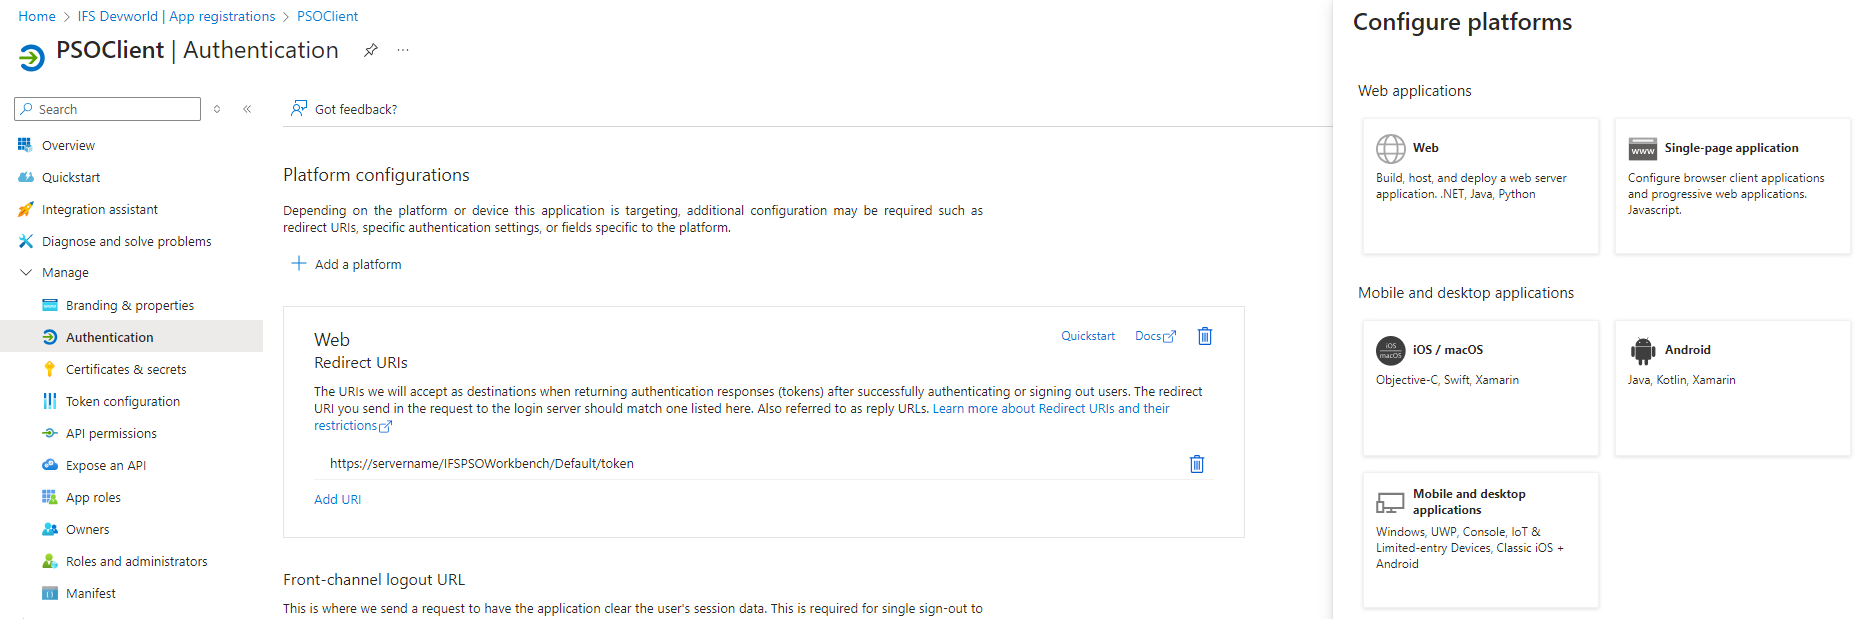
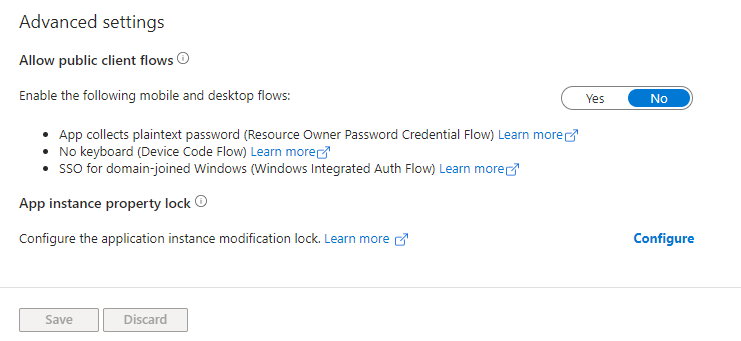
Depending on the platform the application is targeting, additional authentication configuration may be required. On the left side menu, click on 'Authentication' to verify the platform configuration or add a new platform. Set 'Allow public client flows' to 'No'.
Note
Note that the token URI is described in more detail in the general instructions towards the start of this section. Note that for on-premises installs using OIDC with ME-ID, this will be "http://localhost", whereas for Azure installs you must use HTTPS.
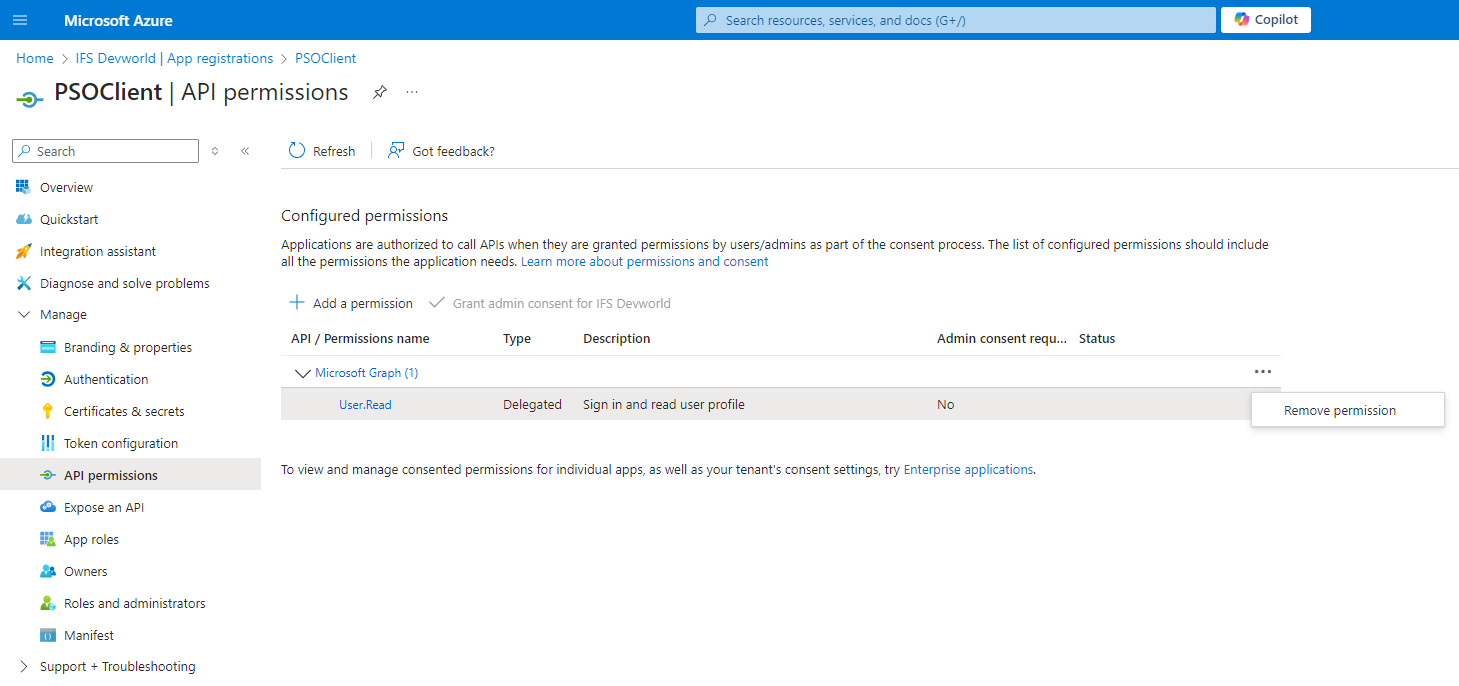
Microsoft by default assumes that we will be using this application to access Microsoft Graph APIs. This is not the case so we can remove this permission. Select "API permissions" in the left menu and click on the three dots and remove the permission.
Acquiring the OpenIdAuthority: For PSO using ME-ID, this is of the form
https://login.microsoftonline.com/{tenant ID}/v2.0where the tenant ID - sometimes called the Directory ID - can be found on the ME-ID's client Overview page within the Azure Portal.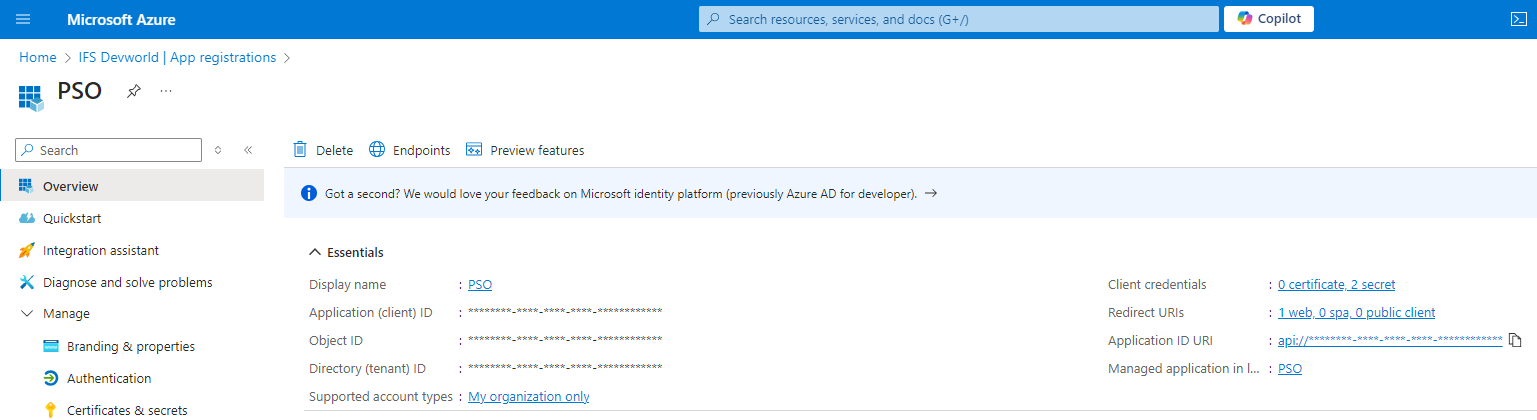
- Acquire the OpenIdClientId: once you have created and configured the App Registration as described above, the value required for the OpenIdClientId parameter can be found on the Overview page for your App Registration. It is a GUID and may also be referred to as the Application ID.
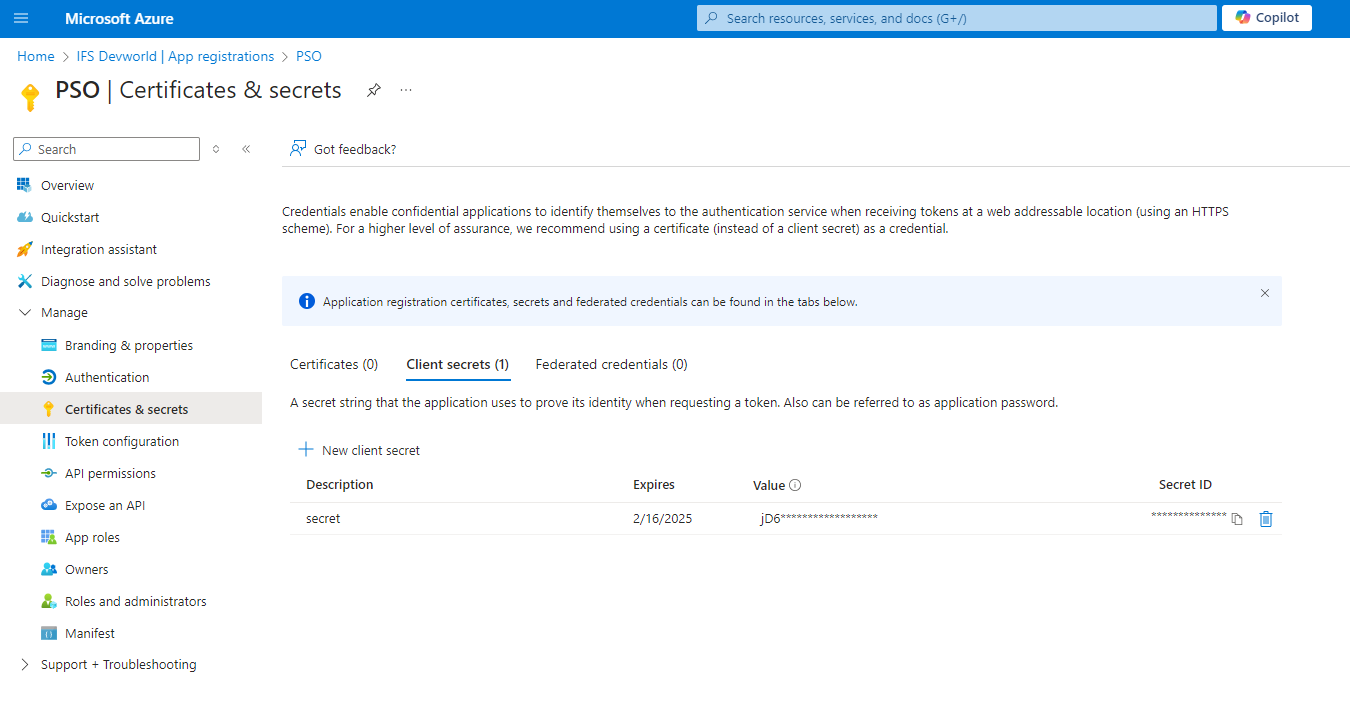
- Acquire the OpenIdClientSecret: once you have created and configured the App Registration as described above, navigate to "Certificates & Secrets" page and select "Client Secrets" tab. Click on "New client secret" and set a description and expiry according to the application needs. The client secret values cannot be viewed, except for immediately after creation. Be sure to save the secret when created before leaving the page. Use this value (not the Secret ID) for the OpenIdClientSecret parameter.
- Acquire the OpenIdScope: once you have created and configured the App Registration as described above, click on 'Expose an API' on the left menu bar. Click on 'Add a scope' this gives a unique URI used to identify the web API. Click on 'Save and Continue' and give a scope name and other mandatory fields as shown in the image below and set the state to 'Enabled' and finally click on 'Add scope'.
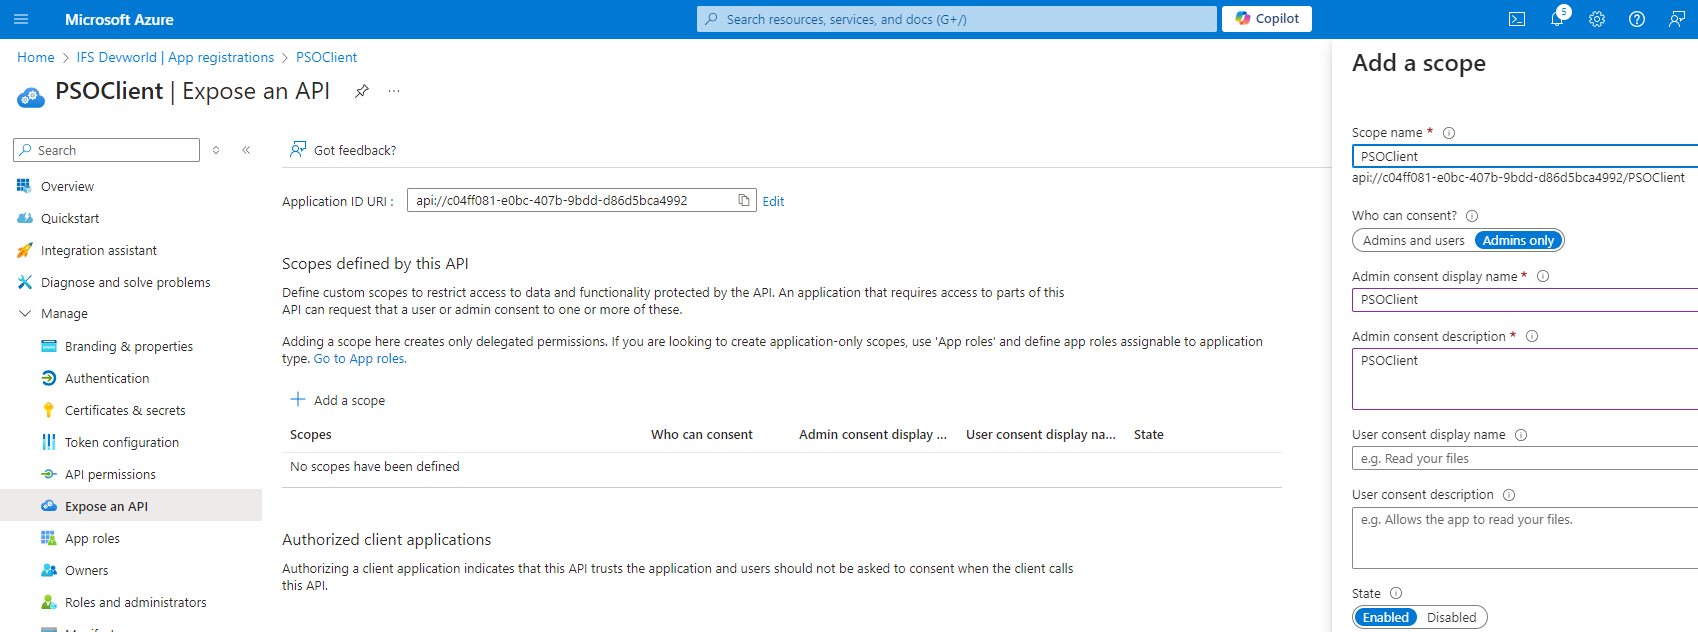 The newly added scope will appear in the grid, you must use this value for the OpenIDScope parameter.
 - Acquiring an OpenIdResourceId: this step is optional and depends on whether the desired authentication flow requires both a Web API and a Public Client. For example, some authentication flows require the combination of a Web API and Public Client for token refreshing - please consult an OIDC expert to determine whether this is necessary for your target setup. If you do need a Web API as well, you will need to create a second App Registration as described above with the difference that on the "Register an application" screen you will select Web API as the Platform Configuration. Once you click on Register, browse to the "Expose an API" page and if an Application ID URI is not already set then click on the "set" button to populate it with a default value, then click on "Add a scope" and fill in the Scope name as "user_impersonation" and set "Who can consent" to "Admin and users", then fill the remaining boxes with a display name and description (these are up to the user). Finally, to wire up the Web API App Registration with the first App Registration we created above (that was set up to use a "Mobile and desktop applications" configuration), browse to the first App Registration and then to the API permissions page, click on "Add a permission" and then select "My APIs". You should see an entry that corresponds to the Scope that was added for the Web API App registration, select this and then click on "Delegated permissions" and tick the box next to "user_impersonation", then click on "Add permissions". You have now linked the two App Registrations and can provide the Application ID of the Web API App Registration as the OpenIdResourceId parameter in PSO.
- Setting PSO parameters: once you have configured ME-ID and have all of the required PSO User's configured, you are ready to set the PSO Parameter values that we have acquired in the previous steps. This can be done, for example, via the Parameters page in the PSO Workbench.
Warning
Following configuration, if the PSO system is failing to log in and is stuck in a refresh loop at the PSO login screen then you can reset the OIDC related parameters by sending in the file "Reset OpenIdAuthority.xml" found in the Setup Files folder in the PSO release. You should then be able to log in again using a PSO username and password. Once logged in, check the Events screen for any warnings and/or errors as these should provide information about possible issues with the authentication setup.
Example implementation using Keycloak
PSO supports the use Keycloak as the OpenID authority in an OIDC authentication setup. In this section we will provide step-by-step details of how to setup a local/server instance of Keycloak, configure the correct details within Keycloak and acquire the required PSO parameters. Details of the parameters that must be configured within PSO to enable OIDC authentication are listed towards the beginning of this section. Note that the guidelines given in this section are intended purely for assistance in setting up a working OIDC implementation for PSO - should the reader require detailed OIDC advice they should seek advice from an OIDC expert.
If you are setting up Keycloak on a server that's different than the PSO install, then ensure that you have done the following:
- Enable inbound TCP connections on port 8080
- Add a custom rule to your server firewall to allow inbound TCP connections on port 8080
- After you have installed Keycloak, using the instructions below, you can start the Keycloak by following instructions here:
https://www.keycloak.org/getting-started/getting-started-zip#_start_keycloak
Keycloak setup instructions:
- Set up a local Keycloak instance by following the instructions here: "https://www.keycloak.org/getting-started/getting-started-zip". The server installation is basically the same, you can find more information here "https://www.keycloak.org/docs/25.0.4/server_admin/". If configured correctly, the Keycloak instance will be available at "http://localhost:8080/"
- Configure a new realm by following the instructions here: "https://www.keycloak.org/getting-started/getting-started-zip#_create_a_realm". This realm will host the client and users that will be used to interact with PSO.
- We now need to create a new client within the newly created realm. Follow the instructions here: "https://www.keycloak.org/getting-started/getting-started-zip#_secure_the_first_application"
- On the Clients screen click Create
- Specify a Client ID, leave the Client Protocol as 'openid-connect' and click Save
- In the client settings set the Client authentication to true to create a private or confidential client.
- Go to 'Credentials' tab and select 'Client Id & Secret' to generate a client secret.
- For an on-premise install of PSO using Keycloak on the same server, the Valid Redirect URI value will be "http://localhost/Default/token". For an Azure install of PSO then the Valid Redirect URI value will be the token URI of your Workbench, e.g. "https://{servername}/pso/workbench/Default/token"
- You will now need to create all of the users that will be using Keycloak with PSO in Keycloak, you can do this by following the instructions here: "https://www.keycloak.org/getting-started/getting-started-zip#_create_a_user"
PSO setup instructions:
- Setting up PSO Users: before setting any parameters for OIDC in PSO, please ensure that you have mapped users from Keycloak to PSO users and ensured that at least one user has administrator permissions. For example, if a user in your Keycloak has a Username of "joe.bloggs@really.com" then you will need to have a PSO user with the ID field set to this.
Acquiring the OpenIdAuthority parameter value: For an on-premise install of PSO using a local instance of Keycloak, this is of the form
http://localhost:8080/realms/{REALM_NAME}/Where Realm Name is the name of the realm created earlier.For an Azure install of PSO with Keycloak installed in a separate server, then this is of the form:
http://{SERVERNAME}:8080/realms/{REALM_NAME}Where SERVERNAME is either the public IP address of the server that has Keycloak installed in or its fully qualified domain name (FQDN) - see more information here "https://www.keycloak.org/docs/25.0.4/server_admin/#configuring-realms".Note: In an internet-facing setup we strongly recommend using SSL/HTTPS for Keycloak, more information here "https://www.keycloak.org/docs/25.0.4/server_admin/#sslhttps-requirement".
Acquiring the OpenIdClientId parameter value: For PSO using Keycloak, this will be the Client ID value of the Client that was created earlier.
- Acquiring the OpenIdClientSecret parameter value: For PSO using Keycloak, this will be the Client Secret value that was created earlier. This is required for private or confidential client only.
- Acquiring the UserNameClaim parameter value: For PSO using Keycloak, this will be preferred_username
- Setting up PSO parameters: once you have configured Keycloak and have all of the required PSO users configured, then you are ready to set the PSO parameter values that we have acquired in the previous steps. This can be done, for example, via the Parameters page in the PSO Workbench.
Warning
Following configuration, if the PSO system is failing to log in and is stuck in a refresh loop at the PSO login screen then you can reset the OIDC related parameters by sending in the file "Reset OpenIdAuthority.xml" found in the Setup Files folder in the PSO release. You should then be able to log in again using a PSO username and password. Once logged in, check the Events screen for any warnings and/or errors as these should provide information about possible issues with the authentication setup.