Azure Installation
Prerequisite Steps
Warning
Azure VM-based installations using the IFS PSO Installer are deprecated. Kubernetes is the supported deployment option, including for workloads hosted on Azure (for example AKS). This installation method remains supported until 30 September 2031. See Migrating from Windows or Azure for migration guidance. Contact an IFS consultant if you need further assistance.
Note
It is assumed that anyone intending to deploy a scheduling system to Azure has a valid Azure subscription. Your Azure subscription details (see the Pre-requisite steps section below) must be provided when requesting a licence key as the IFS PSO Installer requires this information to be encoded into the licence before it will allow Azure deployments.
When communicating with Azure The IFS PSO Installer and PSO services need to be authenticated. Your deployment to Azure is secured using Azure Active Directory (AAD) as a broker for calls to Azure. There are two options available for authentication:
- Using a Service Principal - The installer and PSO services both use the Service Principal for authentication.
- Using an interactive login - The installer uses a logged-in user for installation. The PSO services use an Azure Managed Identity for authentication.
Setting up authentication using a Service Principal
If not using an interactive login, before you can use the IFS PSO Installer for Azure deployments you need to set up a Service Principal account in your AAD. PSO will use this Service Principal account (essentially an AAD account that applications can use) to make calls to Azure. See https://docs.microsoft.com/en-us/azure/azure-resource-manager/resource-group-create-service-principal-portal?view=azure-cli-latest for more details.
To create the Service Principal:
- In the Azure Portal, navigate to Azure Active Directory -> App Registrations -> New application registration
- Give the Service Principal a name (between 4 and 256 characters in length)
- Sign-on/reply url can be set to a placeholder url (e.g. https://example.org)
- Click 'Create'
The next step is to create a key. This can be done as follows:
- Click on the Service Principal you have just created
- Navigate to Manage -> Certificates & secrets
- Click 'New client secret'
- Enter a description and a duration
- Click 'Save', and you will be shown the application key. Copy the key at this point, as you will not have access to it again
Warning
The application key will only be shown once at this point, and cannot be accessed again through the Azure Portal. Make sure to save a copy of the key before continuing.
You will need to give the Service Principal access to the subscription using RBAC configuration. This is done through the Azure Portal:
- Navigate to the chosen subscription and click on 'Access Control (IAM)'
- Click on 'Add role assignment'
- For the Role, Owner is required
- Under 'Select', search for the name of the Service Principal
- Click 'Save'
Note
In order to add the role assignment, you will need to be an Owner on the subscription. If not, the 'Add role assignment' button will be disabled.
With the Service Principal set up, you need to provide four pieces of information that you must then provide to IFS so that a licence key can be generated, which you can then use with the Installer:
- Subscription ID
- Azure Active Directory Tenant ID: This can be found on the Azure Portal under Azure Active Directory > Properties > Directory ID
- Service Principal Application ID: This can be found on the Azure Portal by selecting the relevant Service Principal under Azure Active Directory > App Registrations, then using the value shown for * Application (client) ID *
- Service Principal Application Key: This can be generated in the Azure Portal. Note that this is only shown once, when it is first created.
The above details are encrypted into your licence key and used by both the IFS PSO Installer and the PSO services to authenticate calls to the Azure API with Oath 2 level compliance.
Using an interactive login
When using an interactive login a Service Principal does not need to be setup. You just need to provide your Subscription ID and the Tenant ID of your Azure Active Directory (sometimes referred to as Directory ID on the Azure Portal) to IFS so that a licence key can be generated, which you can then use with the Installer. The Subscription ID and Tenant ID are encrypted into your licence key.
The IFS PSO Installer will show an interactive login dialog for Azure and the installation will be done as the user you login with. As part of the installation the installer will automatically setup a managed identity in Azure. This managed identity will be used by the PSO services when they authenticate with Azure and is locked down to have role-based access control of only the deployment's resource group.
Warning
In order to use an interactive logon, you will need to be an Owner on the subscription.
Warning
For the installer to be able to set up a managed identity in Azure, your subscription must be registered to use 'Microsoft.ManagedIdentity'. This can be set in the Azure portal, under 'Resource providers' on the selected subscription.
Note
The "Create Image" option is currently only available when doing authentication using a Service Principal and not when using Managed Identities.
Setting up a Key Vault for HTTPS
If HTTPS is required for an installation, a Key Vault must be setup and configured prior to the install and an SSL certificate in pfx format needs to be uploaded as a Secret.
The required steps for setting up the Key Vault are as follows:
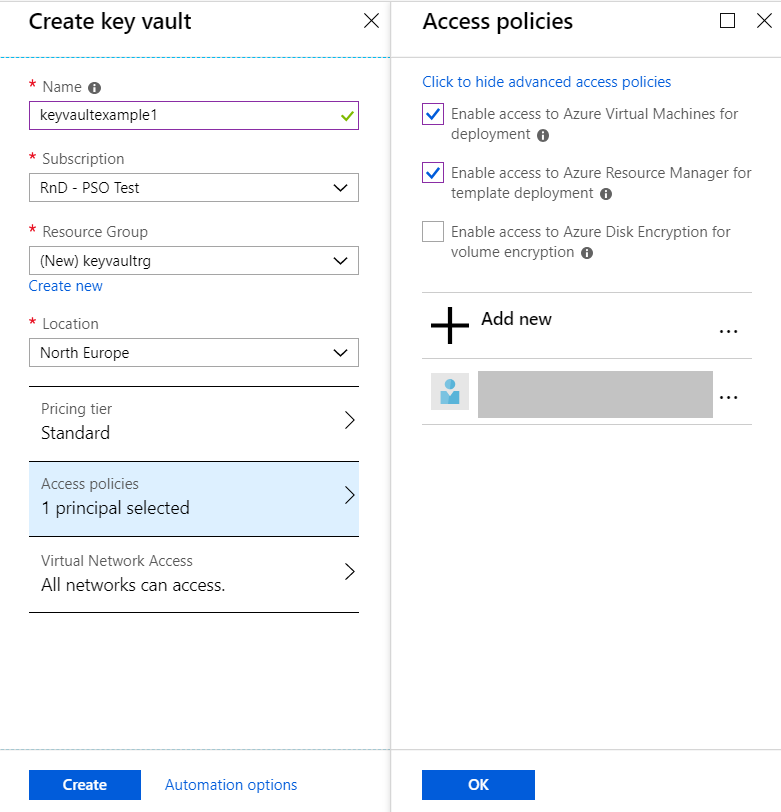
- In the Azure Portal, go to 'Key Vaults' and then select 'Add'
- Enter the name, resource group and location for the Key Vault
- Click on 'Access policies' and then on 'Click to show advanced access policies'
Check 'Enable access to Azure Virtual Machines for deployment' and 'Enable access to Azure Resource Manager for template deployment'
Note
If using PowerShell to create a Key Vault, this step is equivalent to setting the 'EnabledForDeployment' flag to true.
Still in the 'Access policies' window, click on 'Add new'
- If you previously setup a Service Principal click 'Select principal' and search for your Service Principal
- Under 'Secret permissions', ensure that at least 'Get', 'List', 'Set' and 'Delete' are selected
- Accept the changes you have made and click 'Create' to create the Key Vault
As the certificate management resides under the end-user's, or service provider's, responsibilities, they must create and manage the Key Vault. This is a straightforward procedure and extensive documentation can be found on the Azure website to aid with this step.
Once a Key Vault has been created the next step is to upload the SSL certificate as a Secret. A PowerShell script is provided in the Setup Files folder within a release distribution to aid with this ("Upload certificate to key vault.ps1").
To upload a certificate, run the upload script within PowerShell. The script takes the following parameters: subscription_id (your subscription id), vaultName (the name given to the key vault created above), secretName (a name for the secret), filename (the complete filepath to the certificate), certPassword (the certificate password) and AzureUSGovernment (whether the Key Vault resides in the AzureUSGovernment cloud). If not provided, the script will prompt for these values, with the exception of AzureUSGovernment which is an optional switch parameter, i.e. if present it is taken as true, if absent it means false.
Example
& '.\Upload certificate to key vault.ps1' -subscription_id "1234567890" -vaultName "examplevault" -secretName "examplesecret" -fileName "C:\xxxxx\xxxxxxxx\xxxxx.pfx" -certPassword "abcdef"
Note
This script requires Azure-Rm in order to run. If this is not installed you can install it with the PowerShell command "Install-Module AzureRm".
Once the certificate is uploaded you can retrieve the Key Vault Resource ID (visible in the Settings -> Properties section of the Key Vault on the Azure Portal) and the Secret Url (visible in Settings -> Secrets -> Select the secret you created in the upload step -> drill-down to the desired certificate version, e.g. the latest version, and you will see the Secret Identifier url). These are needed for setting up HTTPS when running the installer. The certificate thumbprint is also required when running the installer. You can retrieve this from your certificate with the PowerShell command "Get-PfxCertificate -FilePath "Certificate.pfx", where "Certificate.pfx" represents the filepath to your certificate.
Warning
The current requirements from Microsoft are that a Key Vault must have 'Enable access to Azure Virtual Machines for deployment' and 'Enable access to Azure Resource Manager for template deployment' set to true. The Key Vault must also reside in the same subscription and location as the Virtual Machine. If this is not configured correctly you may find that deployments will either fail or timeout. Please consult Microsoft for up-to-date details of how to set up a Key Vault for use with Virtual Machines deployments - see 'https://docs.microsoft.com/en-us/azure/virtual-machines/windows/key-vault-setup'
Required Resource Providers for a Subscription
To enable Azure functionality to be used by an Azure subscription you must configure Resource Providers. This can be easily done using the Azure Portal by navigating to the Subscription that you are interested in and then selecting the Resource Providers blade. The Resource Providers required for PSO in Azure are as follows:
- Microsoft.Authentication
- Microsoft.Compute
- microsoft.insights
- Microsoft.KeyVault
- Microsoft.ManagedIdentity
- Microsoft.Network
- Microsoft.OperationalInsights
- Microsoft.Portal
- Microsoft.Resources
- Microsoft.Sql
- Microsoft.Storage
How do we deploy a scheduling system to Azure?
To deploy an IFS PSO system to the Microsoft Azure cloud follows very similar steps to a local installation. You use the IFS PSO Installer to define which software components you wish to install and then define the corresponding database connections, then the installer will perform the installations and any required configuration. When we deploy a scheduling system to Azure we have the additional factor that the software is to be installed on a virtual machine that has not been created yet, rather than on the local machine that the IFS PSO Installer is running on. To facilitate this process, the IFS PSO Installer uses a storage container in the Azure cloud to hold the software, a template of how the virtual machine should be configured, and a configuration file defining details of your deployment (e.g. which software components to install, how many machines to create, etc). When we create a deployment on Azure, the "role instance(s)" (essentially, virtual machines with a pre-configured Windows OS) downloads the information and software files that we have placed in our storage container and installs the software to our specification. We can then interact with the Azure service via the Scheduling Gateway service (to send scheduling input to the system and retrieve broadcast data) and via the Scheduling Workbench user-interface.
Note
The storage container used by the IFS PSO Installer resides within your Azure subscription. You can create, and remove, storage accounts using the installer. The IFS PSO Installer handles maintaining, and uploading of, software/configuration files in the Azure storage container.
Deploying to Azure and PSO VM Roles
The IFS PSO Installer provides the ability to deploy an IFS PSO system to the Microsoft Azure cloud platform. When deploying PSO to Azure, the default configuration is to deploy instances of VM "roles" of type DSE and Interface; DSE machines primarily handle optimisation whereas Interface machines host the remaining services.
Default Role Configurations
The default application configuration for the DSE and Interface roles is as follows - please consult the Architecture and Sizing Guide for explanations of the service acronyms, e.g. DSE corresponds to Dynamic Scheduling Engine:
- DSE: ADM, DSE, SSM, SMM
- Interface: ABE, ADM, ARC, DSP, DST, GWY, PSW, RPL, SBM, SES, SIM, SMM, SQM, SRG, SSM, SWB, TRA
Note
The role configuration used by the Installer is read from the "Role Configurations.xml" file in the Setup folder of the release distribution and can be edited if required. However, the default role configuration should be suitable for most deployments of PSO to Azure and we recommend that this is not altered unless advised to do so by IFS.
Auto-scaling
The PSO system can be configured to auto-scale the number of VMs and the database performance based on the current workload. This functionality can be switched on via the "AutoScale" parameter. But this requires Role Cache rules also to be set, which are best set up through the installer. Once enabled, the Scheduling Machine Manager (SMM) will monitor the workload on the system and provision/remove VMs as required. Additionally, the SQL Azure database will be monitored to ensure the performance tier is suitable for the current load (measured in DTUs) and used disk space.
Note
Auto-scaling only applies to the VM instances. If auto-scaling the database is required the vCore Serverless option in Azure should be used.
Note
Auto-scaling can only be selected via the installer if your licence key includes the Scheduling Portal licence part.
Note
When using auto-scaling you do not need to use Service Resiliency checks - it is one or the other, but not both. The Installer will configure the required parameters correctly and no additional post-install changes to parameters are required. Note that you should not manually change the parameters AutoScale and MonitorServiceResilience unless instructed to do so by IFS as changes to these parameters will affect the operation of the PSO system on Azure.
Warning
Auto-scaling only supports the use of the default role IDs: "DSE" and "Interface" defined in "Role Configurations.xml" file in the Setup folder.
Resilience to instance drop-outs with non-auto-scaling deployments
When deploying PSO to Azure the standard configuration separates the IFS PSO services across different machines. At the time of writing, Microsoft guarantee a 99.95% uptime SLA for instances in a deployment, hence at face-value one may assume that at least two instances of each role will be required to ensure 100% effective uptime. However, for non-auto-scaling deployments, the IFS PSO software performs background checks to ensure that all required services in a deployment are up and running across the available instances, meaning that a minimum of one instance of a role can be deployed (not two) and the services will compensate for any drop-outs as instances are recycled by Azure. In short, the IFS PSO software will stop/start the component services across the instances in your deployment to ensure the required deployment configuration, thus compensating for any downtime of a VM instance.
As an example, consider a non-auto-scaling deployment with two roles: DSE and Interface. The DSE role is responsible for scheduling, whereas the Interface role handles all other required services (Scheduling Input Manager, Scheduling Query Manager, etc). At some unknown time, Azure may take down the Interface instance to recycle the VM and/or install updates. At this point service resilience checks performed by the DSE role will notice that, for example, a Scheduling Input Manager (and any other required services) are missing and start up those services on the DSE role. When the Interface role is restarted and its services become active again, the DSE role will switch off any services that it has been running to cover the Interface role and the deployment.
Note
Service resiliency is handled by the Scheduling Service Manager (SSM) service which must therefore be installed in a non-auto-scaling deployment.
Note
Service resiliency should not be enabled when using auto-scaling - it is one or the other, but not both, as auto-scaling will handle server drop-outs by provisioning new VM(s).
Creating an Azure VM image to use with the IFS PSO Installer
The IFS PSO Installer can be used to create a VM image from which you can create deployments. The advantage of creating a re-usable image is that the majority of the time consuming configuration steps are performed just once when the image is created. Then, when the image is used to create a deployment, the VM will boot up considerably quicker. Note that this also applies to recovery from VM recycling by Microsoft. Therefore, using a pre-built image means less downtime and faster start-up.
Note
Azure Managed Images can only be used to create a VM within the same subscription and region. If you require deployments across different regions you will need to create images in the respective target region(s).
Creating an image
An image is deployed in its own Resource Group along with a Storage Account that contains the required software and scripts to bootstrap the image. As such, when creating an image we will also need to create a Resource Group and Storage Account. Note that this is a separate Resource Group to any deployment(s) based on the fact that VM images have a different lifecycle to a PSO cloud deployment and also to ensure encapsulation. A detailed description of the pages in the IFS PSO Installer is given in the following section, therefore, this section will focus on the pages that relate to creating and deleting images.
To create a VM image:
- Select the "Create Image" option on the "Service Selection" page.
- On the "Resource Group" page, enter a valid name for the Resource Group and select the target location.
- On the "Storage Account" page, provide the name for the storage account.
- Set the image creation going by confirming on the "Actions" page.
Creating an image takes roughly 30 mins. Once complete, you will find a Resource Group in the targeted subscription containing an Azure Managed Image that can be used for PSO deployments - details of how to deploy using an existing image are given in the following section.
Note
The "Create Image" option is currently only available if your licence key has Service Principal details embedded.
Deleting an image
When deleting a VM image you can either delete just the image (using the "Delete Image" option on the "Service Selection" page) or delete the entire Resource Group used in the image creation process (i.e. including the Storage Account). Both options are valid but the preferred approach is to delete the Resource Group as this cleans up all resources associated with the image that you wish to delete.
Note
When using the "Delete Image" option, multiple images may be selected.
Warning
An image cannot be deleted if there is currently a live deployment that was spawned from it. To remove an image, all deployments that have used it must first be deleted or upgraded to use a different image.
Warning
When deleting an image, the resource group will be also deleted unless it is associated with another image.
Deploying an Azure service using the IFS PSO Installer
Note
If you intend to use custom certificates for RDP and/or HTTPS with your Azure deployment then you must have the certificate files available in .pfx format and the password at hand as they will be required during the install process.
Start Page
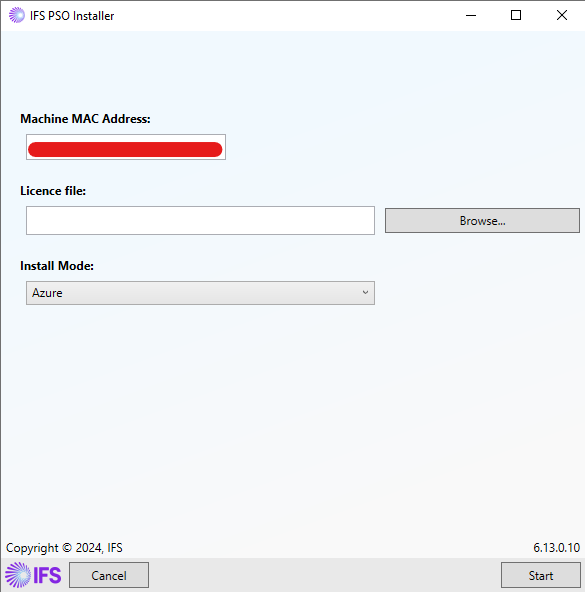
The process of deploying an IFS PSO system as an Azure service is very similar to that for a local installation as described in the "Standard Software Installation" section. From the start page of the IFS PSO Installer, select your licence file and then select "Azure" from the Install Mode option. Click "Next" to continue.
Licence Details
Provided you have a valid licence, you will be taken to the "Licence Details" page where you may review the software products covered by the selected licence. Clicking next to proceed with the installation.
Subscriptions
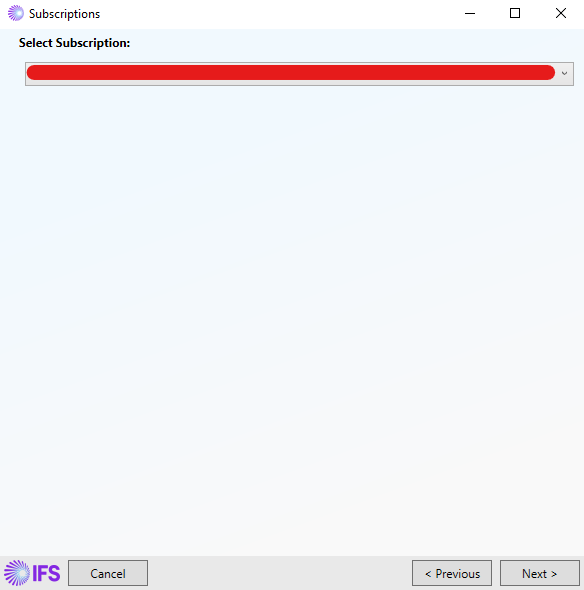
As discussed earlier in this section, you will require an Azure subscription to be able to deploy an IFS PSO system to Azure using the IFS PSO Installer and details of your Azure subscription will be encoded into your licence key. On the Subscription page you may select from the subscriptions that your licence is aware of. After selecting the desired subscription, click "Next" to proceed. If your licence key does not have the Service Principal details embedded you will be asked to login to Azure so the installation can progress as your user. At this point the installer will fetch information about your subscription from Azure: existing IFS PSO deployments, storage containers (primarily used to store software and configuration files during the install process), and Sql Azure databases.
Select Service Action
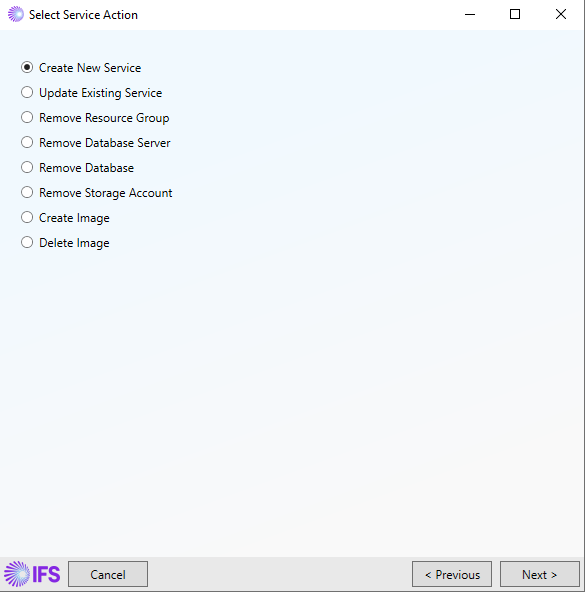
An IFS PSO System deployed to Azure is referred to as a Service. As such, to create a new IFS PSO system in the Azure cloud we select "Create New Service" and click "Next" to continue.
You will then need to step through several screens to populate details about how the new deployment should be created.
Storage Account
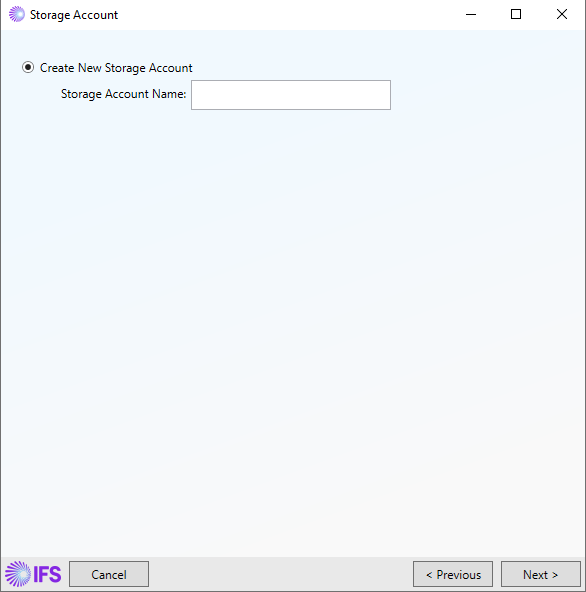
A storage account on Azure is used as a holding place for data relating to the service you wish to create. As such, the first step is to select the storage account that you will use. If you have no storage accounts, or you wish to create a new storage account for this deployment (which we recommend) then select "Create New Storage Account" and enter a valid storage account name. If you have an existing storage account that was previously created using the IFS PSO Installer that you wish to use you may also select it here using the "Select Existing Storage Account" option.
Resource Group
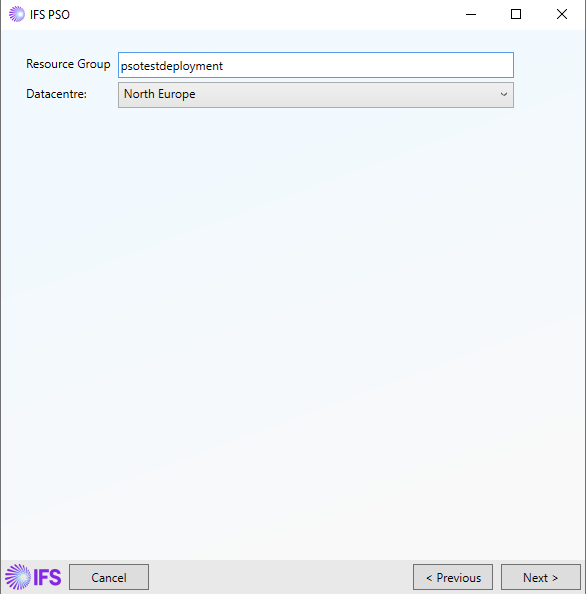
The resource group will form part of the URL that can be used to access the service when it has been deployed to the cloud.
The datacentre is the location of your Azure deployment.
Service Details
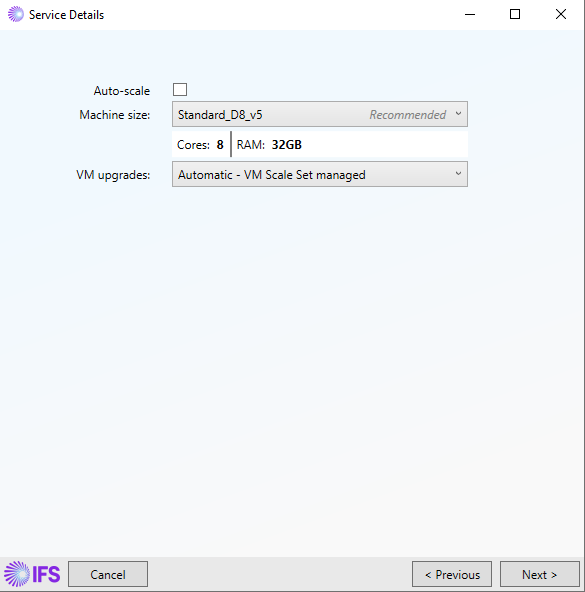
On the Service Details page you enter the machine size to use for your Azure deployment. The drop-down will show a list of all available standard D series machines, starting with the most recent family of machines. The details of the machine size option (number of cores and RAM) are shown - further details of the VM specification can be found on the Microsoft Azure web pages. If the list of available VM specs does not contain a specific machine size that you require, please contact IFS.
Note
For basic testing purposes a 4 core machine size should be suitable. For larger testing environments (e.g. for load testing), or production environments, we recommend an 8 core VM.
The policy for applying Windows VM upgrades can also be selected here:
- Automatic - VM Scale Set managed - OS Upgrades are automatically managed at the VM Scale Set level. This is the default option. A maintenance control configuration can be selected in the Azure portal after each installation to allow specifying a maintenance window.
- Automatic - VM Windows Update (Legacy) - OS Upgrades are automatically managed by Windows Update inside each VM. This option will be automatically selected when upgrading an existing system that never had a policy configured.
- Manual - OS Upgrades are manually managed at the VM Scale Set level.
Deployment selection
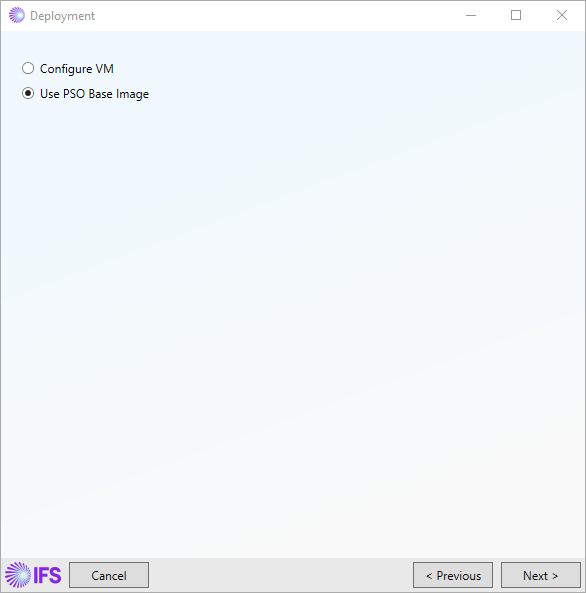
The deployment options are selected on the "Deployment" page:
- Configure VM: provision a Windows Azure and configure post-bootup.
- Use PSO Base Image: provision a pre-configured PSO Windows Azure VM. This is the recommended deployment option. Note that this option is only available if the user/service principal resides in the IFS Azure Active Directory, is a member of the PSO Azure AAD Group and the deployment is targeting one of the following regions:
- East US
- East US 2
- Central US
- West US
- North Central US
- South Central US
- Canada Central
- North Europe
- West Europe
- UK South
- Japan East
- Australia Southeast
- South Africa North
- UAE North
- Central India
- Australia East
- Southeast Asia
- Norway East
- Switzerland North
- Sweden Central
- Japan West
- Use Existing Image: select a pre-built PSO image. Some minor configuration is required post-boot but VM startup times are considerably quicker than with the Configure VM option. Please see the earlier section "Creating an Azure image for use with the IFS PSO Installer" for more details.
Warning
Azure Managed Images can only be used to create a VM within the same subscription and region. As such, if you have not created an image within the same subscription and region (i.e. there are no available images to deploy from) then the "Use Existing Image" option will be hidden.
Warning
The IFS PSO Installer will check for consistency between the software of the selected image and itself. This check is performed to prevent a mismatch between the software installed on the image and the software version being installed.
Application selection
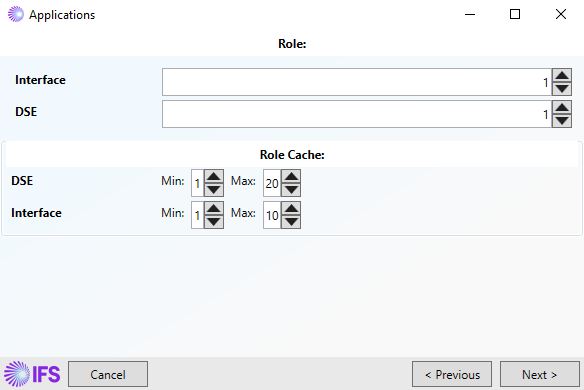
The next step is selecting the instance counts for the different roles in the deployment. The role configuration is pre-defined in the "Role Configuration" xml file in the Setup folder, containing a default list of roles and instance counts. Cache rules can be defined to dictate the minimum and maximum instances of roles and of systems (i.e. databases), effectively providing bounds for the automatic scaling in the deployment. The default cache rules are also specified in the Role Configuration file.
Note
During an upgrade, the role counts on this page will be pre-populated with the existing counts, provided that the names of the existing roles match the names of the roles in the "Role Configuration" xml file.
Note
The role cache options are only displayed if auto-scaling has been enabled.
Database Servers
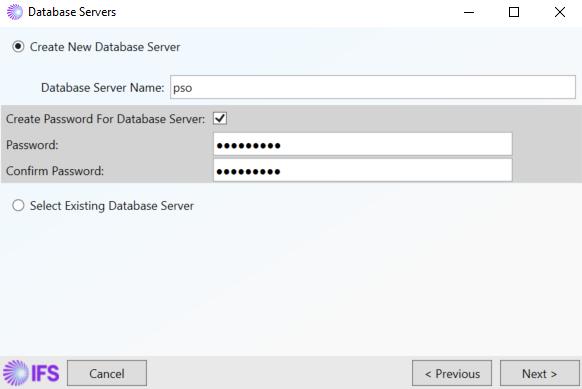
Database setup for an Azure deployment differs from when we perform a local installation. For a local installation we may have an on-premises database server which may be either a Sql Server or Oracle database. For an Azure deployment we instead adopt the Sql Azure database platform - this is the natural choice when deploying to the Azure cloud. As such, we are required to have a Sql Azure database server that can host the IFS PSO databases that are required by our deployment.
For a fresh install you will need to select "Create New Database Server" and provide a name for the database server. You may also opt for a custom database server password for the admin users.
Whereas if you have previously deployed a service using the IFS PSO Installer and you already have a compatible* Sql Azure database server, this can be chosen from the list of available servers, after selecting "Select Existing Database Server". In the case where the chosen database server uses a custom admin password, the same has to be provided.
*We define "compatible" to mean a Sql Azure database server that was created by the IFS PSO Installer.
Databases
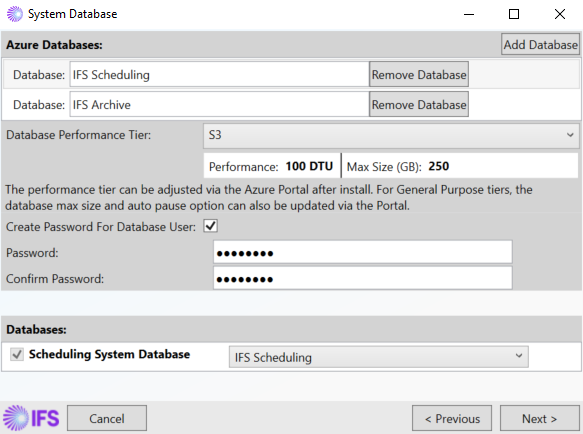
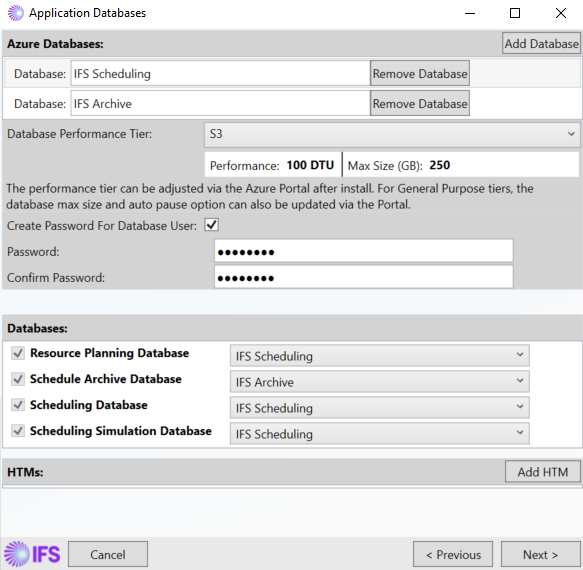
Database configuration is split across two pages: System Database and Application Databases - screenshots shown above. The first concerns the database configuration for the System Database that underpins the installation. The second screen is for the Application Databases connection details, e.g. Scheduling, Resource Planning, etc. Both pages allow you to define the Azure Databases that will reside on the Azure Database Server selected on the previous page. You may add and remove databases and then in the "Databases" section you can assign a database for a specific PSO schema. Note that based on the PSO services that have been selected on the Modules page there will be required and optional PSO database schema. If a schema is required then it will be ticked and cannot be unticked, and therefore must have a database assigned to it. If the schema is optional then you may tick/untick as desired.
By default, all schemata except for the Archive schema will install to a database called "IFS Scheduling" on the database server. The archive schema will install into its own "IFS Archive" schema. The name of the database may be edited via the text box in the database list. Using a single database for all schemata is a cost advantage because the Microsoft Azure platform charges per database. However, you may use multiple databases if you see fit, i.e. one for Scheduling Database and one for Scheduling System Database, though this will incur extra cost.
Note
When the Actions page is reached at the end of the Installer, database actions will be determined. If you have made alterations to the databases on your selected database server the Installer may infer that databases need to be added/removed. Therefore, please review the actions before initiating the install.
Note
The performance tier for the newly created databases can be selected in the installer. This will show a list of all available 'Standard' edition tiers and all regular 'General Purpose' edition tiers. See MSDN for further details on SQL Azure performance tiers. The performance tier of a database can be re-configured after the installation via the Azure Portal. For General Purpose tiers, the database maximum size and auto sleep options (for the Serverless compute model) can also be configured in the Azure Portal.
Warning
The Schedule Archive schema should be installed to its own database. If the Schedule Archive is to be used, then use "Add Database" to create a database solely for use by the archiving system. Ensure that the "Schedule Archive Database" is set to be the database created in the previous step. The install will also create an IFS_ArchiveReader user that has read only access to the Schedule Archive database only. The connection string for this user is written to the connection strings file during the last step of the install.
Warning
The IFS_ArchiveReader user is not suitable for use with a multi-tenant system consisting of multiple customer tenant Organisations. As such, the IFS_ArchiveReader connection details should only be made available to customers for a single-tenant system or a system that contains only two Organisations (IFS Admin and Customer).
Note
The IFS_Scheduling login has access to all the IFS databases. You may also opt for a custom database password for IFS_Scheduling user during the installation. In the case of an upgrade install, where the database uses a custom password, the same has to be provided. The IFS_ArchiveReader login has access to the IFS Archive database only. Custom Password can only be set to IFS_Scheduling user. Neither of these users have master database access. When using SQL Server Management Studio, the default "Connect to database" is set to master. To login with either IFS_Scheduling or IFS_ArchiveReader, click the "Options >>" button and explicitly specify the database to connect to under "Connect to database".
Depending on the software components that you have selected, there will be required and optional databases. With the exception of the Hierarchical Travel Matrix, the database connection details for required and optional databases are handled by the IFS PSO Installer, you merely need to select which optional databases you require.
Hierarchical Travel Matrix Configuration
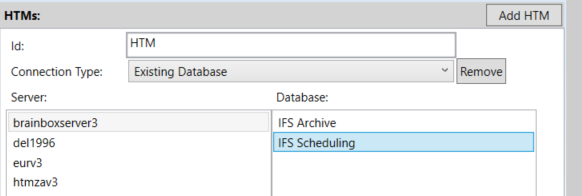
If you require, or optionally select, a Hierarchical Travel Matrix database, you must provide the connection string details. For an Azure deployment, the Hierarchical Travel Matrix database must reside in a Sql Azure database. You may select a HTM database either via entering the connection string, or, if you have installed a HTM using the IFS PSO Installer, you can choose to select a database from an existing database server within the currently selected subscription - see the screenshot below. For further details on how to create a Hierarchical Travel Matrix database in Sql Azure please consult the "Installing the Hierarchical Travel Matrix" section within this guide.
To configure a Hierarchical Travel Matrix (HTM), simply use the "Add HTM" button to add a HTM connection record and then fill in the details for that connection. Note that multiple HTM connections can be added, giving the scheduling system the possibility of using a different HTM for different datasets.
Note
The HTM (Travel Matrix) Database is optional when using the scheduling system (unless the Schedule Travel Analyser is installed). If using this database please ensure the parameter 'TravelCalculationOption' has been set to 'HierarchicalTravelMatrix', and the 'HierarchicalDatabaseMatrixId' has also been specified correctly. This can be done via the Scheduling Workbench Administration workspace.
Note
When using multiple HTM connections, the HierarchicalDatabaseMatrixId will likely be different for the different HTM databases. In this case, associate a HierarchicalDatabaseMatrixId with a Profile by setting the HierarchicalDatabaseMatrixId as a Profile_Parameter and then referencing the Profile on the Dataset of interest.
Import/Export
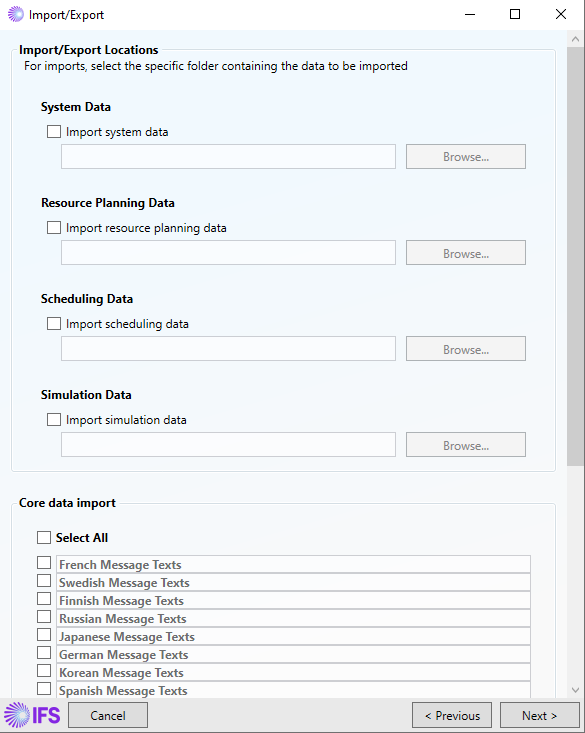
The Import/Export screen provides the option to import or export Resource Planning, Scheduling, Simulation and System data. This includes System Parameters, Workbench snapshots (PSO Workbench files) and WISE Data. See the Standard Software Installation - Import/Export section for details of this screen.
Admin Settings
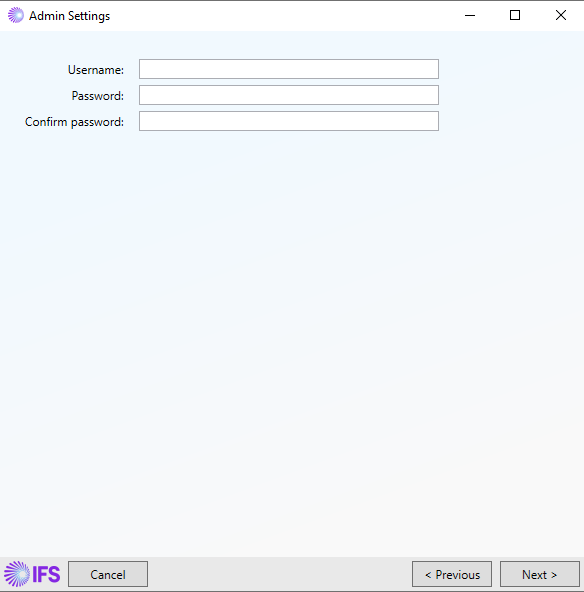
The Admin Settings screen allows you to set administrator credentials.
Note
Note that common usernames such as 'Administrator' are easy to guess and should be avoided.
Security
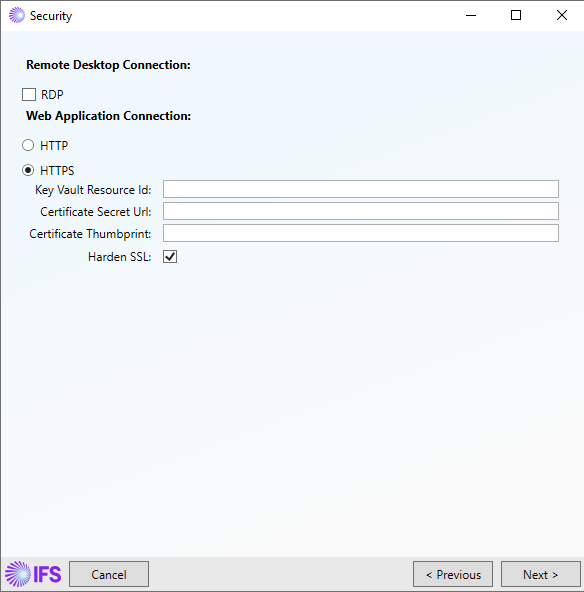
The security page in the IFS PSO Installer allows the RDP and HTTP/HTTPS settings to be configured. To switch RDP on/off simply use the checkbox under the Remote Desktop Connection header. You will then be required to provide login details for the RDP connection.
To access your deployment you can use the public domain url and ports 50001-50100, where port numbers map to instances in the deployment. For example, port 50001 maps to the first VM instance in the deployment. The public url for your deployment can be retrieved from the Azure Portal by examining the Public IP component, residing in a Resource Group with name matching your chosen service name.
Warning
RDP connections should not be left open in production environments.
For web applications you may configure either HTTP or HTTPS, or both. Configuring HTTPS requires an SSL certificate stored in an Azure Key Vault. You can pin a specific certificate version or use Key Vault sync so each VM uses the current certificate from the vault. See the prerequisite steps for how to set up the Key Vault.
With the pre-requisites in place you can set up HTTPS by ticking the HTTPS option and providing the following details:
- Certificate mode: choose Pinned version to bind a specific Key Vault secret version, or Key Vault sync to follow certificate updates written to the vault.
- Key Vault Resource ID: the endpoint url for the Key Vault (visible in the Settings -> Properties section of the Key Vault on the Azure Portal).
- Pinned version mode:
- Certificate Secret Url: the url for the secret on the Key Vault, including the target version. (Visible in Settings -> Secrets -> Select the secret you created in the upload step -> drill-down to the desired certificate version, e.g. the latest version, and you will see the Secret Identifier url)
- Certificate Thumbprint: the thumbprint of the SSL certificate. Note: This can easily be retrieved using the PowerShell command Get-PfxCertificate, with the only argument required being 'FilePath', the path to the certificate.
- Key Vault sync mode:
- Certificate name: the name of the certificate in the Key Vault.
- Grant the VM scale set managed identity read access to the vault (Secrets User and Certificate User for RBAC vaults, or get on secrets and certificates for access-policy vaults). Use the managed identity name shown on the Security screen (
{resourceGroup}mi, for examplemy-pso-rgmi). You can grant this access during deployment after the managed identity is created. HTTPS is configured automatically once access is in place; the installation can finish before access has been granted but the environment will not be reachable until after certificate sync has completed. - Each VM checks Key Vault for certificate updates hourly and when the VM starts or restarts. When you replace or renew the certificate in Key Vault, the change is applied on the next sync without reinstalling PSO.
- Harden SSL: if checked, TLS 1.0 and TLS 1.1 are disabled and a reduced set of cipher suites are available. Older browsers may not be able to connect to a hardened SSL site.
Note
It is strongly advised to configure at least one of either HTTP or HTTPS for use with web applications. If you do not do this then you will not be able to access web applications in your deployment as there will be no bindings configured.
Database Firewall
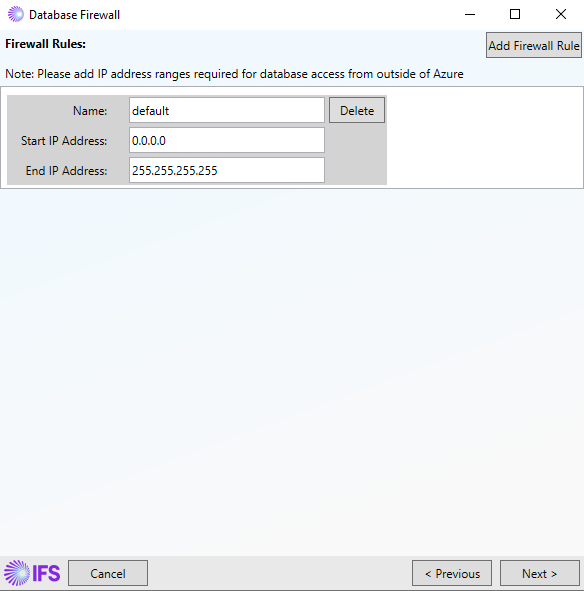
The Database Firewall page allows you to configure the permitted IP address ranges for connections to the Sql Azure database. It is straightforward to add and delete firewall rules. Note that any changes you make on the Database Firewall page will not be applied until actions are performed at the end of the installation process.
Note
It is essential that the firewall around the database is configured to allow connections from Windows Services deployed to Azure. As this is a mandatory requirement for the deployment to function, the installer handles the configuration of the firewall between the database and the scheduling services that are to be deployed to Azure.
Note
Please take caution when deleting firewall rules and remember to configure an IP address range for machines that will be used to interact with your Azure deployments. For instance, it is strongly recommended to include the public IP address of the machine from which installations/upgrades will be performed.
Network Security Group
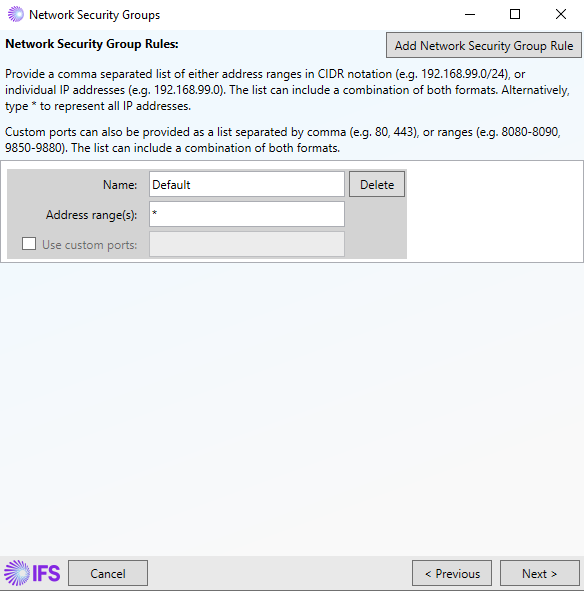
The Network Security Group page allows you to set up a firewall for the deployment's virtual network, which restricts the permitted IP address ranges that can connect to any web-facing modules (such as the workbench). Individual IP addresses can be entered, or ranges can be provided using CIDR notation. Custom ports can be set if required, if not the default port values from the security group will be used - this includes the ports required to allow the services to run, e.g. port 80 for the PSW and/or port 8744 for the GWY. For further details of the default ports, please see the "Default Ports" section towards the beginning of this document.
Note
An asterisk can be used instead of an IP address or a range to represent all IP addresses.
Note
CIDR notation is defined as an IP address, followed by a slash and then a network mask (represented as an integer between 1 and 32). In binary, the first n bits in the provided IP address can be anything, but the remaining bits must all be 0, where n is the network mask. For example, 192.168.100.32/27 is valid CIDR notation, whereas 192.168.100.32/26 is not since the 27th bit of the IP address is a 1.
Monitoring
Setting up Azure Monitoring allows you to monitor both the general health of the system - using metrics such as DTU usage.
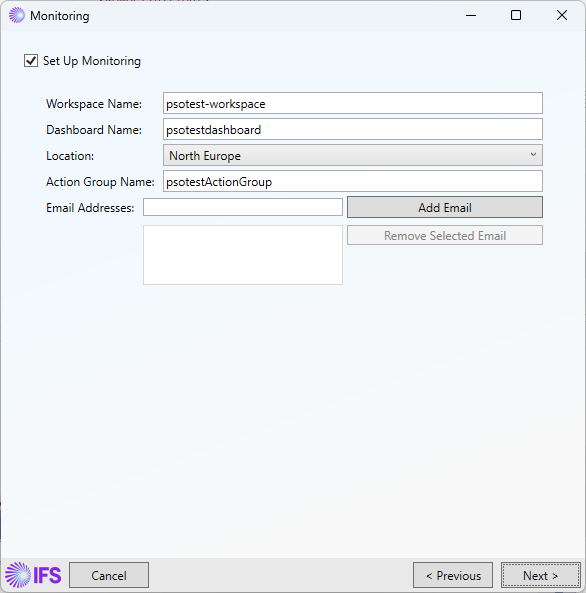
A dashboard provides a screen in the Azure Portal containing graphs for various metrics and shortcuts to useful features for the deployment. The name provided acts as an id and as a display name when viewing and selecting dashboards in the Azure Portal, but the display name can be changed through the Azure Portal if desired.
For full details around how to use the dashboard, what alert rules are set up, and how to configure a deployment when not using an agent, please see the 'Azure Monitoring' section within this guide.
Note
The location provided for the monitoring does not need to match the location provided for the rest of the deployment, and the location for the deployment may not be available for the monitoring.
Note
The workspace name must be globally unique. A number may be postfixed to the name provided to ensure this.
Actions summary
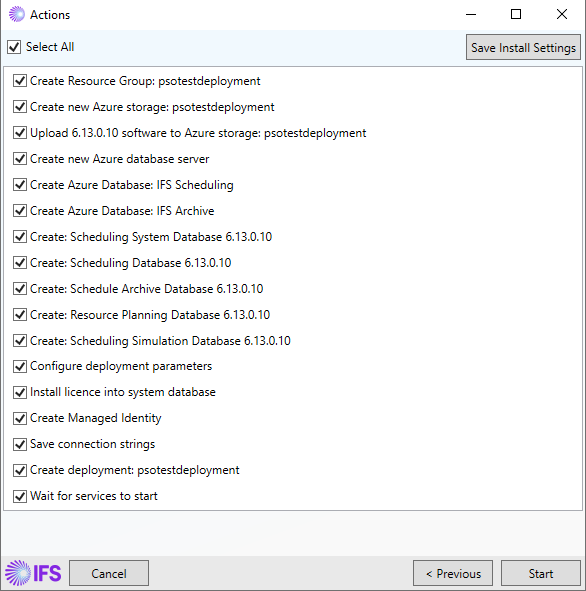
The Actions page summarizes the various steps to be performed when creating the deployment. Click "Start" to run the IFS PSO Installer against the actions. Once it has finished your new Azure deployment will be being created and you will need to allow some time before it comes online and can be used, typically in the order of 10-15 mins.
Note
The option "Purge old software from Azure storage" is a clean-up task. If the installer detects that there is an older version of the software residing in the azure storage container it will suggest this action.
Note
When creating or updating a deployment, the final action in the list is to "Save connection strings" - this saves the database connection strings to a date-time-stamped file in the ConnectionDetails folder (which is created in the release directory by the IFS PSO Installer).
Updating an Azure deployment
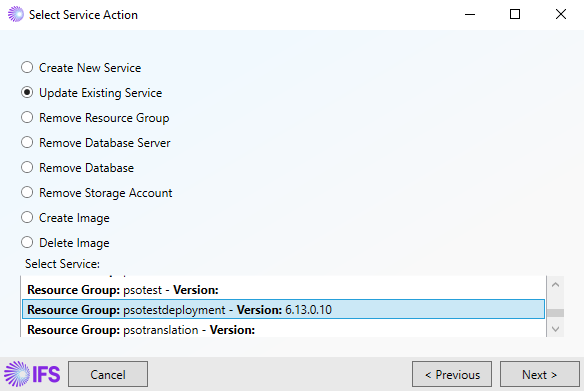
Updating an Azure deployment involves uploading the newer software, plus any configuration changes, to Azure storage and then re-deploying the service. This in turn involves taking down the existing service running the old version of the software and deploying a new version, and also performing any required updates to the IFS PSO databases on the Sql Azure database server being used by the service.
To update an existing Azure deployment to a newer version of the IFS PSO software select "Update Existing Service" on the Select Service Action page, then select the desired service from the list and click "Next" to continue.
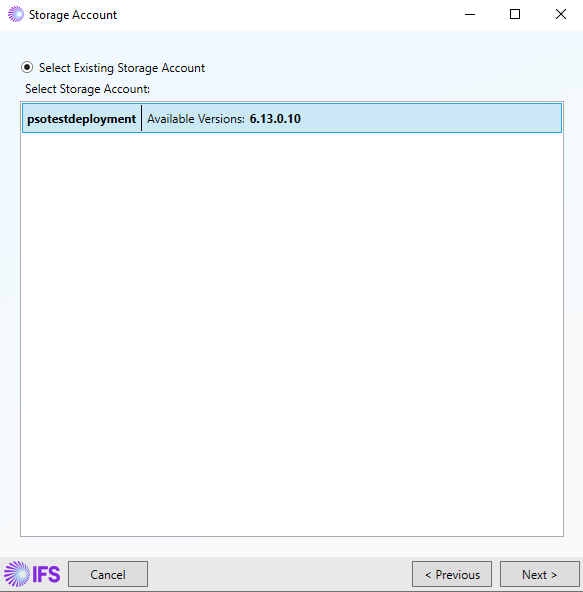
You will then be required to select the storage account that you wish to use for this deployment. You may either select an existing one (for example, the storage account that was used for the previous deployment of this service) or create a new one.
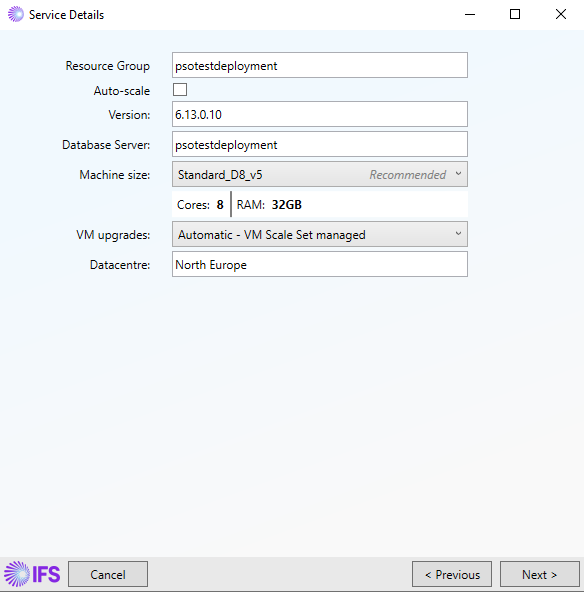
The Service Details page then shows the existing information for the cloud service. When updating a service you may also choose to change the machine size, for example, if you wanted to increase the number of cores and/or RAM when the service is redeployed. The VM upgrades policy can also be reconfigured.
Moving along, you may then set the number of role instances that you wish to include in your deployment in the Applications screen. In the Database Servers screen you can then select whether you want to create a new database server or use an existing database server.
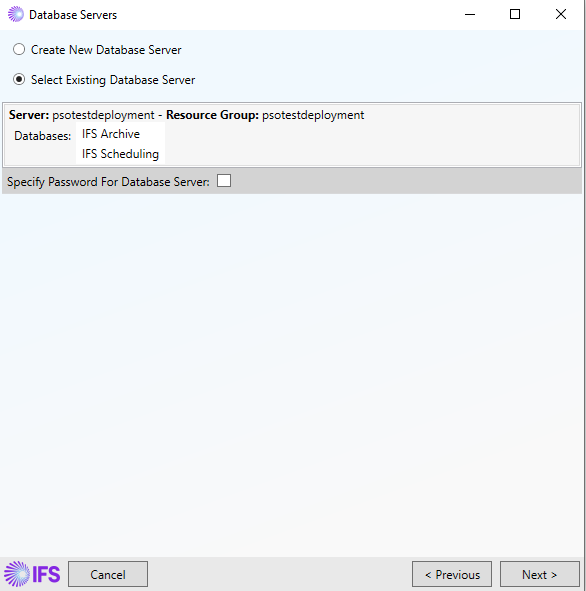
Following that, the Databases pages allow the connection details to be edited. Again, you may add/remove optional database connections as desired.
The Import/Export page allows you to automatically export the data that is currently in the System, Scheduling and Resource Planning databases. The data is saved to xml files for safety, in case a later action fails. Further information can be found in the Standard Software Installation - Import/Export section.
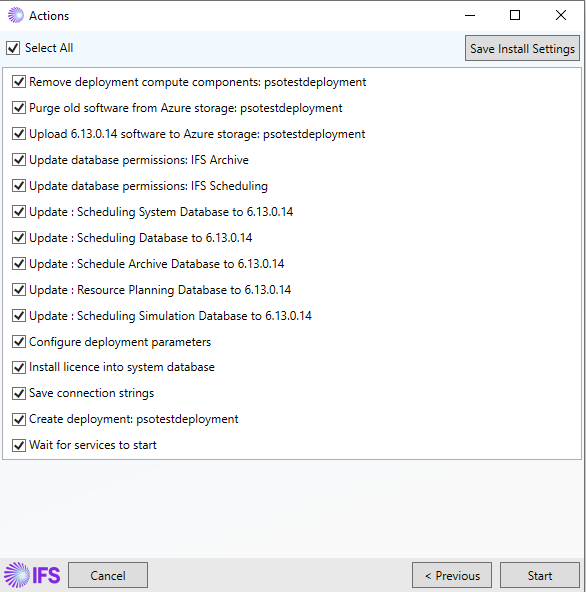
Again, the actions page summarizes the necessary steps to upgrade the Azure deployment - the IFS PSO Installer will determine the required database scripts to run. Clicking "Next" begins the process. As with creating an Azure deployment, there will be a short delay between the IFS PSO Installer completing the necessary actions and the upgraded Azure deployment becoming available for usage.
Deleting an Azure service
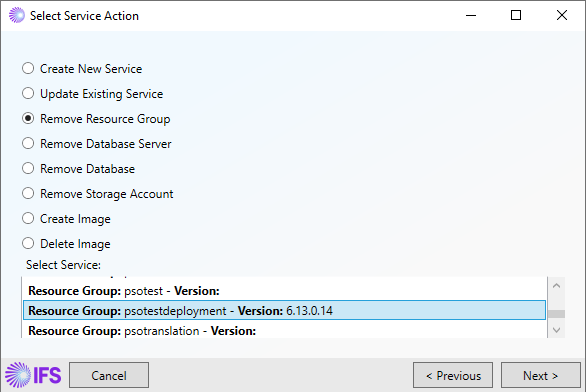
To delete an Azure service you simply select "Remove Resource Group" on the Select Service Action page, then select the service(s) that you wish to delete. On clicking "Next" you will be taken to the Actions page where you may review your decision and click "Start" when you are happy to proceed and delete the service.
Note
Multiple services may be deleted at the same time - simply select the services you wish to delete on the Select Service Action page.
Deleting a Sql Azure database server
The IFS PSO Installer may also be used to delete existing Sql Azure database servers. To delete a database server, on the "Select Service Action" page, select "Remove Database Server" and then select the database server(s) that you wish to delete. On clicking "Next" you will be taken to the "Actions" page where clicking "Start" will delete the server.
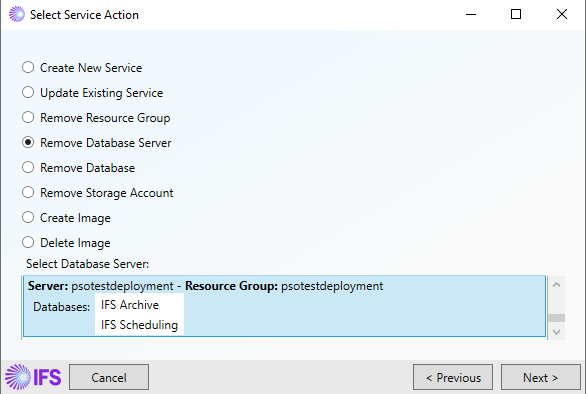
Note
Note that the IFS PSO Installer will only allow Sql Azure databases that have been created using the IFS PSO Installer to be deleted.
Note
Multiple database servers may be deleted at the same time - simply select the database servers you wish to delete on the Select Service Action page.
Deleting a Sql Azure database
Sql Azure databases can also be deleted using the Installer. To delete a database, on the "Select Service Action" page, select "Remove Database" and then select the database(s) that you wish to delete. On clicking "Next" you will be taken to the "Actions" page where clicking "Start" will delete the database.
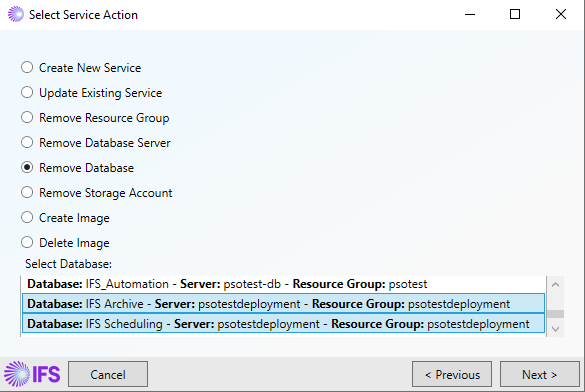
Deleting an Azure storage account
To delete an Azure storage account, select "Remove storage account" on the Service Selection page, then select the storage account you wish to delete and proceed to the actions page.
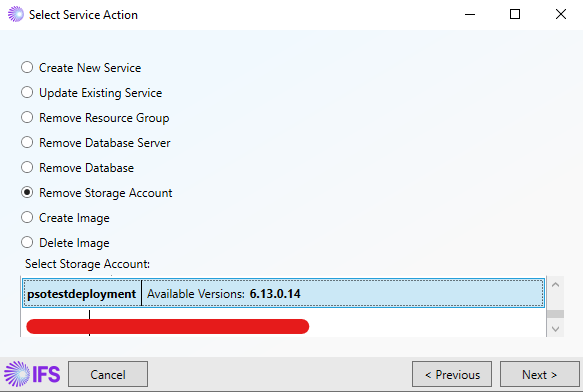
Warning
If you delete a storage account that is the current data store for an existing service, that service will no longer be able to be recreated should the Azure platform decide to recycle the underlying VM. Furthermore, if you try and update a service deployed to Azure after deleting its corresponding storage account, you will lose all configuration information (i.e. role configurations and selected modules) and will need to enter all details again during the upgrade process. For these reasons we strongly recommend that you ensure all services that are linked to a storage account have been deleted prior to deleting the storage account. Note that when you attempt to delete a storage account, the IFS PSO Installer will inform you of any services that are linked to that storage account.
Testing an Azure Deployment
After the installer has completed the Azure installation, it is important to perform a number of initial "smoke tests" to establish whether the deployment was successful and that the scheduling system is working as intended.
Accessing the Scheduling Workbench
Navigate to the Scheduling Workbench and login to the administrative user account. This will confirm that login is possible, that UI client-server communications are functioning correctly, and that the server-side of the UI is correctly connected to the database.
Workbench URL
HTTPS://[service-name].[data-centre].cloudapp.azure.com/IFSPSOWorkbench/
Note
The exact Workbench URL will have been saved to a date-time-stamped file in the ConnectionDetails folder created in the release directory after the original installation.
Note
The the default base paths for an Azure VMSS deployment are /IFSPSOWorkbench and /IFSSchedulingRESTfulGateway.
Verifying the Scheduling System
Once logged on to the Scheduling Workbench locate the Administration Workspace, click on the System Diagram tab to show your complete Azure system. This is important as it shows all the services and databases that are related to this deployment. At this point it is worthwhile checking that all of these components are as expected based on the configuration during installation. Note that the "Role Configuration" XML file (bundled in the Setup folder with the release) defines what services should be installed during the installation process.
While still in the Administration Workspace click on the System tab and locate Events. This provides a real time event log from each of the services, showing error, fatal, information and warnings events. From here any errors will be reported, for example if a service is unable to connect to a database.
After establishing that the Azure system contains all of the required services and that there are no critical errors, the next process is to send in scheduling input data.
Sending input data to an Azure Deployment
Data is sent through the RESTful Gateway to an Azure Deployment. The RESTful gateway allows an API client to interact with PSO, and it can be used to send or retrieve data.
Note
API testing tools such as Postman can be used to interface with the RESTful Gateway.
Before sending scheduling input data through the RESTful Gateway a session token is required to authorize the client. This can be retrieved via sending a POST request to the session endpoint. Parameters for the accountId, userName and password will be required. If the POST was successful a session token is returned.
HTTPS://[service-name].[data-centre].cloudapp.azure.com/IFSSchedulingRESTfulGateway/api/v1/scheduling/session?
    accountId=Default&
    userName=administrator&
    password=password
Bearer authentication uses the session token to authenticate the client. Scheduling input data can now be sent through the RESTful gateway. This can be done via sending a POST request to the data endpoint. A parameter for the dataType will be required. For scheduling input data the dataType is SCHEDULE. The scheduling input XML data will be sent in the body of the request.
HTTPS://[service-name].[data-centre].cloudapp.azure.com/IFSSchedulingRESTfulGateway/api/v1/scheduling/data?
    dataType=SCHEDULE
Note
See the Interface Guide — RESTful Gateway for further details.