Command Line Installs
The Installer can be operated from the command-line, whereby the user passes an xml settings file containing details of the installation that they wish to perform, therefore enabling automated installs via scripted pipelines. This section contains details of how to operate the Installer via the command-line, the settings file and example use cases.
Warning
Kubernetes installs are no longer documented in this section. See the Kubernetes Installation section instead. Kubernetes XML input installations are deprecated and Helm based YAML files installations should be used instead.
Capturing Input Settings from the Installer UI
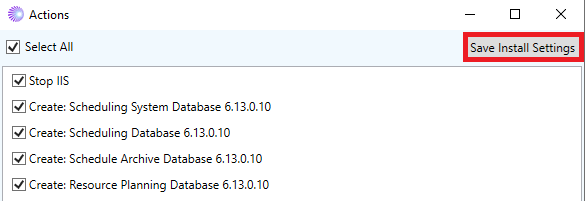
The format of the input settings file is described in detail below. However, an excellent starting point for using the Installer in command-line mode is to first run it interactively (in “UI” mode) and then save the settings from an install. This can be done by entering the required details for your chosen installation and then, at the Actions page, clicking on the “Save Install Settings” button - see the below screenshot. The saved file can then be passed to the Installer on the command-line. This approach gives a quick and easy way to generate example settings files that can either be run on the command-line as it is, or used as a template for that particular install operation.
Running the Installer
From Windows
To run the Installer you will need to locate the Setup folder within the release distribution, within which is the executable IFS PSO Installer.exe. You will then need to open a PowerShell command prompt with Administrator privileges and type the following command:
PS> & ".\IFS PSO Installer.exe" -cli -s "PATH TO SETTINGS FILE"
The installer settings can also be written to the standard input stream of the command line installer using the following command:
PS> Write-Output $InstallerSettings | & "IFS PSO Installer.exe" -cli -stdin
From Linux
To run the Installer you will need to locate the Linux Setup folder within the release distribution, within which is the executable installer. You will then need to open a command prompt and type the following command:
./installer -cli -s "PATH TO SETTINGS FILE"
Or from the standard input stream:
printf '%s\n' "$InstallerSettings" | ./installer -cli -stdin
Note
The installer in the Linux Setup folder may need to be given permission to allow execution which can done by the following command: chmod +x ./installer
Note
Not all Linux distributions install the icu package by default. This package is required by the installer and can usually be installed using the package manager provided with the distribution.
Note
The standard, uninstall (standard), exportStandard and webInterface install modes are not supported on Linux.
Command Line Flags
The following table shows the possible flags to include when running the installer in command line.
| Flag | Required for Command Line Install? | Description |
|---|---|---|
| -cli | Y | Indicates use of command-line interface mode |
| -s | N | Settings file flag. Should be followed by the path to the settings file |
| -force | N | Will disable any warning prompts that may ask if you wish to continue and will always run through to completion. Force mode can also be set through the xml input, but is overridden by this flag if set |
| -stdin | N | Indicates that the installer settings will be written to the standard input stream of the command-line installer. |
Installer Input Settings
The input to the installer is in the form of an xml file which contains settings required to drive your PSO installation. The structure of the xml is described below:
- LicenceFile: the path to your licence key file.
- InstallMode: standard, uninstall, azure, htm, exportStandard, exportAzure and webInterface. The default is standard.
- AzureMode: create, update, remove, delete_database_server, delete_database, delete_storage, create_image and delete_image. For use when InstallMode is azure. The default is create.
- StorageMode: create or use_existing. For use when InstallMode is azure. The default is create.
- AzureDatabaseServerMode: create or use_existing. For use when InstallMode is azure. The default is create.
- StartServicesAfterInstall: whether to start services once installation is complete. True by default.
- StartServicesAutomaticallyOnRestart: if true, sets the service startup type to automatic, whereas false sets it to manual. True by default.
- EncryptConnectionStrings: whether to encrypt connection strings in application config files. True by default.
- ImportLicence: whether to import the licence key into the Scheduling System Database. True by default.
- RoleFile: file path to a Role Configuration file - for use with Service Resiliency with on-premises installs.
- ServiceUsername: username to be used by the services when they run.
- ServicePassword: accompanying password for the above username.
- Subscription: the subscription id for an Azure install.
- StorageAccount: the name of the storage account to use in an Azure install.
- Location: the location id for an Azure install (e.g. "northeurope"). See Permitted Values section below for all allowed locations.
- ResourceGroup: the resource group id for an Azure install.
- AzureMachineSize: the id for the machine size to use in an Azure install. The default is a 4 core machine using the most recent family of machines (Standard_D4_v5 at time of writing). See Permitted Values section below for all allowed machine sizes.
- AzureVMUpgrades: the VM upgrade policy to use. Permitted Values: Automatic, AutomaticLegacy, Manual
- AzureDatabaseServer: the name of the Azure database server.
- AzureDatabaseServerPassword: The custom password for the Azure database server. If required, the value can be set during the create Azure mode. For the rest of the Azure modes, where the Azure database server uses a custom password, the same needs to be provided.
- AzureDatabase: the name of the database to use when the InstallMode is exportAzure, or the name of the database to create when InstallMode is htm and the HTMDeploymentMode is azure.
- AzureDatabasePassword: The custom password for the Azure database. If required, the value can be set during the create Azure mode. For the rest of the Azure modes, where the Azure database uses a custom password, the same needs to be provided.
- BootstrappingMode: configure_vm, use_pso_base__image, or use_existing_image. For use when InstallMode is azure. Determines whether to use an image for an install (PSO or custom), or to configure a VM from scratch.
- ImageResourceGroup: the resource group of the image to use when InstallMode is azure and BootstrappingMode is use_existing_image.
- OrganisationOption: specifies whether to take an import/export for all organisations or only the organisation specified by SelectedOrganisation. One of "All" or "Selected".
- SelectedOrganisation: organisation account id to import/export data for. Only relevant if OrganisationOption is set to "Selected".
- AutoScale: whether an Azure install should be set to auto-scale the number of VMs and database performance based on the current workload. False by default.
- HTTPS: whether HTTPS should be configured. If set to false, HTTP will be configured instead. True by default.
- RDP: whether RDP should be configured for and Azure deployment. False by default.
- RDPUsername: the username for logging in when using RDP.
- RDPPassword: accompanying password for the above username.
- HardenSSL: whether weaker SSL protocols and cipher suites should be disabled. False by default.
- KeyVaultResourceId: the endpoint url for the Key Vault if configuring HTTPS
- SSLCertificateSecretUrl: the url for the secret on the Key Vault, including the target version, if configuring HTTPS.
- SSLCertificateThumbprint: the thumbprint of the SSL certificate, if configuring HTTPS in pinned version mode.
- SSLCertificateMode:
PinnedVersionorKeyVaultSync. If omitted on a new deployment, pinned version is used. - SSLCertificateName: the certificate name in Key Vault when using Key Vault sync mode.
- UseMonitoring: whether monitoring should be set up for an Azure install. False by default.
- MonitoringWorkspaceName: the name of the workspace for Azure monitoring. If left unspecified when using monitoring, a standard name will be created.
- MonitoringDashboardName: the name of the dashboard for Azure monitoring. If left unspecified when using monitoring, a standard name will be created.
- MonitoringLocation: the location id where the workspace should be created. If left unspecified when using monitoring, a location will be selected automatically, the same as the location for the deployment if possible. See Permitted Values section for a list of allowed locations, but note that monitoring may not yet be permitted in all locations.
- MonitoringActionGroupName: the name of the action group for Azure monitoring. If left unspecified when using monitoring, a standard name will be created.
- MonitoringUseAgent: whether monitoring should be set up to use an Azure monitoring agent to pull event logs. This is the recommended way and so the default is true.
- MonitoringLogErrors: whether Azure monitoring should gather error events and report them to the dashboard. True by default.
- MonitoringLogWarnings: whether Azure monitoring should gather warning events and report them to the dashboard. True by default.
- MonitoringLogInformation: whether Azure monitoring should gather information events and report them to the dashboard. False by default.
- HTMDeploymentMode: Either azure or local. For use in htm mode. Defines what kind of database the HTM is being deployed to. Default is local.
- HTMFolder: For use in htm mode. Defines the root folder for the HTM containing both the 'scripts' and 'data' folders.
- HTMScriptsFolder: For use in htm mode. Defines the root folder for the HTM scripts.
- HTMDataFolder: For use in htm mode. Defines the folder where the HTM data has been extracted to.
- DBAUsername: For use in htm mode when doing a local Oracle install. Specifies the username for a DBA level user. Must be upper case.
- DBAPassword: The accompanying password for the above user.
- DatabasePerformanceTierFinal: For Azure installations, specifies the performance tier to set any newly created databases to. This must be the name of a valid performance tier for the location you are installing into. The default is S1, but for production environments it is strongly recommended to use a higher performance tier. The performance tier can also be configured after install using the Azure Portal.
- DatabasePerformanceTierInstall: For Azure installations, specifies the performance tier to use for newly created databases during the installation. The database will be scaled back to 'DatabasePerformanceTierFinal' after install. This is primarily intended for HTM Azure installations.
- ScaleDatabase: This is now obsolete.
- DatabasePerformanceTier: This is now obsolete.
- Force: whether the installer should run in force mode, raising no warnings that prompt for confirmation before continuing. False by default.
- WaitForServicesTimeoutMinutes: How long to wait for services to start before timing-out. Default is 10 minutes.
- SkipWaitForServices: Skip waiting for services to start. Default is SkipWaitForServices=false.
- AdminUsername: User name for scheduling administrator user.
- AdminPassword: Password for scheduling administrator user.
- InstallationFolder: The path to the folder in which the software should be installed. If unspecified, "IFS\Scheduling" will be used within the Program Files (x86) folder.
Note
The administrator user is only added when creating a new Scheduling System database. When performing an upgrade the entities AdminUsername and AdminPassword are ignored.
Note
Details for the number of Azure roles should be specified by editing the role configuration file in the Settings folder.
InputApplications
A list of InputApplication elements should be provided with one element per application that you intend to install.
- InputApplication:
- ApplicationType: the application to install. This is a capitalised, three letter acronym. For example, for the Schedule Input Manager we have SIM. All application acronyms can be found in the Architecture and Sizing Guide.
- Install: whether an application is to be installed. Default is "true" meaning it will be installed. This is relevant for removing applications during an upgrade, where you would set Install to "false" to remove an application from an installation.
InputConnectionTypes
The database connections that you wish to use with your PSO installation. This is a list of InputConnectionType elements, one per database connection.
Warning
If there are one or more HTM connections specified here then they will overwrite the existing HTM connections on an upgrade. If you do not wish to make any changes to existing HTM settings on an update, you do not need to include any HTM details in the input settings.
- InputConnectionType:
- Id: an Id to be used for the connection. This is currently only relevant for HTM connection strings as they are stored in the System database as part of the installation and therefore require a unique identifier. If no Id is specified, one will be auto-generated.
- Database: the PSO database schema for this connection. This is one of: Archive, Scheduling, System, Modelling, MachineLearning, Simulation, or HTM.
- ConnectionString: the connection string for the database connection.
- AdminConnectionString: this is optional. If specified, this connection string will be used during installation, while the 'ConnectionString' value will be used by the installed components.
- Provider: The database provider. One of Sql, Oracle or SqlAzure.
- Active: whether the connection is to be used. Default is "true" meaning it is to be used. This is relevant for removing connections during an upgrade, where you would set Active to "false" to remove a connection.
- AzureDatabase: the name of the database when connecting to an existing Azure database.
- AzureDatabaseServer: the name of the database server when connecting to an existing Azure database.
- ExplicitConnectionType: either ConnectionString or ExistingDatabase. Specify for explicit connections (e.g. HTMs). If using ExistingDatabase, make sure to specify AzureDatabase and AzureDatabaseServer.
InputDatabaseImportExportSettings
A list of InputDatabaseImportExportSetting elements, one for each database that you wish to import/export data to/from. The databases suitable for import/export are: System, Scheduling, Modelling, Simulation.
- InputDatabaseImportExportSetting:
- Database: the PSO database schema for this import/export.
- FolderPath: the target import/export folder.
InputSetupFileImportSettings
A list of InputSetupFileImportSetting elements, one for each setup file that you wish to import during the install/upgrade.
- SetupFileName: the name of the file to import - see the Installer UI for the list of possible files.
InputFirewallRules
For an Azure install, you can specify your Database Firewall rules. Rules can be specified to be deleted to remove a rule when performing an upgrade on an existing deployment. InputFirewallRules is a list of InputFirewallRule elements, one for each Database Firewall rule.
- InputFirewallRule:
- Name: the name of the rule
- StartIpAddress: the IP address to begin the IP range the rule covers.
- EndIpAddress: the IP address to end the IP range the rule covers.
- Delete: indicates whether the specified rule should be removed from a deployment. False by default.
InputNSGRules
For an Azure install, you can specify your Network Security Group rules. Rules can be specified to be deleted to remove a rule when performing an upgrade on an existing deployment. InputNSGRules is a list of InputNSGRule elements, one for each Network Security Group rule.
- InputNSGRule:
- Name: the name of the rule
- AddressRanges: a comma separated list of IP addresses, or address ranges in CIDR notation. (See Azure Installation Section in this guide for more details)
- Ports: if specifying custom ports, enter a comma separated list of ports, or hyphen separated port ranges. Leave unspecified to use the default ports, based on your selected security options.
- Delete: indicates whether the specified rule should be removed from a deployment. False by default.
InputMonitoringEmailAddresses
When using monitoring, the email addresses to use when alert rules are triggered can be defined in the InputMonitoringEmailAddressesElement. Alternatively, email addresses to remove from an existing deployment can be specified here. InputMonitoringEmailAddresses is a list of InputEmailAddress elements, one for each email address.
- InputEmailAddress
- Address: the email address of the recipient.
- Delete: indicates whether the email address should be removed. False by default.
InputDeleteDatabaseServers
With InstallMode set to azure and AzureMode set to delete_database_servers, the servers to delete can be specified in InputDeleteDatabaseServers. InputDeleteDatabaseServers is a list of InputDeleteDatabaseServer elements, one for each server to be deleted.
- Name: the name of the server to be deleted.
InputDeleteDatabases
With InstallMode set to azure and AzureMode set to delete_database, the databases to delete can be specified in InputDeleteDatabases. InputDeleteDatabases is a list of InputDeleteDatabase elements, one for each database to be deleted.
- DatabaseName: the name of the database to be deleted.
- DatabaseServerName: the name of the database server containing the database to be deleted.
InputDeleteResourceGroups
With InstallMode set to azure and AzureMode set to remove, the resource groups to delete can be specified in InputDeleteResourceGroups. InputDeleteResourceGroups is a list of InputDeleteResourceGroup elements, one for each resource group to be deleted.
- Name: the name of the resource group to be deleted.
InputDeleteStorages
With InstallMode set to azure and AzureMode set to delete_storage, the storage accounts to delete can be specified in InputDeleteStorages. InputDeleteStorages is a list of InputDeleteStorage elements, one for each storage account to be deleted.
- Name: the name of the storage account to be deleted.
InputDeleteImages
With InstallMode set to azure and AzureMode set to delete_image, the images to delete can be specified in InputDeleteImages. InputDeleteImages is a list of InputDeleteImage elements, one for each image to be deleted.
- Name: the name of the image to be deleted.
- ResourceGroup: the name of the resource group containing the image to be deleted.
Permitted Values
Machine Size
The machine size should be any valid standard family machine, for example Standard_D8_v5 for an 8-core machine. The installer Ui can be run to see the list of currently available machines.
Location
The location can be any available Azure location. The Id is in lower case with no spaces, for example 'europenorth', 'centralus', 'japaneast'.
Examples
Standard install of a single application
A good starting point for getting to grips with command-line PSO installs is a basic install of a single application. To this end, the following example xml shows how to install a Schedule Input Manager that is only targeting a Scheduling System Database.
<?xml version="1.0" encoding="utf-8"?>
    <InputSettings xmlns:xsi="http://www.w3.org/2001/XMLSchema-instance" xmlns:xsd="http://www.w3.org/2001/XMLSchema">
      <LicenceFile>PATH TO LICENCE FILE</LicenceFile>
      <InstallMode>standard</InstallMode>
      <InputInstallModules>
        <InputInstallModule>
          <ApplicationType>SIM</ApplicationType>
        </InputInstallModule>
      </InputInstallModules>
      <InputConnectionTypes>
        <InputConnectionType>
          <Database>System</Database>
          <ConnectionString>SYSTEM CONNECTION STRING</ConnectionString>
          <Provider>Sql</Provider>
        </InputConnectionType>
      </InputConnectionTypes>
    </InputSettings>
Standard install of a multiple applications targeting multiple databases
We now move on to a more involved example whereby multiple applications are installed that target Scheduling, System and Modelling databases:
<?xml version="1.0" encoding="utf-8"?>
    <InputSettings xmlns:xsi="http://www.w3.org/2001/XMLSchema-instance" xmlns:xsd="http://www.w3.org/2001/XMLSchema">
      <LicenceFile>PATH TO LICENCE FILE</LicenceFile>
      <InstallMode>standard</InstallMode>
      <InputInstallModules>
        <InputInstallModule>
          <ApplicationType>SIM</ApplicationType>
        </InputInstallModule>
        <InputInstallModule>
          <ApplicationType>DSE</ApplicationType>
        </InputInstallModule>
        <InputInstallModule>
          <ApplicationType>SBM</ApplicationType>
        </InputInstallModule>
        <InputInstallModule>
          <ApplicationType>SQM</ApplicationType>
        </InputInstallModule>
        <InputInstallModule>
          <ApplicationType>RPL</ApplicationType>
        </InputInstallModule>
      </InputInstallModules>
      <InputConnectionTypes>
        <InputConnectionType>
          <Database>Scheduling</Database>
          <ConnectionString>SCHEDULING CONNECTION STRING</ConnectionString>
          <Provider>Sql</Provider>
        </InputConnectionType>
        <InputConnectionType>
          <Database>System</Database>
          <ConnectionString>SYSTEM CONNECTION STRING</ConnectionString>
          <Provider>Sql</Provider>
        </InputConnectionType>
        <InputConnectionType>
          <Database>Modelling</Database>
          <ConnectionString>MODELLING CONNECTION STRING</ConnectionString>
          <Provider>Sql</Provider>
        </InputConnectionType>
      </InputConnectionTypes>
    </InputSettings>
Standard install using admin database connection
It is also possible to run the installer using different database credentials to those which will be used by the PSO components. For example, the installer could be run using a database connection string that uses integrated security, while the services use username and password credentials.
This is achieved by added an 'AdminConnectionString' attribute to each database connection, as in the example below.
Note that the PSO components do not require all the database privileges that are required by the installer, and so the 'ConnectionString' login can then have more restricted access. See 'Database Setup' for more details.
<?xml version="1.0" encoding="utf-8"?>
    <InputSettings xmlns:xsi="http://www.w3.org/2001/XMLSchema-instance" xmlns:xsd="http://www.w3.org/2001/XMLSchema">
      <LicenceFile>PATH TO LICENCE FILE</LicenceFile>
      <InstallMode>standard</InstallMode>
      <InputInstallModules>
        <InputInstallModule>
          <ApplicationType>SIM</ApplicationType>
        </InputInstallModule>
      </InputInstallModules>
      <InputConnectionTypes>
        <InputConnectionType>
          <Database>System</Database>
          <ConnectionString>COMPONENT CONNECTION STRING</ConnectionString>
          <AdminConnectionString>ADMIN CONNECTION STRING</AdminConnectionString>
          <Provider>Sql</Provider>
        </InputConnectionType>
      </InputConnectionTypes>
    </InputSettings>
Upgrading an install with no changes to applications or database connections
To upgrade an installation where no applications will be added/removed and no database connection changes are required can be achieved with the following concise input:
<?xml version="1.0" encoding="utf-8"?>
    <InputSettings xmlns:xsi="http://www.w3.org/2001/XMLSchema-instance" xmlns:xsd="http://www.w3.org/2001/XMLSchema">
        <LicenceFile>PATH TO LICENCE FILE</LicenceFile>
        <InstallMode>standard</InstallMode>
    </InputSettings>
Uninstall
Software can be easily uninstalled using the following xml - note that no licence key is required for an uninstall.
<?xml version="1.0" encoding="utf-8"?>
    <InputSettings xmlns:xsi="http://www.w3.org/2001/XMLSchema-instance" xmlns:xsd="http://www.w3.org/2001/XMLSchema">
      <InstallMode>uninstall</InstallMode>
    </InputSettings>
Basic Azure Installation
A simple Azure installation with default settings and HTTP can be created with the following xml.
<?xml version="1.0" encoding="utf-8" ?>
        <Inputsettings xmlns:xsi="http://www.w3.org/2001/XMLSchema-instance" xmlns:xsd="http://www.w3.org/2001/XMLSchema">
            <LicenceFile>PATH TO LICENCE FILE</LicenceFile>
            <InstallMode>azure</InstallMode>
            <Subscription>SUBSCRIPTION ID</Subscription>
            <StorageAccount>examplestorageaccount</StorageAccount>
            <Location>northeurope</Location>
            <ResourceGroup>exampleresourcegroup</ResourceGroup>
            <AzureDatabaseServer>exampleserver</AzureDatabaseServer>
            <HTTPS>false</HTTPS>
        </Inputsettings>
Azure Installation With Custom Password for the Database server and the Database
A simple Azure installation with the custom password for the database server and the database can be created with the following xml.
<?xml version="1.0" encoding="utf-8" ?>
        <Inputsettings xmlns:xsi="http://www.w3.org/2001/XMLSchema-instance" xmlns:xsd="http://www.w3.org/2001/XMLSchema">
            <LicenceFile>PATH TO LICENCE FILE</LicenceFile>
            <InstallMode>azure</InstallMode>
            <Subscription>SUBSCRIPTION ID</Subscription>
            <StorageAccount>examplestorageaccount</StorageAccount>
            <Location>northeurope</Location>
            <ResourceGroup>exampleresourcegroup</ResourceGroup>
            <AzureDatabaseServer>exampleserver</AzureDatabaseServer>
            <AzureDatabaseServerPassword>CUSTOM PASSWORD FOR DATABASE SERVER</AzureDatabaseServerPassword>
            <AzureDatabasePassword>CUSTOM PASSWORD FOR DATABASE</AzureDatabasePassword>
            <HTTPS>false</HTTPS>
        </Inputsettings>
Azure Installation
An Azure deployment can be created with the following xml, setting up HTTPS, RDP, monitoring, manual VM upgrades, and non-default firewall and network security group rules.
<?xml version="1.0" encoding="utf-8" ?>
        <Inputsettings xmlns:xsi="http://www.w3.org/2001/XMLSchema-instance" xmlns:xsd="http://www.w3.org/2001/XMLSchema">
            <LicenceFile>PATH TO LICENCE FILE</LicenceFile>
            <InstallMode>azure</InstallMode>
            <Subscription>SUBSCRIPTION ID</Subscription>
            <StorageAccount>examplestorageaccount</StorageAccount>
            <Location>northeurope</Location>
            <ResourceGroup>exampleresourcegroup</ResourceGroup>
            <AzureMachineSize>Standard_D8_v5</AzureMachineSize>
            <AzureVMUpgrades>Manual</AzureVMUpgrades>
            <AzureDatabaseServer>exampleserver</AzureDatabaseServer>
            <RDP>true</RDP>
            <RDPUsername>exampleuser</RDPUsername>
            <RDPPassword>examplepassword</RDPPassword>
            <KeyVaultResourceId>KEY VAULT RESOURCE ID</KeyVaultResourceId>
            <SSLCertificateSecretUrl>SECRET URL</SSLCertificateSecretUrl>
            <SSLCertificateThumbprint>THUMBPRINT</SSLCertificateThumbprint>
            <UseMonitoring>true</UseMonitoring>
            <InputNSGRules>
                <InputNSGRule>
                    <Name>NSGRule1</Name>
                    <AddressRanges>192.168.99.0/24</AddressRanges>
                </InputNSGRule>
            </InputNSGRules>
            <InputFirewallRules>
                <InputFirewallRule>
                    <Name>FirewallRule1</Name>
                    <StartIpAddress>10.10.10.10</StartIpAddress>
                    <EndIpAddress>11.11.11.11</EndIpAddress>
                </InputFirewallRule>
            </InputFirewallRules>
            <InputMonitoringEmailAddresses>
                <InputEmailAddress>
                    <Address>example@ifsworld.com</Address>
                </InputEmailAddress>
            </InputMonitoringEmailAddresses>
        </Inputsettings>
Azure Installation with Multiple HTMs
A basic Azure installation with two HTMs is shown in the following xml, with one HTM defined using a connection string, and the other defined through an existing server.
<?xml version="1.0" encoding="utf-8"?>
        <InputSettings xmlns:xsi="http://www.w3.org/2001/XMLSchema-instance" xmlns:xsd="http://www.w3.org/2001/XMLSchema">
            <LicenceFile>PATH TO LICENCE FILE</LicenceFile>
            <InstallMode>azure</InstallMode>
            <Subscription>SUBSCRIPTION ID</Subscription>
            <StorageAccount>examplestorage</StorageAccount>
            <Location>northeurope</Location>
            <ResourceGroup>exampleresourcegroup</ResourceGroup>
            <AzureDatabaseServer>exampleserver</AzureDatabaseServer>
            <InputConnectionTypes>
                <InputConnectionType>
                    <Database>HTM</Database>
                    <ConnectionString>CONNECTION STRING FOR HTM DATABASE</ConnectionString>
                    <ExplicitConnectionType>ConnectionString</ExplicitConnectionType>
                </InputConnectionType>
                <InputConnectionType>
                    <Database>HTM</Database>
                    <AzureDatabase>exampledatabase</AzureDatabase>
                    <AzureDatabaseServer>examplehtmserver</AzureDatabaseServer>
                    <ExplicitConnectionType>ExistingDatabase</ExplicitConnectionType>
                </InputConnectionType>
            </InputConnectionTypes>
            <HTTPS>false</HTTPS>
        </InputSettings>
Basic Azure Update
A simple update of an Azure system, changing none of the original settings, can be done with the following xml.
<?xml version="1.0" encoding="utf-8" ?>
        <InputSettings xmlns:xsi="http://www.w3.org/2001/XMLSchema-instance" xmlns:xsd="http://www.w3.org/2001/XMLSchema">
            <LicenceFile>PATH TO LICENCE FILE</LicenceFile>
            <InstallMode>azure</InstallMode>
            <AzureMode>update</AzureMode>
            <AzureDatabaseServerMode>use_existing</AzureDatabaseServerMode>
            <Subscription>SUBSCRIPTION ID</Subscription>
            <ResourceGroup>exampleresourcegroup</ResourceGroup>
        </InputSettings>
Azure Update With Custom Password for the Database server and the Database
A simple update of an Azure system, where the azure database server and the database uses a custom password, can be done with the following xml.
<?xml version="1.0" encoding="utf-8" ?>
        <InputSettings xmlns:xsi="http://www.w3.org/2001/XMLSchema-instance" xmlns:xsd="http://www.w3.org/2001/XMLSchema">
            <LicenceFile>PATH TO LICENCE FILE</LicenceFile>
            <InstallMode>azure</InstallMode>
            <AzureMode>update</AzureMode>
            <AzureDatabaseServerMode>use_existing</AzureDatabaseServerMode>
            <Subscription>SUBSCRIPTION ID</Subscription>
            <ResourceGroup>exampleresourcegroup</ResourceGroup>
            <AzureDatabaseServerPassword>CUSTOM PASSWORD FOR DATABASE SERVER</AzureDatabaseServerPassword>
            <AzureDatabasePassword>CUSTOM PASSWORD FOR DATABASE</AzureDatabasePassword>
        </InputSettings>
Azure Update Including Multiple HTMs
An update of an Azure system, changing many of the existing settings, can be done with the following xml. The changes made are to update the machine size and RDP password, to add a new firewall rule, to delete an NSG rule and replace it with a new one, and to replace a monitoring email address. Settings are also included to set up two HTMs.
Warning
This update will overwrite any existing HTM settings with the two HTMs specified here. In the previous example for a basic Azure update, if there were existing HTM details, then they would not be deleted, since no HTM details are included in the input xml to overwrite them.
<?xml version="1.0" encoding="utf-8"?>
        <InputSettings xmlns:xsi="http://www.w3.org/2001/XMLSchema-instance" xmlns:xsd="http://www.w3.org/2001/XMLSchema">
            <LicenceFile>PATH TO LICENCE FILE</LicenceFile>
            <InstallMode>azure</InstallMode>
            <AzureMode>update</AzureMode>
            <AzureDatabaseServerMode>use_existing</AzureDatabaseServerMode>
            <Subscription>SUBSCRIPTION ID</Subscription>
            <ResourceGroup>exampleresourcegroup</ResourceGroup>
            <AzureMachineSize>Standard_D8_v5</AzureMachineSize>
            <InputConnectionTypes>
                <InputConnectionType>
                    <Database>HTM</Database>
                    <AzureDatabaseServer>examplehtmserver</AzureDatabaseServer>
                </InputConnectionType>
                <InputConnectionType>
                    <Database>HTM</Database>
                    <ConnectionString>CONNECTION STRING FOR HTM DATABASE</ConnectionString>
                    <ExplicitConnectionType>ConnectionString</ExplicitConnectionType>
                </InputConnectionType>
            </InputConnectionTypes>
            <InputNSGRules>
                <InputNSGRule>
                    <Name>oldnsgrule</Name>
                    <Delete>true</Delete>
                </InputNSGRule>
                <InputNSGRule>
                    <Name>newnsgrule</Name>
                    <AddressRanges>*</AddressRanges>
                    <Ports>2000</Ports>
                </InputNSGRule>
            </InputNSGRules>
            <InputFirewallRules>
                <InputFirewallRule>
                    <Name>newfirewallrule</Name>
                    <StartIpAddress>0.0.0.0</StartIpAddress>
                    <EndIpAddress>255.255.255.255</EndIpAddress>
                </InputFirewallRule>
            </InputFirewallRules>
            <RDPPassword>examplePassword123</RDPPassword>
            <InputMonitoringEmailAddresses>
                <InputEmailAddress>
                    <Address>newemailaddress@exampleemail.com</Address>
                </InputEmailAddress>
                <InputEmailAddress>
                    <Address>oldemailaddress@exampleemail.com</Address>
                    <Delete>true</Delete>
                </InputEmailAddress>
            </InputMonitoringEmailAddresses>
        </InputSettings>
Create Azure Image
The following xml can be used to create an Azure image.
<?xml version="1.0" encoding="utf-8" ?>
        <Inputsettings xmlns:xsi="http://www.w3.org/2001/XMLSchema-instance" xmlns:xsd="http://www.w3.org/2001/XMLSchema">
            <LicenceFile>PATH TO LICENCE FILE</LicenceFile>
            <InstallMode>azure</InstallMode>
            <AzureMode>create_image</AzureMode>
            <Subscription>SUBSCRIPTION ID</Subscription>
            <StorageAccount>examplestorage</StorageAccount>
            <Location>northeurope</Location>
            <ResourceGroup>exampleresourcegroup</ResourceGroup>
            <DatabasePerformanceTierFinal>S3</DatabasePerformanceTierFinal>
        </Inputsettings>
Azure Deployment Using an Image
The following xml shows how to use an image that has already been created to do a new Azure deployment.
<?xml version="1.0" encoding="utf-8"?>
        <InputSettings xmlns:xsd="http://www.w3.org/2001/XMLSchema" xmlns:xsi="http://www.w3.org/2001/XMLSchema-instance">
            <LicenceFile>PATH TO LICENCE FILE</LicenceFile>
            <InstallMode>azure</InstallMode>
            <Subscription>SUBSCRIPTION ID</Subscription>
            <StorageAccount>examplestorage</StorageAccount>
            <Location>northeurope</Location>
            <ResourceGroup>exampleresourcegroup</ResourceGroup>
            <AzureDatabaseServer>exampleserver</AzureDatabaseServer>
            <BootstrappingMode>use_existing_image</BootstrappingMode>
            <HTTPS>false</HTTPS>
            <ImageResourceGroup>exampleimage</ImageResourceGroup>
            <DatabasePerformanceTierFinal>S3</DatabasePerformanceTierFinal>
        </InputSettings>
Azure Deployment Using the PSO Base Image
The following xml shows how to use the PSO base image when performing an Azure deployment. Note that to the "use_pso_base_image" option is only available for users in the IFS AAD tenant that are members of the PSO Azure Group and are in a supported list of Azure regions. For further details please see the details of the Deployment page in the "Azure Installation" section of this guide.
<?xml version="1.0" encoding="utf-8"?>
        <InputSettings xmlns:xsi="http://www.w3.org/2001/XMLSchema-instance" xmlns:xsd="http://www.w3.org/2001/XMLSchema">
            <LicenceFile>PATH TO LICENCE FILE<</LicenceFile>
            <InstallMode>azure</InstallMode>
            <Subscription>SUBSCRIPTION ID</Subscription>
            <StorageAccount>examplestorage</StorageAccount>
            <Location>northeurope</Location>
            <ResourceGroup>exampleresourcegroup</ResourceGroup>
            <AzureDatabaseServer>exampleserver</AzureDatabaseServer>
            <BootstrappingMode>use_pso_base_image</BootstrappingMode>
            <HTTPS>false</HTTPS>
            <DatabasePerformanceTierFinal>S3</DatabasePerformanceTierFinal>
        </InputSettings>
Export Standard
Data can be exported from an on-premise installation. Note that this must be performed on one of the installation machines as the installer will detect connection details from installed PSO software.
<?xml version="1.0" encoding="utf-8"?>
    <InputSettings xmlns:xsi="http://www.w3.org/2001/XMLSchema-instance" xmlns:xsd="http://www.w3.org/2001/XMLSchema">
        <LicenceFile>PATH TO LICENCE FILE</LicenceFile>
        <InstallMode>exportStandard</InstallMode>
        <InputDatabaseImportExportSettings>
            <InputDatabaseImportExportSetting>
                <Database>System</Database>
                <FolderPath>FOLDER TO EXPORT TO</FolderPath>
            </InputDatabaseImportExportSetting>
            <InputDatabaseImportExportSetting>
                <Database>Scheduling</Database>
                <FolderPath>FOLDER TO EXPORT TO</FolderPath>
            </InputDatabaseImportExportSetting>
        </InputDatabaseImportExportSettings>
    </InputSettings>
Export Azure
The following xml shows how to export data from an Azure deployment.
<?xml version="1.0" encoding="utf-8" ?>
        <Inputsettings xmlns:xsi="http://www.w3.org/2001/XMLSchema-instance" xmlns:xsd="http://www.w3.org/2001/XMLSchema">
            <LicenceFile>PATH TO LICENCE FILE</LicenceFile>
            <InstallMode>exportAzure</InstallMode>
            <Subscription>SUBSCRIPTION ID</Subscription>
            <AzureDatabaseServer>exampleserver</AzureDatabaseServer>
            <AzureDatabase>IFS Scheduling</AzureDatabase>
            <InputDatabaseImportExportSettings>
                <InputDatabaseImportExportSetting>
                    <Database>System</Database>
                    <FolderPath>FOLDER TO EXPORT TO</FolderPath>
                </InputDatabaseImportExportSetting>
                <InputDatabaseImportExportSetting>
                    <Database>Modelling</Database>
                    <FolderPath>FOLDER TO EXPORT TO</FolderPath>
                </InputDatabaseImportExportSetting>
                <InputDatabaseImportExportSetting>
                    <Database>Scheduling</Database>
                    <FolderPath>FOLDER TO EXPORT TO</FolderPath>
                </InputDatabaseImportExportSetting>
                <InputDatabaseImportExportSetting>
                    <Database>Simulation</Database>
                    <FolderPath>FOLDER TO EXPORT TO</FolderPath>
                </InputDatabaseImportExportSetting>
            </InputDatabaseImportExportSettings>
        </Inputsettings>
Export Azure With Custom Password for the Database server and the Database
The following xml shows how to export data from an Azure deployment, where the azure database server and the database both uses a custom password.
<?xml version="1.0" encoding="utf-8" ?>
        <Inputsettings xmlns:xsi="http://www.w3.org/2001/XMLSchema-instance" xmlns:xsd="http://www.w3.org/2001/XMLSchema">
            <LicenceFile>PATH TO LICENCE FILE</LicenceFile>
            <InstallMode>exportAzure</InstallMode>
            <Subscription>SUBSCRIPTION ID</Subscription>
            <AzureDatabaseServer>exampleserver</AzureDatabaseServer>
            <AzureDatabaseServerPassword>CUSTOM PASSWORD FOR DATABASE SERVER</AzureDatabaseServerPassword>
            <AzureDatabase>IFS Scheduling</AzureDatabase>
            <AzureDatabasePassword>CUSTOM PASSWORD FOR DATABASE</AzureDatabasePassword>
            <InputDatabaseImportExportSettings>
                <InputDatabaseImportExportSetting>
                    <Database>System</Database>
                    <FolderPath>FOLDER TO EXPORT TO</FolderPath>
                </InputDatabaseImportExportSetting>
                <InputDatabaseImportExportSetting>
                    <Database>Modelling</Database>
                    <FolderPath>FOLDER TO EXPORT TO</FolderPath>
                </InputDatabaseImportExportSetting>
                <InputDatabaseImportExportSetting>
                    <Database>Scheduling</Database>
                    <FolderPath>FOLDER TO EXPORT TO</FolderPath>
                </InputDatabaseImportExportSetting>
                <InputDatabaseImportExportSetting>
                    <Database>Simulation</Database>
                    <FolderPath>FOLDER TO EXPORT TO</FolderPath>
                </InputDatabaseImportExportSetting>
            </InputDatabaseImportExportSettings>
        </Inputsettings>
Import data
Data can be easily imported using the following xml.
<?xml version="1.0" encoding="utf-8"?>
    <InputSettings xmlns:xsi="http://www.w3.org/2001/XMLSchema-instance" xmlns:xsd="http://www.w3.org/2001/XMLSchema">
        <LicenceFile>PATH TO LICENCE FILE</LicenceFile>
        <InstallMode>standard</InstallMode>
        <InputConnectionTypes>
            <InputConnectionType>
                <Database>System</Database>
                <ConnectionString>SYSTEM CONNECTION STRING</ConnectionString>
                <Provider>Sql</Provider>
            </InputConnectionType>
        </InputConnectionTypes>
        <InputDatabaseImportExportSettings>
            <InputDatabaseImportExportSetting>
                <Database>System</Database>
                <FolderPath>IMPORT FROM FOLDER</FolderPath>
            </InputDatabaseImportExportSetting>
        </InputDatabaseImportExportSettings>
    </InputSettings>
Remove Resource Group
A resource group can be deleted with the following xml.
<?xml version="1.0" encoding="utf-8"?>
        <InputSettings xmlns:xsi="http://www.w3.org/2001/XMLSchema-instance" xmlns:xsd="http://www.w3.org/2001/XMLSchema">
            <LicenceFile>PATH TO LICENCE FILE</LicenceFile>
            <InstallMode>azure</InstallMode>
            <AzureMode>remove</AzureMode>
            <Subscription>SUBSCRIPTION ID</Subscription>
            <InputDeleteResourceGroups>
                <InputDeleteResourceGroup>
                    <Name>exampleresourcegroup</Name>
                </InputDeleteResourceGroup>
            </InputDeleteResourceGroups>
        </InputSettings>
Remove Database Server
The following xml can be used to delete a database server.
<?xml version="1.0" encoding="utf-8"?>
        <InputSettings xmlns:xsi="http://www.w3.org/2001/XMLSchema-instance" xmlns:xsd="http://www.w3.org/2001/XMLSchema">
            <LicenceFile>PATH TO LICENCE FILE</LicenceFile>
            <InstallMode>azure</InstallMode>
            <AzureMode>delete_database_server</AzureMode>
            <Subscription>SUBSCRIPTION ID</Subscription>
            <InputDeleteDatabaseServers>
                <InputDeleteDatabaseServer>
                    <Name>exampleserver</Name>
                </InputDeleteDatabaseServer>
            </InputDeleteDatabaseServers>
        </InputSettings>
Remove Database
The following xml shows how to delete databases from a database server.
<?xml version="1.0" encoding="utf-8"?>
        <InputSettings xmlns:xsi="http://www.w3.org/2001/XMLSchema-instance" xmlns:xsd="http://www.w3.org/2001/XMLSchema">
            <LicenceFile>PATH TO LICENCE FILE</LicenceFile>
            <InstallMode>azure</InstallMode>
            <AzureMode>delete_database</AzureMode>
            <Subscription>SUBSCRIPTION ID</Subscription>
            <InputDeleteDatabases>
                <InputDeleteDatabase>
                    <DatabaseName>IFS Archive</DatabaseName>
                    <DatabaseServerName>exampleserver</DatabaseServerName>
                </InputDeleteDatabase>
                <InputDeleteDatabase>
                    <DatabaseName>IFS Scheduling</DatabaseName>
                    <DatabaseServerName>exampleserver</DatabaseServerName>
                </InputDeleteDatabase>
            </InputDeleteDatabases>
        </InputSettings>
Remove Storage Account
The following xml shows how to delete a storage account.
<?xml version="1.0" encoding="utf-8"?>
        <InputSettings xmlns:xsi="http://www.w3.org/2001/XMLSchema-instance" xmlns:xsd="http://www.w3.org/2001/XMLSchema">
            <LicenceFile>PATH TO LICENCE FILE</LicenceFile>
            <InstallMode>azure</InstallMode>
            <AzureMode>delete_storage</AzureMode>
            <Subscription>SUBSCRIPTION ID</Subscription>
            <InputDeleteStorages>
                <InputDeleteStorage>
                    <Name>examplestorage</Name>
                </InputDeleteStorage>
            </InputDeleteStorages>
        </InputSettings>
Delete Image
The following xml shows how to delete an image.
<?xml version="1.0" encoding="utf-8"?>
        <InputSettings xmlns:xsi="http://www.w3.org/2001/XMLSchema-instance" xmlns:xsd="http://www.w3.org/2001/XMLSchema">
            <LicenceFile>PATH TO LICENCE FILE</LicenceFile>
            <InstallMode>azure</InstallMode>
            <AzureMode>delete_image</AzureMode>
            <Subscription>SUBSCRIPTION ID</Subscription>
            <InputDeleteImages>
                <InputDeleteImage>
                    <Name>exampleimage</Name>
                    <ResourceGroup>exampleresourcegroup</ResourceGroup>
                </InputDeleteImage>
            </InputDeleteImages>
        </InputSettings>
Local HTM Installation with SQL
The following xml shows how to install a local HTM using a SQL database.
<?xml version="1.0" encoding="utf-8"?>
        <InputSettings xmlns:xsd="http://www.w3.org/2001/XMLSchema" xmlns:xsi="http://www.w3.org/2001/XMLSchema-instance">
            <LicenceFile>PATH TO LICENCE FILE</LicenceFile>
            <InstallMode>htm</InstallMode>
            <InputConnectionTypes>
                <InputConnectionType>
                    <Database>HTM</Database>
                    <ConnectionString>CONNECTION STRING</ConnectionString>
                    <Provider>Sql</Provider>
                </InputConnectionType>
            </InputConnectionTypes>
            <HTMFolder>PATH TO HTM FOLDER</HTMFolder>
        </InputSettings>
The following xml shows how to install a local HTM using a SQL database with the HTM scripts and data folder defined.
<?xml version="1.0" encoding="utf-8"?>
        <InputSettings xmlns:xsd="http://www.w3.org/2001/XMLSchema" xmlns:xsi="http://www.w3.org/2001/XMLSchema-instance">
            <LicenceFile>PATH TO LICENCE FILE</LicenceFile>
            <InstallMode>htm</InstallMode>
            <InputConnectionTypes>
                <InputConnectionType>
                    <Database>HTM</Database>
                    <ConnectionString>CONNECTION STRING</ConnectionString>
                    <Provider>Sql</Provider>
                </InputConnectionType>
            </InputConnectionTypes>
            <HTMScriptsFolder>PATH TO SCRIPTS FOLDER</HTMScriptsFolder>
            <HTMDataFolder>PATH TO DATA FOLDER</HTMDataFolder>
        </InputSettings>
Local HTM Installation with Oracle
The following xml shows how to install a local HTM into an Oracle database. Note that the Oracle database must be on the same server as the installer.
<?xml version="1.0" encoding="utf-8"?>
        <InputSettings xmlns:xsi="http://www.w3.org/2001/XMLSchema-instance" xmlns:xsd="http://www.w3.org/2001/XMLSchema">
            <LicenceFile>PATH TO LICENCE FILE</LicenceFile>
            <InstallMode>htm</InstallMode>
            <InputConnectionTypes>
                <InputConnectionType>
                    <Database>HTM</Database>
                    <ConnectionString>CONNECTION STRING</ConnectionString>
                    <Provider>Oracle</Provider>
                </InputConnectionType>
            </InputConnectionTypes>
            <HTMFolder>PATH TO HTM FOLDER</HTMFolder>
            <DBAUsername>EXAMPLEUSER</DBAUsername>
            <DBAPassword>examplepassword</DBAPassword>
        </InputSettings>
Basic Azure HTM Installation
The following xml shows how to install an HTM into a new Azure database.
<?xml version="1.0" encoding="utf-8"?>
        <InputSettings xmlns:xsd="http://www.w3.org/2001/XMLSchema" xmlns:xsi="http://www.w3.org/2001/XMLSchema-instance">
            <LicenceFile>PATH TO LICENCE FILE</LicenceFile>
            <InstallMode>htm</InstallMode>
            <Subscription>SUBSCRIPTION ID</Subscription>
            <Location>northeurope</Location>
            <AzureDatabaseServer>exampledatabaseserver</AzureDatabaseServer>
            <HTMDeploymentMode>azure</HTMDeploymentMode>
            <HTMFolder>PATH TO HTM FOLDER</HTMFolder>
        </InputSettings>
Azure HTM Installation
The following xml shows how to install an HTM into a new Azure database, scaling the database during creation, setting a custom database name, and configuring firewall rules for the database server.
<?xml version="1.0" encoding="utf-8"?>
        <InputSettings xmlns:xsd="http://www.w3.org/2001/XMLSchema" xmlns:xsi="http://www.w3.org/2001/XMLSchema-instance">
            <LicenceFile>PATH TO LICENCE FILE</LicenceFile>
            <InstallMode>htm</InstallMode>
            <Subscription>SUBSCRIPTION ID</Subscription>
            <Location>northeurope</Location>
            <AzureDatabaseServer>exampledatabaseserver</AzureDatabaseServer>
            <AzureDatabase>exampledatabase</AzureDatabase>
            <InputFirewallRules>
                <InputFirewallRule>
                    <Name>newfirewallrule</Name>
                    <StartIpAddress>0.0.0.0</StartIpAddress>
                    <EndIpAddress>10.10.10.10</EndIpAddress>
                </InputFirewallRule>
            </InputFirewallRules>
            <HTMDeploymentMode>azure</HTMDeploymentMode>
            <HTMFolder>PATH TO HTM FOLDER</HTMFolder>
            <ScaleDatabase>true</ScaleDatabase>
            <DatabasePerformanceTier>P1</DatabasePerformanceTier>
        </InputSettings>