Installing the Hierarchical Travel Matrix
For dynamic scheduling it is usually recommended that a Hierarchical Travel Matrix (HTM) be used. Details of which countries are included in which HTM region are included in a later appendix. Further details on these HTM regions, including their final size and the disc space required for installation, can be found in the Architecture and Sizing Guide — Hierarchical Travel Matrix, which also details the matrix ID which should be set when using each respective HTM.
There are two ways to install a HTM into a database: automatically using the IFS PSO Installer, or, manually using database scripts. It is recommended that the automatic option is used in all cases, to avoid the risk of introducing errors.
Prerequisites
Warning
The HTM database format has changed over time, and the format used for the latest HTM available in a given region may vary as a result. Newer "V2" and "V3" HTMs can only be used by PSO 6.1 and upwards and PSO 6.5.0.17 and upwards respectively.
Warning
If using the installer please ensure that you are using the latest version.
Warning
Before starting the HTM installation remember to check that the server the HTM database is on has enough disk space for the installation (for space requirements, find the matrix id being installed in the Architecture and Sizing Guide — Hierarchical Travel Matrix)
Note
Optionally, the database (once populated and known to be working) can be marked as read-only and the (table etc.) creation rights can be removed from the database user.
Note
In order to use the HTM after installation, the IFS PSO services must be configured to access the database using the correct user in the connection string. In addition the parameter 'TravelCalculationOption' must be set to 'HierarchicalTravelMatrix' and the 'HierarchicalDatabaseMatrixID' parameter must be set to the correct 'Matrix ID' value (see the Architecture and Sizing Guide — Hierarchical Travel Matrix).
Warning
Never modify an HTM that is already in use by IFS PSO services (e.g. to upgrade to a new HTM release). Create a new HTM database (in SQL Server) or a new HTM user (in Oracle) and populate that. Once the new HTM database is known to be working, either rename the databases (on SQL Server) or adjust the user name in the IFS PSO services connection strings (on Oracle). Once the old HTM database is known to be no longer required, drop the database (on SQL Server) or drop the old user name (on Oracle).
Warning
Be aware that large HTMs may take a few hours to install depending on the database provider and server it is being installed on. Oracle and SQL Azure typically take longer than SQL Server.
HTMs can be installed on either SQL Server, SQL Azure or Oracle databases. The installation process differs slightly for each database provider, however the first few steps are common:
- Download the data for the matrix to be installed. The data is comprised of the actual HTM data (locations, travels etc.) and installation scripts for each database provider (organised in folders with the database provider names).
- The HTM data is packaged in a compressed file, which needs to be unzipped once it is downloaded to the server hosting the target HTM database.
- You now should have a series of .csv files in a folder which will be used to load the HTM data to a database using the scripts in the corresponding folder (SQL, Oracle or SQLAZURE). Below are the instructions for each database provider.
- Once installation is complete, refer to 'Post-HTM-installation checks' below to check whether the HTM installation was successful.
Warning
Note that for older V1 HTMs the folder where the .csv files need to be extracted to depends on the database provider used. See the relevant sections for more detail.
Automated HTM Installation
The IFS PSO Installer can be used to create a new HTM database. If you wish to use the IFS PSO Installer for a HTM database install, you will need your licence key at hand. In the following sub-sections we provide instructions for installs against a local SQL Server or Oracle or PostgreSQL database, and for installations into a SQL Azure database.
Note
The HTM database format has changed over time, and the format used for the latest HTM available in a given region may vary as a result. The latest (6.1+) version of the installer can be used to install any supported version.
Microsoft SQL Server Installation
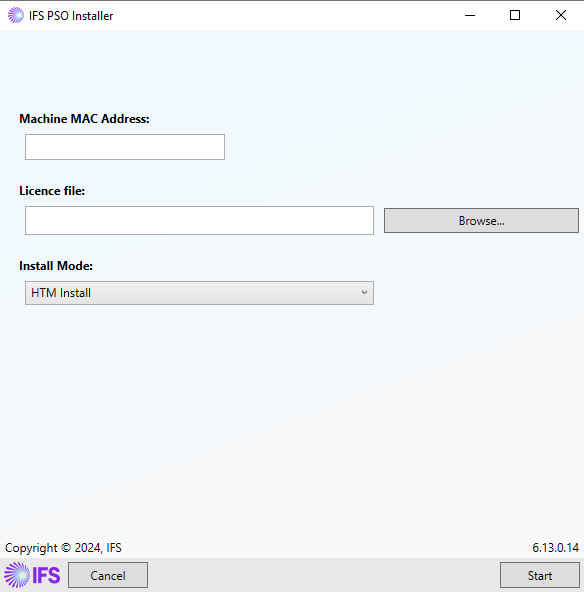
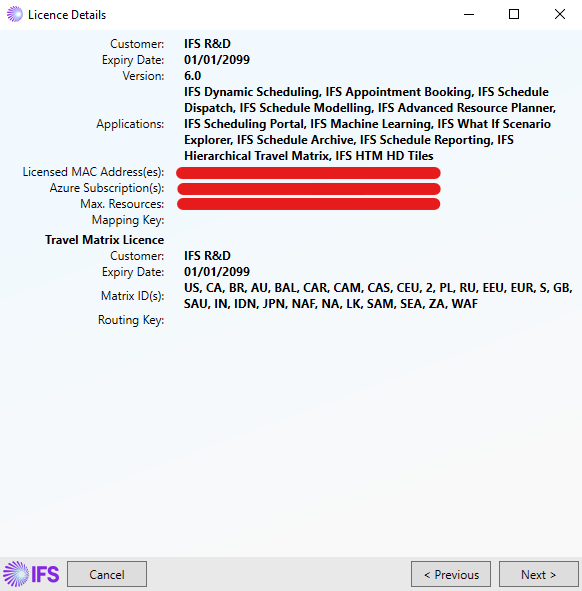
After starting the IFS PSO Installer, you will be presented with the start page where you can select your licence key file and then select "HTM Install" from the Install Mode option - see the snapshot above. After clicking "Start" you will move to the Licence Details page where you may review the specifics of your licence key. In particular, you can see which HTM matrix IDs the licence is valid for - see below snapshot. No actions needs to be taken on this page so you may click "Next" to continue.
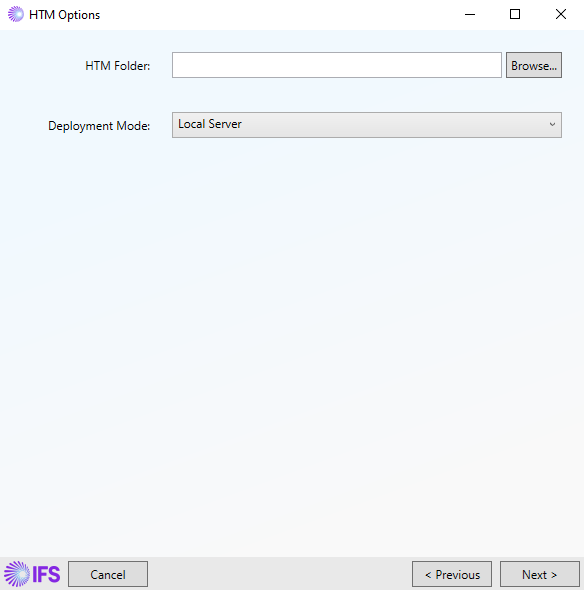
The HTM Options page allows you to select the type of HTM install that you would like to perform. The different options are as follows:
- HTM Folder: this is the root folder for the HTM containing both the 'scripts' and 'data' folders.
- Deployment Mode: either "Local Server" or "Azure". For SQL Server or Oracle installs you will select "Local Server", whereas for SQL Azure you will typically select "Azure", however it is possible to install an HTM to SQL Azure using the "Local Server" option (see the note at the end of this section for further details).
Warning
The HTM folder should not be located within a OneDrive folder as this can cause the install to fail.
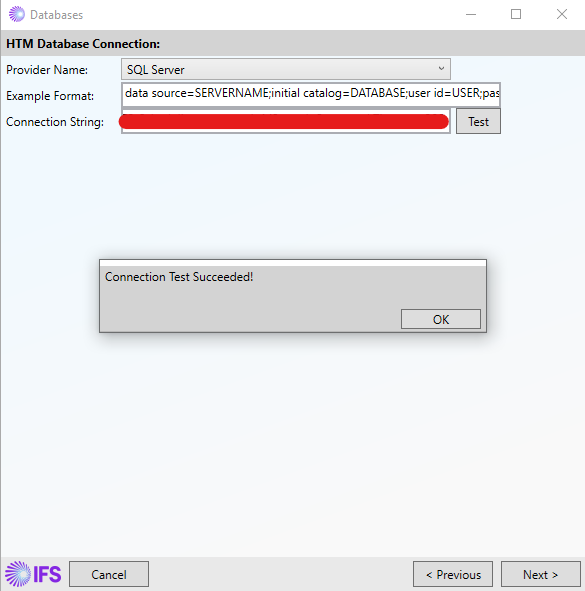
For a SQL Server HTM install, set the Deployment Mode to "Local Server" and then choose the relevant option for Install Mode. The next page you come to is the Databases page, where you will enter the connection string for your SQL Server database. Note that you will need to have a database already created and a user with sufficient permissions to create tables, etc., against the database that you can use for the HTM install. Once you have entered the connection string for your target database you may test that it is correct using the Test button. With a valid connection string, click "Next" to continue.
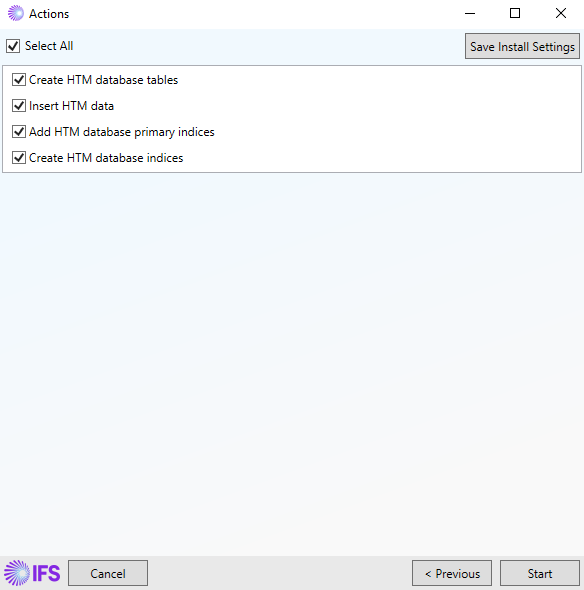
The Actions page will then summarise the steps that the IFS PSO Installer needs to take to perform the HTM install. To proceed with the install click "Start". You will be informed when a task is running (it will be marked as "Executing") and for the data insertion step there will be an estimated time of completion to provide a rough indication of the time remaining. Once all actions are marked as "Done" the install is complete. If at any point an error occurs information will be displayed on the IFS PSO Installer.
Note
It is possible to install an HTM into a SQL Azure database using the steps described for an on-premise SQL Server database, with the difference that the "SQL Azure" provider type is selected on the Databases page. However, when installing an HTM into Azure it is particularly useful to increase the database performance so as to speed-up the data insertion process and this additional step would need to be handled externally to the IFS PSO Installer - details can be found in the Manual Installation section below. Instead, if you use the IFS PSO Installer, all of the required steps are visible and easily handled therefore it is the recommended way to create a SQL Azure HTM database - see the following "Microsoft SQL Azure HTM Installation" section.
Microsoft SQL Azure HTM Installation
Note
Before attempting a SQL Azure HTM install using the IFS PSO Installer, please ensure that your licence key is valid for Azure installs.
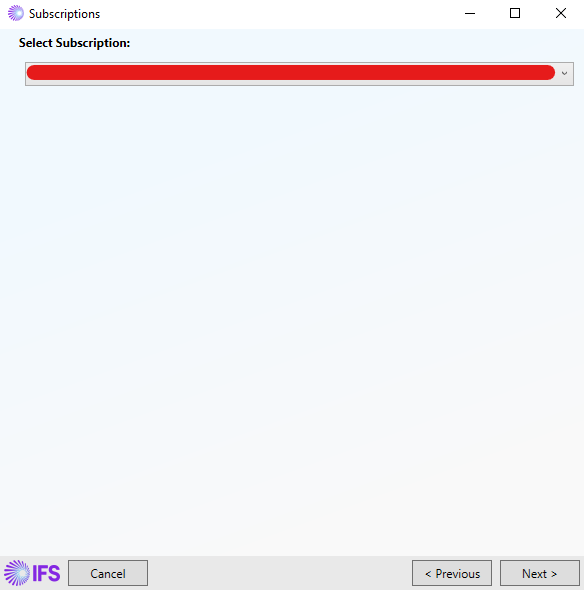
The installation process for SQL Azure is identical to that for SQL Server in the preceding section up to the HTM Options page in the IFS PSO Installer, the difference being that for a SQL Azure install you will set the Deployment Mode option to "Azure" (instead of "Local Server"), then click "Next". You will then come to the Subscriptions page where you should select the Azure subscription that you wish to install the HTM database under, then click "Next" to continue.
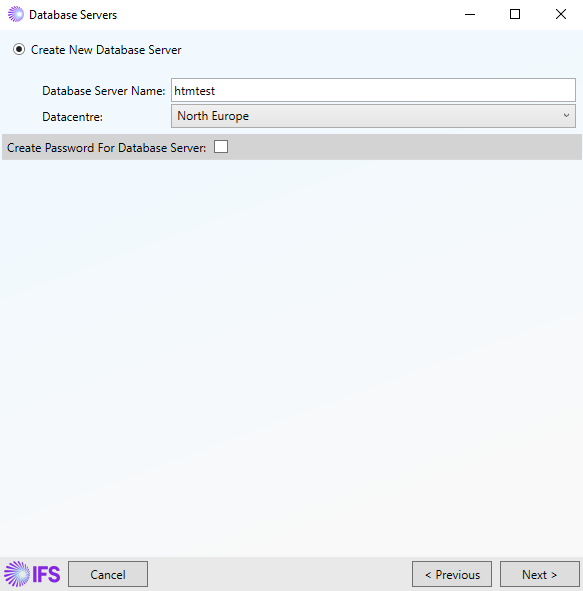
The Database Servers page allows you to select the database server that you will use for the HTM install. You will need to specify an appropriate database server name and select the Data Centre location where you would like the database server to be created - this should be as close as possible to the site.
Note
When creating a new database server the installer will create a Resource Group on Microsoft Azure to host the database server which has the same name as the database server.
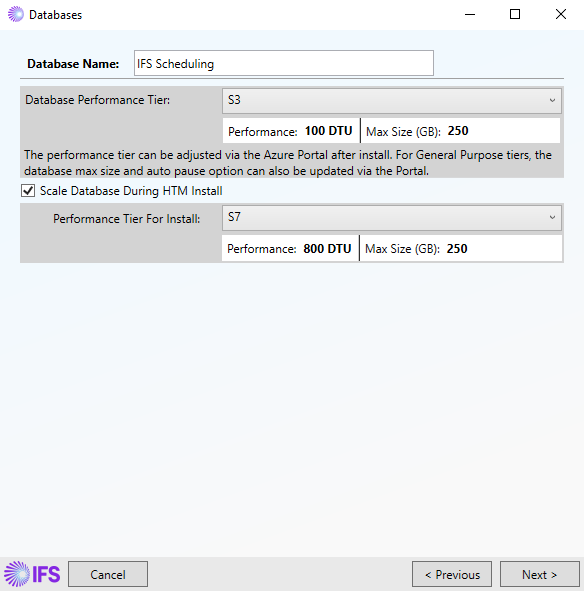
On the Databases page, you may then set the database name to be used for the HTM install - by default this is "IFS Scheduling".
The next option is to select the database performance tier. See the Architecture and Sizing Guide for guidance on which tier to use. The tier can also be configured after installation via the Azure Portal.
Note
When using the General Purpose tiers for an HTM installation, the databases will be created using the maximum available size for the database. This will then be reduced automatically after installation to cover only the size required, plus a small buffer.
The final option is to "Scale Database During HTM Install" which concerns the performance tier of the database to be used during the HTM install, which may differ from the performance tier required for day-to-day operations of the HTM database. We would typically recommended that the database is scaled to the mid-to-high performance level (e.g. an S7) as this will better handle the large volume of data that is inserted during the HTM install. Once the install has completed the database will be scaled back down to the value selected previously. The snapshot above shows an example of the Databases page.
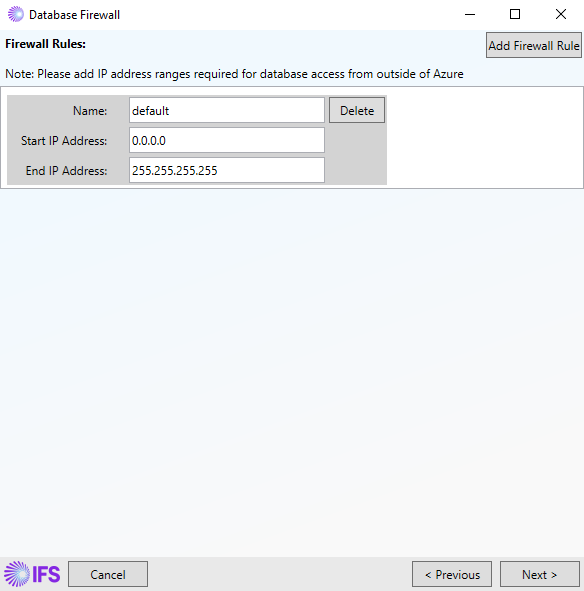
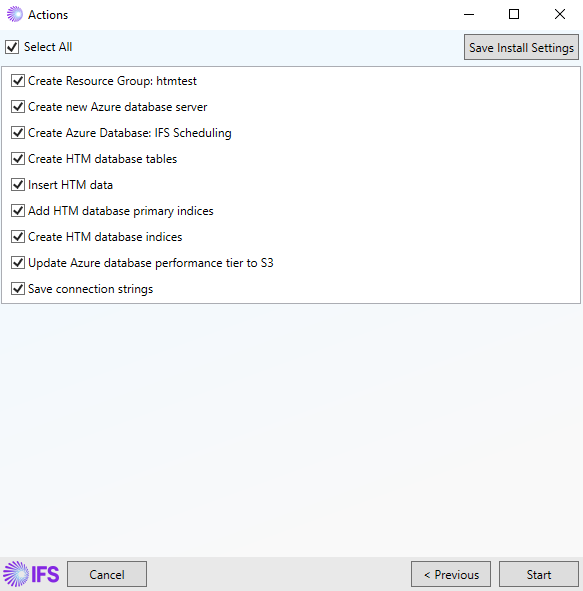
The next page in the IFS PSO Installer is for Firewall configuration for the SQL Azure database server. Here you can add in permitted IP address ranges by either editing the default "all addresses open" firewall rule and/or adding in extra firewall rules. The snapshot below shows an example of the Actions page - notice that the penultimate action is to update the performance tier of the database to an S1.
Note
When performing an HTM install against a managed SQL Azure Database there will be an additional action to "Save connection strings". This action saves the database connection string to a date-time-stamped file in the ConnectionDetails folder (which is created in the release directory by the IFS PSO Installer).
The final step for a SQL Azure HTM install is to review the list on the Actions page and then set the install in motion by clicking the "Start" button.
Oracle HTM Installation
Note
To perform an Oracle HTM install using the IFS PSO Installer, the release folder for the scheduling software and the HTM release must be copied to the server where the Oracle database is installed. This is because the HTM data is inserted using a local directory alias, hence the IFS PSO Installer must be running on the Oracle database server.
Note
Note that you will need to have a database user already created who has sufficient permissions to create tables, etc., that can be used for the HTM install. For further details please see the Oracle install sub-section in the Manual Installation section below.
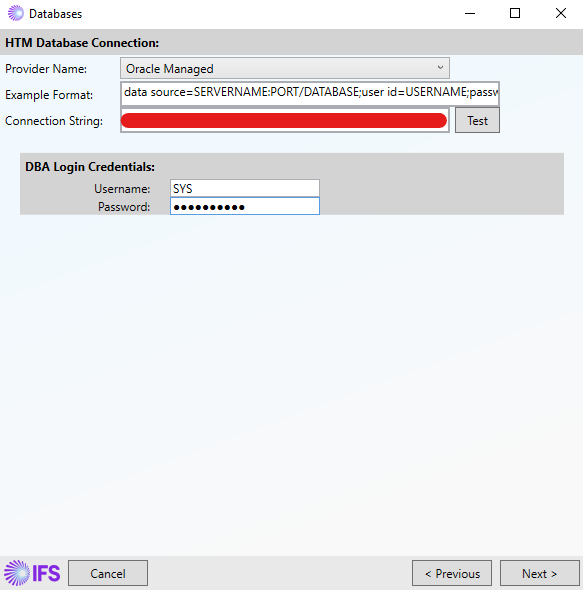
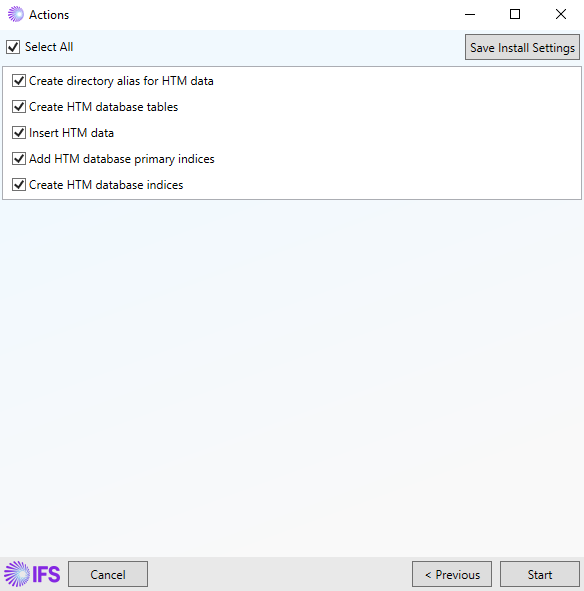
Installing an HTM into an Oracle database follows the same basic steps as for Microsoft SQL Server, differing at the Databases page in the IFS PSO Installer - please review the steps prior to that in the Microsoft SQL Server section above. For an Oracle install you will select "Oracle" as the provider type on the Databases page, after which you are required to enter a valid connection string as well as the login username and password for a DBA level user - see above snapshot. (The latter is required to grant certain permissions during the install process - if needed, specific details can be found by examining the steps in the manual installation section). Both the user id and the DBA user must be in upper case. Once the required details have been entered, clicking "Next" takes you to the Actions page where there is a summary of the steps for the HTM install - see snapshot below. To start the install, click "Start".
Warning
Due to the large volume of data that is inserted during an HTM install, there may be issues with insufficient available table space. You may see this if the "Insert HTM data" step fails, at which point the corresponding Oracle error message will be displayed. Once you have adjusted the table space you will need to re-run the installation process again.
Warning
The final step in the HTM install process is to "Create HTM database indices". Please be aware that creating the indices can take as long as the actual data insertion.
Manual HTM Installation
Microsoft SQL Server Installation
Note
Once you have downloaded and ran the self-extracting file as described at the start of this section (or the extracted data from .rar file if the data is too large), you are ready to prepare the database to load the HTM data. These instructions are for Sql Server Management Studio.
Note
The script names are different depending on the version of HTM being installed. The instructions below will provide both names.
For V1 HTMs, put the extracted CSV files in the root folder of the HTM i.e. the folder containing the subfolders "SQL", "SQLAzure" and "Oracle"
Warning
This folder should not be located within a OneDrive folder as this can cause the install to fail.
Note
For V2 and V3 HTMs there is no need to move any files from their default location.
Create a database. Ensure that the drive where you are going to create the database has enough free space. Ensure that you have dbo rights in the new database.
- Open a command prompt and 'cd' to the SQL sub-folder of the HTM data folder, e.g. cd \HTM\GB\scripts\SQL.
- If you already have data in the database, use the drop indices and drop tables scripts to remove the existing data and tables (called "Hierarchical Travel Matrix Drop Indices.sql" and "Hierarchical Travel Matrix Drop Tables.sql".
- Open the create tables script ("Hierarchical Travel Matrix Create Tables.sql"), ensure that the correct database is selected, and run it.
Run the batch file, "Hierarchical Travel Matrix Bulk Copy.bat", using four parameters: database name, server name, SQL server user name, password. e.g. "Hierarchical Travel Matrix Bulk Copy.bat" TravelGB localhost IFS_PSO mypassword. If using integrated security against a local database, it is only necessary to specify the database name.
Note
This process may take some time (possibly hours).
Once complete, run the primary indices script ("Hierarchical Travel Matrix Primary Indices.sql").
- Run the create indices script (called "Hierarchical Travel Matrix Create Indices.sql"), which again may take some time.
- When the script has completed, you can shrink the database.
Microsoft SQL Azure HTM Installation
SQL Azure HTMs should always be installed automatically using the installer. Manual installation is not supported.
Oracle HTM Installation
Note
Once you have downloaded and ran the self-extracting file as described above, you are ready to prepare the database to load the HTM data. These instructions are for Oracle® SQL Developer.
Note
The script names are different depending on the version of HTM being installed. The instructions below will provide both names.
For V1 HTMs, put the extracted CSV files in the root folder of the HTM i.e. the folder containing the subfolders "SQL", "SQLAzure" and "Oracle".
Warning
This folder should not be located within a OneDrive folder as this can cause the install to fail.
Note
For V2 and V3 HTMs there is no need to move any files from their default location.
Choose an Oracle user name for accessing the HTM database e.g.'IFSHTM'. Create this HTM user in Oracle. The HTM user must have rights to create tables (including external tables), views, procedures, sequences and triggers. The HTM user requires the CONNECT and RESOURCE roles and does not require the DBA role. As the HTM is large (several GBs), consider creating a separate tablespace for the HTM user. Ensure that the TEMP tablespace is large enough for the HTM indexes to be created.
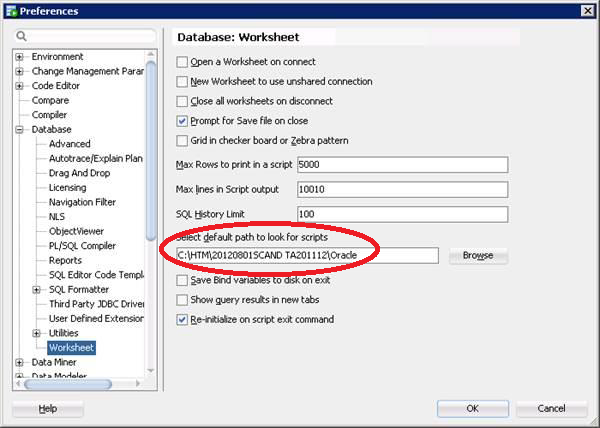
The default path to look for scripts must be modified to the folder (called Oracle) that contains the Oracle scripts provided with the HTM, e.g. C:\FrenchHTM\V1\Oracle. This setting can be found under Tools / Preferences / Database / Worksheet.
Open a SQL Worksheet using a connection with the Oracle "SYS" user, using role "SYSDBA".
Execute the CreateDirectory.sql script. This script takes two arguments, the Oracle HTM user name (using the correct case) and the path (on the Oracle server) where the .csv files are located. Note that the path is assumed to be on the Oracle server: if you have the CSV files locally, then you must share the folder and specify a UNC path to it. If the path contains spaces then it must be quoted (using single quotes). Ensure that the script has run without errors.
Note
The CreateDirectory script performs the following commands.
- DROP DIRECTORY "HIER_DIR"; (actually an equivalent PL/SQL command that does not error if the directory does not exist)
- CREATE DIRECTORY "HIER_DIR" AS 'C:\HTM\AU';
- GRANT READ, WRITE ON DIRECTORY "HIER_DIR" TO "IFSHTM";
Warning
The most common errors are:
- running the script as a user without DBA rights
- specifying the Oracle HTM user name with an incorrect case
Create a Connection for the Oracle HTM user created earlier (e.g. IFSHTM) and Open a SQL Worksheet using that connection.
- Execute the create script ("Hierarchical Travel Matrix Create.sql") as the Oracle HTM user by typing the command @'Hierarchical Travel Matrix Create' in the worksheet and selecting 'Run Script'.
- This script will produce errors! These are an artefact of the script supporting multiple HTM formats. The script will successfully process the database objects appropriate to the database version, and flag errors for database objects not appropriate to the database version. However, if the whole process completes in seconds, then there is probably some other problem: at least some of the CSV imports should succeed.
- The script can take many hours to complete depending on the size of the HTM.
- If installing a V1 HTM, run the script LoadMatrix_Bounds.sql. The parameter it asks for should be "Matrix_Bounds.csv". This step is not required for newer version HTMs.
- Refer to 'Post-HTM-installation checks' below to check whether the HTM installation was successful.
Warning
If the name of the Oracle directory is changed in the CreateDirectory.sql file then all the 'Load*.sql' files must also be changed to match. This is not recommended.
Adding HD Tiles
Warning
Never modify an HTM that is already in use by IFS PSO services (e.g. to upgrade to a new HTM release). Create a new HTM database (in SQL Server) or a new HTM user (in Oracle) and populate it using the instructions above.
Warning
HD tiles increase the HTM database size significantly. Ensure you have enough free diskspace.
Note
High Density Tiles are a legacy alternative to Routing and are now deprecated. High Density tiles are only available with V2 HTMs.
Post-HTM-installation checks
Once the scripts have completed, there are a few checks that are recommended to verify that the installation was successful.
- Check that the scripts executed without any errors.
Verify that the new HTM is working correctly by adjusting a test environment DSE to connect as the new HTM user. Check that the HTM is connected correctly and that the tiles appear as information in the event logs.
Warning
When pointing the DSE to a Sql Azure HTM database, make sure you use the full database name as the value for the data source field in the connection string of the DSE config, e.g.:
data source=tcp:"server_name".database.windows.net,1433;
Verify that the new HTM is working correctly with the DSE by sending the corresponding verification file (which is supplied with the HTM installation files).
Note
The HTM Verification files contain a single resource and two activities. One activities has ID 'SUCCESS' and the other 'FAIL'. If the 'SUCCESS' activity is scheduled this indicates that the HTM is set up and working correctly.
These files are intended to be used with default travel parameter settings, so please be aware that having non-default settings could impact the results.
It is recommended to check the event logs to verify that the DSE reports that it has successfully connected to the HTM, or to diagnose issues if the verification fails.
Some older versions of these files may use a slightly different method of verification. For example, some files contain only a single activity that will only be scheduled if the HTM is installed.
Migrating to a new HTM
Updating the HTM that you are using to a newer version essentially involves installing the new HTM and then switching over the applications to point at the new HTM. Step-by-step instructions for this process are as follows:
- Install new HTM on new database.
- Test connection and performance using a test environment before releasing the new HTM onto your production system.
- Switch production system to new HTM during a suitable maintenance window (e.g. during off peak time). HTM connection details are stored in the System database and can be edited via the Administration workspace in the workbench. As such, HTM connections can be reconfigured without the need to reinstall the applications.
- Validate the new HTM in the production system including operation and performance. Should any issues be identified, switch back to the previous HTM.
- Once operation of the new HTM is stable and satisfactory, decommission the old HTM database. We recommend a timeframe of at least two weeks for this overlap.