Standard Software Installation
Warning
Standard Windows on-premises installations are deprecated. Kubernetes is the supported deployment option for new and upgraded environments. This installation method remains supported until 30 September 2031. See Migrating from Windows or Azure for migration guidance. Contact an IFS consultant if you need further assistance.
This section describes how to install the various software components required to run the IFS PSO system.
The IFS PSO Installer
The IFS PSO Installer has been created to ease the installation and upgrade of the IFS PSO services and products. A shortcut to the program can be found in the root release directory with the program and additional files located in the 'Setup' folder.
Note
Please do not remove any files from the Setup folder as they are all required by the IFS PSO Installer application.
Note
Please see the "Azure Installation" section for details regarding deploying the IFS PSO software to the Microsoft Azure cloud service.
Note
Please see "Updating an installation" within this section if updating from a previous version.
Note
Please ensure all users are logged off and webbroswers closed before doing an upgrade/install of the PSO workbench.
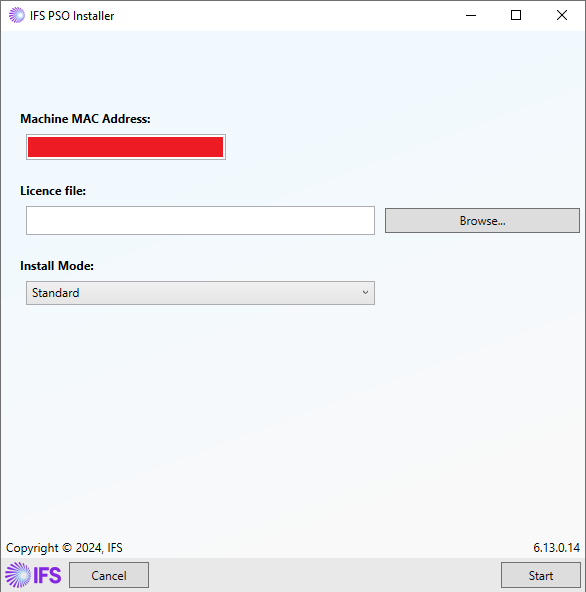
This section steps through the various stages required by the IFS PSO Installer program. On starting the 'IFS PSO Installer', either via the shortcut or directly from the executable, you will be presented with the following screen:
Note
The start page of the IFS PSO Installer displays a detected MAC Address. When requesting a licence key for local installations, it is important to provide the MAC addresses of all of the machines that are intended to be used so that the required information can be encoded into the licence key. The IFS PSO Installer can therefore be used to detect an appropriate MAC address on a target machine. For further details regarding licencing please contact IFS.
The first steps in the installation process are selecting the licence key file and deciding on the Install Mode for the current installation:
- "Standard" - Choose this Install Mode for local installations.
- "Azure" - Choose this Install Mode for deploying the IFS PSO software to Azure - as covered in the "Azure Installation" section.
- "Export Data" - Choose this mode to export system data. See - "Exporting System Data".
Once the Licence File and Install Mode have been selected, click "Start" to run the installer.
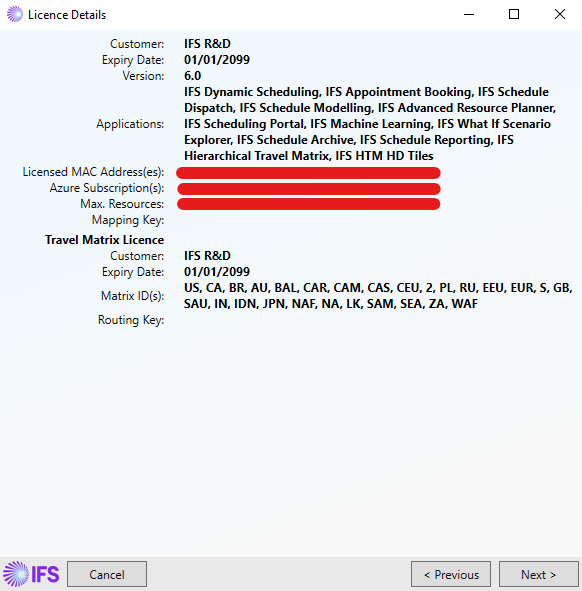
Licence Details
The Licence Details page summarizes useful information about the selected licence and, in particular, which features and software products are available with the selected licence.
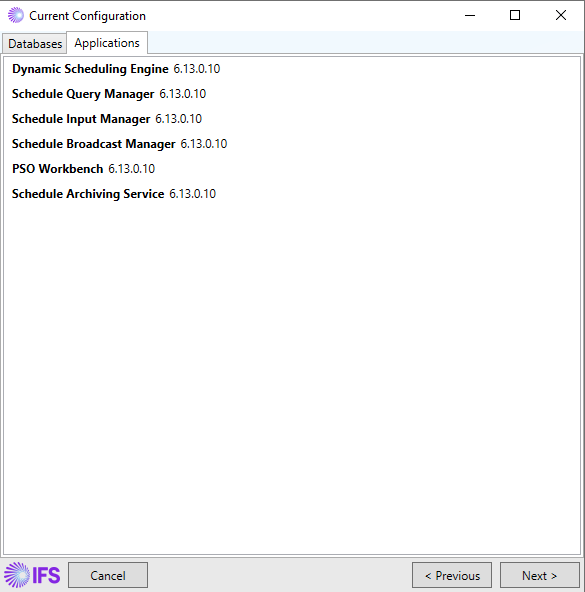
Current Configuration
As part of the installation process, the IFS PSO Installer will detect already installed software components and extract database connection details from them. The details of modules and database connections are summarized on the Current Configuration page. Note that this page will only be shown if there are existing software components. For example, when performing an update/upgrade of an existing system, details of which can be found in the "Updating an installation" section below.
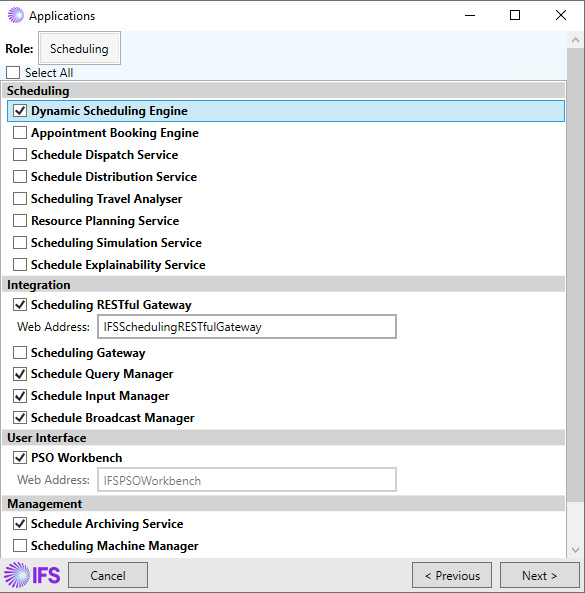
Select Applications
The Applications page allows the software applications that you wish to install to be selected. Any software components already installed on the system will be automatically ticked - if you wish to uninstall an already installed component then simply deselect it at this stage.
Note
Not all components will be required. Refer to the Architecture and Sizing Guide to determine which components are required for your installation.
Note
Please note that it is recommended to install the Scheduling Services Manager (SSM) on every server on which components are to be installed. This service will assist the Admin service in attempting to re-start any IFS PSO service that has stopped running for any reason.
Warning
The Scheduling Gateway (WCF) and Scheduling Web Interface are now deprecated and will be removed in a future release. As such, we recommend that new integrations are developed using the Scheduling Restful Gateway (SRG) and that existing integrations are also migrated to use the SRG.
Database configuration
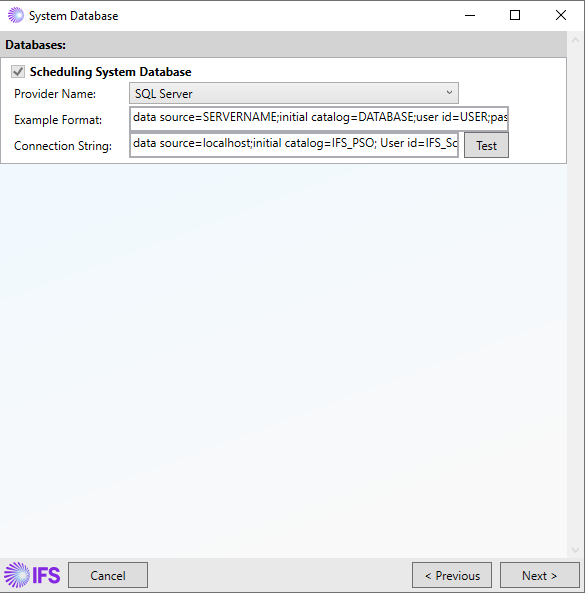
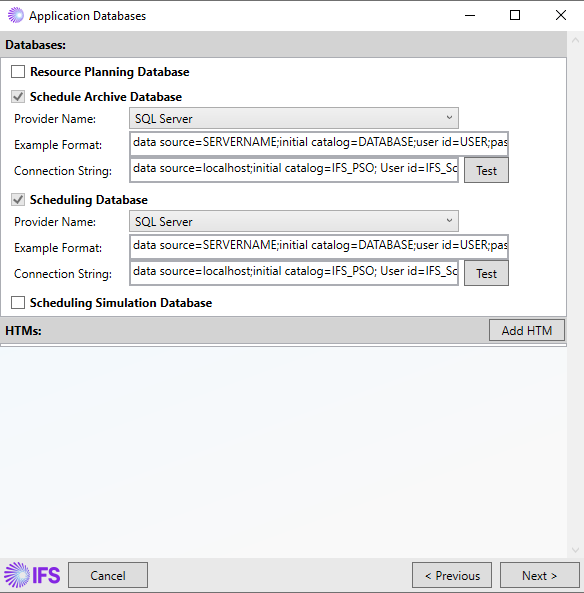
The next screens that we reach in the IFS PSO Installer are used to enter database connection details. This is split into two parts with the first being the connection details for the System Database that underpins the installation. The second screen is for the Application Databases connection details, e.g. Scheduling, Resource Planning, etc. Example screenshots of both pages are shown above.
The IFS PSO Installer will determine which databases are mandatory, which are optional and which are not required, based on the software components that were selected for install. Required database connections will be ticked and cannot be deselected. You may also select which, if any, optional databases you wish to include in the install by selecting them using the tickbox on the left hand side. For further details of which optional databases are relevant for your needs please contact IFS.
Note
If software components are already installed on the system the database connection details from them will be automatically pre-filled on the Databases page.
For required connections, or selected optional connections, you must provide valid connection details. This includes selecting the relevant data access provider for your chosen database server, and entering a valid connection string. The format of the connection string varies slightly between Sql Server and Oracle, therefore we provide an example connection string format that can be copied and pasted into the connection string box to aid the process. Once a connection string has been entered the IFS PSO Installer will attempt to validate the connection string via a background check, or if you prefer you may click the "Test" button to test the connection string and receive a more detailed error description (should the connection be invalid). Once valid connection strings have been entered for all required/optional connections to be included in the install, click "Next" to continue.
Note
You will not be allowed to proceed in the install process until valid connection details have been provided.
Note
The connection details are written to the corresponding configuration file of the installed software component. For services these will be 'AppSettings.json' files found in the installation folder for that component. For example, the Schedule Input Manager config file is found by default at 'C:\Program Files (x86)\IFS\Scheduling\IFS Schedule Input Manager\AppSettings.json'. Web components will install by default into 'C:\inetpub\wwwroot', and the configuration file name will be 'AppSettings.json'. For example, the Scheduling Workbench configuration file is found by default at 'C:\inetpub\wwwroot\IFSPSOWorkbench\appsettings.json'.
Note
For local installs on Oracle, the local Oracle Net Configurations should be used to set the real server name, and this name should be used during installation of PSO.
Note
For Oracle installs, the user id must be in upper case.
Warning
When processing large data volumes it is recommended that command time-outs are added to the connection strings of each component. This is to avoid database time-outs occurring when reading data from or adding data to the database. To set the command timeout to 5 minutes, simply add the text 'Command Timeout=300;' to all connection strings. This applies to both Oracle and SQL server databases.
Warning
For performance reasons, we do not support using SQL Azure databases for an on-premises installation.
Hierarchical Travel Matrix Configuration
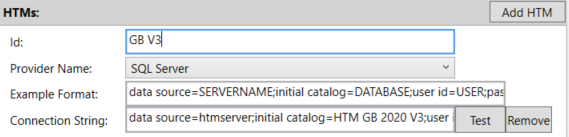
The Hierarchical Travel Matrix (HTM) can also be configured on the Databases page. Simply use the "Add HTM" button to add a HTM connection record and then fill in the details for that connection. Multiple HTM connections can be added, giving the scheduling system the possibility of using a different HTM for different datasets.
When performing an installation against a pre-existing System Database, the Installer will read HTM connection details from the System Database which will be auto-populated on the Application Databases page. Note also that when an installation completes the HTM connection details are saved to the System Database rather than to the application configuration files.
Note
The HTM (Travel Matrix) Database is optional when using the scheduling system (unless the Schedule Travel Analyser is installed). If using this database please ensure the parameter 'TravelCalculationOption' has been set to 'HierarchicalTravelMatrix', and the 'HierarchicalDatabaseMatrixId' has also been specified correctly. This can be done via the Scheduling Workbench Administration workspace.
Note
When using multiple HTM connections, the HierarchicalDatabaseMatrixId will likely be different for the different HTM databases. In this case, associate a HierarchicalDatabaseMatrixId with a Profile by setting the HierarchicalDatabaseMatrixId as a Profile_Parameter and then referencing the Profile on the Dataset of interest.
Local Settings
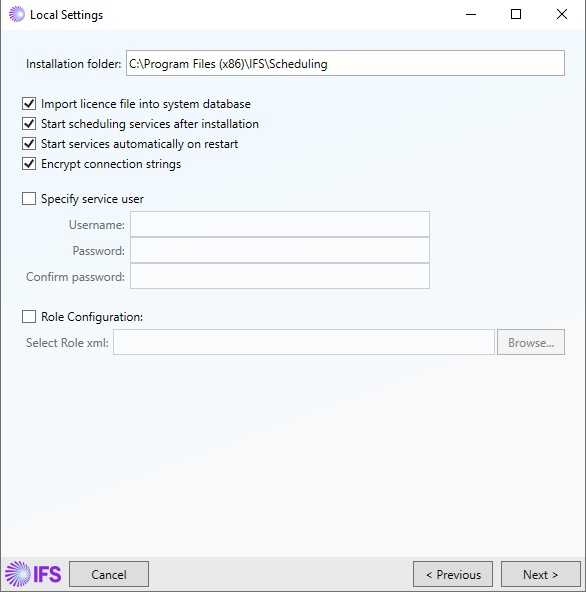
The next screen contains a number of options:
- Defining the physical path where the software should be installed.
- Importing the licence into the system database during installation.
- Starting the services following installation.
- Whether services should automatically start when the host machine is restarted.
- Defining a specific service user and corresponding password.
Note
By default the services will be configured to start up automatically when the server is booted up. Select the option 'Do not start services automatically on restart' if this is not desired.
Import/Export
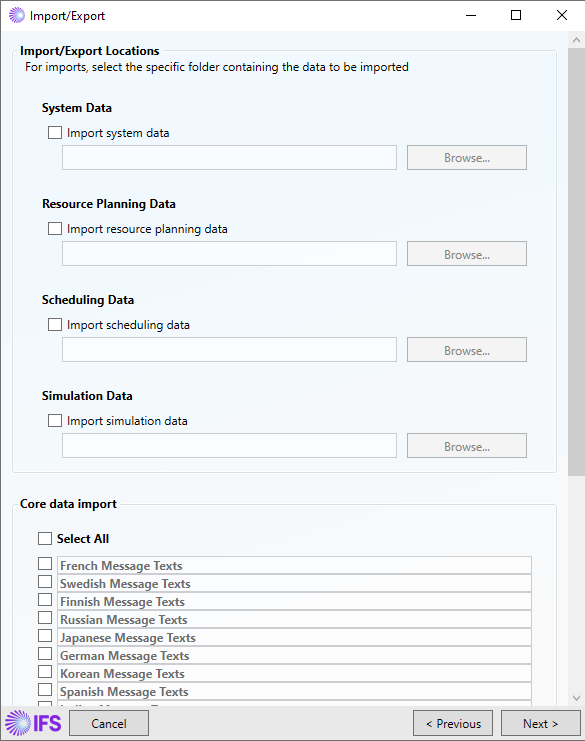
The next screen provides the option to import or export Resource Planning, Scheduling, Simulation and System data. This includes System Parameters, Workbench snapshots (PSO Workbench files) and WISE Data.
The options presented to you depend on the actions that need to be performed for each database. If the database is being newly created, then you will be given the option to import data. If the database needs to be recreated, you will be given the option to export the existing data, and automatically re-import it upon completion of the upgrade. If the database already exists and will not be recreated, then you are given the option to export the data that currently exists.
When importing files, you must select the folder that contains the files to be imported. However, when exporting data, you must select a directory in which you want the export folder structure to be created. This will create, within the folder selected, an 'ExportFiles' directory, and within that, 'SystemFiles', 'ResourcePlanningFiles' and 'SchedulingFiles' directories for the data being exported. A recommended location for this folder structure will be provided by default, but this can be changed to any location.
In order to import xml files containing system data, the files must be located within the same folder, and each file must begin with 'Acc_x_' or 'Org_y_', where 'x' represents the organisation account id and 'y' represents the organisation id.
When importing system data, saved schedules (which are part of the system data) can also be imported. The xml files containing the scheduling data should be in a "ScheduleData" sub-directory of the selected system data directory. This directory structure is generated automatically by the installer export functionality. The installer can also import scheduling data snapshots that it did not generate, but were exported from another application - such as the Scheduling Workbench. In order to do this, place the scheduling data files in a "ScheduleData" sub-directory, and ensure they have names beginning with 'Acc_x_' or 'Org_y_', where 'x' represents the organisation account id and 'y' represents the organisation id.
Resource planning data can be imported by pointing to the folder containing exported resource planning files. These may either be xml or arp files. The files must be contained within the same folder, and each file must begin with 'Acc_x_' or 'Org_y_, where 'x' represents the organisation account id and 'y' represents organisation id.
In order to import files containing scheduling data, specify the containing folder. The files are expected to have been generated from a previous run of the installer. Loading of these files differs from loading of the snapshot scheduling files in that the snapshot schedules are loaded into the system schema and are not processed by the Dynamic Scheduling Engine, whereas the live scheduling data are loaded into the scheduling schema and are processed by the Dynamic Scheduling Engine. The following types of scheduling datasets can be exported, dormant, paused and running.
If there is data available to export, the 'Select Organisations' option will appear at the top of the screen. Use this to choose whether to export the data for all organisations, or just a single one.
In addition to importing data that has been generated and exported previously, it is possible to seed the system with core data such as language specific message files. Select which file(s) to load from the Core data import section of the Import/Export screen. Note that if you install a country specific language e.g. "pt-BR" you should also install the base language e.g. "pt".
Note
It is only possible to export data this way from systems on version 5.8 or later. For systems on 5.7 or earlier, please use the export options in the workbench.
Note
In the case of a failed update you can rollback an installation where you are offered an option to export data. You can find more information in the "Rollback Process" section in this guide.
Admin Settings
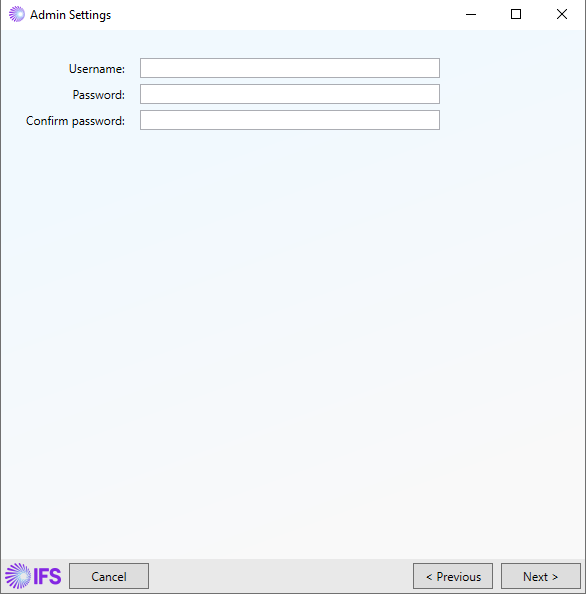
The Admin Settings screen allows you to set administrator credentials.
Note
Note that common usernames such as 'Administrator' are easy to guess and should be avoided.
Actions
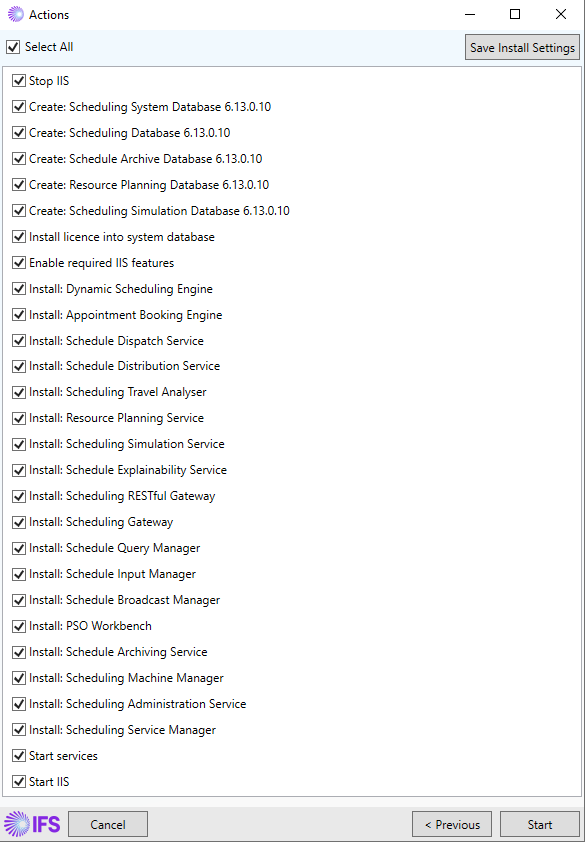
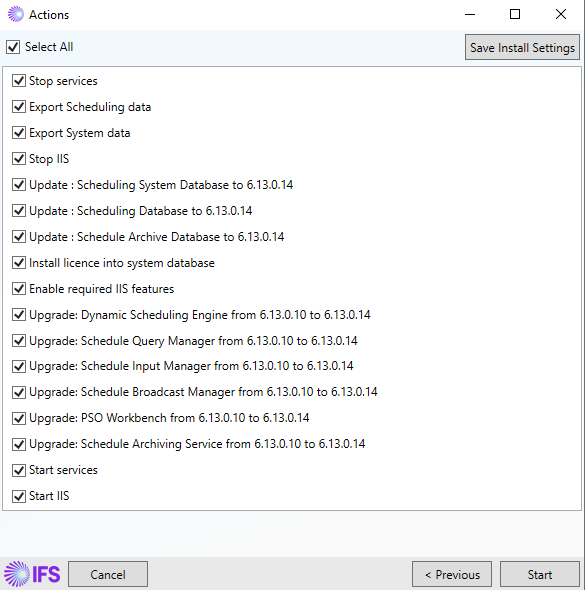
The Actions screen is the last stop in the installation process; it provides a summary of actions that have been selected along with additional tasks that the installer has determined to be necessary. For instance, this may include: enabling IIS features required by the Scheduling Workbench, the flavour of database script to run (i.e. create, upgrade or update), stopping/starting services. If you do not want the installer to perform a specific task, simply deselect it.
Note
The IFS PSO Installer will prompt the user if any database actions are to be undertaken. If you are not happy to let the installer handle the running of database scripts then you must deselect any database actions before proceeding. Alternatively, you may exit the installer and perform the database actions manually, then re-run the installer and it will automatically detect the required database actions.
When you are satisfied with the choices the installer has presented, click "Start" to commence the installation. Once the installation process completes you may exit the installer and begin using the IFS PSO software.
Configuring an installation with service resiliency
It is common in medium-to-large scale system to host the DSE on a separate machine to the interface services (e.g. SIM, SQM, SBM). Such a deployment would be referred to as a "multi role" deployment because the different servers essentially have different roles. In this scenario the scheduling software can be configured to use service resiliency checks. In short, the user provides a specification of what the deployment should look like and installs all required applications on all servers, then the SSM controls which services are started on a particular server, and also performs regular checks to ensure that the role configuration is being satisfied. If, for example, one of the servers unexpectedly drops-out, the other servers will start up the required services to satisfy the specified role configuration.
The following steps describe the installation process required to configure service resiliency:
- Before installing any services, setup the role configuration in an xml file. A template file is provided in the Setup Files folder, in the file "Role configuration template.xml" The roles and the required instance count should be specified in the Role table, then the corresponding applications for each role are specified in the Role_Application_Type table.
- Perform an install (as described in the "IFS PSO Installer" section above) with all of the services required across all of the roles installed on each server - not all services will actually be running on each server but all required services must be installed to be able to provide contingency should a machine in the deployment drop-out. On the Local Settings page, select the Role Configuration option and then select the xml file with your Role data from the previous step - see the below screenshot. Ensure the services are started - see the Local Settings screen in the IFS PSO Installer for this option. Note that there will be an action to Insert Role Configuration when you reach the Actions screen which will handle inserting the data into the system database.
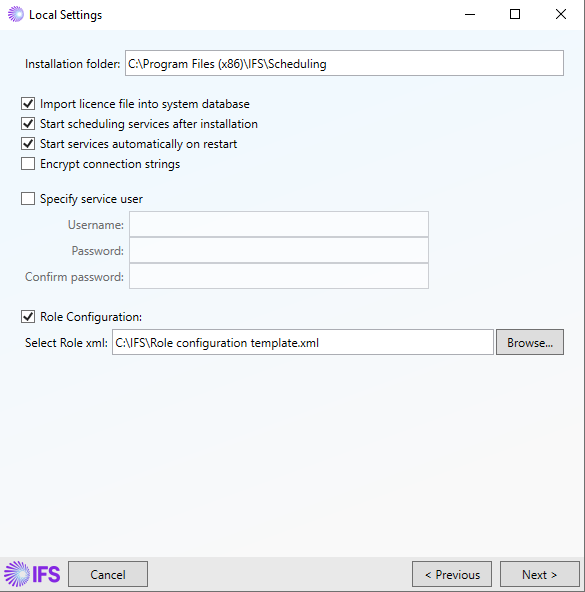
- Repeat the install on all required servers ensuring that all required services are selected from all roles. As before, ensure the services are set to start after install - the SSM(s) will handle the required stopping/starting of services to match up with the prescribed role configuration.
To assign a role to a specific server, add Role_Preference entries to the role template. For example:
<Role_Preference>
    <role_id>Interface</role_id>
    <machine_id>server1</machine_id>
</Role_Preference>
<Role_Preference>
    <role_id>DSE</role_id>
    <machine_id>server2</machine_id>
</Role_Preference>
Note
Service resiliency is handled by the Scheduling Service Manager (SSM) service which must therefore be installed. A SIM will also need to be installed to allow the role configuration data to be sent into the system.
Note
The parameters "RoleBasedDeployment" and "MonitorServiceResilience" tell the SSM that you are using a role-based setup for your machines and also indicates that the SSM should stop/start services and monitor drop-outs for the services in the deployment, therefore they must be set to True for the service resiliency functionality to work.
Note
The role configuration can be modified by sending Role data into the scheduling system (as described above). Should you wish to "switch off" a service on a particular role you must mark it with active=false in the revised data.
Warning
Please note that the Scheduling Data Adaptor service does not work with the resiliency functionality.
Configuring retry handling on database connections
From time to time, transient faults may occur for database connections. For example, in a high throughput system there may be a small chance of concurrent data access resulting in a deadlock. Moreover, an occasional loss in database connectivity may cause a connection to fail. In such cases it is desirable to include retry handling for database connections. This can be easily configured by adding options to the connection strings - this can be done via the install process when using the IFS Scheduling Installer. The available options are:
- DelayType: one of fixed, incremental, or exponential, which are set by adding "DelayType=fix", "DelayType=inc", or "DelayType=exp" to the connection string, respectively.
- Delay: specifies the delay between retries (in seconds). If not specified, the default value is 1. For use with the fixed delay type only.
- InitialDelay: specifies the initial delay (in seconds). If not specified, the default value is 1. For use with the incremental delay type only.
- DelayIncrement: specifies the incremental increase in delay on each retry (in seconds). If not specified, the default value is 1. For use with the incremental delay type only.
- DeltaBackoff: specifies the magnitude of the delay for a retry strategy with exponentially increasing delay (in seconds). The actual value used is a random value between 0.8-1.2 times DeltaBackoff. If not specified, the default value is 10. For use with the exponential delay type only.
- MinBackoff: specifies the minimum value for the backoff retry time in the exponential retry strategy (in seconds). If not specified, the default value is 1. For use with the exponential delay type only.
- MaxBackoff: specifies the maximum value for the backoff retry time in the exponential retry strategy (in seconds). If not specified, the default value is 30. For use with the exponential delay type only.
- Retry: the maximum number of retries. If not specified, the default value is 2.
An example connection string for SQL Server including retry handling would be:
data source=SERVERNAME;initial catalog=DATABASE;user id=USER;
        password=PASSWORD;Retry=20;DelayType=fix;Delay=5
Likewise, an example connection string for Oracle including retry handling would be:
data source=SERVERNAME:PORT/DATABASE;user id=USERNAME;password=PASSWORD;
        Retry=20;DelayType=inc;InitialDelay=5;DelayIncrement=2
Note
Additional options on a connection string should be semi-colon-separated. Note also that the retry handling options are specific to PSO and are not general connection string options, therefore they should be removed from the connection string when not using PSO.
Updating an installation
From time-to-time you may be required to upgrade an existing software installation to a newer version. The tasks necessary for a software/database update can be performed using the IFS PSO Installer. A detailed description of the different flavors of software update can be found in the "Updating and Upgrading" section in this guide.
The first step is to start the IFS PSO Installer within the release folder of the software version that you are upgrading to. Once the IFS PSO Installer is running, simply follow the same steps as a standard installation (described earlier in this section).
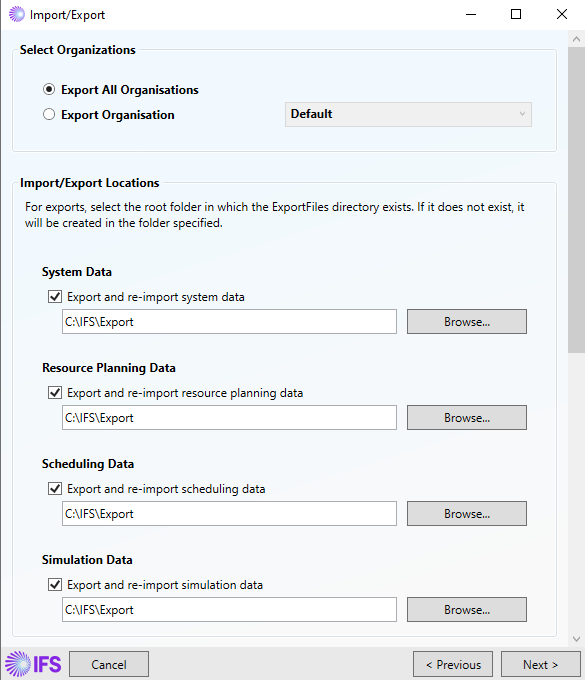
The Import/Export page allows data to be exported prior to running install actions. The following data can be exported: Resource Planning, Scheduling and System data.
Note
It is recommended that a database snapshot / backup is taken before the update. This is to avoid potential data loss in the event of issues with the install. The Import/Export option can be selected in order to avoid data loss for some data but not all data from the system is exported (e.g. Archive data).
Note
In the case of a failed update you can rollback an installation. You can find more information in the "Rollback Process" section in this guide.
The snapshot below shows an example of the Actions screen when updating an installation:
Note
The IFS PSO Installer will detect any existing software components and database connections. Based on the version of the existing databases, the IFS PSO Installer will determine which actions to perform (e.g. forced create, update, or upgrade). The Modules and Databases pages in the installer will be pre-populated with existing software and database connections details, respectively.
Removing an installation
To remove an IFS PSO installation, run the IFS PSO Installer and, on the start page, select the "Uninstall" option and then proceed to the Actions page where you can click "Start" to uninstall the software.
Configuring HTTPS for the Gateway Service
To configure HTTPS for an on-premises PSO installation requires any web-facing applications to be configured for HTTPS. This includes the Workbench as it is hosted in IIS and the Scheduling Gateway Service (GWY). For an on-premises deployment it may suffice to use a self-signed certificate, which can be generated in IIS. Alternatively, you may possess an SSL certificate which authenticates the url that you wish to deploy against.
To setup HTTPS requires the following general steps - note that if you are not using the GWY then you only need to consider the first step:
- Configure HTTPS in IIS using the chosen certificate. Note that this may be a self-signed certificate or your own SSL certificate. This will cover port 443 for HTTPS.
- Set the TransportProtocol parameter for the Gateway service to BINDING_WS_HTTP
The GWY uses port 8744, therefore we must also add a HTTPS binding for that port using the certificate. The following PowerShell commands will do this:
$thumbprint = <your certificate thumbprint>
            $guid = [guid]::NewGuid().ToString("B")
            netsh http add sslcert ipport="0.0.0.0:8744" certhash=$thumbprint certstorename=MY appid="$guid"
Finally, restart the GWY service so that the HTTPS configuration is picked up.
Testing a Standard Deployment
After the installer has completed the installation, it is important to perform a number of initial "smoke tests" to establish whether the deployment was successful and that the scheduling system is working as intended.
Firstly, access the scheduling UI and login to the administrative user account. This will confirm that login is possible, that the UI client-server communications are functioning correctly, and that the server-side of the UI is correctly connected to the database.
PSO Workbench URL
http(s)://localhost/IFSPSOWorkbench/
The RESTful Gateway on an IIS deployment is available by default at:
http(s)://localhost/IFSSchedulingRESTfulGateway/
Once logged on to the Scheduling Workbench locate the Administration Workspace and select to view the Events. This provides a real time event log from each of the services, showing error, fatal, information and warning events. From here any errors will be reported, for example if a service is unable to connect to a database.
Go to Applications and make sure that the system contains all the required services and that there are no critical errors. The next process is to send in the scheduling input data. The SmokeTest.xml (you will find this file in 'Verification Files' folder) file can be placed into the IFS PSO input folder (normally C:\IFS\Scheduling\Input).
It is expected that the DSE will process the data and produce a plan that will be displayed on the Scheduling Workbench.
To view the schedule, navigate to the Scheduling workspace. Once the DSE has produced a plan it will be displayed on the Gantt chart. If a plan has been generated, then the system has passed the smoke test. Furthermore, viewing the Events within the Administration Workspace should verify that the scheduling input data was received and processed.
Configuring a proxy
The services may need access to external services such as the open ID authority or real time travel data. If a proxy is needed for this it can be configured by setting machine level environmental variables to the proxy address. The variable HTTP_PROXY is used for HTTP requests and HTTPS_PROXY for HTTPS requests. The variable must be set to the HTTP address of the proxy e.g. 'http://my-proxy:8888'. For more information on the environmental variables used see https://docs.microsoft.com/en-us/dotnet/api/system.net.http.httpclient.defaultproxy?view=netcore-3.1
The services need to be able to communicate with each other and often this will not work when all traffic is sent via a proxy. To stop traffic between services going via the proxy the NO_PROXY environmental variable can be set. This is a comma separated list of machines names that the services run on and must also include 127.0.0.1. For example 'MACHINE_A,MACHINE_B,127.0.0.1' would allow communication between two machines (MACHINE_A and MACHINE_B).
Once the variables have been set the services must be restarted to pick up the proxy configuration. For IIS it must be restarted by running 'iisreset /restart' at an elevated command prompt.
If the WCF Gateway is in use it must also be configured separately by altering the 'Scheduling Gateway.exe.config' file in the Scheduling Gateway's installation folder.
<system.net>
  <defaultProxy>
    <proxy usesystemdefault="True" proxyaddress="http://my-proxy " bypassonlocal="True"/>
    <bypasslist>
      <add address="MACHINE_A"/>
      <add address="MACHINE_B"/>
    </bypasslist>
  </defaultProxy>
</system.net>
http://my-proxy should be replaced with the proxy and all the machine names added to the bypasslist.
This must go within the top level