Advanced Resource Planning
The basic instructions on how to plan resources into the rota and generate shifts for them can be found in the PSO Workbench User Guide. This section details some of the more advanced concepts that can be used when planning a rota.
Planning With Rules
Rules can be used to ensure that the planned rota obeys working time directives and agreed limitations on working hours.
Shift Based Rules
There are six types of rule that can be applied, in three different categories: working hours, rest periods, and breaks. These are designed so that rules can be set up to match standard working time directive rules, but can also be customised to any business level or individual resource level or resource shift level agreements.
- Limit the total time spent working over a given reference period. For example, a resource can only work at most 168 hours in a 4 week period, or perhaps at most 40 hours in a 1 week period.
- Limit the maximum length of each shift. For example, no shift can be more than 12 hours.
- Check that work carried out between the hours specified does not exceed the maximum amount. For example, this can be used to ensure that no resource works all through the night.
- Ensure that shifts include at least the minimum required time in breaks. For example, each resource must be allowed a 1 hour lunch break. This can also depend on the length of the shift.
- Limit how soon a shift can start after the end of the previous shift. For example, this could be used to ensure that a resource has at least 12 hours 'off shift' before their next shift starts.
- Ensure a minimum rest period occurs at least the minimum amount over the reference period. For example, each resource must have at least one 48 hour period off shift in any 10 day period.
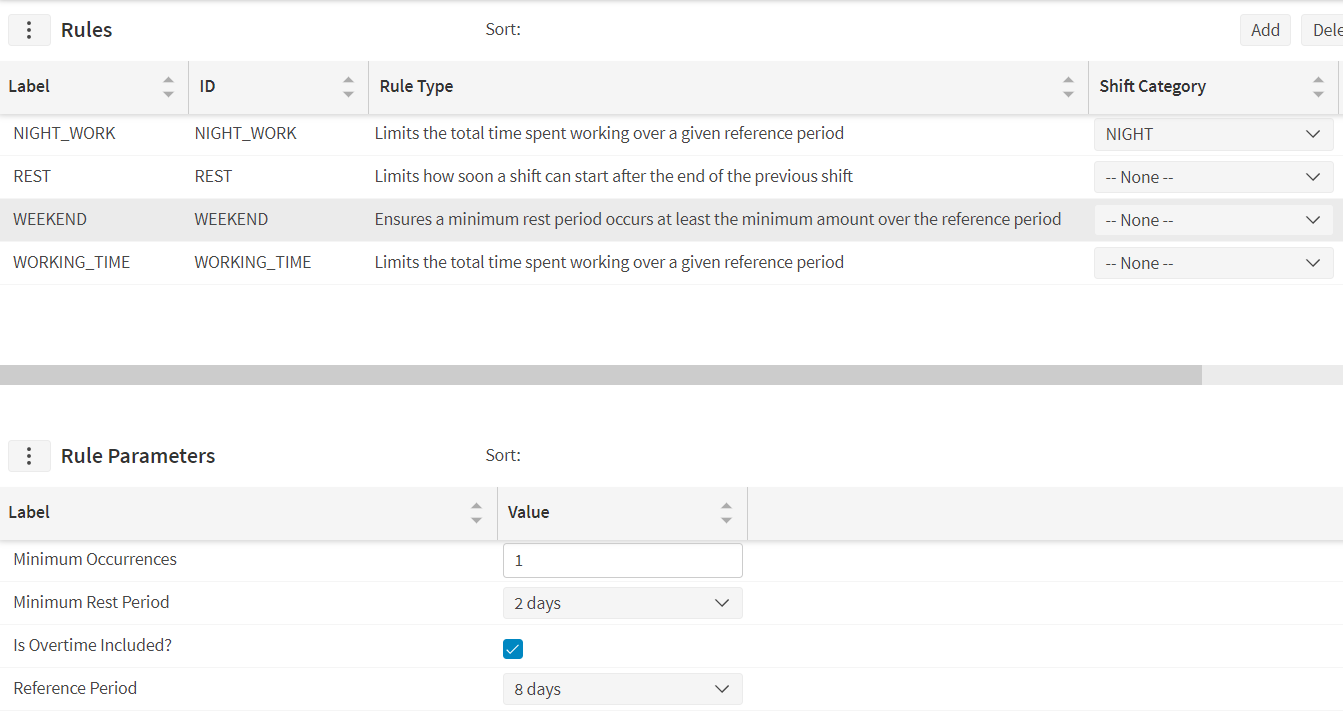
Rules can optionally be linked to a shift category, in which case only shifts of the specified category would be considered when applying the rule. In the example above, a 'NIGHT_WORK' rule has been set up which prevents a resource from being on too many night shifts. This relies on any shift template for night shifts using the 'NIGHT' shift category.
Membership Based Rules
Rules can also be linked to membership categories. Membership categories are especially useful when a resource is expected to stay away from home while working. In this situation there will be limits on how long the resource should be away from home for, and this is independent from the shifts that they are working during this period.
There are two rules that apply specifically to membership categories:
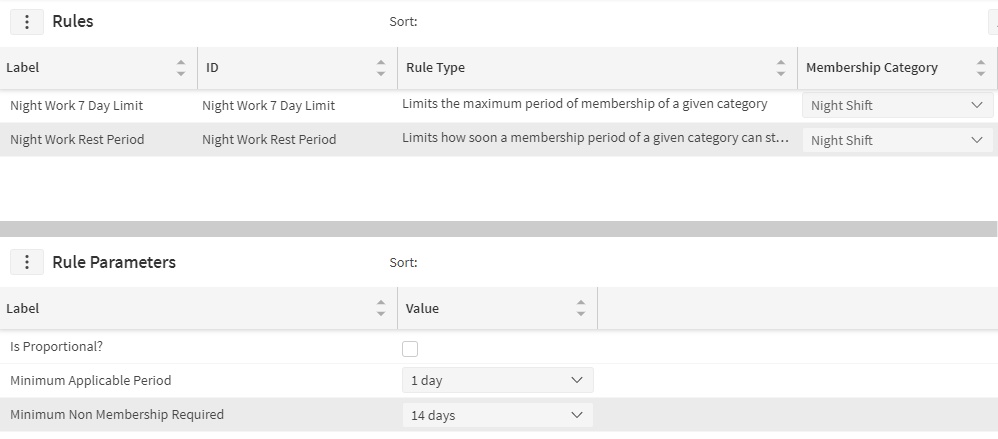
- Limit the maximum period of membership of a given category. For example, a resource can only work continuously away from home for at most 2 weeks.
- Limit how soon a membership period of a given category can start after the previous period. For example, once a resource has returned home they should not need to leave again for at least 2 weeks. This can be dependent on the length of the previous membership category period.
In the example below two rules have been set up, one to limit the amount of continuous 'night shift' membership to 7 days, and the other to require at least 2 weeks between any two periods of night shift membership.
Linking Rules to Resources
In order for rules to be applied, they need to be linked to resources. The simplest way to do this is to set the rule as 'global'. Alternatively, it is possible to configure which rules should apply to which resources through the use of rule collections.
A resource can be linked to a rule collection either directly or via the resource type. Note that a resource is only ever linked to a single rule collection, so a rule collection assigned to a resource will override the rule collection assigned to the resource type. Only the rules included in the assigned rule collection will apply to the resource.
Furthermore, rules can also be linked to resource shift via the rota item, shift template or shift template item. Any rules defined at shift level will override a rule defined at resource level for matching rule types. Non matching rules defined at both resource and shift level are merged together for validations.
The following rules cannot be defined at a shift level:
- REST2: Ensures a minimum rest period occurs at least the minimum amount over the reference period
- WORKING_TIME: Limits the total time spent working over a given reference period
Note
The rules are taken in order of precedence: shift, then resource, then resource type.
Rule Validation
Rules are automatically validated each time a change is made to the rota. This is based on both the rota period currently being edited, and the master rota for the periods either side of this.
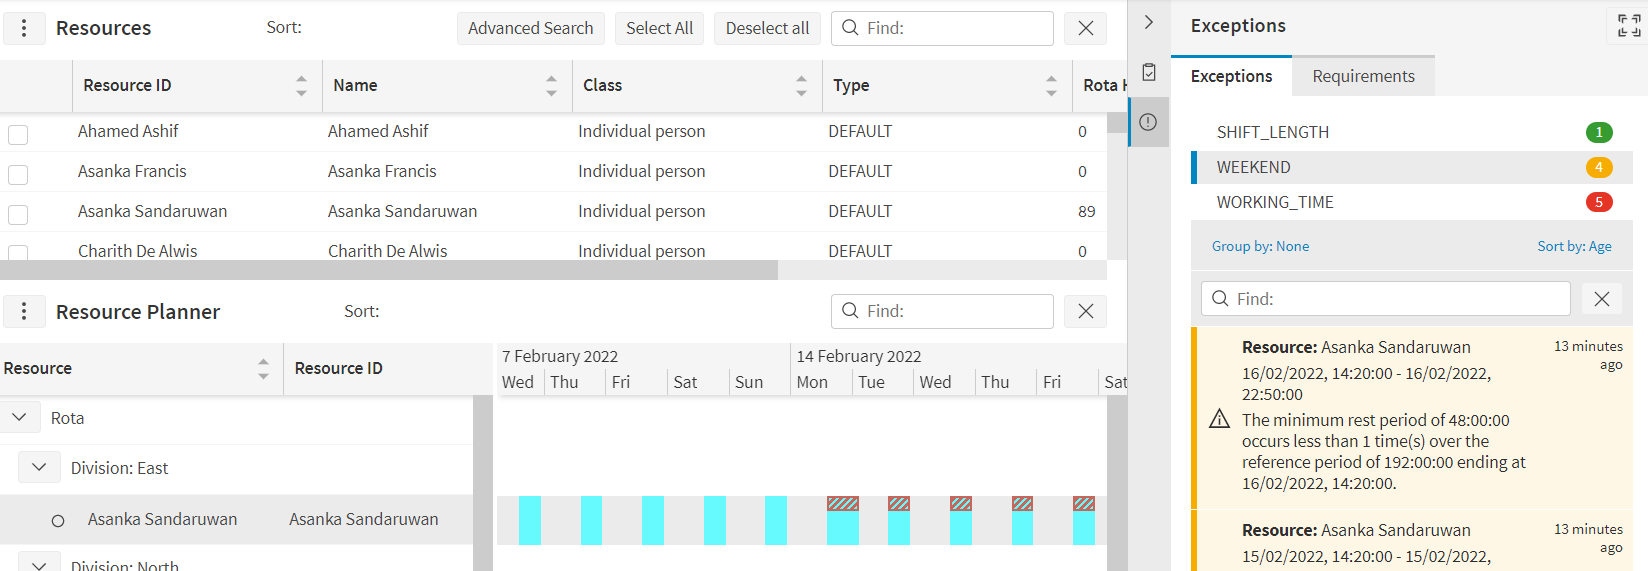
Rules are always validated on a rolling basis. For example, a rule that a resource should not work more than 48 hours in a 7 day period would be broken if the working hours exceeded the 48 hour limit in any 7 day period. This could include a period from 8am on a Monday morning until 8am the Monday after. The exception is always logged against the shift that resulted in the rule being broken.
When a rule is broken, this will be signified on the rota planner Gantt and also in the rota exceptions panel.
Planning With Requirements
Requirements are used to ensure that the correct blend of skilled resources is on shift in the rota at any given time. This is most useful where resources do not work set shift patterns, but instead work a combination of different shifts starting at different times of day (including night shifts), and/or on different days of the week (including weekend work).
Note
Requirements can also be useful for regular shift planning to ensure that there is enough cover when resources are unavailable due to illness or vacation.
There are three basic concepts that underpin the new functionality: roles, positions and requirements.
Roles
A role is simply a combination of skills, and a resource is considered to satisfy a role is they possess all of the required skills. This could include multiple skills, qualifications and/or certifications.

Resources are not linked to roles directly. Instead, the system will determine automatically whether a resource fulfils a role, based on the skills attributed to the resource. The roles fulfilled by the resource are shown on the resource screen, and the 'Role Details' panel can be used to see a breakdown of how close a resource is to fully satisfying each role.
Note
Since resource skills can expire or have limited availability, so too the resource may only satisfy a role for a limited period of time. A colour coded 'alert status' is used to highlight this:
- Green implies that the resource fully satisfies the role always.
- Amber implies that the resource fully satisfies the role for some but not all of the time.
- Red implies that the resource never fully satisfies the role.
The role satisfaction percentage is based on the percentage of the required skills which the resource possesses. This will also reflect where the resource only possesses the skill for a limited time. For example, if a role required 2 skills, and the resource possessed the first always, but the second for only the first 6 months of a 1 year period, the resulting satisfaction would be 75%.
Note
Usually, it would be expected that a resource would need to possess all the skills linked to the role in order to satisfy the role. However, it is also possible to define 'any skill' roles, where the resource needs only to possess at least one of the linked skills.
Positions
Positions allow planners to specify that a resource is working in a given position when they are planned into the rota.
Resources can be attributed a default position to aid with searching for appropriate resources to fill a position. However, since the assigning of a resource to a position in the rota is a planning exercise, there is no obligation for a resource to be attributed the position they are assigned to.
It is still possible to limit which resources can work in a position, but this is achieved via roles. Each position can optionally be linked to a role, and this enforces that any resources assigned to work in the position must satisfy the required role.
This highlights the difference between positions and roles: positions are an organisational concept that planners must explicitly plan resources into, while roles are a validatory concept that the system will automatically verify.

Requirements
Requirements are used to specify how many resources are needed at any given time in the rota. Requirements can be set globally, or against divisions or teams (See 'Planning With Teams').
Each requirement can be made up of multiple sub-requirements for a specific position or role, and over a specified time period. In each case, different alert levels can be associated depending on the number of resources either satisfying the role, or planned into the position.
For example, suppose that there should ideally be two plumbers working each weekend, though if necessary it may be ok with only one. This is represented in the role requirement below.

- The required role is 'Plumber'.
- The time period is set to a repeating pattern from 9am to 5pm each Saturday and Sunday.
- If there are no plumbing resources working at this time the requirement alert level will be 'Error'.
- If there is only one plumbing resource working at this time the requirement alert level will be 'Warning'.
- If there are two or more plumbing resources working at this time the requirement alert level will be 'Ok'.
This could be expanded to include resources satisfying different roles, and covering different periods of the day and/or days of the week. Expanding on the above example, suppose we have the following role requirements:
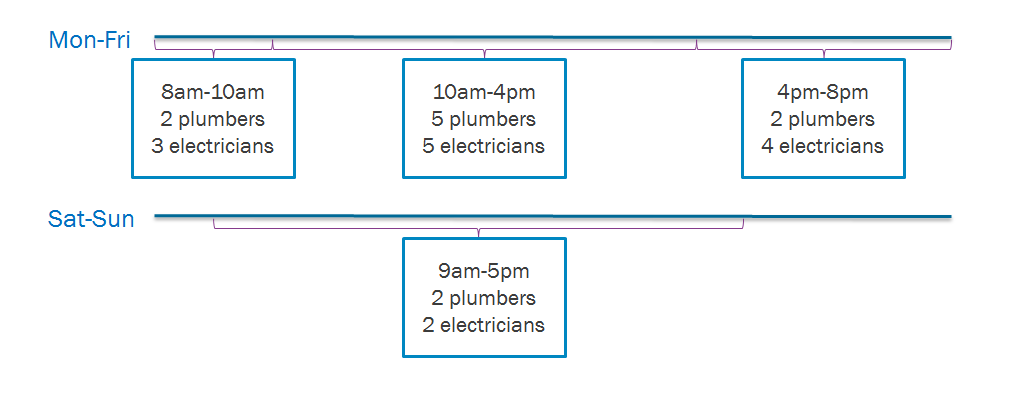
We can also include position requirements, so let's also assume that we require both a 'Leader' resource and a 'Deputy' resource, both of which need to be working during core hours.

Requirement Alerts
On the Resource Planner, alert bars will appear where requirements have been specified, to show the user whether requirements have or have not been met, based on the current rota. Each time the user updates the rota the alerts will be updated to reflect the change.
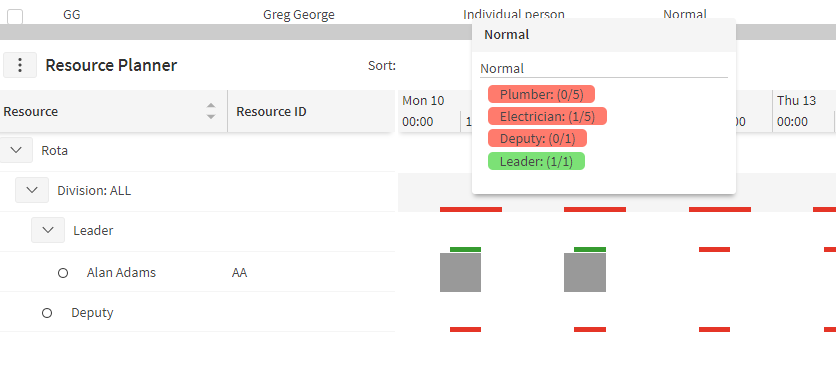
Note here that the position requirements are reflected in there being a row for each of the two required positions, which resource can then be planned into. Note also that Alan Adams now satisfies both the 'Leader' position requirement, and the 'Electrician' role requirement, for the time that he is planned into the rota.
Alerts are also displayed in an exceptions side panel.
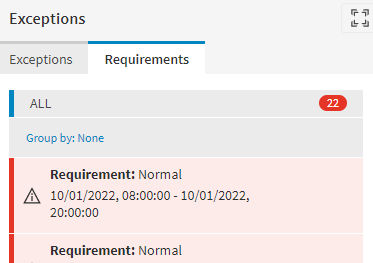
Note
There are several additional columns available in the resource search grid to help with planning against requirements. These are hidden by default but can be added by the user, or switched on by default by an administrator (via the 'Lists' screen). There are also various options to help with searching for an appropriate resource to plan into a position, or to fulfil a role requirement, including the 'Advanced Search' panel. See the PSO Workbench User Guide for further details.
Planning With Teams
Teams are groups of Resources who will work together. Shifts are planned for the team as a whole, rather than for the resources individually. Individual resources are planned as team members for set periods of time.
In this example, teams have been created that will travel together in a van:

Now we can select the team from the resource selector, add it into the planner, and create shifts for it:
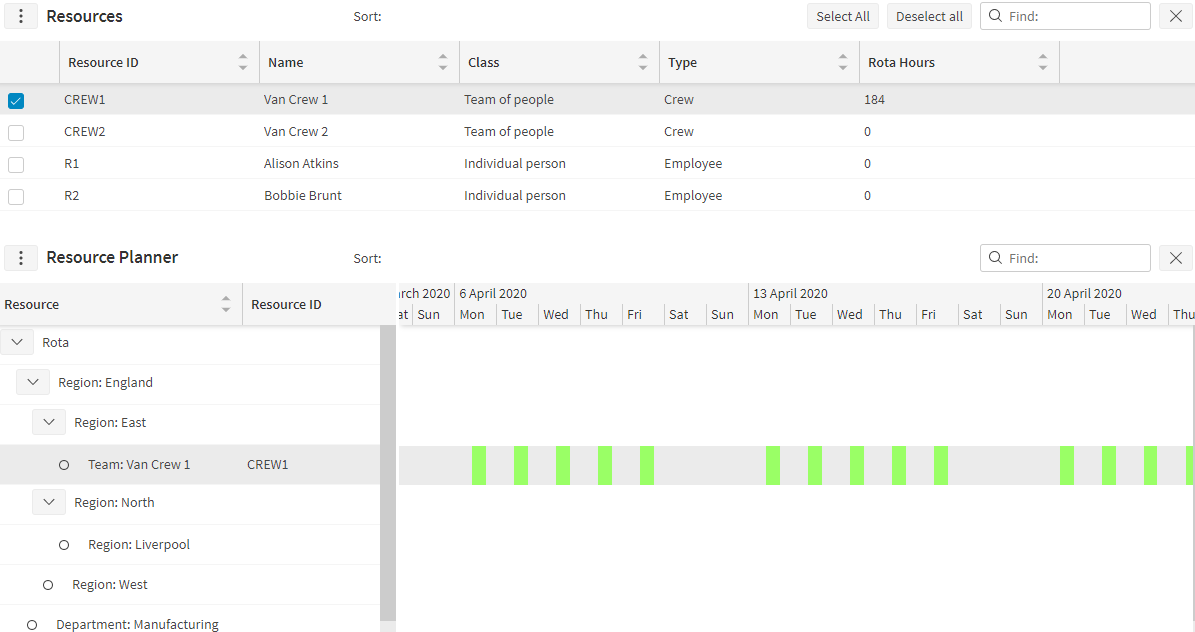
Now, because the Team has shifts, whenever we add a Resource to the Team, it will automatically inherit the shifts of the Team.
Let's add some resources to the team and the result is as follows:
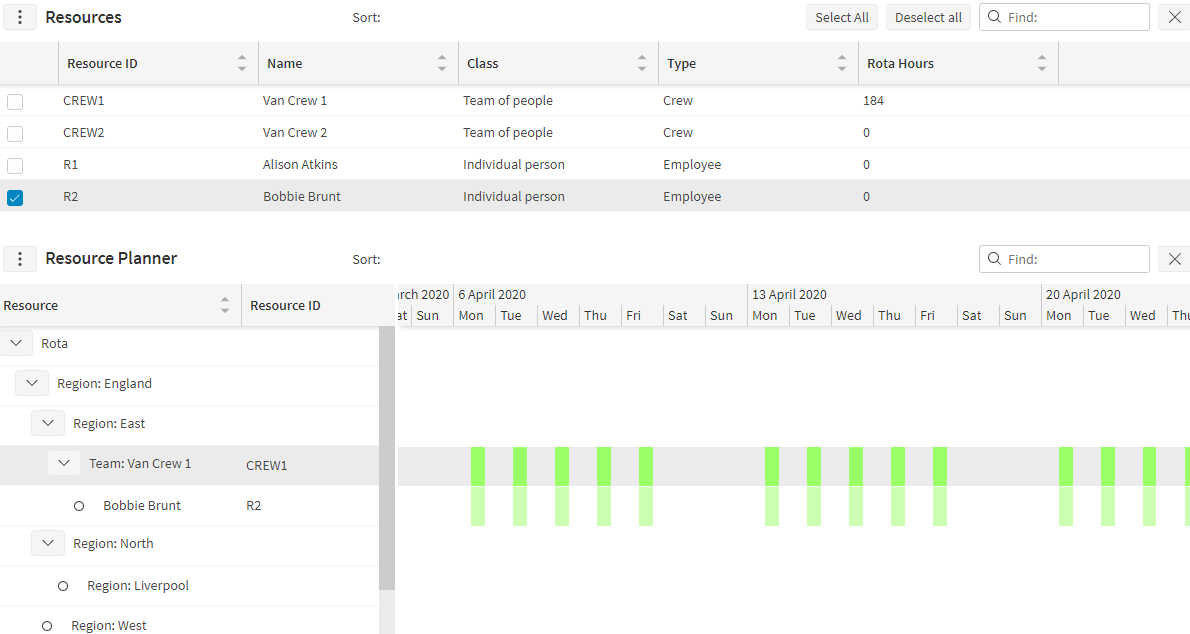
Membership in Teams
When a team is added to the rota, and shifts are generated against that team, this will create both the rota items (shifts) for the team, and also a period of rota membership for the team. This is in just the same way as when shifts are created against an individual resource.
For a resource being added to a team, the team membership is also indicated by a period of membership, this time for the resource within the team.
When a resource is first added to the team, it will be assumed that the resource has membership of the team whenever:
- The team has membership in the rota
- The resource does not have membership elsewhere in the rota (e.g. in a different team)
Note
This resource team membership can only occur where the team has membership in the rota. Thus if a resource is added to a team with no rota membership, the resource will also not have membership within the team at this stage.
Similarly, if shifts are generated for the team, each resource will automatically be given membership of the team during this period, provided they have not been planned elsewhere in the rota.
We can change the team membership of each resource in a team by first selecting the desired resource and pressing the specify membership period button from the dropdown, doing so will open the following panel:
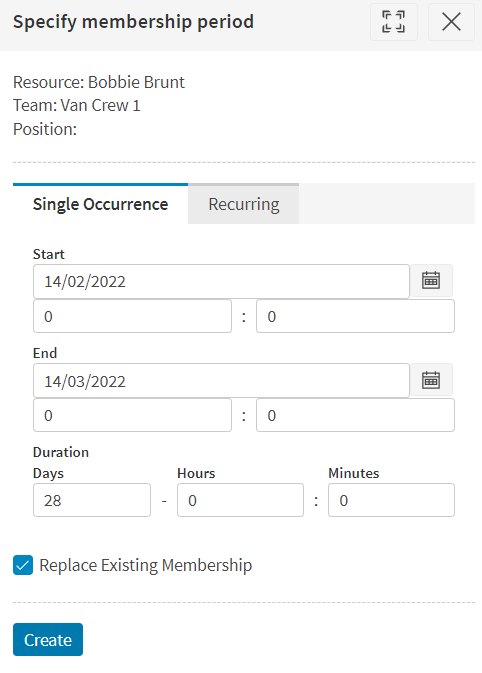
From here we can choose to add a one time membership period for the resource for a set amount of time or we can choose to add a recurring membership period for the resource. There is the option to either replace the existing membership of the resource in the team, or add to it.
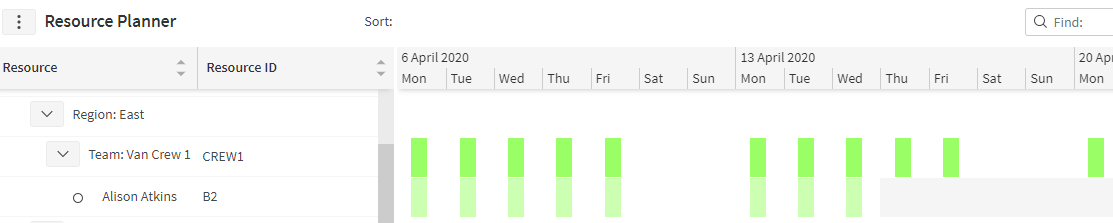
Note
When specifying team membership in this way, any membership of the resource elsewhere in the rota (e.g. in a different team) will be removed for the period specified.
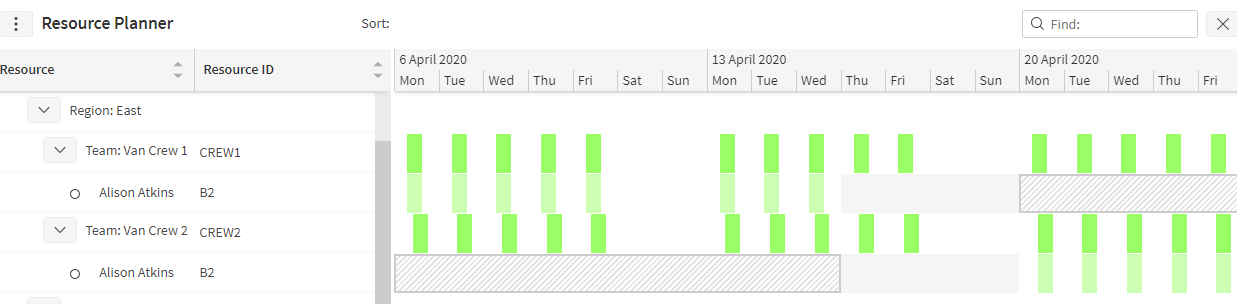
Integrating Teams With Scheduling
When integrated with the scheduling system, the Dynamic Scheduling Engine will schedule work for the team as a whole, rather than the individual resources within the team. On the Resources screen in the Workbench, the team structure will be copied over from the Resource Planner so the individual team members can still be viewed as usual.
One significant feature here is that the skills attributed to the team can be inherited from the skills of the individuals within the team. When defining a skill there is a 'Team Inheritable' flag; if this is set to true then the team will inherit the skill from any individuals within it.
The 'Team Proficiency Multiplier' allows the proficiency of the team in a skill to be increased when multiple resources within the team possess the skill.
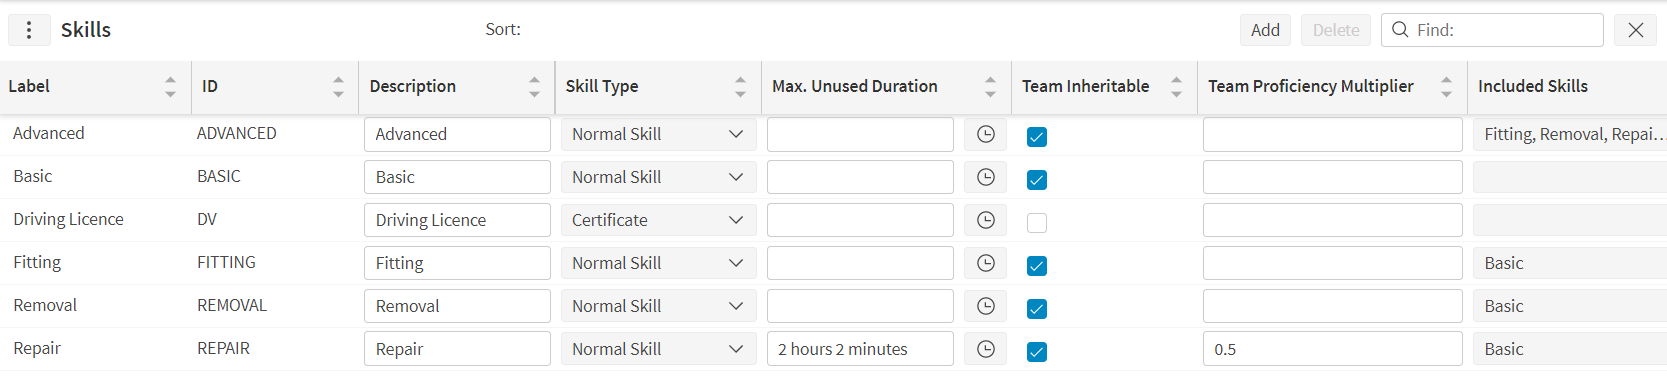
As an example of how the proficiency multiplier works, suppose that there are two resources within a team with the same skill. The first resource has this skill with proficiency 1, and the second resource possesses the same skill but with proficiency 0.8.
If no team proficiency multiplier is specified, or if the value is set to 0, then the team proficiency will equal that of the most proficient resource, which in this case would mean a proficiency of 1.
If the team proficiency multiplier is set to 1, then the team proficiency will be the sum of the individual resource proficiencies. In our example this would mean that the team proficiency would be 1.8.
Finally, any value between 0 and 1 can also be used. In this case the team proficiency would equal that of the most proficient resource, plus a proportion of the proficiencies of the other resources, as given by the multiplier. So in our example a value of 0.5 would mean that the team proficiency would be 1 + 0.5 * 0.8 = 1.4.
Team Requirements
Requirements can be linked to teams in a similar way to how they are linked to divisions. Simply define the requirement on the requirements screen and then link the team to the requirement on the teams screen. In this way it is possible to ensure that the correct combination of resources are present within the team at all times.
The requirements can be made up of both role requirements and position requirements. In the case of position requirements, the position rows will be displayed underneath the team row for resources to be planned into.
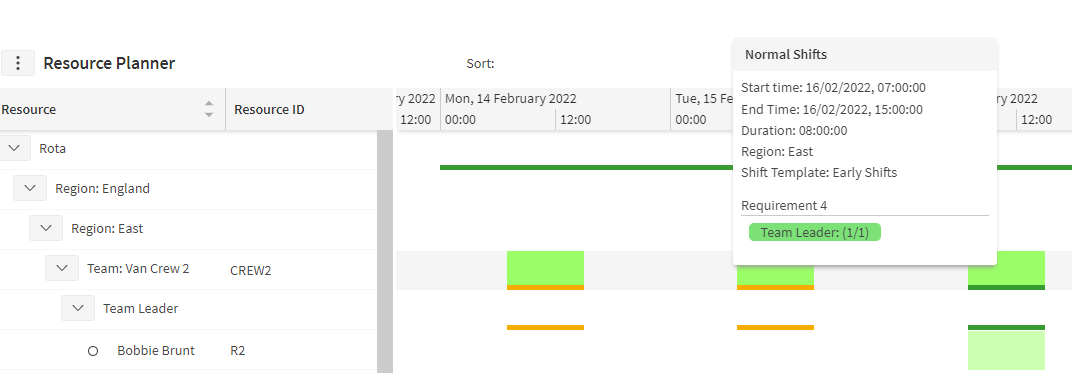
In the example below the team requires a team leader position. Resource Bobby Brunt has been assigned to this position from Wednesday onwards.
Note
Note that for team requirements, the requirements are only applied where the team resource has shifts. As such it is not usually necessary to restrict the requirement to only apply at certain times of day, as might be expected with division requirements.
Automated Rota Planning
When planning with many resources using multiple shift patterns and varying requirements, the task of planning the rota can become very complex. To help with this, the Dynamic Scheduling Engine can be used to automatically generate a rota.
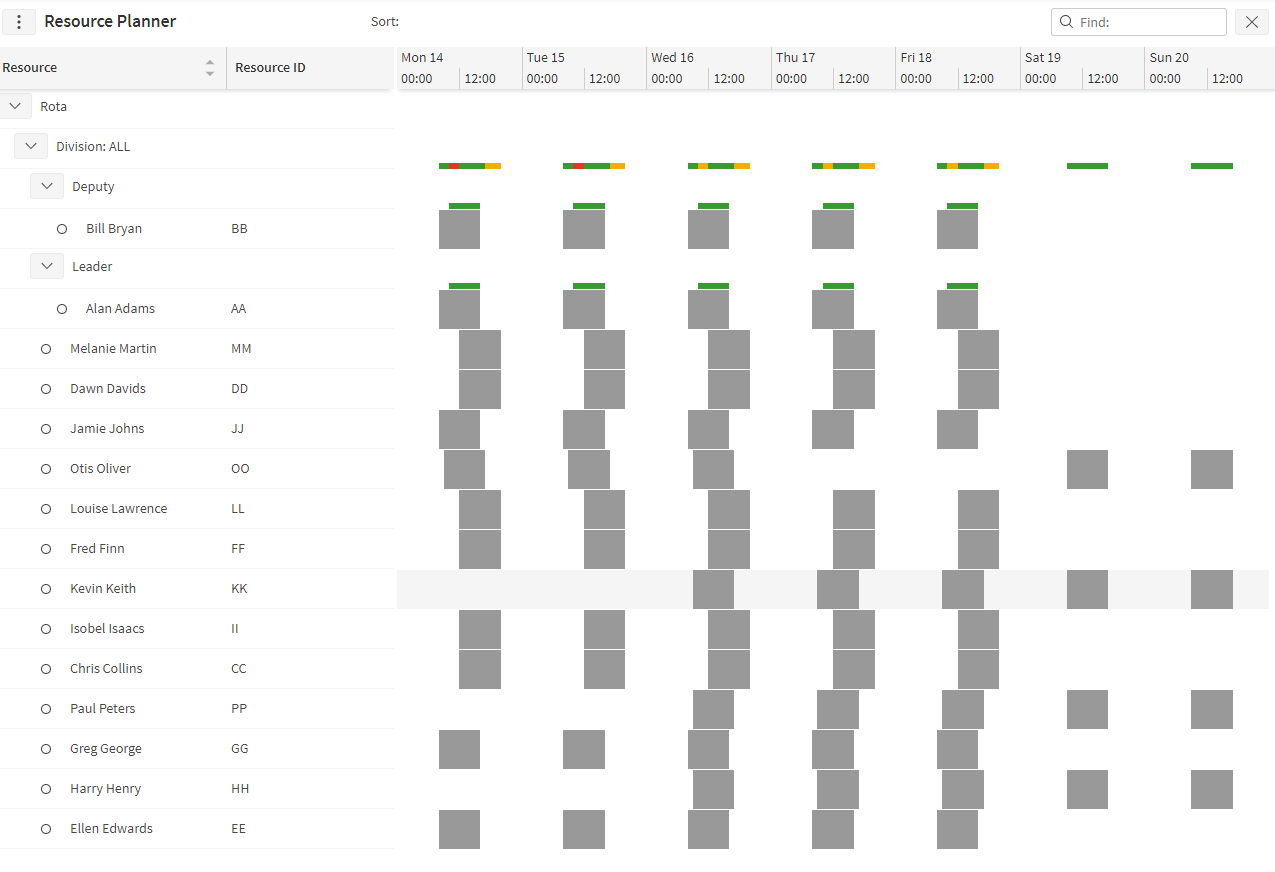
The example below shows an automatically generated rota with limited resources, meaning that it is not possible to fully satisfy all requirements. However, by planning resources to work different shift patterns, most requirements have been met at least up to the warning level.
Warning
It is not currently possible to use automated rota planning to plan against team requirements.
The Generation Process
To use this feature, the permission 'PlanningARPAutoGenerateRota' should be enabled for the user. The user will then see an 'Auto Generate' button on the rota selector panel. On clicking this button they will have the option to choose a maximum run time for generating the schedule, and an option to 'Finish Earlier if Possible'. After selecting appropriate values, the user clicks the 'Generate' button to trigger the auto-generation process.
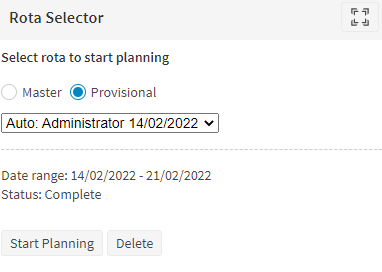
Automatically generated rotas are created as provisional rotas. This means that the resulting rota can be viewed by any other user, but the master rota is not yet updated. This allows a user to verify the results of the auto generated rota, make any adjustments they wish to make, and then apply the changes to the master rota when they are ready to.
While the provisional rota is generating, the provisional rota will show as 'Generating' and will not be viewable. Once generated, the rota can be viewed and edited in the same way as any other provisional rota. See the PSO Workbench guide for further details.
Setting Priorities
The Dynamic Scheduling Engine works by attempting to maximise a schedule score, and this applies when it is used for rota planning in the same way as it does for other scheduling problems.
The first part of this is to ensure that the rota is valid, and the DSE will apply the same validation rules as are applied when manually planning a rota. In particular:
- Resources can only work in divisions they are associated with.
- Resources can only work in a position if they satisfy the required role for the position.
- The shifts planned for a resource will always be according to a defined shift template. Furthermore, the resource will follow the shift template for its entire duration, except possibly at the start and end of the rota planning period.
- If resources are associated with a shift template set, then they can only work shift templates belonging to this set.
- Rota validation rules that are defined on the resource will be obeyed, for example to limit the total working hours of each resource. Any rota validation rules defined on the shift template or shift template item will not be applied when automated rota planning, though these will still be validated when rota is checked for rule exceptions.
Once it is established that the rota is valid, the DSE will score the rota based primarily on the requirements that have been set up. This is where the 'Unit Resource Value' on the incentives can be used to fine-tune the DSE behaviour.
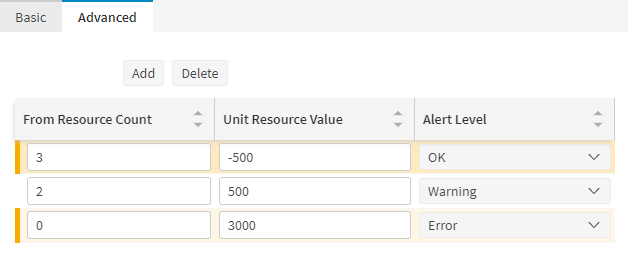
By default, an 'Error' requirement alert is given a unit value of 1000. This means that for each hour of individual resource time that satisfies the requirement, the schedule score will be increased by 1000. This will apply up until the next 'From Resource Count' level is hit, at which point the unit resource value associated with this new level will take effect.
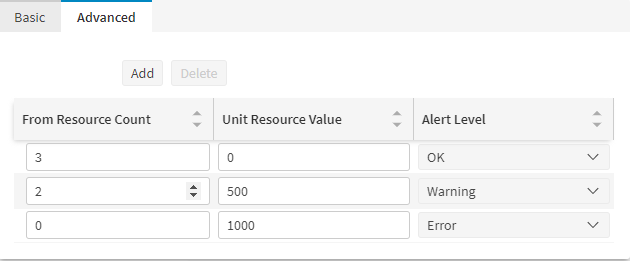
The example above uses the default values of 1000 for an error alert level, 500 for a warning alert level and 0 for the ok alert level. This means that if 3 resources were planned 8 hour shifts, each satisfying the requirement, the schedule score would increase by 20,000 (8 * 1,000 for each of the first two resources, and 8 * 500 for the third). Adding any further resources that satisfy the requirement would make no further improvement to the schedule score.
These values can all be adjusted by the user. For example, for a particularly important requirement, the unit resource value could be increased to 3,000. If the user wished to prevent any more than the required number of resource being scheduled then the 'OK' level unit resource value could be changed to a negative value.
It is also possible to encourage the automated rota generation process to limit the use of certain shift patterns, or to use some shift patterns in preference to others. There are three attributes that relate to this. The columns are all hidden by default, but can be enabled via the user column options, or enabled by default via the administration Lists page.
- Shift Templates -> Precedence. This relates to the basic value of using a shift template for a resource. When generating the rota, there is a small value associated with a resource being assigned shifts, which is equal to 1,000 per day multiplied by the precedence. Thus increasing the precedence of a shift template will increase the schedule score if that shift template is used, which makes it more likely to be used. A precedence value of 0 can also be used, which would mean that there is no intrinsic value in assigning resources to the shift template, but the template would still be used where necessary to fulfil requirements.
- Shift Templates -> Repeat Preference. This can be used to either encourage or discourage a shift template from being used multiple times. A value greater than one will encourage repeated use, while a value less than one will discourage repeats. One use for this might be to prevent a resource from being repeatedly on night shifts.
- Shift Template Set Items -> Preference. This allows for fine tuning of which resources are preferred for which shift templates. Shift template sets can be associated with a resource either directly or via the resource type. If a shift template set is associated with a resource then only the shift templates in the set can be applied to the resource. Furthermore, by setting the preference it is possible to prefer some templates in the set over others. The value should be between 0 and 1, with 0.5 being the default (no preference). A value of 0 would prevent the shift template from being used in automated rota generation, while if a value of 1 is used on any shift template, then only those templates with a value of 1 will be considered.