Administration - Organisation
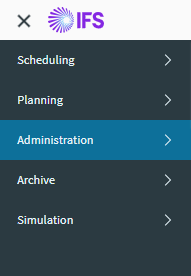
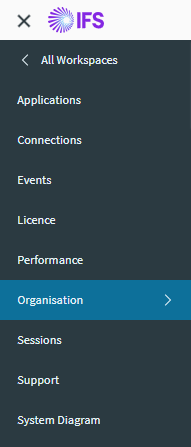
Organisation Management can be accessed from the Organisation tab in the Administration workspace.
Users defined as Administrators should be given permission to access the Administration workspace. The following section details the screens available to Administrators for managing organisations.
Note
Changes to data on these screens should be tried on a test system before alterations are made to a live environment.
Areas
See the Travel Time Profiles section for details on this screen.
Display Contexts
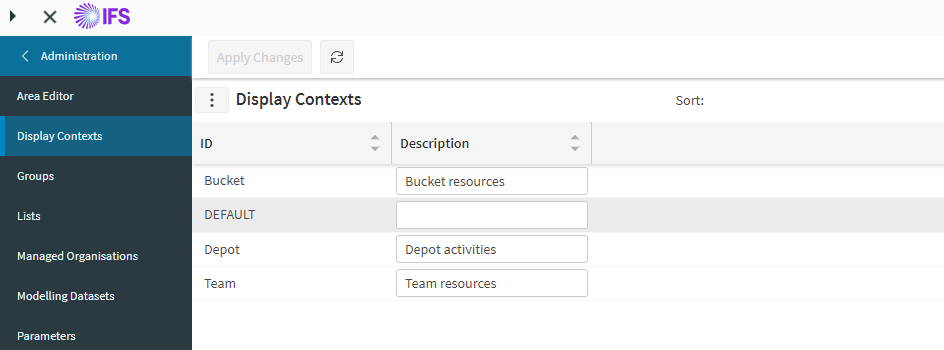
Display contexts are used to determine when a particular list type should be used. It is specified against the list on the Lists page and can also be set against a dataset. For use of the tooltip and itinerary lists, the display context can be set against the activity, activity type, resource or resource type.
Lists with a matching display context will be used, chosen from lists specified against the user's group, or from a matching display context in the default lists if there are none with a matching display context in the group. If no display contexts match, then the 'DEFAULT' display context will be used, with the appropriate list selected in the normal way.
Note
A list that is being used by a group will have no option to change the display context.
Groups
Users can be associated within a number of groups or roles. Each group can have its own permission defined and lists defined. Activities and resources can also be mapped to groups via the scheduling input data. This enables users to be given selective data access based upon functionality and the type of data being viewed.
Note
Groups must be defined here before the interface can associate an activity or resource. In order to associate activities or resources to groups see the Scheduling Schema entity Object Group.
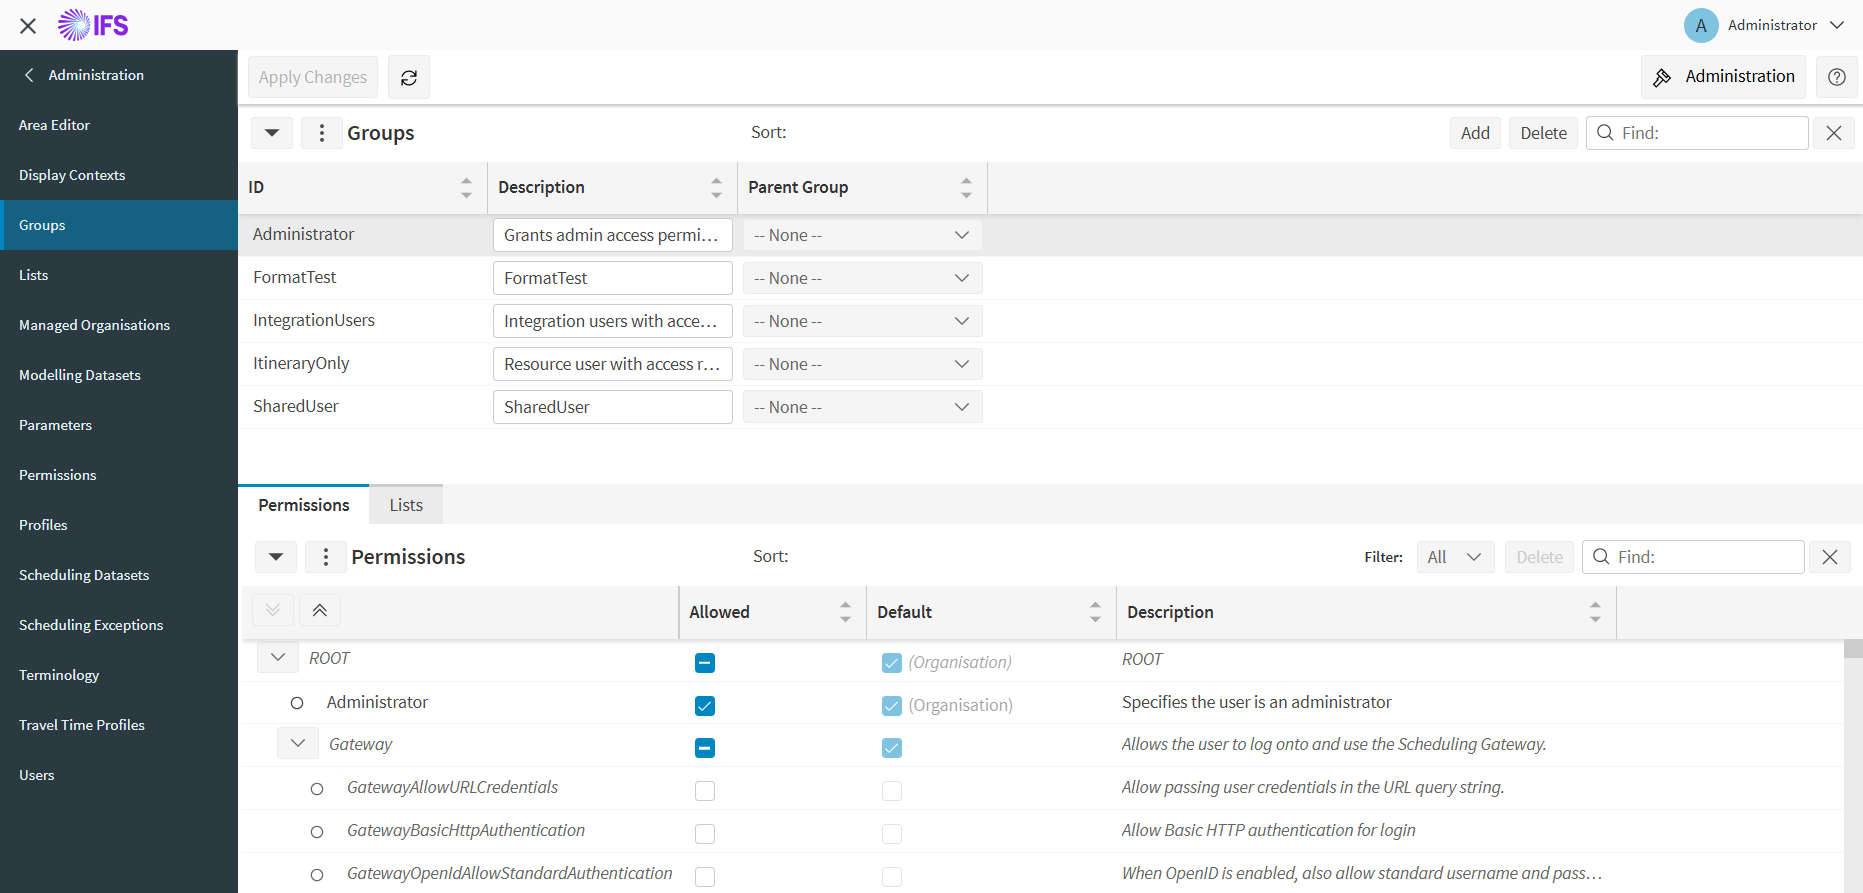
Once a group is created users can then be assigned to it from the 'Users' child grid.
The permissions for the group can be altered by overriding each value. See the Permissions screen for more information.
A list can be specified for each list type which will then be used by users within the group. See the Lists screen for more information.
Lists
The Lists screen is used to define columns, tooltips, detail lists and user selectable lists such as manual change reasons. A list contains entries which each have a label and a value. The label is used to describe the data to the user and the value is used to specify where the data should come from. The possible values for the list entries are listed in the Data Fields section of the Administration Guide.
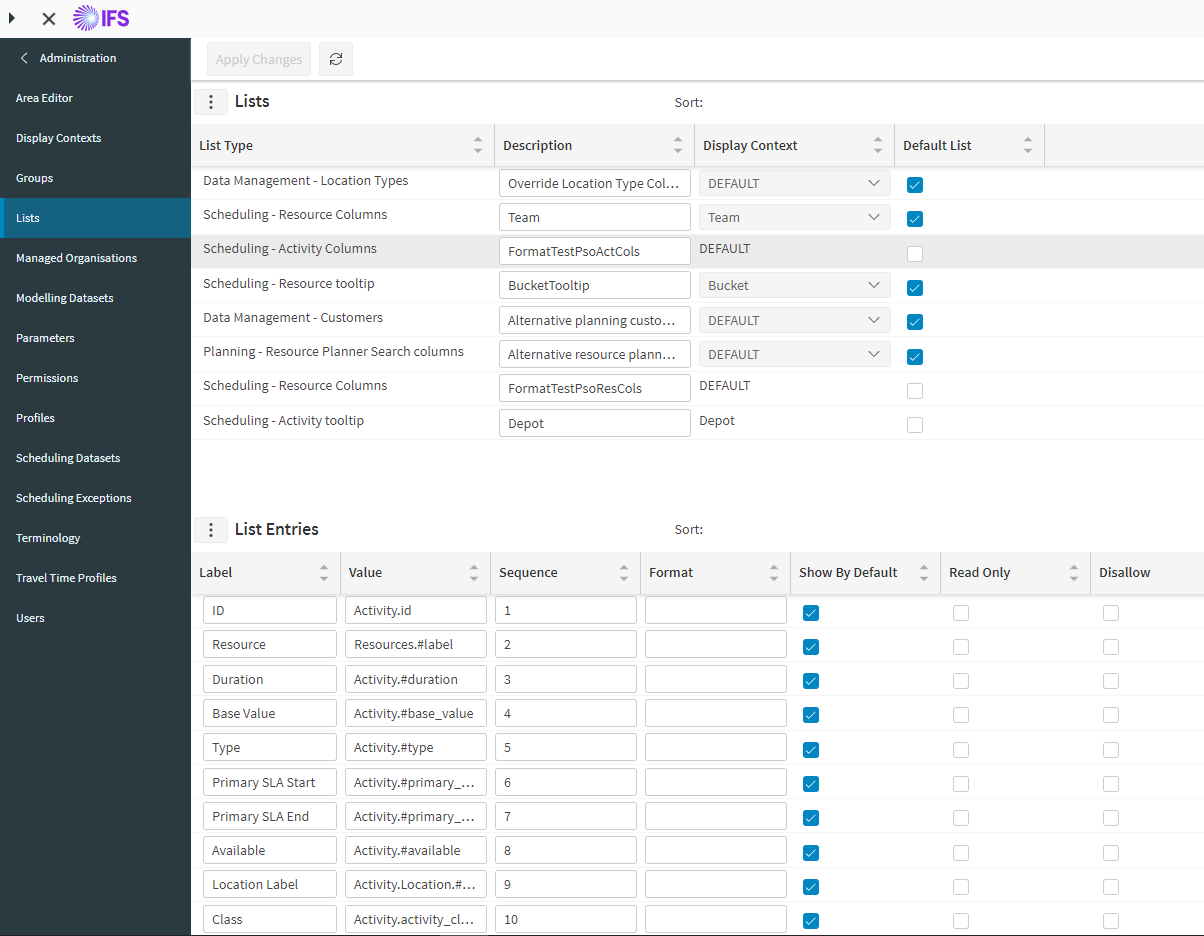
Create a new list by selecting a list type and providing a description. The default entries for this list type will then be automatically placed in the List Entries section. If the Default List column is checked this list will be used for users that do not have a list specified for the list type within any of their groups.
The order in which the list entries will appear is determined by the Sequence column. This can often be overridden by the user by selecting the column and dragging it to the position it is required on the header line or by altering the order in the Workbench options dialog.
The Format column is used to specify how numbers should be formatted when displayed. See the Microsoft documentation on Numeric Format Strings for more information.
http://msdn.microsoft.com/en-us/library/dwhawy9k(v=vs.95).aspx
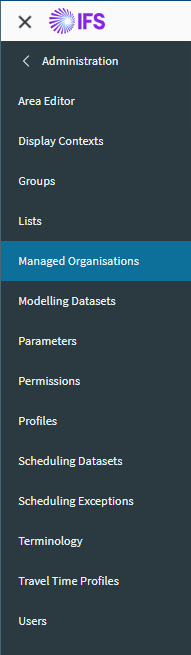
Managed Organisations
The managed organisations screen allows additional organisations to be set up within the scheduling system. These organisations will be child organisations of the user's current organisation, so the user is able to manage them and restrict certain permissions as required.
This is primarily intended for a publicly hosted system, where multiple customers are using the same scheduling system. By creating separate organisations for each customer, the customers are kept entirely separate with no crossover with other customers using the system. All users, profiles, etc. will be specific to that customer.
Furthermore, access to any system level data (such as applications and event logs) can be restricted.
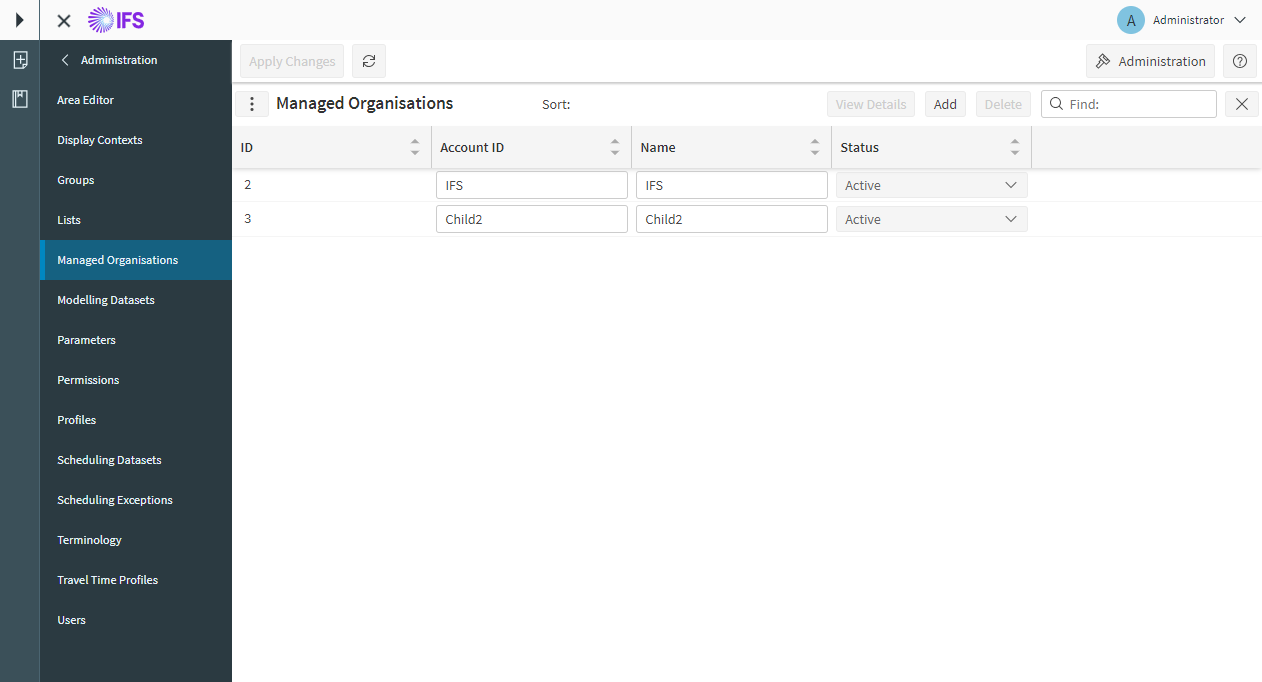
To create a new organisation, specify the id (only if the permission AdminSubOrganisationsIdEntry is set to true, otherwise this is not necessary - see note below), account id, and name in the top part of the screen, then set the status to 'Active'.
Note
If the permission AdminSubOrganisationsIdEntry is set to false, the SWB will automatically set the organisation id when creating the new organisation. In principle, a managed organisation need not know the organisation id to operate as calls to the Scheduling Gateway Service can be made via the Account ID.
Note
Both the organisation id and account id must be unique across the system. The head organisation has id 1 and account id 'Default'.
Note
When an organisation is created a default profile is also created for the organisation, and certain permissions are disabled. See below for the permission details.
Note
Allowing a permission from this page does not automatically grant the child organisation the permission. The permission would be set to the default, but an administrator for the child organisation would now have permission to alter it.
To delete an organisation, select the row and click on the 'Delete' button. Deleting an organisation will set the status to 'deleting', but the actual deletion will be handled by the Scheduling Administration Service. Since the deletion of an organisation cannot be undone, the user will be asked to confirm the deletion by entering the organisation account id. This is to prevent accidental deletion of an organisation. Click on the button 'Apply Changes' to save the deletion or 'Reject Changes' if you do not wish to delete the organisation.
Note
Once the organisation is marked for deletion, it will no longer be displayed on the screen and the organisation account id will be freed up for use.
The button 'View Details' gets enabled when an organisation is selected and it will redirect to a new screen. In here, it is possible to add users to the organisation, assign groups to those users, restrict permissions, and manage the scheduling and modelling datasets associated with the organisation.
Users
Only users directly associated with an organisation are able to log into that organisation. To create users for the organisation simply enter the details in the 'Users' sub-grid.
To create a user for the organisation, click the 'Add' button and enter the details in the 'Users' sub-grid. To give this user Administrator rights select 'Administrator' from 'Group' selection dropdown. This creates a user with access to the Administration workspace, plus other default administration permissions. On login the user will be forced to change the password set here.
Note
Note that Common usernames such as 'Administrator' are easy to guess and should be avoided.
Note
Users can be assigned to multiple groups if required. If the user is assigned to multiple groups, permissions are applied in the following order of precedence. If a permission is explicitly revoked in a group, it takes the highest precedence and it would disable the permission for the user. If this is not the case, and instead the permission is explicitly granted in any group, this takes precedence and the user would be granted the permission. If the permission is not explicitly revoked/granted in any user groups, then the organisation permissions are checked. If the permission is not set at organisation level, the default value for the permission will be applied.

Permissions
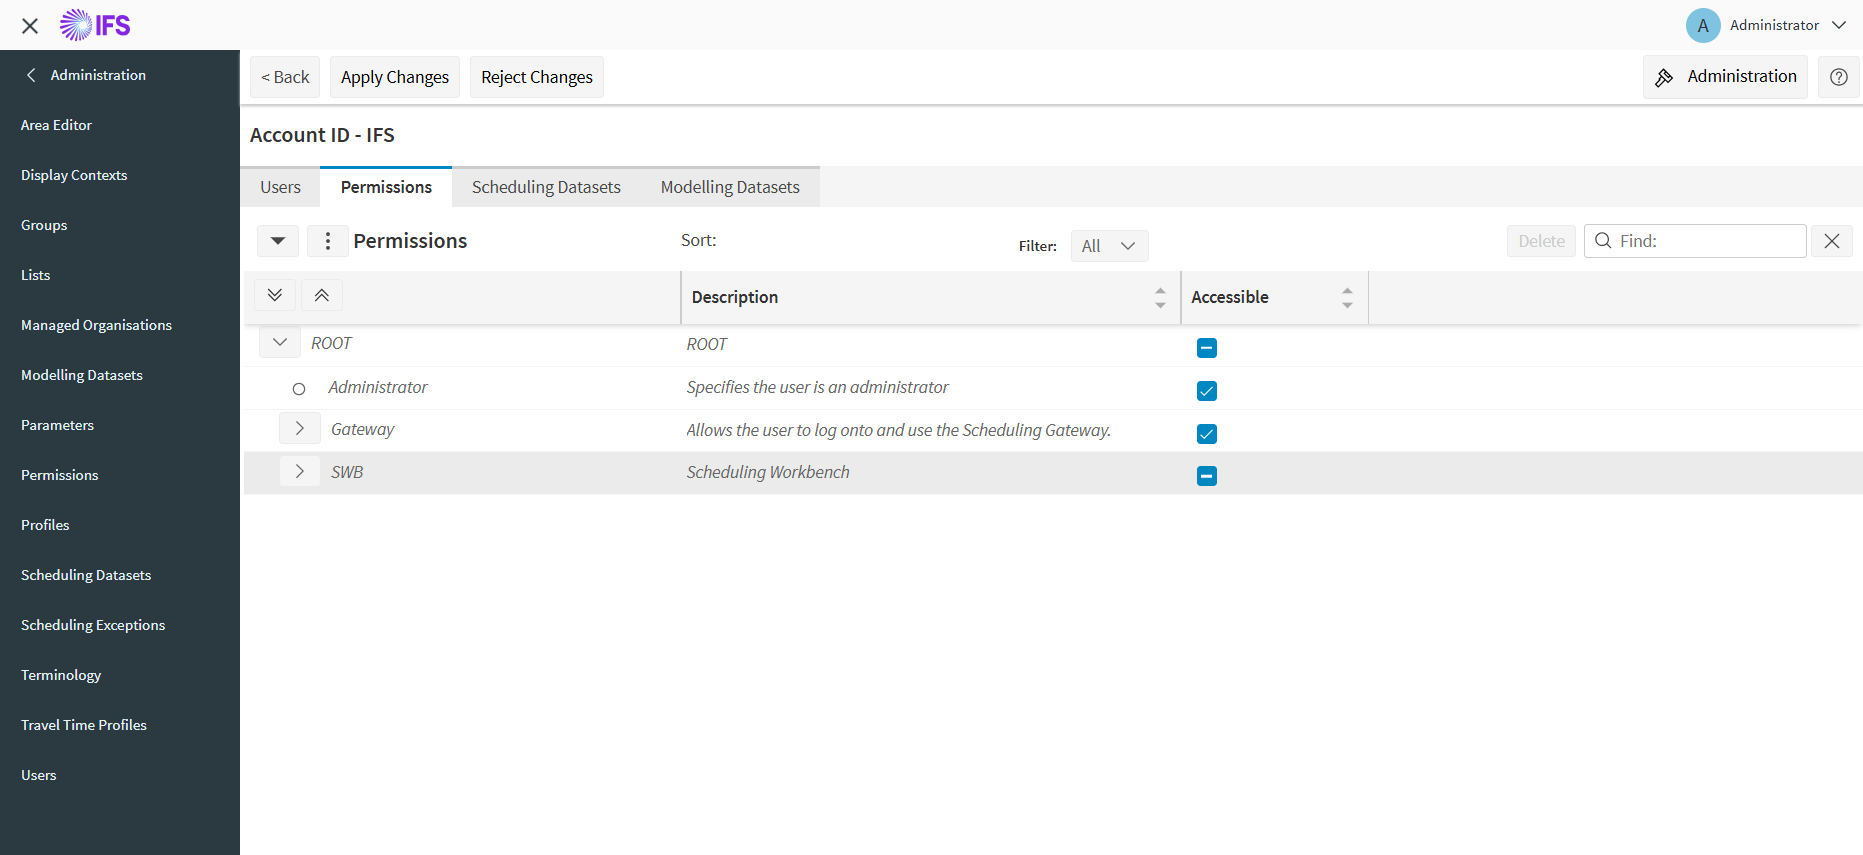
This allows certain permissions to be disabled for the entire managed organisation. If any permissions are explicitly disabled against the organisation they cannot be re-enabled by a user within the organisation.
Note
By default, three permissions are disabled when an organisation is created: 'AdminSubOrganisationsView', 'AdminSystemView', and 'AdminSystemDiagramView'. These prevent any users in the organisation from seeing system level information or from creating their own managed organisations. This means that they are only able to manage their own organisation data.
Datasets
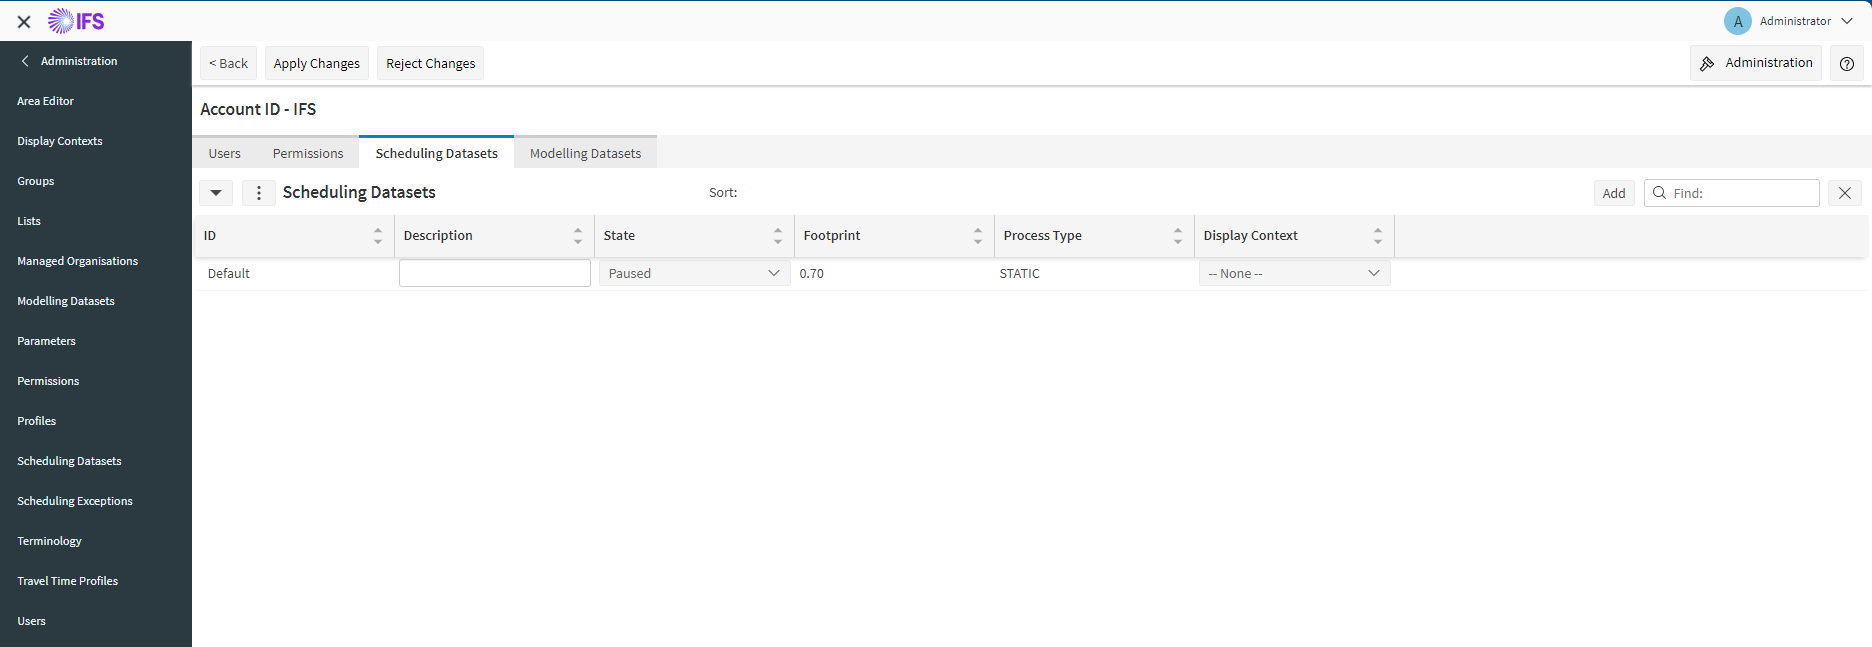
The 'Scheduling Datasets' tab allows scheduling datasets within the child organisation to be managed. New scheduling datasets can be created, and the status updated on existing ones.
The 'Modelling Datasets' tab allows modelling datasets within the child organisation to be created, updated and deleted.
Note
Default datasets for scheduling and modelling are automatically created for the head organisation, but are not for any child organisations.
Using a managed organisation
Scheduling data can be sent for a managed organisation by specifying the organisation id on the input reference. If using the Scheduling Gateway, the logged in user must belong to the organisation.
To log into the organisation on the Scheduling Workbench, you must specify the organisation account id in the Workbench url, e.g. http://servername/pso/workbench/CompanyX.
Licence key for a managed organisation
Each organisation requires a licence key which includes the Account ID for the organisation. The licence key must have sufficient privileges and usage quotas (e.g. Activity Count, Resource Count, etc) otherwise the organisation will not be able to use the PSO system. Please consult IFS for further details around licencing.
Example scenario - Managed Single Tenant
As an example, consider a pseudo-multi-tenant system where we have two organisations: the Default organisation (account id = "Default", organisation id = 1) and a tenant organisation (account id = "Tenant", organisation id = 2). Note that the default Permissions for a child organisation will hide certain screens and disable some functionality that is not deemed essential, following the principle of least-access.
If our desired situation was to give the Tenant organisation sufficient access and Permissions so that they can run the system themselves, the Default organisation can (via the Managed Organisations page) enable Permissions for the Tenant organisation. For example, the System Event page is disabled by default for child organisations but can be enabled by setting the Permission “AdminEventsView” to true. There is also a Permission called “ViewAllEvents” which is turned off by default for child organisations; enabling this would show all events, disabling it (and “AdminEventsView” is set to true) would result in the child organisation only seeing events for their dataset(s) but not the system-level events (i.e. those that tell you how the applications are behaving). Choosing the right combination of Permissions ultimately depends on the visibility to the underlying PSO system, access to functionality and level of service that are intended for the child organisation.
Modelling Datasets
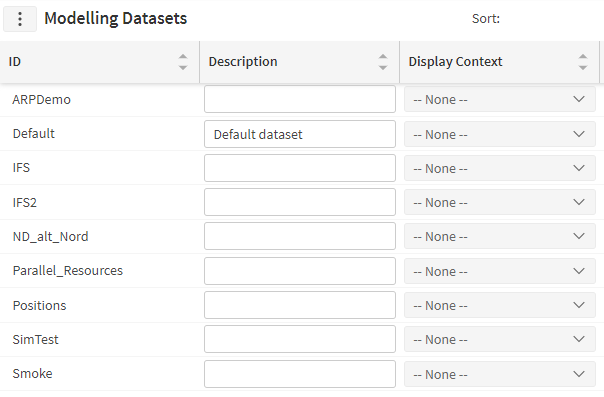
Modelling datasets allows the user to edit the ID and description for datasets in the modelling database with the ability to create new datasets.
Warning
Deleting a dataset will delete all data inside the dataset.
Parameters
This screen allows the querying and setting of the system parameters. Some parameters must never be altered without guidance from IFS.
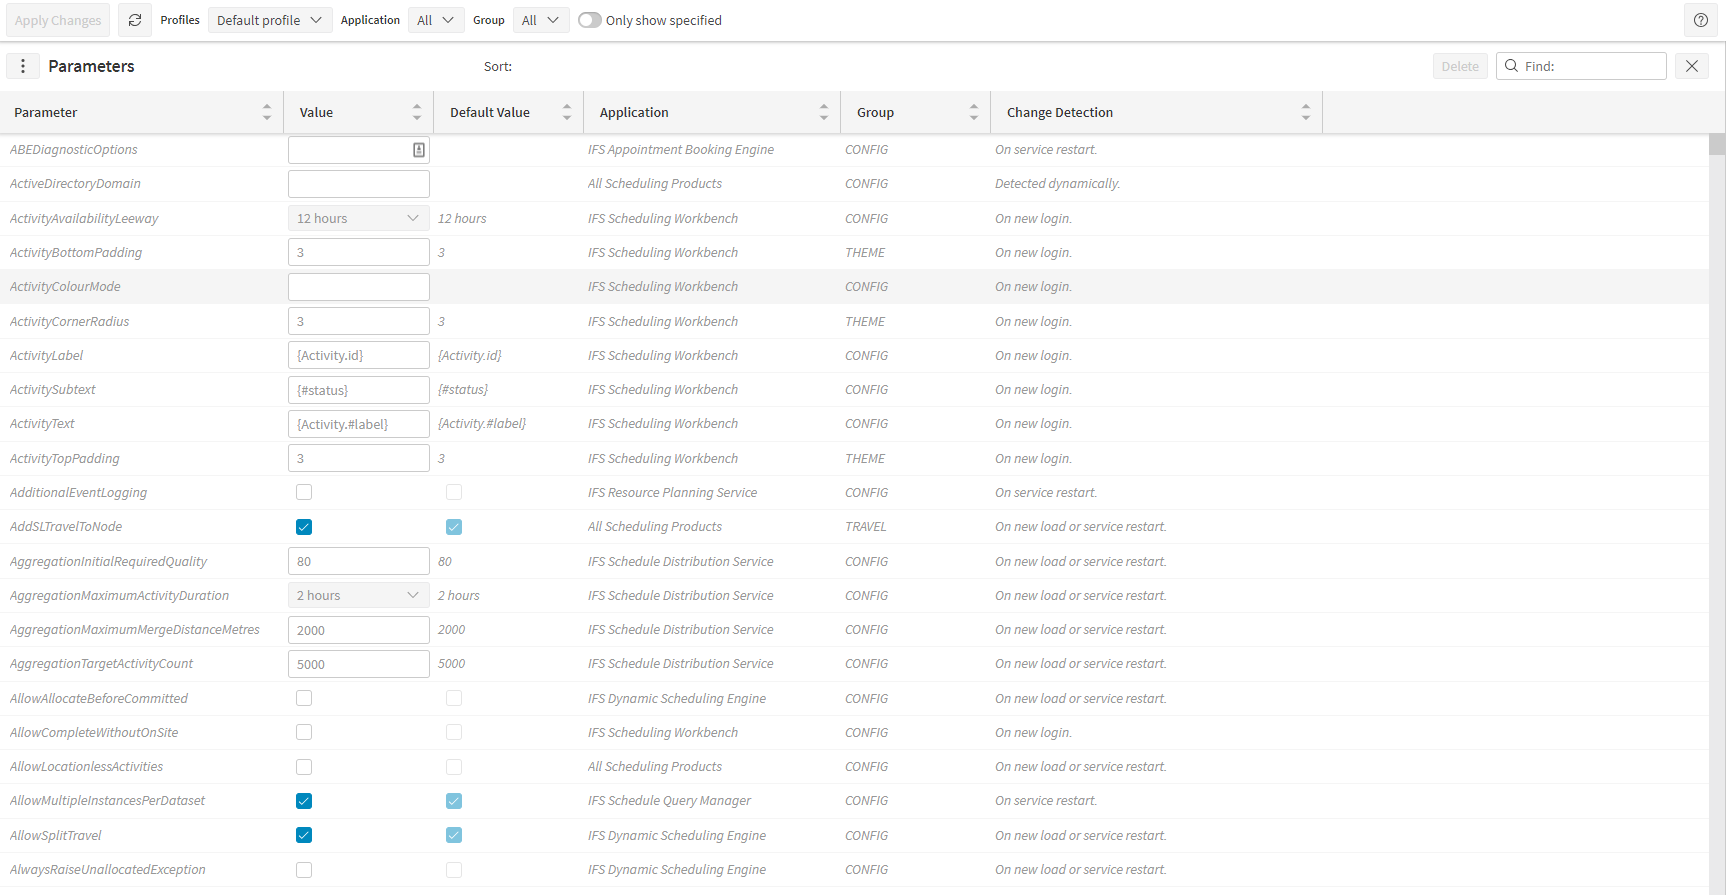
The parameters for a specified profile can be selected from the Profile drop down list. The default is to use the profile called 'Default'. Within this the list of parameters for the selected profile of each application can be queried by selecting the application type from the Application drop down list. This restricts the list to only those parameters. The default is to display all parameters. Parameters can alternatively be selected from the group drop down list where related parameters are grouped together or by using the Find box.
Within the grid of data there are the columns 'Value' and 'Default Value'. These are the values the parameters take. The default value is used if nothing is defined for that parameter.
Note
To reset a parameter value to the default delete the parameter row.
Note
In order for some parameters to take effect the service they apply to may need to be restarted.
Permissions
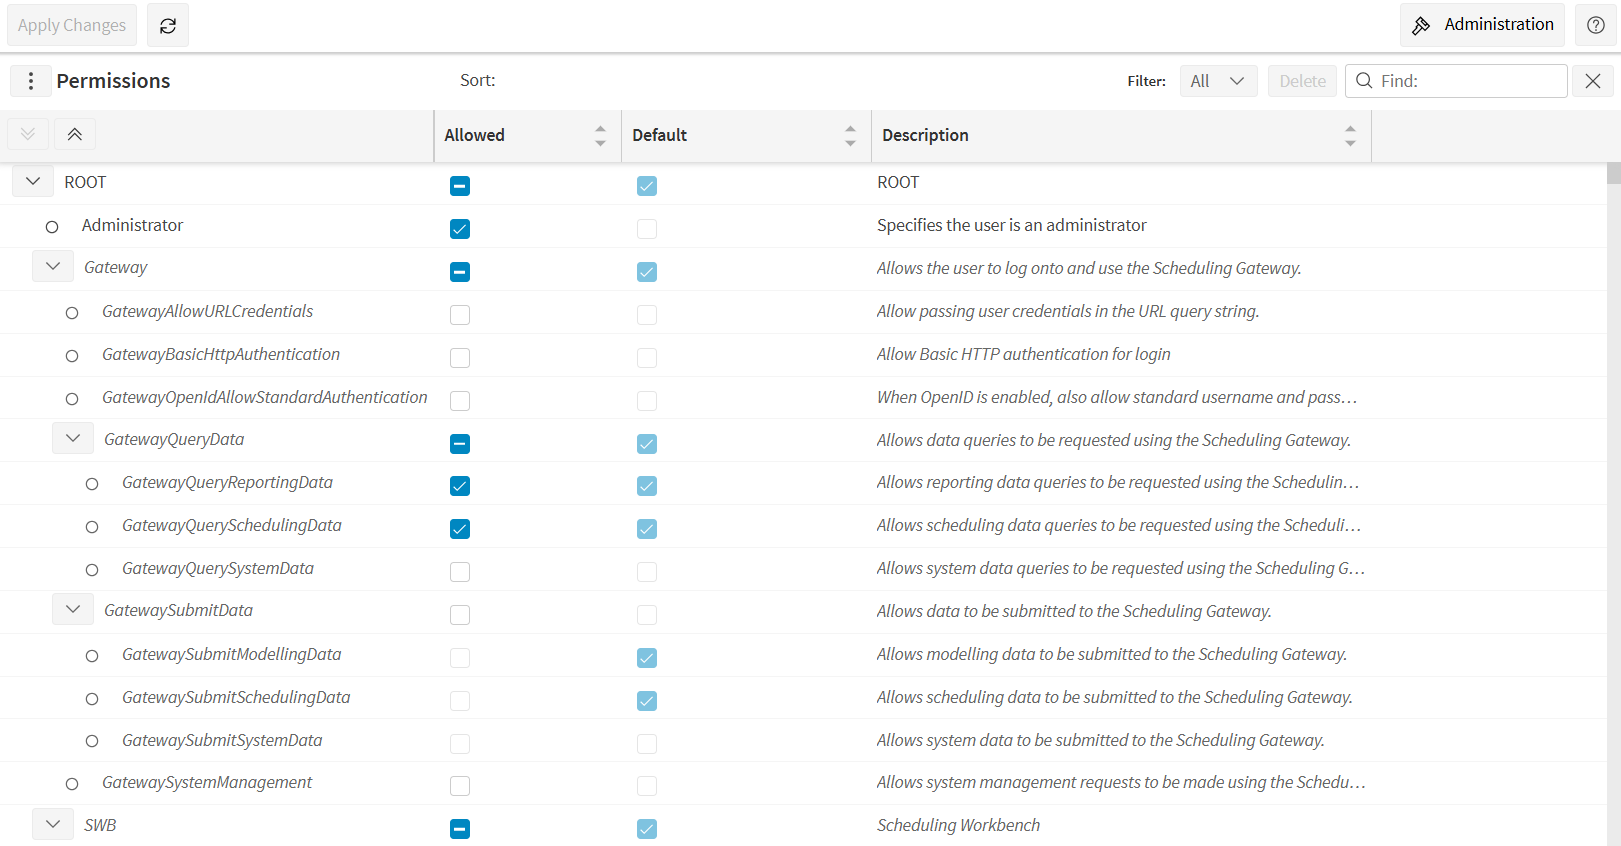
This tab is used to define what functionality will be available by default when using the system. Some installations will want to restrict and not use some functionality or tabs available. The screen displays all the permissions available and allows them to be set or unset.
If the text is presented in italics, it indicates that no value has been specified, and the default value is being used. If the text appears in normal font, it means a value has been provided, and the option to delete the value is enabled.
Note
A description for each available permission is shown on the screen, and this information can also be found in the System Data section of the Administration guide.
Profiles
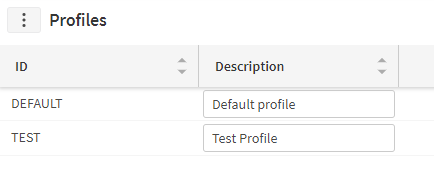
Profiles are used to define sets of parameters with different values. These profiles may be defined for:
- Different datasets, selected on the Scheduling Datasets screen.
- For use with different travel matrix databases.
- For particular users and selected on the Users tab. This typically would be for defining particular UI parameters for a named user.
There is a standard profile provided in the system installation called 'DEFAULT' and this should never be removed. All datasets, users and travel matrices use this if an alternative is not specified.
There are three different ways a profile can be specified when scheduling:
- Input_Reference
- Dataset
- Application_Instance
The latter two methods can be defined in the Scheduling Workbench as explained in the sections on Scheduling Datasets and System - Applications screens.
Associating a profile with the Input_Reference for a dataset must be done in the input data sent to the scheduling system. The profile parameters applied to a dataset will be applied in the order of precedence shown in the list above
Note
Parameters that are not set in a profile will inherit their values from the 'DEFAULT' profile.
Scheduling Datasets
Scheduling Datasets are sets of self-contained data which represent a scheduling problem to be solved by the scheduler. There can be many datasets within a Scheduling Database and the system can be configured so that each Dynamic Scheduling Engine will process individual datasets or share the processing of a dataset or datasets. IFS can advise on the exact configuration to use for an installation, or see the Architecture and Sizing Guide.
Datasets can be created as part of the data input if they do not already exist. See the Scheduling Schema Guide on Input_reference.dataset_id. By default the dataset called 'Default' is used if a different one is not supplied on the input.
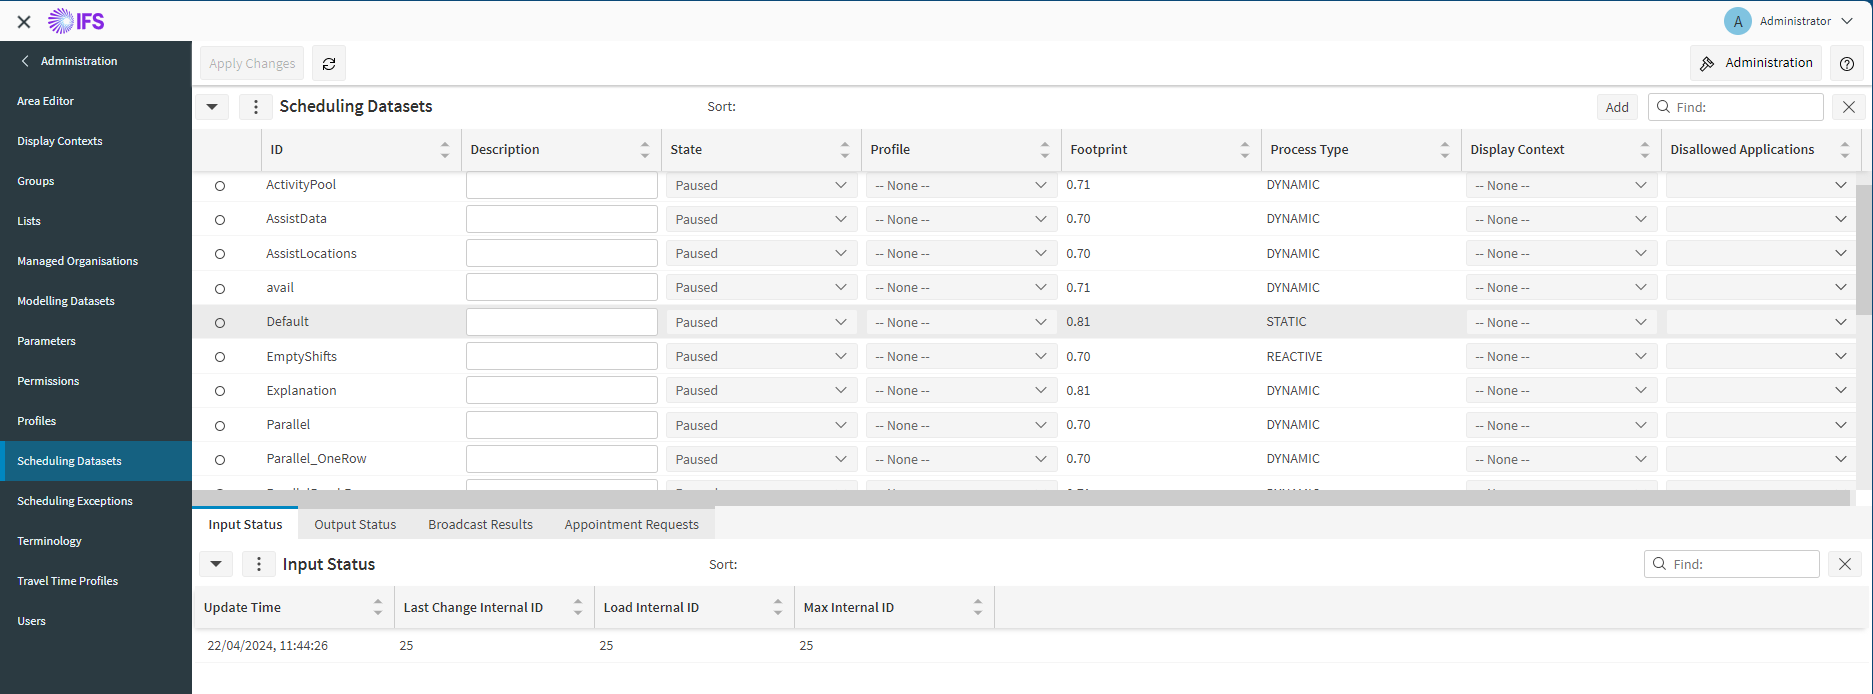
This screen allows the following:
- Creation, expiration and update of the dataset details.
- Defining a parameter profile for the dataset. See Profiles screen.
- If any application type does not need to process a dataset this can also be configured here by disallowing that application.
- Seeing the current status of datasets.
Input / Output Status
The Status tab provides details on the current status of the selected dataset. It is split into two sections, the top section displaying details of the Input data received and the lower section displaying details of plans produced.
The following input information is displayed:
- Update Time - The last time the dataset was updated
- Last Change Internal ID - The internal ID of the last change
- Load Internal ID - The internal ID of the last initial load
- Max Internal ID - The maximum internal ID of data loaded
The following output information is displayed:
- Update Time - The last time the plan for the dataset was updated
- Last Plan ID - The plan ID of the last change plan
- Input Internal ID - The input internal ID for the last plan
- Complete Plan ID - The plan ID of the last complete plan
Broadcast Results
Broadcast Results section presents details of broadcasts output by the Scheduling Broadcast Manager service.
The information displayed tells you:
- Broadcast Time - The time the broadcast was created
- Broadcast ID - The Broadcast ID, this is specified in the Input XML
- Plan ID - The ID of the plan that was broadcast
- Success - Whether or not the broadcast was successful
- Input Internal ID - The internal ID of the input data the plan was broadcast against
- User ID - The ID of the user who made the change
- Update Type - Indicates whether or not the broadcast was sent successfully
- Response - The response code returned from the receiving system
- Message - The message returned from the receiving system
- Result Code - The HTTP result code returned from the receiving system
- Application Instance ID - The ID of the broadcast manager instance that sent the broadcast
- Send Time Taken - The time elapsed while sending the broadcast
Appointment Requests
The Appointment Requests section presents details of the appointment requests handled by the system.
The information displayed tells you:
- Appointment Request ID - The appointment request ID as provided in the input
- Request Time - The time the appointment request was started
- Response Time - The time the appointment request response was ready
- Success - Whether or not the appointment request was successful
- Input Time - The time the input made it into the database
- Output Time - The time the output plan made it into the database
- Input Internal ID - The internal ID of the input data that included the appointment request
- Plan ID - The ID of the plan that included the generated appointment offers
- Load Internal ID - The internal ID of the LOAD at the time of the appointment request
- Requested Slots - The number of appointment slots requested
- Offered Slots - The number of appointment slots offered
Note
Appointment requests that are sent into the system as general input data (i.e. via the Gateway's 'data' endpoint and not via the 'appointment' endpoint) will not be shown here.
Scheduling Exceptions
This screen allows you to update the settings for scheduling exceptions.
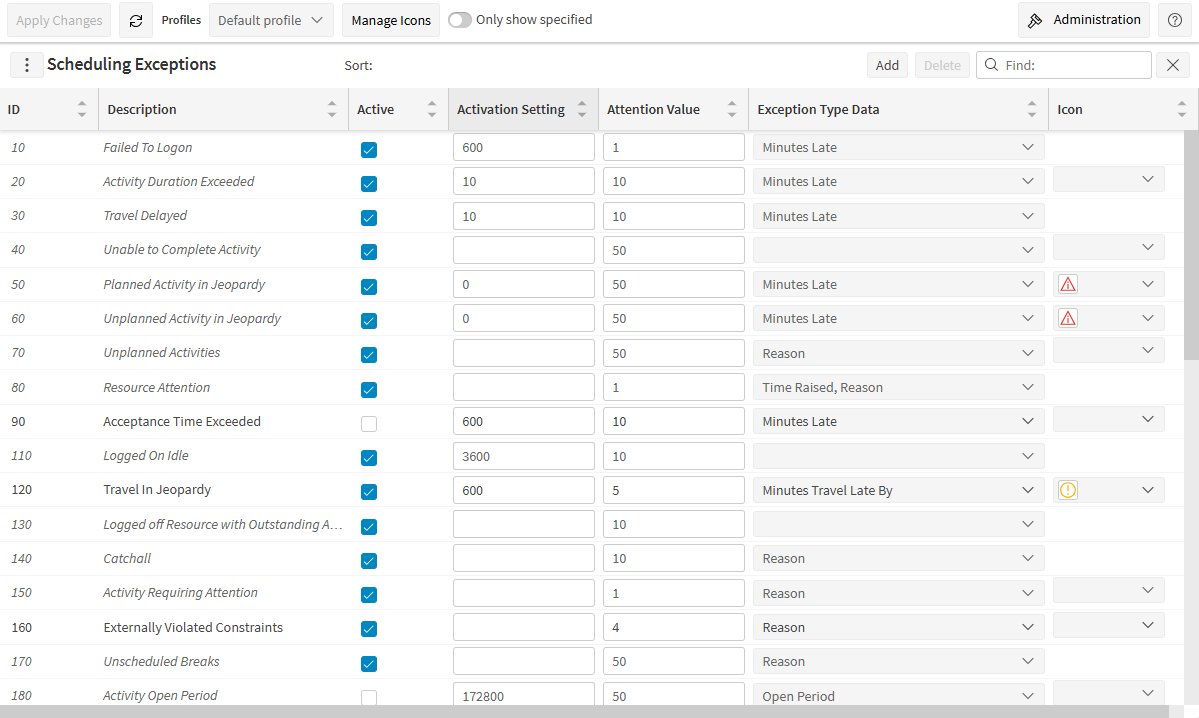
Each exception has four properties that can be set:
- Active: This allows the user to choose which exceptions they would like to have reported. For example, if resources are not expected to set activities to 'Accepted' status, then it would be advisable to switch off the 'Acceptance Time Exceeded' exception.
- Activation Setting: The behaviour of this depends on the exception type. For exceptions that support an activation setting, the value will change the conditions under which that exception is raised. See the details below.
- Attention Value: The attention value affects the traffic light status that the exception type is shown in on the Workbench. Once the number of exceptions of this type reaches the attention value setting, the exception type will be shown in red. The exception will show in orange once 75% of the threshold is reached.
- Exception Type Data: Here the user can configure which of the available exception type data options they would like to be included in the output.
- Icon: This allows the user to select which icon the scheduling exception will appear with in the scheduling Gantt. This property can only be defined for exceptions that are related to activities.
Exception Type Details
Below is a list of each exception type, together with details of how the activation setting is applied (if at all).
- Failed To Logon: Raised when a resource has not logged onto their current shift. This will not be raised against resources who are on / have recently been on private appointments. The activation setting is a time in seconds after the start of the shift or end of private appointment, so by default the exception will be raised once the resource is 10 minutes late in logging on.
- Activity Duration Exceeded: Raised when an activity has exceeded its expected duration. The activation setting is the percentage of time the duration must be exceeded by for the exception to be raised, default 10%.
- Travel Delayed: Raised when the travel to an activity has exceeded the expected travel time, or where it is expected that the original estimated travel time will be exceeded. The activation setting is the percentage of time the travel must be exceeded by for the exception to be raised, default 10%.
- Unable To Complete Activity: Raised when an activity is set to 'Incomplete' status. The activation setting has no effect.
- Planned Activities In Jeopardy: Raised when planned activities (allocated to a resource) are expected to exceed their SLA deadline. The deadline is the end of the first SLA period for the activity where the SLA Type for that period has the 'generate jeopardy exceptions' flag set to true. The activation setting holds the time in seconds that the activity must have missed its primary SLA by for the exception to be raised, default 0.
- Unplanned Activities In Jeopardy: Raised when unallocated activities are expected to exceed their SLA deadline as a result of not being allocated - i.e. if the SLA deadline is before the end of the scheduling window (including any appointment window). The activation setting holds the time in seconds that the activity must have missed its primary SLA by for the exception to be raised, default 0.
- Unplanned Activities: Raised when an activity is not currently allocated to any resource. The activation setting has no effect.
- Resource Attention: Raised when a resource has requested assistance, perhaps due to a problem with their current work, or dangerous conditions. The activation setting has no effect.
- Acceptance Time Exceeded: Raised when a resource has failed to accept a committed activity after a specified period of time. The activation setting holds the time in seconds since an activity has been committed at which point an exception will be raised if the activity is not accepted, default 10 minutes.
- Logged On Idle: Raised when a resource has logged on but does not have any work to do within a defined time limit. The activation setting holds the minimum time in seconds from the current time for which the resource has no work to do, default 1 hour.
- Travel In Jeopardy: Raised when a resource has not started travelling to a fixed time activity by the time that the travel should have started. The activation setting holds the time in seconds beyond the start of travel to the fixed time activity, default 10 minutes. A negative activation setting may be used to trigger the exception before the planned start of travel, and the activity need not have a fixed time in this case.
- Logged Off Resource With Outstanding Activities: Raised when a resource has logged off but still has committed work in their shift. The activation setting has no effect.
- Activities Requiring Attention: Raised when the 'highlight' attribute is set against an activity on its latest status. The activation setting has no effect.
- Externally Violated Constraints: Identifies constraint violations caused by committed or fixed activities, for example that an activity is committed to a resource who lacks the required skills. This may be due to manual interventions to the schedule. This covers the following conditions:-
- Invalid activity status. Reason id 520.
- Activity fixed to a time which is outside availability constraints / SLA. These are only checked if they exist for the activity. Reason id 550.
- Activity is fixed to a resource who does not have skills or is not in the activity region. Reason id 560.
- Activity is fixed to a resource and time, but resource is not working at this time. Reason id 570.
- Activity fixed or committed to resource without the required parts. Reason id 590.
- Activity fixed or committed to resource exceeding resources maximum travel. Reason id 600.
- Activity fixed such that it breaks the minimum separation requirement. Reason id 640.
- Invalid activity class fixed to a bucket resource. Reason id 660.
- Activity exceeds parallel count. Reason id 680.
- Activity exceeds parallel metric limit. Reason id 690.
- Activity violates parallel exclusivity. Reason id 700.
- Activity at invalid parallel location. Reason id 710.
- Unable to schedule committed activity validly. Reason id 720.
- Activity violates block constraint. Reason id 740.
- Unscheduled Breaks: Raised when explicit breaks have not been allocated. The activation setting has no effect.
- Activity Open Period: Raised when a non-completed call has been open for longer than a threshold value. The activation setting holds the threshold time in seconds that an activity must have been open for, default 2 days.
- Overlapping Activities: Raised when activities are overlapping (for example, due to overlapping fixed start times). The activation setting holds the time in seconds that two activities must overlap by (including travel), default 5 minutes.
- Empty Route: Raised when a resource does not have any activities scheduled in their current shift. This applies only to shifts which currently intersect the timeline or start within 12 hours of the timeline (configurable by the EmptyRoutesExceptionStart parameter). The exception is not raised if long private activities cover the shift. Activation setting holds the minimum time in seconds from the current time to the end of the shift, so by default the exception will only be raised if there is at least 1 hour of shift time remaining.
- Invalid Logon: Raised when a logon/logoff event is received for a resource and the logon is not in any shift, or within the snap time for any shift. The activation setting has no effect.
- Excessive Travel In Route: Raised if total travel in a shift exceeds a specified amount. The activation setting holds the threshold travel time in seconds, and defaults to 6 hours (21600 seconds).
- Travel Calculation: Identifies any issues with HTM connections used by this dataset. The activation setting has no effect.
- Resource Logged Off Early: Raised when a resource logs off their shift before the expected end time. The activation setting is the number of seconds early they must log off to trigger the exception (default 15 minutes).
- Fixed Activity Interrupts Commits: Raised when a resource has non-fixed committed activities which have been pushed to be scheduled after a fixed activity also in the resource's route. The activation setting has no effect.
- Multiple Trips to Same Location: Raised when a location (or locality) is being visited multiple times within a period of time. The activation setting is the maximum time (in seconds) that two visits to the same location must be planned within to trigger the exception, default 12 hours.
- Unused Depot Activities: Raised when there is a depot activity in the input data which has not been used at all in the schedule. The activation setting has no effect.
- Committed Linked Activity: Raised when an activity is linked to another activity via a pre-requisite or co-requisite link, and the linked activity is now committed but this activity is not. The activation setting has no effect.
- Licence Expiring: Warns when the licence to use the software is about to expire. The activation setting is the time remaining on the licence in days at which point the exception will be raised.
- Location Partially Allocated: This is only applicable when the DSE parameter 'DoOnLocationAllowRevisits' is set to false. In this case the exception will alert the user when some visits to a location have been planned but others are left unallocated. The activation setting has no effect.
- Unscheduled Breaks (Implicit): Raised when implicit breaks have not been allocated. The activation setting has no effect.
- Incomplete Modelling Pattern: This is specific to cyclic scheduling, and is raised when the repeated visits for a modelling pattern could not be allocated to the end of the schedule. The activation setting has no effect.
- Activity Completed With Remaining Committed Visits: Raised when a splittable activity is completed but there are outstanding future committed visits to the activity. The activation setting has no effect.
- Operations Not Fully Allocated: This is specific to cyclic scheduling, and is raised when the operations for a repeatable activity could not be allocated through to the end of the schedule. The activation setting has no effect.
- Partially Committed Bucket Route: Raised when a shift for a bucket resource includes both committed and allocated activities. The activation setting has no effect.
- Shift Cut Off is Approaching: Raised when the cut off time for allowing uncommitted activities to be scheduled into a resource's shift is approaching. The activation setting specifies the threshold in seconds from the current schedule time within which the exception will be raised, default 10 minutes.
- Pre-Requisite Delay Deadline Missed: Raised when an activity has a pre-requisite which uses a pre-requisite delay model, and the primary deadline between the activities is exceeded. The activation setting specifies the time in seconds that the SLA must have been missed by for the exception to be raised, default 0.
- Invalid Committed Route: Raised when a resource has at least one route where the committed activities in the route cannot be validly scheduled. The exception will record the first invalid route for the resource.
- Broken Activity Link: Raised when an activity that is linked to another activity is fixed or committed and violates the activity group rules.
- Unplanned Repeatable Activities: Raised when a repeatable activity is not currently allocated to any resource. The activation setting has no effect.
- Maximum Resources Exceeded: Raised when an activity is split to multiple resources but uses more resources than it is permitted to use according to its maximum resources setting. The activation setting has no effect.
- Catch All: All other exceptions relating to activities and resources such as errors during data transfer or invalid data values. The activation setting has no effect.
Custom Exceptions
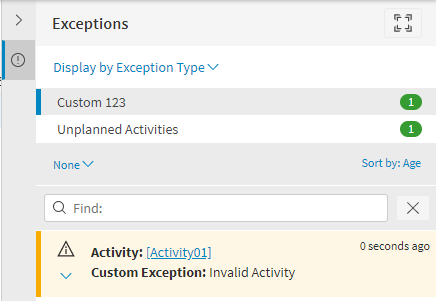
You can also add custom schedule exception types from this screen. To be displayed in the exceptions tab they must correspond with custom exceptions created in the scheduling input data. For example if a change file is sent containing the following custom exception:
<dsScheduleData xmlns="http://360Scheduling.com/Schema/dsScheduleData.xsd">
    <Input_Reference>
        <datetime>2009-04-21T00:01:28.0659189+01:00</datetime>
        <id>20/04/2009 10:12:28</id>
        <input_type>CHANGE</input_type>
        <dataset_id>Default</dataset_id>
        <schedule_data>SCHEDULE</schedule_data>
        <load_status>0</load_status>
        <duration>P2D</duration>
    </Input_Reference>
    <Custom_Exception>
        <id>cust1</id>
        <schedule_exception_type_id>1001</schedule_exception_type_id>
        <activity_id>Activity01</activity_id>
    </Custom_Exception>
    <Custom_Exception_Data>
        <custom_exception_id>cust1</custom_exception_id>
        <label>Custom Exception</label>
        <value>Invalid Activity</value>
        <sequence>1</sequence>
    </Custom_Exception_Data>
</dsScheduleData>
And the following custom schedule exception type is created on the Schedule Exceptions screen:

The custom exception will be displayed on the Scheduling Workbench as shown below:
Note
Custom Schedule Exception types must have an ID greater than or equal to 1000.
Note
The Dynamic Scheduling Engine and Scheduling Query Manager need to be restarted in order for the custom exception data to show up.
Managing Icons
The user is able to add, edit and delete the icons that are available for selection by clicking the 'Manage Icons' button in the toolbar. Clicking this button will open a data panel on the page that displays all of the currently available icons displayed in order of their priority.
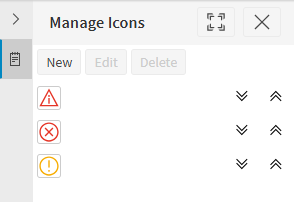
The priority of an icon is used to determine which icon will be displayed if an activity has multiple exceptions with icons associated to it. The icon with the highest priority will be displayed. The user can change the priority of icons by reordering the list in the manage icons panel, which can be done either using the arrow buttons next to the icon in the list or by dragging and dropping them into place. The list of icons will start with the highest priority and end in the lowest.
There are three system icons that will appear by default. These icons can be edited but by default they will appear as a red alert, a red error and an amber warning with priority descending.
By clicking the 'New' button in the manage icons panel, the user will open a new data panel with the options to create a new icon. This panel will give you the following options:
- Icon Type: Gives the user the choice between using the PSO default icons or using an external URL.
- Icon: A dropdown showing all the default PSO icons. This option is only visible when the icon type is set to 'Default'.
- Colour: A colour picker to define the colour of the icon. This option is only visible when the icon type is set to 'Default' and is also disabled for icons with pre-defined colours, for example the ifs-logo.
- Path: Here the user can add a link to an external URL to use as the icon. This option is only visible when the icon type is set to 'External URL'.
- Icon: This allows the user to select which icon the scheduling exception will appear with in the scheduling Gantt. This property can only be defined for exceptions that are related to activities.
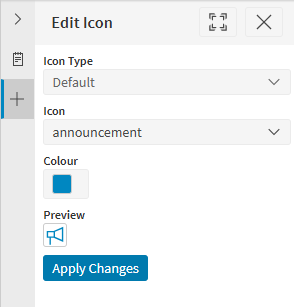
Once these values have been defined then the user will be given a preview of what the icon will look like. If the user is happy with this icon then they can apply changes which will add the icon to the list of available icons. The new icon will be created with the highest priority so will be inserted at the tooltip of the list of manageable icons.
By selecting a pre-existing row in the manage options panel and clicking the 'Edit' button the User will be directed to the Edit Icon panel. This is the same panel used to add icons but when editing, the options will be prefilled to the values of the selected row. Here the user can make any changes they need to an existing icon. Applying changes will not affect the priority of the icon.
Selecting a pre existing row in the manage options panel and clicking the 'Delete' button will delete the icon and remove it as an option from the main page. If a schedule exception had the deleted icon selected as its icon then this will also be removed from the schedule exception. The three system default icons are not able to be deleted but they can be edited.
Terminology
This option is used to change some of the terminology used within the Scheduling Workbench, so that, for instance, it may be used in different markets.
Warning
This functionality is currently only available for English based languages (en, en-GB, en-US etc.).
Note
- Only a pre-defined list of terms may be replaced.
- The terminology will be the same for each organisation and language i.e. it is not possible to have different terminology in two different datasets.
- A simple form of term substitution is used: for each term, a singular and plural alternative may be specified, along with a singular and plural form with an upper-case first letter. Depending on the terminology used, this may create some issues e.g. if an existing English phrase "an activity is in jeopardy" had the term "activity" replaced by "job", then the phrase would appear as "an job is in jeopardy", which is not grammatically correct. Please be aware of these issues when using different terminology.
- Note that there are other things that affect the language used, such as custom Lists, customer data, and the message translations in other languages.
- The Scheduling Workbench must be restarted before any terminology changes will appear.
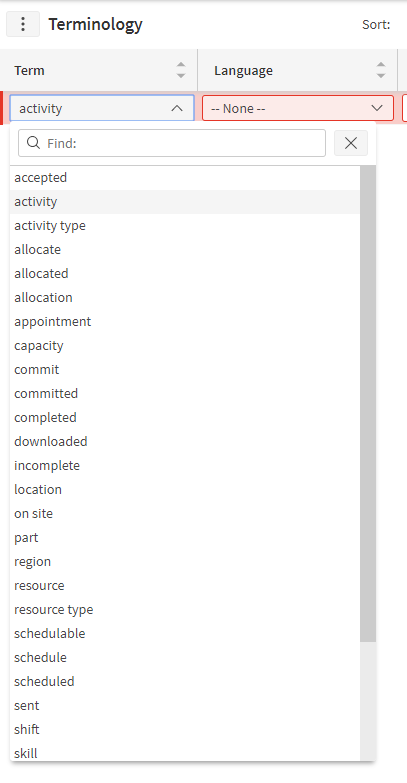
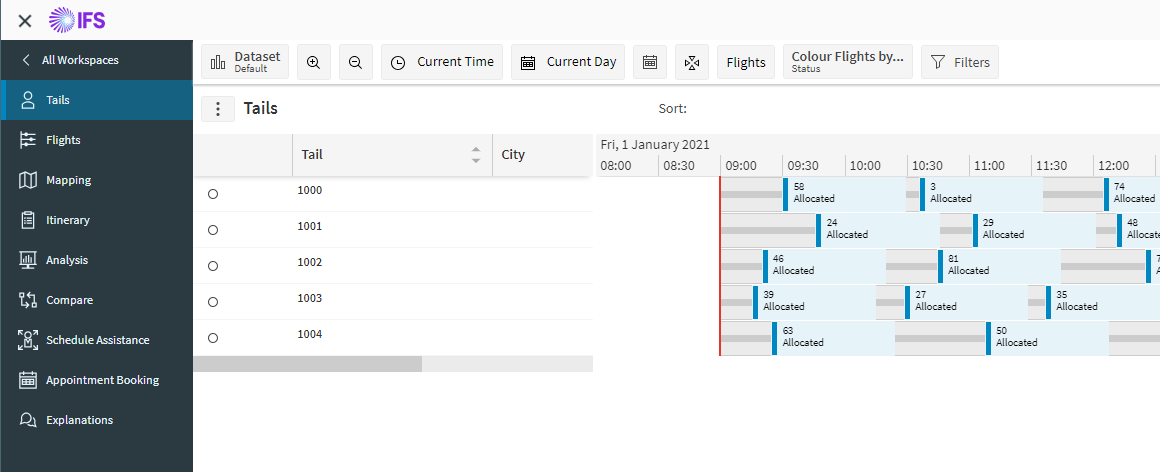
The following example shows how the terms "resource" and "activity" may be changed to "tail" and "flight" for use in Tail Planning.
Here is the drop-down list of terms that may be changed:
This shows how the new terms are entered:

And this shows the result in the Scheduling Workbench:
Travel Time Profiles
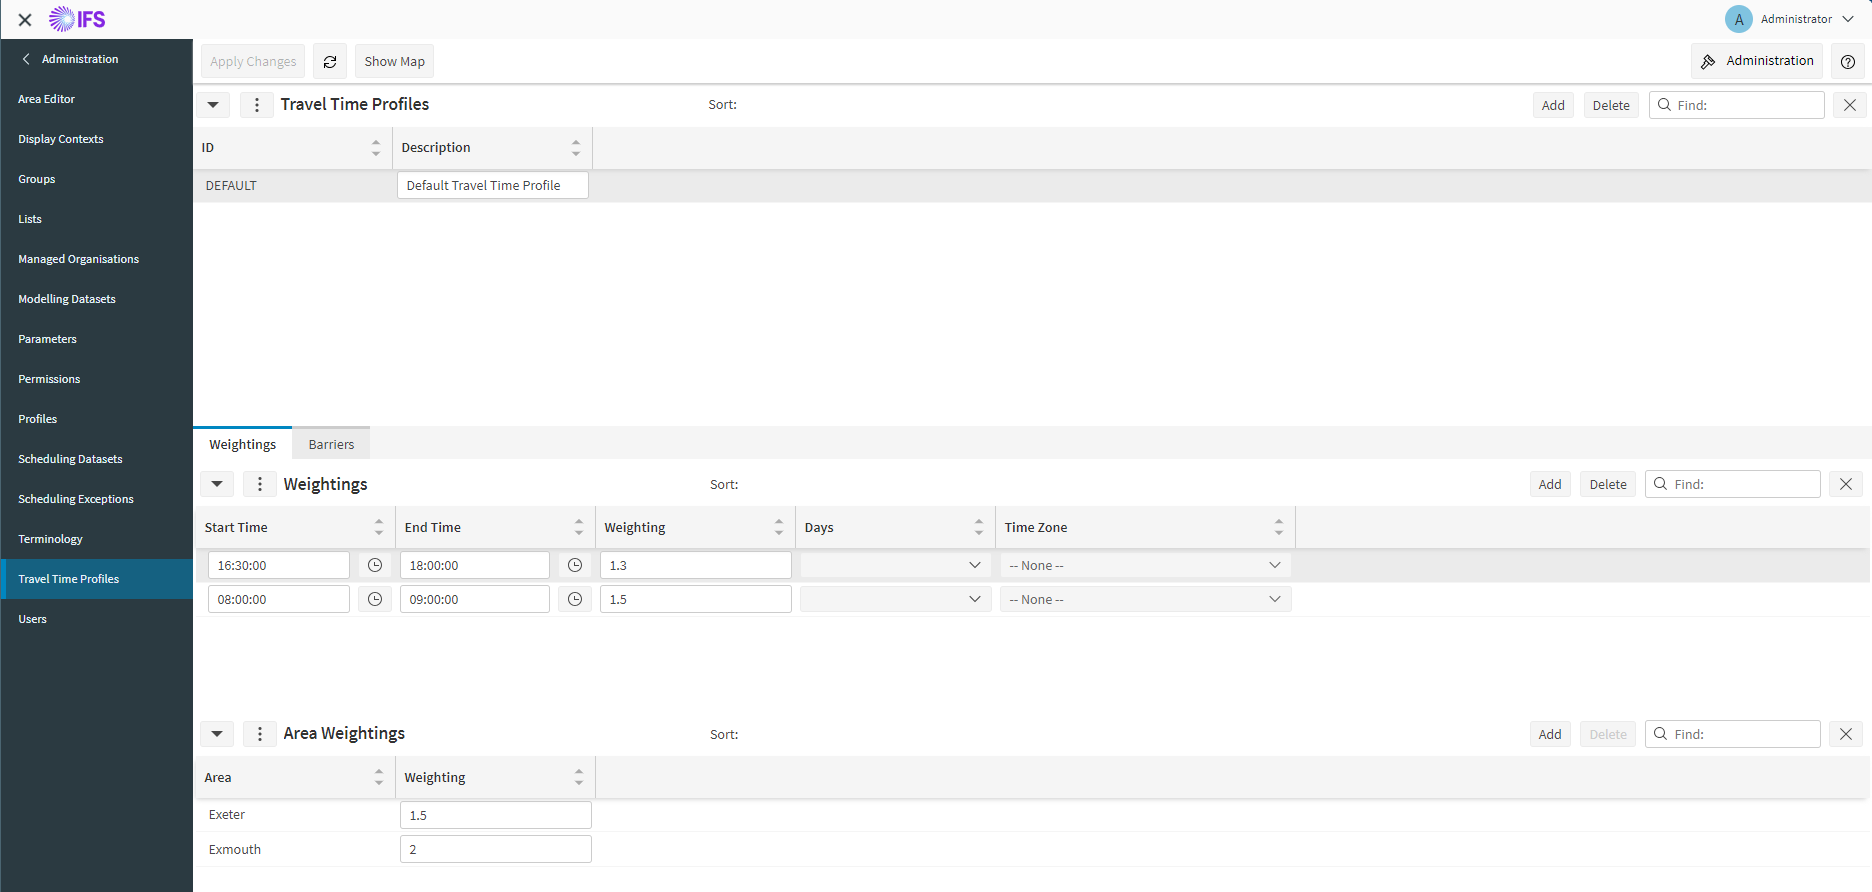
A travel time profile allows you to adjust the expected journey times used by the Dynamic Scheduling Engine, depending on the time of day and the area the journey covers. There are two factors that make up the travel time profile: travel time weightings and travel time barriers.
Travel time weightings allow you to specify a multiplier that should be applied to all travel journeys at a particular time of day and optionally in a particular area. There are three parts to this:
- Setting a multiplier (or weighting) that gets applied to all travels at particular times of day.
- Defining areas within which you wish to apply different weightings.
- Defining an override weighting for a particular area at a particular time of day.
Travel time barriers allow you to specify where there are blockages within the travel network which will require a diversion to be taken and so add extra time to the journey.
It is possible to set up multiple travel time profiles, but initially the system will contain a single travel time profile named 'DEFAULT' which will be empty.
See the Scheduling Concepts - Travel Guide for details on setting up travel time profiles and how they are used. See the Operations - Using travel time profiles section for more information on linking travel time profiles to a scheduling problem or to specific resources.
Travel time barriers can be viewed in the Barriers grid as well as on a map by clicking on 'Show Map' button. To create a new travel time barrier, click on add button on the barriers grid, open the map by clicking on 'Show Map' button and click on the map to create barrier points. Double click on the map to complete the new travel time barrier. Barrier points can be edited on the map by selecting a point and dragging it to a different location. Press ALT and click on a barrier point to delete it.
Barrier blockages are shown in the Blockages grid. Use the Add button in Blockages grid to create new barrier blockages, and Delete button to delete existing barrier blockages.
Areas
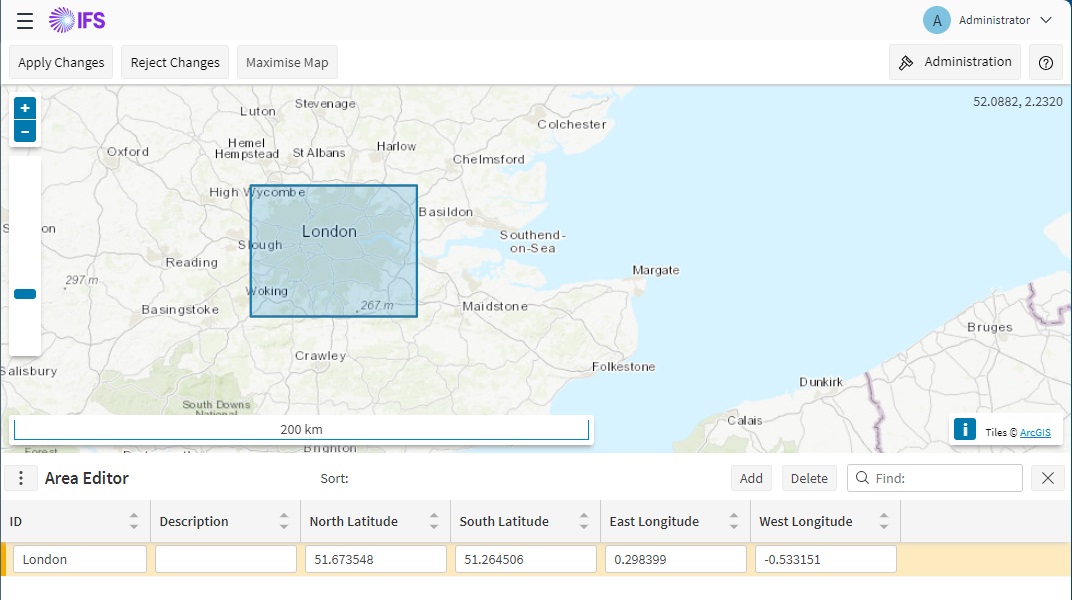
The travel time profile also allows you to define different weightings which apply only in certain areas. The first step to do this is to define the areas themselves, which is done using the area editor. Here, we have defined a single area covering London:
Users
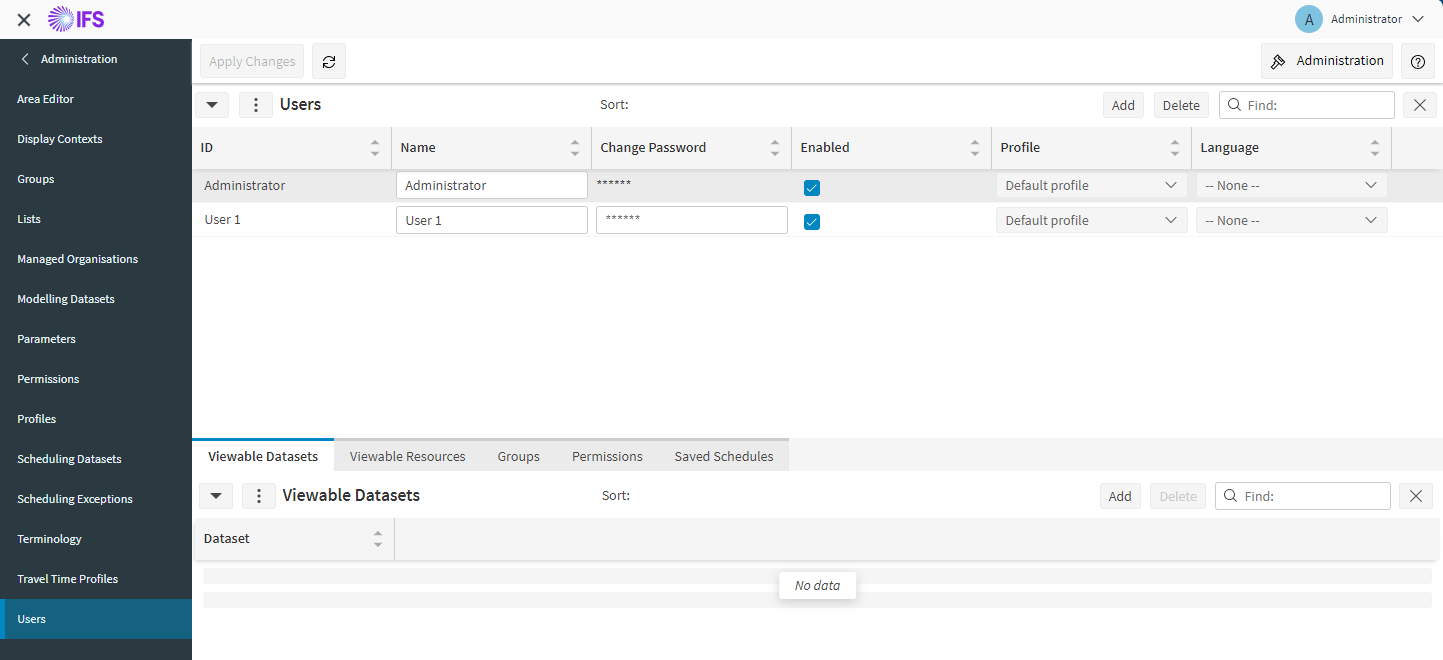
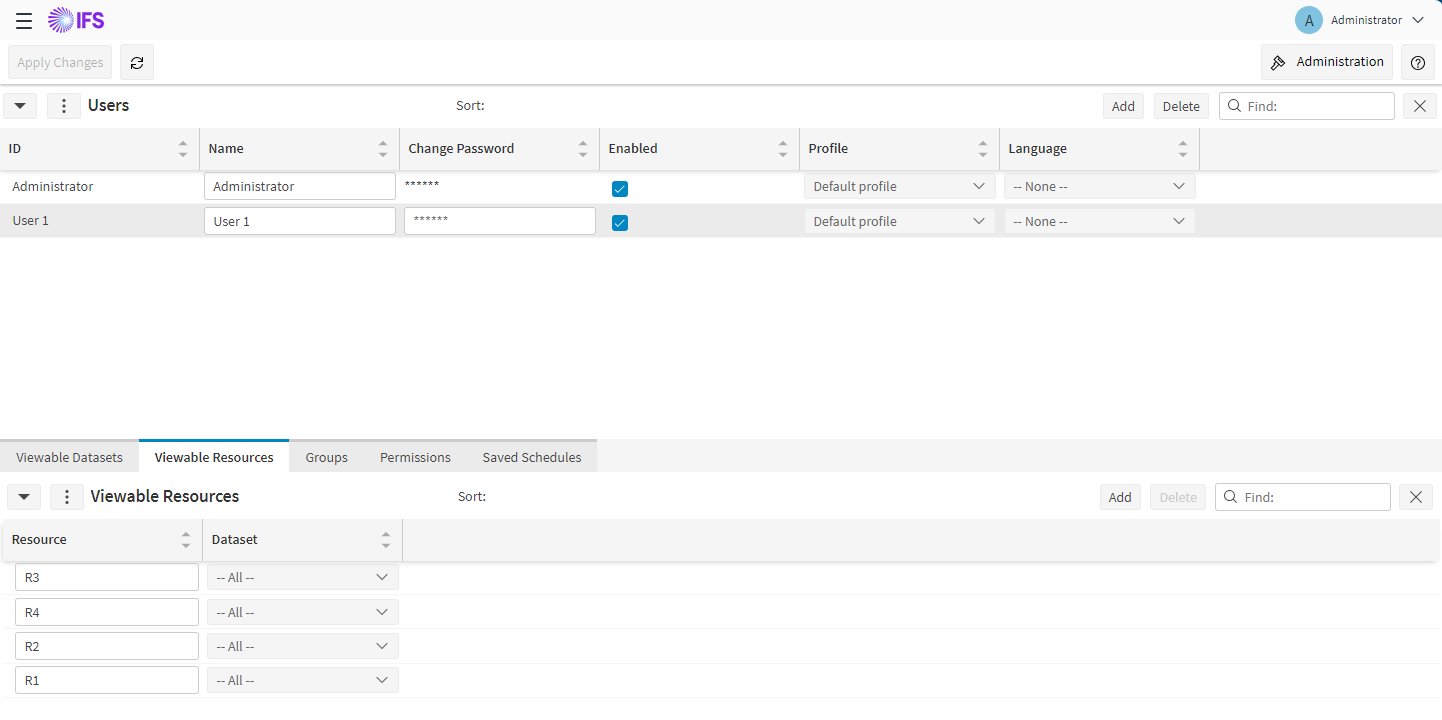
The Users screen allows administrators to do the following:
- Create, update and delete users.
- Specify datasets they should be allowed to access. See Dataset screen.
- Specify resources they should be allowed to access. See below.
- Specify a profile to associate with the user. See Profile and Parameters screens.
- Specify permissions to associate with the user. See Permissions screen.
- Manage saved schedules for the user. See below.
Note
Users can be given access to all datasets rather than just the ones listed under Viewable Datasets by using the ViewAllDatasets permission.
Viewable Resources
The Viewable Resources tab allows the user to be linked to a specific list of the resources that they should have access to. Note that this will only take effect if the permissions 'ViewAllResources' is switched off for this user.
Note
See the 'Operations -> Restricting Access to Resources and Activities' section of the Administration Guide for further details of how user access to both resources and activities can be restricted.
User Data
User Data Schedules saved via the Scheduling workspace can be exported and imported from the User Data tab within the Users screen.
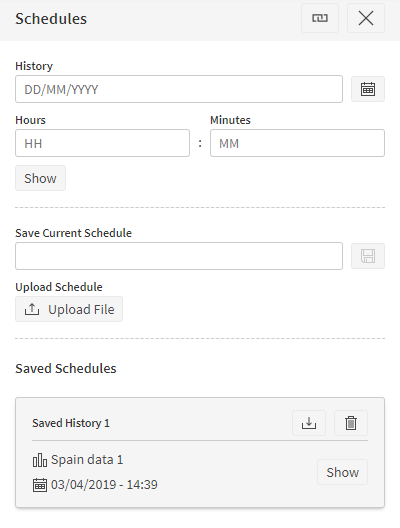

Use the Download button to download the saved data.
To upload a saved schedule or ARP export use the Upload file button after selecting the desired user you wish to import the data for.
To import a saved schedule:
- Click Upload file button and Browse to select the required saved schedule.
- Click Open. The imported schedule is now available for viewing with the Schedules screen within the Scheduling workspace for the selected user.
Note
Users can be given the UserSchedulesUpload / Download permissions to allow them to upload and download schedules from the Saved Schedules dialogue.
Administration
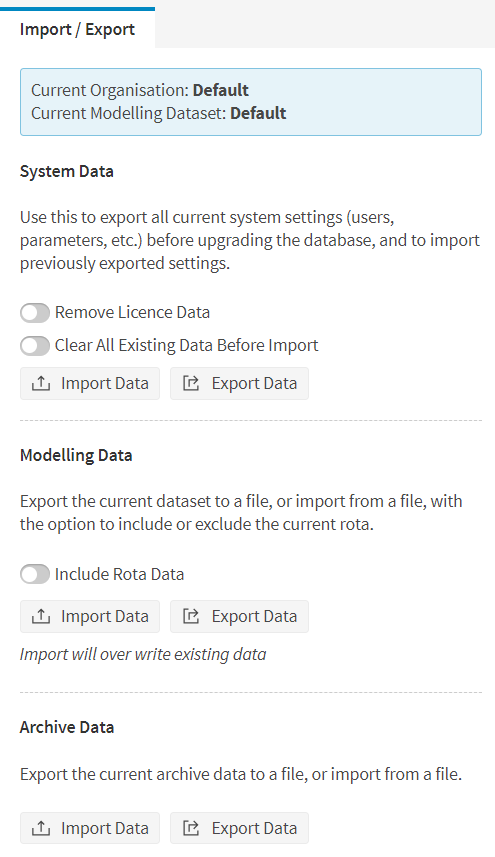
On each organisation administration screen an 'Administration' button will appear in the top menu bar. Clicking this button will open a side panel, from where it is possible to import and export organisation data.
Import / Export
This screen allows you to import and export system, modelling and archive data. Click the Import Data button and select a file to import. Click the Export Data button and select a location to export.
When importing system data the Clear All Existing Data Before Import option controls whether the existing data will be removed before importing the data.
To be able to export modelling data a dataset must be first selected under the Modelling Dataset screen or under the details for a managed organisation.
Note
The system organisation can import language files to update or add new message texts.
Warning
Please ensure that extra care is taken when importing data to verify that the data being imported is correct since these actions cannot easily be undone.
When importing modelling data, all existing data in the dataset will be lost. Please only import data if you are sure that the data you are importing is accurate.
In particular, please note that if modelling data is exported that does not include rota data, and this data is then imported into the same dataset, the net effect will be that all rota data will be lost.