Planning - Data Management
This section describes briefly how the data management screens work, and then provides details of each page.
Note
For general information about the planning workspace see the Planning Workspace help details.
Editing Data
The Data Management screens all use a consistent, easy-to-use way of adding, changing and deleting data. For example the Resources screen:
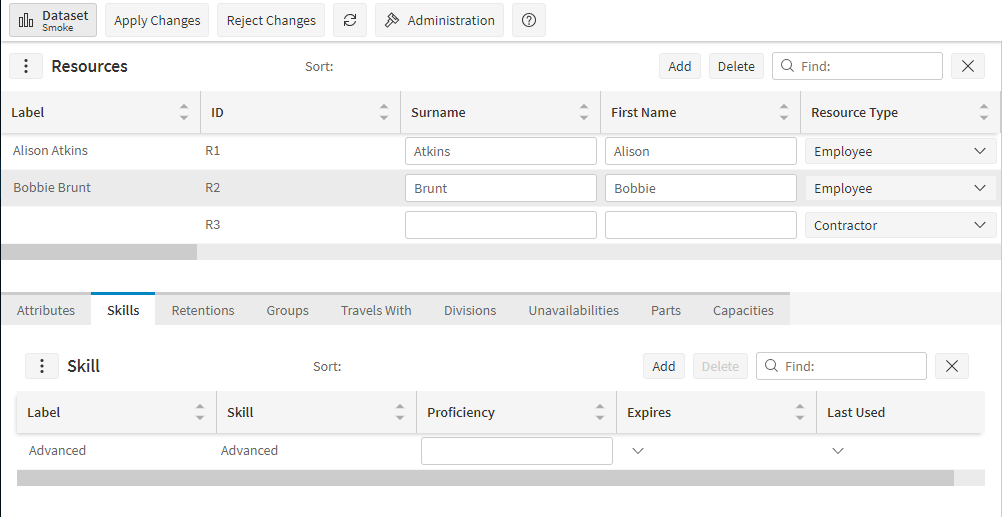
This shows a table of values in the top half of the screen with details below that apply to the currently-selected row in the main table. Some cells allow values to be typed in, whilst others allow you to pick from a drop-down list, or other input methods. New rows can be added with the Add button.
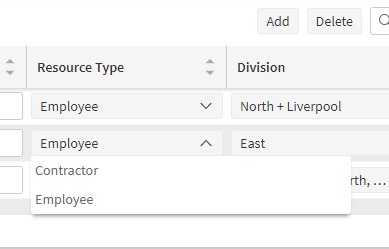
If any changes or additions are made, the relevant row is highlighted with an orange bar on the left-hand side of the table. For example, if we change Bobbie brunt to a contractor:
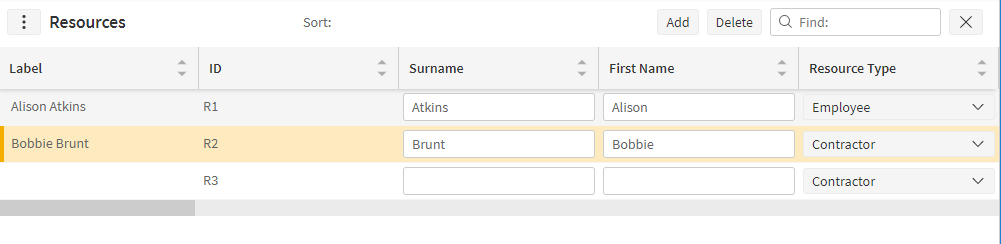
It is possible to make many changes, add many rows and they will all be marked orange. However, these are not saved until the Apply Changes button is used. The changes will then be saved and the lines return to normal:
If the entered data is not valid the row and the cell will be marked red. This may be because some essential items have been missed or invalid data entered, e.g. text in a place where a number was expected or an invalid date. Most rows required a unique ID, and a duplicate in another row is not valid.
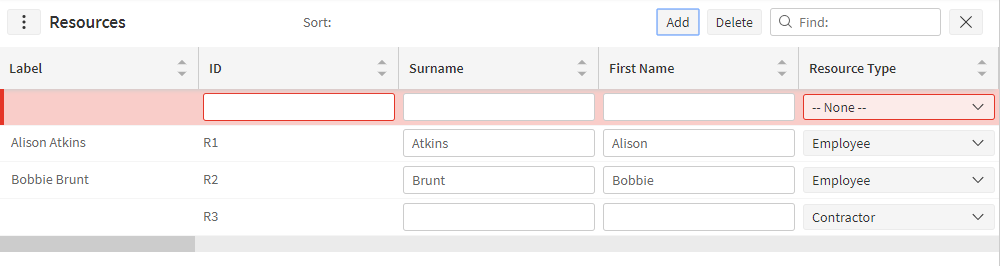
Correct any mistakes and press Apply Changes again if this happens.
Note
When adding a new row, the columns where a value is required will be highlighted with a red outline.
If you do not wish to save your changes, click Reject Changes and all modifications highlighted orange or red will be removed.
To delete a row, select the row by clicking in the box at the left-hand end of the row and press the Delete button. The row will go grey, as shown below:
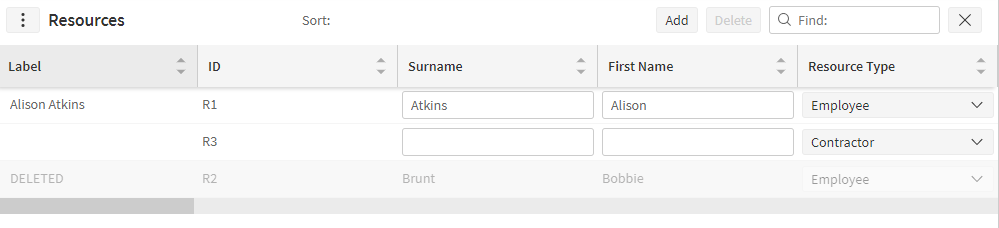
Click Apply Changes to save the deletion or Reject Changes if you do not wish to delete the row.
Where there is a secondary part to the screen in the bottom half, these details apply to the currently selected item in the top half e.g.
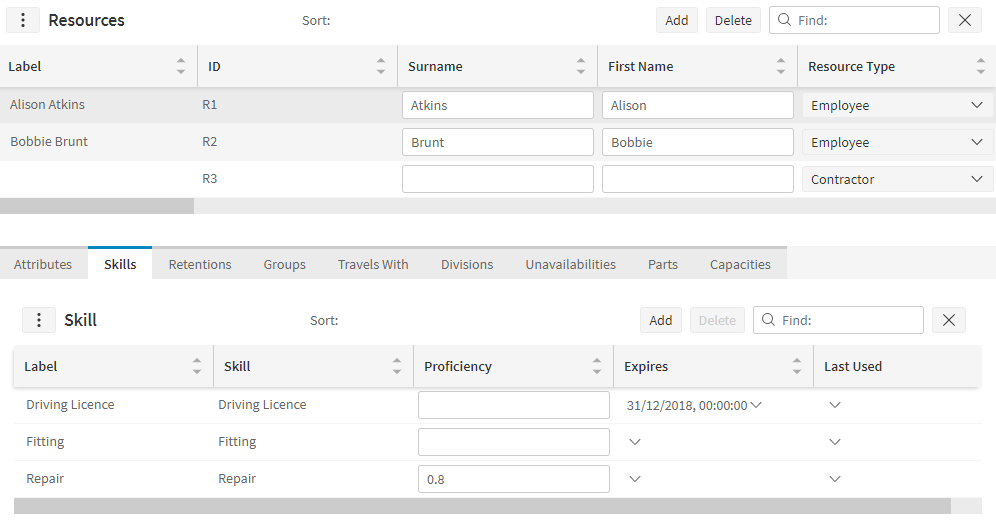
They may be added, changed and deleted in exactly the same way as the entries in the top-half of the screen.
If there are many sub tables, these may be placed in tabs. Where a table has an invalid row marked in red, the tab and the parent row in the main table will also be marked in red.
Configuration
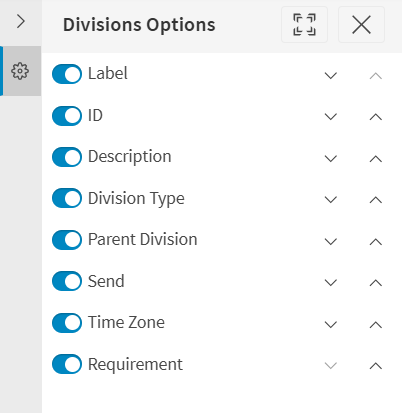
Users can configure which columns are displayed and in what order for each data grid. To open the options panel simply click on the three vertical dots next to the data grid title.

This will open the options panel showing the current order of the columns in that grid, and allowing the user to change it. The changes will be saved and reapplied each time the user visits the page in future.
Note
Each data grid will have view and edit permissions related to it. These can be used to set up each screen to remove any screens that are not required, and to make screens read only where necessary. This can be configured in the administration workspace.
In addition each data grid has a default 'list' associated with it which determines the column order and which columns are visible and editable. These lists can also be configured via the administration workspace.
Warning
Please note that the column level permissions to view and edit data in the data grids no longer apply in the new version of the workbench. Instead administrative users should configure the default lists for each data grid to set up which columns users can see and edit. This also allows admin users to change the default column order to make it more suitable for their organisation.
Activity Modelling
Activity Modelling defines the set of rules to be applied to a dataset activity for the modelling application.

Sometimes the pattern requirements may be for multiple visits within the regular time interval. The most common scenario would be when multiple visits are required per week.
If this is required then the 'Step' column on the activity modelling should be used. A step of 2 would mean that 2 visits are required in each interval.
It is likely that there will be some minimum delay between visits in this case (i.e. it would not be allowed to carry out the two visits immediately one after the other). This can be defined using the 'Min Delay' column on the activity modelling.
Activity Templates
Activity templates used to create regular visit activities, such as planned maintenance work.

The Gantt is based on the modelling pattern.
The first visit shown should start at the last_visited time, if specified, otherwise the current time. Future visits should be shown fitting in with the modelling pattern, based on the interval, step and min_delay.
If step is 1, repeating visits will start at each interval period. e.g. for interval of 1 week all visits will be 1 week apart.

If step is more than 1, visits will be shown after a gap of min_delay from the previous visit, up to the step count. After that the next visit will start with an interval period after the first visit.
If interval 1 week, step 3, min delay 1 day:
- 2nd visit should be 1 day after first visit
- 3rd visit should be 2 days after first visit
- 4th visit should be 7 days after first visit

Operations

Links an operation to an activity template.
Earliest start describe the earliest time that the operation can be carried out for this activity. Latest start describe the last time (before the current schedule time) that the operation was performed. Last performed describe the latest time that the operation can be carried out for this activity.
Usage Period

Defines the expected usage against this activity template of the specified class and between the specified dates.
Start date describe the date from which this usage level applies. End date describe the date until which this usage level applies.
Operation Usage

Defines the recorded usage and date of the specified class for this activity and operation.
Activity Types
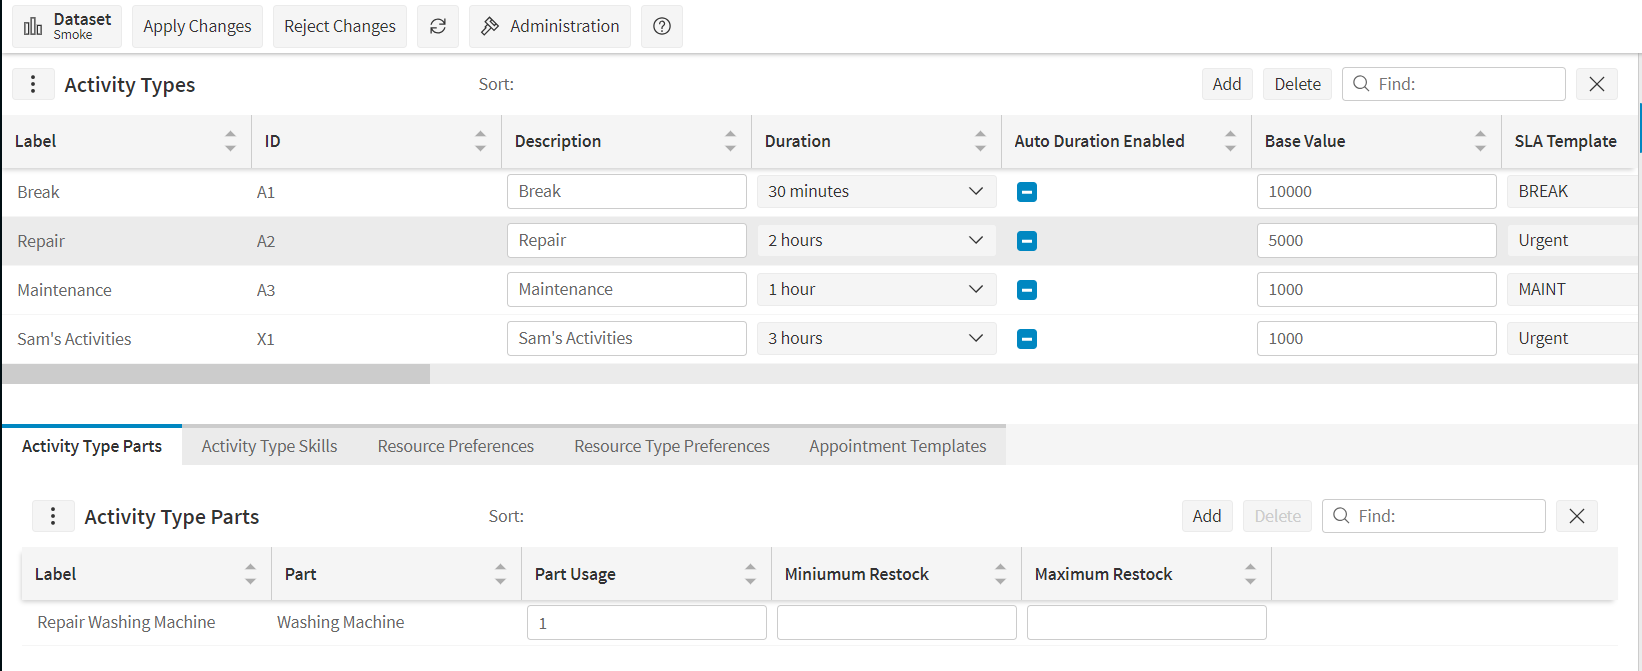
Activity Types are only used when the Advanced Resource Planner is integrated with Scheduling.
They define the types of call or break that will be performed by Resources.
In the example above, activity types have been created for a break, and for call types including repair and maintenance.
Activity Types link to SLA Templates which must have been set up in advance.
The Icons column can be used to add icons to activity types which will then show-up on activities in the scheduling Gantt.
Parts, Skills, Resource Preferences, Resource Type Preferences, Appointment Templates and Custom Metrics can be linked to an Activity Type in the tabs.
Appointment Templates

Appointment templates are used by the Appointment Booking Engine and the Appointment booking screen in the Scheduling Workbench.
Appointment templates define slot patterns for appointment offers that are used by the Appointment Booking Engine. Columns include:
- Day Pattern: the days within the week to apply the appointment template to.
- Number of Slots: the total number of slots to return.
- Window length: the slot length for the returned appointment offers
- Granularity: if the window length is less than the total length of the slot, then the offers returned will start at the slot start time plus an exact multiple of the granularity.
- Offer Expiry Window: the period for which the offers slots are held, if they have not yet been accepted or rejected.
When an appointment template is selected, the lower half of this screen displays the appointment template items. These define the appointment slot start and end times.
Note
You will need to enable the 'AppointmentTempView' permission to view this screen. Speak to your system administrator if you are unable to do this yourself.
Attributes
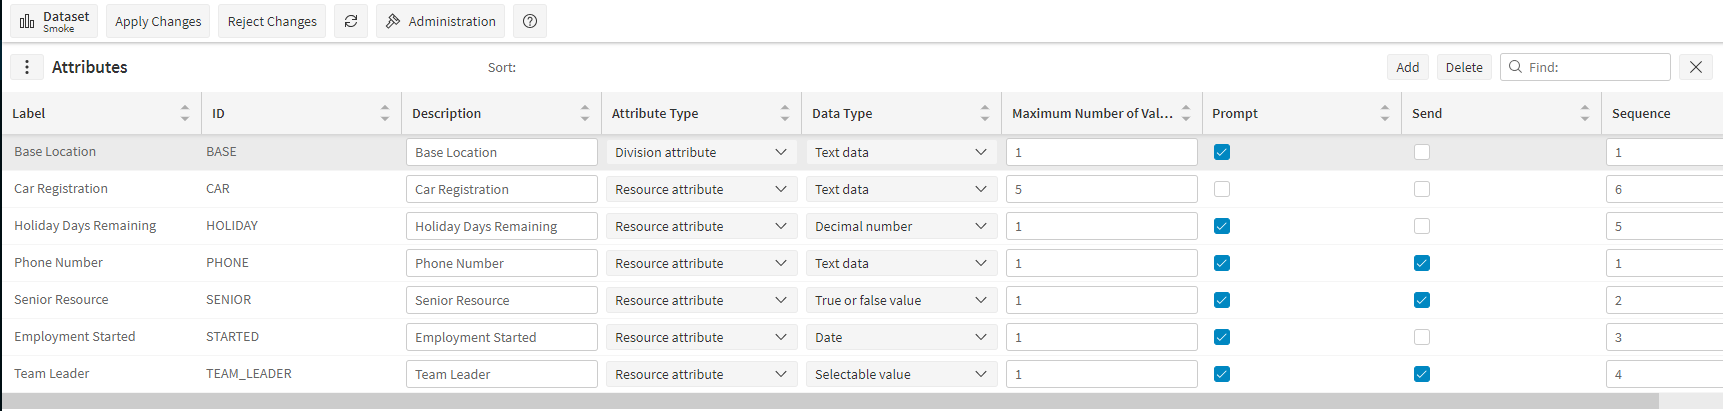
These define additional attributes which can be attached to a Division or a Resource. Each attribute has:
- Label shows how the item will appear.
- A unique id.
- A description.
- A type: whether it applies to a Division or a Resource.
- A data type (e.g. 'text data'). If a data type of 'Selectable value' is used the allowed values can then be entered into the grid below.
- A maximum number of values that may be provided for this attribute. So an attribute 'phone number' may support several values, whereas 'job title' would probably only support one value.
- Prompt: if ticked, then users will be prompted for values for these attributes when entering Divisions or Resources.
- 'Send' indicates whether these attributes will be sent to the Scheduling system if you are using Scheduling as well as Resource Planning.
- Sequence: a value that is used to order the attributes for display within their respective screens: Resource, Team, Division.
Buckets
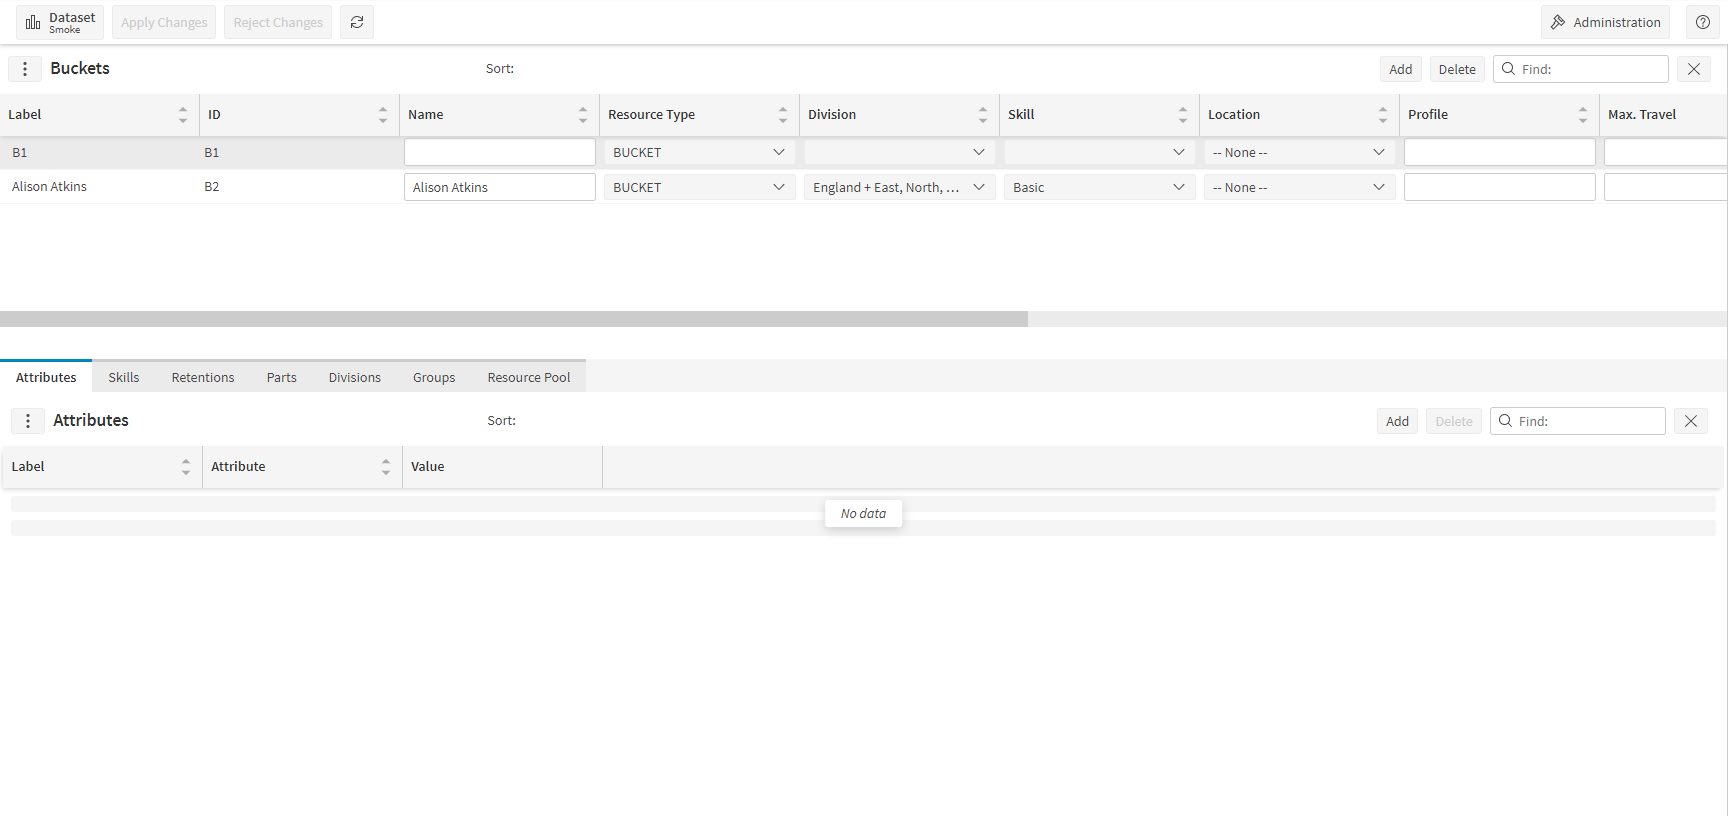
Resource buckets represent a collection of resources where the number of, and the details of, the resources are not known, such as with an external contractor. Activities may be scheduled to resource buckets, but the precise timing of each allocation is unknown.
Teams may have all the properties, skills, capacities and attributes that a Resource has except for parts. See the 'Resources' section above for details.
Calendars
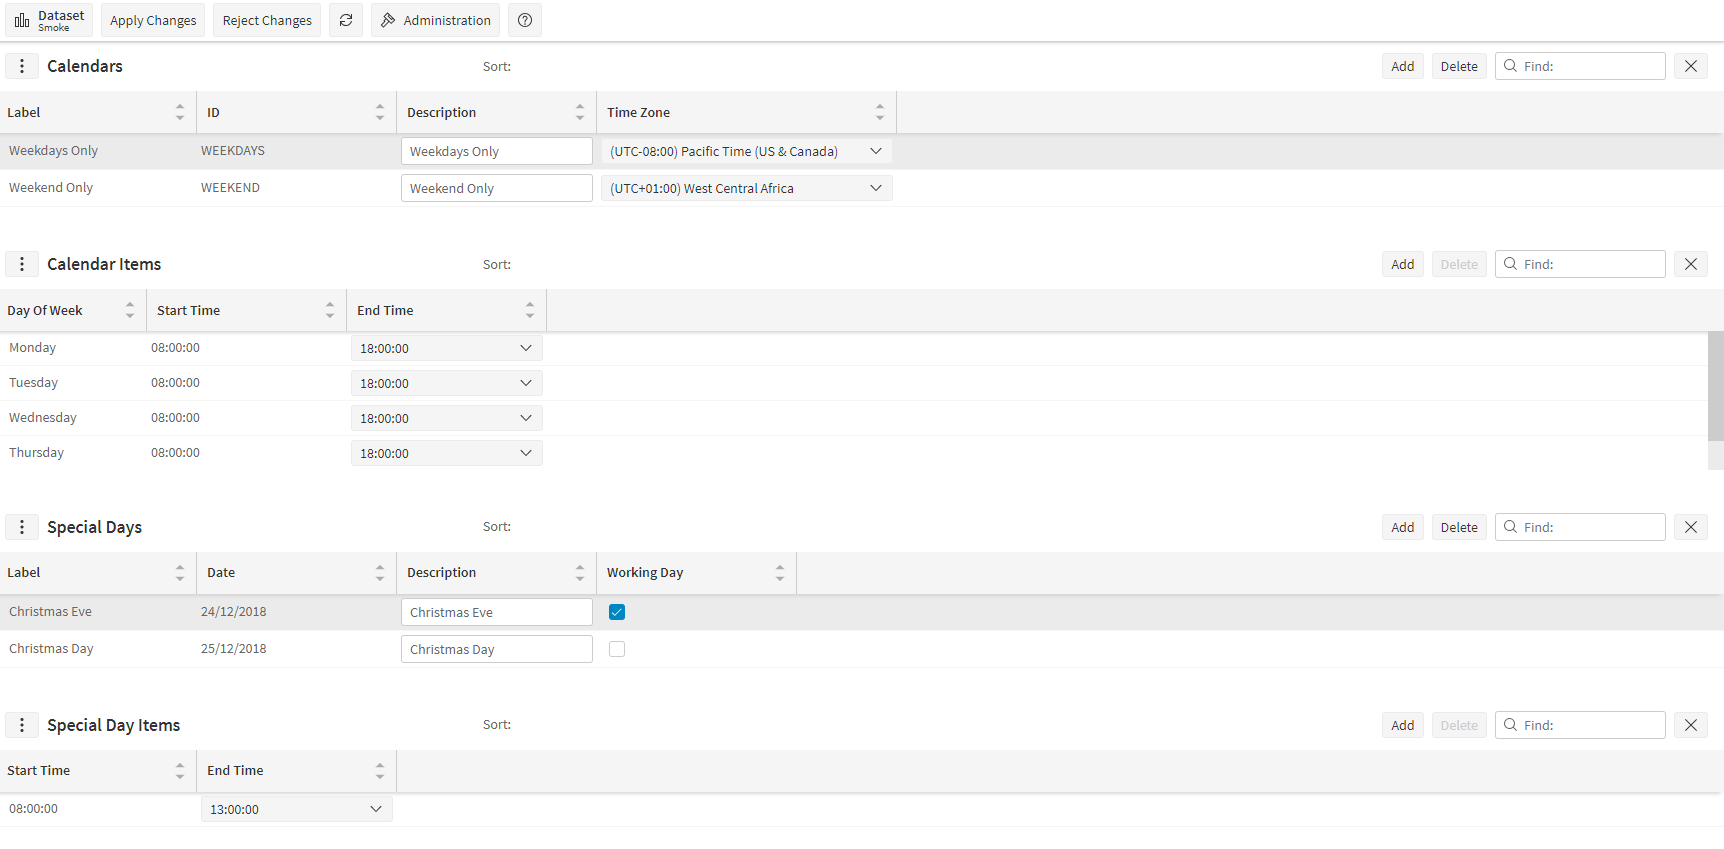
Calendars are used to define the periods of time in which an SLA is considered active. This means that the slopes on the SLA will only apply during the active calendar periods. Outside of these periods the SLA value will remain constant.
Each calendar consists of a number of calendar items, which define the standard weekly calendar pattern. In addition, special days can be added to override the standard day pattern for particular reasons, such as bank holidays.
Capacities
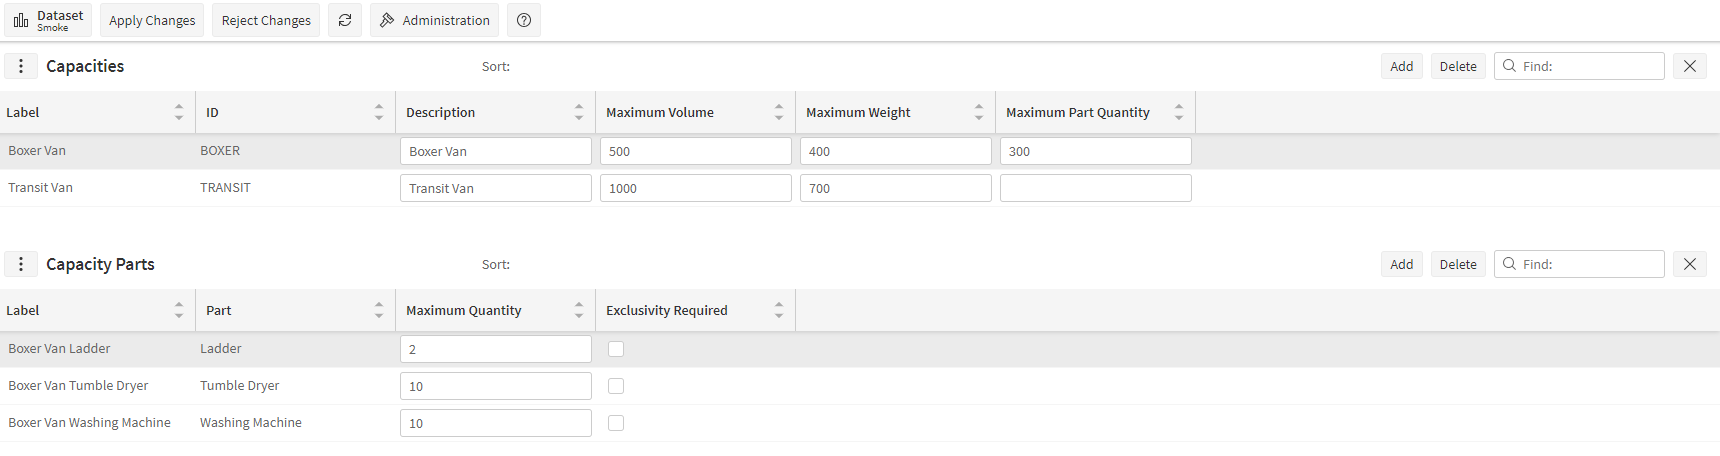
Capacities define the quantity and volume of Parts that can be carried by a Resource or Resource Type. Each capacity has:
- Label shows how the item will appear.
- A unique id.
- A description.
- A maximum volume that can be taken up by parts.
- A maximum weight of parts.
- A maximum quantity allowed of all parts held by a Resource or Resource Type.
Each capacity then contains a number of parts with the following attributes:
- Label shows how the item will appear.
- A maximum quantity allowed of that particular part.
- Exclusivity Required: this indicates if the part must be carried for the capacity requirement.
Categorisations
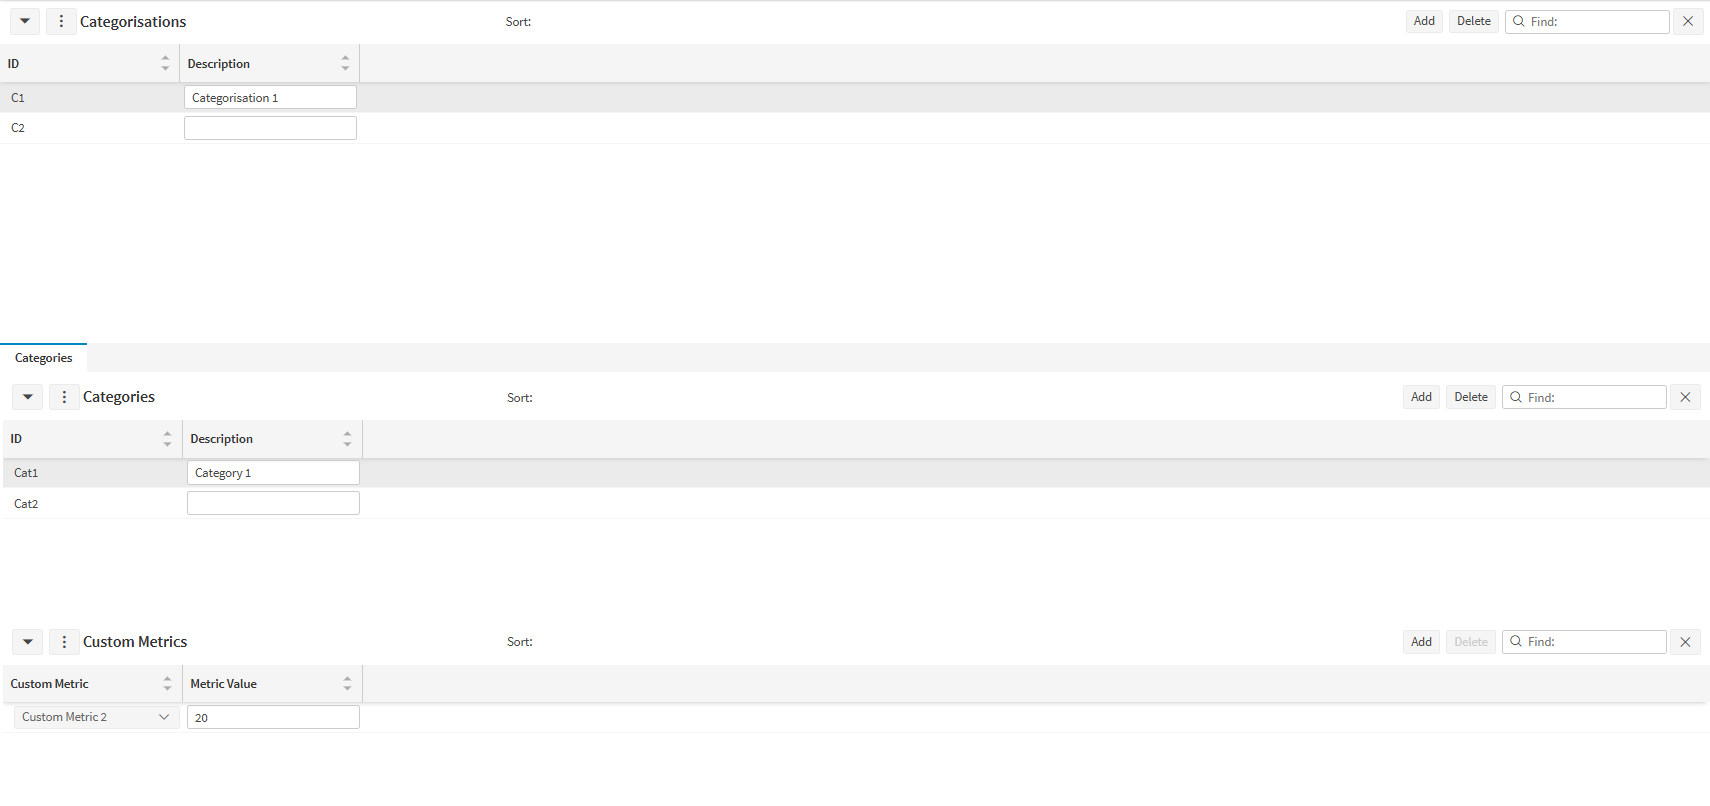
In this screen categorisations can be set up. Categorisations are groups which hold categories, serving as a parent entity for organising them into meaningful groups. Categories can be added to each categorisation, the id of a category must be unique inside a categorisation but the same category can be added to multiple categorisations. For every category a custom metric can be defined. If a category has a custom metric then anything assigned to the category will have that custom metric imposed on it.
In the buckets, resources, teams, activity types and resource types screens, there will be an option to add a category parent row. To do this, a categorisation id and category id need to be defined. A row can only belong to one category in a categorisation but can have as many different categorisations as required.
Contracts
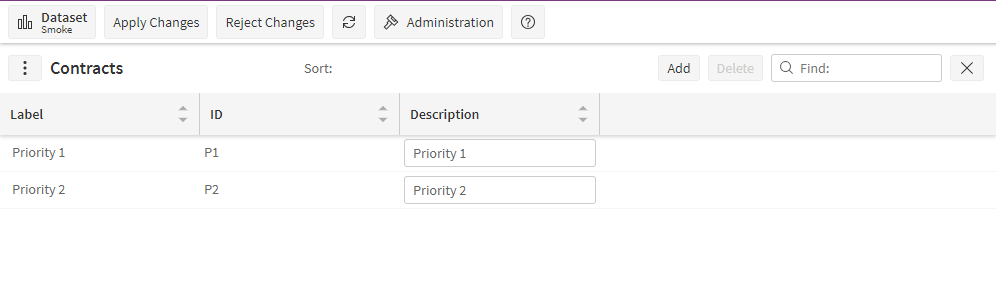
In this screen contracts can be set up. These have a number of purposes:
- For display purposes in dynamic scheduling.
- For reporting purposes using the data archive.
Contracts can be linked to activity types, and also directly to activities in the schedule input data.
Customers
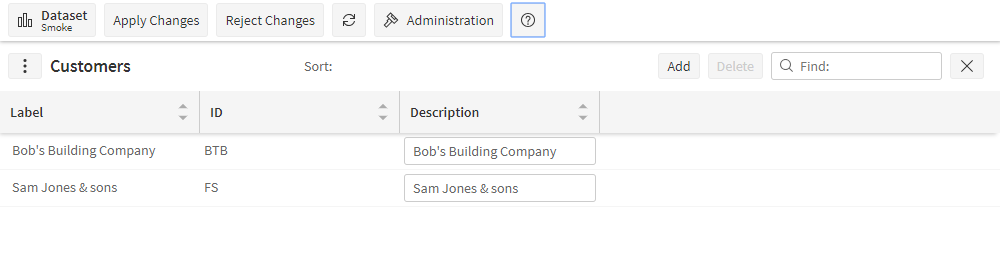
In this screen customers can be set up. These have a number of purposes:
- For display purposes in dynamic scheduling.
- For reporting purposes using the data archive.
Customers can be linked to activity types, and also directly to activities in the schedule input data.
Custom Metrics

In this screen custom metrics can be set up. These are rules which define a limit to the total metric value that is permitted within a shift.
Custom metrics can be linked to activity types, and also directly to activities in the schedule input data.
Depot Transfer Settings
See the 'Transfer Rules Templates' section for details of this screen.
Divisions
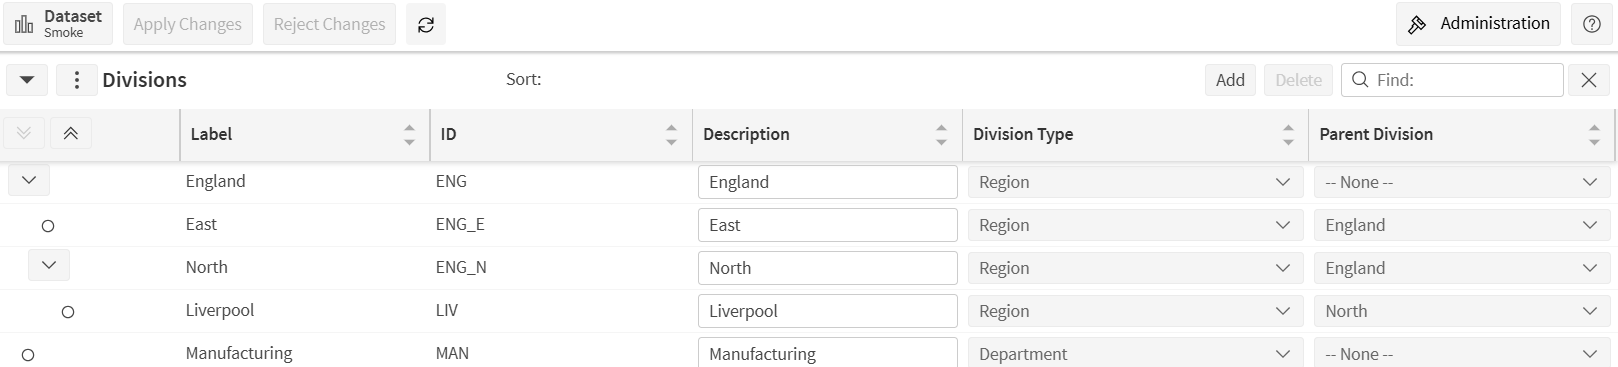
A division or department within an organisation, for which shifts and working times need to be planned. Divisions are arranged in a hierarchy, so in the example above, North and East are both part of the parent division England.
Divisions need not be defined at all, in which case everything is considered part of a global rota.
A Division requires a unique id, a type and a description. A Division can also be linked to a time zone.
To specify a parent Division select one from the drop-down list or select --None-- to make it a top level division. The divisions are displayed in a tree. Click on the symbol in the first column to show or hide the child divisions.
The Send field indicates whether the Divisions will be sent to Scheduling, if Scheduling is in use. If Divisions are sent, they are implemented as Regions within Dynamic Scheduling.
Use the  icons at the top-left of the grid section to quickly expand or collapse all the divisions.
Division Types
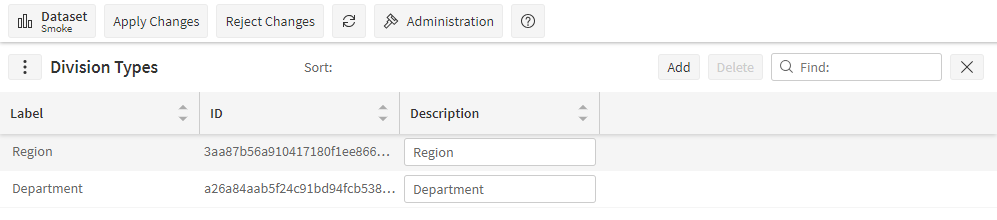
Division Types define different uses for Divisions: e.g. regions, types of work or groups of employees that are planned together, etc.
They have no attributes other than a Description.
Fuel Types
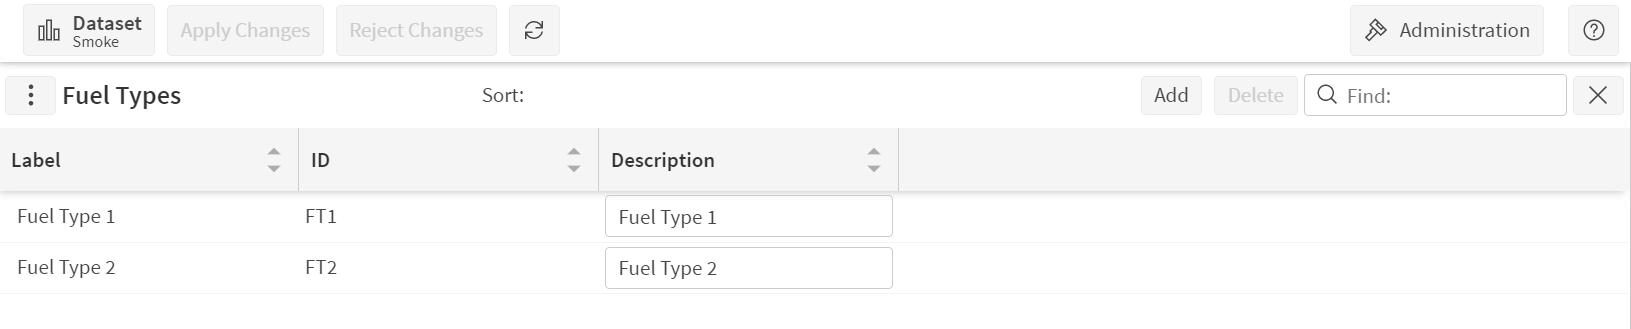
The type of fuel used by the vehicle. e.g. Petrol, Diesel, etc.
Fuel Type is optionally linked to a vehicle model.
Icons
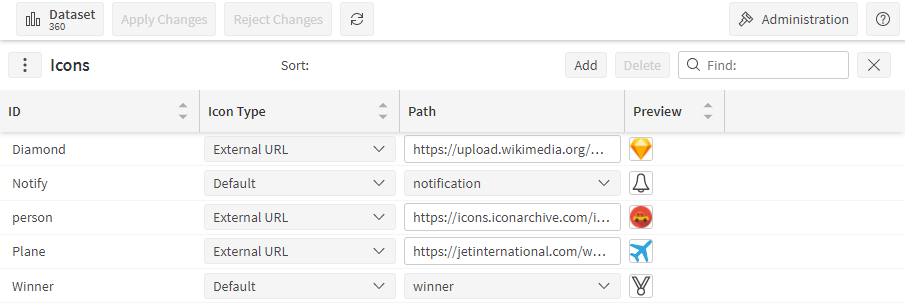
The Icons page can be used to set up icons which can later be added for Activity Types and Resource Types.
Icons of two types can be added, which are of 'External URL' and 'Default'. 'External URL' can be used to add icons by specifying the web URL of any image whereas 'Default' is used to add SVG icons that are already shipped with the application.
Path column can be used to enter the web URL of the image or to select the SVG id.
Locations
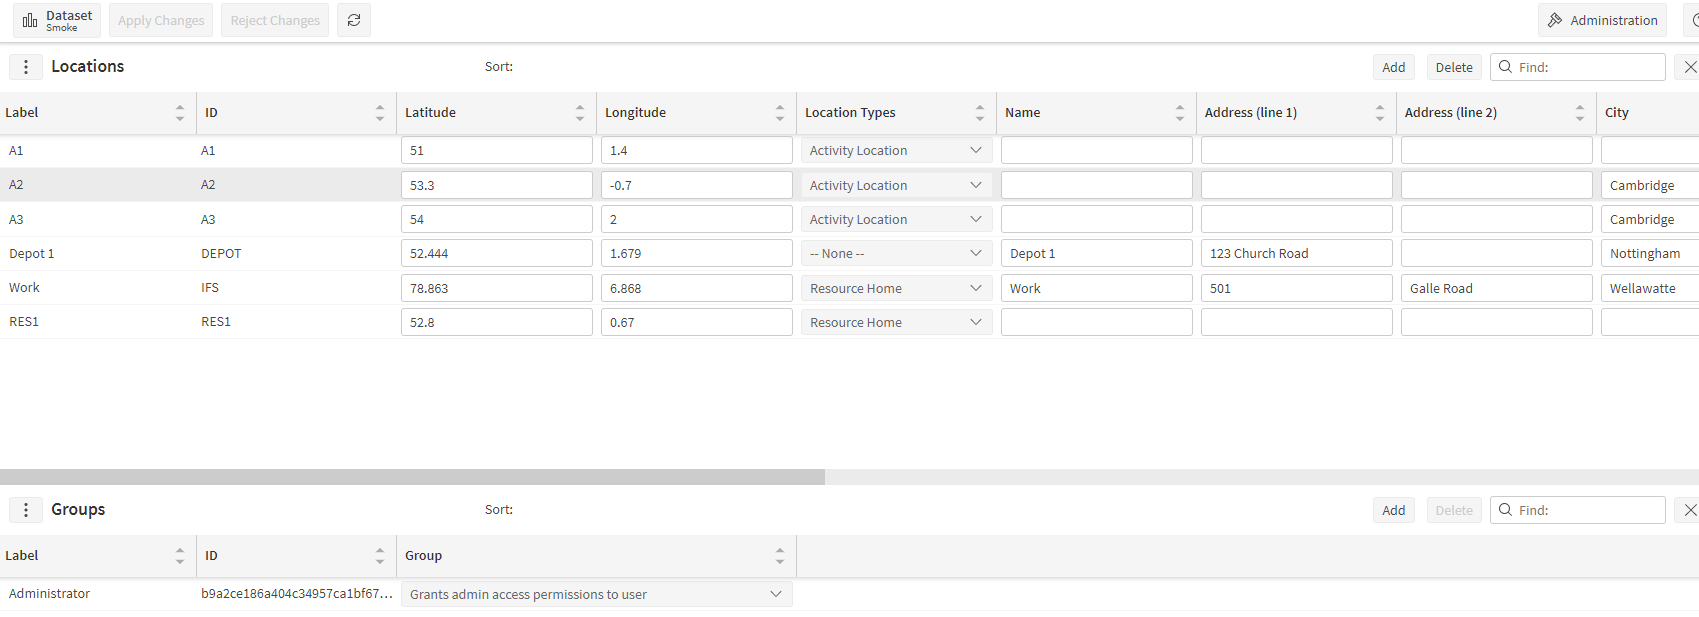
A Location is a place identified by a latitude and longitude which is used to locate resources and activities. Mainly these are important for scheduling, if scheduling is being used in combination with Resource Planning.
A Location must have a unique id. A Location Type is optional - if specified, then the Location inherits the Location Type's values for Add Time and Lack of Coverage, unless these are specified explicitly on the Location.
Other Location details are a person or organisation name and an address, split into its component lines.
This screen also allows Locations to be linked to Divisions. Select the Division(s) that the Location belongs to in the drop-down list in the Divisions column.
The column start based availability relates to any patterns of availability that have been defined. It determines whether the availability applies only to activity start time, or to the entire visit to the activity.
Locations can be associated to groups, which is specified in the sub tables in the lower part of the screen. If linked to a group, it will restrict which users are able to see the locations based on the group specified. Else, the location will be viewable to all users.
Location based filtering can be applied by setting groups to locations. Please see the 'Object Group Filtering' section in Advanced Resource Planning Concepts for further details.
Location Types
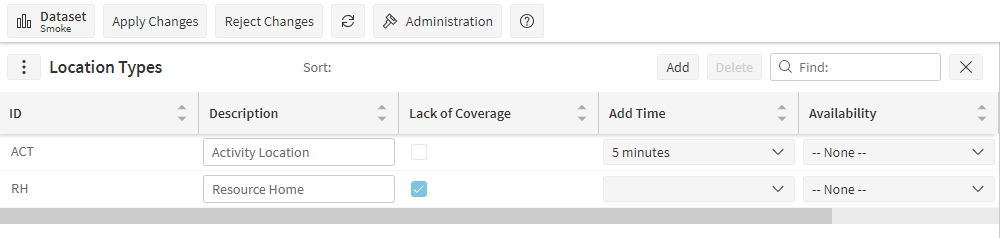
A Location Type is used to define certain characteristics of Locations, in particular whether or not they are known to have mobile phone coverage (which may affect scheduling decisions, if scheduling is in use) and how much of an overhead is imposed by the requirement to park, report to reception and sign in (again, this is particularly relevant to scheduling).
Additionally, a Location Type has a unique id, a description, availability and start based availability (does the availability defined for this location type apply only to activity start time).
Membership Categories
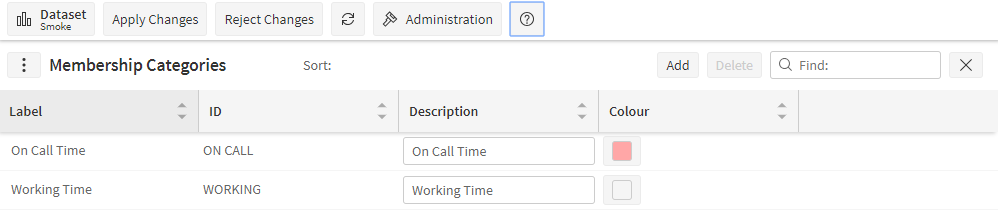
When a resource is planned into the rota they are assigned rota membership for the entire period that they have been planned. Membership categories allow this rota membership to be split into periods of different categories of membership. For example, if a resource if expected to stay away from home (e.g. on an oil rig) then a membership category can be used for the entire period that they are away (e.g. 'Offshore').
Membership categories can optionally be given a colour which will appear as a background colour when used on the resource planner.
Membership categories are linked to shift templates, and can also be linked to both requirements and rules. This means that both requirements and rules can be based on rota membership rather than actual working time.
Operations
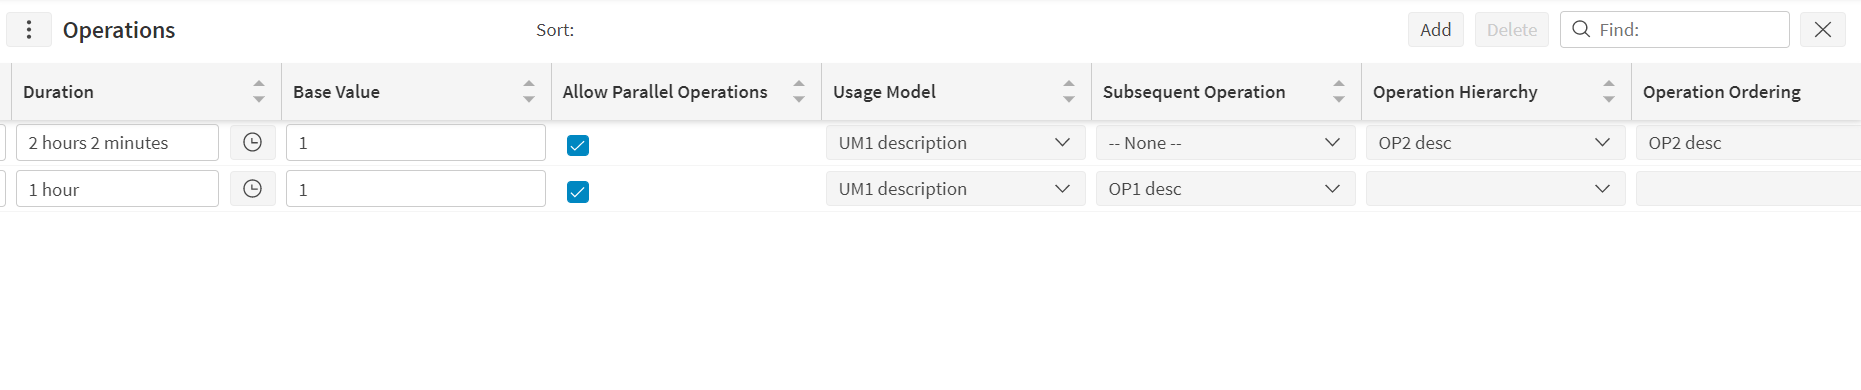
Defines an operation that can be linked to an activity template.
In the context of Fleet Planning, each operation will have limits around how frequently it must be performed. These are usually based on a combination of elapsed time, flying hours and number of flights (flying cycles). Operations will have a maximum limit on each of these, and operations should ideally be planned as close as possible to the earliest of these limits. (Note that since the limits can vary over time it is not possible to say in advance which limit will be hit first).
The column 'Operation Hierarchy' allows operations to be placed in a hierarchy. In such cases, whenever a parent operation is carried out, the child operation will also be taken to have been carried out.
The column 'Operation Ordering' allows a specific ordering of operations to be defined when multiple operations are carried out within a visit.
The column 'Skills' Used to set a skill requirement for a particular operation.
Parts
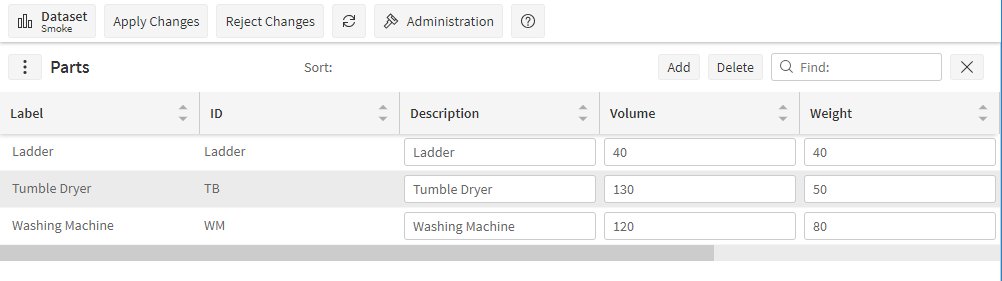
Parts are only used when the Advanced Resource Planner is integrated with Dynamic Scheduling.
Parts contain an ID and a description, and in addition can be given a volume, weight and marked as reusable with a cost per hour.
Positions

Positions can be used to set requirements against, and to search for resources when in the resource planner.
Resources can be linked to positions via the resources screen. The resource planner will then allow the user to search by position and find resources with matching positions.
The parent position allows for a position hierarchy to be defined, which is used when searching by position. The match will include any resources with a parent position of the position being searched for.
Positions can also be used when setting up requirements. In this case the resource planning screen will include the required positions within the planning tree, and users can plan resources into a specific position.
Note
It is not necessary for a resource to be assigned to a particular position in order to plan the resource in that position. The assignment is purely to aid with searching for an appropriate resource.
The required role column allows the position to be linked to a role which must be fulfilled in order for the resource to work in this position. This restriction is applied when planning shifts for resources on the resource planning screen.
Note
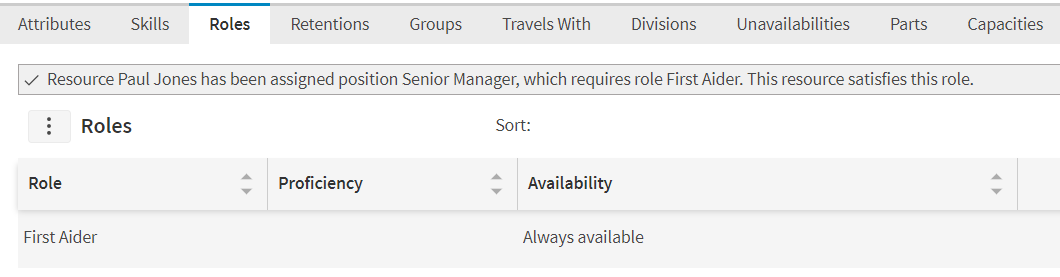
It is possible to assign a resource to a position for which they do not satisfy the required role. However the resource will not be allowed to work in the position on the resource planner, unless a manual role override is performed. The Resources data management screen also warns of any conflicts within the 'Roles' sub table.
Resources
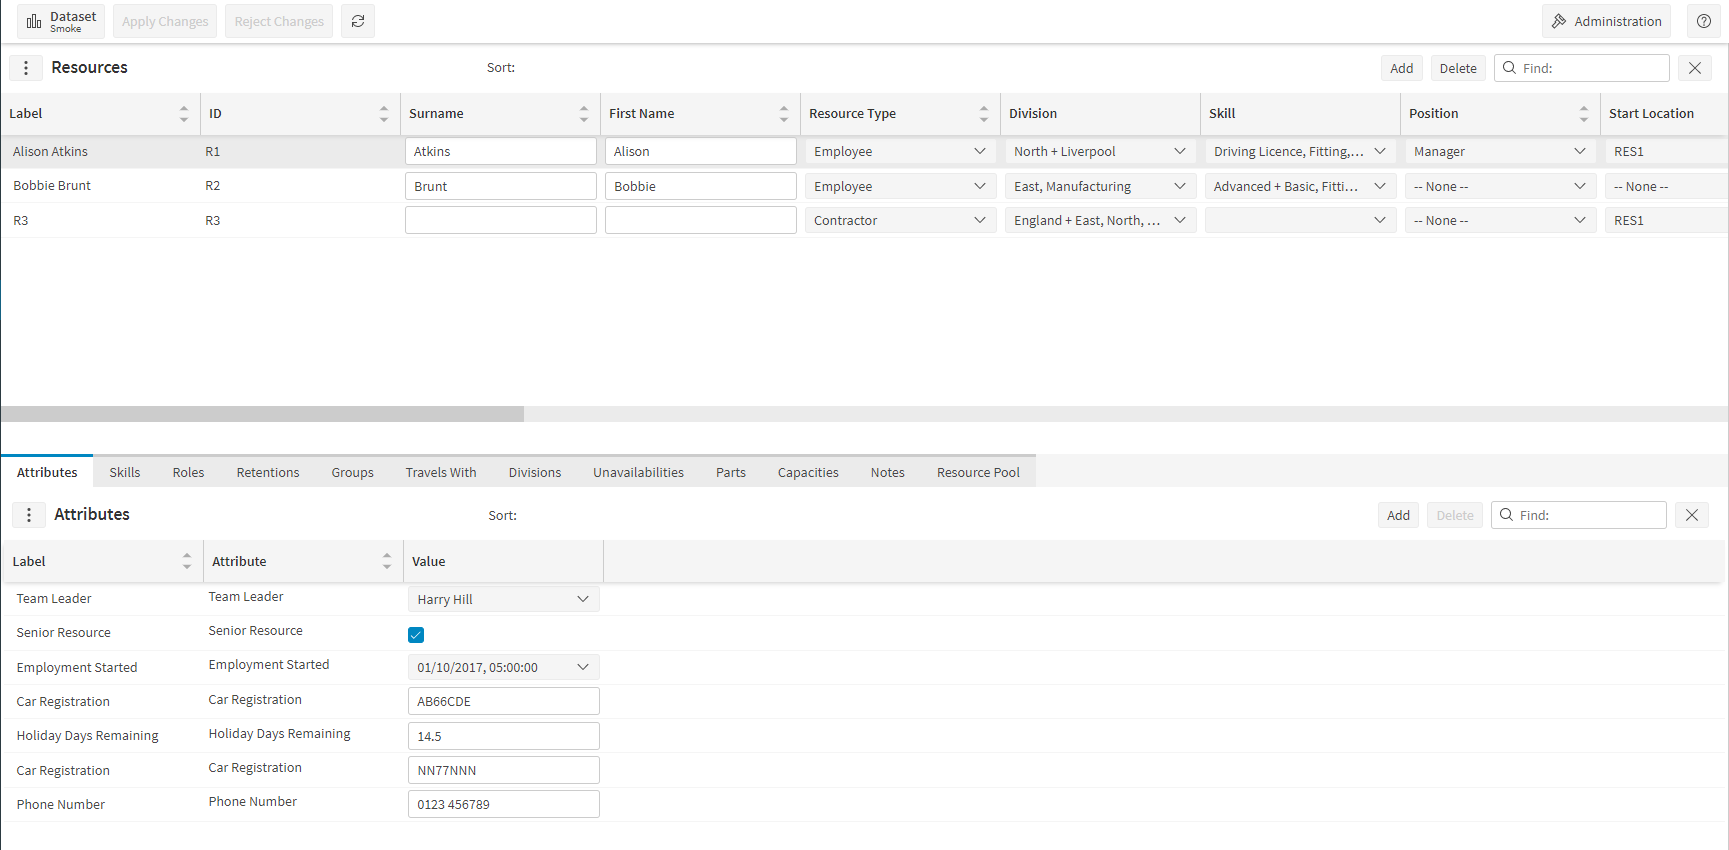
A Resource is a member of staff for whom we are going to plan shifts. A Resource has the following fields, which can be edited through this screen:
- ID - Must be unique
- First Name
- Surname
- Resource Type - This must be provided
- Divisions - Which Divisions this resource is a member of (may be more than one)
- Skills - This lists the skills that the resource possesses
- Position - The id of the position attributed to this resource.
- Start Location - Used in scheduling
- End Location - Used in scheduling
- Profile - Used in scheduling for travel calculations
- Rule Collection - The set of working time rules that should be enforced for this resource
- Cost/km - Used in scheduling
- Cost/hour - Used in scheduling
- Cost/hour (OT) - Overtime cost per hour, used in scheduling
- Max Travel - Used in scheduling
- Travel From - The travel allowed beyond the end of shift for this resource, used in scheduling
- Travel To - The travel allowed before the start of shift for this resource, used in scheduling
- Utilisation - Used in scheduling
- O.O.R. Multiplier - Out of region multiplier, used in scheduling
- Shift Template Set - The set of shift templates that can be used to plan shifts for this resource
- Contact Details - For example: mobile phone number for the resource
- Time Zone - A time zone in which the resource operates
Resources have other data, which is specified in the tabs and sub tables in the lower part of the screen.
Attributes
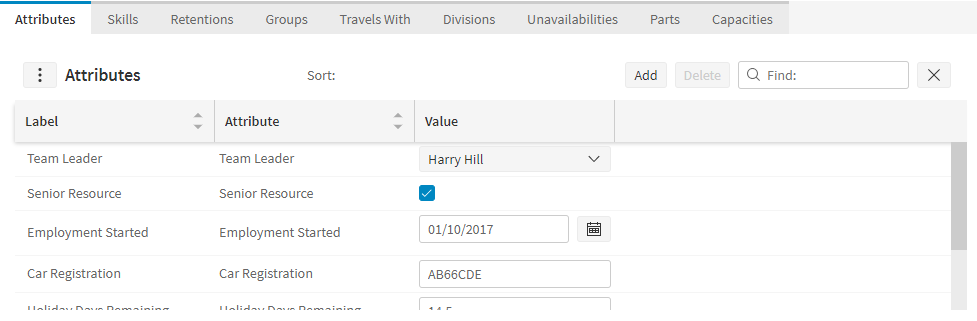
This allows you to provide values for each resource, for the additional attributes specified as Resource Attributes in the Attributes section.
Skills
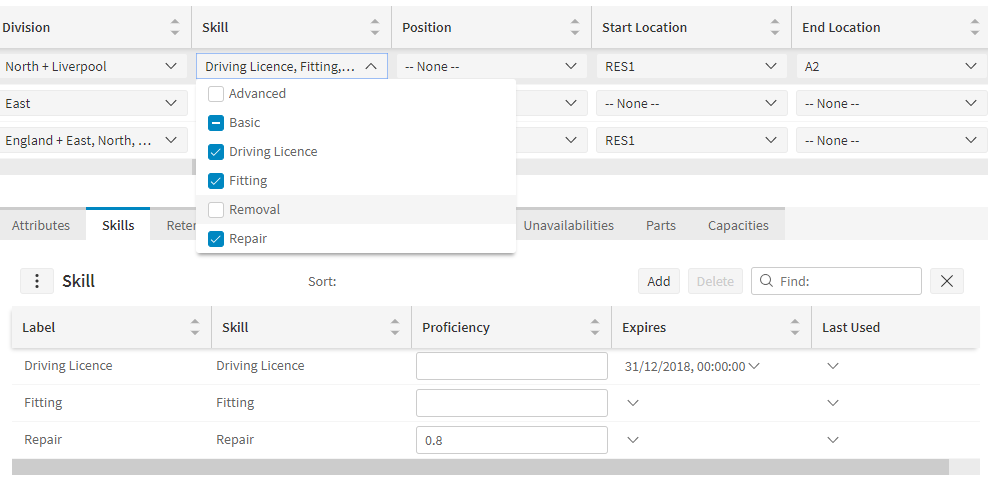
Skills can be assigned to the resource through the drop-down in the skill column of the main grid, or in the child table in the Skills tab. Some skills include other skills and these additional skills are listed after the main skills in the skill column. Each skill that the resource has is listed in the table in the Skills tab. For each skill a proficiency and an expiry date may be specified (used in scheduling). The date that the skill was last used may also be recorded (this information is used in conjunction with the skill's 'maximum unused period'). A given resource's skill can have an availability period. This is a period of time for which this resource can utilise this particular skill. This is entered in another table below the skills table. A newly created skill must be saved before a Skill Availability can be added. If no availability is specified then the skill is always available.
Roles

Each role that the resource satisfies is listed here. Roles are calculated automatically so it is not possible to edit this table directly. For each role a proficiency value is calculated based on the skill proficiencies (the proficiency shown is the minimum across the required skills). Availability information is also displayed, based on the availabilities and expiries of the required skills.
Note
Clicking on the 'Details' button, in the top right, will bring up the Role Details pop-up. For more information see the relevant section in Advanced Resource Planning Concepts Guide.
Retentions
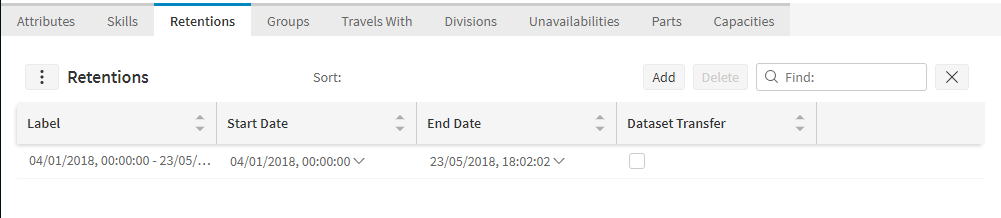
Retentions are used to make Resources active for a period of time, thus rota items can be generated during these periods. Retention periods need to be set-up prior to rota item creation.
If the dates are completely outside of the Resource planning window then the resource will be filtered out from the resource panel.
Groups
Groups can be assigned to resources (and also to resource types). Use the combo box to add the resource to selected groups. This will then restrict which users are able to see the resource.
Resource based filtering can be applied by setting groups to resources. Please see the 'Object Group Filtering' section in Advanced Resource Planning Concepts for further details.
Travels With
You can create 'travels with' which is linked to a resource. You can specify an optional time pattern for the duration for which the 'travels with' applies.
Divisions
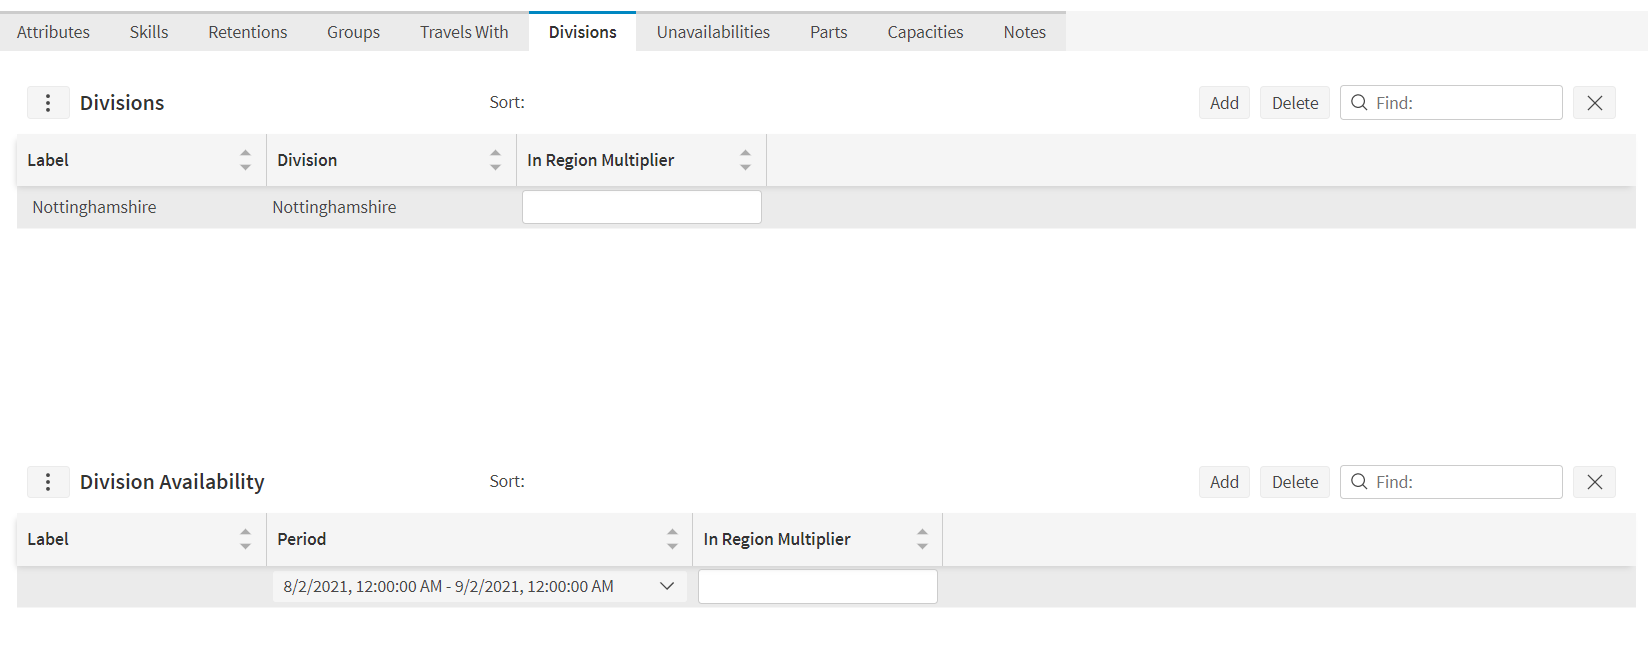
Here you can assign divisions to a resource as well as value for the within-region multiplier field to restrict a resource to a particular area.
A given resource's division can have an availability period. This is a period of time for which this resource belongs to this particular division. This is entered in another table below the divisions table. A newly added division must be saved before a Division Availability can be added. If no availability is specified then the resource is always available in the division.
Unavailabilities
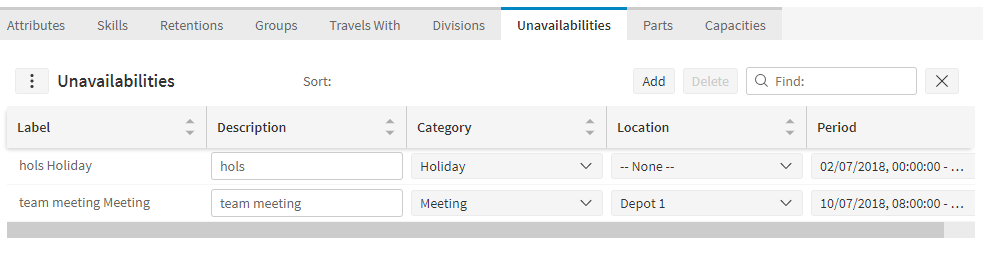
Here you can assign unavailabilities to a resource. The 'Unavailability From' field is a filter which limits the amount of data displayed. The calendar provides a convenient display of the resources unavailabilities.
Parts
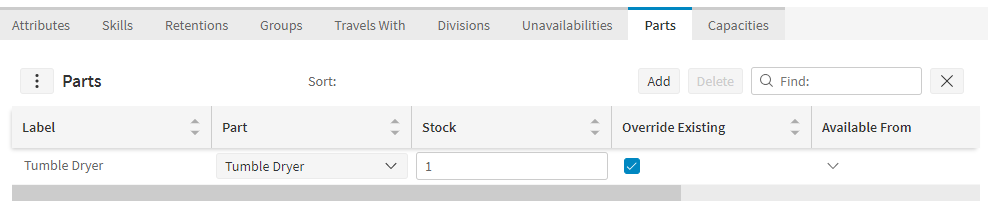
Here you can assign Parts to a Resource. Please see the Resource Modelling Schema Guide for further details of the fields shown here.
Capacities

Here you can assign Capacities to a Resource.
Resource Pool

Here you can assign one or more Resource Pools to a Resource.
Resource Pool Sets
A Resource Pool Set defines a number of different groups of resources which may be used to schedule a set of activities linked in a "chain". Activities are linked into a chain using Activity Resource Pool Set. All activities in the chain must be scheduled to resources from a single Resource Pool, although any of the Resource Pools in this set may be chosen.
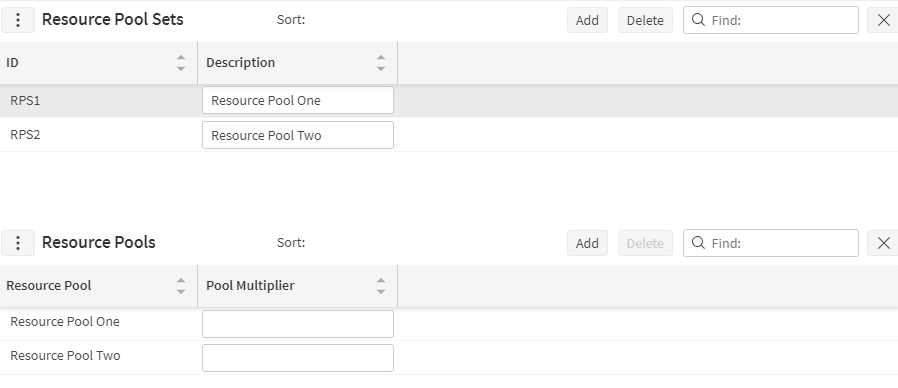
Resource Pools
A Resource Pool defines a groups of resources based on resource or resource type. Shared part stocks can be defined for the resource pool if the part is linked to a resource pool set that the resource pool is part of.
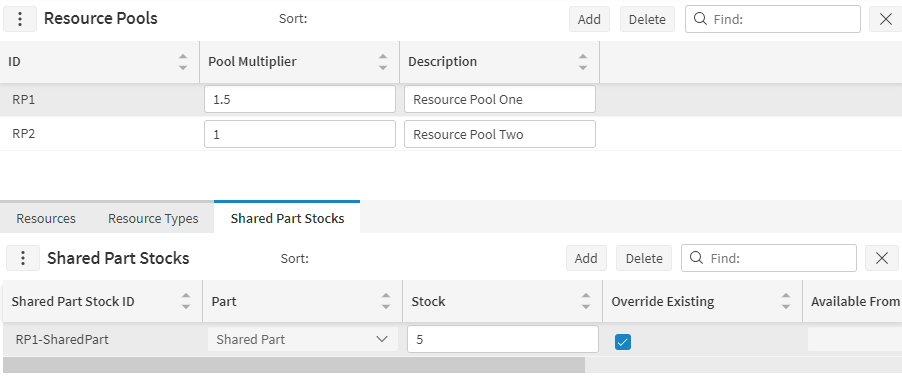
Resource Types
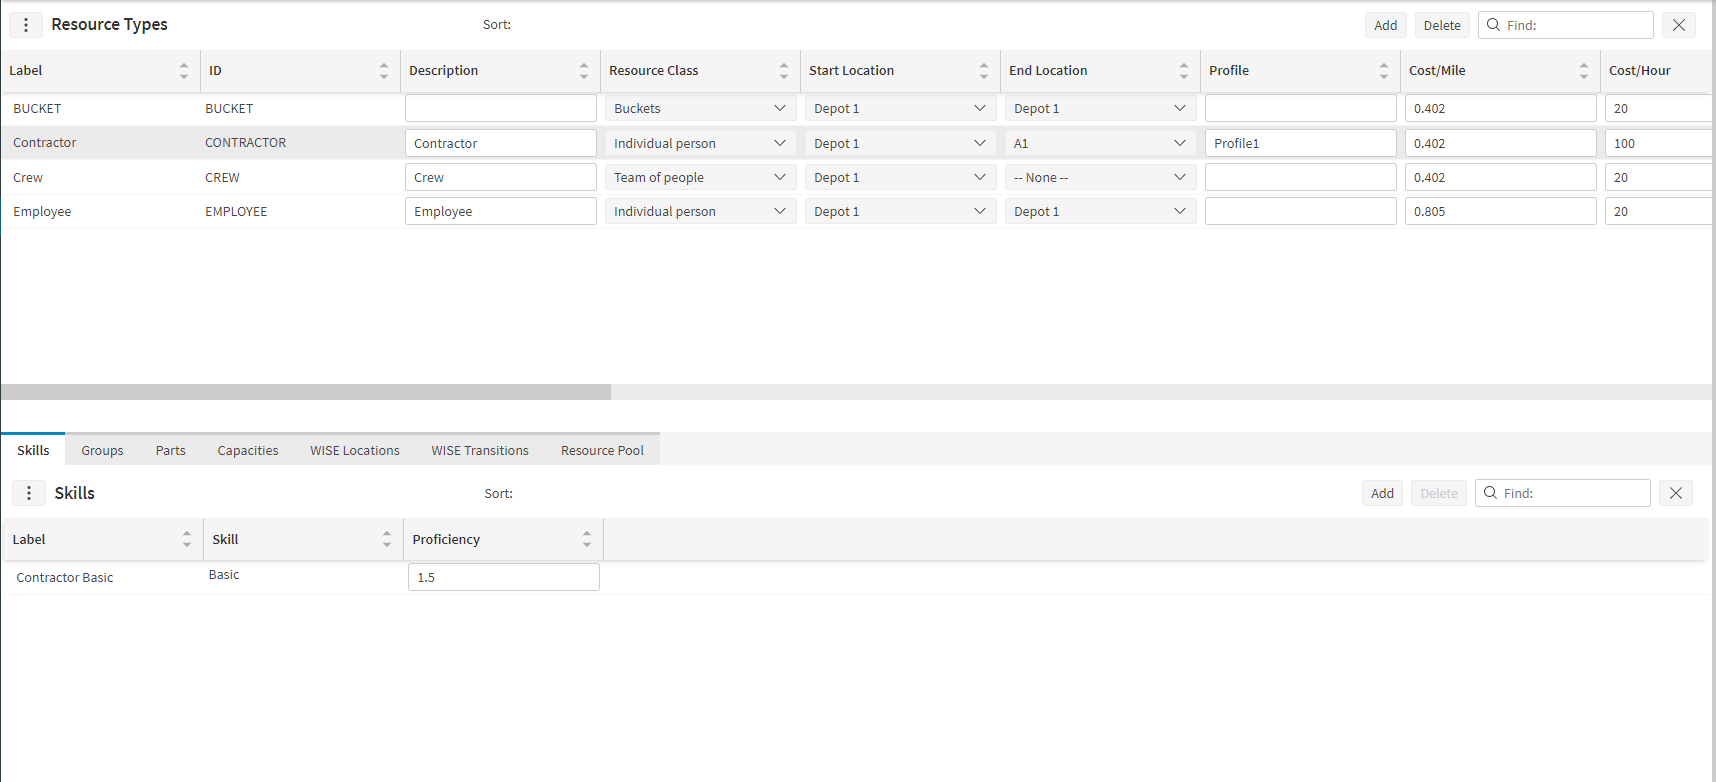
A Resource Type is a category of Resource. Resources inherit the properties of their Resource Type, unless a value is specified in the Resource record which overrides the value in the Resource Type
Resource Types have the following properties, which can be specified through this screen:
- ID - Must be unique
- Description
- Resource Class - The classification of this resource
- Start Location - Set start location and it will apply to the resource when type is defined against it so no need to define on resource
- End Location - Set end location and it will apply to the resource when type is defined against it so no need to define on resource.
- Profile - Used for travel calculations in scheduling
- Cost/km, Cost/hour, Max Travel, Utilisation - Used in scheduling
- Cost/hour (OT) - Overtime cost per hour, used in scheduling
- Travel From - The travel allowed beyond the end of shift for resources of this type, used in scheduling
- Travel To - The travel allowed before the start of shift for resources of this type, used in scheduling
- Travel Cost Model - Used in scheduling
- Utilisation - Used in scheduling
- Hire Cost - Used in scheduling
- Release Cost - Used in scheduling
- O.O.R. Multiplier - Out of region multiplier, used in scheduling
- Rule Collection - The set of working time rules that should be enforced for this resource
- Speed factor - Used in scheduling
- Icons - Used to add icons to resource types which will then show-up on resource rows in the scheduling Gantt
Resource Types can also specify skills and groups which all resources of this type will inherit. For each skill a proficiency may be specified (this is used in scheduling).
Resource based filtering can be applied by setting groups to resource types. Please see the 'Object Group Filtering' section in Advanced Resource Planning Concepts for further details.
The WISE Locations tab can be used to restrict the Locations in which Resources of the particular Resource Type can be added automatically when using the WISE.
Parts and Capacities may also be applied to Resource Types. Please see the Modelling Schema Guide for further details of the fields shown under the Parts tab.
Roles

Roles are types of job which may require a number of skills. In the above example, for instance, to be a Plumber you need to have the Plumbing skill, but also Plastering and Health and Safety skills.
Role Types may be one of the following:
- ALLSKILLS (the default) - a Resource can fulfil this role only if they have all the skills required.
- ANYSKILL - a Resource need only have one of the skills required, in order to fulfil the role.
Rules
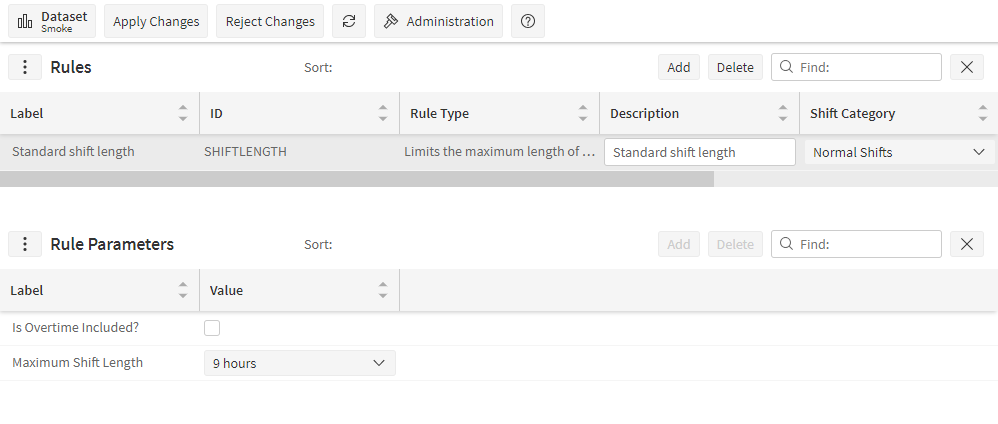
Rules are rules or laws about permitted working times e.g. minimum rest periods, requirements to have breaks, maximum continuous working time, etc. A rule can be set to global to apply to all resources or can be added to a Rule Collection and assigned to Resources and Resource Types.
There are multiple pre-defined Rule Types, which cannot be changed or added to. However, you can choose which of these rules are applied and specify parameters for each rule type. You can specify more than one rule of each type, should you wish to.
A full description of the different types of rule is given in the Working Time Rules section later in this document.
Commit rules and their overrides can be defined here. They can be passed to the scheduling database to be used by the Schedule Dispatch Service. For a more detailed description of these rules see the Scheduling Schema Guide.
Specific Rules
The Rules that you have chosen to set up are shown in the top part of the screen:
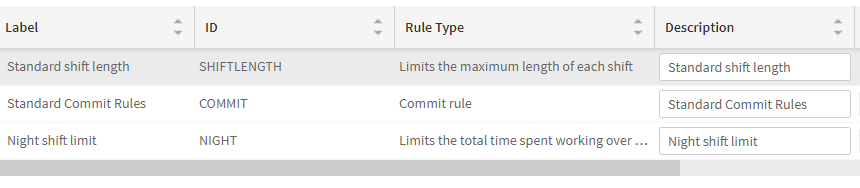
Each of these rules has a Rule Type (one of the standard Working Time rule types), an optional description, and a Shift Category that this rule applies to. If no Shift Category is specified, the rule applies to all Shift Categories. Each rule type has its own parameters that will need to be set. Once you select a Rule, you can see the parameters for this rule in the section below.
Note
There are two rules relating to membership periods instead of actual shifts. For these rules a membership category must be specified. For all other rules the membership category will be ignored.
Rule Parameters
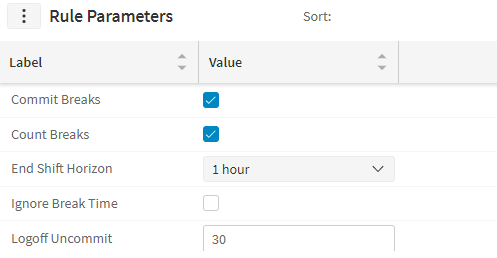
Each parameter that has been specified is listed here. Once a rule type get selected, rule parameters will populate based on the selected rule type. It is also not possible to add more than one row for the same parameter, since only one value may be specified for each parameter.
Rule Collections

Rule Collections are used to link a set of rules to a Resource or a Resource Type; so that some people in the organisation have different rules applied to them e.g. a company may employ some lorry drivers (who need working time rules) and other office workers (who need different rules).
Create Rule Collections using the Add button, and then pick the rules that are in the collection by clicking on the Rules field and choosing rules from the drop-down list.
Separation Groups
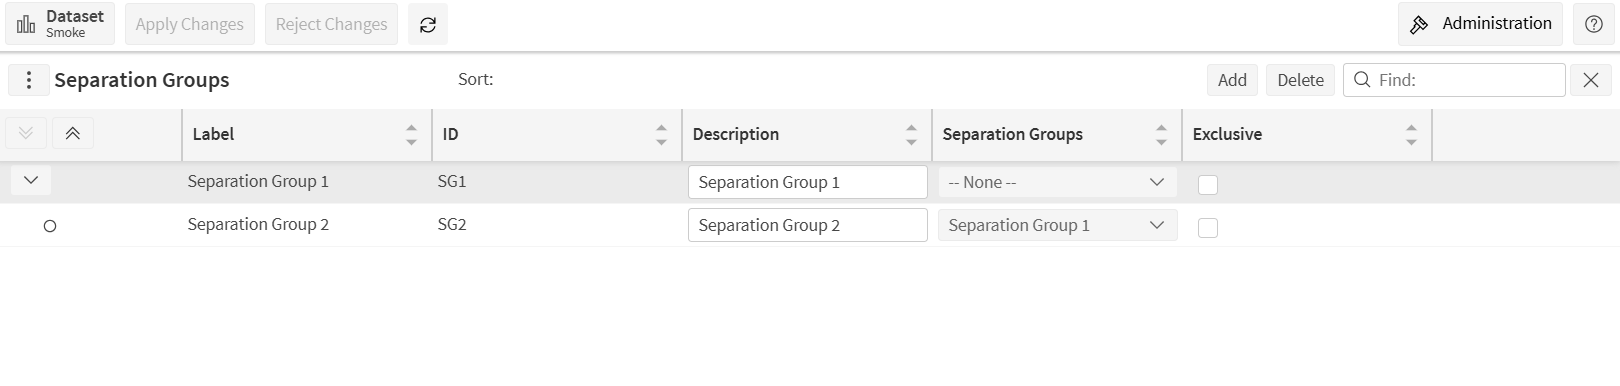
Defines a group of activities to which separation rules should apply. The rules are defined in a separation model.
Warning
The use of Separation Models should be as limited as possible. Alternative time-based constraints should be evaluated before using Separation Models. IFS PSO Product Development must be consulted before using Separation Models. Separation models can only be used to constrain to a single time range, they cannot be used to provide a series of separations each with a different incentive.
Separation Models
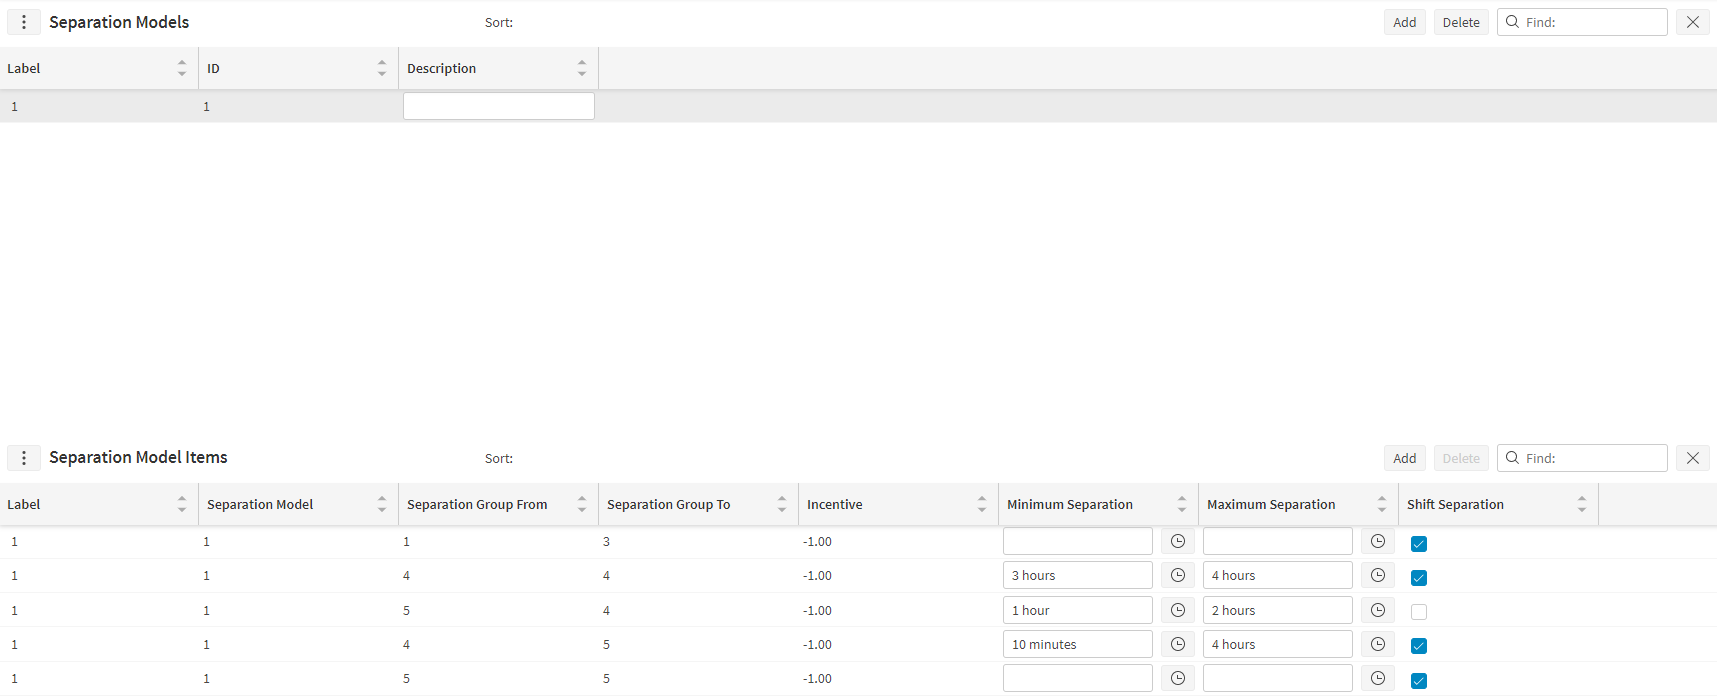
This defines a set of rules for preventing activities from being scheduled too closely together, or too far apart. Activities to which the rules apply must belong to a separation group, which they can be linked to via the Separation Groups column on Activity Types page. Resources are then linked to the Separation Model via the Separation Model column on either Resources or Resource Type pages.
The rules themselves are defined via Separation Model Item rows. Each row specifies a separation group from and to, a minimum and maximum allowed separation, and the option to use shift separation (at least one type of separation must be supplied). Additionally an incentive can be provided. With the default incentive value of -1 the separation will be applied as a hard constraint, so the minimum and maximum must be satisfied. If a positive incentive value is used then the value is added to the plan margin if the separation conditions are satisfied.
In the case of a hard maximum separation constraint, the plan is considered invalid if the gap between an activity in the separation to group and the nearest previously scheduled activity in the separation from group (scheduled to the same resource) exceeds the maximum separation. If there is no such activity then this is valid. If an activity in the separation from group is followed by multiple activities in the separation to group, then only the first of these must obey the maximum separation constraint.
For a soft separation constraint the incentive is applied if the gap between an activity in the separation to group and the nearest previously scheduled activity in the separation from group (scheduled to the same resource) is within both the minimum and maximum separations. If an activity in the separation from group is followed by multiple activities in the separation to group, then the incentive will only be applied to the first of these.
Warning
The use of Separation Models should be as limited as possible. Alternative time-based constraints should be evaluated before using Separation Models. IFS PSO Product Development must be consulted before using Separation Models. Separation models can only be used to constrain to a single time range, they cannot be used to provide a series of separations each with a different incentive.
Shift Categories
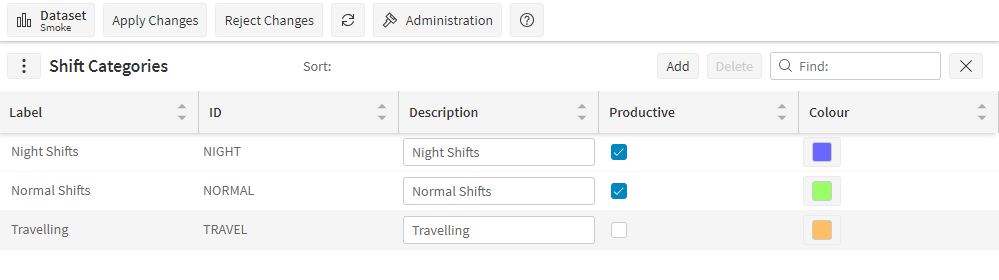
Shift Categories have a unique id and a description and also (optionally) a colour in which shifts of this category will be shown in the Resource Planning screen.
The productive column can be used to mark certain shift categories as being non-productive. Any rota item linked to a non-productive shift category will not contribute towards requirements.
To change the colour, click the coloured cell in the Colour column.
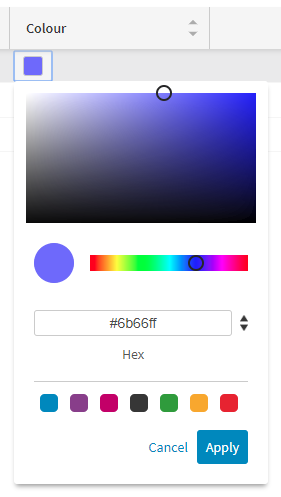
Precise 'red, green, blue' values between 0 and 255 may be typed in to the number boxes on the right or click in the coloured areas to select a colour.
Shift Templates
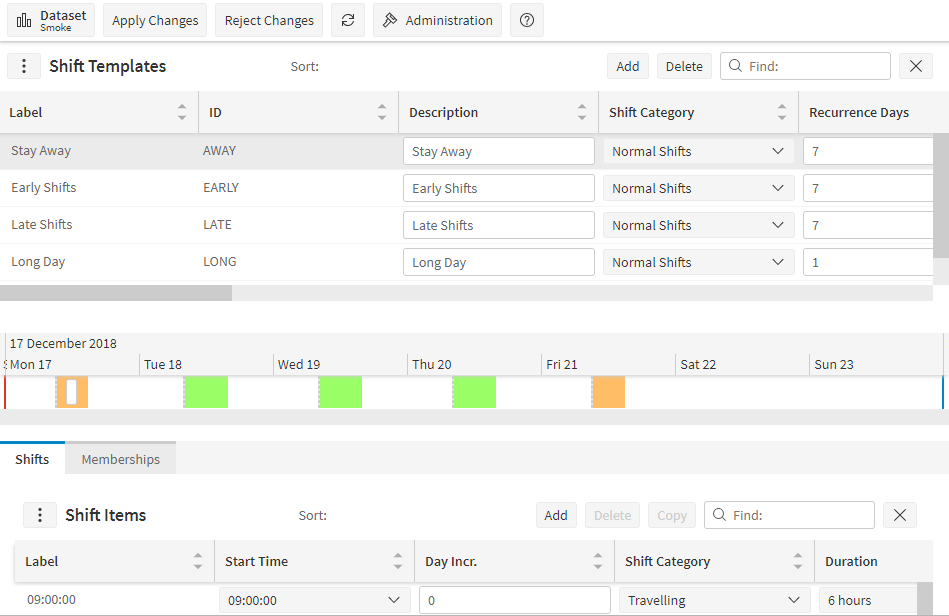
A Shift Template is a common pattern of shifts (working times) which can be applied to a resource or a set of resources. Each Shift Template has the following properties:
- ID - must be unique
- Description
- Shift Category - this links the shift template to a category which can be used to change the shift colour and apply particular rules
- Recurrence Days - how often this shift pattern repeats. So a shift template for office hours of 09:00 to 17:30, Monday to Friday, would have a Recurrence Days of 7, since the pattern repeats every week.
- Start Day - displays days of the week. If this is set then the shift template will always be applied starting from the selected day, and then cycling through, based on the Recurrence Days column. If you want to start on Monday-Friday (Saturday-Sunday off) repeating shift pattern, then you must select a recurrence days of 7 and Start Day as Monday.
- Duration - the length of the shift
- Overtime Period - the length of any overtime period at the end of the shift. This is a period that may be used, but only if there is an abundance of work on that day. It is primarily for scheduling.
- Snap Time - for scheduling - if a resource logs in within this time of the start of their shift, they are considered to have started the shift
- Split Allowed - for scheduling - are activities allowed to be split into this shift? E.g. when a long job from the previous day may overrun into this shift.
- Utilisation - for scheduling - a value between 0 and 100 indicating how full the shift is allowed to become. The default (if no value is supplied) is 100 i.e. the shift may become completely full.
- Shift Cost - for scheduling - the cost of using this shift. May be used to encourage the use of permanent staff rather than contractors, for example.
- Utilisation Template - for scheduling - specifies utilisation values indirectly via a template, rather than directly using the Utilisation field above.
- Early / Late End Leeway - allows the end time of the shift to flex based on when the resource actually starts the shift.
- Split Priority - used to restrict whether activities can be split across this shift.
- Precedence - used to increase the value of the shift in automated shift planning.
- Repeat Preference - used to encourage or discourage the shift from being used repeatedly in automated shift planning.
- Manual Scheduling only - whether the DSE should automatically schedule work in this shift.
- Start Location / End Location - the start and end locations for this shift. If specified, these will override the locations specified at the resource or resource type level.
- Cost/Hour / Cost/Hour (OT) / Cost/Km - the resource costs associated with this shift. If specified, these will override any costs specified at the resource or resource type level.
- Max. Travel / Travel From / Travel To - travel restrictions associated with this shift. If specified, these will override any restrictions specified at the resource or resource type level.
- Travel cost Model - the travel cost model associated with this shift. If specified, these will override any travel cost model specified at the resource or resource type level. The travel cost model will also take precedence over the Cost/Km and Max. Travel settings.
Shift Items
A Shift Template contains a number of Shift Items, which specify the actual shifts that will be created, once a start date for the Shift Template has been specified. The middle part of the screen shows these for the currently selected Shift Template:
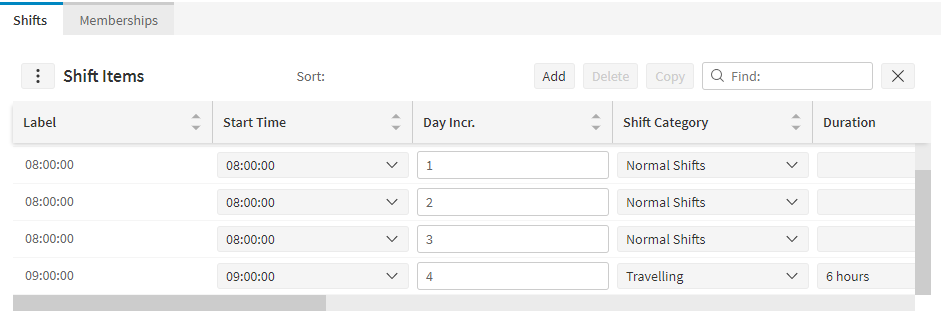
If the Shift Template were chosen to start on May 9th for instance, then using the Shift Items above, shifts would be created as follows:
- May 9th, 09:00 to 15:00
- May 10th, 08:00 to 17:00
- May 11th, 08:00 to 17:00
- May 12th, 08:00 to 17:00
- May 13th, 08:00 to 17:00
So the Day Increment ('Day Incr.') is added to the Shift Template start time and then the Time Increment is added ('Time Incr.'). This generates the actual shift times. If a Shift Template start time of May 16th had been specified, all the shifts would have been a week later.
The Shift Category of Shift Items will normally be inherited from the Shift Template but it is possible to override this e.g. to create an 'on-call' shift, which may have different rules applied.
Similarly the Shift Item's Overtime Period, Snap Time and other attributes are inherited from the Shift Template but may be overridden.
To copy a Shift template select the template and then enter a shift template item or select an existing shift template item. With this shift template item selected, click the Copy button. This will replicate the selected Shift Item. If the selected Shift Item has breaks, then these breaks are also copied into the newly created shift Item.
A preview of all the shift items, showing the shift time, snap time before the shift, overtime after the shift and any breaks, is displayed in the middle of the screen.
Shift Breaks
Any Breaks that are specified for a shift item are shown in the lower part of the screen. The Breaks for the currently-selected Shift Item are listed.
Breaks can be either 'explicit' (in which case they are scheduled by the DSE in a similar way to regular activities), or 'implicit' (in which case they are scheduled according to a set of rules). In either case the break will have an expected duration and a window during which it can take place. For example, each resource may have a one-hour break sometime between 12:00 and 14:00. More than one break period may be defined.
For explicit breaks, we must create an Activity Type for the break; since this break is a type of activity that can appear in schedules. We also need to create an SLA Template and an SLA Type in order to create the Activity Type shown above. The creation of these will be described elsewhere in this document.

Alternatively, implicit breaks can be added directly from the Shift Template screen, without the need to create an Activity Type (since implicit breaks are not activities). Select implicit breaks tab and fill in the details as shown, providing a window of time in which it is possible for the break to begin. Note that there must be enough room in the shift for the break to begin at the latest time in the window, even though the break will be scheduled as early in the window as possible.

Membership Periods
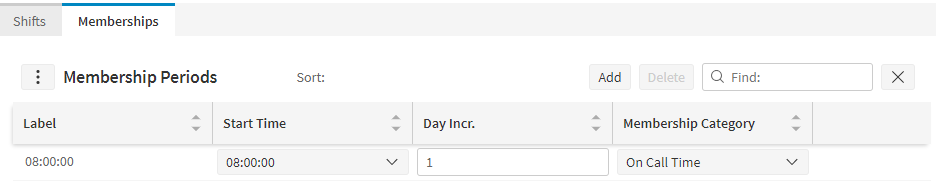
Membership Periods can be used to categorise the time within the shift template into different membership categories. In the example above the resource is on call and the entire membership period is marked accordingly.
Rules and requirements can both be linked to membership categories.
Shift Template Sets
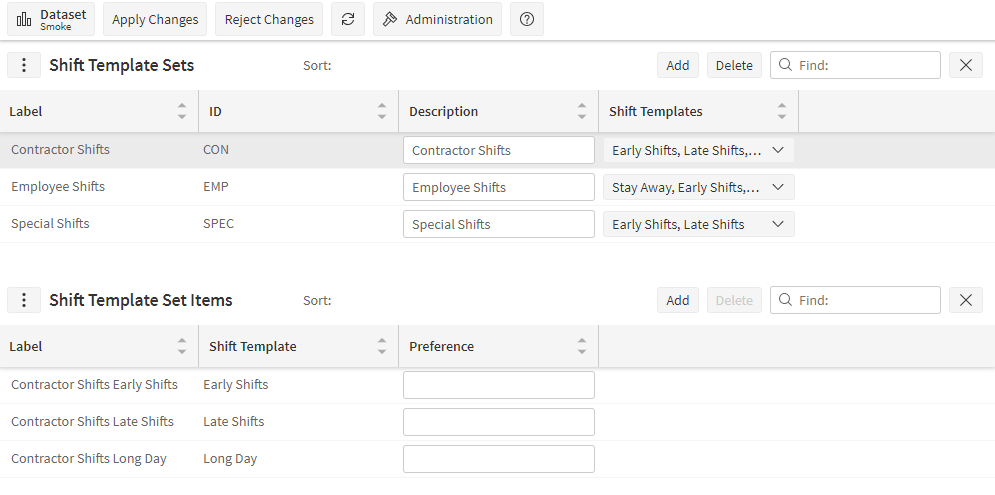
A Shift Template Set is a group of Shift Templates that can be applied to a Resource or a number of Resources.
They have an id, a description and a list of Shift Templates that link to it.
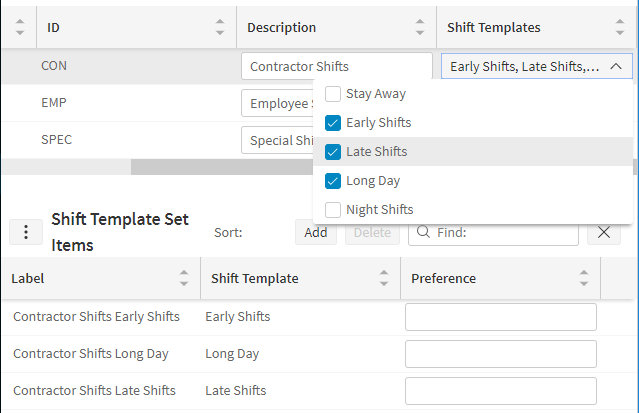
The Shift templates in the set are listed in the Shift templates column. You can add or remove shift templates with the drop-down. The shift templates are also listed in the child grid. You can add or delete with the buttons and specify a preference for each one.
Skills
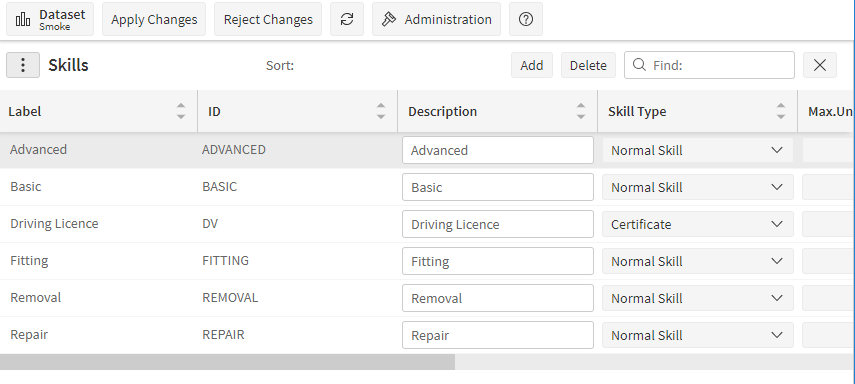
Skills are abilities, experience, competencies or qualifications that may be required to perform certain types of work. They may be created and modified in this screen, and then linked to Resources in the Resource screen and then linked to job roles in the Roles screen.
Each Skill has the following details:
- Label shows how the item will appear.
- ID - must be unique
- Description
- Skill Type - a grouping of skills which is set up in the Skill Types screen.
- Max Unused Duration - if a resource has not used this skill for longer than this period, they are considered to no longer have the skill. This field is not currently used in the Resource Planner
- Team Inheritable - if a resource is part of a team, then if Team Inheritable is true for a skill, the Team is considered to have this skill.
- Team Proficiency Multiplier - if multiple resources within a team possess the same skill, this determines how the resource proficiencies will be combined.
- Included Skills - other skills can be considered part of this skill.
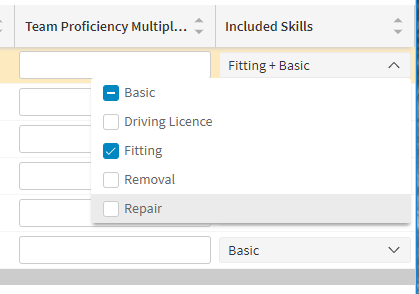
The Included skills allows a skill to "include" another skill. In this example, the "Fitting" skill includes the "Basic" skill. When we are choosing skills to include in "Normal skill" we check the box for "Fitting". Including the fitting skill will also implicitly include the "Basic" skill, so the drop-down shows a partial check for "Basic", and the Included skills columns lists the included skills then implicit skills as "Fitting + Basic"
Note
As an example of how skills work within teams, suppose an individual resource is planned into a team on the resource planner. Then each of the resource's skills will also be inherited by the team for the planned period, provided that the skill is team inheritable.
Now suppose that the resource has a certain skill with proficiency 1, and that a second resource is also added to the team. This second resource possesses the same skill but with proficiency 0.8.
If no team proficiency multiplier is specified, or if the value is set to 0, then the team proficiency will equal that of the most proficient resource, which in this case would mean a proficiency of 1.
If the team proficiency multiplier is set to 1, then the team proficiency will be the sum of the individual resource proficiencies. In our example this would mean that the team proficiency would be 1.8.
Finally, any value between 0 and 1 can also be used. In this case the team proficiency would equal that of the most proficient resource, plus a proportion of the proficiencies of the other resources, as given by the multiplier. So, in our example, a value of 0.5 would mean that the team proficiency would be 1 + 0.5 * 0.8 = 1.4.
Note
Note that skills can also be added explicitly to a team resource. Skills added in this way will take their proficiency and availability settings directly from the team skill. The resources planned into the team will have no effect.
Skill Types
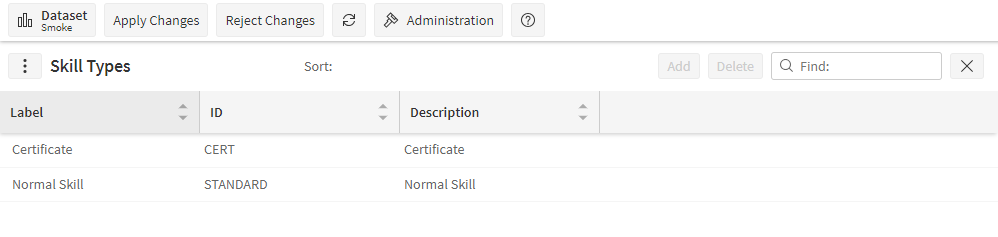
Each Skill Type has the following details:
- ID - must be unique
- Description
SLA Template
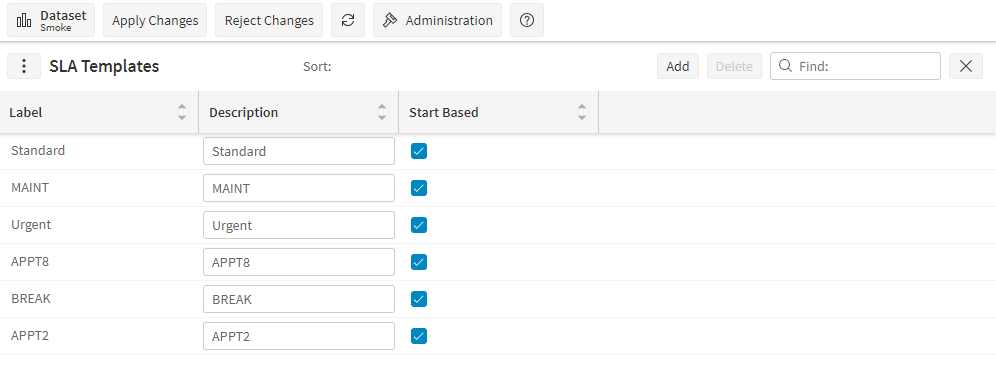
SLA Templates are only used when the Advanced Resource Planner is integrated with Dynamic Scheduling.
An SLA Template defines a set of SLA Types which are used as a group for a specified type of Activity. Activity Types link to them.
For example, an urgent activity might have a 2-hour deadline i.e. it must be started within two hours of being raised. In this case it would have an SLA Type for the first two hours. But it would also have a secondary SLA Type for the period after 2 hours, since if the job could not be done in time, then it still needs doing and therefore requires an SLA. There will therefore commonly be two SLA Types for each SLA Template.
Start based; is the value for the activity calculated using the activity start time or end time.
SLA Types
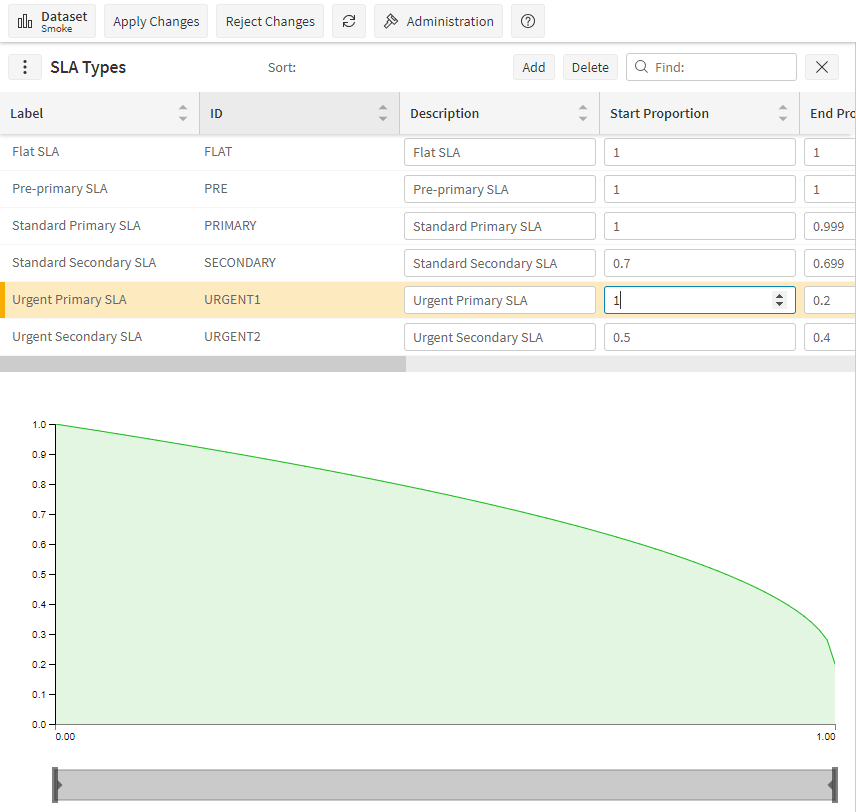
SLA Types are only used when the Advanced Resource Planner is integrated with Dynamic Scheduling.
They work in combination with SLA Templates as described above. For full details of all the details of SLA Types, see the Scheduling Schema Guide.
Slot Usage Rules
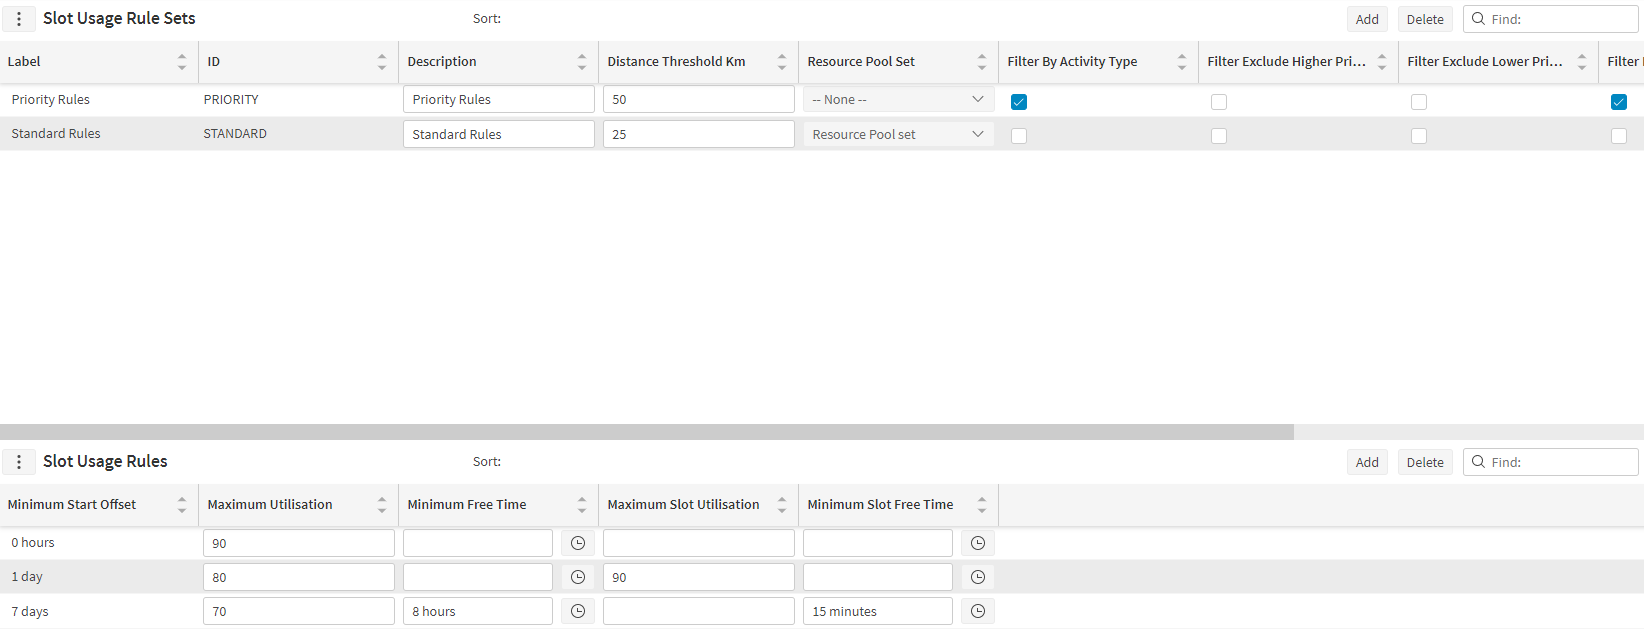
Slot Usage Rules are only used when the Advanced Resource Planner is integrated with Dynamic Scheduling.
They allow you to specify restrictions on resource utilisation when appointment booking. See the appointment booking guide for a full explanation of this functionality.
Slot Based Rules can be linked to Appointment Templates for application.
Split Models

Split Models are only used when the Advanced Resource Planner is integrated with Dynamic Scheduling.
They allow you to specify how activities can be split into multiple visits, and when they can be interrupted. For full details see the Scheduling Schema Guide.
Teams
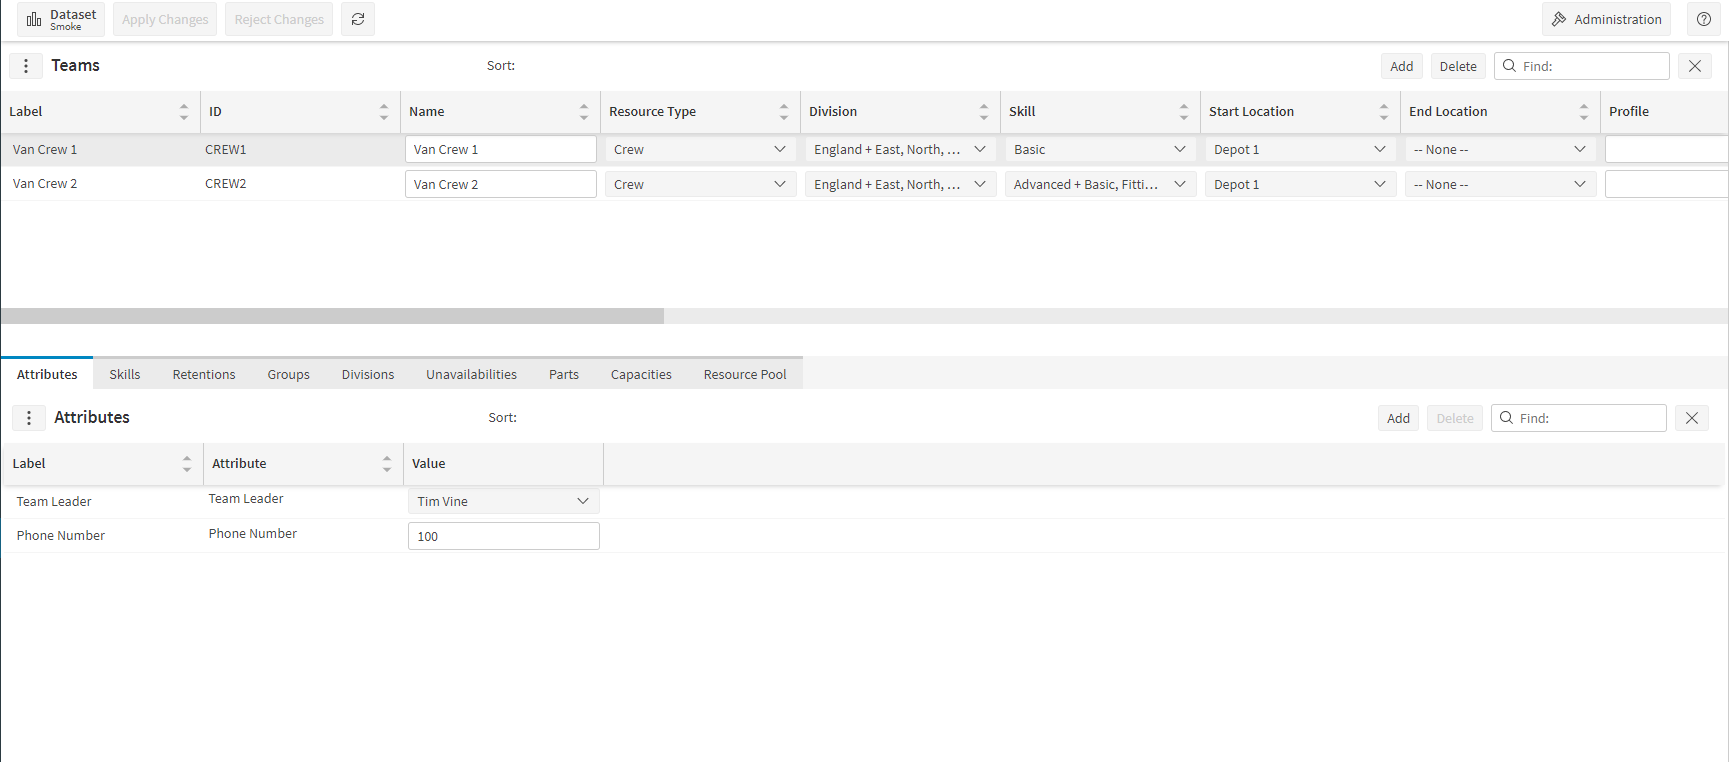
Teams are groups of Resources who commonly work together, and for whom it is quicker to plan shifts for the team, rather than for the resources individually.
Resources are assigned to Teams as part of the Resource Planning process. Team membership may be for a defined period of time.
Teams may have all the properties, skills, parts, capacities, tools and attributes that a Resource has. See the 'Resources' section above for details.
When using the Advanced Resource Planner alongside dynamic scheduling, the team resource will be the resource which is sent for scheduling.
Note
Skills may be assigned directly to the team or inherited from the resources planned into the team. See the 'Skills' section for more details on how this is applied when the team resource is sent to the scheduling engine.
Note
Parts and Capacities will only be applied if they are linked directly to the team - they cannot be inherited from the member resources.
Transfer Rule Templates
Transfer Rule Templates define the rules for transferring parts between two distinct depots. The specific depots these rules apply to must be set up externally as Depot_Transfer records, providing a depot_transfer_settings_id. Only one Depot_Transfer record can be created for each parent-child pair of depots. A transfer only applies to the pair of depots defined, and do not chain together to transfer a part in stages. Transfers should not be used for transferring reusable parts.
Depot Transfer Settings define a collection of templates that apply to the different parts that can be transferred. A default template can be used for all parts by selecting 'Apply To All' when filling in the details for the Depot Transfer Settings. Rules can be defined for individual parts as Part Transfer Settings. Part Transfer Settings can be used instead of a default, or can be used to override the default for the selected part.
Each Transfer Rule Template consists of one or more delivery levels, which can capture different delivery options to transfer the part (same day, next day, etc.). The unit cost of delivery is set at this point. For each level, one or more template items can be set up which define when the part will be available.
The following screen shows an example of how a delivery level can be set up to allow for a transfer to be made by 16:00 on the same working day, provided the transfer is requested by 12:00.
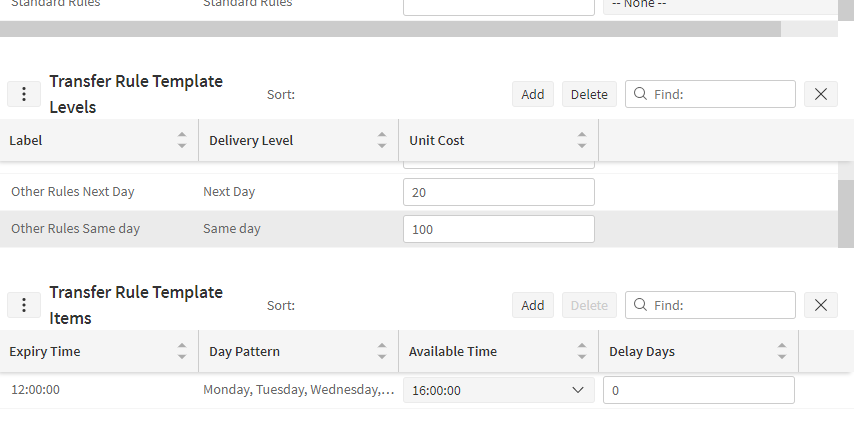
The day pattern shows that the rule will only apply on Mon-Fri, and the delay days shows that the delivery will be made zero days after the request (i.e. on the same day).
The next screen shows the way in which a next day delivery can be set up, with the delivery being made by 09:00 on the next working day, provided the transfer is requested by 15:00.
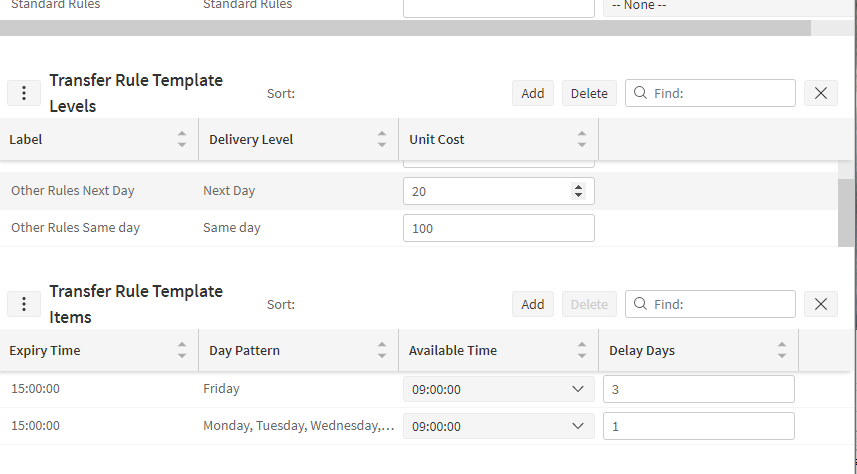
Two Transfer Rule Template Items have been created. The first shows that if a request is made by 15:00 on Mon-Thurs, a transfer can be made by 09:00 on the next day (one delay day). The second is similar, but only applies on a Friday, and with three delay days. This means that if the transfer is requested on a Friday by 15:00, the part can arrive at 9:00 three days later (on Monday, the next working day).
Once the Transfer Rule Templates and Depot Transfer Settings have been set up, the appropriate rules that could be used will be chosen based on the current day of the week and time of day.
Travel Cost Models
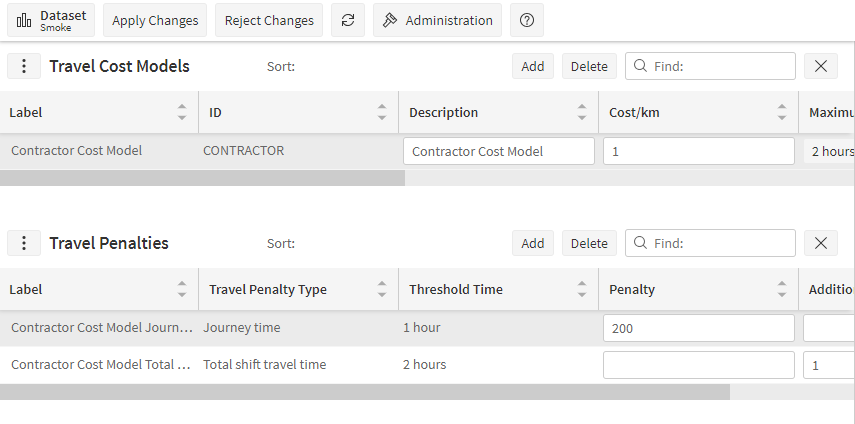
A travel cost model is used to set advanced rules to limit the amount of travel scheduled to a resource. Travel can be limited by individual journey time, by travel time from the shift start location and by total shift travel time. The limitation can either be a hard constraint, or be in the form of penalties and additional costs once the travel exceeds a certain threshold.
The travel cost model can be applied to a resource type, to an individual resource or to a particular shift.
Unavailability
Unavailabilities are periods of absence from work. If shifts are planned during the unavailable period then they will not contribute to meeting the requirements for the Division.
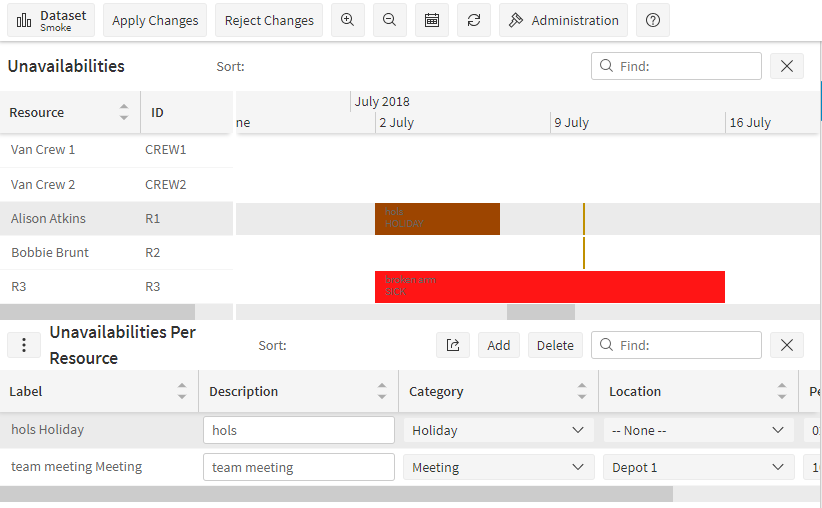
Unavailability screen is composed of two parts: the top section displays a Gantt of resources and teams, and their unavailability. The lower section contains a grid display showing the unavailabilities for a selected resource or team.
To create new unavailability:
- Select the row for the resource or team.
- In the child grid, press the Add button.
- Complete the details in the new row.
To copy an unavailability to more resources or groups:
- Create an unavailability for a single resource.
- Remain on that unavailability row and press the replicate button located in the lower left of the unavailability screen.
- The tool panel will show "Create Multiple Unavailabilities".
- Select all resources and teams that you wish to apply the same unavailability to. To de-select a resource from the list, click it again.
- Click Create button to create the new unavailability for the selected resources or close the tool panel if you've changed your mind.
- Apply Changes
The find field can be used to filter current data that is in view.
Unavailability Categories
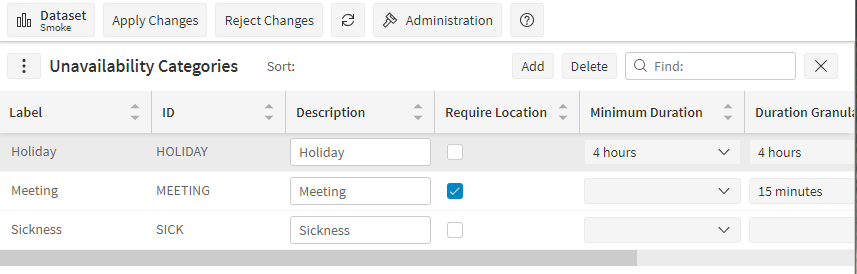
Unavailability Categories are different reasons why a resource may be unavailable for work, such as holiday or sickness.
If using the Resource Planner with Scheduling, some other details may be useful:
- Require Location - whether or not the unavailability happens at a location e.g. company meetings. Some unavailabilities, such as holidays, have no specific location
- Minimum Duration - the minimum duration for an unavailability of this type e.g. holidays may be of half a day minimum duration
- Duration Granularity - the smallest incremental unit of time for an unavailability of this type.
- Colour - A colour can be assigned to an unavailability category. This selected unavailability category colour will appear on the generated unavailability.
Usage Classes
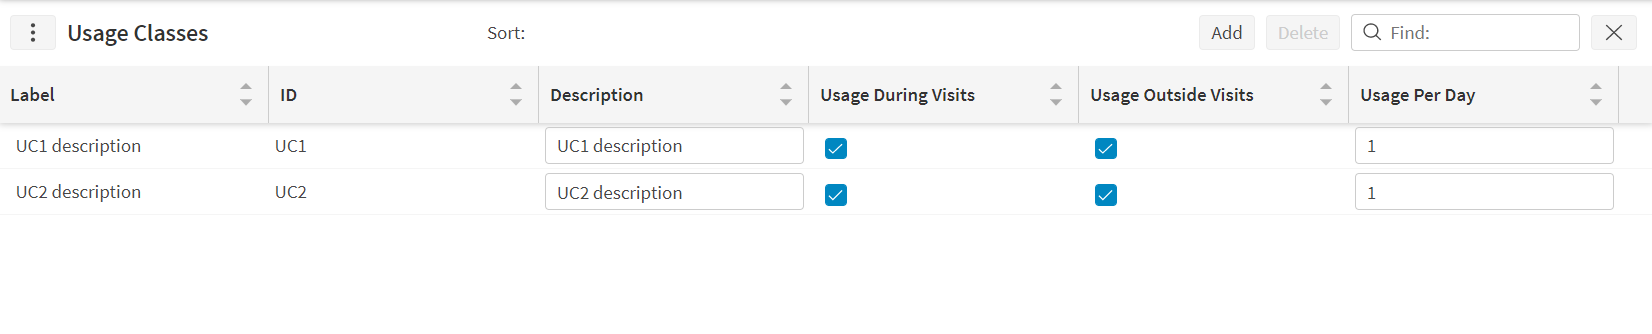
Defines a class of usage, along with a default usage rate for this class of usage.
The Usage Class will hold the various types of usage that can be associated to a usage model, and this will include a default usage per day.
If the usage varies over time and by activity, then an Activity Usage Period can be used to override the default usage for the activity and period specified.
Usage Models

This is used to define expected rates of usage for different types of usage that might apply to an operation.
Each Usage Model will consist of one or more Usage Model Item rows, which specify the maximum usage for a type of usage.
Usage Model Item

Sets usage limits for the specified class of usage within a usage model.
Usage Model SLA

To determine the value of an operation, a Usage Model SLA is associated to the model. This links an SLA Type to the usage. The value of carrying out an operation will then be the base value of the operation multiplied by a proportion coming from the usage model SLA.
If the SLA Type had a start proportion of 0 and an end proportion of 1, then the proportion from the SLA model would simply match the proportion of the usage that had been used up. This usage proportion will be calculated as the maximum from all the different usage types associated with the model.
Utilisation Templates
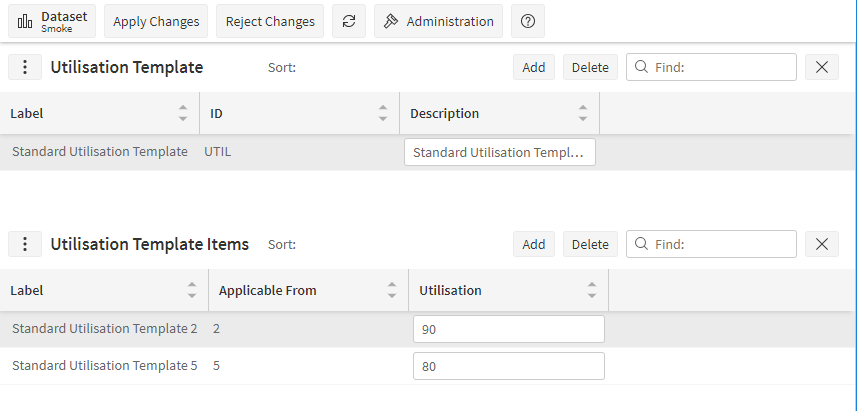
Utilisation Templates are only used when the Advanced Resource Planner is integrated with Dynamic Scheduling.
They allow you to specify that some shifts will not be allowed to be completely full when scheduling.
For instance, in the example above, from two days hence, we only allow shifts to fill up to the 80% level.
Utilisation Templates are optionally linked to Shift Templates. Any resources using shifts created by such a Shift Template would have their utilisation constrained in this way.
Vehicle Class
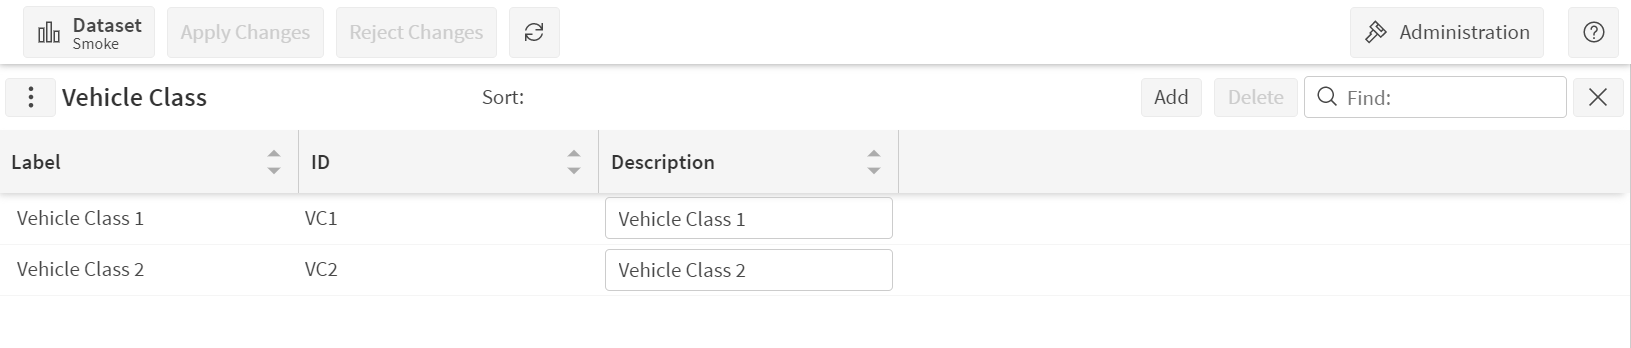
Vehicle class is the class assigned to each vehicle. For instance, motor vehicle class can be based on body style of the car like hatchback, sedan, sport utility vehicle or can be based on vehicle weight or wheel count or axel count or any different category of vehicles according to the requirements.
Vehicle class is optionally linked to a vehicle model.
Vehicle Models
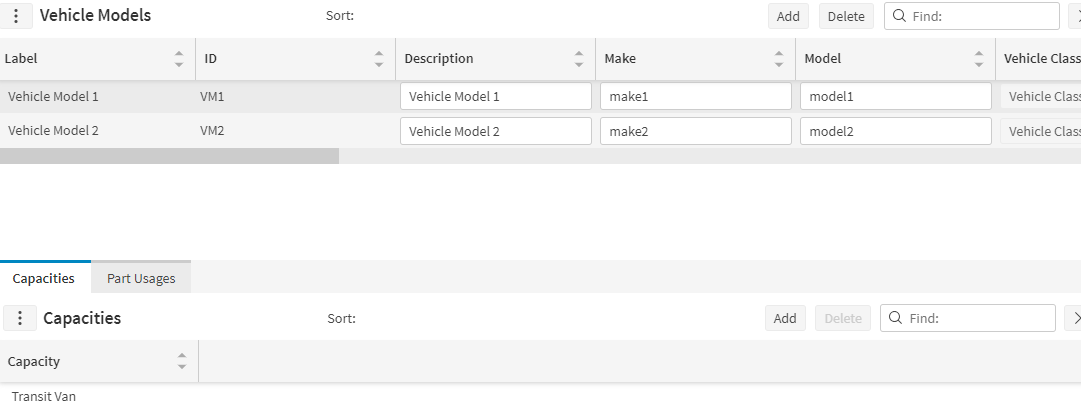
Vehicle models are used to store information about the various makes and models of vehicles in the current fleet. Capacities and vehicle part usages can be set against the vehicle model.
Each vehicle is then linked to a vehicle model.
Vehicle Ownership Types
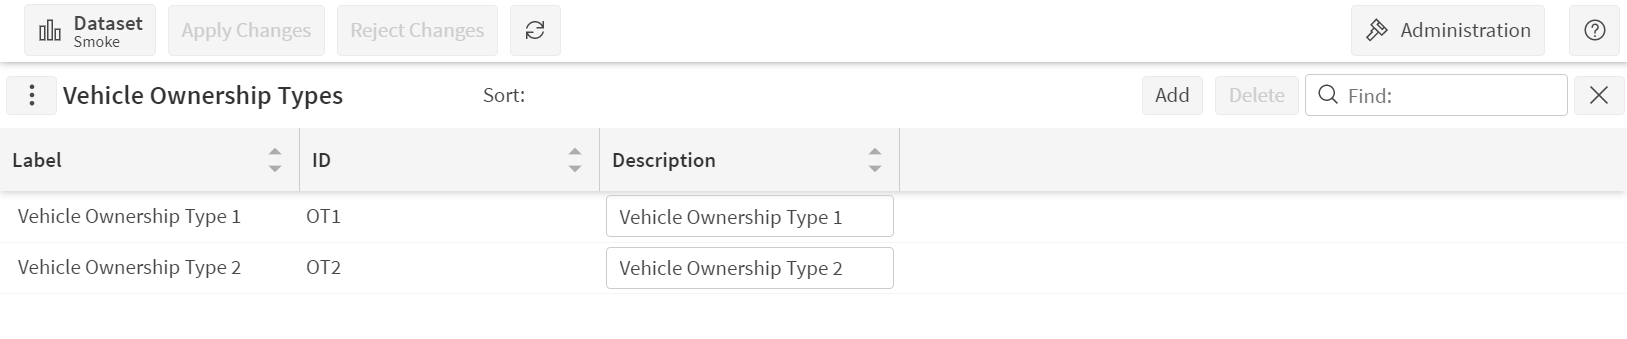
Defines the type of ownership of the vehicle. e.g. Personal vehicle or lease vehicle etc.
Vehicle ownership type is optionally linked to a vehicle model.
Vehicles
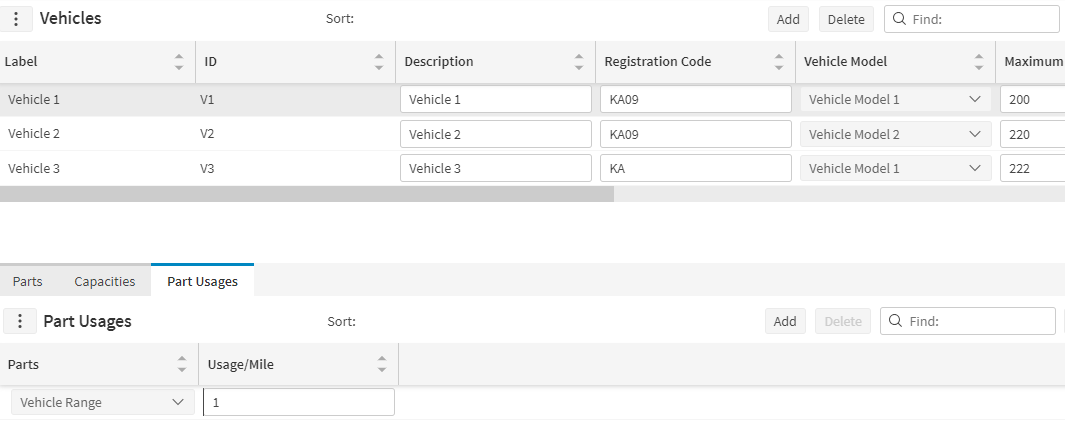
This contains details of all vehicles which are used across the workforce. Part stock, capacities and vehicle part usage can also be set against the vehicle.
Each vehicle can then be assigned to a resource and/or a resource shift.
Note
Resources can be set to use different vehicles across different shifts. However, when using vehicles with parts for scheduling it is important that only one resource is set to use a vehicle at any one time.
Administration
The administration section of the planning workspace consists of two tabs. The first tab allows you to import and export data from the resource planner, and remove historical rota data. The second tab allows you to transfer resources between datasets. A modelling dataset must exist, otherwise functionality will be disabled. A default modelling dataset is created for the head organisation, but not for any child organisation.
Import / Export
The import and export screen allows you to perform the following functions:
- Export the data from the Resource Planning database and download this export to a file on your local system. This option allows you to select which rotas are included in the export.
- Upload previously saved data from a file on your system into the system database and import data from the system database into the resource planning database. Data will always be imported into the active dataset, but it is possible to import data that was exported from a different dataset.
Warning
Please be aware that when importing data, all existing data in the dataset will be lost. Please only import data if you are sure that the data you are importing is accurate.
In particular, please note that if data is exported that does not include rota data, and this data is then imported into the same dataset, the net effect will be that all rota data will be lost.
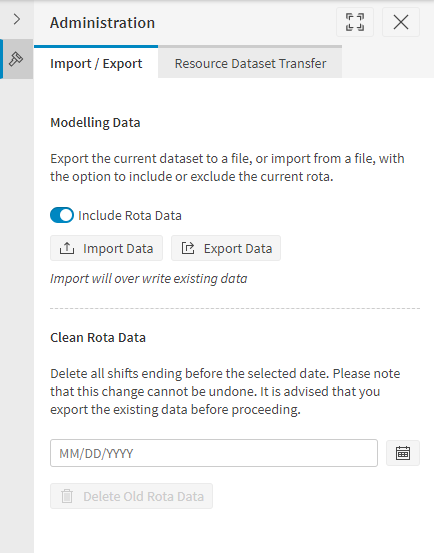
When exporting data, the exported files will be saved as .arp files. In fact these files are usually xml files and can be opened using any xml viewing tool. However, for some larger datasets the files will be downloaded in zipped format. In this case the resulting file may be much smaller than expected, and cannot immediately be viewed as xml, but it can still be re-imported in exactly the same way.
Data Cleaning
The data cleaning screen allows you to delete historical rota data and so avoid the rota becoming too large. Data will be deleted from the rotas specified and up to the time specified. This will delete all shifts ending before the specified time along with any related data (exceptions, breaks etc.). The process is irreversible so it is advisable to export the existing data before proceeding with the deletion.
Resource Dataset Transfer
This screen allows you to transfer one or more resources from one dataset to another for a period of time. Resources can only be transferred under the following conditions:
- Each resource must be fully retained in the existing dataset during the period of the transfer.
- Each resource must either not exist or else have no retention in the new dataset during the period of the transfer. (Note that if a resource has no retention periods specified in the new dataset then they are considered to be fully retained and so transfer will not be possible.)
- The resource type must exist in the new dataset.
When a resource is transferred all child data (such as resource skills) will also be transferred, provided that any other required data already exists in the new dataset. Additionally any locations used by the resource will be copied to the new dataset. If the data to be copied has any optional references to data that does not exist in the new dataset, this reference will simply by removed.
For example:
- A resource skill will only be copied if the skill already exists in the new dataset.
- If a location references a location type that does not exist in the new dataset then the location type will be set to null when the location is copied.
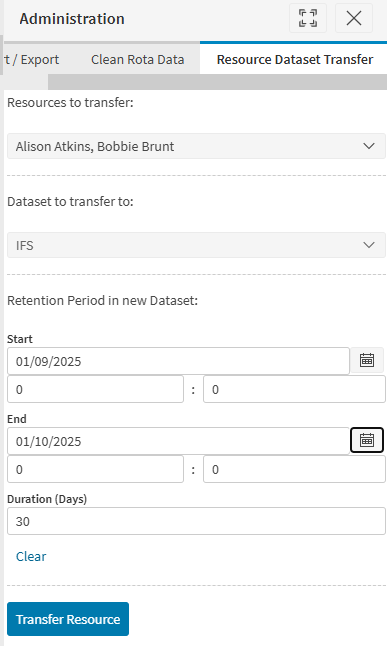
After transferring resources, each resource will appear with retentions created in both the transfer from dataset and the transfer to dataset. In the transfer from dataset, if you view the Retentions for a transferred resource, the retentions should appear similar to that shown in the below screenshot (assuming they had no previous retentions). This means that the resource is retained in the transfer from dataset for all time except the period where they have been transferred.
