Planning - Resource Planner
This section describes the functionality with the Resource Planner screen.
Note
For general information about the planning workspace see the Planning Workspace help details.
Note
See the Advanced Resource Planning Concepts Guide for further details about the concepts underpinning the resource planning functionality.
Rotas
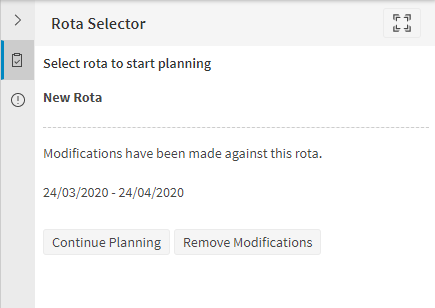
Having set up your basic data (resources, shift templates etc.), select the Resource Planner tab to start planning shifts. When the screen loads, you will see the following panel on the right-hand side.
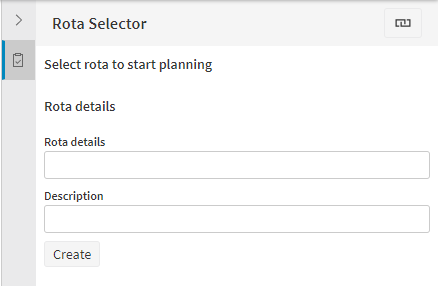
If a Master rota is not created, you can create one on this page. Please note that users without the 'ARP Create MasterRota' permission will not be allowed to create a new Master Rota.
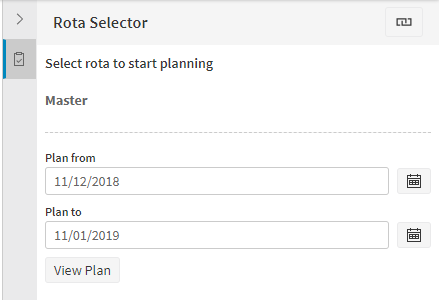
Users without the 'Edit' permission will see the 'read-only' version of the Rota Selector:
The result of planning resources with the Resource Planner will be a 'Rota'. This is a complete plan of the shifts being worked by each resource, including the division, position, and/or team that the resource is working within.
Each Resource Planner dataset is expected to have a single 'master' rota, which is the accepted master copy of the rota that resources are expected to follow. When you wish to make changes to the rota, you select a limited time period that you wish to plan for, and a sub-rota is created to allow you to make these changes. Having done some planning you can either apply these changes back to the master rota, or discard them.
Several planners may work on the rota at the same time but they should each be working on a different part of the planning (perhaps each dealing with a different Division or a different type of work) so that they don't interfere with each other.
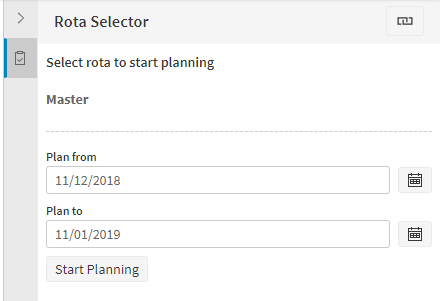
The period which we are planning for is shown - by default this shows the next month. Change these dates if you wish, either by typing in different values, or selecting alternative dates using the calendar control (click the calendar symbol on the right to do this). Then click Start Planning.
If the rota contains divisions, with the 'Division Selector' permission, it is possible to select and work on only a subset of those divisions. This can result in improved performance and usability for a large data set.
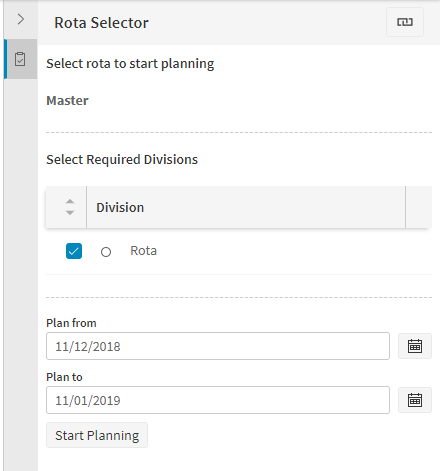
The examples that follow use some Divisions that have been set up previously using the Data Management screens. A full explanation of how to add Divisions is given in the Data Management section.
The Planning Screen
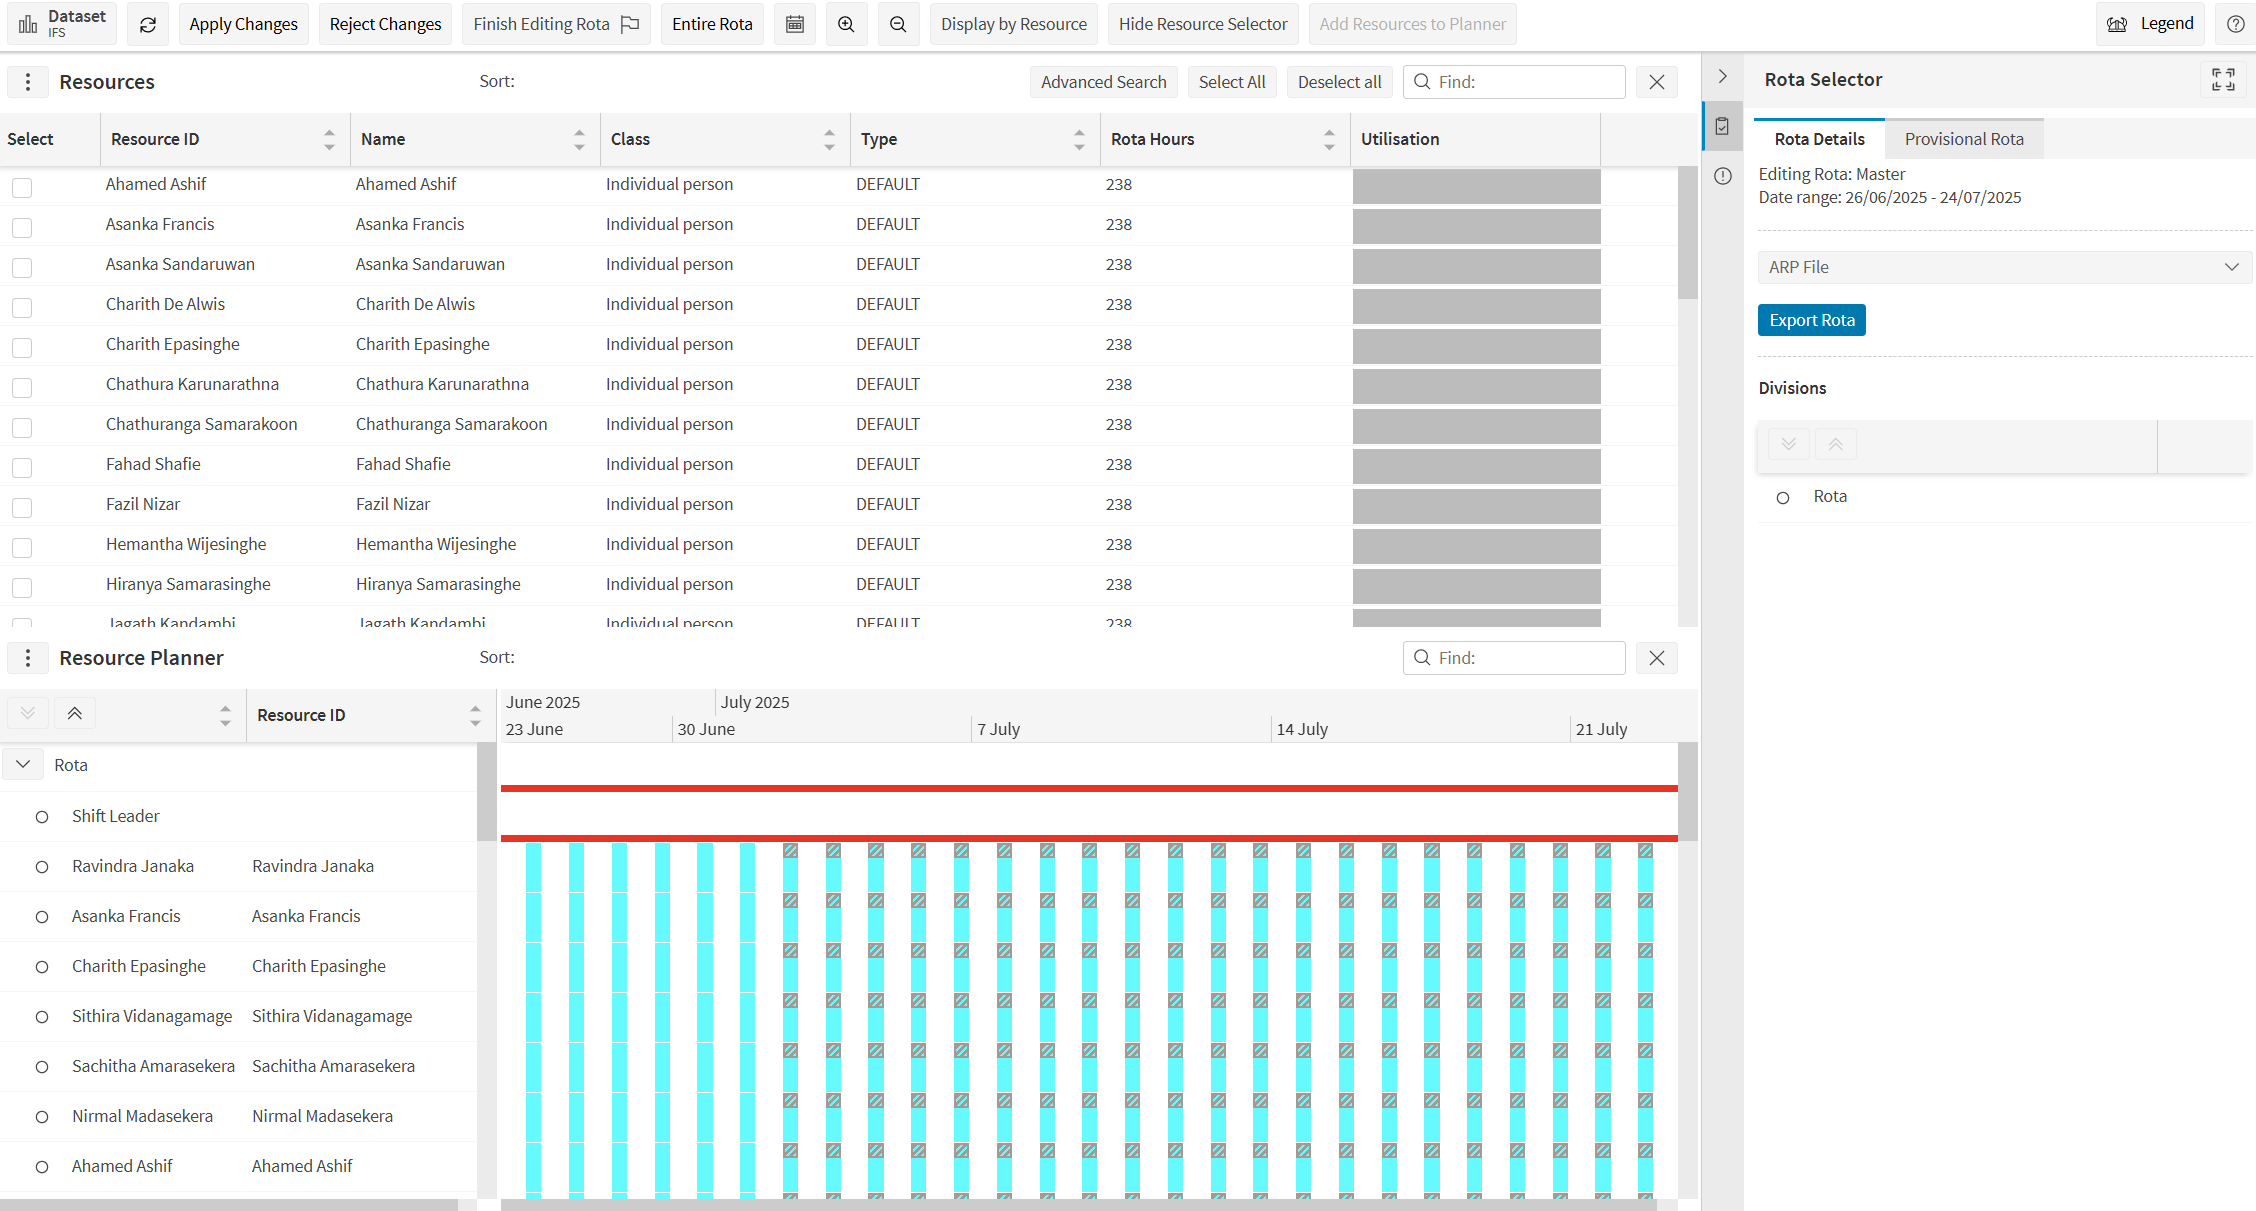
The planning screen is split into an upper and a lower section. The upper section shows the different resources that are available for planning, whilst the lower section (titled 'Resource Planner') shows the Rota itself.
Firstly, let's have a look at the bottom section of the Resource Planner.
The Resource Planning Display
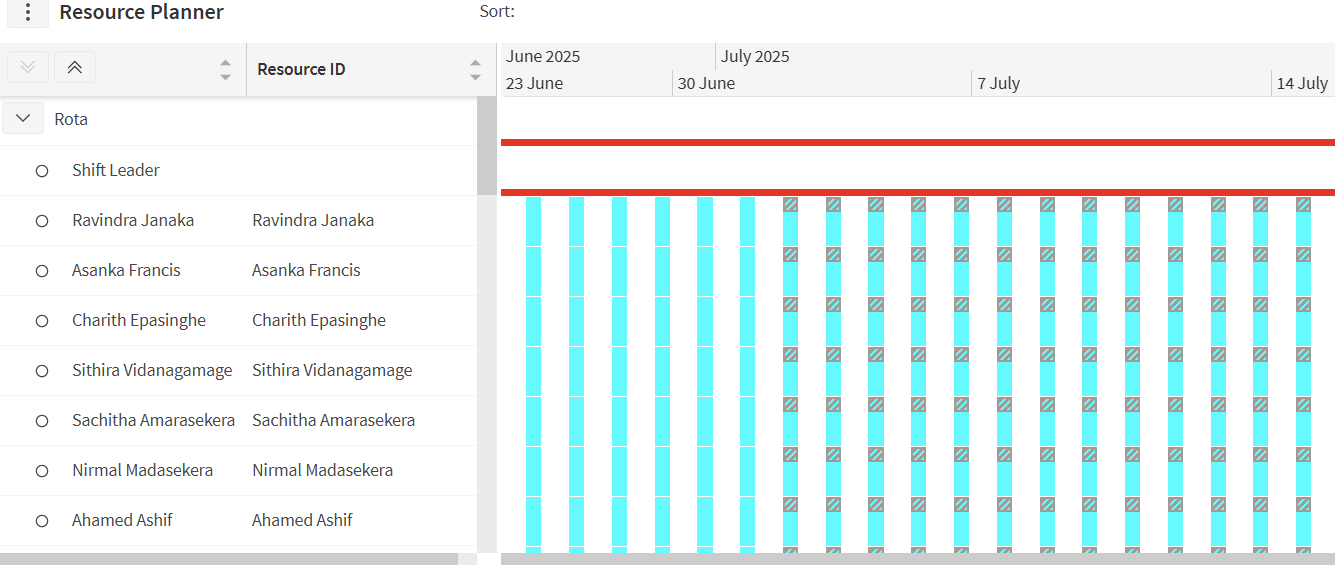
This section shows a hierarchy of Divisions, so in this example, the North division includes sub divisions of North East and North West. All Divisions are part of the overall Rota, so it is possible that other Divisions may also be planned under the Rota.
It is possible to expand and collapse the different levels within the Rota and when you do so, just the summary is shown. Collapsing and expanding is done by clicking on the toggle button  on the left-hand end of the row.
Use the  icons at the top-left of the Resource Planner section to quickly expand or collapse all resources in the rota view.
Now look at the buttons at the top of the screen:

- 'Dataset' switches between datasets
- 'Apply / Reject Changes' to save or discard your changes to the rota
- 'Finish Editing Rota' allows you to apply, reject or save changes for later whilst exiting the Resource Planner.
- 'Legend' shows the different items on display.
- 'Entire Rota' zooms the timeline so that the entire rota planning period is shown (as in the above screenshots)
- 'calendar icon' centres the display on the specified date.
- 'Zoom' buttons zoom the displayed time/date in and out.
- Additionally, you can use the horizontal scroll bar to move the display backwards and forwards through time.
- 'Display by Resource' shows the Resource Planner by Resource
- 'Hide Resource selector' hides the Resources section so the Resource Planner can fill the page.
- 'Add Resources to Planner' enables you to select multiple resources and add them to the Planner.
Note that the time divisions shown will be months, weeks, days or hours, as appropriate. Now that we have zoomed in, days are shown rather than weeks.
The Division Filter
In the right hand panel, there is a hierarchy of Divisions shown:
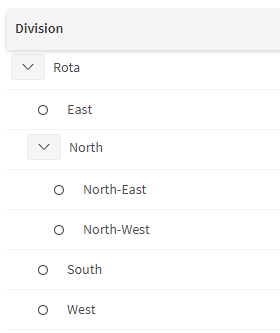
Clicking one of these filters the whole display to just look at that Division. So, for example, click 'East':
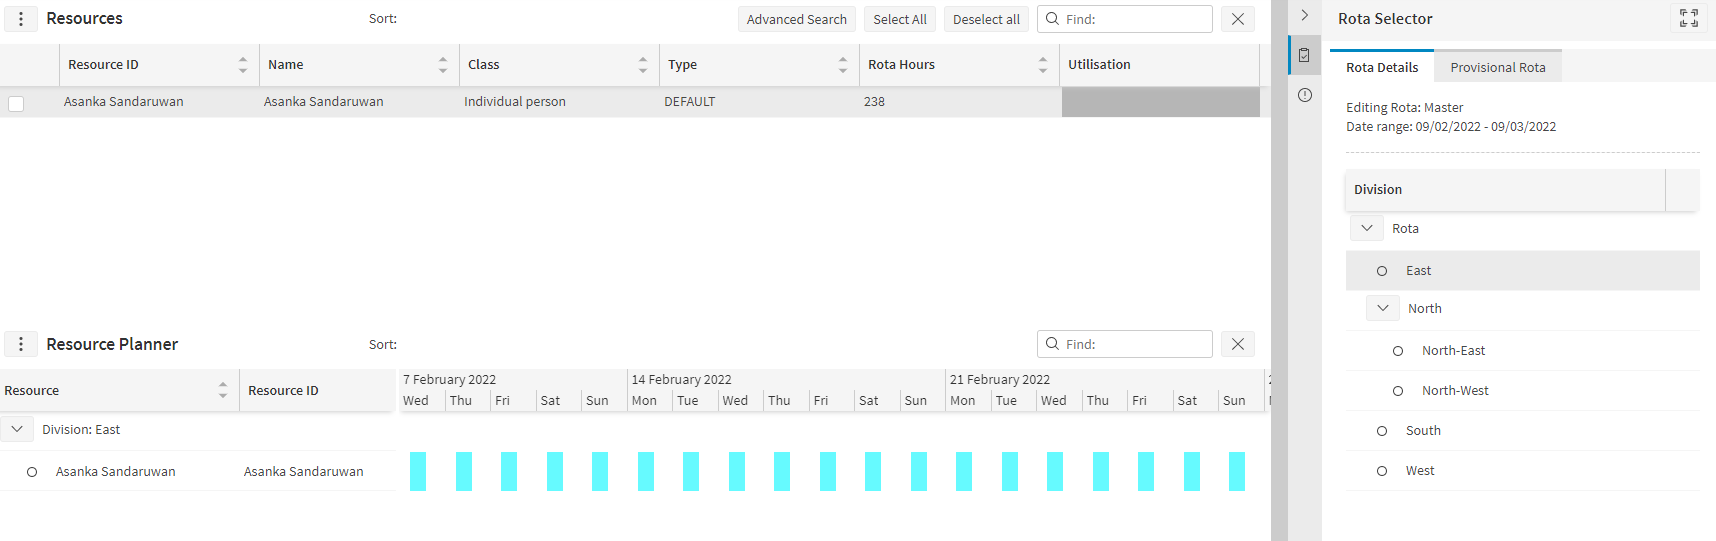
The only row now shown on the Resource Planner part of the display is the East row and only resources which are in Division East will be shown in the top section of the screen.
The Resource Display
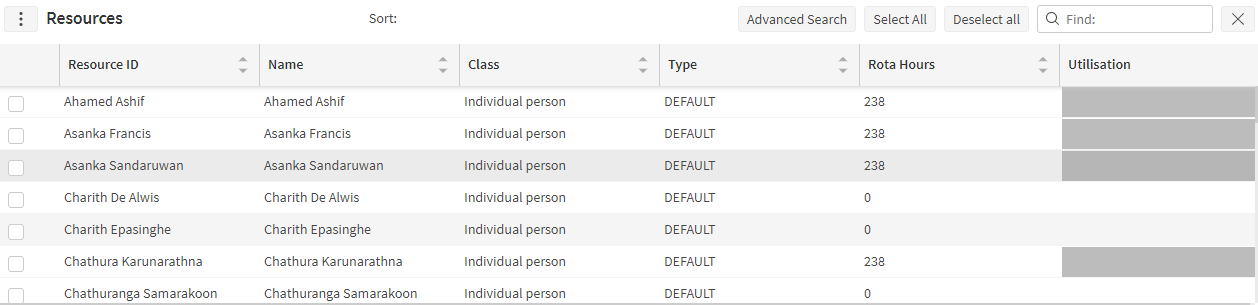
This section allows you to filter, sort and search for resources and teams that you can use to plan a rota shown in the bottom half of the screen.
Most of the columns shown here are self-explanatory, but note:
- Rota Hours is the number of working hours defined by the current planning session.
- Utilisation shows graphically the availability of resources in the current planning session's date range.
This makes it easier to see who is available and who needs more hours allocated to them.
Note
The utilisation graphic is based on the rota membership for the resource, not just the time when the resource has shifts planned. For example, if the resource is planned for regular Monday to Friday shifts for 2 weeks, then the utilisation would show the entire 2 weeks as fully utilised.
The graphic is colour coded according to the membership category or unavailability category that applies at the time.
The graphic will, by default, treat all the time where the resource has been planned into the rota as utilised. There is also an option to only treat rota membership as utilised if it is associated with a membership category, so any rota membership that is not associated with a membership category will appear as free time. This option is controlled by the parameter 'TreatMembershipWithNoCategoryAsUtilised'. This also applies to the utilisation slider when searching for a particular date range.
Note
The columns displayed in the resource selection grid are configurable. In particular, there are five columns relating to planning against requirements (using roles and/or positions) which are hidden by default. Details of these columns can be found in the 'Advanced Search' section below. Please see the Scheduling Administration Guide for full details on column configuration.
To sort by any of the columns, click the column header. Click it again to sort in the reverse order, and a third time to clear the sort. You can also sort by multiple columns by clicking on the columns in turn.
The list of resources can be filtered in several ways:
- Selecting a division will filter to only those resources who are able to work in the selected division.
- The 'Find' box can be used to quickly search for resource against any data in the search columns.
- The 'Advanced Search' button allows for filtering by resource class, skill, role, position, date range and utilisation. See the section below for further details.
Planning Shifts For Resources
In order to generate shifts for resources, it is first necessary to add the resources to the resource planner in the appropriate division (and/or team or position). Select the resources you wish to add in the resource selector panel.
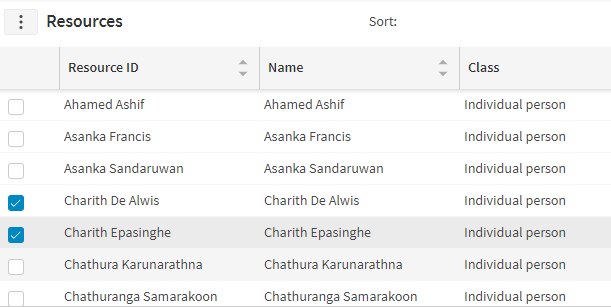
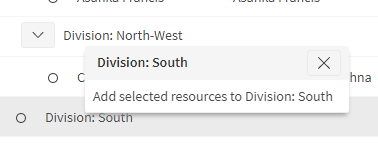
Then select the division row into which you wish to plan the resources. An option to add the resources to the division should appear. Select this option and the row will be added to the planner for each selected resource.
Note
These steps describe planning resources into a division. However, if divisions are not used the same steps can be applied when adding resources to the top level 'Rota' row. The 'Add Resources To Planner' button will also add the selected resources at this top level.
To generate shifts for these resources, click again on the division row, and select the 'Generate Shifts' option.
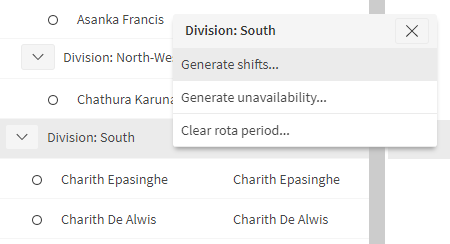
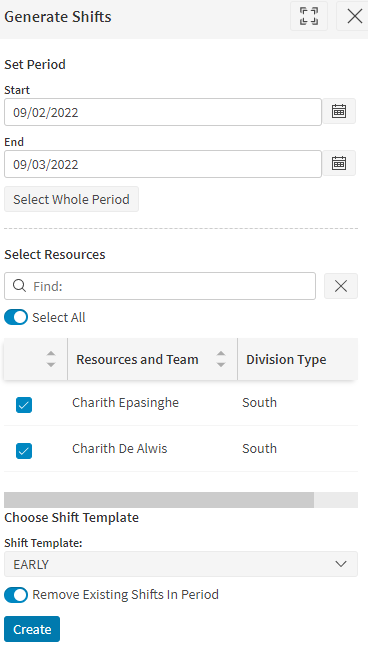
This will open the 'Generate Shifts' data panel. Select the time period and resources that you wish to generate shifts for, and the shift template to use, then click the 'Create' button.
Note
The generated shifts will be created using the time zone associated with the division that the resource is being planned into. If the division does not have an associated time zone (or divisions are not being used), the shift will be created using the resource time zone. If the resource does not have an associated time zone then the current workbench time zone is used.
Note
When you set the 'Remove Existing Shifts In Period' slider to 'off' the resource planner will not generate new shifts if there is a collision with any previous shifts. If the slider is set 'on' any previous shifts for the specified resources will be removed prior to new shifts being generated.
You can also generate shifts for an individual resource by clicking on the resource row. Once the resource has shifts planned, this menu option will look something like the image below.
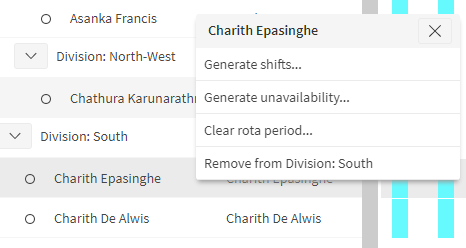
In addition to generating shifts, this allows you to clear shifts for the resource for a specified period (button will be available if PlanningClearRotaPeriod permission is allowed), remove the resource from the division entirely, or create a period of unavailability.
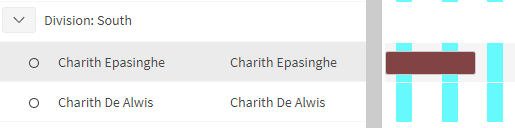
Note that any unavailability created in the planner will be considered as 'pending' and will not appear in the main unavailability screen until the changes have been applied to the master rota.
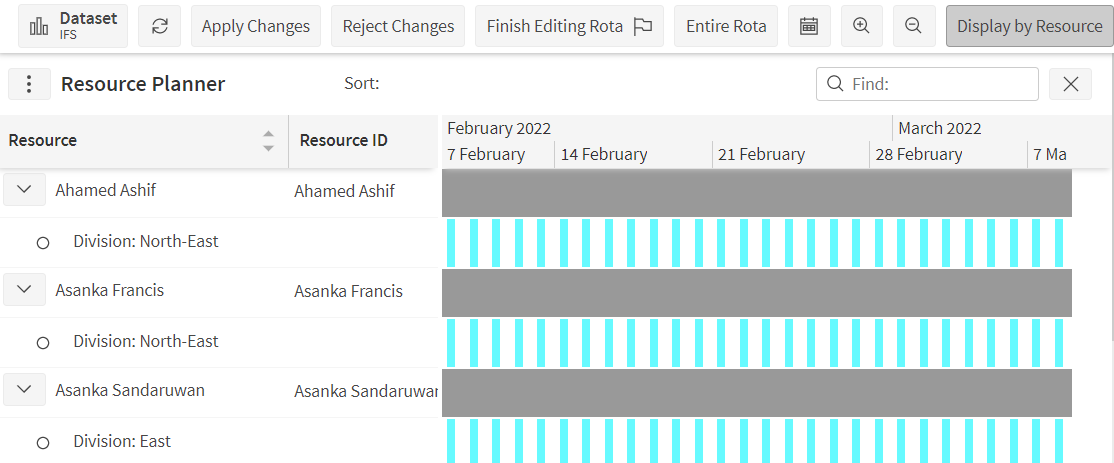
It is also possible to view the rota from a 'resource-first' viewpoint. Click the 'Display By Resource' button to switch to this mode.
Note
See the Advanced Resource Planning Concepts Guide for details about planning with Teams.
Shift Details
Click on any shift in the Resource Planner and you have an option to see the shift details or delete the shift. Shift details shows the following screen:
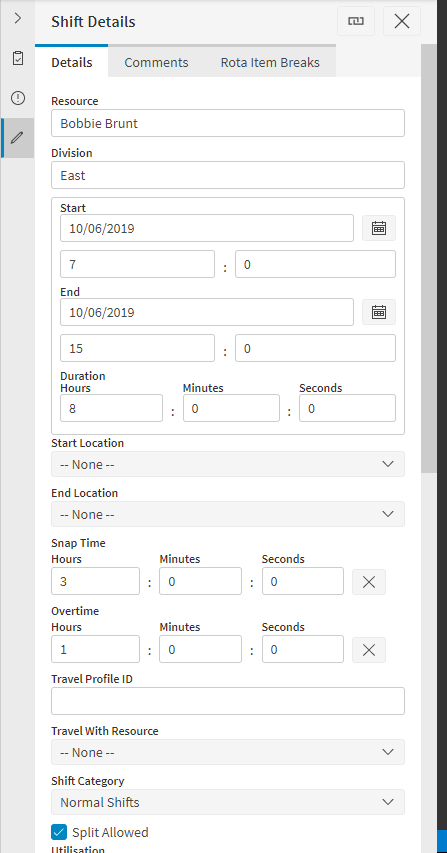
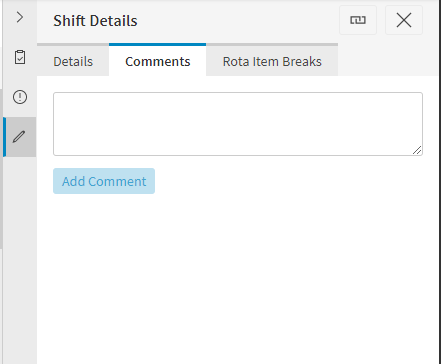
The Comments tab allows you to add comments to the shift which are then displayed in the tooltip if you hover over the shift. Comments shows the following screen:
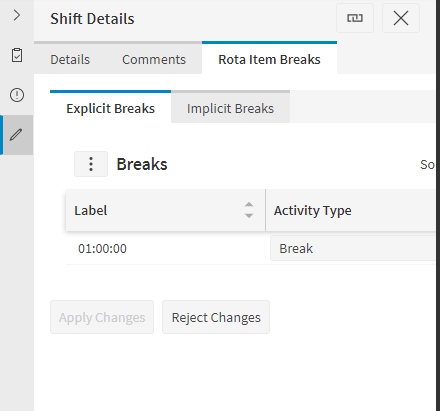
The Rota Item Breaks tab allows the user to view and edit the breaks associated with the shift. Item Breaks shows the following screen:
The Roles tab shows which roles are being fulfilled by the resource during this shift. It also allows the user to add manual role overrides - see the section below for details.
For team resources the Team Skills tab will show which skills the team possesses for this particular shift, and also the proficiency of the team for each skill. A team's skills can be defined explicitly against the team and/or inherited from the skills of the resources within the team.
The Resource Pools tab shows which resource pool memberships are associated with this specific shift. It also allows the user to add new resource pool memberships to this shift. Shift specific memberships override permement memberships for the duration of the shift.
Saving Changes
All changes made in the resource planner are automatically saved as local changes in a 'working set' rota. Once you are satisfied with the changes you have made and wish to update the master rota with these changes, simply click the 'Apply Changes' button. You can also click 'Reject Changes' to revert back to an exact copy of the master rota.
Once you have finished editing the rota, click 'Finish Editing Rota'. If you have unsaved changes this will bring up the following screen:
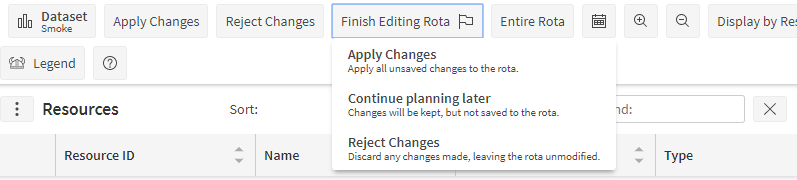
Choose one of these three options. If 'Apply Changes' is chosen, then the master rota will be updated, while if 'Reject Changes' is chosen then any changes made will simply be discarded.
Alternatively, you may click the 'Continue planning later' button. This returns to the starting screen and leaves any changes pending (neither saved nor discarded). Closing or refreshing the browser window will also have this effect.
Advanced Planning
The Resource Planner also includes the ability to plan against requirements, to support complex rota planning. This allows you to ensure that the correct combinations of skilled resources are working at any given time.
Note
See the Advanced Resource Planning Concepts Guide for further details about setting up roles, positions and requirements. This also covers using rules to ensure that working time agreements are kept to.
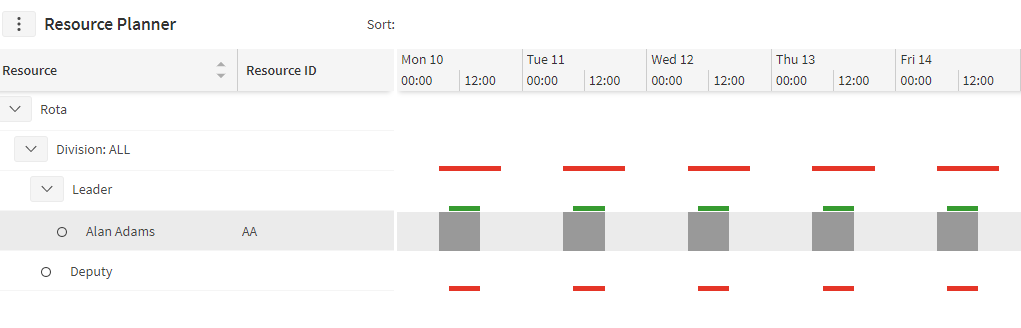
Requirements can be applied either globally, to a specific division, or to a team. When planning with requirements, the division or team row will show alert bars to highlight where resources are required, and if this requirement has been met.
For position requirements, the position rows will also appear in the resource planner, and resources can be added to a position from the context menu on the position row.
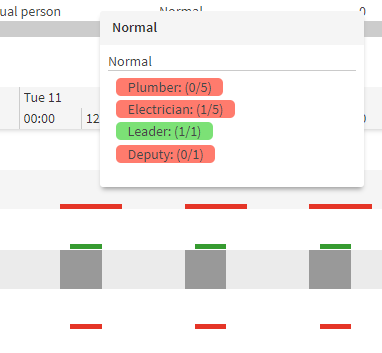
Hovering over an alert bar will show details of the requirements at that time.
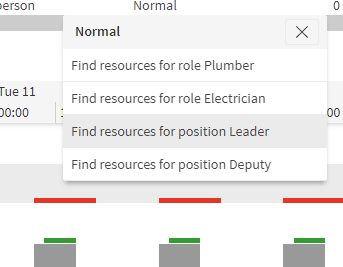
Clicking on the alert bar will allow you to quickly filter to resources who are able to satisfy the requirement.
Advanced Search
When using the advanced resource planning functionality, such as requirements, roles and positions, it may be useful to search for resources that match a given role, skill or position. The advanced search panel can be used for this purpose.
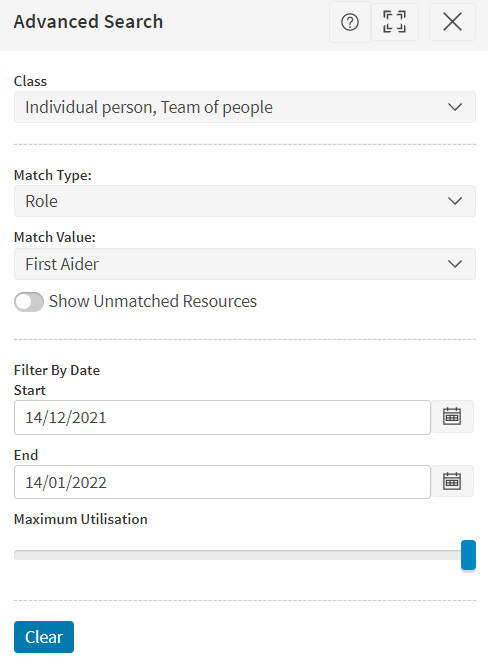
To open the panel, click the 'Advanced Search' button above the resource search panel. When a filter has been applied, this button will display a blue filter icon as shown below. To clear the filter, click the 'Clear' button at the bottom of the panel.

Resource Class
When using Teams or Bucket resources in addition to standard resources, the search panel includes a multi-select filter for the class of resource.
Match Criteria
The Match options allow the user to specify a particular skill, role or position that a resource should satisfy. The user first selects which type of criteria they wish to filter by, and then the specific skill, role or position that they wish resources to satisfy. The resource search panel will then update to show only those resources that satisfy the role or skill for at least part of the time.
Note
In the case of positions, the search will instead show any resources who have been assigned the position (or a parent position) as their default position. This is even if the resource does not satisfy the role required by the position.
When a role requires multiple skills, it is also possible to search for resources that partially satisfy the role (i.e. they have some but not all of the required skills). This is achieved by switching the toggle 'Show Unmatched Resources', and setting the 'Minimum Satisfaction' slider appropriately.
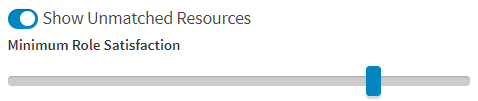
Date and Utilisation Filtering
The advanced search panel can also be used to search for resources who are not yet fully utilised in the rota. This is achieved by setting the 'Maximum Utilisation' slider. The date range that this applies to can also be updated if required.
Note
When setting the date range this will also apply to the role satisfaction calculations, where resources have limited skill availability.
Custom columns
There are five additional columns that can be used in the resource planner search display to provide information on roles, skills and positions. For each column except the 'Position' column, the data shown for each resource will be in regard to the match criteria selected in the Advanced Search panel. If the match criteria is set to search for a position, then the information shown will be for the role required by this position.
- Position: this shows the default position assigned to the resource.
- Proficiency: this shows the role or skill proficiency.
- Skill Availability: this shows the periods of time where the resource satisfies the role or skill.
- Alert Status: this shows the colour coded alert status - see the 'Role Details' section for details.
- Satisfaction: this shows the satisfaction level of the resource for the role or skill.

Note
These columns are all hidden by default, but the user can enable them via the data grid options menu for the resource planner search display. Alternatively, an administrative user can configure the columns to show automatically for all users via the 'Lists' administration page.
Role Details
For roles where all skills are required, a resource will only automatically satisfy the role if they have all the skills required by the role. A role may consist of many skills, so when a resource does not satisfy a role it will often be useful to know which skills are lacking. This information is provided by the role details pop-up, which can be accessed from several places within the Advanced Resource Planner.
- In the data management resources screen, go to the 'Roles' tab and click on the 'Details' button.
- In the resource planning search display, filter by either role or position then click the 'Role Details' button.
- In the planning grid, click on a division which both contains resources and has requirements linked to it, then select 'Role Details'.
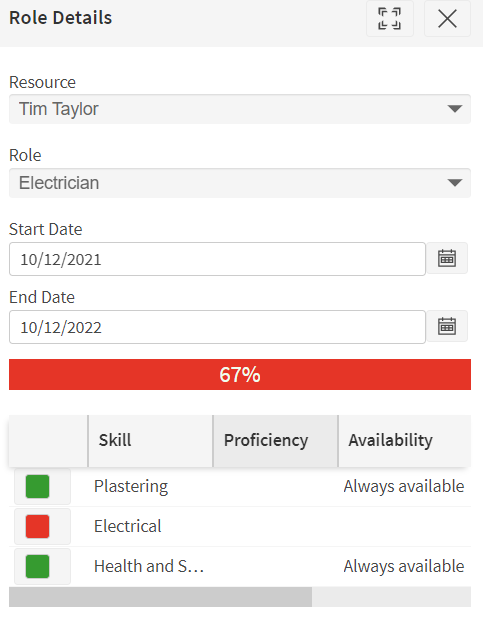
The pop-up allows the user to select a particular resource and role, and a date range. It will then show a status for each skill required by the role, along with details of the proficiency and availability of the skill.
The status is a colour reflecting whether the resource satisfies the role for all or some of the specified time.
- Green (OK): the resource satisfies the skill for the entire time specified.
- Yellow (Warning): the resource satisfies the skill for some but not all of the specified period.
- Red (Error): the resource does not satisfy the role at all during the time specified.
In addition, an overall role status and satisfaction level is shown.
The satisfaction level reflects how close the resource is to fully satisfying the role. The value is essentially the percentage of skills which the resource does satisfy compared to the total number of required skills. For example, if a role requires 4 skills and a resource has 3 of them, they would have a role satisfaction of 75%. If a resource satisfies a skill for part of the time the satisfaction will also reflect this.
Role Overrides
It is also possible to manually assign roles to resources who don't automatically satisfy the role. This is known as a 'Role Override', and a user will require the permission 'PlanningARPAllowRoleOverride' to use this functionality.
A role override can be applied to a resource from the context menu on the resource row in the planner.
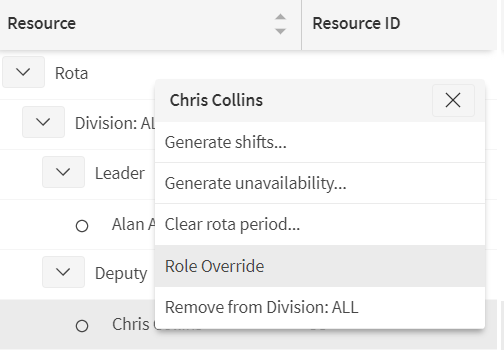
This will open a role overrides data panel, from where role overrides can be added or removed.
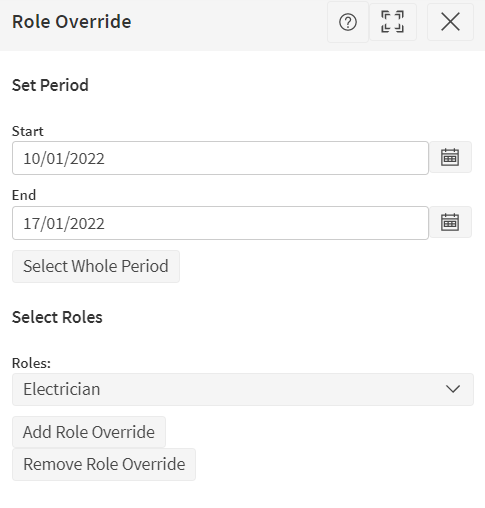
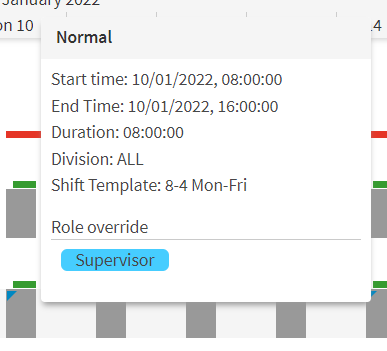
Once a role override is applied, any shifts that this role override applies to will appear with a blue triangle in the top left hand corner, and the details of the role(s) being overridden will appear in the shift tooltip.
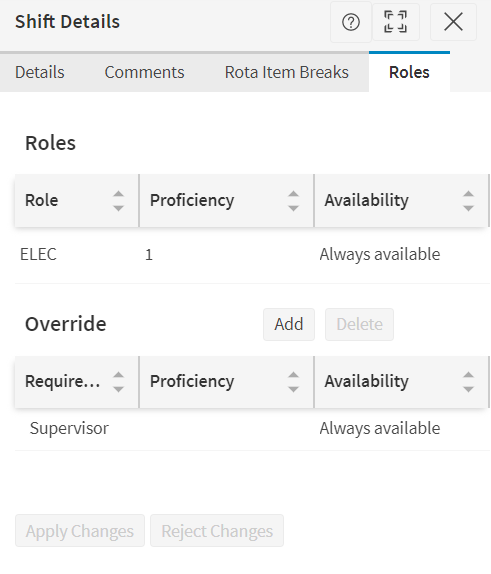
The roles tab on the shift details panel will also show the details of any roles that have been overridden. This tab is editable, so it is also possible to add and remove role overrides from here.
When planning with positions, if the position has a required role then it will not be possible to plan a resource into that position unless they satisfy the required role, or a role override is applied. If you attempt to add a resource to a position when they do not satisfy the position role, a pop-up will appear asking if you wish to apply a role override.
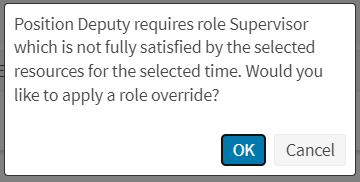
Click OK to add the resource to the position and apply the role override, or Cancel to abandon the change.
Provisional rota
Provisional rotas allow users to share changes they have made with other users before updating the master rota with these changes. This could be to allow a more senior user to approve the changes, or simply to allow another user to continue planning the rota.
To allow a user to save their changes to a provisional rota, the permission 'PlanningARPAllowSaveToProvisionalRota' must be enabled. If you wish to prevent users from saving changes to the master rota (so that users can only make provisional changes), then the permission 'PlanningARPAllowSaveToMasterRota' should be disabled.
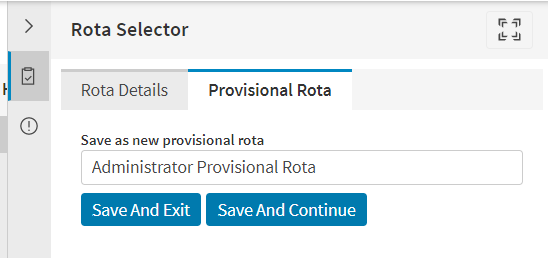
If a user has 'PlanningARPCreateProvisionalRota' permission they are allowed to create provisional rotas. If allowed they will see an option 'Save as new provisional rota' under the 'Provisional Rota' tab in the rota selector. There is an option to give the provisional rota a name (set to a default name). The provisional rota can be then created by clicking either of the two buttons:
- Save And Exit
- Save And Continue
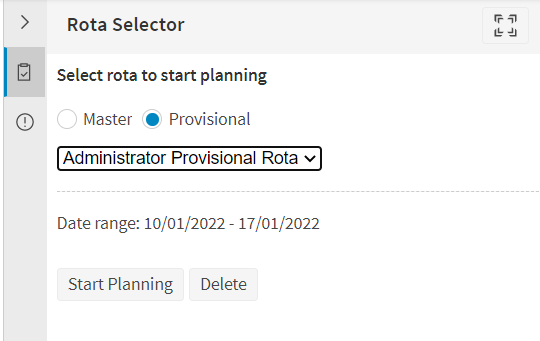
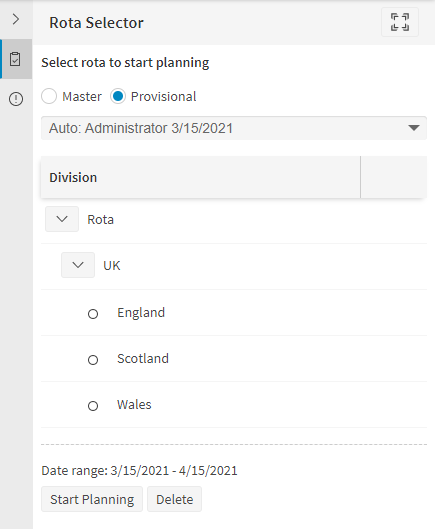
User can view the created provisional rotas in the rota selector screen upon selecting the 'Provisional' option. A drop-down with the list of all the provisional rotas created will be displayed. The user can then select any one of these provisional rotas and continue to make changes to it by clicking the 'Start Planning' button. If a provisional rota is no longer required, then it can be deleted from the rota selector screen by clicking on 'Delete' button.
When editing a provisional rota, any changes made will be within a new 'working set' rota. When you apply changes to your working set rota, these changes will be applied to the provisional rota. To apply all changes from the provisional rota to the master rota, return to the 'Rota Selector' panel.
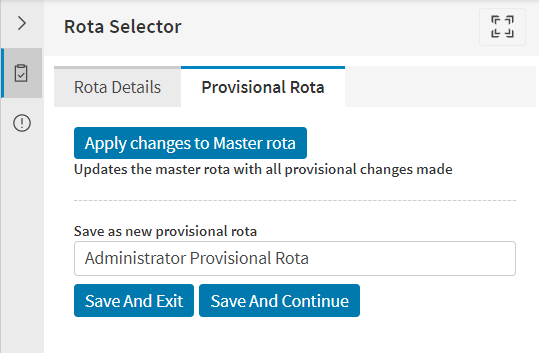
The 'Apply changes to Master rota' option will update the master rota with all changes made in the provisional rota, plus any further local changes made. The provisional rota will then be deleted. The 'Save as new provisional rota' option allows the local changes to be saved as a separate provisional rota. There is no restriction on the number of provisional rotas linked to a master rota.
Automated Planning
The advanced resource planner includes the option for the rota to be generated automatically.
Note
This requires use of the Dynamic Scheduling Engine, so the option is only available with a licence to use Dynamic Scheduling, and the core scheduling services must be installed.
Provided the condition described above is satisfied, automatic generation can be switched on by enabling the permission 'PlanningARPAutoGenerateRota'. If this permission is enabled, a new button will appear on the Resource Planning Screen, when initially selecting a rota:
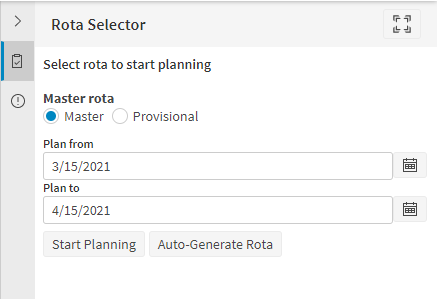
To auto generate, simply select the required rota planning period in the usual way, then click the button. Few options for generating the rota will appear:
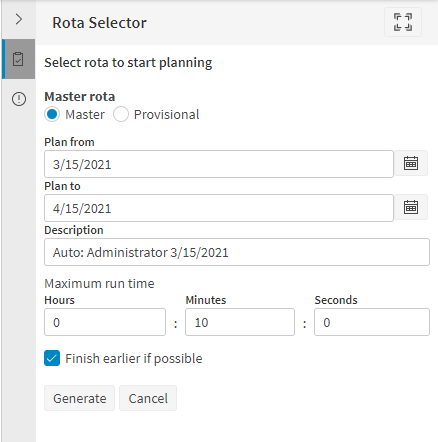
- Description: This is how the rota will appear on the rota selector screen.
- Maximum run time: This is the maximum length of time the Dynamic Scheduling Engine should use to auto generate the plan.
- Finish earlier if possible: If ticked the auto generation will stop once a 100% quality plan is reached. Note that this does not guarantee that the plan cannot be improved - see the scheduling concepts guide for details.
The 'Generate' button will then commence the automatic generation of the rota. The rota is saved as a provisional rota. This means that the master rota will not be changed until a user enters the rota and saves the changes to the master rota. The section on 'Provisional Rotas' gives full details on how to view and edit the provisional rota, and apply the changes to the master rota.
Import Shift Data
Valid File Types
Import shift data allows the user to import ARP and Excel files with shift data into the resource planner. To import a file using this feature, the user will first need a valid file. A valid ARP file will simply need to contain entries for the desired shift data following the Modelling Schema, this file should mostly consist of RAM_Rota_Item, RAM_Rota_Item_Break and RAM_Rota_Membership_Period entries.
For a valid Excel file to be uploaded the file will need to contain the following features:
- A column containing the id of any resource the user wishes to import shift data for.
- A row containing all the dates the user wants to import shifts on.
- Optionally a column containing the id of the division the user wants a resource to be a member of for a shift.
In addition to this, the user will also need to setup their parameters correctly to inform the workbench which rows and columns contain the information it needs for importing. These parameters are as followed:
- ShiftImportDatesRow: This defines the row which contains the dates.
- ShiftImportResourceIdColumn: This defines the column containing the resource ids.
- ShiftImportDivisionIdColumn: This defines the column containing the division ids. Leave blank if no divisions are being imported
- ShiftImportRowsStart: This defines the first row the user wants to be imported. The import will subsequently read every row below this parameter until it reaches a row with no resource id
- ShiftImportColumnsStart: This defines the first column the user wants to be imported. The import will subsequently read every column to the right of this parameter until it reaches a column with no date.
- ShiftImportSheetName: This defines the worksheet in the Excel document that contains the data for import. If this value is blank then the import will use the first available worksheet.
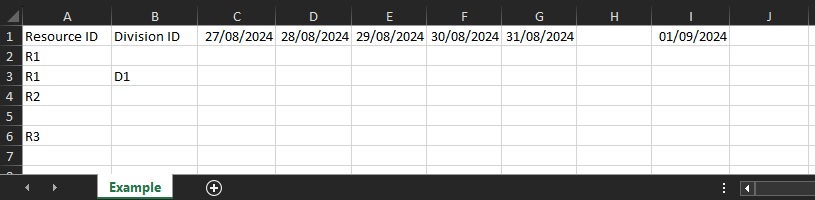
This is an example of a valid Excel file. In this example the user could setup their parameters as followed:
- ShiftImportDatesRow = 1
- ShiftImportResourceIdColumn = A
- ShiftImportDivisionIdColumn = B
- ShiftImportRowsStart = 2
- ShiftImportColumnsStart = C
- ShiftImportSheetName = Example
It is important to note that with these parameters the resource with id 'R3' would not be imported since there is a row with no resource id defined on line 5 which is after the parameter ShiftImportRowsStart. The user could instead set this parameter to 5 where only resource R3 would be imported. Similarly, no data for the date 01/09/2024 would be imported since there is a gap in column H which is after the parameter ShiftImportColumnsStart. Again, if the user could instead set this parameter to I where only data for the date 01/09/2024 would be imported. It should also be noted in the example that the user can define a resource id twice, this is useful if the user wants a resource to work shifts in different divisions in an import. However, the user should not include multiple Rows with the same resource and division id combination as they will overwrite each other, an explanation of how to import multiple shift items for a resource in a single day can be found later in this document.
Once the user has this template setup they can begin to define what they want to be imported into the resource planner. Each cell in the area defined by the parameters ShiftImportRowsStart and ShiftImportColumnsStart will import data for the resource and division that shares its row and on the date that shares its column. Each cell can contain the following input (in the examples below assume ST1 and ST2 are shift template ids, the parameter ShiftImportCheckExistingCharacter is set to '*' and the parameter ShiftImportSeparatorCharacter is set to ','):
- A single shift template id ('ST1'): This will delete any existing shifts for the resource in the division on the selected date and add a shift with the given shift template id.
- A single shift template id with the ShiftImportCheckExistingCharacter parameter ('ST1*'): This will check if a shift already exists with the shift template id for the resource in the division on the selected date exists, if it does it will delete all other items on that date except for the matching shift. Otherwise, it behaves The same as above.
- The ShiftImportCheckExistingCharacter ('*'): This will keep any existing shifts for the resource in the division on the selected date.
- A blank value (''): This will delete any existing shifts for the resource in the division on the selected date.
- A List separated by the ShiftImportSeparatorCharacter parameter (*,ST1,ST2): This allows for any combination of the first three options to be used at the same time. If the user uses the ShiftImportCheckExistingCharacter with a shift template id the import will keep all existing shifts for the resource in the division on the date and add a new shift with the given shift template id as well. If the user lists multiple shift template ids Then the import will add shifts for both of these shift template ids. A blank value can not be used in a list of items.
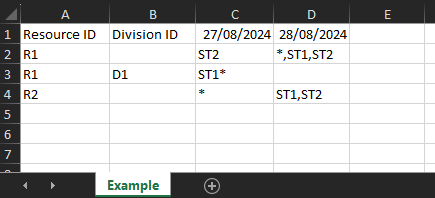
If the user were to import the example above they would expect to see the following results:
- Resource R1 with no division should have all existing shifts deleted on the 27/08/2024 and a new shift with shift template id ST2 added. On the 28/08/2024 any existing shifts should be retained and two new shifts with shift template id ST1 and ST2 should be added.
- Resource R1 in division D1 should check if a shift already exists with shift template ST1 on 27/08/2024 and only add a new shift if it does not exist. All other shifts on this day should be deleted. On the 28/08/2024 any existing shifts should be deleted.
- Resource R2 with no division should have all existing shifts retained on the 27/08/2024. On the 28/08/2024 any existing shifts should be deleted and two new shifts with shift template id ST1 and ST2 should be added.
As seen above the user has access to two other parameters in addition to the ones previously defined. These are available to users who may already use the default character in their ids and can be changed to any character. ShiftImportCheckExistingCharacter is defaulted to '*' and ShiftImportSeparatorCharacter is defaulted to ','.
Import Options
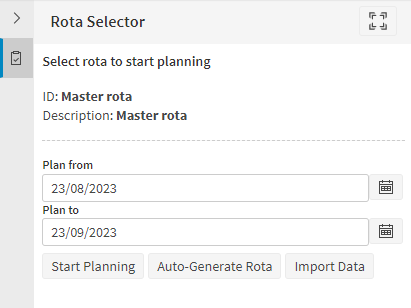
To import the data, navigate to the rota selector panel and select the required rota planning period in the usual way, then click the 'Import Data' button. After clicking the import button, the following options will appear:
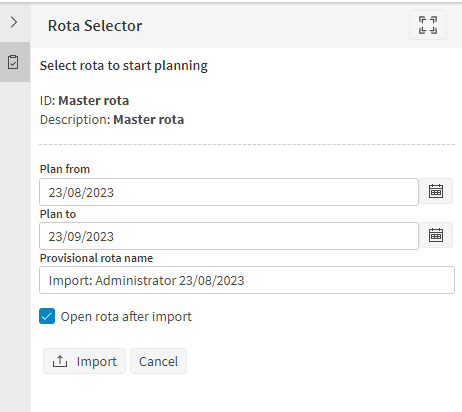
- File Type: Select which file type the user wants to import. Default ARP File.
- Provisional rota name: Name for the provisional rota.
- Open rota after import: If ticked it opens the resource planner after the data is imported.
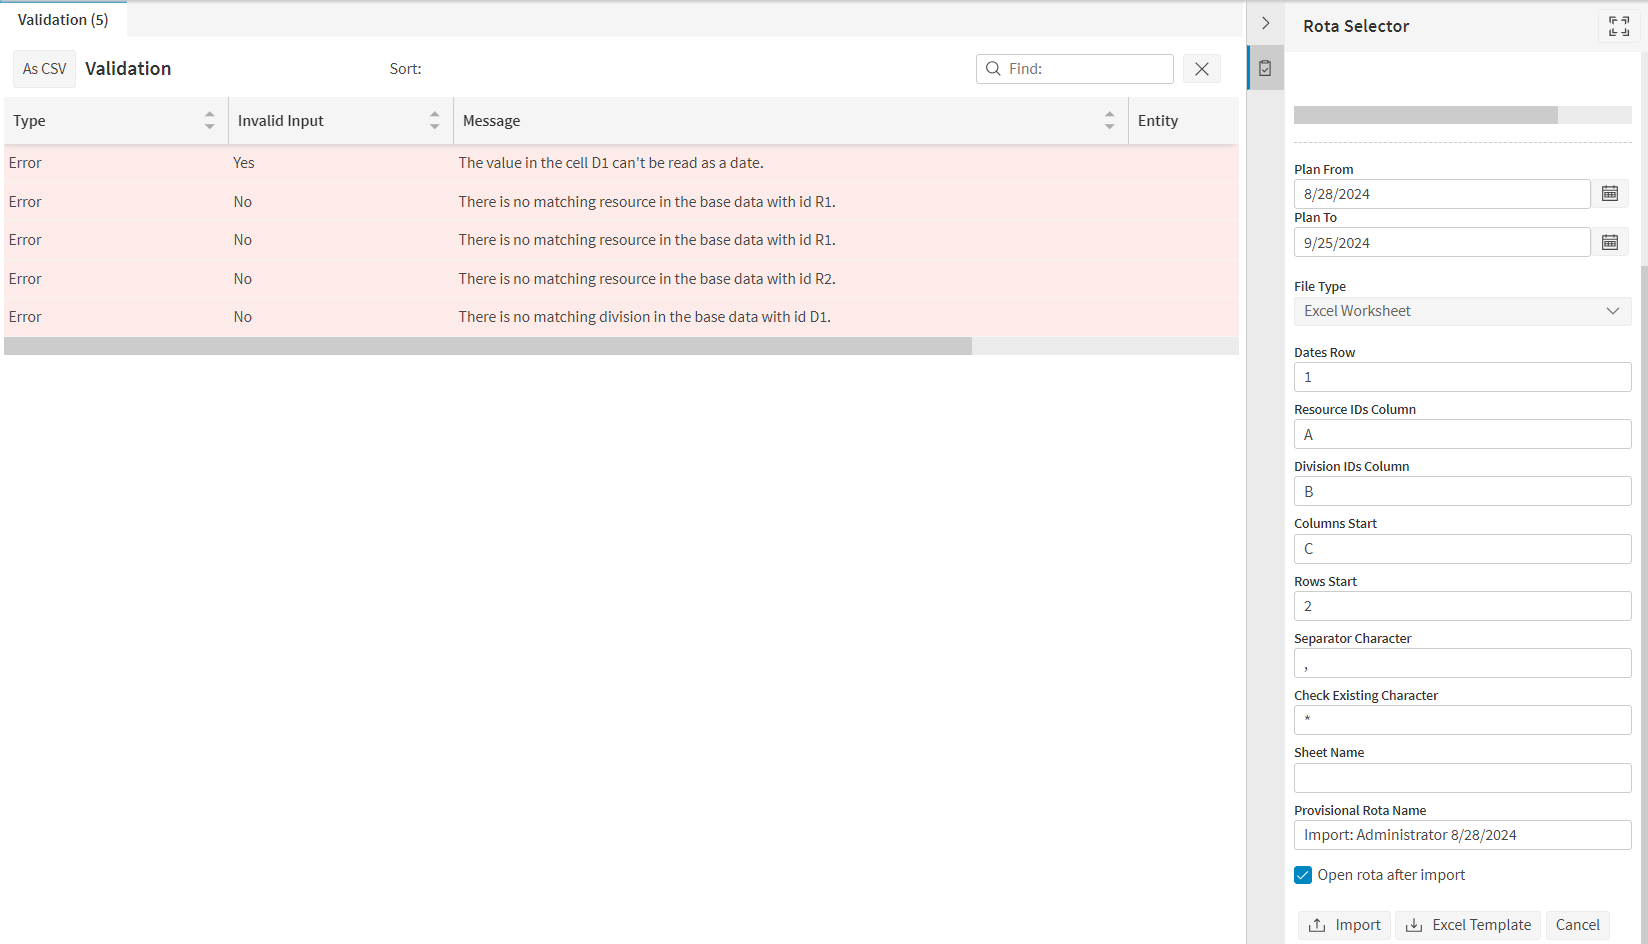
If the user selects the Excel Worksheet option for file type the user will also have the following options:
- Dates Row: Sets the user parameter ShiftImportDatesRow. This parameter is required for import.
- Resource IDs Column: Sets the user parameter ShiftImportResourceIdColumn. This parameter is required for import.
- Division IDs Column: Sets the user parameter ShiftImportDivisionIdColumn. This is an optional parameter.
- Columns Start: Sets the user parameter ShiftImportColumnsStart. This parameter is required for import.
- Rows Start: Sets the user parameter ShiftImportRowsStart. This parameter is required for import.
- Separator Character: Sets the user parameter ShiftImportSeparatorCharacter. This parameter is required for import
- Check Existing Character: Sets the user parameter ShiftImportCheckExistingCharacter. This parameter is required for import
- Sheet Name: Sets the user parameter ShiftImportSheetName. This is an optional parameter.
Shift Import Validation
Once the user has a file and has selected the desired options for the import, they can begin the import of the shift data. To do this the user will need to click the 'Import' button on the rota selector panel. After clicking this a file selector will open for the user to select the file they want to import. Once the file has been selected the workbench will then run validation on the selected file.
If the user has selected an Excel file for import the file will need to go through some preliminary validation. In these steps the workbench will attempt to convert the Excel data into our modelling schema. To do this, checks are made that the required parameters are populated and that all the parameters are in the correct format. If any of the parameters have any issues then no attempt to convert into the schema will be made and validation failures will be returned to the user. If the validation of the parameters passes then the next step is to ensure the Excel file is readable. In these checks the workbench will attempt to find the specified worksheet, if it can not be found validation failures are immediately returned. If the worksheet exists, then a check is performed to ensure that the dates are readable and that the resource and division IDs specified exist in the user's data. If there are multiple issues at this step (for example multiple resource and division IDs do not exist in the data) the validation will return all of the failures at once so the user can fix all of the issues before attempting to import again. Once all of these steps have passed then the workbench can convert the Excel data into modelling data ready to be imported.
The final step of validation, performed on both available file types, is to check the data against specific rules for each data table. Some examples of the validation being performed here include checking that RAM_Rota_Item rows do not overlap each other for resources. All validations failures at this step will be reported at the same time again so that the user can fix all failures found at once before attempting to import the file again.
If the import of a file return validation failures then a new data table will appear on the resource planner page. This will give a list of all validation failures which occurred during the import. Below you can see an example of an import with validation failures. This data table will persist until the user attempts to import again or starts planning on the rota.
If a file passes all validation checks, the imported shift data is saved as a provisional rota. This means that the master rota will not be changed until a user enters the rota and saves the changes to the master rota. The section on 'Provisional Rotas' gives full details on how to view and edit the provisional rota, and apply the changes to the master rota.
Exporting Shift Data
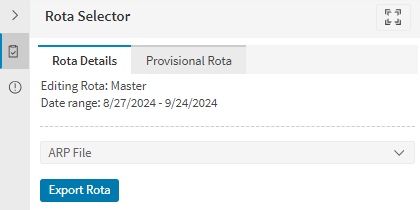
If a user is editing a rota they will have the option to export that rota as either an ARP or Excel file. The option can be found in the rota selector panel with a dropdown to select the file type the user wants. The export will include all shift data in the current rota for the currently selected period. If the user is exporting an ARP file then the shift data will be exported in the modelling schema format as expected. However, if the export is for an Excel file the export will look something similar to below.
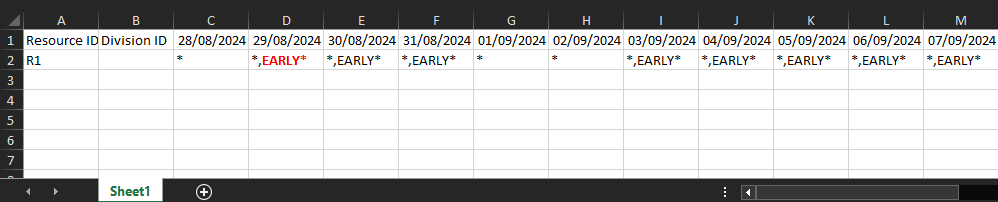
In this export any shifts that exist in the rota will be denoted by its shift template id on the day it has been created for and in a row belonging to the resource and division it belongs to. By default all cells will be exported with the ShiftImportCheckExistingCharacter parameter. If the user has modified any of the shifts in the rota after generating them (for example changing the shift cost of that shift), then this will be denoted with it's shift template id in bold and coloured red. Note that this does not affect anything on the importing of this file, the workbench is unable to track the modifications currently.
Note
See the Advanced Resource Planning Concepts Guide for further details about automated rota planning.