Scheduling - Resources and Activities
This section describes the functionality available within the Resources view and the Activities view.
Note
For information on filtering, viewing saved and historical schedules and other toolbar options see the Scheduling Workspace help details.
The Resources View
The Resources View provides information about all of your resources, along with their current shift patterns and plan of activities.
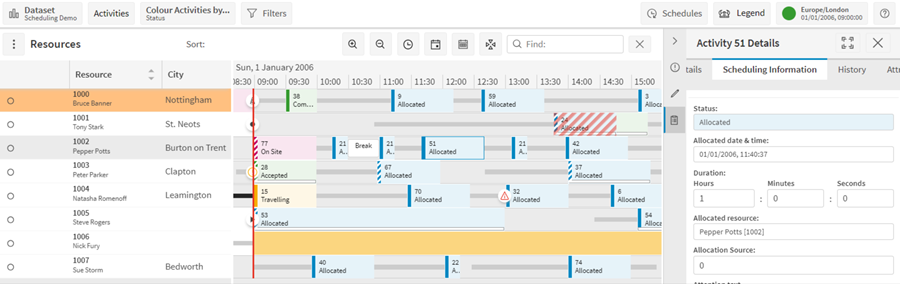
The view is split into three main sections:
- The left hand side contains details of each resource in grid format. The columns are configurable.
- The central part of the screen displays a timeline showing the schedule for each resource.
- The right hand side of the screen shows other information such as the exceptions summary, resource or activity details, or the legend. These can be selected with the buttons in the toolbar.
The Scheduling Window
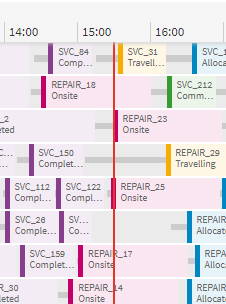
The current time is represented by a vertical red line. The end of the scheduling window is represented by a vertical blue line.
Note
You can view the current time by using the 'Current Time' or 'Current Day' buttons in the toolbar at the top of the page.
Warning
It is the responsibility of the customer to maintain and clean up historic activities on the PSO workbench and within the system as a whole. Failure to do so can lead to performance issues when loading the PSO workbench. For example, if an activity is fixed to a date and time a week ago, PSO must load all days from that period along with the activity. As the days go on, this impact worsens and can significantly increase workbench load times.
Using Quick Find
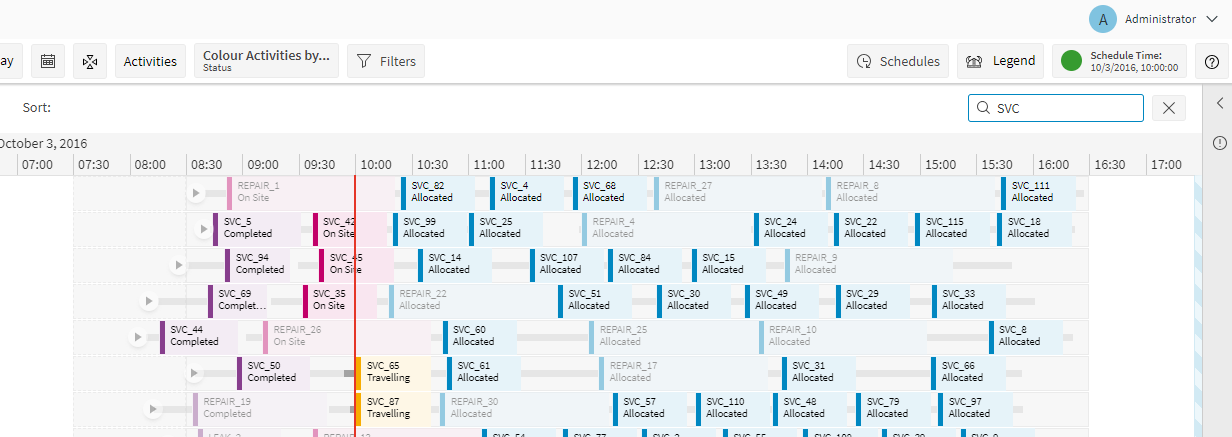
You can use the fast find tool located at the top right of the window to search for resources and activities matching all or part of your search string.
You can also search on the activity label. Where a resource does not match the search string, but certain activities allocated to the resource do, then any other activities not matching the search string will be greyed out.
Re-sizing Columns and Sorting
To resize a column simply click and drag the vertical bar on the right side of the column heading, to the desired position.
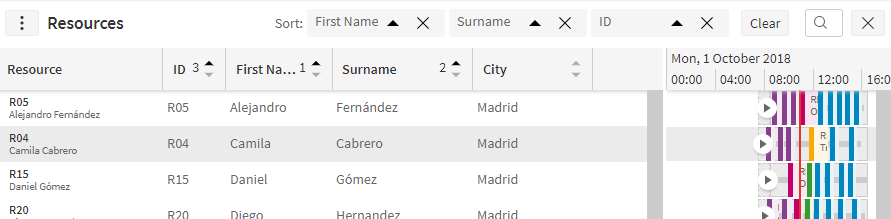
You can sort the rows in the Gantt by clicking any of the column headers. This will sort the data in ascending order based on the data in this column. Clicking a second time will switch to descending order, and clicking a third time will remove the sort. Some columns do not allow sorting.
If you click on another column header this will become the new primary sort column, and the previously selected column will become the secondary sort column. For example, in the screenshot below the columns were selected in the following order : ID, Surname, First Name As you can see this means First Name is the primary sort column followed by Surname and then ID.
Expand/Collapse All
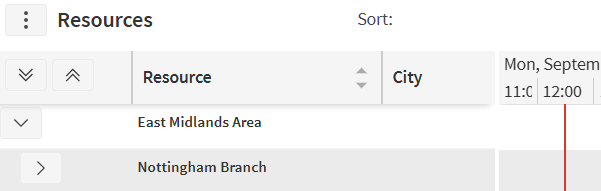
You can quickly expand or collapse all resources by using the  icons at the top-left of the resource grid.
Resource Options
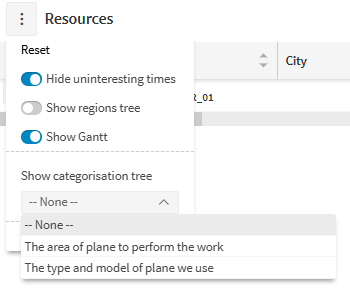
You can customise the resource grid and Gantt further by clicking the three vertical dots icon next to the 'Resources' title.
This will open an options popup as shown below.
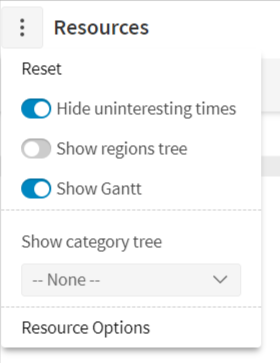
You can toggle the Hide uninteresting times Gantt option and the option to show the regions tree.
You can display or hide the Gantt in the Resources view using 'Show Gantt' toggle.
Above settings can be set to their defaults by clicking on 'Reset' button.
When you click on 'Resource Options' button, it will open a panel on the right hand side of the screen. Here you can select which columns to display on the Resources grid and in which order they appear.
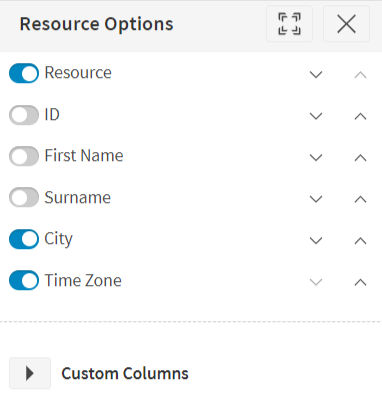
Further there is a collapsed section to add/delete/display custom columns. When you expand the 'Custom Columns' section, it allows you to add a new column.
- 'Caption' value given is used as new column header
- 'Expression' can be selected from the suggestions popup. Label format defined here is used to generate values for the new column.
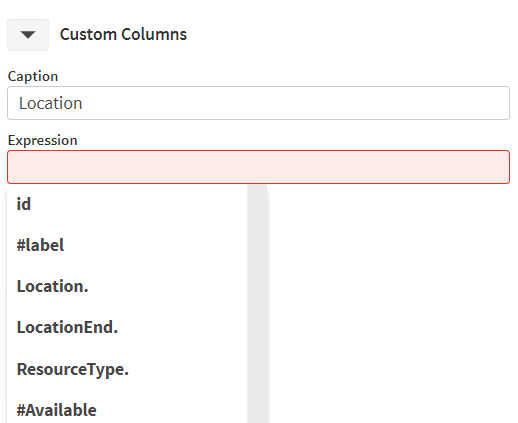
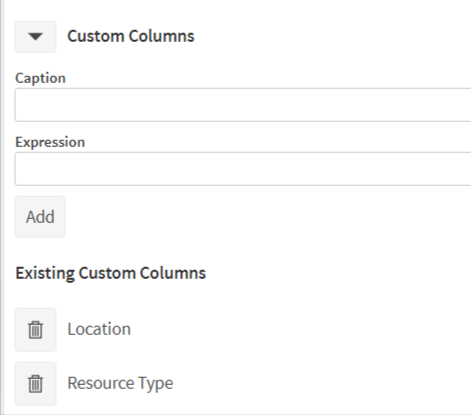
After successfully adding the column, Resources data grid is getting updated. New column added is listed in 'Existing Custom Columns' section. Custom columns can be deleted by clicking on the delete icon for the relevant column.
Activities
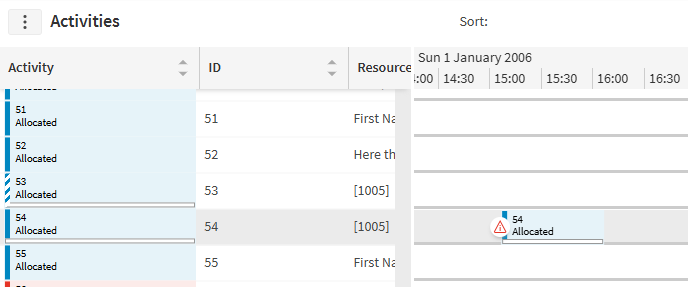
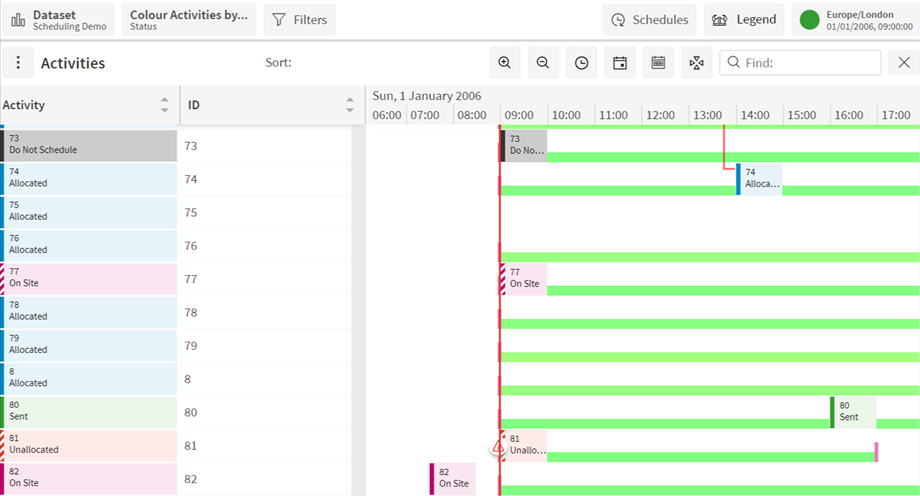
Visits to activities are represented by a bar positioned in the timeline at the period where they are allocated. The activity may have already started, or may be planned for a future date and time. By default activities are coloured according to their status. The Activity column also shows the activity as it will appear in the Gantt, and this can be dragged in the same way as the Gantt items.
Note
Labels on the activity bars will only become visible when the zoom level is such that there is room for them. Those which cannot fit into the space available will show the first part of the activity label completed by ellipses.
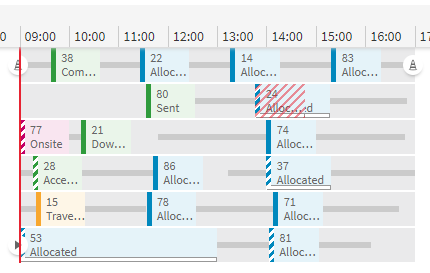
If an activity is in jeopardy a red alert symbol will appear at the start of the visit bar. This indicates that the activity is currently scheduled to miss its primary SLA.
Private activities or appointments (holiday, sickness, training days, etc.) are represented by orange bars. These activities indicate that the resource is occupied, and cannot be scheduled to undertake other activities during this time.
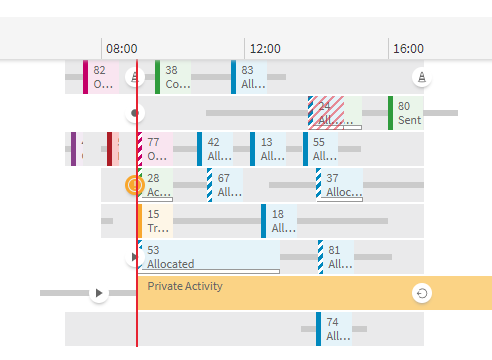
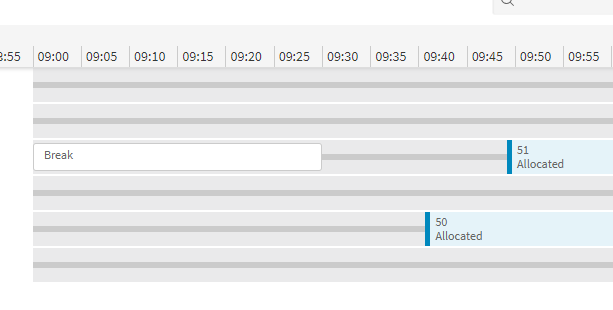
Periods of planned resource breaks (lunch breaks, for example) are indicated by a white box (colour configurable using PSWBreakDefaultColourExplicit parameter), that only fills the middle three-quarters of the row.
If Colour by Status is selected, break events will display different colours according to the event status. These colours are configurable using the PSWCommittedBreakColour, PSWBreakOnColour, and PSWBreakOffColour parameters.
Travel Time
In geographic scheduling problems it will be necessary for the resource to travel from one location to the next. The expected travel required is indicated by a thin grey bar on the Gantt.
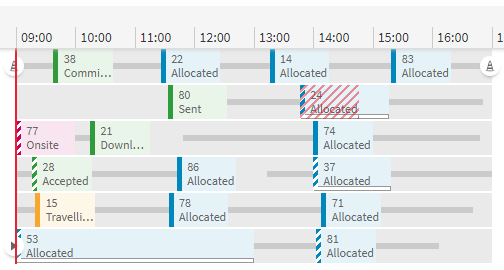
Activities at the same location will be displayed with no travel time between them.
Shifts
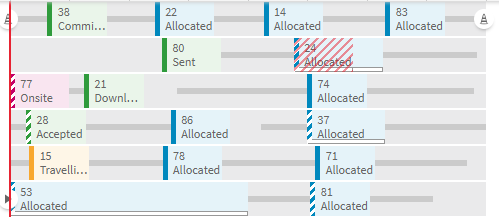
Shifts are periods of time associated with a resource. These define the start and end date and time during which a resource is available to be scheduled.
By default, shifts are represented as light grey boxes displayed along the timeline for a resources schedule.
Resource Events
Resources log on to their shift to become available for work, and log off at the end of the shift. By default, a log on is represented by a black arrow, and a logoff by a black logoff icon.

GPS location updates can also be sent for resources. If so the latest fix will be displayed on the Gantt.

Overlapping Activities
Overlapping activities are displayed with red striped bars on the Gantt.
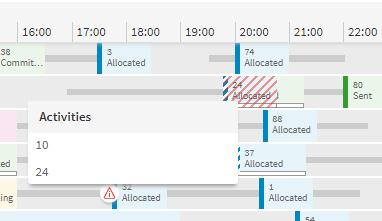
Clicking bars will show a menu of the overlapping activities. Selecting one will bring it to the top so it can be seen.
In addition an overlapping activities exception will highlight the affected activities.
Unallocated Activities
Unallocated activities do not appear in the Gantt (since they are not scheduled to any resource), but it is still possible to view these from within the Resource view. To do this simply click the 'Activities' button at the top of the screen. The display is the same style as used on the Activities view.
By default only Unallocated activities will be shown here, but it is also possible to show 'Do Not Schedule' and 'Allocated' activities by selecting the required options.
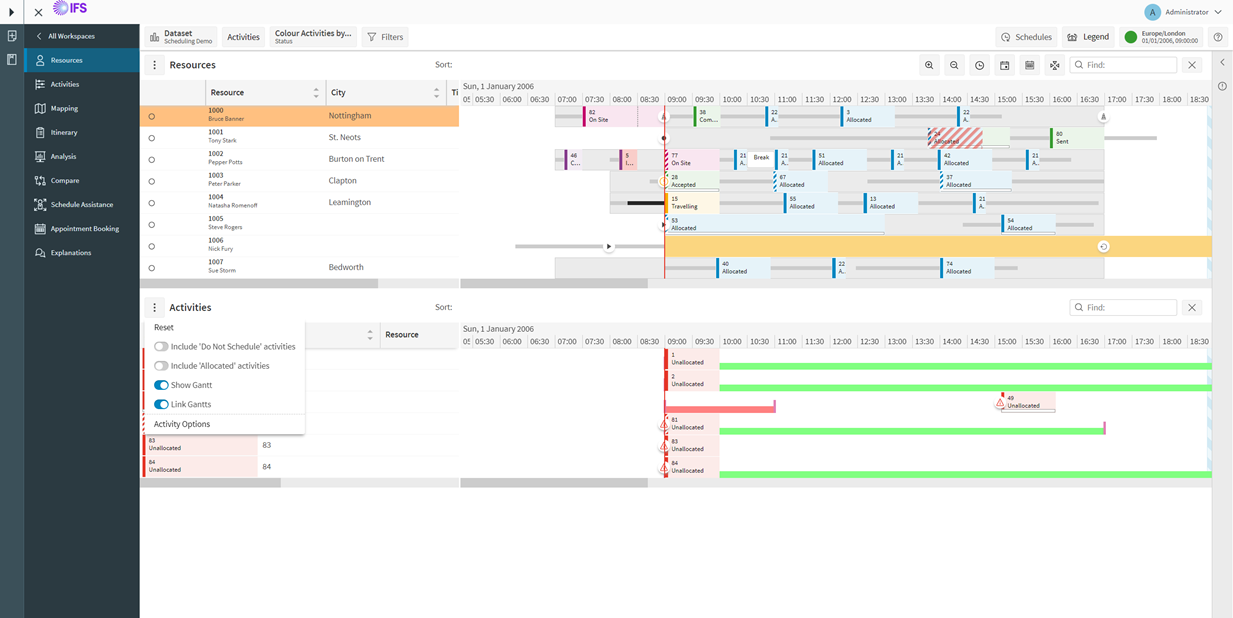
Further, it is possible to display or hide the Gantt in the Activities view using 'Show Gantt' toggle.
By default Resources and Activities views are synchronised. You can link or unlink the views using 'Link Gantts' toggle. When unlinked, it will allow independent adjustment of grid and Gantt areas in each view without affecting the other.
When the views are unlinked and if Gantt is visible, both the Resources and Activities views will each display their own set of buttons for Zoom-in, Zoom-out, Current Time, Current Day, Calendar and Show All Data, as shown in the image below.
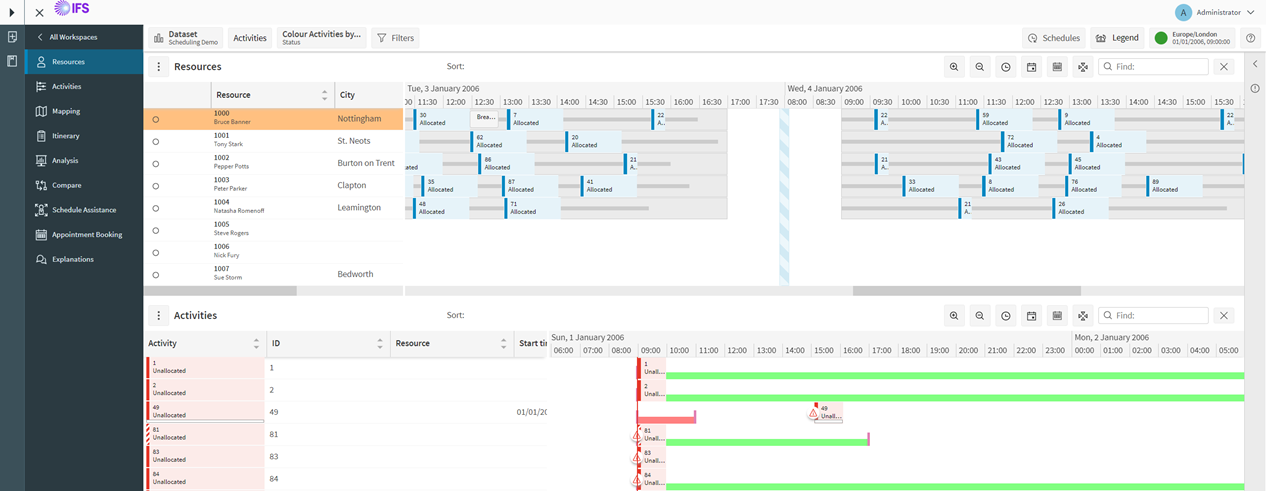
When the views are linked, these buttons appear only in the Resources view, and both views respond synchronously when any button is clicked.
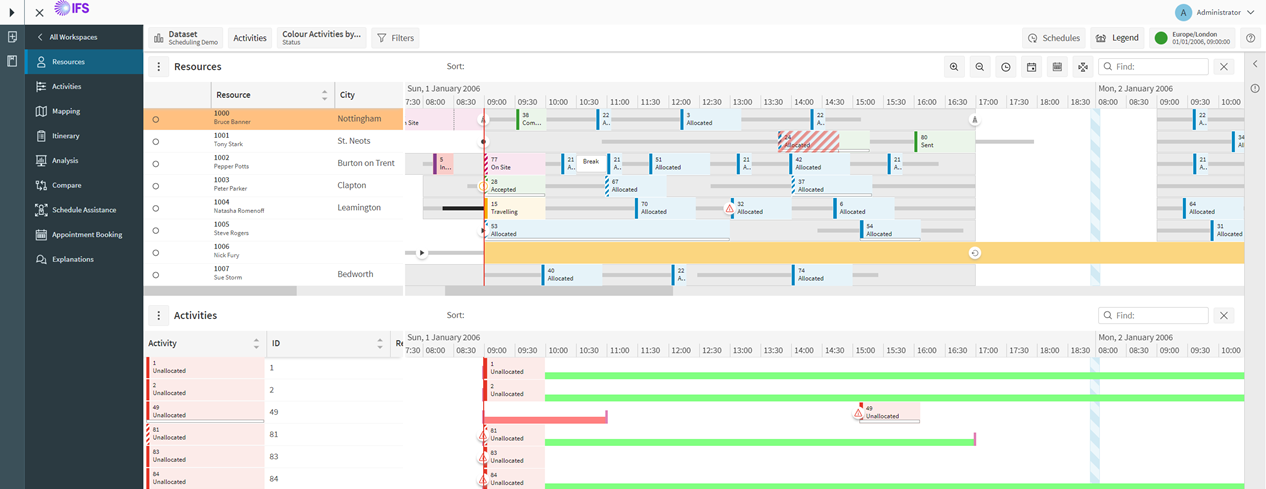
A horizontal splitter is available between the Resources and Activities views, allowing to resize the panels by dragging it horizontally.
Activity Colours
The colours of activities can be changed to help visualize the data. Click on the Colour Activities by button in the top toolbar to change the colour mode.
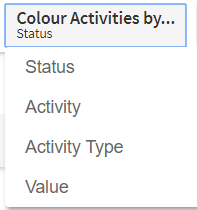
The Activity and Activity Type options will use the colour data on the Activity or Activity Type if provided.
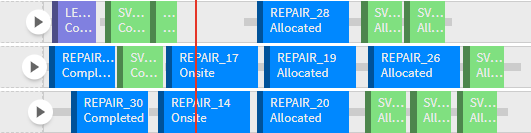
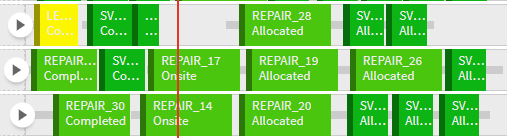
Colour by Value will show the activities coloured based on the activity's base value. The lowest value activities will be coloured green, while the highest value will be bright yellow.
Legend
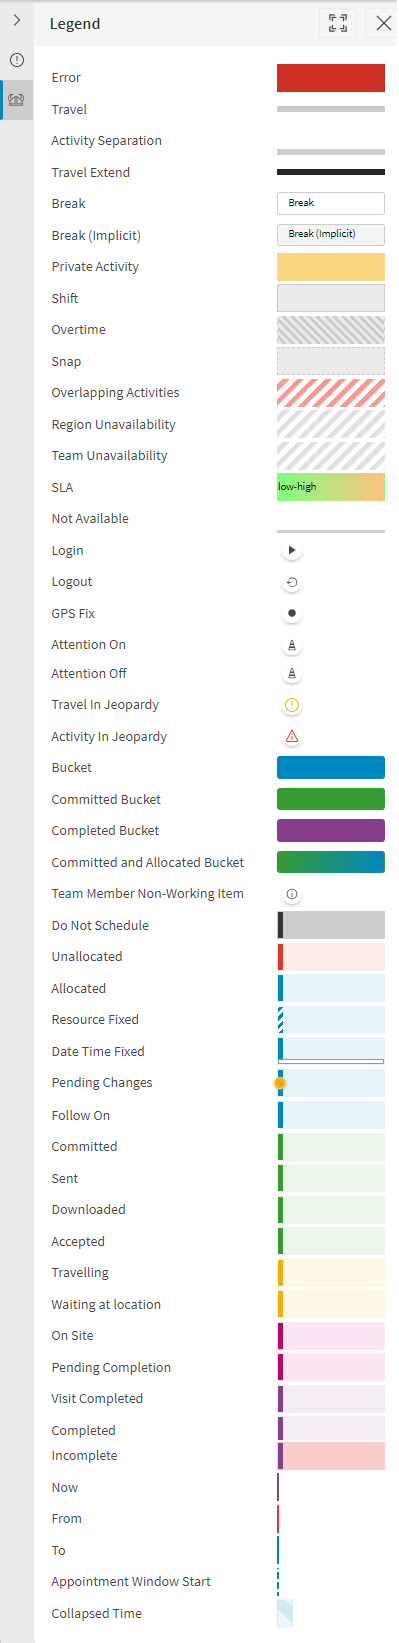
The Legend provides a quick visual reference to the bar styles and symbols used to represent schedule elements such as activity status and Service Level Agreements (SLA). The Legend is available in both the Resources and Activities pages, click the Legend button in the toolbar and the legend will appear in the tools panel.
Hiding Uninteresting Times
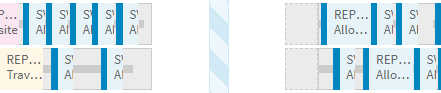
By default any uninteresting times on the resources Gantt will be collapsed, for example if no resources are working overnight. This means that more useful information can be displayed on the Gantt at one time. Where uninteresting times have been collapsed a thin vertical line will be shown instead.
Team Resources
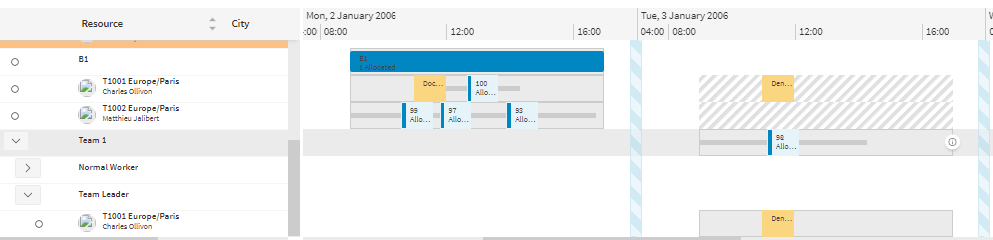
When a dataset contains resources which are members of a team (represented as an entry in Team_Resource database table) the resources page will display a row for the team, showing work allocated to the team. This works as a tree view, so the Team row can be expanded to show a row for each resource in the team.

The Resources in the team may also be broken down in a tree or roles. In some cases a resource may be sometimes part of a team and sometimes work on their own. In these cases the resource Gantt will show a row for the resource working alone, and a child row under the team. The row for the resource working alone will show Activities assigned to the resource and show Team Unavailability at times when the resource is in a team. Activities allocated to the team show in the team row, and not in the child row for the resource. Private activities may be assigned to a resource while it is part of a team. These show on both the resource row and the child row within the team.
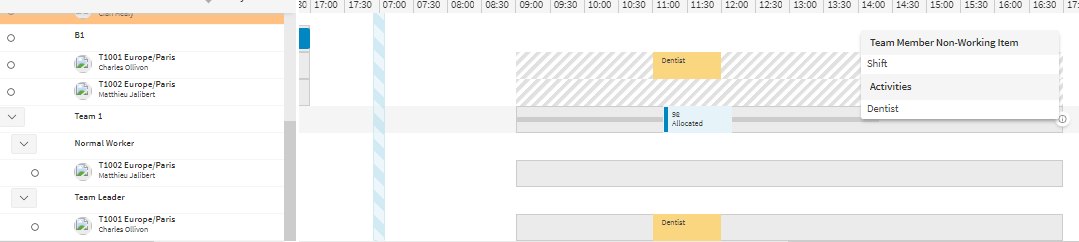
When a team contains a resource that has a private appointment during a team shift a "Team Member Non-Working Item" icon will be displayed to the right of the shift in the team row, indicating that the team is incomplete for part of that time. Hovering over that symbol reveals more information about the private appointment.
Buckets
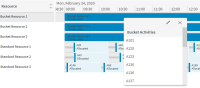
When a resource has the resource_class_id of 'BUCKET' on either the resource or the resource type, this resource and its activities will be displayed by a bucket item. A bucket item is a shift spanning 'allocation' on the Gantt which displays how many activities in the bucket are allocated or committed. When clicking on a bucket item a list of the activities that said bucket item contains will be displayed in a dropdown. This dropdown behaves similarly to other context menus on the Gantt where you are able to view details of specific activities, make changes to activities or make bulk changes to activities. For more information on buckets see Scheduling Concepts - Resource Capacity Management.
Parallel Resources
Parallel resources (resources with a resource_class_id of 'PARALLEL') will be displayed with an overview row comprised of items that show when the resource has work allocated to it. This row will also indicate if any of the activities at this time are committed. Clicking on any of these items will show a dropdown list of any activities scheduled at this time. Breaks and private activities will be shown in this overview row as well.
The parallel resource can be expanded to show multiple rows showing the precise timings of all the activities allocated to the resource. There will be as many rows as are needed to show all of the activities occurring in parallel.
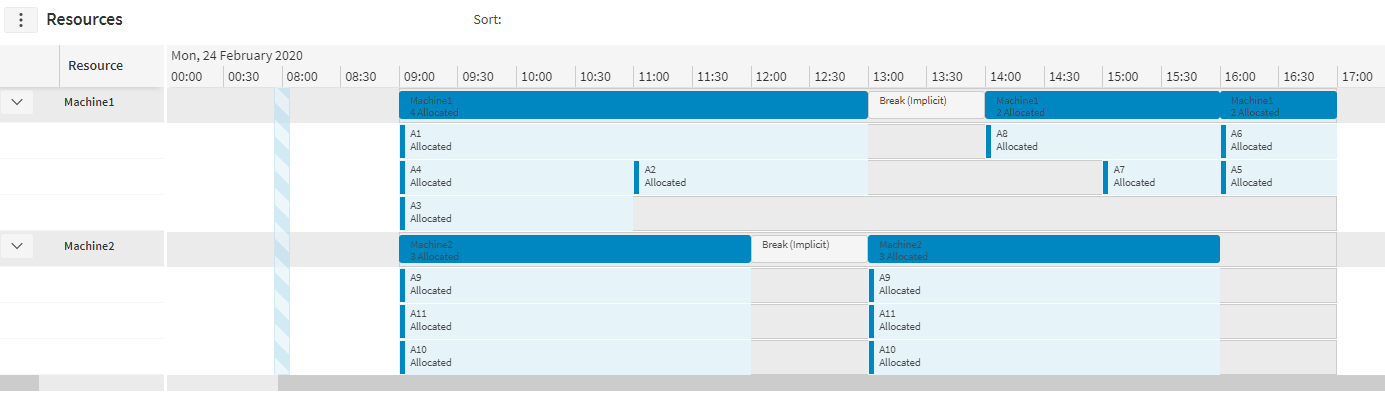
For more information about parallel resources see Scheduling Concepts - Resource Capacity Management.
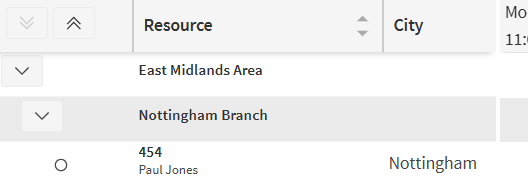
Regions Tree
There is an option to display the resources arranged in a tree of regions. This can be switched on in the resource options panel and a default can be set by an administrator with the GanttShowRegions parameter. See Organisation - parameters.
Categorisation Tree
There is an option to display the resources arranged in a tree of the selected categorisation's category values.
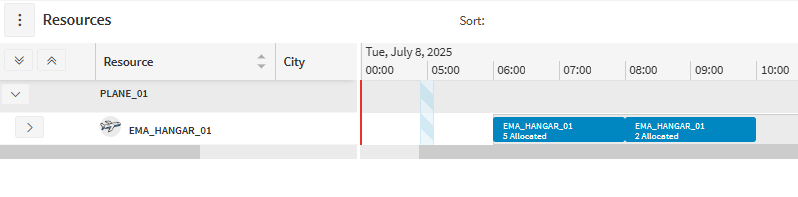
This can be switched on in the resource options dropdown by selecting a categorisation from the options provided in the 'Show categorisation tree' dropdown.
The Activities View
The Activities view displays a list of all activities and their current status. The view is laid out in the same way as the resources view, with three main sections: a data grid, a timeline and an exceptions summary.
Using Quick Find
You can use the fast find tool located at the top right of the window to search for activities matching all or part of your search string. You can search on the contents of any of the columns you have displayed on the left hand side of the window; by default this is ID, Resource, Start time and Duration. The "Activity" column shows the activity as it will appear on the timeline. This shows the status and can be dragged even if the activity in the timeline is off to either side of the visible area.
Activity Options
You can customise the activity grid and Gantt by clicking the three vertical dots icon next to the 'Activities' title.
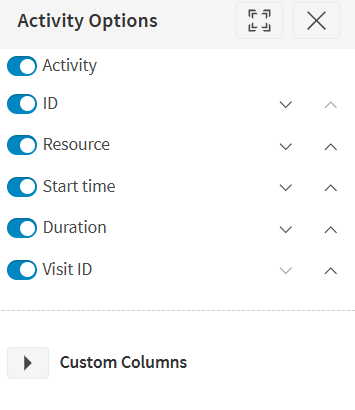
This will open an options popup. You can configure to display or hide the Gantt in the page using 'Show Gantt' toggle.
To customise the activity grid column options, click the 'Activity Options' button. This will open a panel on the right hand side of the screen from where you can select which columns are shown, the order in which they appear, and expandable section to add/delete/list custom columns. See Resource Options section for details on custom columns.
Allocations
Visits to activities are represented by a bar positioned in the timeline at the period where they are allocated. The activity may have already started, or may be planned for a future date and time. By default activities are coloured according to their status.
Unallocated activities are displayed at the current time, unless they are fixed to a time in which case they will appear at the fixed time. The Activity column also shows the activity as it will appear in the Gantt, and this can be dragged in the same way as the Gantt items.
SLAs and Availabilities
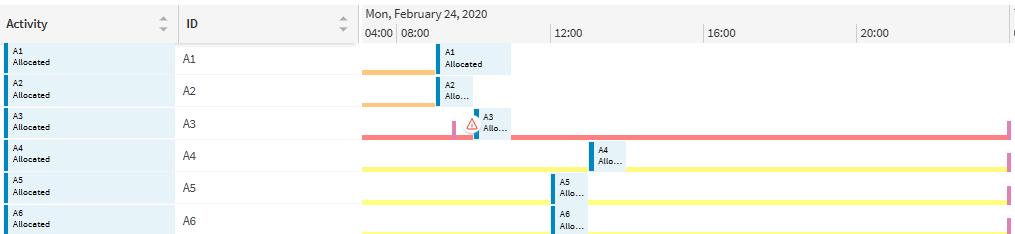
If a Service Level Agreement (SLA) has been defined for an activity, this is indicated by a coloured bar in at the bottom of the activity row. The beginning and end of a SLA is indicated by a pink vertical bar. The colour of the bar is indicative of where the activity is scheduled within the SLA, and also the availability of the activity at that time.
- Green - start of the primary SLA
- Yellow - Midway through the SLA
- Orange - end of the primary SLA
- Red - after the primary SLA
- Grey - unavailable to be scheduled during this period
An example of this is shown below.

In addition, activities that are in jeopardy are indicated with a red triangle warning at the start of the bar. This indicates that the activity is currently scheduled to miss its primary service level agreement (SLA), and the primary SLA has not expired.

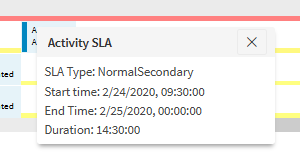
Hovering over or clicking on an SLA bar will display a pop-up context menu for the SLA. This will display the SLA's start and end time, duration and SLA type id.
Resource Attention Alert
The Attention Alert is a scheduled event used to show when an individual resource requires attention. This may be used in many ways, for example as a 'Panic' alert or a more general use for example if 'the resource cannot access a certain site'. The Resource becomes highlighted orange on the Gantt chart and an exception is shown in the exception panel.

Resource Details
The Workbench lets you view detailed information about your resources. To view this information click on the resource whose information you want to view.
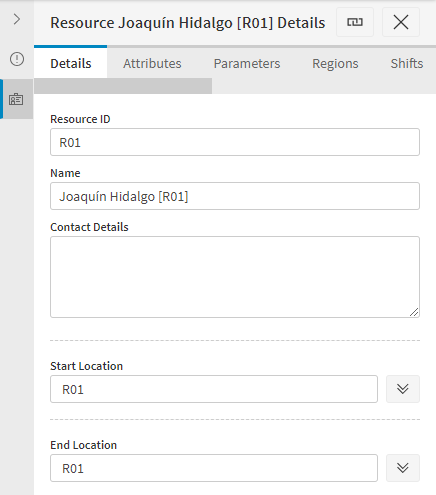
The Resource Details panel opens. Each tab in this panel provides detailed information relating to the selected resource.
Note
The tabs available may differ from those on the screenshot. This is most likely because by default the workbench will only show the tabs that contain data for that particular resource. In addition, there are specific permissions to view each tab which are configurable by the Workbench Administrator.
Details tab
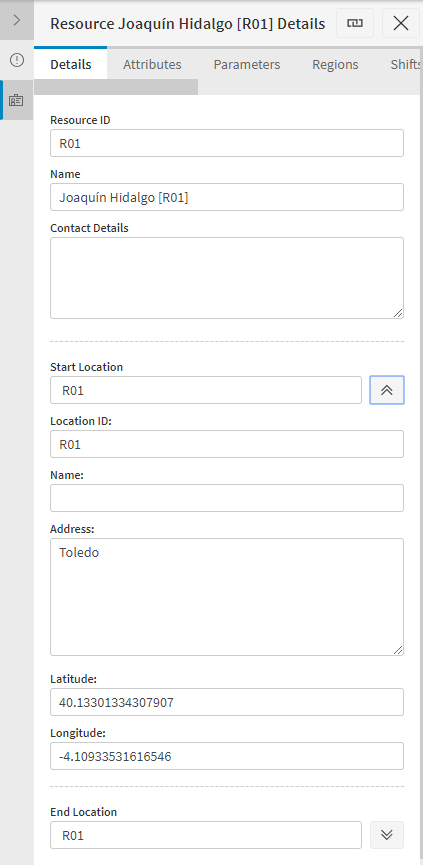
Displays general information about the resource including ID, name, start location ID and end location ID. Clicking on the arrows to the right of the location ID fields will display more detailed information in the Location Details section.
Attributes tab
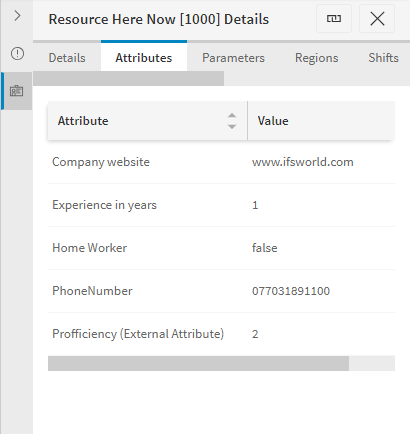
Displays the name and value of any additional details the EA has attached to the resource in their input data.
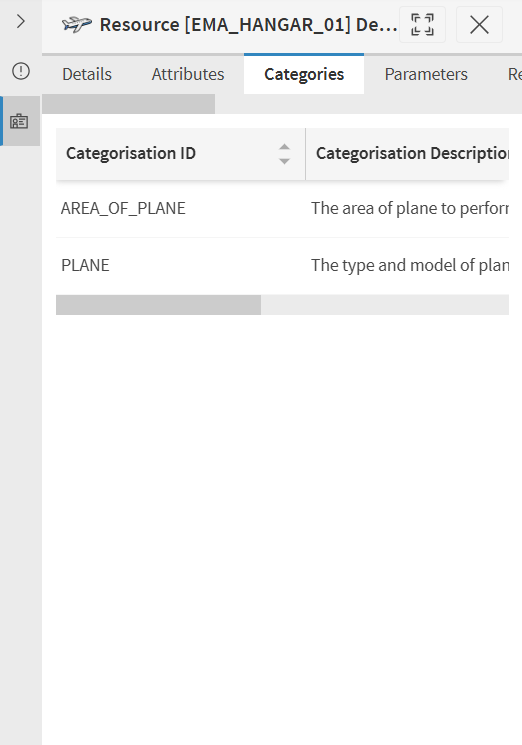
Categories tab
Displays the category and categorisation details associated with the resource.
Parameters tab
Displays a list of parameters for the selected resource which influence the scheduling decisions of the DSE.
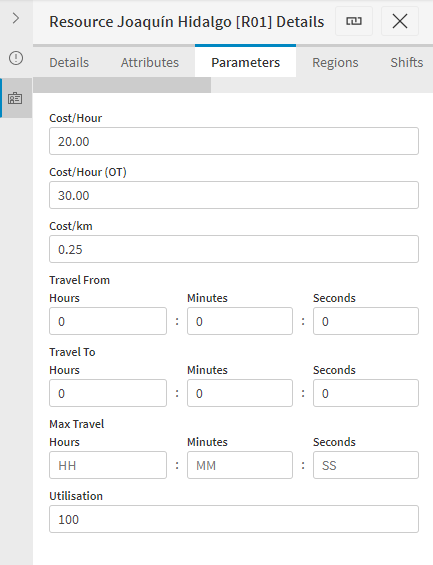
Here is a brief description of each parameter:
- Cost/Hour - the cost for every hour travelled by the resource
- Cost/Hour OT - the cost for every hour travelled by the resource within their overtime period
- Travel From - amount of time the resource is allowed to travel at end of shift without incurring any cost (i.e. unpaid travel time)
- Travel To - amount of time the resource is allowed to travel at start of shift without incurring any cost (i.e. unpaid travel time)
- Cost/Km - the cost for every km travelled by the resource
- Max Travel - the maximum distance from the start location that the resource will travel, defined as a time.
- Utilisation - the percentage of the resources shift the DSE is allowed to schedule work into
- Travel Cost Model - the travel cost model used to calculate travel costs for this resource (if present). Clicking on the ellipses button will bring up details of the model in use for that resource. Note that if a travel cost model is being used then the default resource distance cost and maximum travel do not apply, and as such are hidden from the tab.
Travel Cost Model Details
This pop-up appears when clicking on the travel cost model button in either the parameters of shifts tab, and displays details about the associated travel cost model.
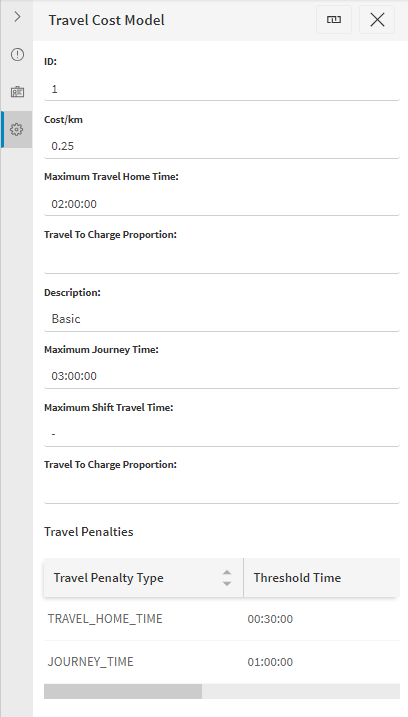
The top section shows the following information:
- ID - the ID of the travel cost model
- Description - the description for the model
- Cost/Km - the default cost per km to apply
- Maximum Journey Time - The maximum time allowed for a single journey to or from a schedulable activity.
- Maximum Travel Home Time - The maximum time allowed for travel from the shift start location to an activity in the shift.
- Maximum Shift Travel Time - The maximum total travel allowed in the shift.
- Travel To Charge Proportion - If the travel to period for the shift is non-zero, then any costs associated with the first journey in the shift will only be charged at this proportion of the usual cost, up until the travel to limit is met.
- Travel From Charge Proportion - If the travel from period for the shift is non-zero, then any costs associated with the final journey in the shift will only be charged at this proportion of the usual cost, up until the travel from limit is met.
The bottom section details any travel penalties that apply. These are one off penalties and additional costs per km that apply once the amount of travel passes a threshold value. These can be applied to individual journeys, to the travel home time or to the total shift travel time.
For example, suppose there is a journey time penalty which applies after one hour, and has an additional cost of 2 per km. If the default cost per km is 0.25, then for a journey of two hours, the first half would be charged at 0.25 per km, and the second half at 2.25 per km. If the journey was 100km, this would mean a journey cost of 50 * 0.25 + 50 * 2.25 = 125.
Regions tab
Details which region or regions the selected resource belongs to.
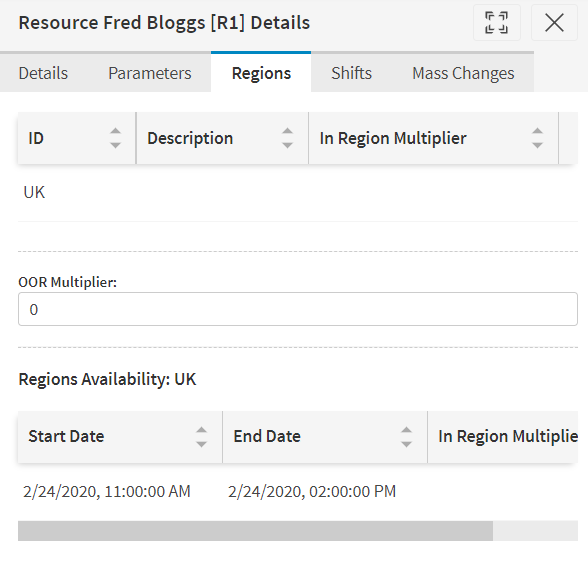
By default, a resource will only be allocated an activity if they are in the same region although this behaviour can be modified through the use of out of region multipliers. The within region multiplier can also be used to prefer resources to work in certain regions. See the Scheduling Schema Guide for details.
Preferences tab
Provides information about preferences towards or against particular activities.
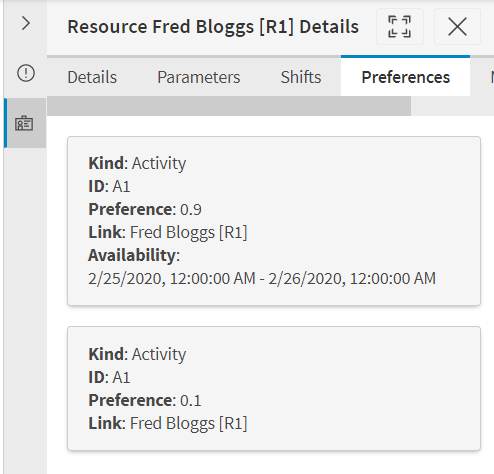
A resource can be preferred to an activity, activity_type or location on a sliding scale of 0 to 1. A value of 0 means the resource will never be considered and 1 means only that resource (and other resources with a preference of 1) will be considered. If no preference is specified, the default value is 0.5
Shifts tab
Defines the shifts and shift patterns for the selected resource including start and end locations with address and latitude and longitude details and times.
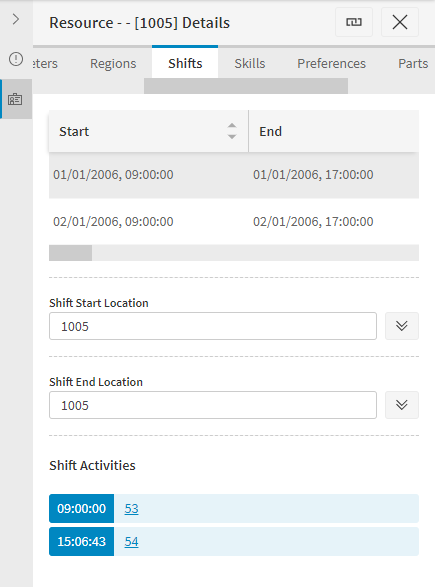
A shift pattern will create a shift on the days specified between the period start and period end dates. Shifts that would overlap existing shifts and therefore are not used are displayed in grey.
Activities for the shift are shown as a list and can be double clicked to drill through to the activity details.
The shift details can also be accessed directly from the Resources Gantt whilst hovering over a shift; simply use the right mouse click and select Shift Details. This will then take the user directly to the screen above.
Skills tab
Provides information on skills held by the resource.
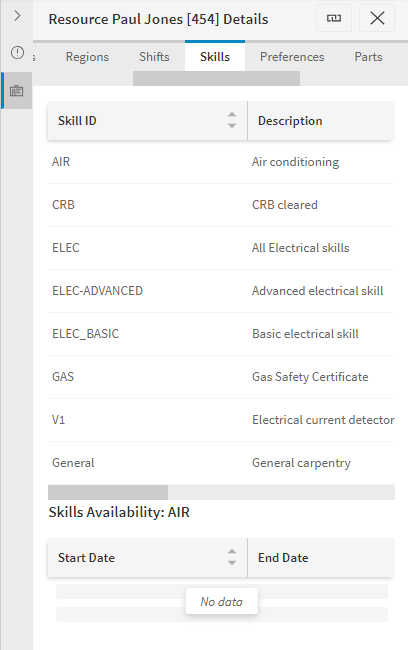
Skills are required for the resource to be allocated activities requiring that skill. The proficiency value indicates how quickly the resource can carry out the activity, where 1 is the default.
Parts tab
A resource can only be allocated an activity requiring a part(s) if they are carrying a sufficient quantity of the same part.
Resource details displays the parts and quantities used over the scheduling window as each activity is carried out. When the activity has been completed the quantity used by the activity will be subtracted from the quantity carried by the resource.
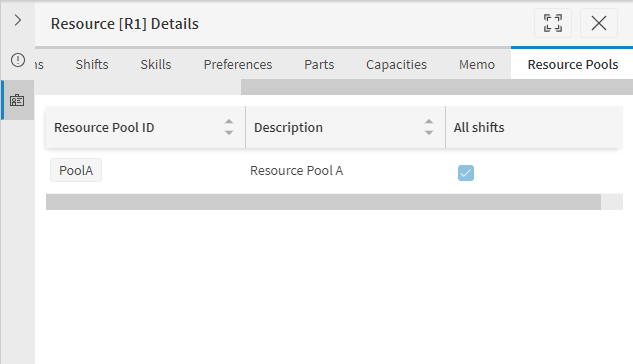
Resource Pools tab
Resource details displays the resource pools that the resource is a member of. The resource pool details can be accessed by clicking on the resource pool label within the table. Resource pool memberships that persist for a limited number of shifts are indicated. Selecting these rows will list the applicable shifts.
Rules tab
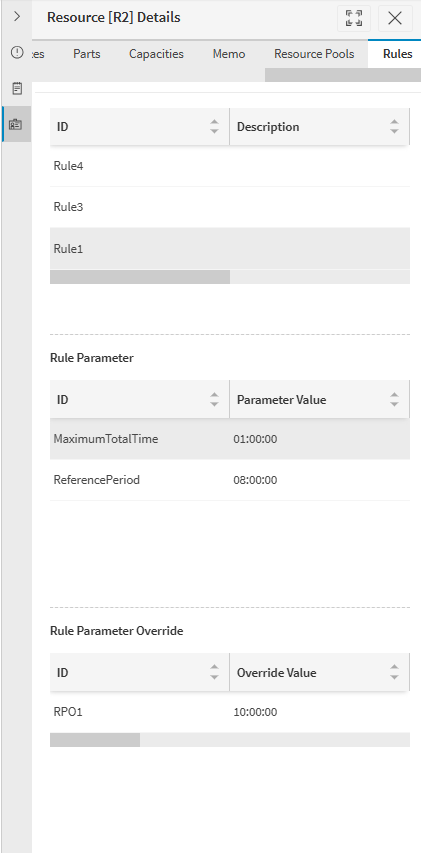
Displays all the rules associated with the resource. By selecting a rule in the top grid, any parameters linked to the rule will be displayed. By selecting a rule parameter in the middle grid, any overrides linked to the rule parameter will be displayed.
Note
This table will only display rules linked to the resource using rule collections, and will not display with older methods of linking. Please see the Advanced Resource Planning Concepts guide for more details.
Activity Details
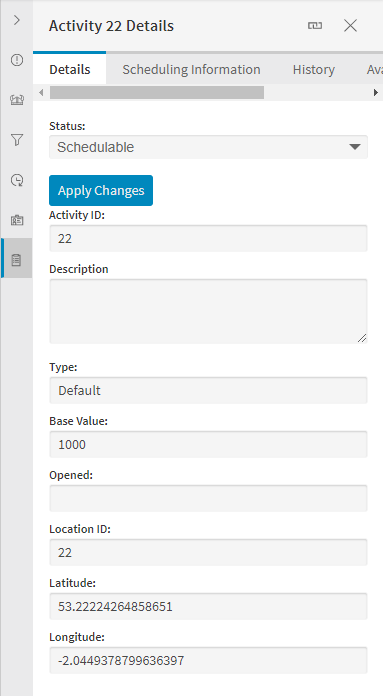
The Scheduling Workbench will also allow the user to view detailed information about activities. To view this information click on the Activity which will open the right panel showing the details.
Note
The tabs available may differ from those on the screenshot. This is most likely because by default the workbench will only show the tabs that contain data for that particular activity. In addition, there are specific permissions to view each tab which are configurable by the Workbench Administrator.
Details tab
Displays general information about the activity including its ID, priority, description, and location. You cannot edit this data.
The full location details can be seen by clicking the drop-down arrow next to the location label. This will also identify if the activity can be fulfilled remotely, without visiting the activity location.
Scheduling Information tab
Displays the scheduling information for the activity, including allocation source (how the activity was allocated), allocated resource, allocated date & time, duration, status, and whether or not the activity is date time or resource fixed.
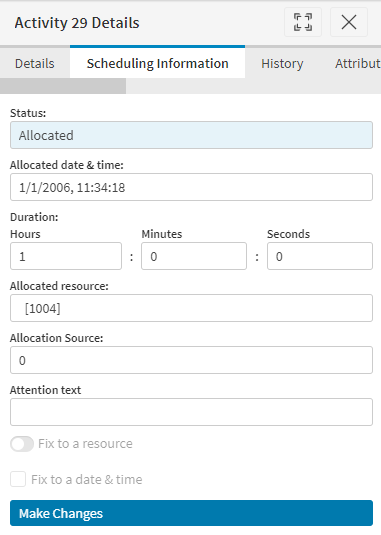
The 'Duration' field shown in the scheduling info tab is the allocated duration of the visit to the activity. This may include any applied proficiencies and overheads, and for split visit activities this will be the duration of the currently selected visit.
If necessary, you can update some of this information via the 'Make Changes' button, which opens the manual changes panel.
History tab
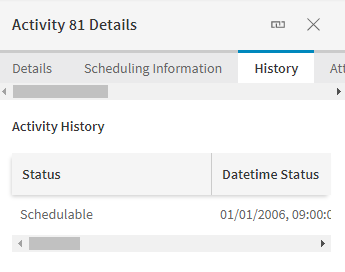
This displays historical status information for the activity.
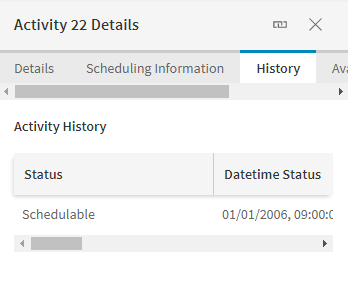
This allows you to see at which point in time status changes for the activity took place, the duration of the activity at that point, which resource it was allocated to, whether or not it was fixed and the date and time it was fixed to.
The 'Datetime Status' column displays the date and time the status took effect in the real world (e.g. the time that the resource started travelling).
The 'Datetime Stamp' column displays the date and time at which the status change was sent to the scheduling system.
The 'Reason' column can be used to provide details on the status update. If the status change was made manually on the workbench this will be populated with the name of the user who made that change. In addition is the reason given by the user when making the change will be displayed, if the system has been set up to require this.
If the change is made via an external application then the contents of the Reason field are set by the EA. For example when a status update is sent for an activity by a resource it might display 'Mobile Update'.
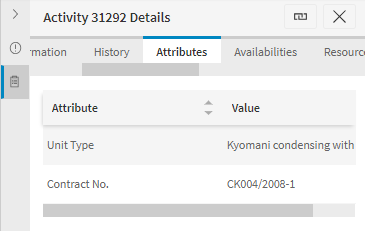
Attributes tab
This tab displays the name and value of any additional details the EA has attached to an activity in the input data.
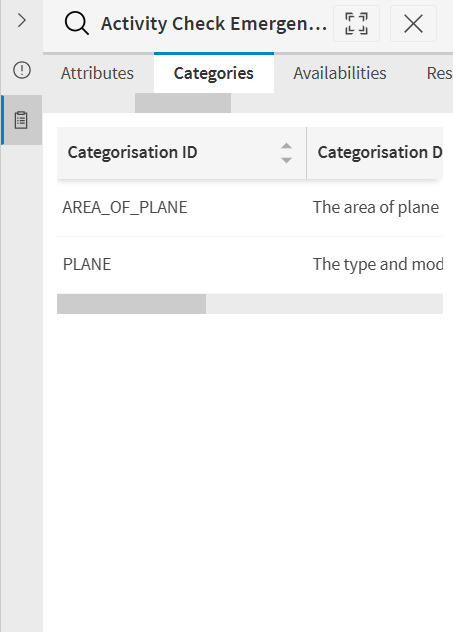
Categories tab
Displays the category and categorisation details associated with the activity.
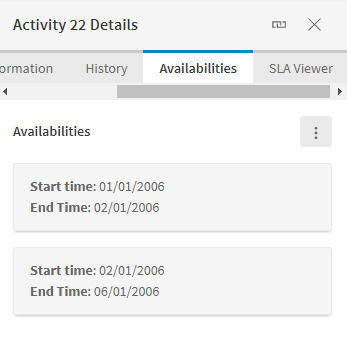
Availabilities tab
This tab provides details of when the activity is available to be scheduled. The availability of an activity can be restricted in a number of different ways, and this view shows the combined availability, while also allowing the user to include or exclude specific types of availability.
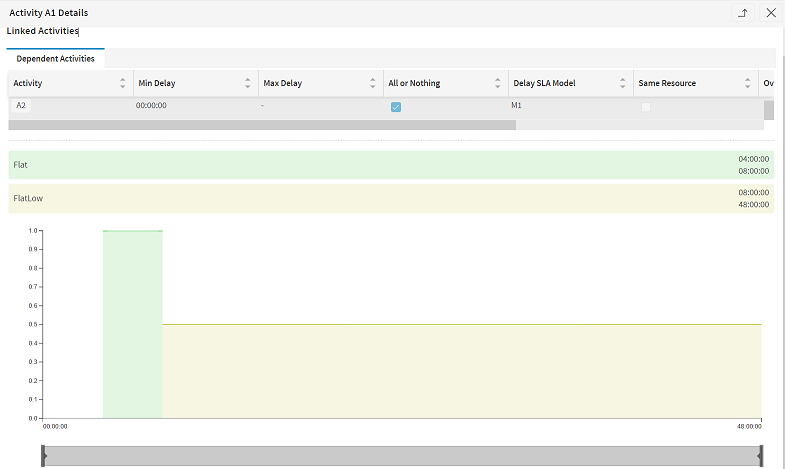
Linked Activities tab
This provides details of any pre-requisites or co-requisites required for the activity. It also details any combined call links, and any activities which depend on this activity as a pre-requisite. Finally it details any suggested orderings related to this activity.
For pre-requisite links that have a delay SLA model associated to them, the SLA model can be viewed by selecting the link.
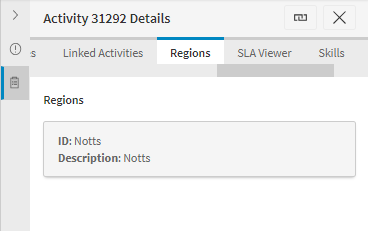
Regions tab
This tab shows all the regions associated with the activity.
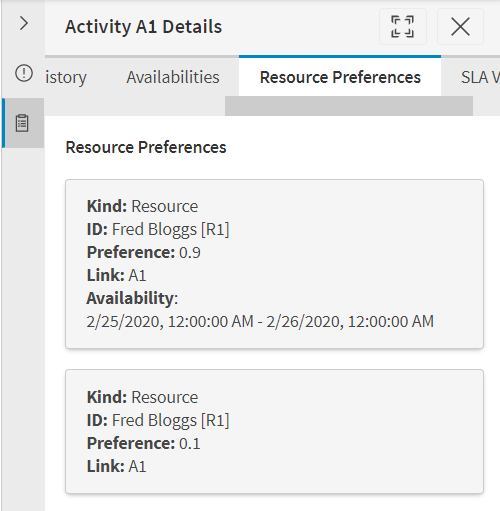
Preference tab
This tab displays any resources that are preferred to the activity.
SLA Viewer tab
Displays a graphical representation of the start and end times for the SLAs that apply to the activity.
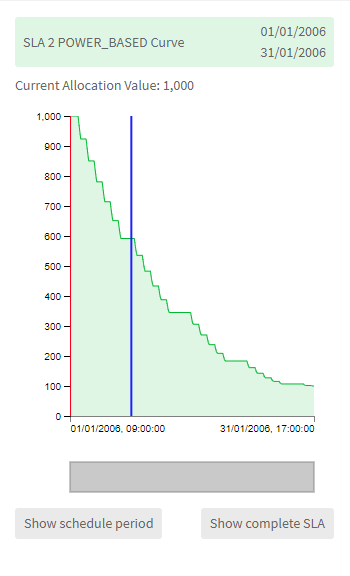
The colour coded bars display the periods covered by each SLA. The two scroll bars beneath the graph allow you to zoom in on a particular area. The top scroll bar focuses in from the left, whilst the lower scroll bar focuses from the right allowing you to pinpoint an exact section of the graph.
Checking the 'Show schedule period' box forces the SLA viewer to display only that part of the SLA which falls within the scheduling window (i.e. between the red and blue vertical bars).
Note
For detailed information on SLAs, see the Costs and Values Concepts Guide.
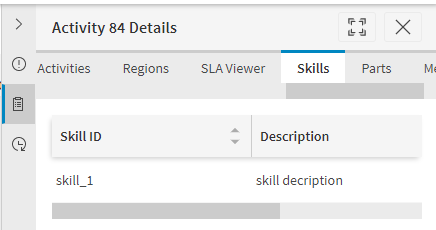
Skills tab
Displays any skills required for the job to be allocated. Skills act as a constraint on the ability of the activity to be scheduled to a resource. If any skills are listed a resource must possess all of these in order for the DSE to allocate the activity to them.
Parts tab
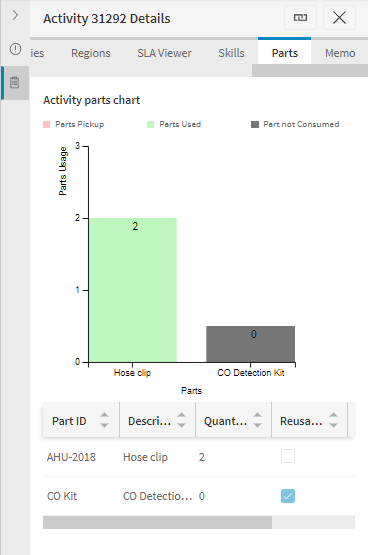
Displays any parts required for the job to be allocated. Parts act as a constraint on the ability of the activity to be scheduled to a resource. If any parts are required a resource must carry enough of the type of part specified in order to be allocated the activity.If the part is a Global Part, or a Shared or Standard Part with an allocated activity, the 'Part Usage Details' button can be used to view information on how the part is being used.
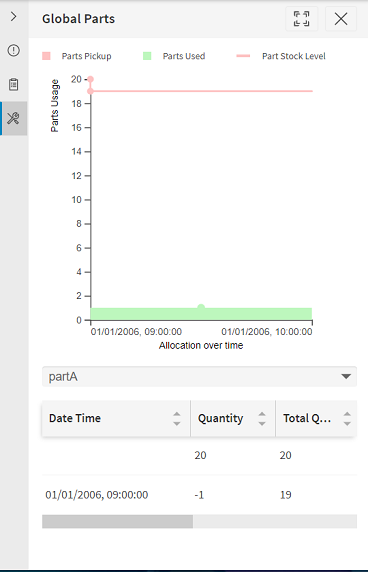
Global Parts
Displays any global parts and their use over time.
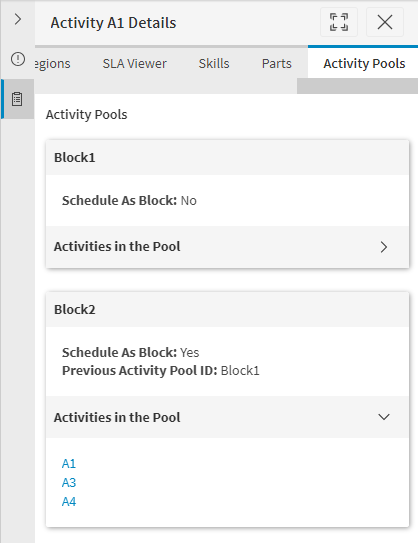
Activity Pools
This provides details of the pool(s) the activity is linked to and whether the pool is scheduled as a block. Clicking on the right arrow button will display all the activities that are linked to this pool.
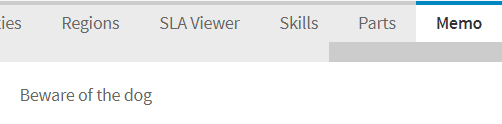
Memo tab
Displays general information about the activity.
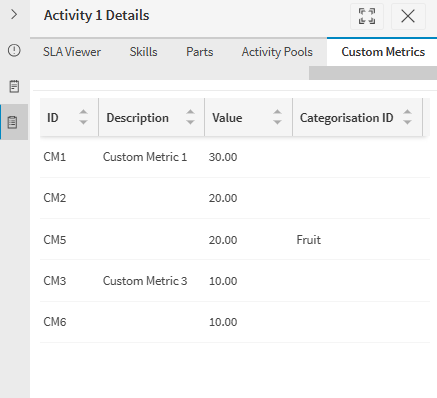
Custom Metric tab
Displays all custom metrics linked to the activity or inherited from the activity type.
Custom URLs
Custom URLs can be displayed at the bottom of the Activity Details window as shown in the example below:
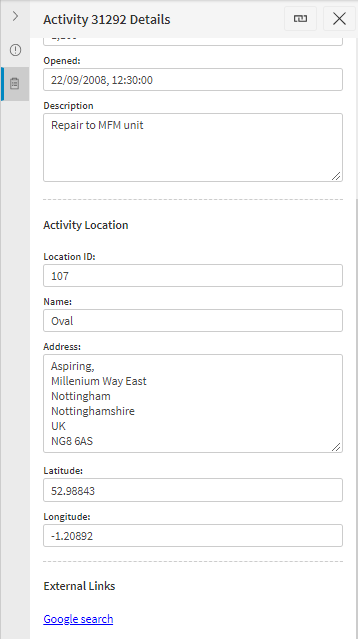
These URLs function as standard hyperlinks and redirect the user to the web page defined in the underlying URL.
Resource Pool Details
The Scheduling Workbench will allow the user to view detailed information about resource pools. To view this information, select a resource pool from the resource pools tab of the resource details panel.
Note
The tabs available may differ from those described here. This is most likely because by default the workbench will only show the tabs that contain data for that particular resource pool. In addition, there are specific permissions to view each tab which are configurable by the Workbench Administrator.
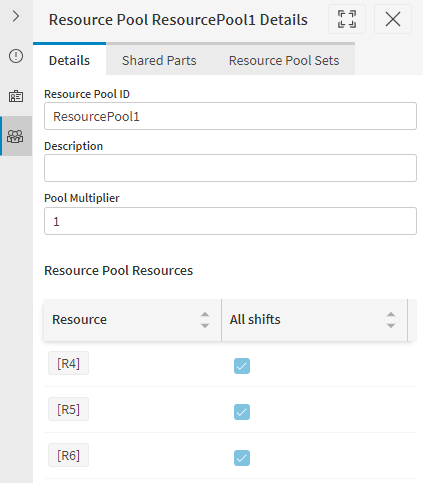
Details tab
Displays general information about the resource pool including its ID, description, and a list of the resources in the pool. You cannot edit this data. Resource details can be viewed by clicking on the desired resource label.
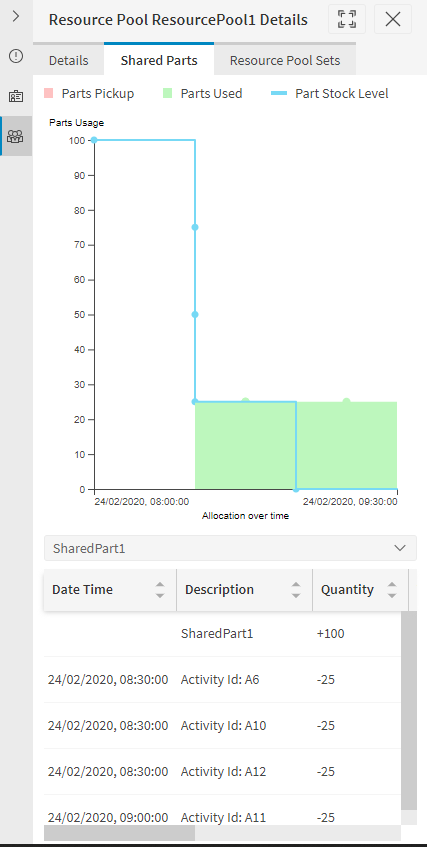
Shared Parts tab
Displays the shared part stocks available to and used by the resources in the resource pool. Details of specific part usages are displayed in the table below the shared parts graph. The details of the activity or resource using the part at any given time can be viewed by clicking on the corresponding label.
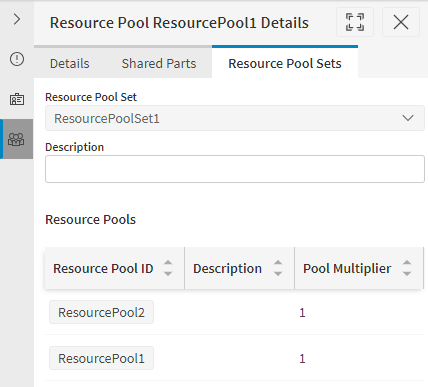
Resource Pool Sets tab
Displays general information about the resource pool sets that the resource pool belongs to including its ID, description, and a list of the resource pools in the set. You cannot edit this data. Resource pool details can be viewed by clicking on the desired resource pool label.
Vehicle Details
The Scheduling Workbench will allow the user to view detailed information about the vehicles used by resources. To view this information, select the vehicle from the details tab on the resource details panel. Alternatively, if the vehicle is used at shift level, the same details can be accessed from the shifts tab.
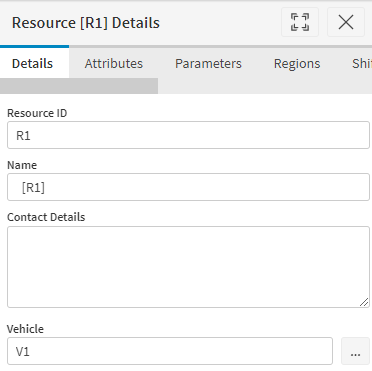
Note
The tabs available may differ from those on the screenshot. This is most likely because by default the workbench will only show the tabs that contain data for that particular vehicle. In addition, there are specific permissions to view each tab which are configurable by the Workbench Administrator.
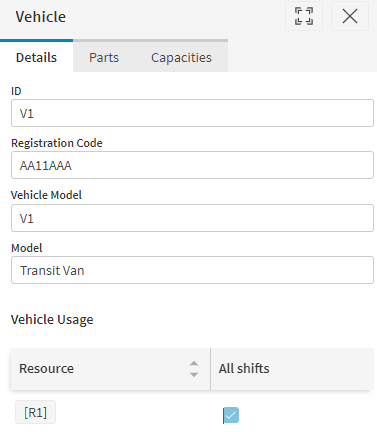
Details tab
Displays general information about the vehicle, and a list of the resources using the vehicle. Resource details can be viewed by clicking on the desired resource label.
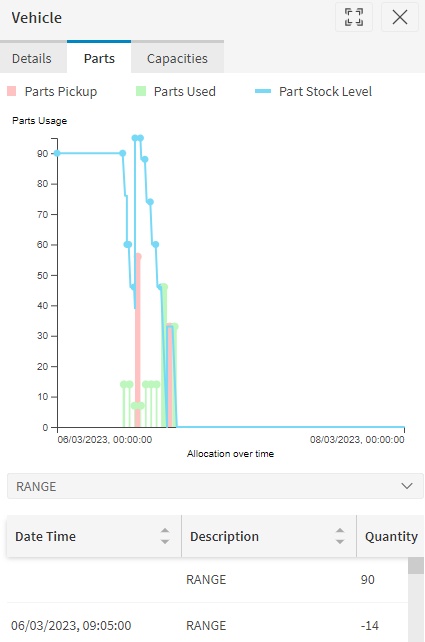
Parts tab
Displays the shared part stocks available to and used by the resources in the resource pools. Details of specific part usages are displayed in the table below the shared parts graph. The details of the activity or resource using the part at any given time can be viewed by clicking on the corresponding label.
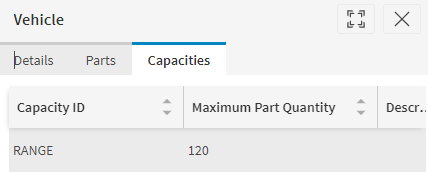
Capacities tab
Displays the parts capacities linked to the vehicle.
Exceptions
Exceptions are schedule events that may require manual intervention. Each plan may contain a number of schedule exceptions which can be viewed from the Exceptions panel to the right of the workbench window, invoked using the exceptions toolbar icon.
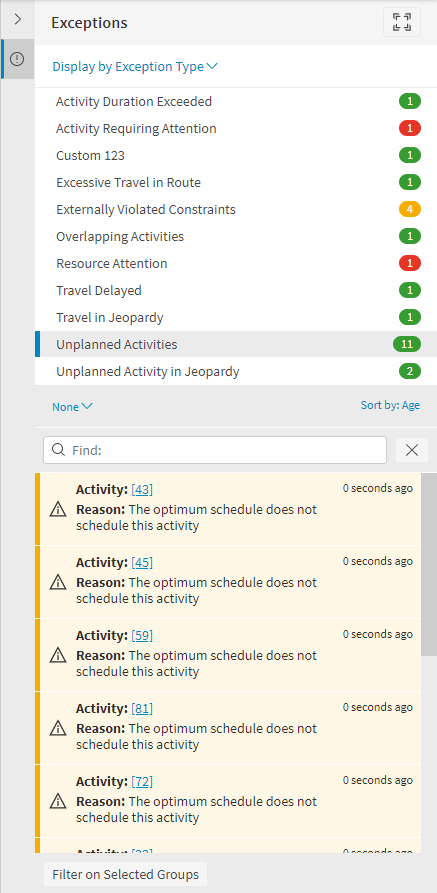
The top half of the exceptions panel shows the list of exception types for which exceptions are currently raised. Once you select a type of exception you can then view the exceptions of that type. There are various in-built exception types which may be raised, as described below.
Resource Exceptions
- Failed To Logon: Raised when a resource has not logged onto their current shift.
- Resource Attention: Raised when a resource has requested assistance, perhaps due to a problem with their current work, or dangerous conditions.
- Logged On Idle: Raised when a resource has logged on but does not have any work to do within a defined time limit.
- Logged Off Resource With Outstanding Activities: Raised when a resource has logged off but still has committed work in their shift.
- Empty Route: Raised when a resource does not have any activities scheduled in their current shift.
- Excessive Travel In Route: Raised if total travel in a shift exceeds a specified amount (default 6 hours).
- Invalid Logon: Raised when a logon/logoff event is received for a resource and the logon is not in any shift, or within the snap time for any shift.
- Resource Logged Off Early: Raised when a resource logs off their shift before the expected end time.
- Partially Committed Bucket Route: Raised when a shift for a bucket resource includes both committed and allocated activities.
- Shift Cut Off is Approaching: Raised when the cut off time for allowing uncommitted activities to be scheduled into a resource's shift is approaching.
- Invalid Committed Route: Raised when a resource has at least one route where the committed activities in the route cannot be validly scheduled. The exception will record the first invalid route for the resource.
Activity Exceptions
- Activity Duration Exceeded: Raised when an activity has exceeded its expected duration.
- Travel Delayed: Raised when the travel to an activity has exceeded the expected travel time, or where it is expected that the original estimated travel time will be exceeded.
- Unable To Complete Activity: Raised when an activity is set to 'Incomplete' status.
- Planned Activities In Jeopardy: Raised when planned activities (allocated to a resource) are expected to exceed their SLA deadline.
- Unplanned Activities In Jeopardy: Raised when unallocated activities are expected to exceed their SLA deadline as a result of not being allocated - i.e. if the SLA deadline is before the end of the scheduling window (including any appointment window).
- Unplanned Activities: Raised when an activity is not currently allocated to any resource.
- Acceptance Time Exceeded: Raised when a resource has failed to accept a committed activity after a specified period of time.
- Travel In Jeopardy: Raised when a resource has not started travelling to a fixed time activity by the time that the travel should have started.
- Activities Requiring Attention: Raised when the 'highlight' attribute is set against an activity on its latest status.
- Externally Violated Constraints: Identifies constraint violations caused by committed or fixed activities, for example that an activity is committed to a resource who lacks the required skills. This may be due to manual interventions to the schedule.
- Unscheduled Breaks: Raised when explicit breaks have not been allocated.
- Activity Open Period: Raised when a non-completed call has been open for longer than a threshold value.
- Overlapping Activities: Raised when activities are overlapping (for example, due to overlapping fixed start times).
- Fixed Activity Interrupts Commits: Raised when a resource has non-fixed committed activities which have been pushed to be scheduled after a fixed activity also in the resource's route.
- Multiple Trips to Same Location: Raised when a location (or locality) is being visited multiple times within a period of time.
- Unused Depot Activities: Raised when there is a depot activity in the input data which have not been used at all in the schedule.
- Committed Linked Activity: Raised when an activity is linked to another activity via a pre-requisite or co-requisite link, and the linked activity is now committed but this activity is not.
- Location Partially Allocated: This is only applicable when the DSE parameter 'DoOnLocationAllowRevisits' is set to false. In this case the exception will alert the user when some visits to a location have been planned but others are left unallocated.
- Unscheduled Breaks (Implicit): Raised when implicit breaks have not been allocated.
- Activity Completed With Remaining Committed Visits: Raised when a splittable activity is completed but there are outstanding future committed visits to the activity.
- Broken Activity Link: Raised when an activity that is linked to another activity is fixed or committed and violates the activity group rules.
- Pre-Requisite Delay Deadline Missed: Raised when an activity has a pre-requisite which uses a pre-requisite delay model, and the primary deadline between the activities is exceeded.
- Unplanned Repeatable Activities: Raised when a repeatable activity has no allocated visits in the schedule.
- Maximum Resources Exceeded: Raised when an activity is split to multiple resources, and the number of resources used exceeds the limit specified for the activity.
Other Exceptions
- Catch All: All other exceptions relating to activities and resources such as errors during data transfer or invalid data values.
- Travel Calculation: Identifies any issues with HTM connections used by this dataset.
- Licence Expiring: Warns when the licence to use the software is about to expire.
- Incomplete Modelling Pattern: This is specific to cyclic scheduling, and is raised when the repeated visits for a modelling pattern could not be allocated to the end of the schedule.
- Operations Not Fully Allocated: This is specific to cyclic scheduling, and is raised when the operations for a repeatable activity could not be allocated through to the end of the schedule.
Display By Options
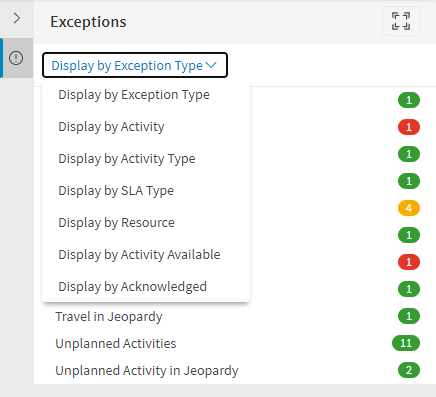
The 'Display by' dropdown allows you to view exceptions based on different properties of the exception. The options are:
- Display by Exception Type - View exceptions grouped by the Exception Type.
- Display by Activity - View exceptions grouped by the Activity.
- Display by Activity Type - View exceptions grouped by the Activity Type.
- Display by SLA Type - View exceptions grouped by the SLA Type of the earliest SLA linked to the activity.
- Display by Resource - View exceptions grouped by the Resource.
- Display by Activity Available - View exceptions grouped by the availability based on whether the activity is considered available for scheduling. The parameter ActivityAvailabilityLeeway controls the period in which the activity must have availability to be considered available.
- Display by Acknowledged - View Acknowledged and Unacknowledged exceptions grouped respectively.
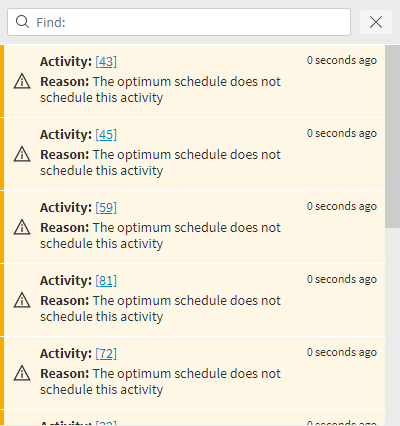
The exception details are shown in the lower half of the panel:
Filtering on Exceptions
You can select an exception type and create an application filter. Select an exception type and click the 'Filter on Selected Groups' button to create a filter:

The Gantt is now filtered to show only the activity required.
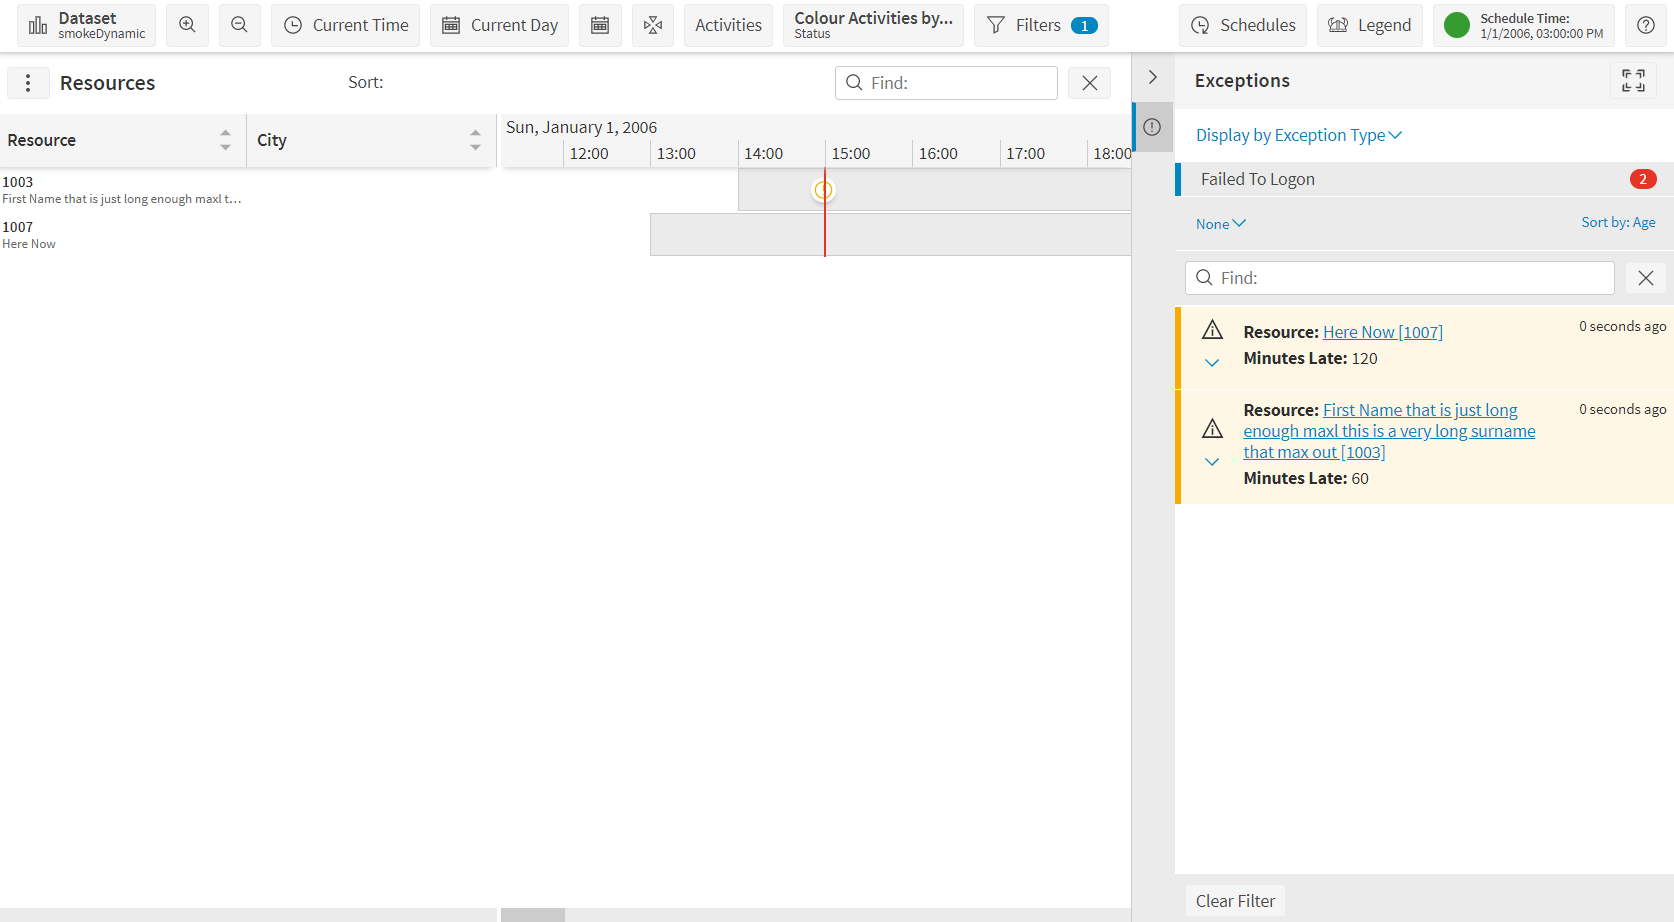
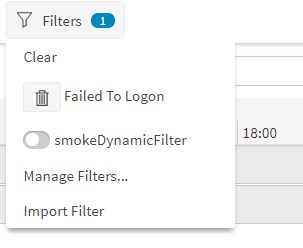
To clear the filter click Filter item on the top menu and click the trash icon next to the applied filter.
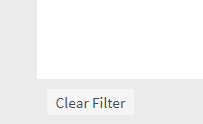
Exception filters can also be cleared from the exceptions panel itself.
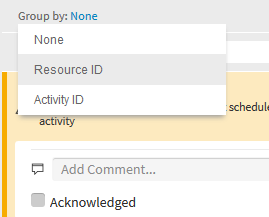
Group Exceptions
Exceptions can be grouped by Activity or by Resource. This will create exception sub-groups according to the rule selected:
Sort Exceptions
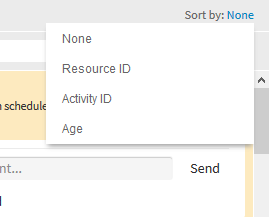
Exceptions can be sorted by Activity ID, Resource ID or by Exception Age.
Note
When a list of grouped exceptions is sorted, the exceptions in each of the sub-groups are sorted according to the selected sort rule.
Sub Group Filtering on Exceptions
Once you have selected an exception type, it's possible to select a sub group and then create an application filter based on both these selections using the 'Filter on Selected Groups' button again.
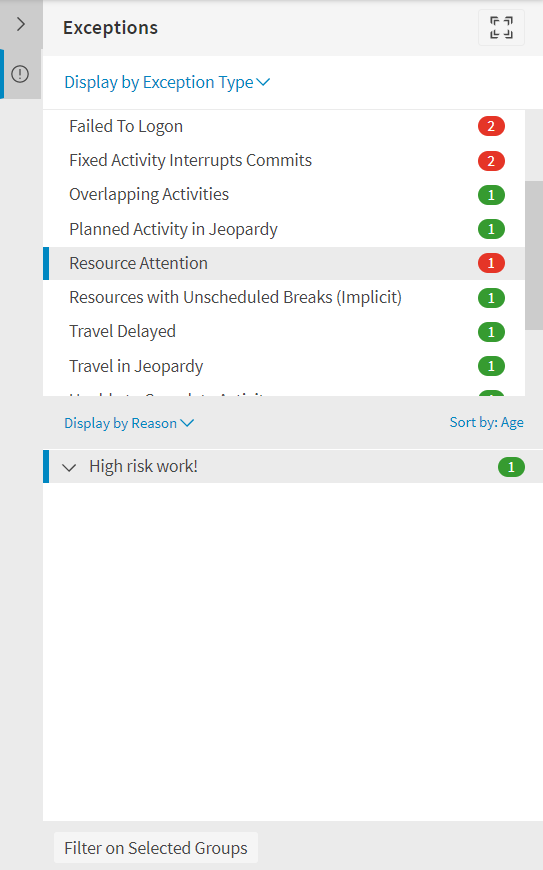
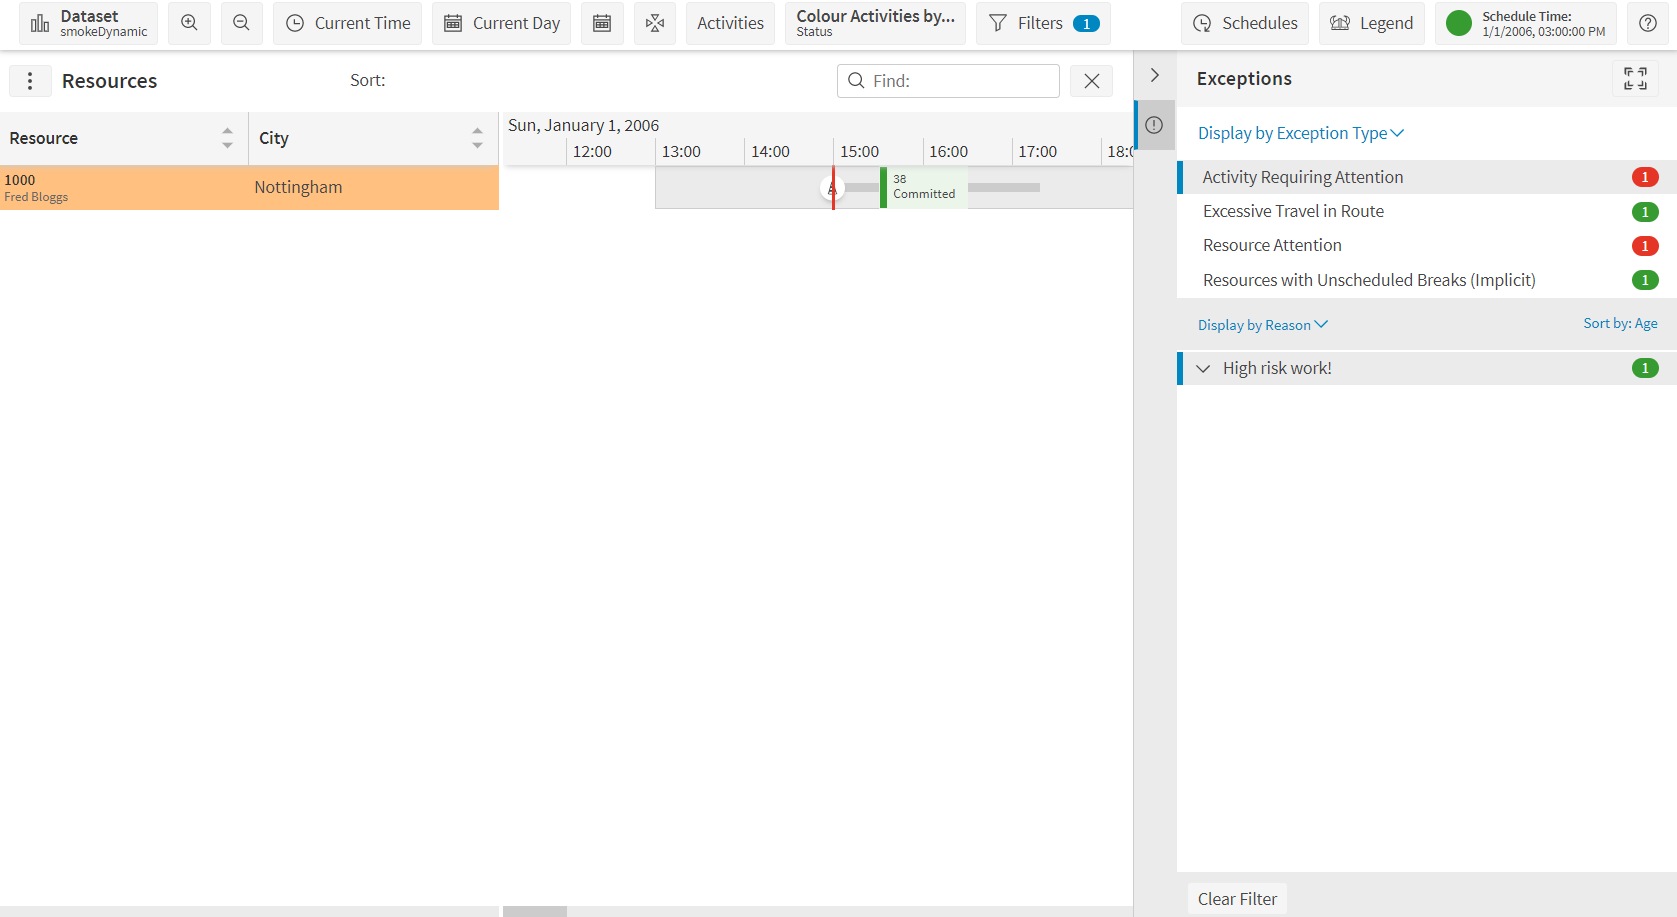
The Gantt is now filtered to show only the sub group required.
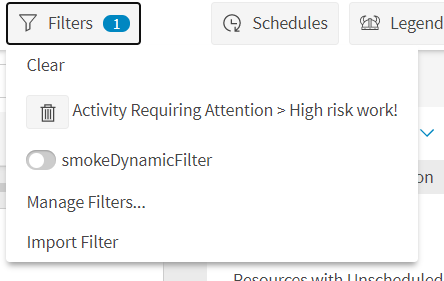
By clicking on the Filter item on the top menu you can see the application filter has been applied to the sub group as well.
Using Fast Find on Exceptions
Type in all or part of an activity, resource, reason, acknowledgement comment, acknowledgement user or previous activity in the Find box to only display matching exceptions, the find box is case insensitive.
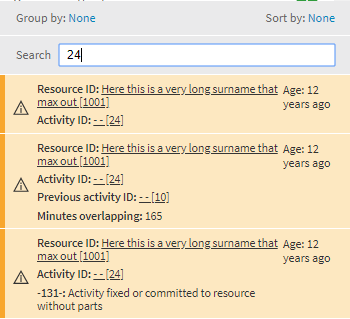
As in the example above, when all or part of an activity or resource id is entered, only the exceptions matching this string are displayed in the exception details section of the panel.
Acknowledging Exceptions
The Scheduling Workbench gives users the power to acknowledge exceptions to demonstrate that they have been dealt with. These acknowledgements are visible to other PSO Workbench users provided they have the appropriate permissions. To acknowledge an exception enter a comment (optional), tick the Acknowledged check box and click Send. It is possible to add multiple comments with varying acknowledged statuses for one exception.
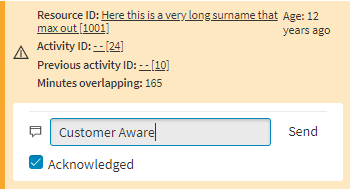
To allow users to acknowledge exceptions there are permissions that require setting, giving the option to switch off the privilege if required.
Navigation help in Exceptions
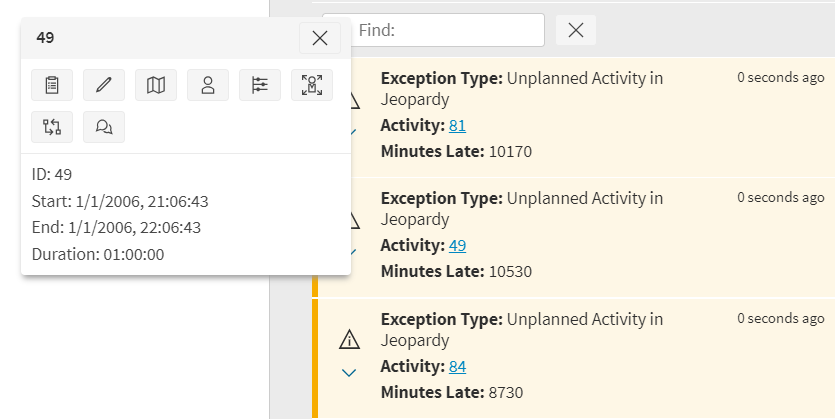
Each exception can have data values associated with it. These are shown in the panel. If the data value is a reference to a resource or an activity, this will appear as a link. Clicking on the link will open the details panel for the resource or activity. Clicking anywhere else in the exception item (but not on the link) will bring up the context menu. If the exception item contains reference to both a resource and an activity, context menu will include both. Otherwise, it will open the context menu for the specific entity.
Overview Panel
Note
Please note that this functionality is only available as a preview or beta release in this version. Functionality and behaviour may change in future releases.
The Overview panel has sections for the useful features described below.
Scheduling Statistics
The statistics section has a series of Performance Statistics about the current schedule data. This is similar to data that can be obtained through the analysis screen, but is available immediately as a summary. Where application filters are applied, the statistics are based on filtered data. (This does not include the quick filter feature in the Gantt, that filters only the data in the Gantt and does not affect statistics).
The user can configure the statistics through the cog button in the top right of the panel. It is possible to add more statistics, remove the default ones, re-order them and change how they are displayed including the caption and description, icons and colours. In some cases it is also possible to configure thresholds so that the statistic changes its appearance above or below critical values.
The Scheduling Statistics header also has a heart with the tooltip 'Favourites only'. A solid heart shows only favourite statistics. An empty heart shows all statistics. The heart is solid by default.
Configure Statistics
The Configure statistics panel contains a list of the user's current statistics. Each can be deleted, or reordered up or down. Statistics can also be reordered by drag and drop. Where a default statistic has been removed by the user, it is shown "strikethrough" at the end of the list. Any default statistic that has been deleted, resequenced, or otherwise altered, has a "Reset" button to reset the default value. New statistics can be added through the "Add statistic" button at the top of the list. Each statistic row has a heart. An empty heart means the statistic is not a favourite. A solid heart means it is a favourite. Click the heart to change the state.
After clicking the Add statistic button, choose the statistic to add from the dropdown list. Optionally set the caption and description, icon and colour. To confirm the new statistic press "Add" or "Cancel" to abandon the addition.
An existing statistic can be edited by selecting it in the list. Optionally the caption and description, icon and colour can be changed. Press "Save and Exit" to confirm the changes.
If the statistic supports thresholds, you can add one or more thresholds by clicking the "Add" button. Each threshold has a minimum value, and the threshold will apply if the statistic goes above that number. The threshold can modify the icon and colour when it applies. If the threshold has icon "none" it will not change the icon. Several thresholds can be added. They will automatically be sorted when you save changes, or they can be sorted during edit by pressing the "Sort" button. Press "Save and Exit" to confirm the changes. The threshold colours do not apply while configuring statistics.
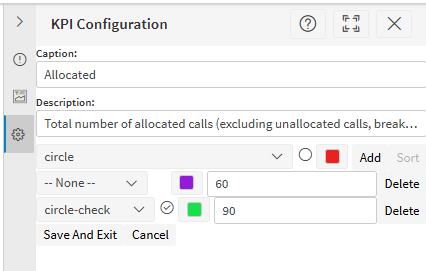
In the example above, When Allocated calls are above 90% the statistic will have a green background and a tick icon. If it falls below 90% but is 60% or above, it will have a purple background and an empty circle icon. If it falls below 60% it will have a red background and the same empty circle icon.
Statistics about Resources
"Standard resources" is the number of resources with class "standard". These are the most common type of resource. This does not count other resource classes such as "bucket", "depot" or "parallel". If a filter is affecting resources, then only those resources that are shown by the filter will be counted.
"Bucket Resources" is the number of bucket resources. A bucket resource represents an external team which can have work allocated to it, but work is not scheduled within the external team.
"Parallel Resources" is the number of parallel resources. A parallel resource represents a resource which can do multiple activities at the same time.
"Team Resources" is the total number of resources which are defined as class "team", or which have members assigned to them.
"In-team resources" is the total number of resources that are assigned to any team.
"Total Resources" is the total number of resources of any class. This will include Standard resources, bucket resources, parallel resources, depot resources, and team resources. If a filter is affecting resources, then only those resources that are shown by the filter will be counted.
Statistics about Activities
The most common type of activity is a "Call". Other types of activity include breaks, private activities, depot or bucket activities. An activity might be scheduled across two or more visits.
"Calls" is the number of activities that are classed as calls. It does not include breaks, private or depot activities. This includes activities that are not scheduled to a resource at all. An activity with multiple visits will only count as 1. If a filter is affecting activities, then only those activities that are shown by the filter will be counted. Activities with a catch-all exception are removed from the data but still included in this count.
"Breaks" is the number of breaks that are scheduled.
"Private activities" is the number of private activities that are scheduled.
"Depot activities" is the total number of depot activities that are scheduled. This might be for example to picking up parts.
"Activities Scheduled" is the number of allocated call activities. This excludes unallocated calls, breaks, private activities or bucket allocations. Multiple visits for the same activity will only count as 1. If a filter is affecting activities, then only those activities that are shown by the filter will be counted. In the analysis screen, when grouped by time interval, a second visit in a different interval is not double counted.
"Unallocated" is the number of call activities that are not allocated to a resource. If a filter is affecting activities, then only those activities that are shown by the filter will be counted. This does not count catch-all exceptions for activities. Activities with this type of exception are removed entirely from the scheduling data, but they do still count in total calls and affect Percentage Allocated. In the analysis page this also includes activities that are allocated after the time interval specified. In the overview page allocations in the future are not counted as unallocated.
"Percentage Allocated" is the percent of call activities and visits that are allocated to a resource. Multiple visits for the same activity will each be counted as an allocation. If a filter is affecting activities, then only those activities that are shown by the filter will be counted.
"Scheduled Activity Duration" is the total duration of allocated activities. With multiple visits the time of both visits is included. This includes work allocated to standard, bucket and parallel resources. It includes calls and depot activities but does not include private or break activities.
"Average Calls per Shift" is the average number of calls per shift. This is based on "Activities Scheduled" which includes calls and depot activities. This counts shifts that are empty, and shifts for standard, bucket or parallel resources.
Statistics that are per Shift
"Shifts" is the number of shifts in the filtered data. This includes shifts that are empty, and shifts for standard, bucket or parallel resources.
"Shifts Used" is the number of shifts that have at least one call activity in the filtered data. This includes shifts for standard, bucket or parallel resources.
"Travel Distance per Shift" is the average travel distance per shift in the filtered data. Only standard and team resource shifts are counted. Bucket and parallel shifts are not counted because they do not have travel. Travel that is not attached to a shift (e.g. because of an anomalous gps fix)is not counted. Shifts with no calls allocated do count.
"Travel Duration per Shift" is the average travel duration per shift in the filtered data. Only standard and team resource shifts are counted. Bucket and parallel shifts are not counted because they do not have travel. Travel that is not attached to a shift (e.g. because of an anomalous gps fix)is not counted. Shifts with no calls allocated do count.
"On-site Duration per Shift" is the average on-site time per shift in the filtered data. Allocation time before or after the shift are cropped so that only time within the shift is counted. Only standard and team resource shifts are counted. Bucket and parallel shifts are not counted because they do not have on-site time. It includes call and depot allocations.
Statistics about Finished or Closed Activities
When a call is closed, the status is usually "Completed" but may be "Incomplete" if there was a problem with the work.
"Activities Completed" is the total number of calls that have been closed with status "Completed"
"Activities Finished" is the total number of calls that have been closed. (These might not be "complete")
"Incomplete calls" is the total number of closed calls that have status "Incomplete". This does not include work that is still scheduled to be done.
"Completed / Finished" is the percent of closed calls that have status "Complete".
Tooltips and Context Menus
When moving the mouse over an item in a grid or Gantt, there is often additional information displayed in a tooltip. The information will depend on the item of interest and the configuration of the system. The tooltips can be configured individually for activities, resources, activity types and resource types. See the 'Administration - Organisation' section on lists for more information about configuring tooltips.
This context menu also works in the exceptions panel over a data value that refers to an activity or resource.
When an item is clicked, the tooltip is replaced by the context menu. Activities and resources have context menus. These can be used to bring up the activity or resource details, or to perform other operations.
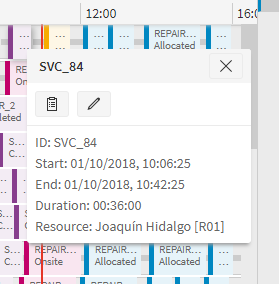
Resource Context Menus
For a resource we might see the following context menu items. (There may be differences e.g. because of permissions)
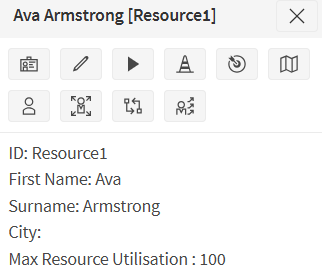
The context menu buttons in the example above do the following:
- Show details for the resource in the tools panel on the current page.
- Open the 'Mass Changes' panel to perform a mass update of activities allocated to this resource (requires permission).
- Manually log on (alternatively log off) this resource (requires permission).
- Manually set attention on or off for this resource (requires permission).
- 'Focus' on this resource in all windows (requires multi screen permission).
- Change to the map page and zoom to the home location of the resource.
- Change to the resource page, select the resource and scroll to it.
- Change to the assist page and select the resource.
- Change to the compare page and add the resource to the compared entities.
- Create a private activity for the resource (only available if integration supports it).
Activity Context Menus
For an activity we might see the following context menu buttons. (There may be differences e.g. because of permissions or type of the activity)
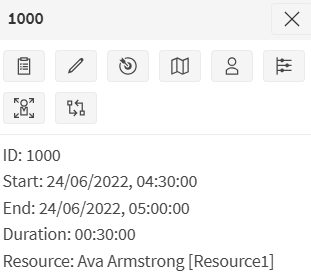
The context menu buttons in the example above do the following:
- Show details for the activity in the tools panel on the current page.
- Open the manual changes panel to update the activity status.
- 'Focus' on this activity in all windows (requires multi screen permission).
- Change to the map page and zoom to the location of the activity.
- Change to the resource page, select the activity and scroll to it.
- Change to the activity page, select the activity and scroll to it.
- Change to the assist page and select the activity.
- Change to the compare page and add the activity to the compared entities.
For unallocated activities there will also be an option to view the activity in the explanations screen, where the activity will be pre-selected to request an explanation.
For activities with 'Allocated' or 'Follow On' status, users with the 'ManChaQuickCommit' permission can quickly commit the activity to its current allocation without opening the manual changes panel.
For private activities there may be an option to delete the private activity if the integration supports this.
Context buttons that change to a different page are still shown even if the user is already on the page. In this case the context button will not change page but will still scroll or zoom to the entity.
Context Menu over several entities
Sometimes there may be multiple activities which are applicable when the user opens the context menu (e.g. when activities are overlapping, or when clicking on a location with multiple activities on the map). In this case a list of the activities will be displayed first. Selecting a particular activity will show the context menu for that activity.
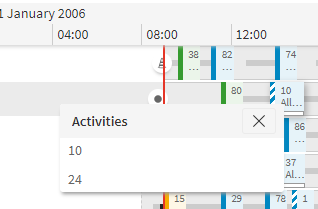
Depending on the context, the following options may be available from the menu.
View activity or resource details.

This button may be shown at the top of the context menu for a resource or activity. Clicking this will open the resource or activity details viewer.
Update activity status

This button will open the manual changes window for an activity. The options allowed depend on the current status of the activity. For example, if the activity status is currently Allocated you will be presented with a box allowing you to update the status to Committed, as shown below.
Manual Logon/Logoff
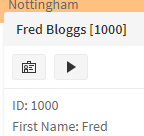
If permission is granted, resources can be manually logged on or off from the context menu. Clicking outside the shift will only allow the resource to be logged on at the current time. Clicking within a shift and before the current time line will also give you the option to logon at the point in time clicked on by the cursor.
Manual attention on/off
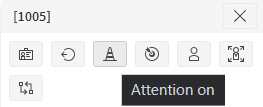
If permission is granted, resources attention can be manually turned on or off from the context menu. Clicking on a resource will turn the resource attention on at the current schedule time.
Navigate to Explanations page

This button may be shown in the context menu based on permissions and if the activity_class_id is CALL. This will allow users to navigate to the Explanations page, focusing on the selected activity.
Filtering Linked Activities

This button will be shown if the activity has one or more linked activities.
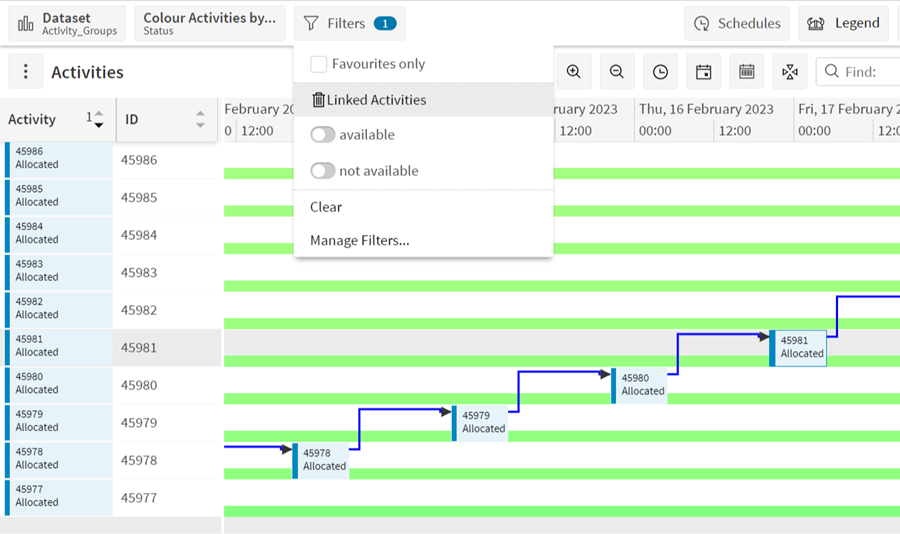
When this button is clicked, a new filter is created and applied based on the chain of linked activities. Once the filter is applied, the "Linked Activities" context menu button in all activities within the chain is highlighted to indicate the selection. The filter can be removed either by clicking the context menu button in any of the activity context menus or by using the Filters menu.
Below is an example of the Activity page Gantt view with the filter applied.
Private Activities
If permission is granted and the option is available, private activities can be created and deleted on the workbench.
Create Private Activities
To create a private activity on the workbench, click the resource context menu button 'Create Private Activity' to open the 'Create Private Activity' window.
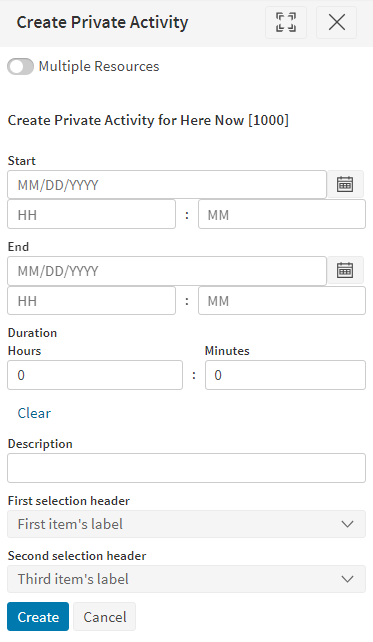
Multiple Resources
This option is available if supported by the integration. Toggle this button to switch between creating identical activities for single resource and multiple resources.
Resources
If 'Multiple Resources' is checked, the field is shown to allow selecting multiple resources.
Start & End
Start date & time and end date & time for the private activity.
Description
Description for the private activity.
Specific controls
There may be additional options that must be selected when creating a private activity. For example, when creating a private activity, it may be required that the user select a reason why the private activity is needed.
Note
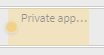
After the private activity has been created and until a plan has been returned by the DSE which includes the change, it will appear 'ghost' with a small yellow dot at the end of the bar as shown.
Delete Private Activities
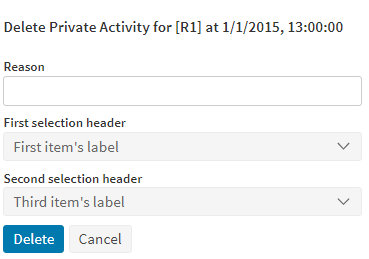
To delete a private activity on the workbench, click the activity context menu button 'Delete Private Activity' to open the 'Delete Private Activity' window.
Reason
Reason for deleting the activity.
Specific controls
There may be additional options that must be selected when deleting a private activity. For example, when deleting a private activity, it may be required that the user select a reason why the private activity should be deleted.
Note
Similarly, after the private activity has been deleted and until a plan has been returned by the DSE which includes the change, it will appear 'ghost' with a small yellow dot at the end of the bar.
Manual Changes
There may be times when you need to manually update an activity. This could be for example if the mobile device being used by the resource is not functioning correctly.
The manual change panel allows you to make changes to the activity status, duration, and other details. You can open the manual change panel by:
- Clicking the "Make Changes" button in the activity context menu.
- Using the "Make Changes" button on the Scheduling Information tab in the Activity Details viewer.
- Dragging and dropping activities in the Gantt chart, which opens the Changes panel.
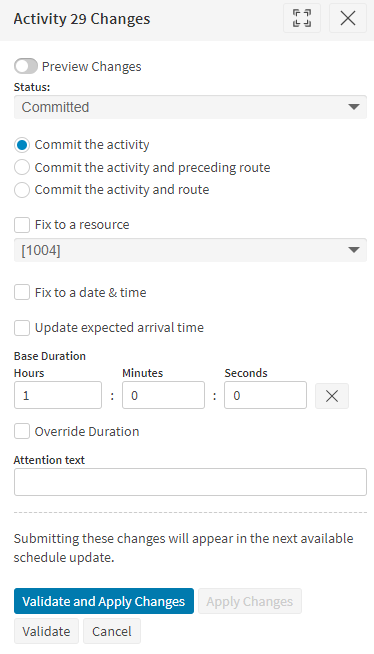
Alternatively, you can access the 'Mass Changes' panel to commit multiple activities simultaneously. See the mass changes section for further details.
Depending on permissions, you may be required to 'validate' the changes you are making before you are able to apply them. See the validation section for further details on this.
Note
Pending Changes - After a manual change has been applied and until a plan has been returned by the DSE which includes the change, the activity will appear with a small yellow dot at the end of the bar as shown.

Status Types
When an activity has been allocated to a resource by the DSE you can only change the status to committed. Once it has been committed, you can then update it to any of the other statuses up to on-site. Once on-site the activity status can be set to complete or incomplete, depending on whether or not the activity was carried out successfully. Setting it to schedulable sends the activity back to the DSE to decide where best to allocate it.
The following table summarises each activity status type. Note that an activity can only ever be in one status.
| Status | Meaning |
|---|---|
| Accepted | The resource has accepted the activity. The activity remains committed, but this provides a positive confirmation that the resource has undertaken the activity. |
| Allocated | The activity has been provisionally assigned to a resource and that resource will now have the activity on their planned route. However, the activity can still be removed from this resource and reallocated to a different resource at any time. This may occur if another resource becomes available and can respond to the activity more efficiently. For example, a resource may be running early on previous activities and now has free time in the schedule, or a new resource may have logged on before their shift start time meaning the activity can be allocated within their snap time. |
| Committed | The activity has been committed to a resource. This can only happen when the resource accepts the activity or it is manually committed. Once committed, the Dynamic Scheduling Engine (DSE) will not make changes until it receives information from the EA stating whether the activity is completed or not. |
| Completed | The activity has been completed by a resource and no longer requires any attention. |
| Downloaded | The activity has been finalised to a resource (the same as committed), but it has also been transferred to the mobile device. |
| Follow-On Visit | This status is used for splittable activities once an earlier visit to the activity is at status committed or higher. |
| Incomplete | The activity has been carried out, but further work is required and another activity needs to be raised. |
| On-site | The resource has arrived at the site to complete the allocated activity. An activity can only have status 'on-site' as a result of data from the EA or manual intervention. |
| Pending Completion | This is treated by the DSE in the same way as the On-site status. The activity is almost finished so the Schedule Dispatch Service can suggest the next activity to be dispatched. |
| Sent | The activity has been sent to a PDA but confirmation that it has been downloaded has not yet arrived. |
| Travelling | The resource has started to travel to the activity. An activity can have the status 'travelling' as a result of a resource informing the DSE via the External Application (EA) or if the status is set manually via the SWB. |
| Unallocated | The activity is in the system but the DSE has not allocated a resource to respond to it. This could be for various reasons, for example that the DSE cannot find a resource with the appropriate skills that can respond within the time constraints of an SLA. |
| Visit Complete | This status shows that a visit to the activity has been completed, but the resource is expected to return later for further visits before completing the entire activity. |
| Waiting at Location | This status shows that the resource has arrived at the location but has not yet started work on the activity. This could be due to availability considerations, or because the activity has a co-requisite and the resource is awaiting the arrival of another resource before the activity can begin. |
Reason Required
Upon changing an activity status you may be prompted to enter a reason for the change as below:
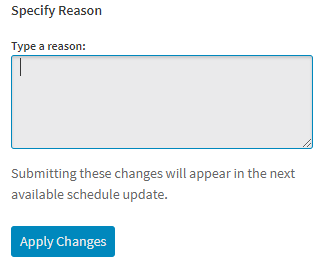
Depending on your system configuration you may also have a selection of reasons to choose from in addition to being able to manually enter a reason.
Note
This functionality is disabled by default so will need to be enabled by your system administrator if required.
Fix to a Resource
When an activity is fixed to a resource, the DSE can still modify its timing or unallocate it, but it cannot change which resource it is assigned to. This is beneficial when a resource is designated for a specific activity. To fix an activity to a resource, open the manual changes panel and check the 'Fix to Resource' box.
Fix to a Date and Time
Similarly, if an activity is fixed to a specific date and time, the DSE can change the resource or even unassign the activity, but the scheduled date and time will remain unchanged. This is useful when an activity must occur within a particular time slot. To fix an activity to a date and time, open the manual changes panel and select the 'Fix to Date & Time' checkbox.
Note
If an activity is fixed to both a resource and a specific date and time, the DSE must schedule it exactly as specified and cannot leave it unallocated.
Duration
The 'Base Duration' in the manual changes panel is the expected duration for the entire activity, excluding any proficiencies etc. Please note that this cannot be updated manually if the duration is being estimated automatically.
The 'Duration Override' allows you to set an expected activity duration that supersedes any previous settings and disregards all factors affecting duration, such as proficiencies.
If both 'Base Duration' and 'Duration Override' are modified, only 'Duration Override' will be applied.
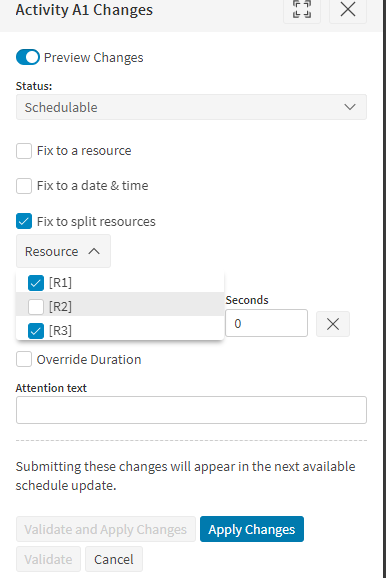
Fix to Split Resources
For activities that can be split into visits across multiple resources, an additional feature is available in this panel to select which resources should be used. Clicking on the "Fix to split resources" checkbox will allow you to select the resources that should be used to split to. Note that this does not guarantee that the activity will be scheduled to the selected resources, and this option will only appear if the activity is permitted to be split to multiple resources.
Validation
Once manual changes are ready to be applied, it may be required that you 'validate' these changes before they are applied. Depending on permissions, and on the type of change being made, validation may also be optional, or not required.
Validation involves verifying that the change being made is valid for the activity (or activities) involved, Where appropriate it will validate that the activity can validly be scheduled to the selected resource at the requested time, and where possible it will also validate the resulting route for the resource.
Details of the validation performed for different types of update is shown below:
- Commit an activity. Validates that the resource is able to carry out the activity within the selected shift, based on skills, regions and other hard constraints, and any availabilities associated with these. Also validates that the activity is available within the shift time, based on any availability and SLA-based time restrictions linked to the activity. When committing a single activity, and provided that the activity is the final committed activity in the route for the resource, this will also fully validate the resulting route for the resource, based on any existing committed or fixed activities in the route, plus the new activity to be committed.
- Fix to a time and resource. Validates that the fixed resource is able to carry out the activity at the fixed time, based on skills, regions and other hard constraints, and any availabilities associated with these. Also validates that the activity is available at the fixed time, based on any availability and SLA-based time restrictions linked to the activity.
- Fix to a time only. Validates that the activity is available at the fixed time, based on any availability and SLA-based time restrictions linked to the activity.
- Fix to a resource only. Validates that the fixed resource is able to carry out the activity, based on skills, regions and other hard constraints.
- Duration changes. Validation will be performed based on the current (or updated) status of the activity, using the above criteria.
- Split resource order changes. Validation will be performed based on the current (or updated) status of the activity, using the above criteria.
- Other changes. No validation is carried out for resetting an activity to a schedulable or 'do not schedule' status, or for other changes that do not impact the scheduling of the activity.
The 'Validate and Apply Changes' button on the manual changes panel will request validation, and then automatically apply those changes if the validation succeeds. If the validation fails, the panel will remain open, and the failure reasons will be displayed.
Alternatively, you can choose to validate changes without automatically applying them using the 'Validate' button. If validation succeeds and you wish to go ahead with the change, you can then click the 'Apply Changes' button to confirm the update.
If validation fails, the panel will display reasons for the failure. If you have the 'ManChaValidationOverride' permission, you can force the change by clicking 'Force Apply Changes'. Otherwise, the apply button will be disabled, prompting you to make necessary adjustments.
Note
To perform validation in this panel, you need the 'ManChaValidationView' permission. The 'ManChaNoValidation' permission allows manual changes to be made without validation. If you lack both the 'ManChaValidationView' and 'ManChaNoValidation' permissions, you won't be able to make any changes in this panel, and a message will inform you of the insufficient permissions.
Drag and Drop
The Scheduling Workbench allows you to drag and drop activities between resources on the Gantt chart.
The parameter 'DragAndDropCommitOption' controls how the workbench behaves when the activity is dropped on a Gantt. The options are:
- Commit To Resource - When dropped, the workbench will first send a validation request if the user does not have permission 'ManChaNoValidation' enabled. If the validation is successful, or the user has the permission enabled, the workbench will then send an update request. If the validation fails the manual changes panel will be opened displaying the validation result.
- Open Manual Changes - When dropped, the workbench will open the manual changes panel with the panel populated with the proposed change.
- Validate and Commit To Resource - When dropped, the workbench will first send a validation request. If the validation is successful the workbench will then send an update request. If the validation fails the manual changes panel will be opened displaying the validation result.
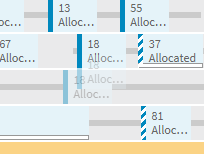
The drag and drop function is very simple to use. Hold down the left mouse button over the main part of the activity you want to move, drag it to the position in the schedule you wish to move it to and release the mouse button.
To change the duration of an activity, hold down the left mouse button over the right edge of the activity, drag it to the size you require and release the mouse button. This action will automatically set the 'Duration Override'.
Note
Drag and drop functionality is not enabled by default, see your system administrator if you need to use this functionality.
Note
It is also possible to use the drag and drop functionality on private activities and breaks.
To select multiple activities press control and click on them. Multiple activities can only be dragged if they are all allocated to the same resource, and none of them are fixed time.
Bulk Manual Changes
The functionality of making changes to an activity on the scheduling Gantt has been extended to making changes to multiple activities. This means now the user can multi-select activities and do changes to all the selected activities at once.
In brief, the functionality works as follows:
While holding ctrl select more than one activity on the Gantt. Now you may see all the selected activities displayed in the tooltip.
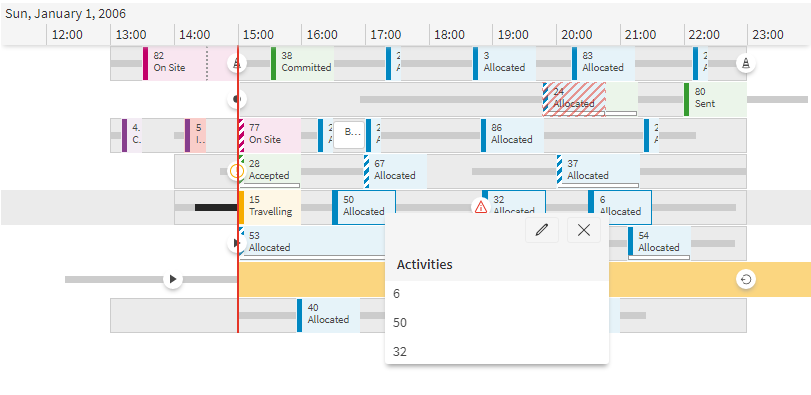
Select the edit icon, like when editing a single activity.
The Bulk Activity Change side panel will open. A list of the selected activities to which the changes will apply is displayed at the top of the panel. If a large number of selected activities have been added, this grid will appear collapsed. You can select or deselect activities in this grid before applying the update.
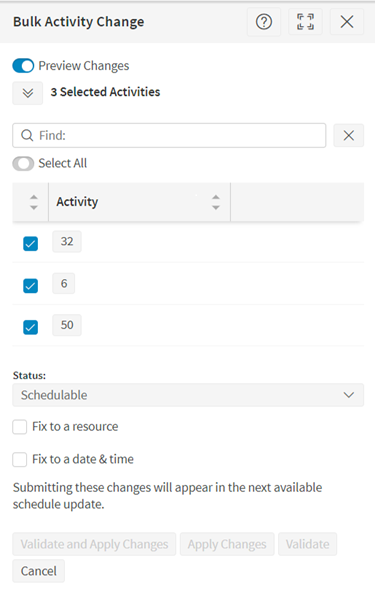
Once the required changes have been made, you will need to validate the changes using either the 'Validate' or 'Validate and Apply Changes' buttons. Once you have a successful validation result, you can apply changes by clicking the 'Apply Changes' button if you clicked the 'Validate' button. If you clicked the 'Validate and Apply Button', the panel will apply the changes once the validation is complete, if successful. The workbench will then be updated once these changes have been included in a new plan.
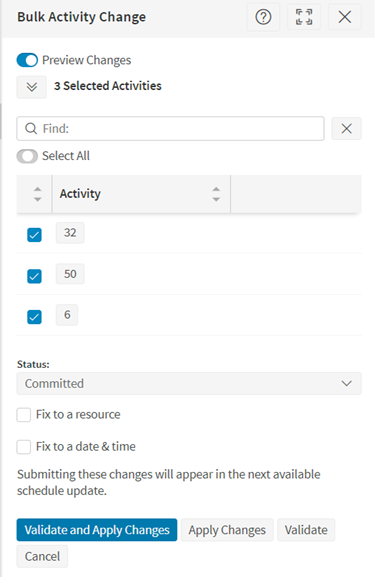
Note
It is also possible to perform bulk changes by using drag and drop functionality on selected activities.
It is possible to quickly commit bulk changes using the Quick Commit Button in the context menu.

This button is available only when all of the following conditions are met:
- 'ManChaQuickCommit' permission enabled.
- The selected activities should have 'Allocated' or 'Follow On' statuses.
- If any split activities are selected, their previous visit must already be Committed, or the previous visits must be included in the selection.
Making Mass Changes to the Schedule
It is possible to make mass changes to the current schedule from the 'Mass Changes' panel. This panel can be accessed from the resource details panel or from the resource context menu.
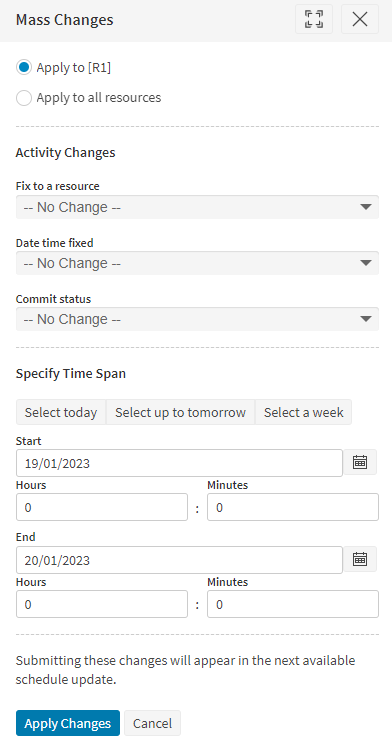
- Apply the changes to a single resource, all of the available resources or all resources of a particular type.
- Decide which changes to make. You can
- Fix or unfix all the activities for the specified period.
- Commit or uncommit all activities for the specified period.
- Specify the period for which the changes are to apply. You can use the buttons to select only today, up to the end of tomorrow or the end of the current week. Alternatively you can manually specify the start and end times between which the changes should apply.
Previewing Manual Changes
Once a user has started making a manual change to an activity, it becomes possible to view a preview of the change on the workbench.

Note
The preview manual changes option is enabled via the parameter 'PreviewManualChanges'. The default setting can be changed by an administrator, but users can also toggle the preview mode on and off, provided they have the permission 'ManChaSwitchPreviewMode'.
The preview mode is designed to give the user a clearer picture of how the change they are making will affect the schedule. The details of how the preview will look depends on the change being made. However, the intention in all cases is to reflect the change for the activity being updated, and the impact this may have on any resource routes affected by the change.
Any visits that have been changed directly by the user are shown with a 'pending' yellow circle at the start of the visit. Any visits that are indirectly affected by the change are shown in preview mode with a smaller pale yellow dot at the start.
Note that the preview mode does not attempt to show the full effects of re-optimising the schedule, but only to show the immediate consequences of the change. Visits that are indirectly affected by the change will remain in the route that the DSE has scheduled them into, but with adjusted times. This may result in some visits being shown at invalid times, for example after the shift has ended.
When the updated DSE plan is produced the schedule will have been re-optimised, and activities will be scheduled to obey all constraints where possible. In particular, any schedulable activities shown at invalid times in preview mode would be expected to be moved when the updated plan is produced.
Some common use cases are detailed below.
An activity is committed to a resource which is currently scheduled to the same resource but later in the route. The preview mode will show the activity moved to the start of the route, and all other activities in the route are pushed later. An example is shown below.

For comparison, the route would be as shown below with preview mode switched off. In this case the changed activity remains where it is currently allocated in the route.

An activity is committed to a different resource to the one currently allocated. The preview mode will show the activity moved to the start of the new route, with visits in this route pushed later, and visits in the route it has been removed from pulled earlier.
An activity is fixed to a resource and time. The activity is shown in the position it has been fixed to, and other activities in the route are scheduled around this visit.

The duration of an activity is extended. The activity is shown with the extended duration, and later activities in the route are pushed back accordingly.

As the user makes changes on the manual change panel, these changes will be reflected in the preview shown on the workbench. The preview mode will also stay in place when the change is applied, and remain until the actual schedule has updated to reflect the change that was made. If there are multiple pending changes then the preview mode will reflect each change while it is pending.
The preview mode is also available for bulk manual changes. However, preview mode is not available for other types of manual update, such as when creating private activities or manually logging a resource on or off.
Please note that there is no preview mode available in the following situations:
- When an activity is fixed to a resource and time that is outside of the resource's shift times.
- When the activity status is updated to a status of travelling or higher.
- When an activity is fixed to a time, but not fixed or committed to a resource.
- When an activity is switched to a different resource, but not committed and not fixed to a time.
- When an activity is committed or fixed to a parallel resource.
Note
Please note that the preview mode does not have full knowledge of the schedule, and so there are some limitations in how visits are displayed. In particular:
- Any availability set against an activity is not accounted for.
- The allocated duration is not updated to reflect resource proficiencies, or other overheads.
- Travel allowance before a shift is not accounted for.
- Travel estimates will not necessarily account for resource or time of day variations. The travel profile associated to a resource will be accouted for, but shift level changes will not.
- There is no adjustment to how splittable activities are split, and no change to later split visits when a split visit is manually updated.
This of course only applies while the change is shown in preview mode, until the updated DSE plan is received.
Manual Change History Panel
Once a user has made a manual change to the schedule, a manual change history panel will appear in the side panels of the workbench. This panel shows a summary of each change made by the user against the currently selected dataset.
Note
This requires the permission 'ManChaHistoryPanel' to be enabled for the user.
Note
The change history is only persisted during the current user session. If the user logs out or refreshes the page then the change history will be cleared.
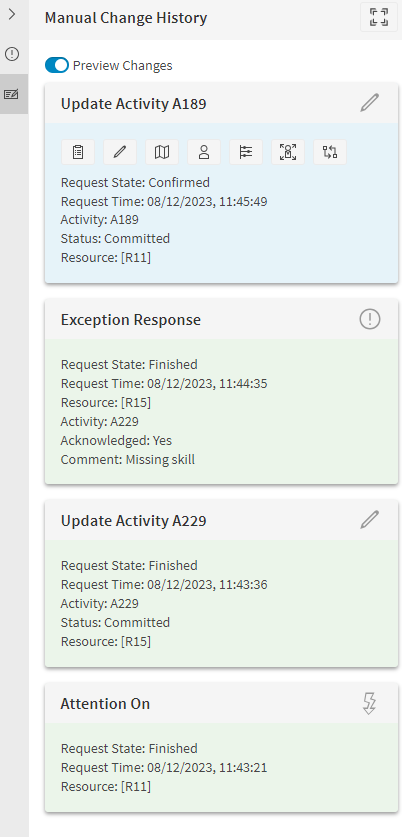
Where activity status changes are still pending (i.e. a change has been made but a new plan including that change has not yet been produced), the user will have the option to view their changes in 'preview mode'. See the preview changes section for more details on this functionality.
The panel will show card details for any manual change to the schedule made by the user. The icon reflects the type of change made (activity update, bulk activity update, acknowledge exception etc.). The colour of the card reflects the current state of the request, as detailed below.
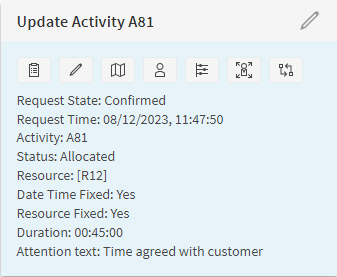
Each change will show the time that the request was made, and the current 'state' of the request. This will be one of the following values:
- Confirmed (Blue) once the change has been sent successfully and accepted. This will correspond with the 'Change to activity saved successfully' message appearing on the screen.
- Finished (Green) once the DSE has updated the plan to reflect the change.
- Rejected (Red) if the change was rejected by the integration. This will correspond to a message on the screen showing why the change was rejected, and this same reason will be shown on the details card.
- Expired (Yellow) if the change was confirmed, but tracking stopped before the plan appears to have reflected the change.
Changes can become expired for a number of reasons:
- The user changes the dataset.
- The user changes the filters, or the schedule changes such that the changed activity is no longer displayed on the workbench.
- The schedule time has moved on by at least the confirmation expiry period (default 5 minutes), and the change does not appear to have been reflected in the schedule.
Note
Note that if the change is expired this does not mean that the change did not take place. In this case the user would be advised to verify for themselves whether the schedule has in fact updated to reflect the change.
The card will also show further details depending on the type of change made. For an activity update the following will be shown:
- The activity label.
- The visit ID for later split visits.
- The updated status for the visit.
- The 'commit option' if one is selected.
- The selected resource.
- Details of whether the resource and/or time have been fixed.
- Details of any duration changes.
- Attention text and/or reason text if set.
Finally, for activity update changes the card will also show controls for the user to interact with the activity. These are the same controls that are available from the activity context menu, so for example will allow the user to view the activity details, or open the activity in the compare screen.
Pending External Status Changes
It is also possible for a user to view and preview external pending activity status changes. This includes any activity status change not made by the current user, and which has not yet been reflected in the schedule. This could be a manual status change made by a different workbench user, by a resource carrying out the activity, or an automated change.
Note
This requires the permission 'ViewExternalPendingStatusChanges' to be enabled for the user.
The user can toggle on or off the display of external pending changes from the 'Manual Changes' panel, or from the 'Manual Change History' panel.
External pending changes are shown with a small dot at the start of the activity bar, similar to the way the pending changes are shown when made by the current user. However, the default colour for the external pending change icon is grey (these colours can be configured via parameters). The external pending changes will be shown either in preview mode or in standard view, as selected by the user, and based on the usual limitations on when preview mode can be used.
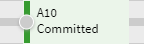
Commit To Allocated Shift
The parameter 'CommitToAllocatedShift' can be enabled to keep activities in the shift they are allocated in when performing a manual commit.
Commit To Availability Window
The parameter 'CommitToAvailabilityWindow' can be enabled to commit activities to an availability window instead of a shift when performing a manual or bulk manual change.
- If there are multiple overlapping availability windows, then the commit will align with the latest window before the committed time.
- When both CommitToAvailabilityWindow and CommitToAllocatedShift are enabled, the commit aligns with whichever has the later start time between availability window or shift.
Multi visit activities
It is sometimes possible for an activity to be visited multiple times within the schedule. The most common occasions where this may occur are for splittable and/or depot activities.
Split Activities
Activities can be defined as 'splittable', in which case the DSE may decide to split the allocation of the activity into multiple visits, as in the example below.

For activities which have been split into multiple visits, each visit will appear on it's own line on the activity Gantt.

The details of each visit can be viewed independently by clicking on the visit required.
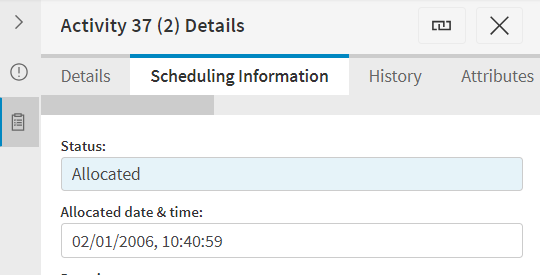
Each visit can have its own status, and two statuses relate specifically to multiple visit activities. The first of these is 'Follow On', which the DSE will set all uncommitted visits of a split activity to once at least one visit is committed. The second is 'Visit Complete' which signifies that the resource has completed his visit to the activity but the activity itself is not yet complete.
Note
Manual changes are limited on all visits except for the first visit to an activity. Visits may be committed, provided that all previous visits to the activity are at status at least committed, and visits may be uncommitted provided that all future visits are uncommitted. No further manual changes are permitted except on the first visit to the activity. Base Duration and Override Duration are not shown in the manual change panel for later visits.
Note
For further details on split activities, see the Scheduling Concepts - Split Activities guide.
Depot Activities
Depot activities are used to supply parts to resources in order for them to carry out activities. Depots can be visited multiple times by multiple resources, as often as is required in the schedule.
As with split activities, each depot visit will appear on it's own line on the activity Gantt. Depot visits are never classed as 'unallocated', but if a depot is not being used then an 'Unused Depot Activities' exception will be raised.
The parts tab on the depot details will show how the depot part stock changes over time.
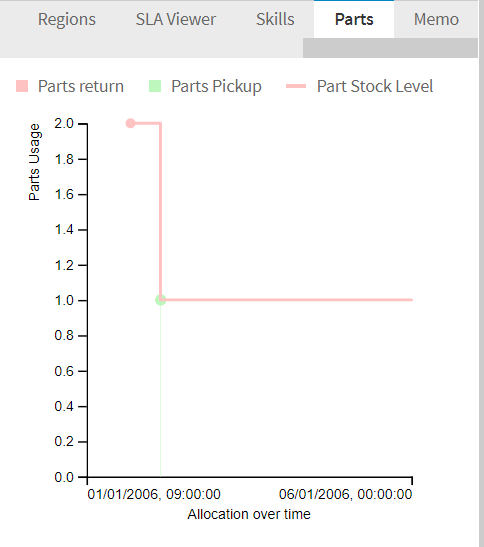
Note
For further details on depot activities, see the Scheduling Concepts - Parts guide.
Icons
It is possible to attach an icon to both activities, resources and exceptions, which will then be displayed on the workbench. Resource icons can be set against either the resource or resource type, while activity icons can be set against the activity or activity type.
Note
If the planning workspace is being used, then Icons can be created here, and set against resources, resource types and activity types.
Note
Icons can only be used for activities of type CALL and DEPOT at the moment.
Resource Icons
If an icon has been set against a resource or resource type, the icon will appear on the resource rows of the Gantt, within the resource summary column.
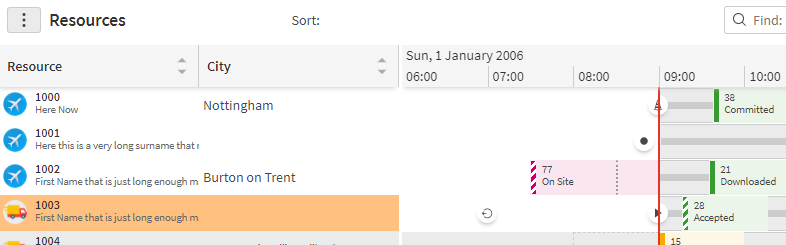
The icon is also displayed on the resource details panel heading.
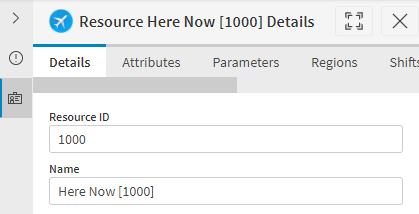
Activity Icons
If an icon has been set against an activity or activity type, the icon will appear on the Gantt item within the resource and activity Gantts. It will also appear in the activity summary column on the Activities screen and the Schedule Assistance Screen.
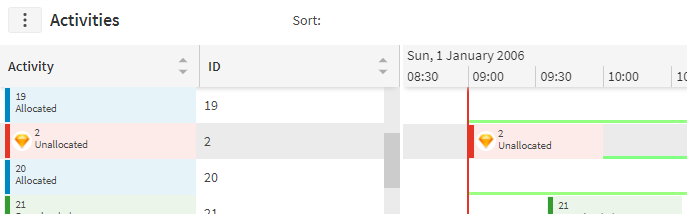
The icon is also displayed on the activity details panel heading.
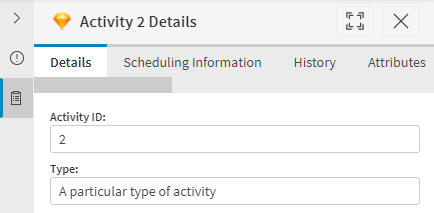
Exception Icons
If an icon has been set against an exception, see the Schedule Exceptions of the PSO Workbench User Guide — Organisation, the icon will appear at the beginning of the Gantt item with the associated exception.