Simulation - View and Run Data
Simulation Data Viewer
The Simulation Data Viewer allows import of data into PSO so that proof of concepts can be undertaken and simulated on a larger scale using customer data or synthetic data produced by consultants.
Note
The Simulation Data Viewer is NOT to be used for production data. The recommendation is that it should be run in its own tenant within PSO.
To use the Simulation Data Viewer users must have the "SimulationWorkspace" Permission and the "SimulationDataImport" Permission.
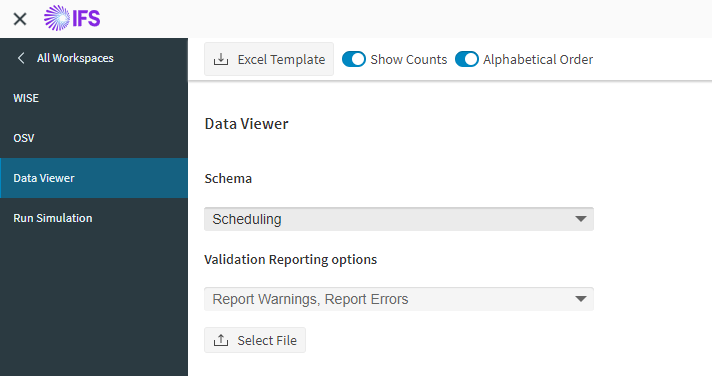
The Simulation Data Viewer can:
- Upload data files.
- Validate data files.
- View the entities in data files.
- Import scheduling data files to the DSE.
Preparing a Data File
The Data Viewer can be used to view both scheduling and modelling (planning) data files.
Scheduling Data Files
For scheduling data files, the files can be in either XML (.xml) or Excel workbook (.xslx) format. The data must conform to the PSO scheduling schema. Data files larger than 500MB may not function correctly.
A template Excel spreadsheet template is provided which is generated from the PSO scheduling schema. This contains a tab for each entity type and a column for each attribute, in the same order as in the schema guide. This template can be downloaded by clicking the "Excel Template" button in the toolbar.
Note
Source data will not be considered by the data viewer for files with an input type of 'CHANGE'.
Modelling Data Files
For modelling data files, the file should be in either .xml or .arp format. If the file contains an update to existing modelling data, it is possible to validate the file against the existing data. Select the 'Merge with existing data' option in this case.
Uploading a File
When a file is uploaded it will be validated against the appropriate schema, and any errors with the data will be displayed to the user. By default the user will also be shown warnings for data that does not follow best recommendations. These warnings can be switched off if desired, so that only the errors are shown.
Click "Select File" and choose a suitable .xml or .xlsx file to upload.
Data Viewer
Once the file is uploaded you see a page similar to the images shown below.
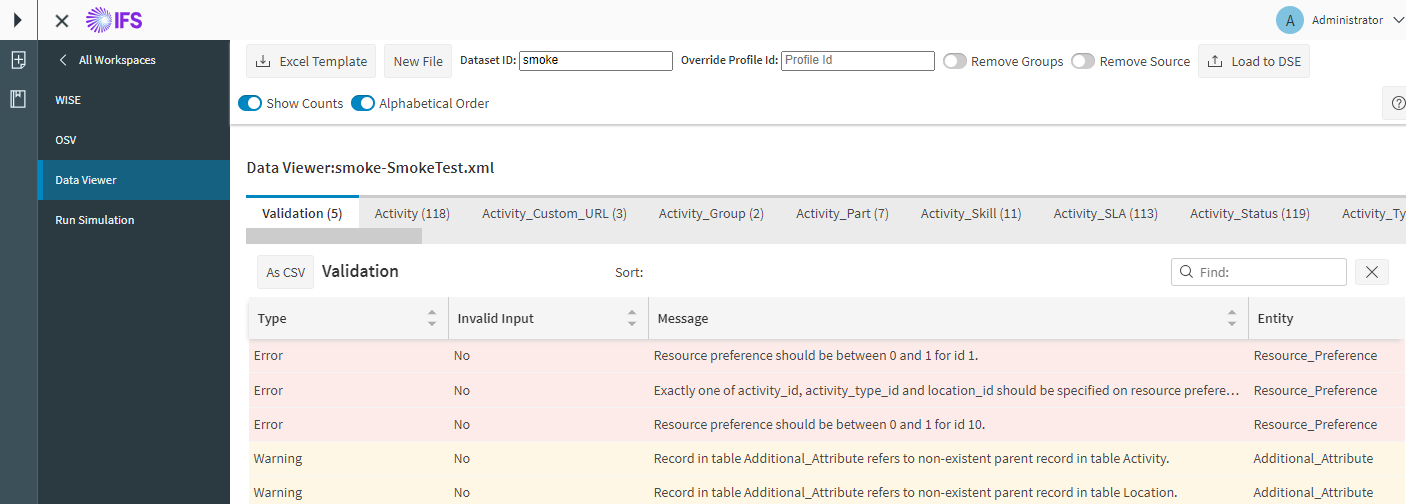
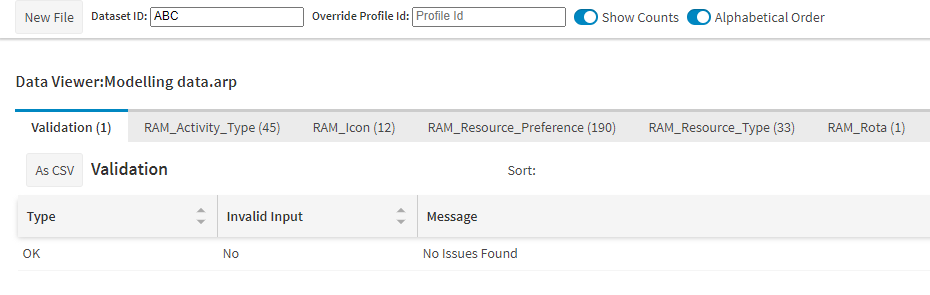
The "New File" button returns to the previous page to select a different file.
This page contains a series of tabs. The first, called "Validation", contains the Validation messages. The other tabs contain details of the entities in the uploaded file with a tab for each type of entity.
The "Show Counts" option allows the user to see a count of the number of entities of each type, displayed in the tab title.
The "Alphabetical Order" option orders the tabs in alphabetical order rather than the logical order that is used normally. The Validation tab is always displayed first.
The Validation tab contains messages arranged as Information, Warning or Error Messages. In the top left of the tab is a "As CSV" button. This will download all the validation results as a csv file for external analysis.
All tab views are provided with the "Find" function.
Import to DSE
When viewing scheduling data, and if the user has the "SimulationDataLoadToDse" permission, there will be a "Load to DSE" button which will import the file as a dataset for the DSE.
There are a number of options to set before Loading to DSE. The "Dataset Id" input is populated with the dataset id from the file that was uploaded. The user can change this to import the data into a different dataset.
Care must be taken not to overwrite production datasets. There are informative warnings and the recommendation is that modelling or demonstrations using this feature should be run in a separate tenant within PSO to keep them separate from production data.
If a profile id is specified in the data file this will appear in the "Override Profile Id" input. The user has the option to override the profile id and import the data as though for a different profile.
If the "Remove Groups" option is switched on, any object groups in the data will be removed. Object groups can result in the uploaded data not being visible to the current user which may not be desired.
If the "Remove Source" option is selected, any source record in the file will be removed as it is uploaded to the DSE. This can be helpful if the data file references a specific Modelling Dataset.
Note
Archive or input history data will already have modelling source data included in it, so in this case it is best to remove the source data tags to prevent them being reprocessed.
Note
Broadcasts and their parameters are removed from the data before being loaded to ensure no accidental communication is done to third party systems.
Validation
Pressing the "Load to DSE" button will validate the request. It is important that the user does not overwrite a production dataset. The recommendation is that a separate tenant is used for simulations. This will enable a wider range of parameters to be amended as part of the simulations.
If the requested data set does not exist, then importing will create a new dataset. Creating a new Dataset is only allowed if the user has permission to see all datasets.
Dataset Ids are case sensitive (e.g. there may be two data sets "data" and "Data") and they can have spaces at the start and end. These situations are confusing and best avoided. A request to add a new dataset that differs only by case from an existing one, will be rejected. A request to add a new dataset with leading or trailing spaces will have them removed.
The maximum length of the Dataset ID is 32 characters.
If the requested Dataset already exists, it will be overwritten. The user is asked to confirm this action.
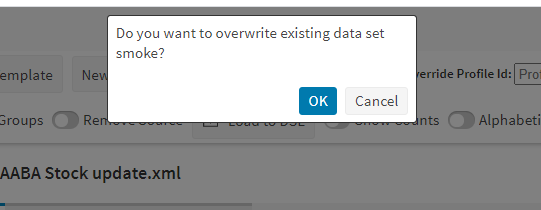
If validation is successful and any confirmations have been given, the data will be uploaded to the DSE. A short time later it should be possible to view the results in the scheduling workspace.
Run Simulation
Run Simulation allows the user to run a sequence of updates to the scenario dataset. This is available to users with both "SimulationDataRun" and "SimulationDataLoadToDse" permissions.
Note
The Simulation Run feature is NOT to be used for production data. Recommendation is that it should be run in its own tenant within PSO.
During the simulation run we need to view and control the simulation files as they are loaded, we also need full access to the user interface at the same time. To do this we open the simulation run in a separate window which appears as a separate browser tab next to the main user interface. The main UI can be used freely without affecting the simulation run.
Note that the browser windows cannot be closed or refreshed during the simulation run.
It may be useful to increase the "JwtLogoutHours" workbench parameter from the default of 2 hours and also increase the "JwtExpiryDays" workbench parameter from the default of 1 day. For users in a child organisation please be aware that changes to these parameters need to be made in the head organisation.
To open the new window press the start Simulation Button.
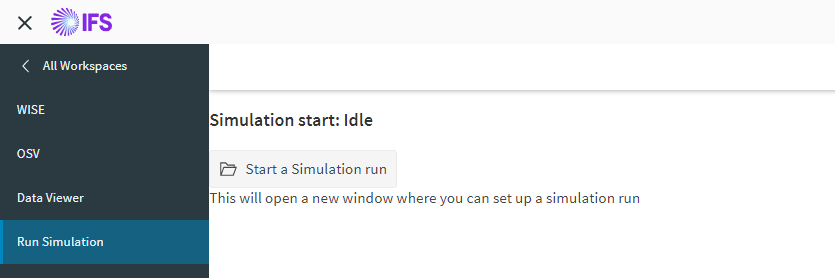
Select files
The "Select Folder" option allows the user to specify a folder and import all relevant files from that folder and any sub folders. The files are not visible while selecting a folder.
"Select Files" allows the user to select some but not all files from a single folder by ctrl-clicking on the desired files. All files for the simulation must be selected at once and must be in the same folder. The files are visible while making this selection.
The supported file types are .xml .xlsx and .arp. Any arp files that are selected can be imported before the simulation run starts, but will not form part of the run. Data files larger than 500MB may not function correctly.
Configure the simulation
Once the files are selected the user sees the following screen and can configure the simulation run. The run is not started yet.
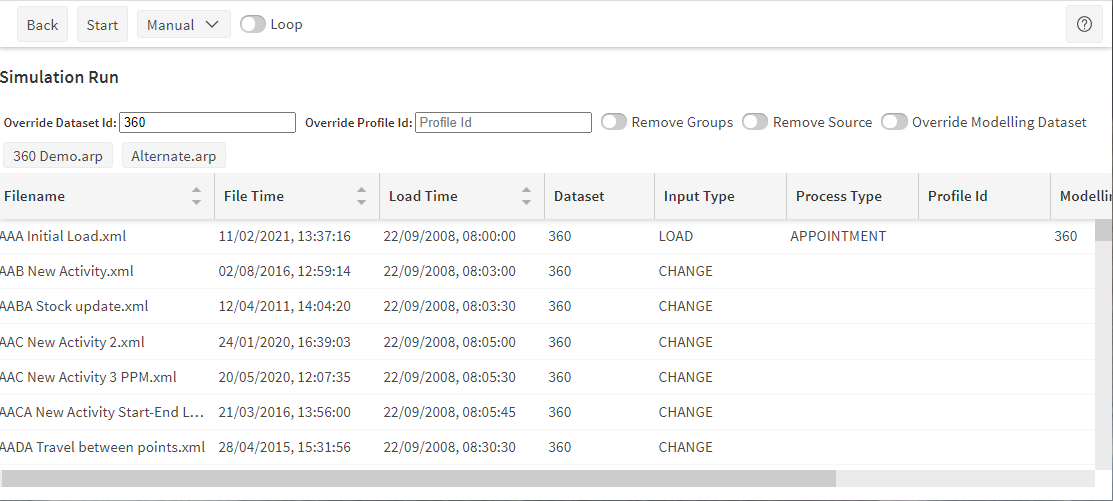
The back button takes the user back to the file selection screen.
The "Override Dataset Id" input allows the user to specify that all the files should be imported into the specified dataset, regardless of any dataset specified in the input file. If this is blank, the files will be imported to the dataset specified in the file (after confirmation).
The "Override Profile Id" input allows the user to specify that all the files should be imported into the specified profile id, regardless of any profile id specified in the input file.
If the "Remove Groups" option is switched on, any object groups in the input files will be removed. Object groups can result in the uploaded data not being visible to the current user which may not be desired for a demonstration.
If the "Remove Source" option is switched on, any source record in the input files will be removed as it is uploaded to the DSE. This can be helpful if the data file references a specific Modelling Data set.
If the user has not chosen to "Remove Source", there is an option to "Override Modelling Dataset". This will replace any modelling dataset record in the input files with the dataset id specified in "Override Dataset Id".
Any arp files that were selected will be displayed as a list of buttons. Clicking these buttons will import the .arp file using the Dataset ID currently specified in the "Override Dataset Id" input. This user will be asked to confirm the import.
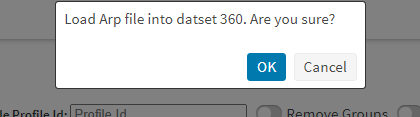
The selected .xml and .xlsx input files are listed in a datagrid. The input files are scanned in the background and the remaining columns are filled in.
- Filename: is the filename on disk.
- File Time: is the timestamp of the input file on disk.
- Load Time: is read from the input_reference record in the file.
- Dataset: is the Dataset Id given in the input_reference record.
- Input Type: shows the input_type given in the input_reference record.
- Process Type: shows the process_type given in the input_reference record.
- Profile Id: shows the profile_id given in the input_reference record.
- Modelling Dataset: if any is specified in a Source_Data record.
- Activities: Lists the activity Ids referenced in the file, or if there are too many, shows the number of Activity Ids in brackets.
Note the sequence can contain load files.
The ordering of the files can be changed by clicking on the column headers. Input files can be arranged by Filename, File Time (the timestamp of the file on disk) or Load Time (The timestamp in the input_reference record). If Load Time is selected as the sort order, the simulation cannot start before all files have been scanned.
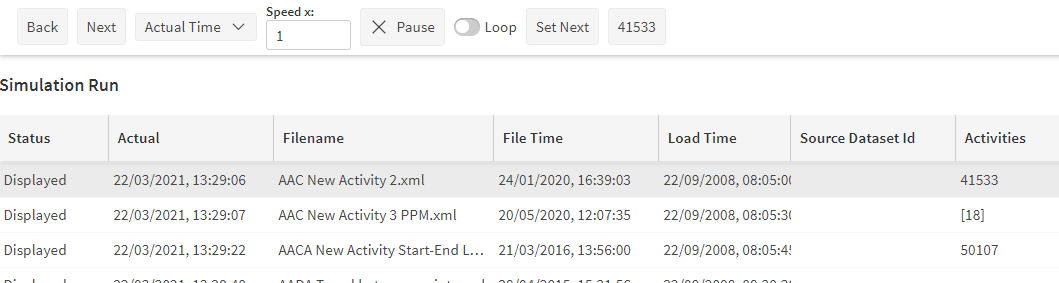
A dropdown in the top bar allows the user to specify the timing mode of the file imports.
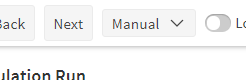
- Manual: The next file is only imported when the user clicks "Next".
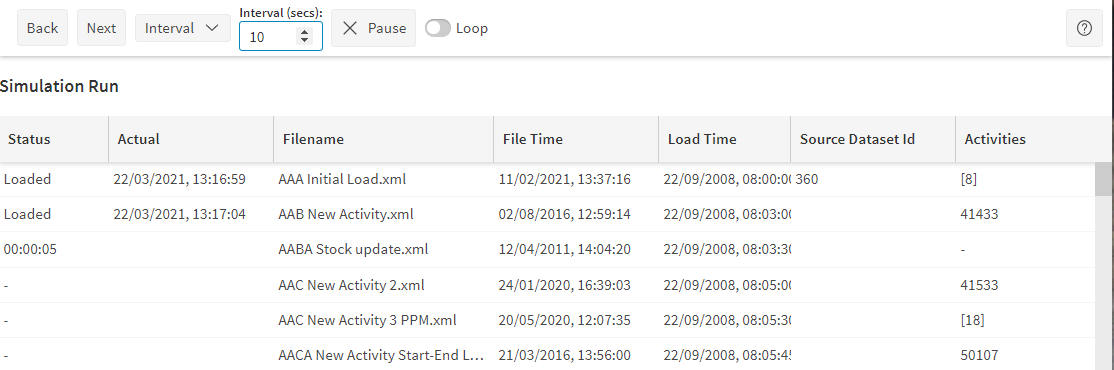
- Interval: Files are imported at regular intervals.
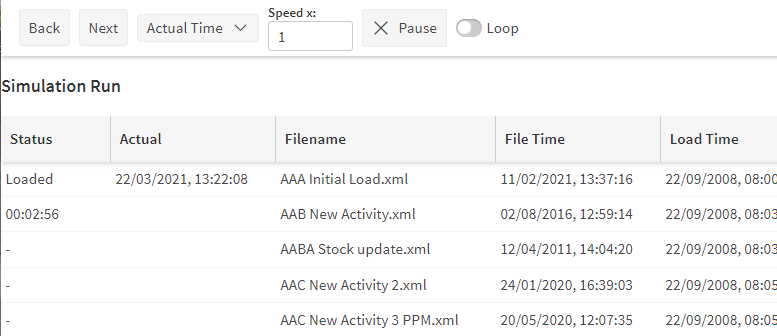
- Actual Time: Files are imported based on the Load Time in the file
The Loop option allows the user to specify if the simulation run should restart at the first file after the last file is loaded.
Once the options have been specified the simulation can be started by pressing "Start".
Validation
Pressing the "Start" button will validate the simulation run. It is important that there is no possibility a production dataset will be corrupted. The recommendation is that a separate tenant is used for simulations. This will enable a wider range of parameters to be amended as part of the simulations.
If the Override DatasetId is not specified then each file will be imported using the Dataset specified in the file. In this configuration the simulation cannot start until all files have been scanned, and all Dataset Ids will be validated before the simulation starts.
If any requested data set does not exist, then importing will create a new dataset. This is only allowed if the user has permission to see all datasets.
Dataset ids are case sensitive (e.g. there can be two data sets "data" and "Data") and they can have spaces at the start and end. These situations are confusing and best avoided. A request to add a new dataset that differs only by case from an existing one, will be rejected. A request to add a new dataset with leading or trailing spaces will have them removed.
The maximum length of any dataset id is 32 characters.
If any requested dataset already exists, it will be overwritten. The user is asked to confirm this action showing a list of the affected dataset ids.
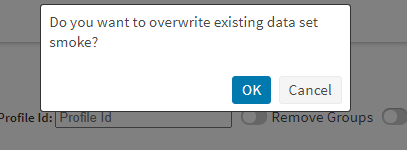
If validation is successful and any confirmations have been given, the data will be uploaded to the DSE. A short time later is should be possible to view the results in the scheduling workspace.
If the data is not loaded because it was a change file and the dataset did not exist, explicit warning will display.
Note
Broadcasts and their parameters are removed from the data before being loaded to ensure no accidental communication is done to third party systems.
Running the simulation
When the simulation starts, the first file will be loaded. The UI in the other browser window will jump to the scheduling/resource page and display the correct dataset if it can (The dataset may not exist yet).
While the simulation is running the user can still change timing mode between Manual, Interval or Actual Time. The user can also change the "Loop" setting.
Once simulation is started the user cannot change the sort order, or import ARP files. The Back button stops the simulation and returns to the previous screen to make changes.
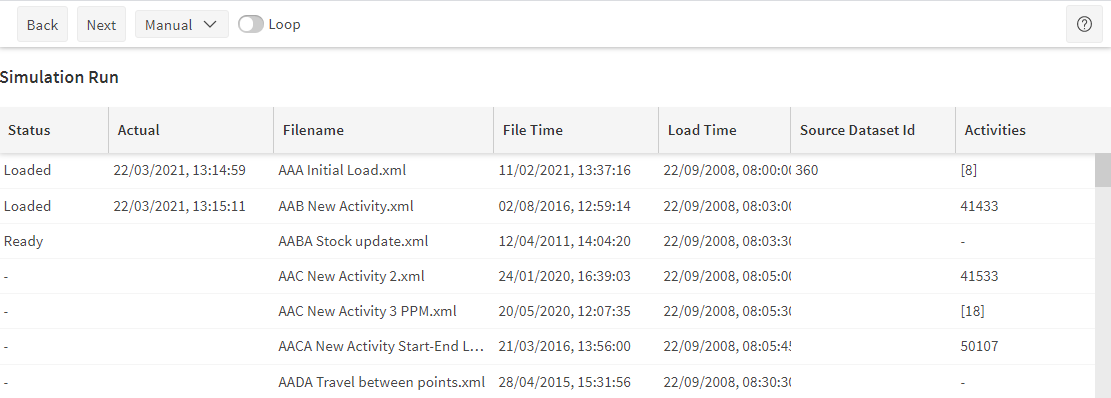
If the timing mode is "Manual", the next file will only be loaded when the user presses "Next".
If the timing mode is "Interval", the next file will be loaded after a fixed interval. The user can adjust the speed with the "Interval (secs)" input. The simulation can be started or paused with the "Play" or "Pause" buttons. If the user clicks "Next" the file will be loaded immediately.
If the timing mode is "Actual Time", the next file will be loaded after a delay based on the load time in the file. The user can adjust the speed with the "Speed x" input, up to 100 times faster than real time. The simulation can be started or paused with the "Play" or "Pause" buttons. Depending on the order of the files it is possible for the next file to have an earlier Load time than the previous file. In this case the next file will be loaded as soon as possible. If the user clicks "Next" the file will be loaded immediately.
The "Status" column shows the progress of each file during the simulation. The values are as follows:
- -: File is not yet scheduled for loading.
- Scanning...: File will be loaded next. The file is being scanned ready for load.
- Ready: File has been scanned and will be loaded next.
- countdown timer: File is scanned and will be loaded when the timer expires.
- Loading...: File is being loaded to the server.
- Loaded: File has been loaded.
- Displayed: This appears only when the data in the file is displayed in the UI.
- Error: Indicates that an error occurred and the file was not loaded.
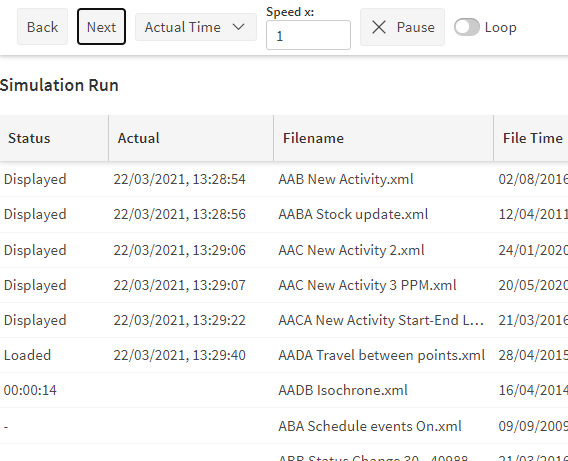
The status "Displayed" only appears when file has been loaded, the DSE has generated a plan using the data in the file, and the UI has refreshed to display that plan or a later one. If the DSE Is not running this status will not appear. If the UI is paused or displaying a different dataset, this status will not appear.
The user can select an input file in the data grid by clicking on it. A "Set Next" button appears. Clicking this will select this row as the next input file. This jumps the simulation to a different place in the load sequence.
If the selected file has activity Ids (but not too many), these will appear as buttons in the toolbar as well. Clicking on an activity button in the simulation run will request the UI window to focus on that activity. This works if the UI is in the scheduling workspace on the resource, activity or map pages. The UI should scroll to the appropriate row and time in a Gantt chart, or to the appropriate location on the map. If the activity cannot be displayed, e.g. because the UI is displaying the wrong data set, or the activity is not in the data, or does not have a location or allocated time, an informative toast message should be displayed.