Simulation - WISE
What is the WISE?
The What-If Scenario Explorer (WISE) allows users to plan for the future, by considering how changes to their demand (workload) and/or resourcing (workforce) will impact business performance. They can also investigate how their resourcing could be changed to improve performance. In particular, it can be used to answer the following types of questions:
- How many resources are required?
- Where should resources best be based?
- What skills should they have?
- Where are the most pressing training needs?
- What KPIs would be achievable?
The WISE deals with three basic concepts: demand, resourcing, and business targets.
- Demand: This is the work that needs to be done. For example, this could be the activities that currently exist in the live schedule, or it could also include work from a potential new contract.
- Resourcing: These are the available resources to carry out the work. Changes can be made to investigate the effect of resources leaving, or new resources joining.
- Targets: These are the targets that the business is looking to achieve, for example 95% SLA Hit Rate.
The WISE can be used to try out changes to demand or resourcing and see the effect this has on the schedule, and the business targets. In addition, a key feature of the WISE is that it can automatically suggest changes that could be made to the resourcing in order to hit business targets.
Using the WISE for the First Time
The WISE screen can be reached via the Simulation workspace menu in the Schedule Workbench. (If you do not see the "Simulation" or "WISE" menu options, check with a system administrator. The permissions "SimulationWorkspace" and "SimulationWISE" are required).
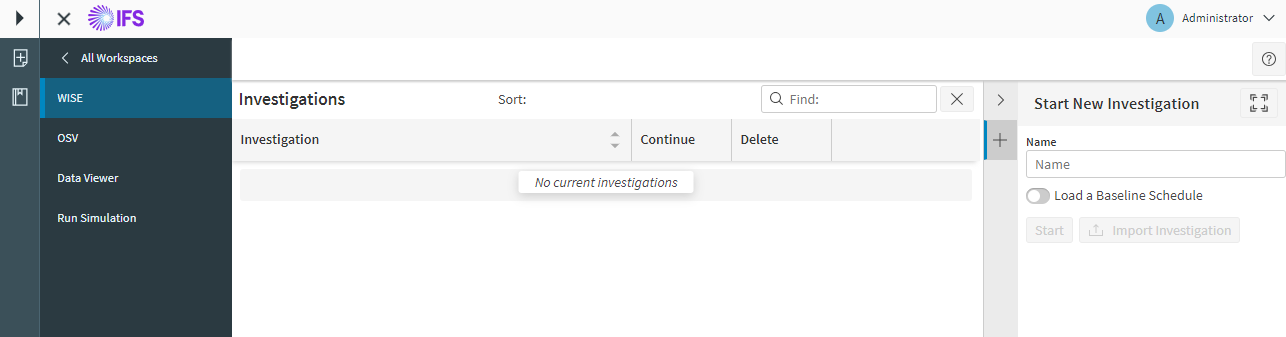
All work carried out in the WISE is grouped into Investigations. This allows the user to explore different types of scenarios in an organised manner, for example: "my monthly planning report", "staff requirements for new contract X", or "best location for new electricians to replace Y".
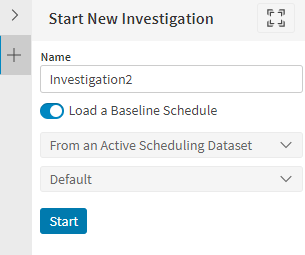
If this is the first time you have used the WISE, there will be no Investigations listed. A new investigation can be created using the 'Start New Investigation' panel on the right-hand side. After clicking 'Start' the investigation will be loaded and the user will be taken to the demand screen. New investigations are automatically created with two default targets: 'Maximise Percentage Allocated' and 'Maximise SLA Percentage Hit'. These can be modified or removed later if required.
Once inside an investigation the top menu will include an 'Investigation' menu button. This will show the name of the current investigation. The user can also click the button to see options to export the investigation, or exit back to the investigations select screen.
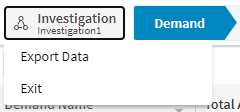
The user can then navigate through the four screens that make up the investigation user flow:
- Demand: This is where the user can model the activities that they want to consider for scheduling.
- Resourcing: This allows the user to model the available resources for scheduling.
- Run Tests: On this screen the user can configure the tests that they want to run.
- Results: This is where the results of each investigation test run can be viewed.

Initially, only the 'Demand' and 'Resourcing' screens will be available.
Demand Screen
When a user first starts an empty investigation in the WISE they will be taken to the Demand screen.
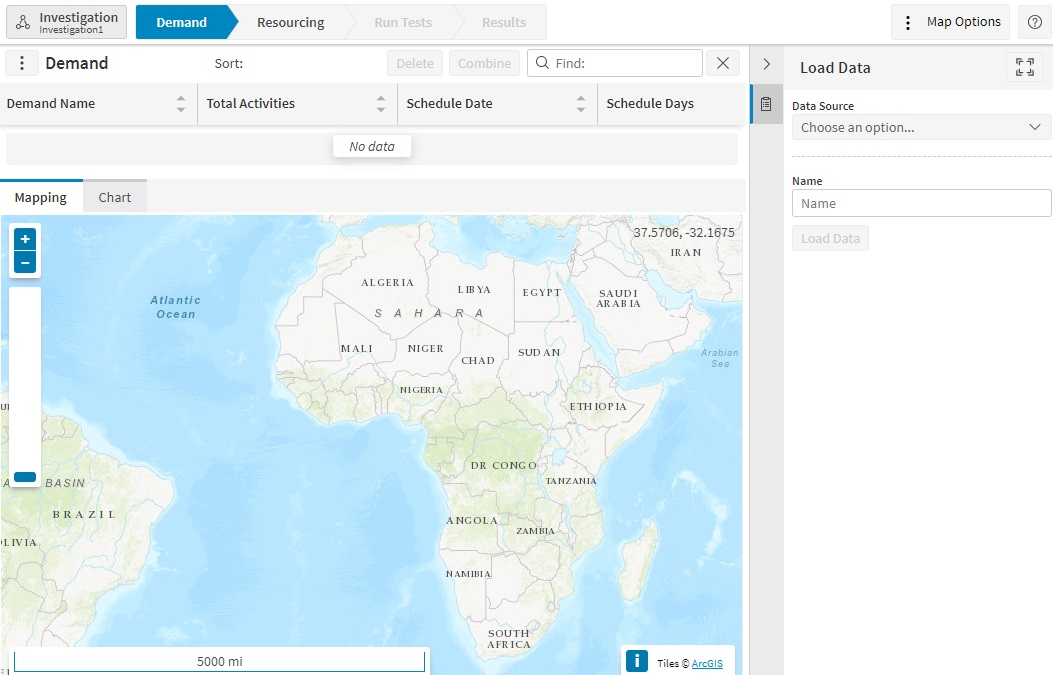
The right-hand side panel will allow the user to load new demand data for the investigation. This demand will be the sample of activities that need to be scheduled. Data can be loaded from various sources:
- From an Active Scheduling Dataset: this will load the outstanding activities from a current live dataset.
- From an Archive Snapshot: this will load data from any saved snapshot in the archive database.
- From a Schedule Data File: this will load data from a saved xml file in standard scheduling format.
- From a Templated File: this will load data in simplified comma separated value (.csv) format.
- Copy From Another Investigation: this will copy demand from a different investigation into the current investigation.
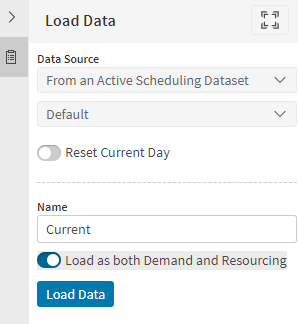
In many cases there is also the option to 'Reset Current Day'. This will reset the current schedule time to the start of the current day. Any activity status updates that occurred during the day will be removed, along with any schedule events (resource logon etc.).
Note
Note that only 'schedulable' activities are included in the demand data. Activities that are fixed or committed to a resource (including private activities) will instead be included in the resourcing data, since they are considered as activities that are tied to the specified resource. The 'Total Activities' count shown against the demand will reflect this. Activities with a status of 'Do not schedule' are not included in either the demand or resourcing data.
Where appropriate there is also the option to 'Load as both Demand and Resourcing'. This will load the selected data as both demand data and resourcing data. For example, when loading a current active dataset, the current activities will be loaded as demand data, and the current resources will be loaded as resourcing data.
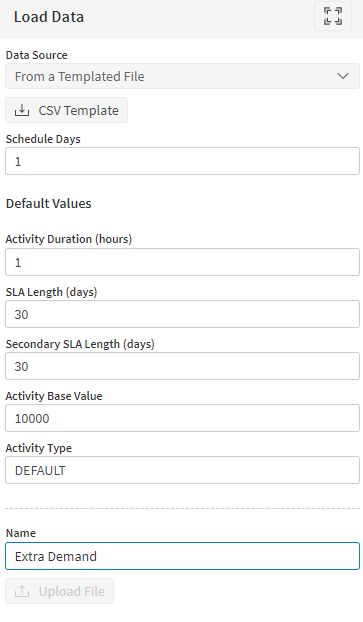
After selecting the 'From a Templated File' option, the user is able to download a template .csv file. This is the file format that should be used when uploading data using the template. It is also possible to leave some values blank, in which case the default values specified on the data panel will be used.
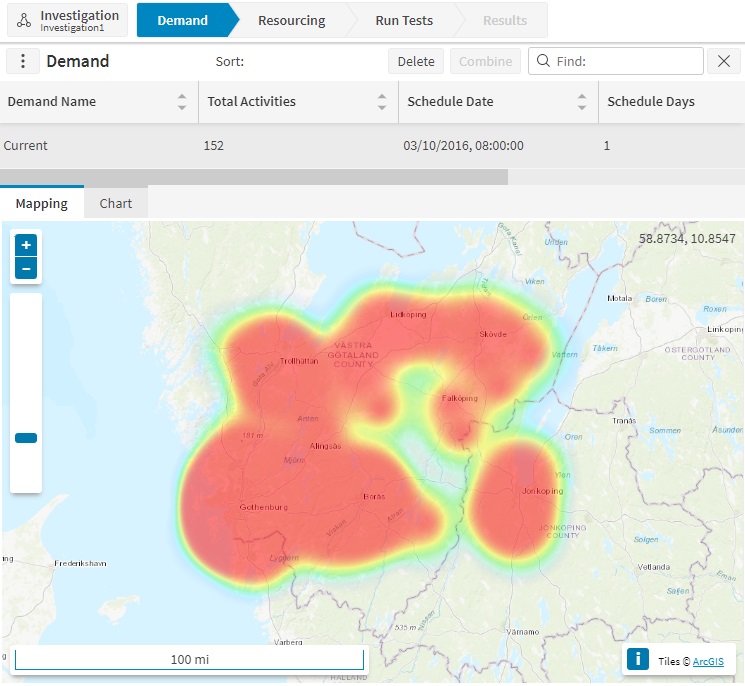
Once data has been loaded, this will appear in the data grid at the top of the page, and displayed in the map and chart tabs in the lower part of the screen. When multiple demands are loaded, the user can select a row to populate the map and chart based on the selected demand.
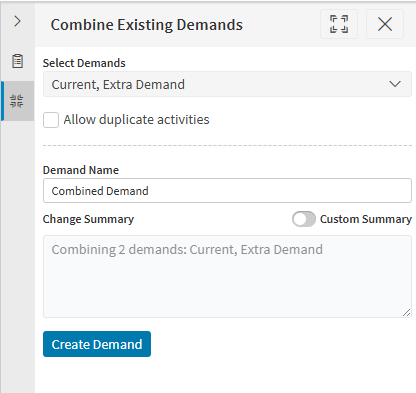
Once two or more demands have been loaded it is also possible to combine these demands into a new consolidated demand. For example, this could be to combine the existing live demand with demand from a potential new contract. A summary of the actions is generated automatically, but users can enter their own by enabling the custom summary toggle.
The map will show a hot spot of the demand data, showing the geographic spread of the activities, and highlighting where there is a higher density of demand.
The 'Map Options' can be used to adjust the map settings, such as the concentration radius used for the heat map.
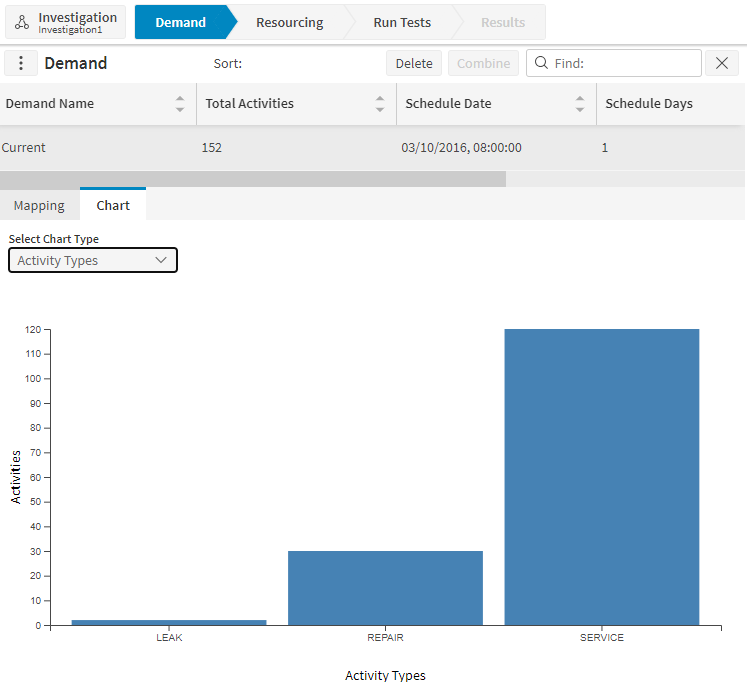
The chart allows the user to see the make up of the demand data broken down by one of several common groupings.
The available groupings include Activity Type, Customer, Contract, Service Level, SLA Type, SLA Deadline, Regions and Skills.
Creating Demand Scenarios
Once a demand has been loaded into the WISE, it is possible to adjust the demand data to create different demand scenarios. For example, it is possible to increase the demand by 10% to see how this affects the schedule. It is also possible to make focused adjustments, for example to increase the demand for a specific customer, or for activities with a specific skill requirement.
To create a demand scenario, select the demand you wish to adjust from the data grid, and then click the 'Create Scenario' button at the top of the demand grid. This will open the 'Create Demand Scenario' data panel on the right of the screen.
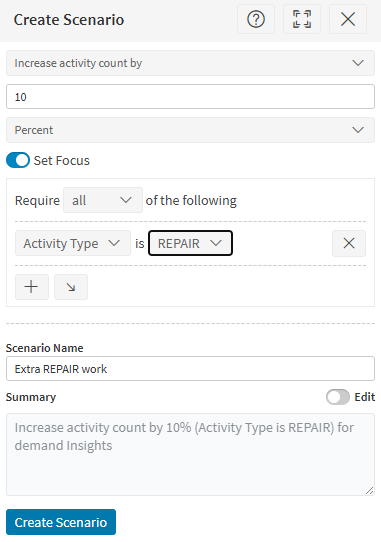
Once open, select the settings for the scenario you wish to create. This includes the type of adjustment (increase or decrease), the adjustment amount as a percentage or actual value (e.g. 10%), and optionally a focus for the adjustment (e.g. a specific activity type or region). Select a new name for the demand scenario, and click 'Create' to generate the new demand.
Once generated, the new demand can be viewed and selected in the data grid, along with the map and chart breakdowns. It can also be used when running tests, to see how the schedule is affected by the changes made in the scenario.
Resourcing Screen
The resourcing screen is where the user can load, view and manually edit the resources that are available for scheduling.
The 'Load Data' panel on the right-hand side can be used to load resourcing data. Most of the options are the same as that for demand data, with a few exceptions:
- From a Templated File: this uses a different file format, which can be downloaded when the option is selected.
- Import From Resource Planner: this loads data from a resource planner dataset. It is possible to load data with resources and shifts as planned in the current rota, or just to load the resource types set up in the resource planner.
Loaded resourcing data will appear in the data grid at the top of the screen, and the selected resourcing row can be viewed in map, chart and tabular (details) format.
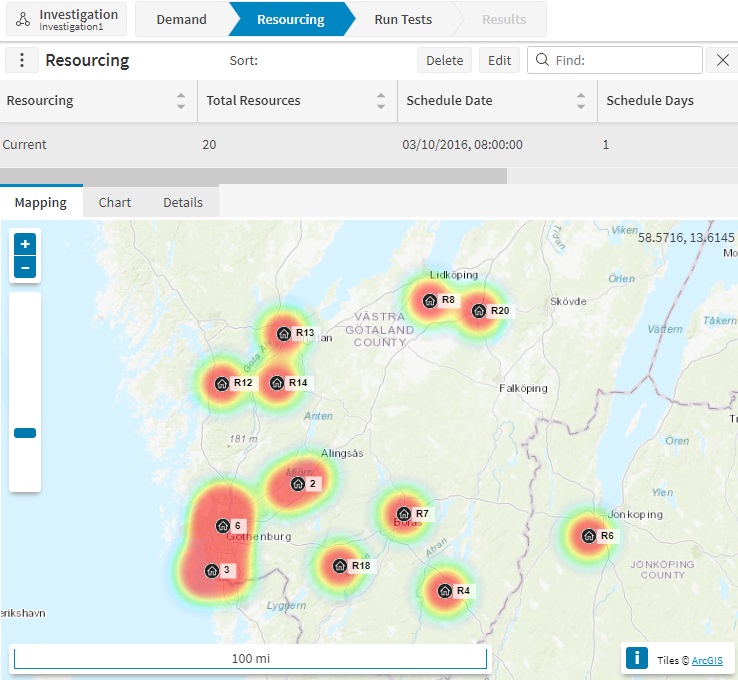
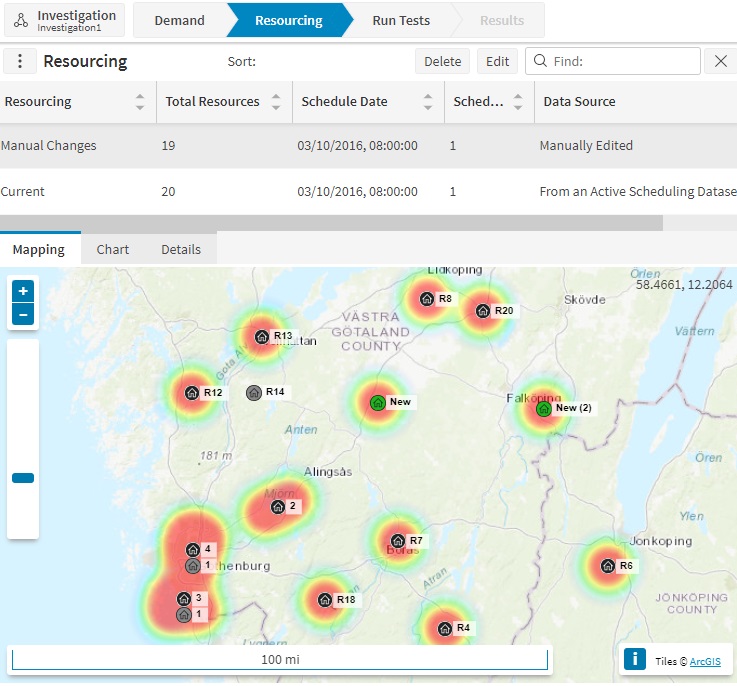
The map will show the locations of each resource in the resourcing, along with a hot spot of the resource locations.
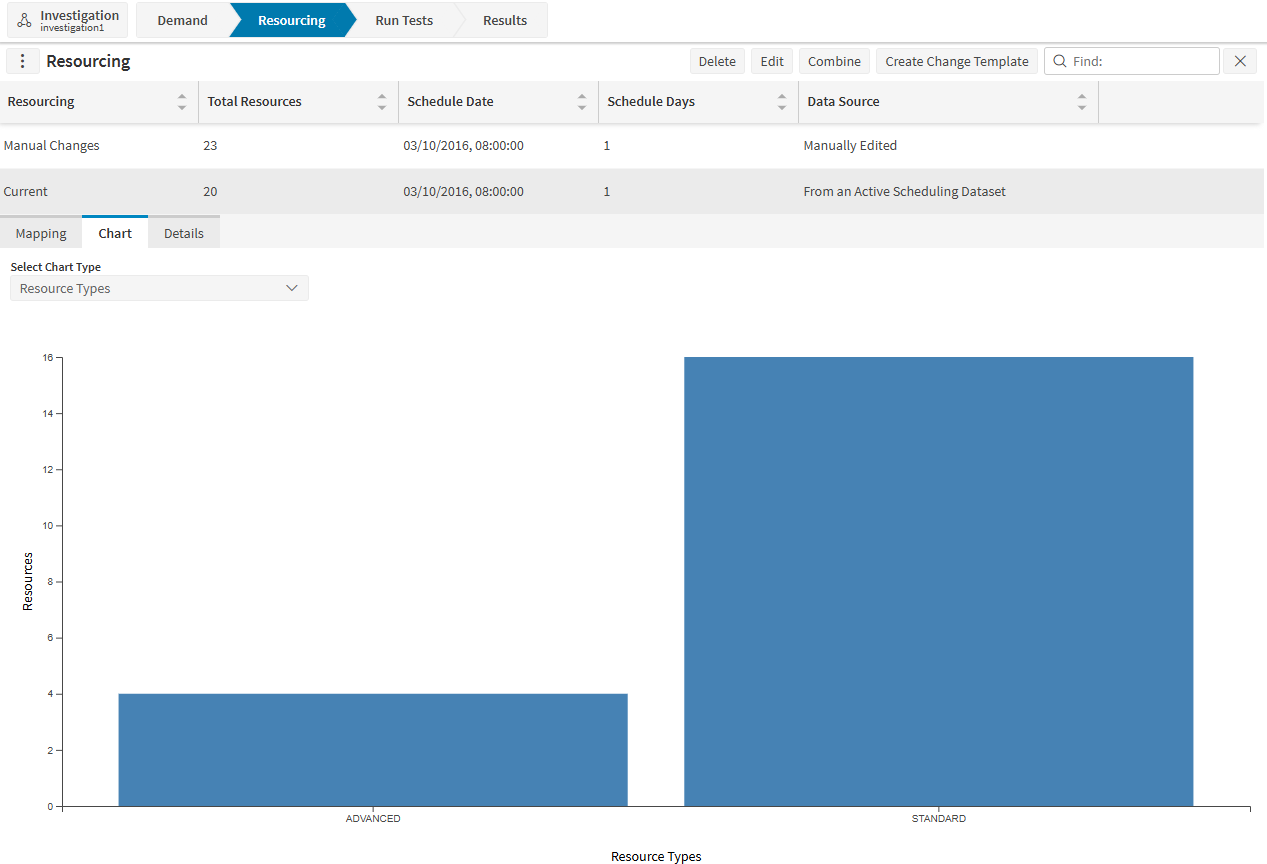
The chart tab will show a break down of the resources by any of resource type, skill and region.
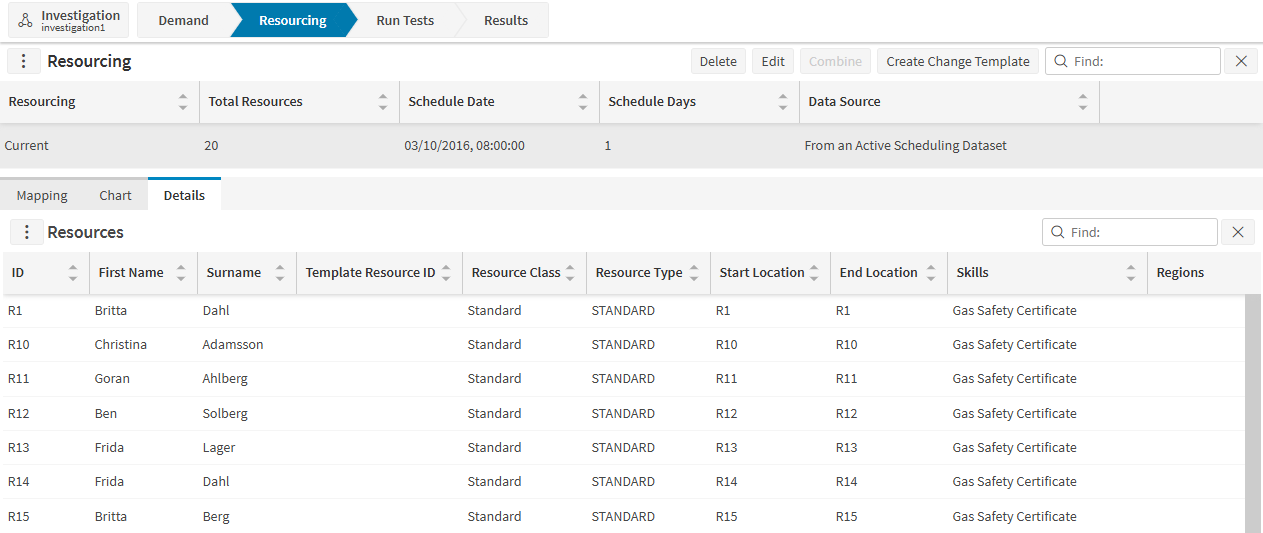
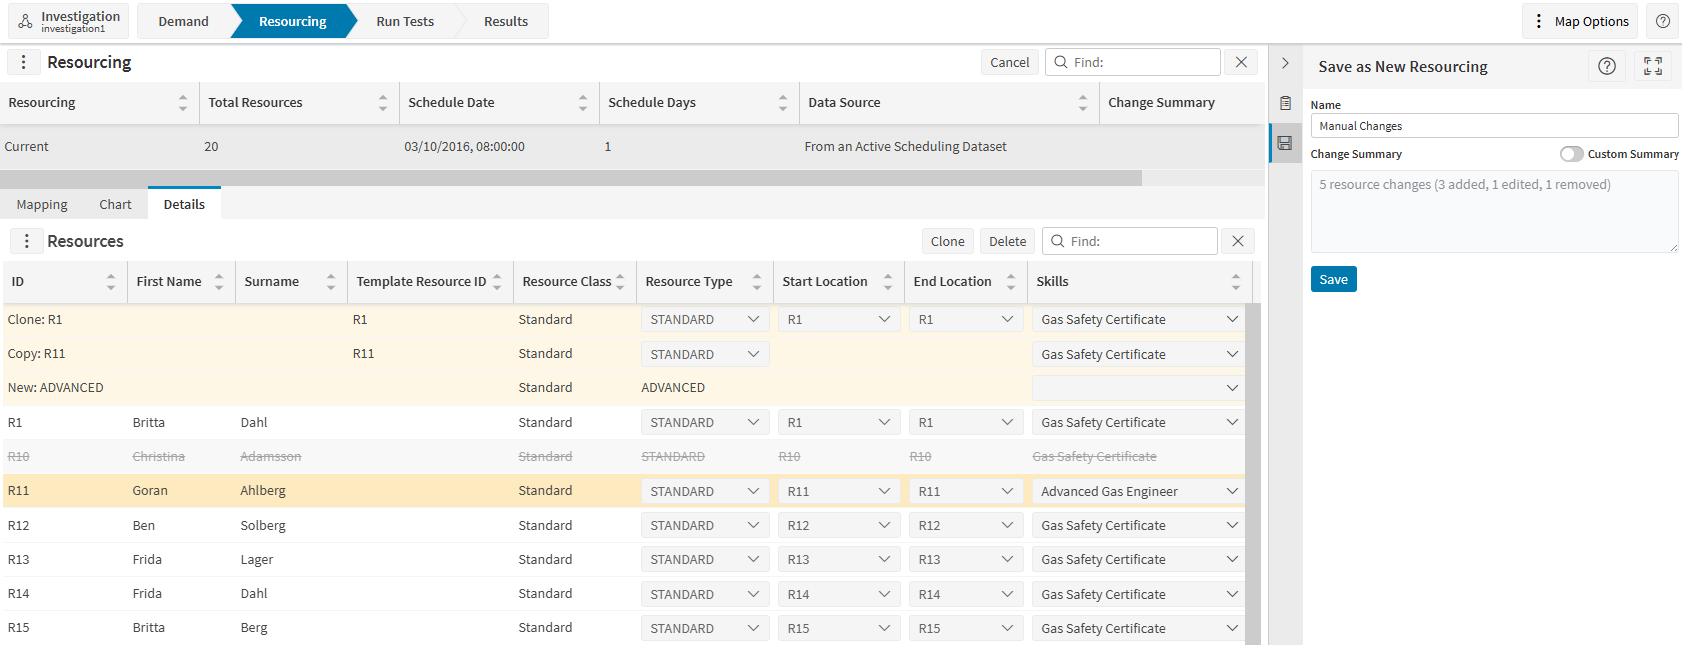
The details tab will show tabular details of each resource, including the resource type and any skills and regions associated with them. For cloned or copied resources, it also indicates the original resource from which they were created.
Once two or more resourcings have been loaded it is also possible to combine these resourcings into a new consolidated resourcing, similar to combining demands.
Note
For combined resourcings, if any resource was added, cloned, copied, removed, or edited, the resource state will not appear in the resource details. All resources will be treated as an independent data: removed resources will not appear as deleted, and edited or added resources will not appear as a changed data.
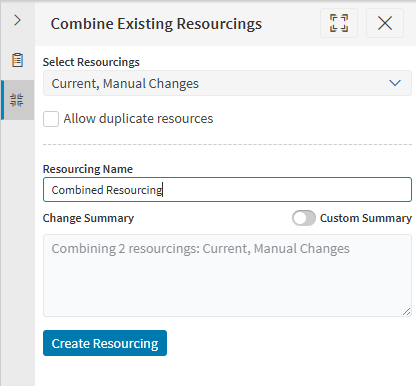
Editing Resourcing
It is also possible to manually edit a resourcing, to add new prospective resources, clone or copy from an existing resource, or remove existing resources. This is done by clicking the 'Edit' button at the top of the data grid.
From the tabular view, you are able to edit the resource type, location, add or remove skills and regions, and adjust the out-of-region multiplier. (Note however that if a new resource is manually added using a resource type as a template, then the resource type is then fixed for that resource).
Resources can be added on the map view, by clicking on the map and selecting the appropriate resource type to add.
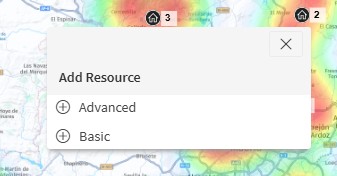
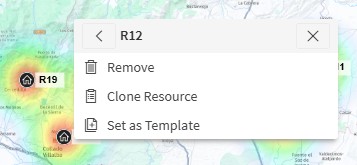
Resources can be cloned from either the map view or the details view. On the map view, select an existing resource and click the 'Clone Resource' option. On the details view, select the row and click 'Clone'.
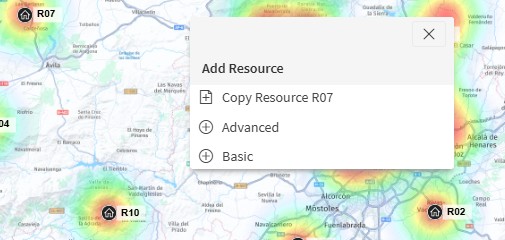
Resources can only be copied from the map view by selecting an existing resource as a template, then clicking any preferred location on the map and choosing the 'Copy Resource' option. Multiple resources can be copied to different locations using this method. If you wish to set another existing resource as a template, you can do so by following the same steps described above.
Note
You can only copy or clone from an original resource; cloned or copied resources cannot be used as templates.
Edits made to an original resource after a copy or clone has been created do not affect the values of the cloned or copied resource.
Resources can also be removed via either the map view or details view. On the map view, select an existing resource, click the resource row in the context menu, and then click the 'Remove' option. On the details view, select the row and click 'Delete'.
Note
Note that deleting a resource will also remove all resources that were cloned or copied from it.
Moving a Resource to a New Location
While in edit mode on the map view, it is possible to drag and drop a resource to a new location. This allows the user to explore the impact of relocating a resource without needing to create a new one.
To move a resource, click and hold on the resource marker on the map, then drag it to the desired location. A movement threshold is applied, so small accidental movements will not trigger a relocation.
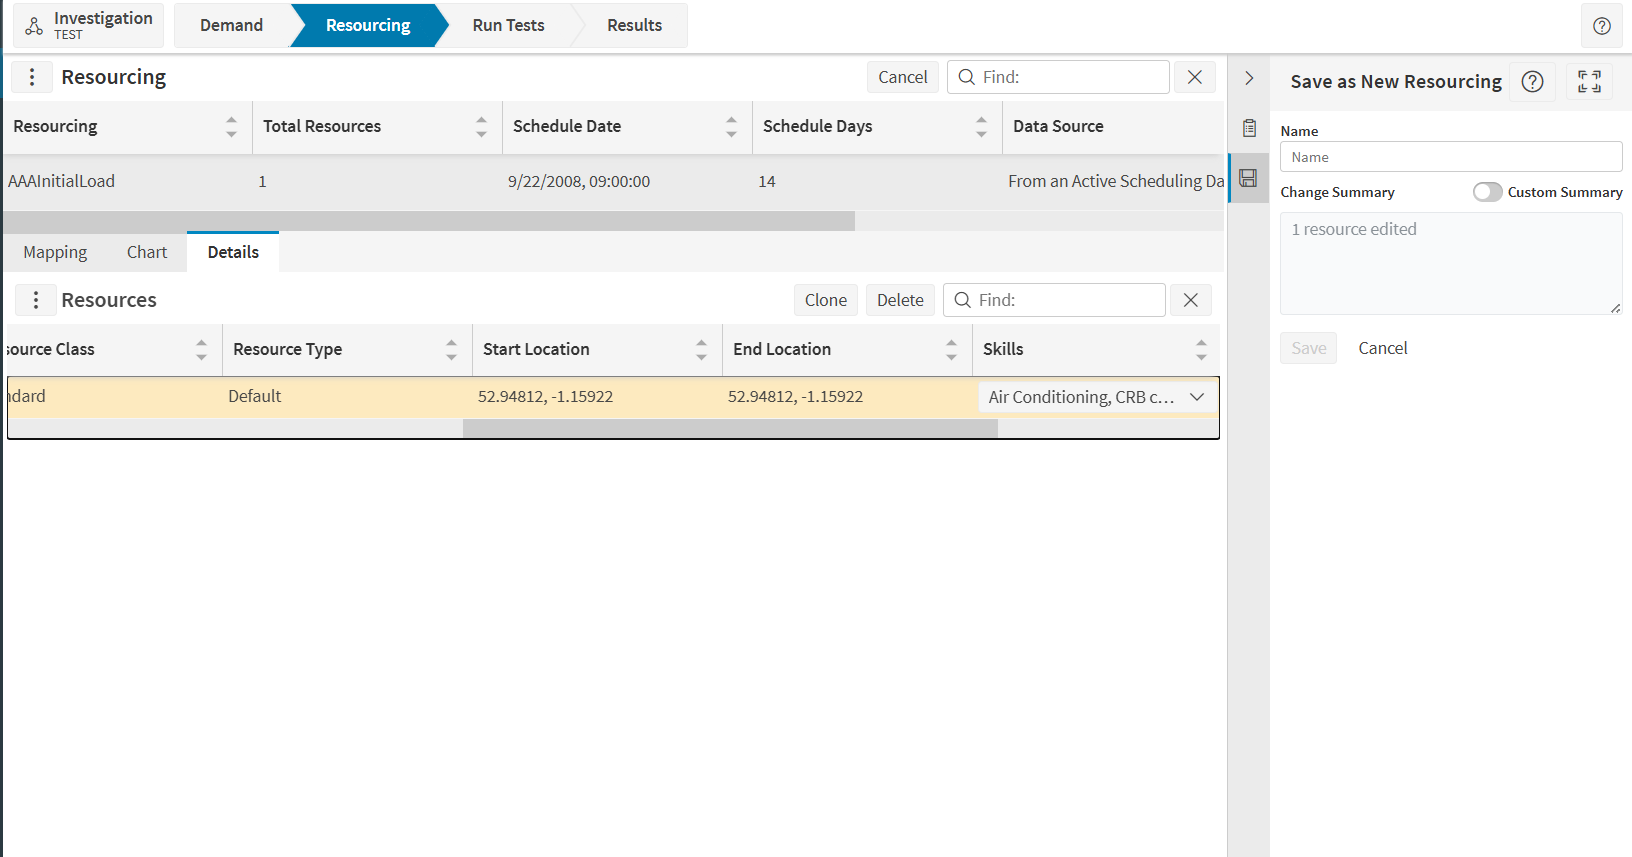
Once the resource has been moved, the resource details tab will show the new location as latitude and longitude coordinates (to 5 decimal places) instead of the original location ID.
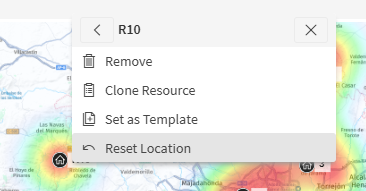
To undo a move, click on the resource at its new location and select 'Reset Location' from the context menu. This will return the resource to its original location. The 'Reset Location' option is only available for resources that have been moved from their original position via the map.
Note
Note that dragging is only available when a single resource is visible at a location. If multiple resources are clustered together, zoom in until the individual resource markers are visible before attempting to drag.
Saving Changes
Once all changes have been made, the new resourcing can be saved via the 'Save as New Resourcing' data panel on the right of the screen. This panel also displays a change summary that outlines all modifications made by the user. To enter your own description of the changes, enable the Custom Summary toggle. Saving will create a new resourcing, including all manual changes that have been made.
Creating Automation Templates
Finally, it is also possible to create automation templates. These templates can be used when running tests to form the basis for automated resourcing changes.
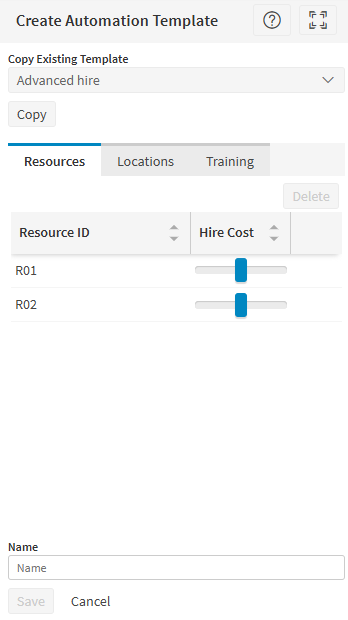
To create an automation template, select any resourcing which has not been manually edited, and click the 'Create Automation Template' button at the top of the resourcing data grid. This will open the 'Create Automation Template' data panel on the right of the screen.
The template consists of 3 parts: Template Resources, Location Constraints and Training Options.
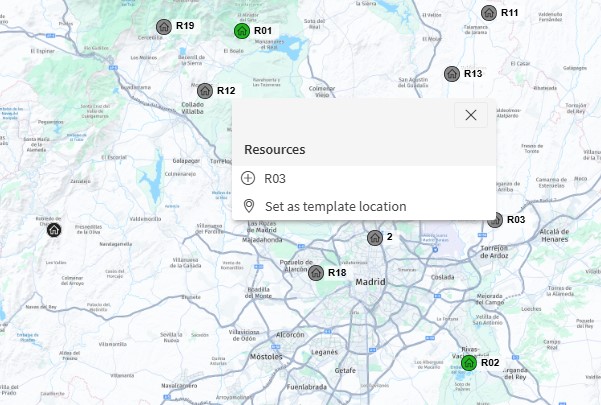
Template resources are resources that can be copied to create new resources when running automated tests. Template resources can be added from both the map and the resource details data grid. From the map, click on a resource location and select the resource you wish to add. From the details grid, select the resource row and click the 'Add' button.
In either case the resource should appear in the data grid on the 'Create Automation Template' panel. Once added, a relative hire cost can be set, which will be used when considering adding resources. Resources with a higher relative cost would only be used if there was additional benefit to the schedule in doing so (e.g. higher skilled resources).
Resources that have been added in error can be removed either on the panel itself, or via the map or details panel.
Note
When a new resource is added from a template resource during an automatic test run, the engine will create a close copy of the existing resource. This includes the same costs, shifts, skills, parts, preferences etc. Region constraints are not copied (the new resource can work in any region). If the resource has a vehicle linked to them then the vehicle will also be copied. Vehicles linked at shift level will be ignored.
By default, resources can be added in any location. However, it is possible to restrict the locations in which resources can be added. This is done via the 'Locations' tab. There are two other options, either setting specific allowed locations, or restricting the locations to match the location of the template resource.
To restrict to specific locations, select this option and then click on the map to add allowed locations. This can be an existing resource location or any other point on the map. Added locations will appear in the data grid on the Locations tab. They can also be removed from there or directly from the map if required.
Finally, the 'Training' tab allows the user to set up training options for resources, in the form of skills that can be added to resources during automatic test runs. Training options are added directly from the 'Create Automation Template' panel, via the 'Add' button on the data grid. Select the skill that you wish to add, along with an associated relative cost and optionally a required prerequisite skill.
Once the template has been set up, give the template a name and click the 'Save' button to save it for use when running automated tests.
When creating multiple automation templates, it is possible to copy previous templates using the 'Copy Existing Template' option at the top of the panel.
Automation templates can be used on the 'Run Tests' screen when running tests with resourcing changes enabled.
If you wish to remove any templates that are no longer of use, this can be done via the 'Test Run Settings' panel on the Run Tests screen.
Note
Actual hire costs and training costs are calculated automatically based on the values of activities carried out by resources in the baseline schedule, if there is one. Otherwise default values are used. Training costs are by default 5 times cheaper than hire costs.
Run Tests
Once demand and resourcing data has been loaded, the 'Run Tests' screen will be available. From here it is possible to run tests to see how the data will be scheduled.
Basic Tests
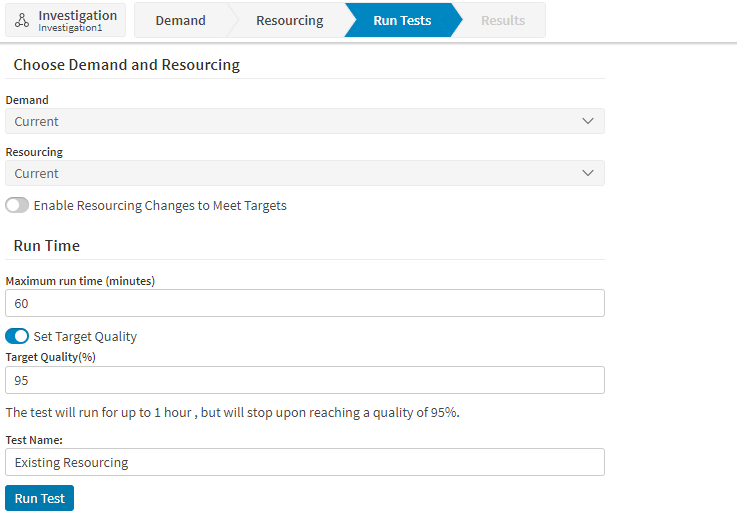
To run a simple test, select the demand and resourcing that should be used, and then select a maximum run time and a target quality. The target quality is the minimum quality that the test will run to before returning the schedule. It is also possible not to set a minimum quality, in which case the test will run for the full allowed time.
Automatic Resourcing Changes
It is also possible to run tests which will suggest resourcing changes automatically.
There are three types of suggestions that can be made:
- Added Resource: Suggests that a new resource is added. Resources are added in order to increase the value of the schedule, and to move towards hitting any business targets that have been set up.
- Removed Resource: Suggests that an existing resource is removed. This suggestion will usually only be made if there is a target to remove resources.
- Changed Resources: Suggestions can also be made to change an existing resource, by upskilling or by changing the resource type.
Resources can either be added using the existing resource types in the resourcing, or by using a Resourcing Change Template that has been set up on the Resourcing screen.
Note
When using resource types, any resource added will use a resource type taken from one of the resource types in the resourcing data. This will determine the skills attributed to the resource, and the 'hire cost' of adding a resource of this type. This cost is then offset against any increases in the schedule value and gains towards targets, to determine if adding the resource is worthwhile. By default, resources can be added in any location, but it is possible to limit the locations that can be considered via the 'Resource_Type_Location' table in the input data.
It is also possible to consider removing existing resources, by setting a negative 'release cost' for the resource type.
Finally, allowed changes to the resource type (along with an associated cost) are set up via the 'Resource_Type_Transition' table.
Targets
The suggested changes are based on targets, so it will first be necessary to set up some business targets that the system should aim towards. These can be added via the 'Add New Target' panel on the right of the screen.
When creating a new investigation, two default targets are automatically added:
- Maximise Percentage Allocated
- Maximise SLA Percentage Hit
These are 'soft' targets using the maximise operator, meaning the system will try to achieve the highest possible values without requiring a specific threshold to be met. Users can modify or delete these default targets as needed via the 'Test Run Settings' panel.
Note
Note that default targets are not added when creating an investigation from an imported file or when using a previous investigation run as a template, as these already contain their own targets.
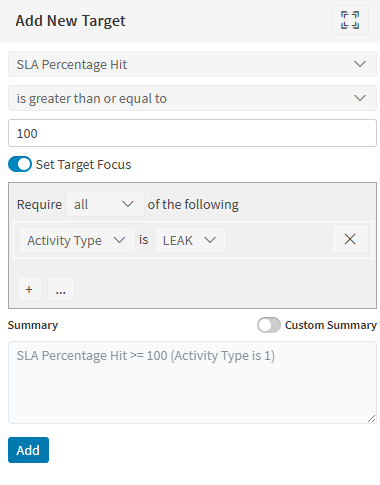
There are a number of options available for the type of target that can be set:
- SLA Percentage Hit: The percentage of activities that are scheduled to be carried out before their SLA deadline.
- Percentage Allocated: The percentage of activities that are allocated to a resource.
- Average Response Time: The average delay from the first available time for an activity to when it is scheduled to be done.
- Travel Time Per Call: The average travel time per activity.
- Number of Resources Added: The number of resources that have been added to the resourcing.
- Number of Resources Removed: The number of resources that have been removed from the resourcing.
- Number of Changed Resource Types: The number of resources in the resourcing that have been changed to a different resource type.
- Number of Resources: The total number of resources in the resourcing.
- Total Allocations: The total number of allocated activities.
- Resource Shifts Used: The total number of shifts used in the resourcing.
Once the target type is selected, the user can choose whether to set a specific target value (e.g. SLA Hit Rate should be at least 90%), or to simply try to maximise or minimise the value.
It is also possible to set a focus for the target. This can be for a specific activity type or customer, or based on skills or regions. It is also possible to set combinations of focus targets, for example to focus on multiple regions, or a specific activity type for a specific customer.
A default summary of the target is generated, but users can override it by enabling the custom summary toggle.
Any targets that have been added can then be used when running advanced tests.
Targets that are added incorrectly, or are no longer required, can also be deleted from the 'Test Run Settings' panel.
Running Advanced Tests
To run tests that will return automated resourcing changes, select the 'Enable Resourcing Changes to Meet Targets' option.
The 'Select Resourcing Change Template' option will display, from where the user can pick a template set up on the resourcing screen, or choose to use the resource types in the resourcing data.
Next, the user can select which targets they want to be considered for this test run, and their relative importance. At least one target must be selected in order to run an automated test.
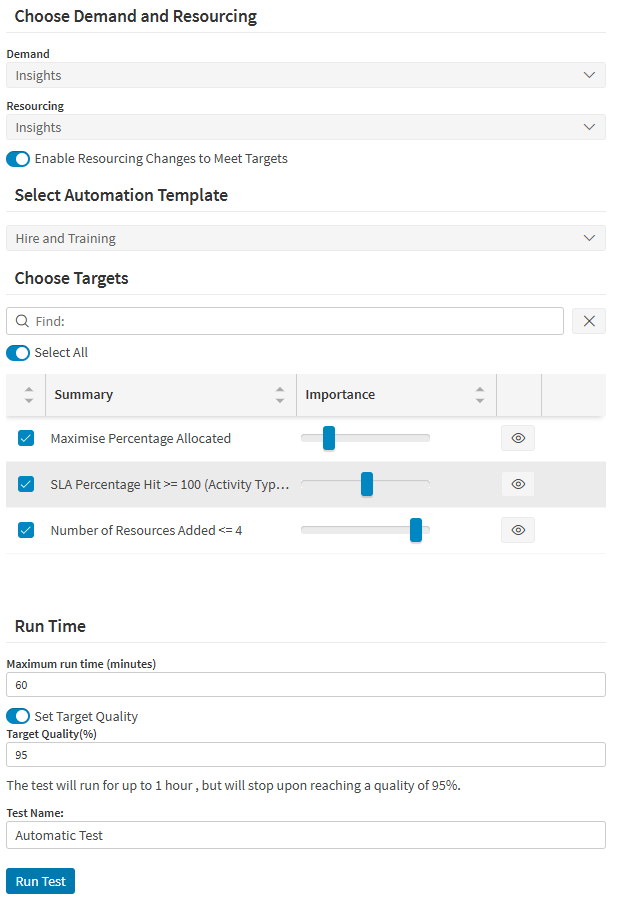
After setting up the targets, along with the demand, resourcing and run time options, and specifying a test name, click the 'Run Test' button to set off the test run.
Note that it is possible to use the 'Empty' resourcing option for advanced tests. This will start with no existing resources, allowing a completely new resourcing to be suggested in the test run.
Test Run Settings
The 'Test Run Settings' button in the top menu bar allows some general settings to be configured for running tests. This includes the default hire and release costs for resource types, and the relative importance of targets compared to improvements to the schedule score. It also allows for existing targets and resourcing change templates to be deleted if they are no longer required.
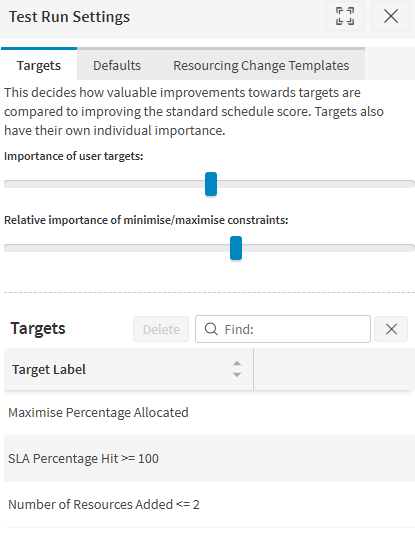
There are further details in the 'General Guidelines for Use' section.
Test Results
Once a test run has been initialised, the 'Results' screen will be available.
If multiple test runs have been requested, this will initially show a test comparison screen, where the user can select tests to compare side by side.
Each test shown will be displayed in a comparison panel, which includes the basic test details, demand and resourcing information, and key result statistics once the test is complete. For automatic tests this will also include the results of the targets that were set up for the test.
Note
The 'Total Activities' statistic will show the total of all activities in the demand and resourcing, excluding any private activities. This may differ from the total activities shown on the demand screen if there are any activities that are fixed or committed to a resource, as these will be included in the resourcing instead of the demand.
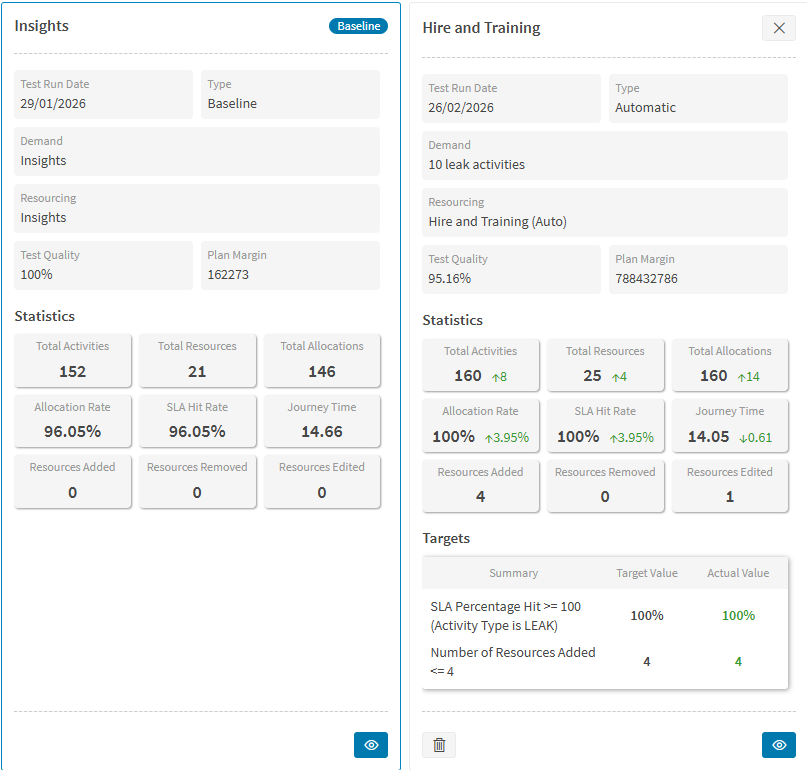
Further details of a specific test run can be viewed by clicking the 'View Details' button at the bottom of the panel. If there is only one test run, the details will be shown automatically on clicking the 'Results' screen option.
This will initially display a map view which will show a combined view of the resourcing and demand.
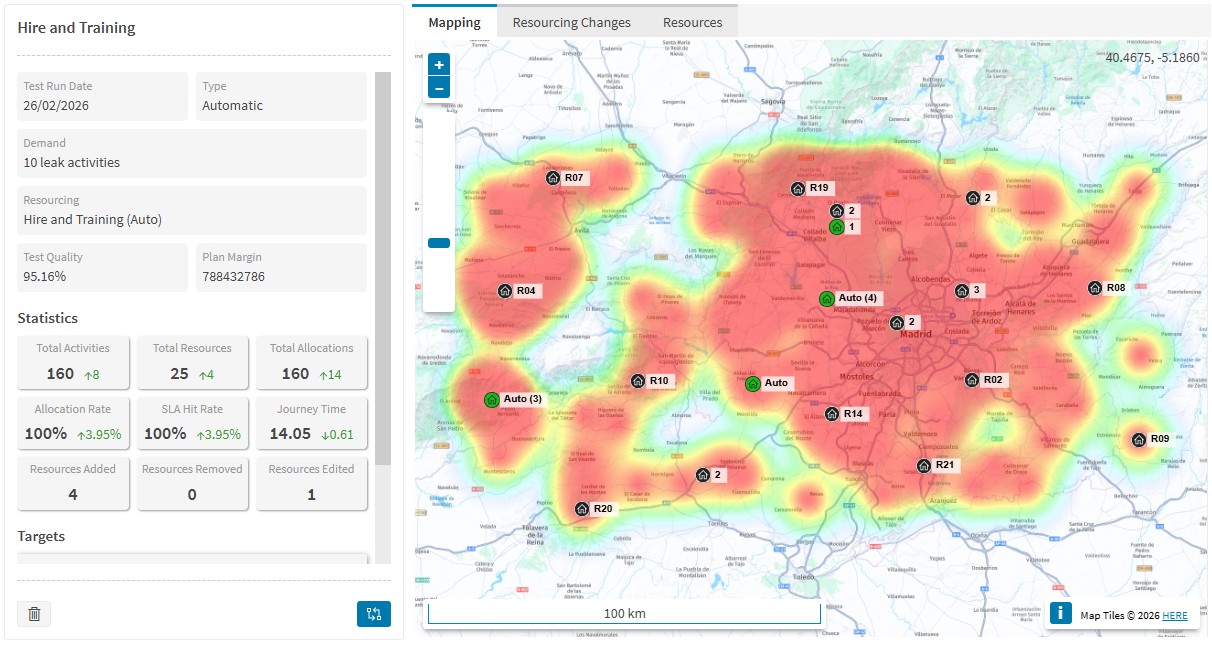
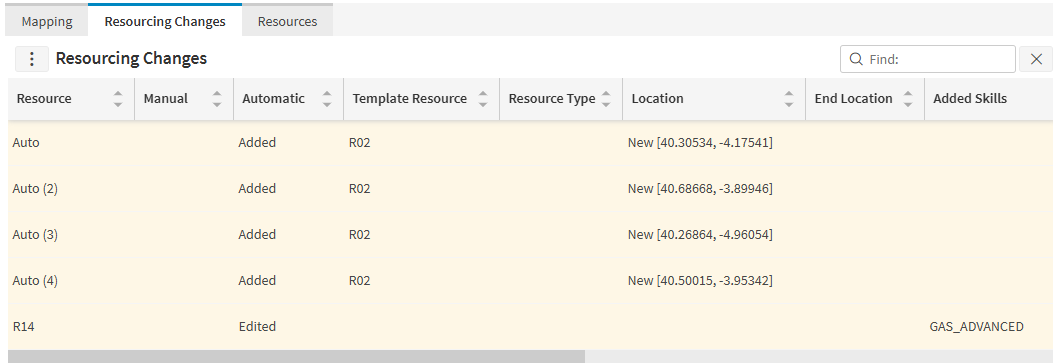
The Resourcing Changes tab will show details of the changes made to the resourcing in this test run. This includes both manual and automatic changes. The Resources tab will show full details of all resources included in the final resourcing for this test run.
It is also possible to view the schedule produced by the test run. This is accessed via the 'View Schedule' button at the top of the results grid, which will take the user to the 'Resources' screen in the scheduling workspace. Alternatively, the 'View Analysis' button will take the user to the 'Analysis' screen, where further analysis of the schedule can be performed.
The 'Generate Report' option will generate an Excel report of the current test run results. This includes summary details, statistical results including the achieved values for each target, and details of all resources and resourcing changes.
It is also possible to download the schedule directly to a file from this screen, provided that the permission 'SimulationWISEDownloadSchedule' is enabled.
The 'Compare' button at the bottom of the test run panel will return the user to the comparison screen. Alternatively, clicking the 'Results' screen option in the top menu bar again will also switch back to the comparison screen.
If a test is still running, this will be indicated on the test run panel. The user can choose to cancel the test run if desired, using the button at the bottom of the panel.
Finally, it is possible to delete a test run if it is no longer required using the 'Delete' button.
Additional Features
Importing and Exporting Investigations
It is possible to export and import entire investigations. This enables the investigation to be shared with another user, or sent to IFS for support purposes.
An investigation can be exported from the Investigation button dropdown in the top menu bar.
To import an investigation, select the 'import' option from the 'Start New Investigation' panel on the investigation select screen, and then select the exported data file.
Loading a Baseline Schedule
It is possible to load a baseline schedule when starting an investigation. This baseline can be an active scheduling dataset, an archive snapshot, or a saved schedule data file (the data file must contain both input and output scheduling data).
This gives a 'quick start' to the investigation, where the selected data is loaded as demand and resourcing data, and a baseline test run is added using the schedule output in the selected data.
The user can then make changes to their demand and resourcing, request further test runs, and compare the results of these runs with the baseline test run.
Using an Investigation as a Template
When creating a new investigation, it is possible to select a previous investigation as a template. This can be useful to avoid duplicate work when setting up targets, or to branch off to a new investigation to explore a particular scenario.
When selecting to load a baseline schedule, the 'From a Previous Investigation Run' option allows the user to load data from a completed test run in another investigation. The user must first select the source investigation, and then choose from the available completed investigation runs.
When a baseline run is selected, the demand, resourcing and test result from the selected run will be loaded into the new investigation. This provides a starting point for further analysis and comparison.
Note
Note that only completed investigation runs are available for selection. Runs that are still processing or have failed will not appear in the list.
General Guidelines for Use
Running Tests
It is good practice to create several demands, each representing the same period. For instance, you might have imported ten demands, each representing a different day's workload, including some busy days and some quiet days. Or you might have imported several demands, each of which represents a week's work. Or you might plan one month at a time, and have demands for each month of the year.
In general, working with single days will be quicker than working with longer periods such as weeks or months, but all these options will work. It's best to be consistent and stick to a single period length, however.
Also, note that the scheduling algorithm used by the WISE is non-deterministic, which means that it will not produce the same results each time it is run. You may find, for instance, that the SLA hit rate is 91% the first time you try a manual test, but if you re-run the same test a few times, the SLA hit rate may come out as other nearby values.
When automated resourcing changes are enabled, the WISE will attempt to add and remove resources in order to get as close as possible to the set of targets that are specified. Some points to note:
- It may not be possible to hit the targets, in which case the WISE will get as close as it can to the targets
- There are two types of target: hard constraints such as "must be >="; and soft constraints such as "minimise". Note that a hard constraint is not guaranteed to be met: it may not be possible to meet it.
- In addition to the targets, the WISE is also attempting to optimise the schedule based on activity values and resource costs. These factors may affect whether or not the targets you specify can be met: for instance, if the activity base values are very low and the resource costs are high, then the WISE may not add resources even though you have specified that you want 100% of activities allocated. The relative importance of targets may be configured in Settings.
- It is also possible that the WISE may choose to add resources even though all targets have been met. This is becuase adding a resource can still increase the schedule value, even if it no longer helps to meet the specified targets. In this case this becomes a simple trade-off between the additional value of the visits scheduled, compared to the hire cost of adding the resource. If this behaviour is not desired, then setting a soft constraint to minimise the number of resources added can help to prevent further additions once other targets have been met.
- If the "Maximum run time" is too short, the results may not be as good as they could be. If you think this is the case, retry the test with a longer "Maximum run time".
- The WISE is only attempting to adjust the resourcing in order to meet these targets. It is not considering other factors which may help to meet the targets, such as changing the relative values of activities, or adjusting the SLA shapes.
Resource Types
When adding new resources to a resourcing in the WISE, a template resource is required in order to determine the attributes of the new resource, such as its skills and costs. This can be done in one of two ways - either by using an existing resource in the data as a template, or by using resource types.
When using resource type, either manually or automatically, they may only be of a resource type present in the current resourcing. New resources will also gain the attributes linked to their resource type. So, for example, if a demand's activities all require skills, the resource types must also have skills to be of use. The following attributes linked to the resource types are integral to achieving meaningful results when resource types are being used:
- Skills (see note below)
- Parts and Capacities
- Preferences
- Shifts and Shift Patterns (see note below)
- Locations: if specified, automatically added resources will only be allowed at locations given by the corresponding resource type locations.
- Costs: resource types have different costs for working and travel time, as well as hire and release costs for adding and removing resources. For example, if the hire cost is 1000 and activities have a value of 100, then a resource will not be added unless they can be scheduled to do at least 10 activities, or there is enough improvement against targets to outweigh the cost. Generally, the WISE won't choose an expensive resource if a cheaper one could do the work.
Note
Note that all new automatically added resources will be added to all regions present within the data. For manually added resources, the regions can be selected from the resource details grid, or the out of region multiplier can be set to allow the resource to be used in any region.
Resource types and their linked attributes are imported as standard when creating a resourcing through any method in the WISE. In order to create and manage new resource types, use of the base data pages in the Planning workspace is recommended. These new resource types can then be imported using the "Import from Resource Planner" option.
Note
The WISE does have an option to automatically create additional resource types based on the skills linked to resources in the imported resourcing data, though this is disabled by default. This option is enabled via the parameter 'WISEAutoGenerateResourceTypes'. With this option enabled, one of two things will happen. If there are six skills or fewer linked to resources, several new resource types will be created with the most common combinations of skills. If there are more than six skills, or there are no resources in the data, a single resource type will be created with all skills linked to it. New resources can then use these new resource types, allowing them to complete activities requiring skills. Additionally, If there are no resource types in the resourcing data, the WISE will create a default one. The resource type's costs and other values will be set to the default values.
Note
If there is no shift or shift pattern linked to a particular resource type, a shift template will be created using the shift information attached to resources of that type in the resourcing. This is done by selecting a 'template' resource from among the resources of that type, which is the resource whose shifts have most in common with the other resources of that type.
Any breaks linked to the selected template resource will also be used in the template. However, the WISE will only use implicit breaks for new resources, so any explicit breaks will be converted to implicit breaks.
If there is no shift information to work with, a default working day pattern will be used, based on the configured default new resource settings.
Default values for the hire cost, release cost, travel cost, hourly costs, utilisation and the shift pattern for resource types can be altered in the WISE's settings, as described in the relevant section later. The settings screen also allows the user to view the above values for each existing resource type in the resourcing as well as each resource type's skills.
The Scheduling Period
Any scheduling performed by the WISE happens at a particular date and time. However, the demand and resourcing may have been derived from data which is at different times e.g. you may have historical demand data for July, and you want to try this with the resourcing which you have now, which may be November. The demand will have various time constraints and SLA windows, all of which are in July; whilst the resourcing will contain shifts for November. Obviously, if the data were left like this, nothing at all would be scheduled.
The WISE will therefore adjust the schedule time to the later of the demand and the resourcing schedule time. If the demand was for an earlier time, all of its SLAs and time-based constraints will be shifted back to the adjusted time. Similarly, if the resourcing was for an earlier time, all the shifts will be moved back to the adjusted time. (All the data is moved by the same amount of time, so that it remains internally consistent.)
It is good practice to use the same scheduling window for all demand and all resourcing data within an investigation, but this rule is not enforced. If the demand is for a month, for instance, and the resourcing is for a week, then the WISE will extend the resourcing to a month when running tests, and will examine the pattern of shifts in the first week in order to populate it with a similar pattern of shifts for the remainder of the month.
Bear in mind that the WISE tests will take longer if a longer time period is used: so analysing a week may take 3 times as long as testing a day; and testing a month may take twice as long as testing a week, etc.
Template CSV Data
When loading demand data from a csv file, the required columns are as follows:
- Activity ID: must be unique within the data if specified
- Activity Type
- Latitude, Longitude: Both must be supplied
- Duration: specified in minutes
- Number of Jobs: this is used to specify multiple jobs of the same characteristics
- SLA Length: this is the length of the primary SLA for the activity.
- Frequency of jobs: this is also used to specify multiple jobs, depending on the selected number of schedule days.
- Skills: this should be specified as a semicolon-delimited list
- Activity Value: this is the value of scheduling the activity
When setting values for SLA length or frequency of jobs, the following format types can be used:
| Value | Meaning |
|---|---|
| 2 days | 2 days |
| 2W | 2 weeks |
| PT4H (XML standard time format) | 4 hours |
| P7D (XML standard time format) | 7 days |
| 3 | 3 days |
| 02:30:00 | 2.5 hours |
| daily | Every 1 day |
| 2 weekly or biweekly | Every 2 weeks |
| quarterly | Every 3 months |
Details of Test Run Settings
The 'test run settings' panel allows configuration of how automated tests will be run.
- Importance of user targets. In addition to the targets, the WISE is also attempting to optimise the schedule based on activity values and resource costs. You can set the relative importance of the targets that you specify by adjusting this slider. If your targets for an automatic test have not been met, it may be worth moving this slider to the right, and repeating the test.
- Relative importance of minimise/maximise constraints. This determines the importance of soft constraints (minimise & maximise) relative to the hard constraints ('must be >=', 'must be <='). If you are running an automatic test with a mixture of these two constraint types, and you are not getting the results you expect, try adjusting this slider left or right.
- Hire cost. This is the overhead that must be incurred to create a new resource. If resources are not being added in automatic tests when you would expect them to, try lowering this value.
- Release cost. This is the overhead that must be incurred to remove a resource. The value can be a negative value, which encourages the WISE to get rid of resources that it does not need.
- Shift start and Shift duration. These are used when the WISE needs to generate shifts because there are none in the resourcing.
- Timezone. This allows the user to set the timezone to use when creating shifts with the default pattern.