The Archive Workspace
Archive
The Archiving Service user interface can be found in the Scheduling Workbench's Archive workspace:
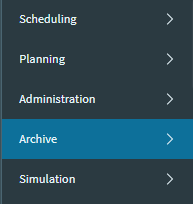
Once the workspace is selected, the user interface appears as a list which contains five sections:
- Snapshots
- Audits
- Timetables
- Timetable Usages
- Attributes
These will be covered in turn below.
Snapshots
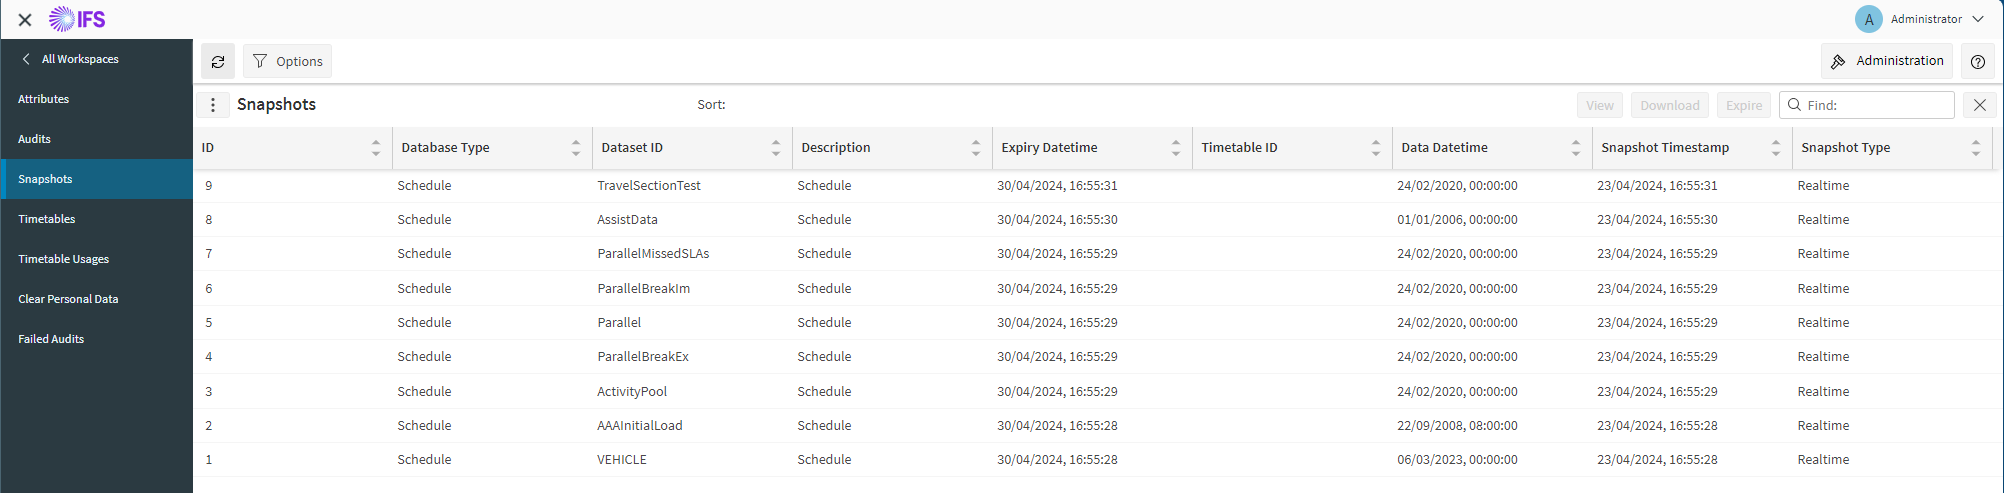
The Snapshot screen shows a list of the Snapshots present in the Archive database. The following columns are shown for each Snapshot:
- ID — a unique ID for the Snapshot.
- Database ID — the database from which the Snapshot was taken (Schedule, Modelling or System).
- Dataset ID — the dataset contained within the Snapshot, if applicable. (The System database does not have a concept of datasets.)
- Description — a short description of the data included in the Snapshot. For Realtime Snapshots, this will be the same as the Database ID. For Intermediate Snapshots, this will be the same as the description of the Audit from which the Snapshot was created.
- Timetable ID — the ID of the timetable according to which the Snapshot was taken.
- Data Datetime — the date and time of the last update included within the Snapshot.
- Snapshot Timestamp — the date and time at which the Snapshot was taken.
- Expiry Datetime — the date and time after which the DAS will delete the Snapshot from the Archive database. This is specified as part of the Timetable, as described later.
- Snapshot Type — either 'Realtime' for Snapshots that have been taken of a database by the DAS, or 'Intermediate' for Snapshots that have been created from an Audit, as described later.
Above the table of snapshots there are buttons to View / Download / Expire the currently selected snapshot.
- View — allows the user to load the current Snapshot up in the Scheduling or Modelling workspaces to view the Snapshot's data. The user can continue viewing the snapshot in the relevant workspace's screens using the main navigation menu on the left.
- Start Investigation — takes the user to the WISE screen, with the selected snapshot data ready to be pre-loaded as a baseline schedule. This is only available for users with permission to use the WISE.
- Download — allows the user to download the current Snapshot to an XML file.
- Expire — allows the user to expire / delete a snapshot by setting the expiry time to the current time and then removed by the Administration Service at later date.
Restoring Snapshots
It is possible to restore the data from a Snapshot back into its original database. This functionality is considered as a last resort, however, and so is not available by default. The feature can be enabled by enabling the 'DataCaptureARCSnapshotRestoreColumn' Permission:
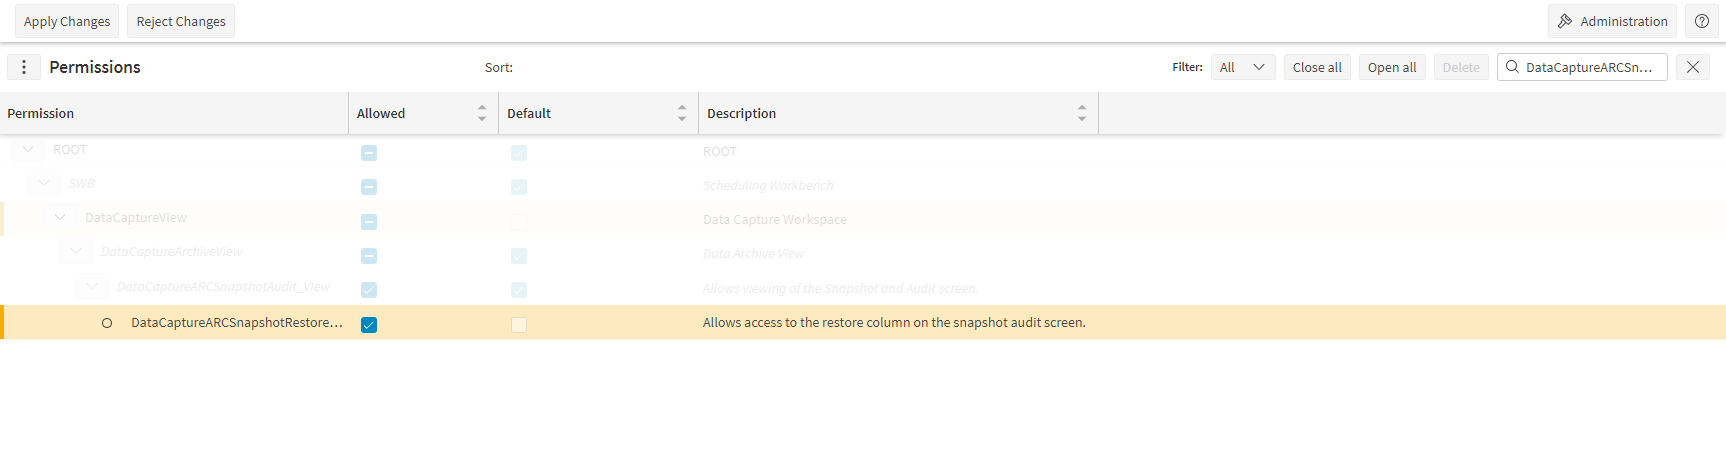
More details on setting Permissions can be found in the Scheduling Administration Guide.
Once enabled, Restore/Import Status column and Restore button appears on the grid

After clicking on the Restore button, the required Snapshot is marked as requested
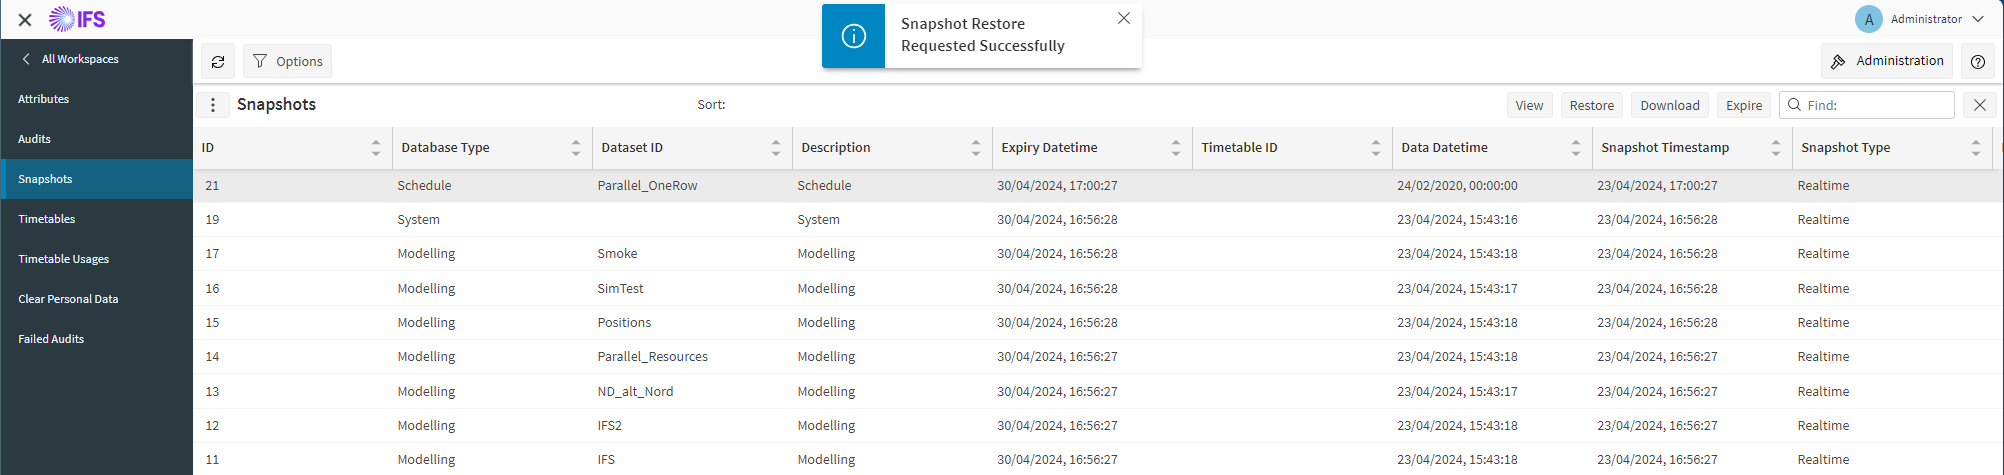
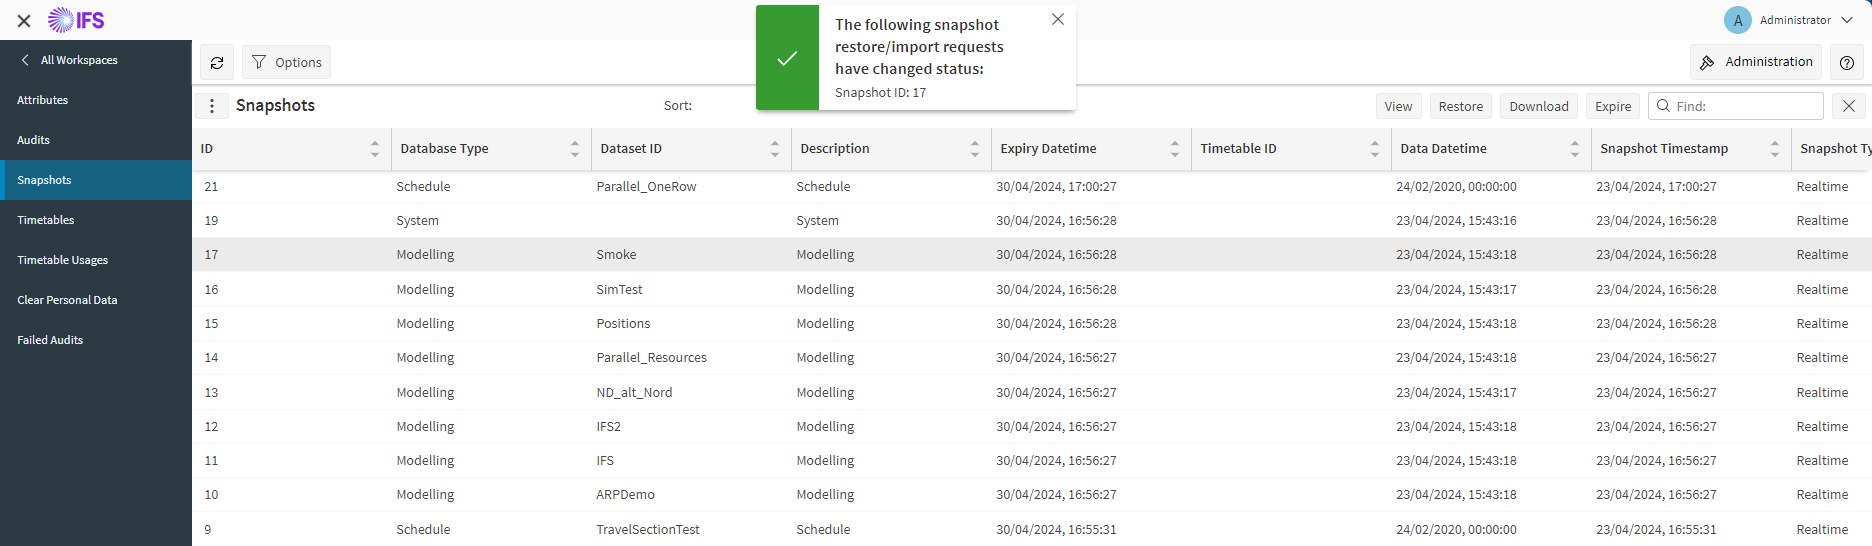
The Restore process is carried out by the Archiving Service (ARC), and so this must be running in order for the Restore to occur. A pop-up is displayed once the Restore is complete, and the status in the Snapshots table is changed:
Audits
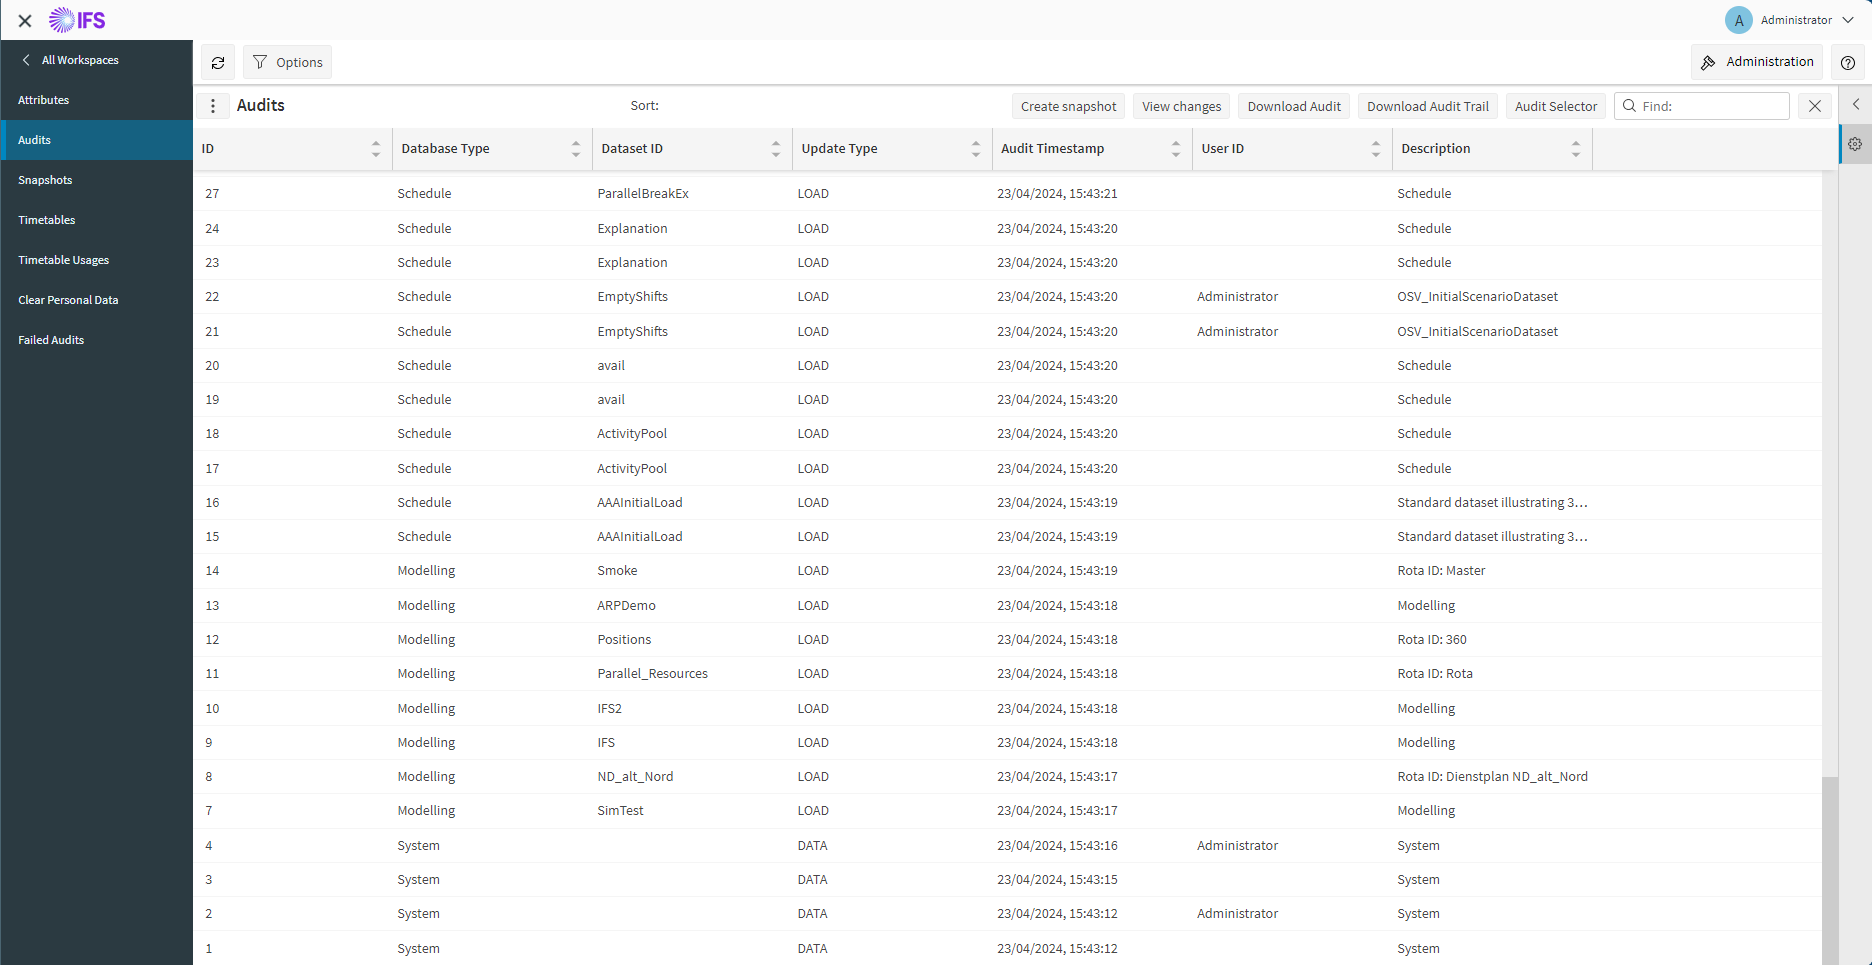
The bottom section of the screen shows a list of the Audits present in the Archive database for a particular day, as specified by the date filter above the list of Audits. (For more details on this filter, see the Filtering section below.) The following columns are shown for each Audit:
- ID — a unique ID for the Audit.
- Database Type — the database into which the Audit data was inserted (Schedule, Modelling or System).
- Dataset ID — the dataset into which the Audit data was inserted, if applicable. (The System database does not have a concept of datasets.)
- Update Type — the type of data inserted in the Audit:
- LOAD or CHANGE (for scheduling input data or modelling data)
- COMPLETE or PLAN CHANGE (for scheduling output data)
- SYSTEM or MESSAGE (for system data)
- CHANGE_REQUEST (for any Workbench manual change that is sent to an external broadcast system)
- Audit Timestamp — the date and time at which the Audit record was created.
- User ID — if the Audit data came from a particular user (as might happen when making changes within the Scheduling Workbench for example), this will be recorded here.
- Description — a short description of the data included in the Audit*.
Above the table of audits there are buttons to Create Snapshot / View Changes / Download the currently selected snapshot.
- Create Snapshot — Audits containing modelling data or scheduling output data can be used to create a new Snapshot, as described later.
- View Changes — clicking this button will open a viewer to enable the user to view the data in the Audit, as described in more detail later.
- Download — a button to allow the user to download the current Audit data to an XML file.
Note
- Default descriptions are overridden by the description columns on the Input_Reference, RAM_Update and System_Input rows in each Audit, if they have been populated. This allows a customer to give meaningful descriptions to data sent into the IFS Scheduling system by the customer interface.
Additional Columns
It is possible to show additional columns in the Snapshot and Audit tables by enabling click the datagrid option button  and toggling the column off/on.
The additional columns shown in the Snapshots table in the extended view are as follows:
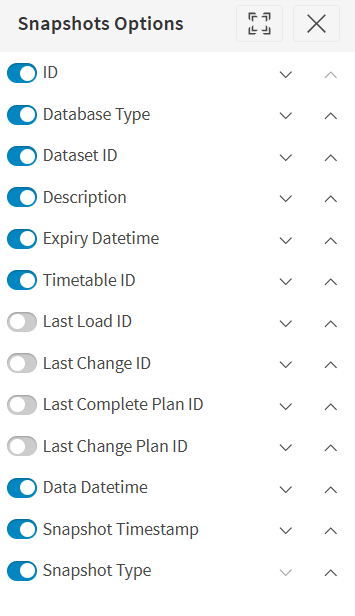
- Last Load ID — the ID of the last LOAD input.
- Last Change ID — the ID of the last CHANGE input.
- Last Complete Plan ID — the ID of the last CHANGE plan.
- Last Change Plan ID — the ID of the last COMPLETE plan.
The additional columns shown in the Audits table in the extended view are as follows:
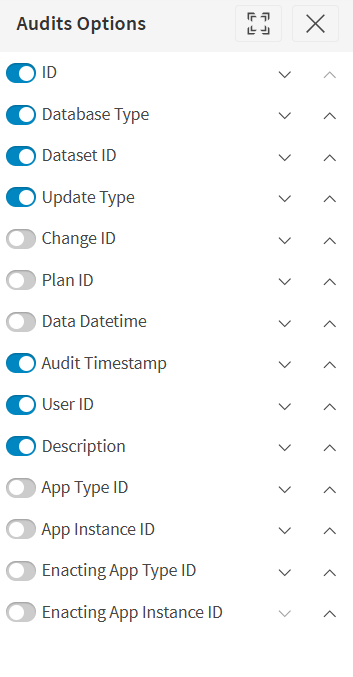
- Change ID — the last input ID corresponding to the Audit data.
- Plan ID — the ID of the plan within the Audit data.
- Data Datetime — the date and time of the update included within the Audit.
- App Type ID — the application from which the Audit data originated from.
- App Instance ID — the instance of the application from which the Audit data originated from.
- Enacting App Type ID — the application which enacted the Audit data. For example, some changes made in the Scheduling Workbench are sent through or enacted by the IMS.
- Enacting App Instance ID — the instance of the application which enacted Audit data.
Snapshot Expiry and Deletion
Snapshots can be expired after which they will be deleted by the Archiving Service. For real time snapshots this expiry date will be determined by the expiry period specified in the snapshot timetable. For manual snapshots the expiry is initially set to 1 week.
The snapshots can be deleted by selecting the row to be deleted and clicking the 'Expire' button.
Note
To prevent a user from changing the expiry or deleting snapshots, set the permission 'DataCaptureARCSnapshotEditDelete' to false.
Viewing Audit Changes
The data within an Audit can be viewed by clicking the 'View changes' button. The data is displayed in a new page, with tabs along the top showing the different data tables.
Rows that are shown represent either new rows or rows that overwrote an existing database row.
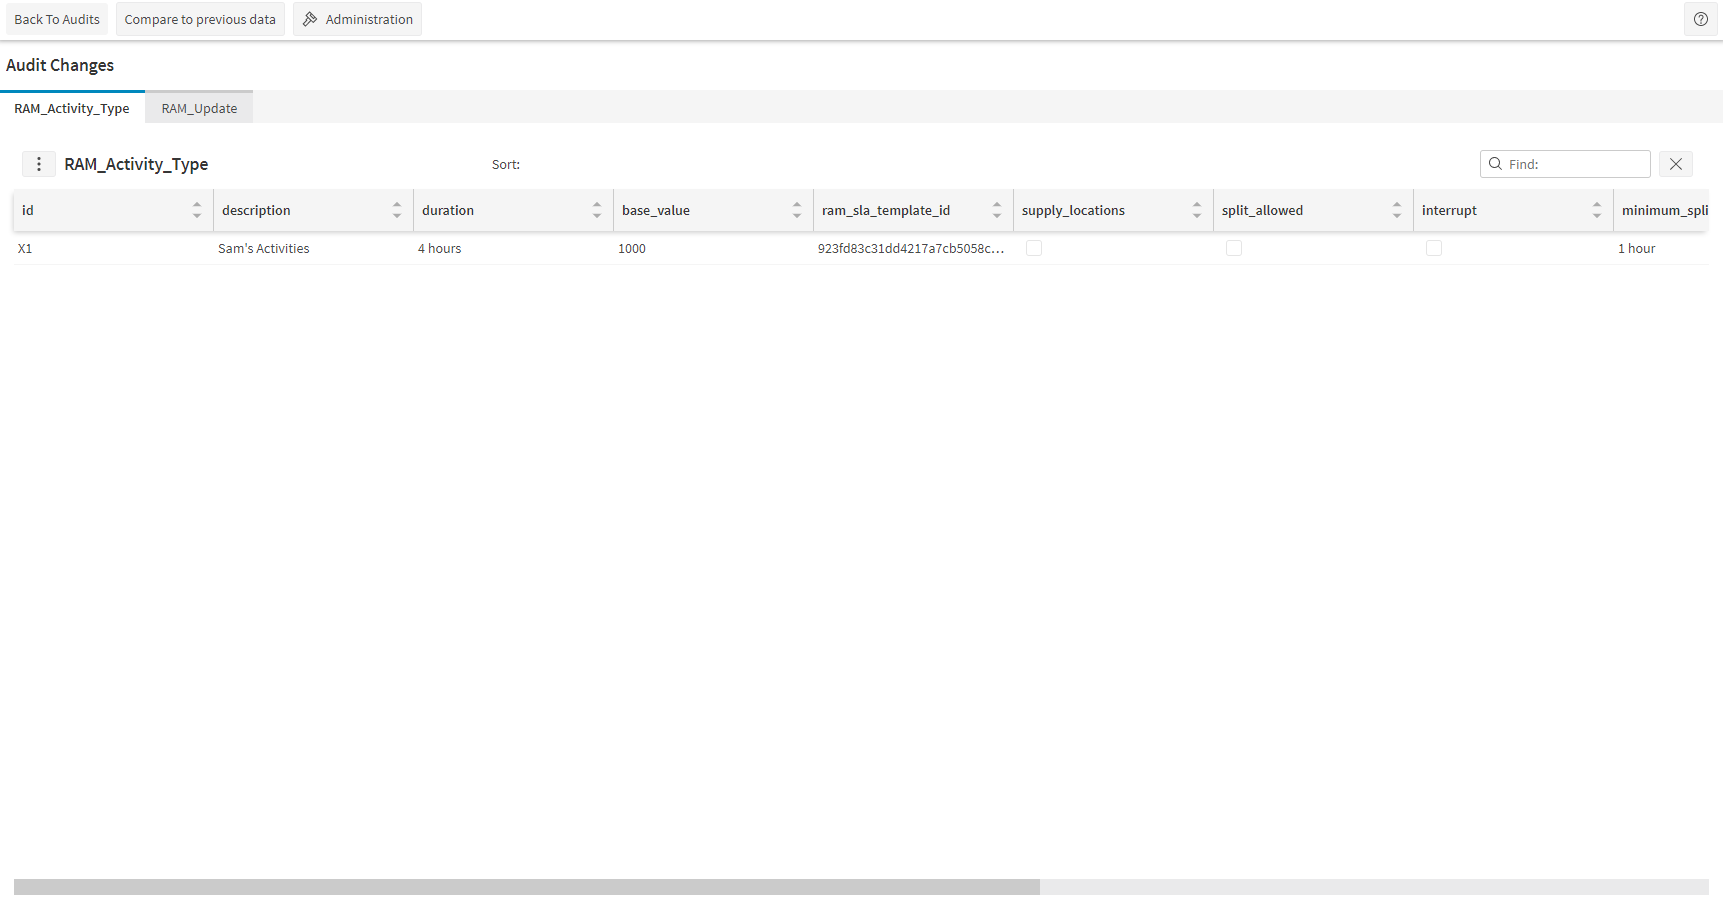
Row deletions are shown with a strike-through and are greyed out.

It is also possible to view the Audit's data relative to the data that was already in the database when it was applied. This can be done by clicking the 'Compare to previous data' button in the toolbar.
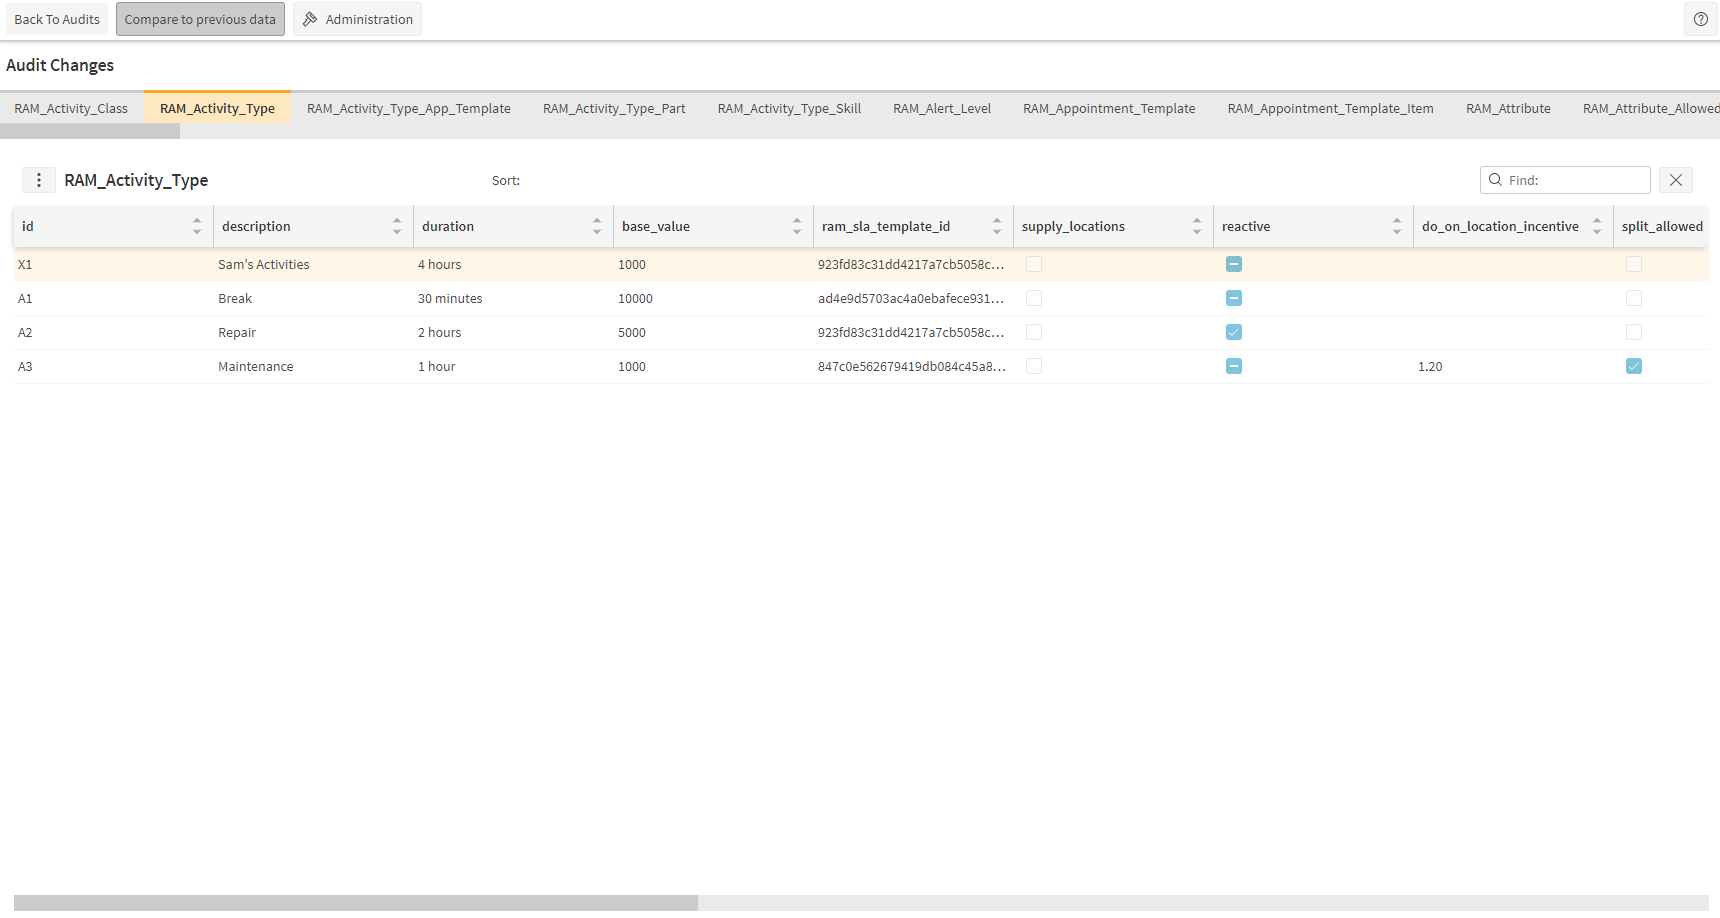
With this option selected, rows without a yellow bar represent existing rows in the database that were unchanged by the audit. Meanwhile, rows that are highlighted yellow are new rows or changed rows.
Downloading Audits
Audits can be downloaded as XML files by selecting an audit row a clicking the 'Download Audit' button. However, if there are relevant Audits before the selected Audit (in other words, there is a preceding Audit trail), the 'Download Audit Trail' button will be enabled:
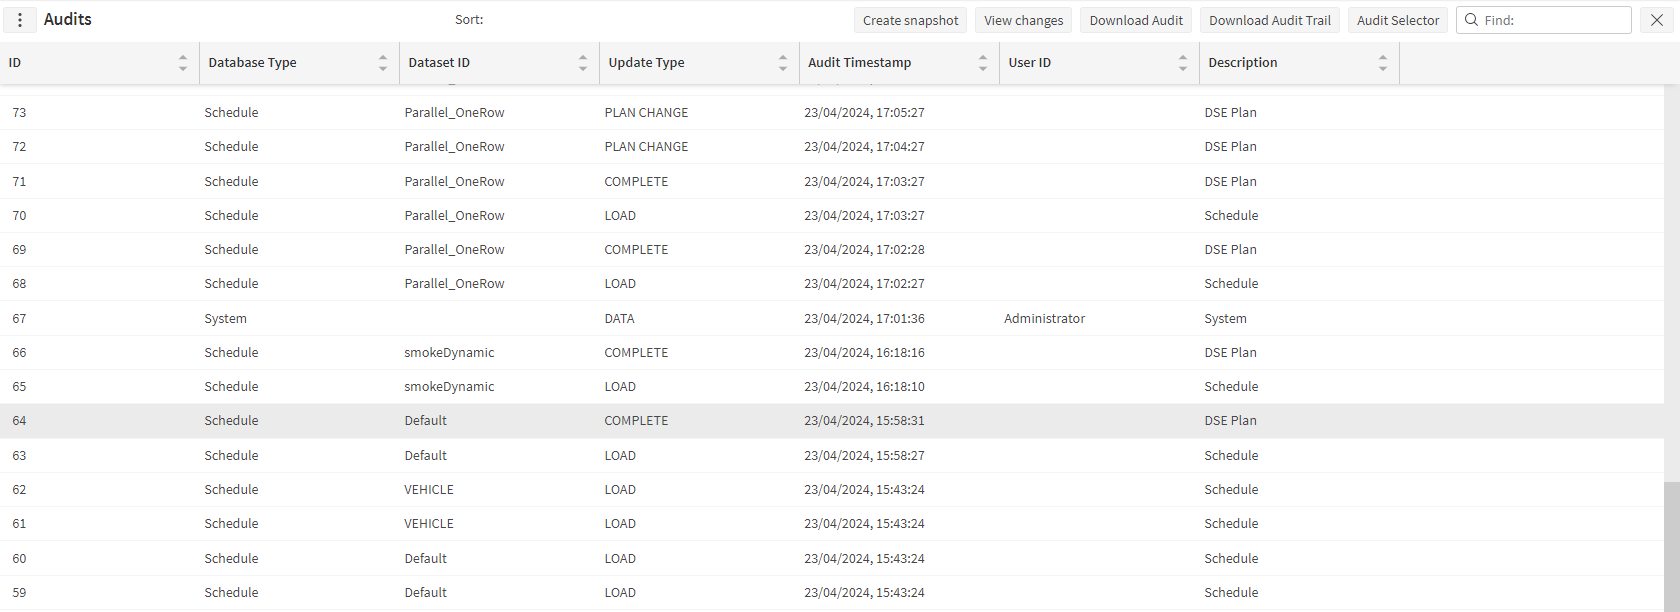
- Download Audit — download just the selected Audit data as an XML file.
- Download Audit Trail — download the selected Audit data and all the relevant Audit data before it (the complete Audit trail) as individual XML files contained within a zip file. If an audit with update type of CHANGE is selected input files will be downloaded. If an audit with update type of PLAN_CHANGE is selected both input and output files will be downloaded.
- Audit Selector — select which Audits from the Audit trail to download as individual XML files contained within a zip file using the Audit Selector:

An Audit is not considered part of an Audit trail if any of the following are true:
- The Audit consists of System data
- The Audit consists of LOAD data (as this overwrites all Audit data before it)
- There are no Audits related to the same database and dataset before the selected Audit
In this situation, the 'Download Audit Trail' button will be disabled, and only the 'Download Audit' button will be enabled to download the selected audit.
Note
In order to download an Audit trail as one complete XML file, create a Snapshot up to the relevant Audit first, as described below. This Intermediate Snapshot can then be downloaded, as with a Realtime Snapshot.
Auditing Parameter Changes
System behaviour is controlled by the administration parameters. So, if system behaviour changes, common questions to ask are:
- Which parameters have changed recently?
- Who changed these parameters?
The Audits pane can be used to answer these questions. It is accessed as follows:
- Open Workspace (Archive)
- Navigate to Audits
- View the Audits grid
Parameters are stored in the System Database, so the rows that contain audit information for parameters will be marked as:
- Database Type = System
- Update Type = SYSTEM
Once the row is selected, click the "View Changes" button. The Audit Changes screen will appear showing:
- System_Input.user_id - the User that changed the parameter
- Profile_Parameter.parameter_id - the parameter that was changed
- Profile_Parameter.parameter_value - the new parameter value
The time at which the change was made is shown on the "Audit Timestamp" column of the parent row
Creating Snapshots up to a Particular Audit
Any Audit containing Modelling data or Scheduling output data can be used to create a new Snapshot. These are created by taking the last LOAD or Snapshot data as a base, then applying all the relevant Audit data between the base and the selected Audit in turn. The result is then stored as an Intermediate Snapshot to distinguish them from Realtime Snapshots that have been taken directly from a database.
Note
Intermediate Snapshots cannot be considered to be as "true" as Realtime Snapshots, as some operations are not fully captured in the Audits. It is therefore recommended that Timetables are set up to ensure regular Realtime Snapshots are taken by the DAS.
As with Realtime Snapshots, Intermediate Snapshots can be viewed and downloaded as required.
Timetables
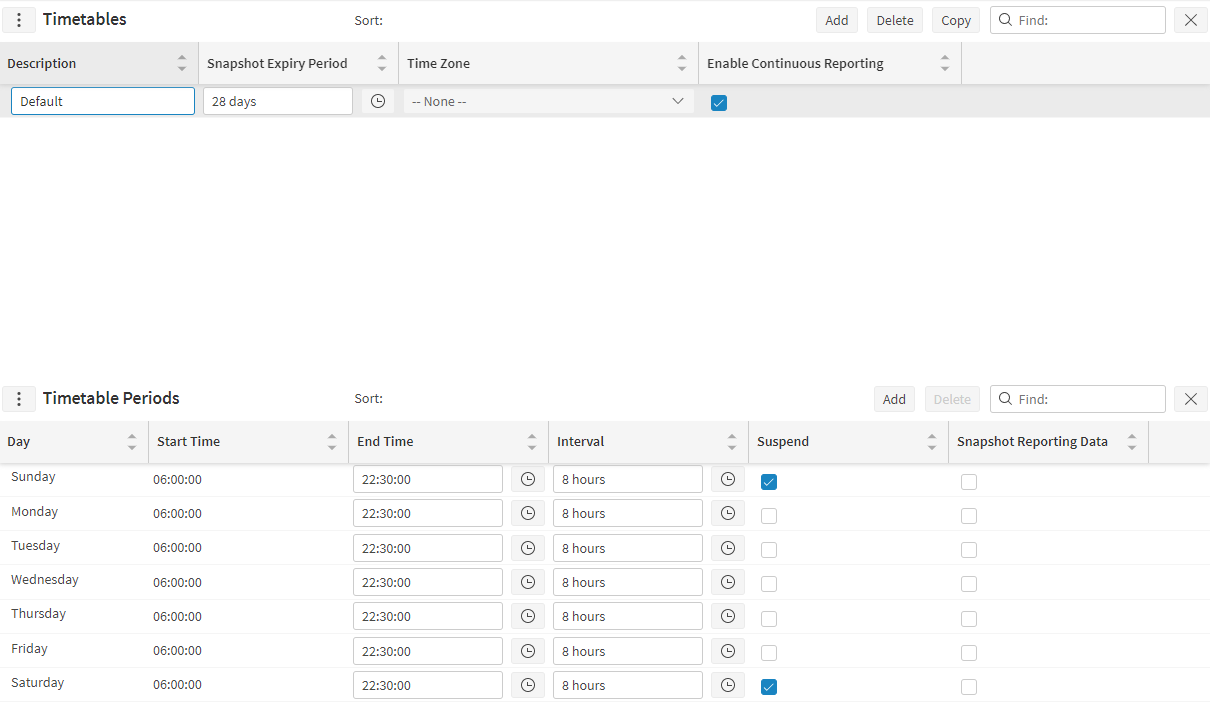
The Schedule Archiving Service (ARC) takes Snapshots according to user-generated Timetables, a list of which are shown on the top of the Timetables screen. Each Timetable has a number of corresponding Timetable Periods which control the timings of Snapshots on each day of the week – selecting a Timetable from the top will show a list of the corresponding Periods on the bottom:
Each Timetable has a Description and additional optional columns:
- Snapshot Expiry Period — Snapshots taken according to this Timetable will have an expiry date set equal to the expiry period after the date the Snapshot was taken. The Archiving Service will periodically check for expired Snapshots and delete them from the database. Snapshots taken according to a Timetable with no expiry period will never be automatically deleted by the Archiving Service.
- Time Zone — the time zone the user wishes the timetable to apply in. This is particularly useful if the business runs across snapshots and the snapshots need to be set up based on a time zone other than the local time zone. Otherwise, local time zone of the Scheduling Workbench server is used.
- Enable Continuous Reporting — when checked the Archive service will continuously generate and update dimension and fact reporting data for the scheduling datasets to which this timetable is applied.
Additionally, each Timetable Period is related to a certain day of the week and has a Start and End Time between which Snapshots will be taken. How often they are taken is defined by the Period's Interval. It is also possible to prevent Snapshots being taken during a particular Period by selecting its Suspend option.
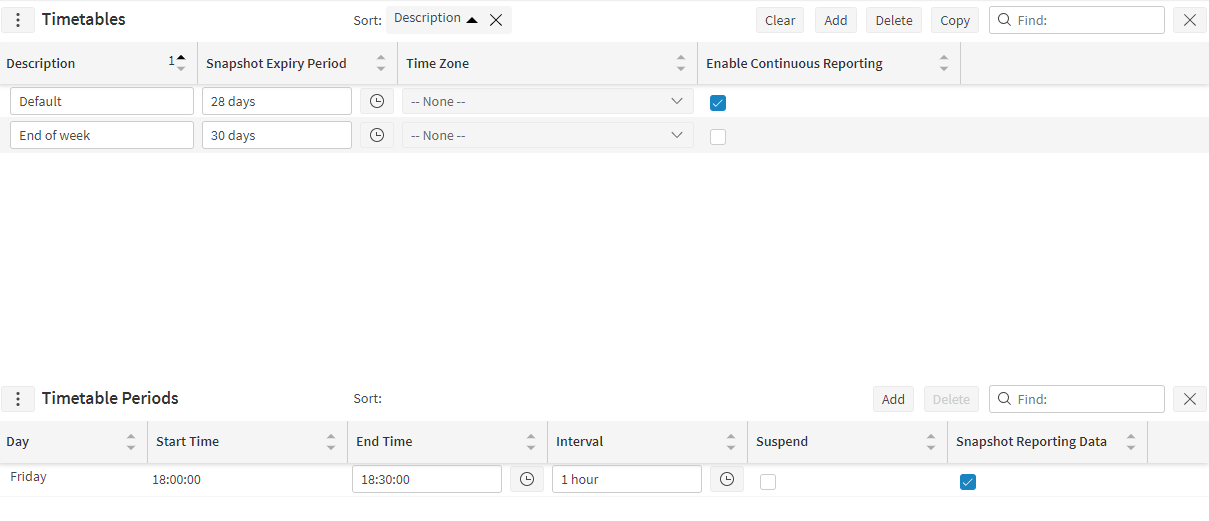
Each Timetable Period has a 'Snapshot Reporting Data' tick box, which when ticked the Archiving Service will process the Scheduling snapshot data to generate reporting data with snapshot fact records and update the Archiving Database.
To confirm that the Archiving Service is generating reporting data as set up by the timetable to do so, check the Events Screen on the System tab of Administration Workspace. You should see events as follows

Note
There is no User Interface for the Reporting Tables. The intention of these tables is that the user can use any BI tool to extract the data from the tables and generate reports.
Note
Due to the Archiving Database's structure, it is not possible to alter the Day or Start Time of a saved Timetable Period. Instead, it is necessary to delete the row and create a new one with the necessary changes.
Changes to the Timetables (made by using the 'Apply Changes' button) will be picked up by the Archiving Service every ten minutes by default. This value can be changed by altering the 'CheckForUpdateSeconds' Archiving Service parameter – see the Scheduling Administration Guide for more information on changing parameters.
Note
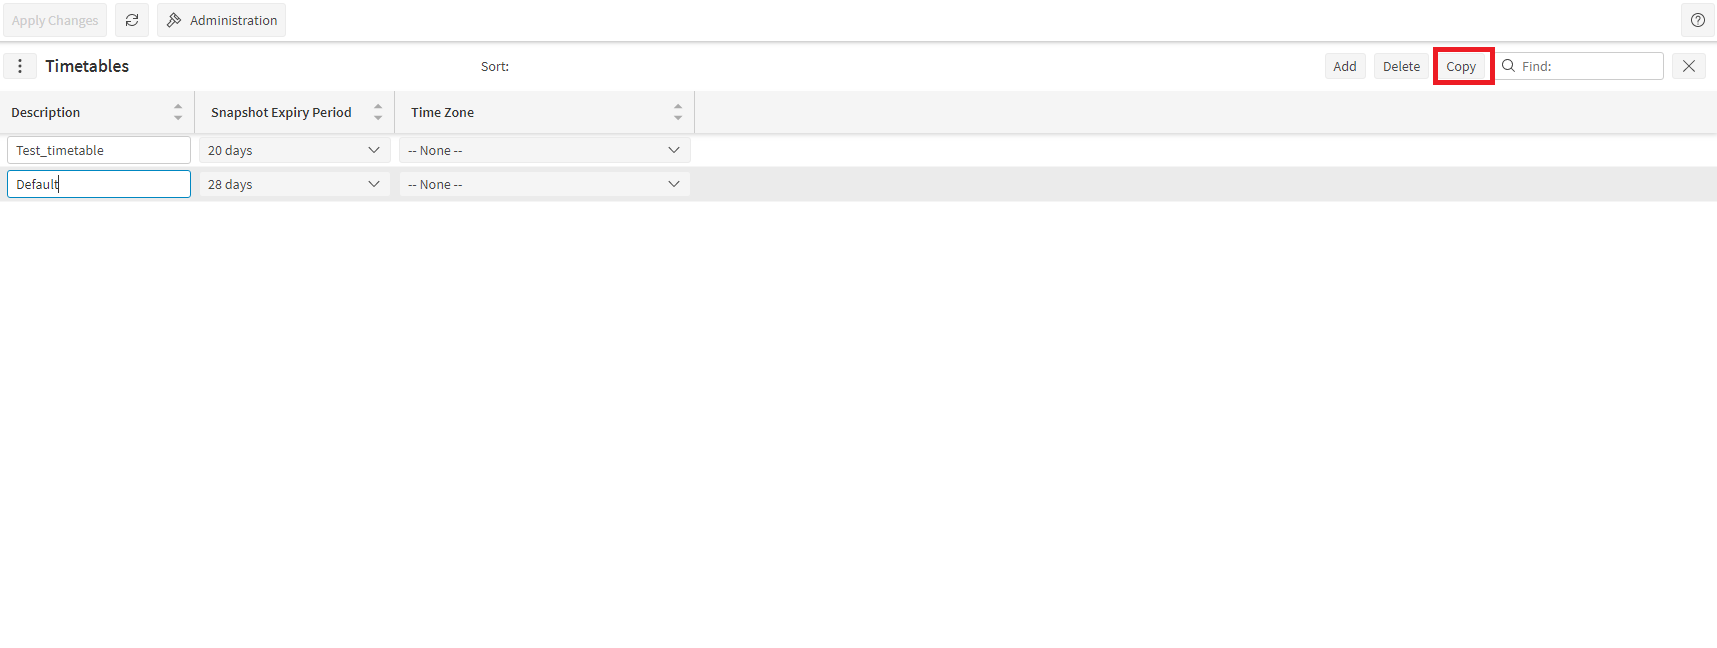
It is possible to copy a Timetable and its corresponding Periods by using the Copy button in the middle of the Timetables screen:
Timetable Usages
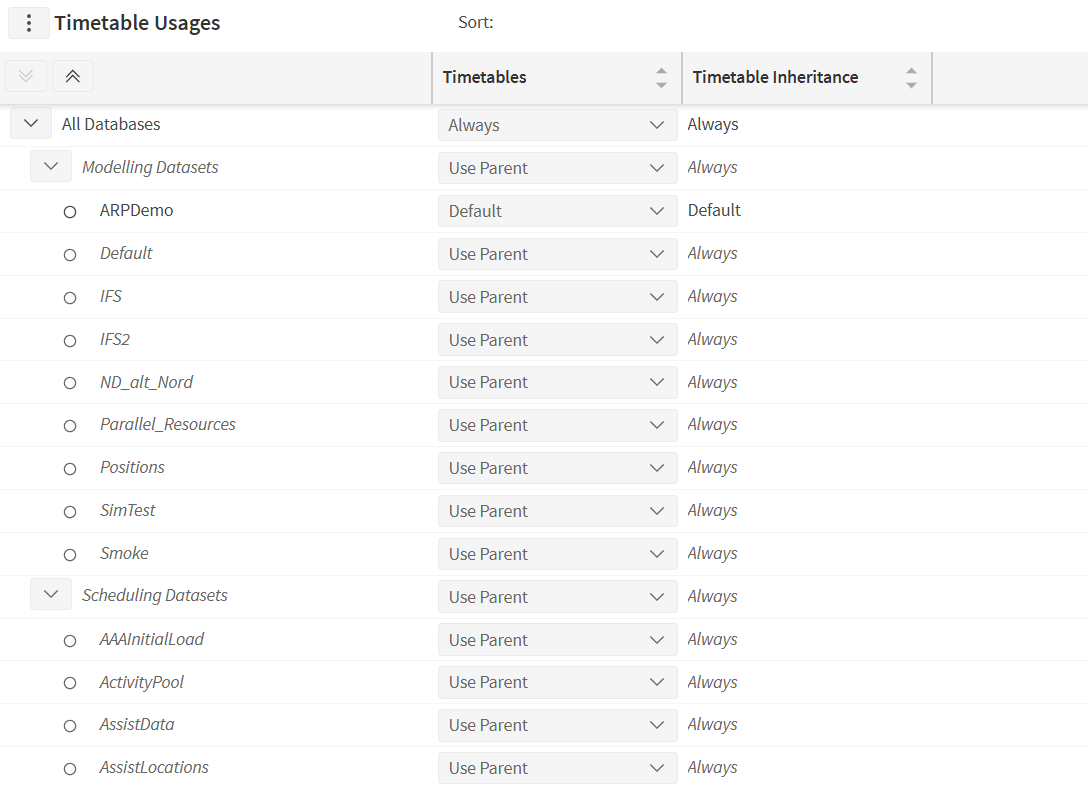
Once Timetables have been created (see the previous section), it is possible to set which database and dataset are Snapshotted according to which Timetable. By default dataset snapshots are automatically taken based on when the dataset is active with the aim to snapshot once per day. The Timetable Usages screen enables the user to select timetables by displaying a list of the databases and datasets in a hierarchical structure:
Use the  icons at the top-left of the grid section to quickly expand or collapse all the divisions.
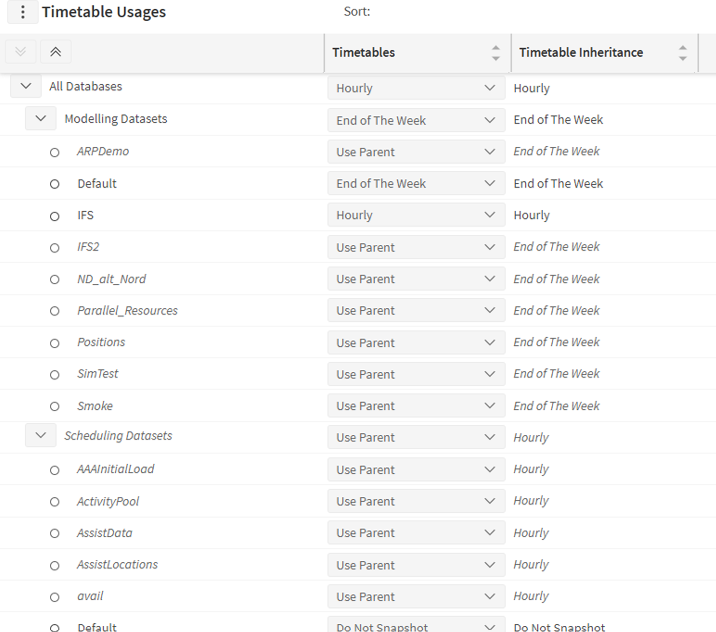
In the image above we have set all the databases to use the Hourly Timetable by default. All Scheduling datasets are set to 'Use Parent' which means they will also use the Hourly Timetable – this can be seen in the "Timetable Inheritance" column which shows exactly which Timetable will be used for each dataset as a result of the user's selection.
The user has specifically set the Scheduling "Default" dataset to 'Do Not Snapshot'. This means it will not be snapshotted by the Archiving Service.
Where the user has not made specific changes to the Timetable Usage hierarchy, the dataset is shown in italic.
For the Modelling Datasets, we have set the "Default" dataset to – End Of The Week and "IFS" dataset to – Hourly.
Changes to the Timetable Usages (made by using the 'Apply Changes' button) will be picked up by the Archiving Service every ten minutes by default. This value can be changed by altering the 'CheckForUpdateSeconds' DAS parameter – see the Scheduling Administration Guide for more information on changing parameters.
Attributes
In the Resource Planning Data Management Screen (Planning Workspace) there is an option of creating 'additional attributes', which can be used to add specific attributes to activities, locations or resources on the Scheduling side - see section 'Entity: Additional_Attribute (Input)' in the Scheduling Schema Guide for further details.
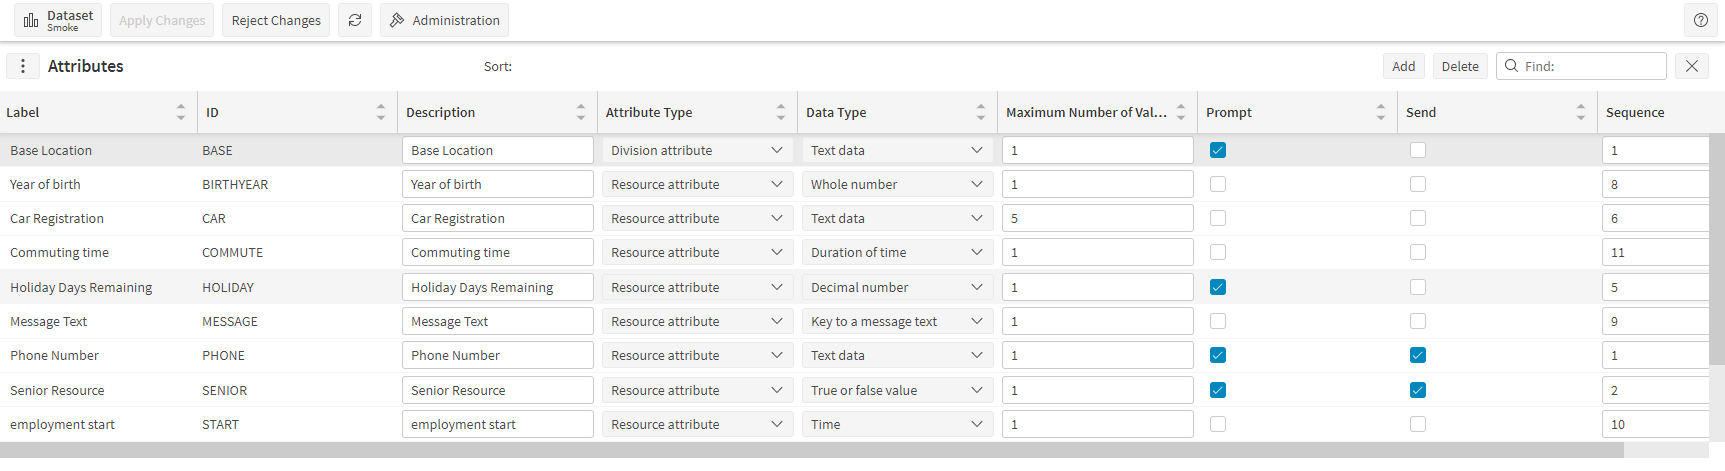
Note
The screenshot above of the additional attributes is from the Planning workspace, and not the Archive workspace. It is displayed here, to give an example of additional attributes being used.
The Attribute screen offers the user the option to ask the Archiving Service to report on these attributes, i.e. the label_value (from Additional_Attribute - see screen shot of example below). The user can choose up to 4 activity-related attributes and up to 4 resource-related attributes.
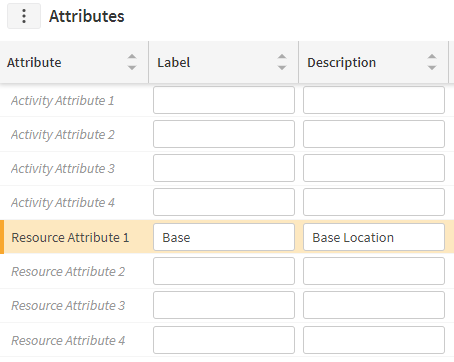
Where applicable these attributes (e.g. if the Archiving Service is recording statistics in a fact table for an activity with an attribute linked to it), will be referenced on the activity and resource related fact tables, i.e. ARC_Activity_Fact, ARC_Allocation_Snapshot_Fact, ARC_Resource_Snapshot_Fact. The reference to the attributes on these fact tables are values and foreign keys to attribute dimensions (ARC_Attribute_Value):
- 'attribute_value1' or equivalent (2, 3 or 4).
- 'arc_attribute_value_key1' or equivalent (2, 3 or 4).
For attributes whose values can be parsed to a number (not just a description), the user can also set up value groups that they wish to categorise the values into.
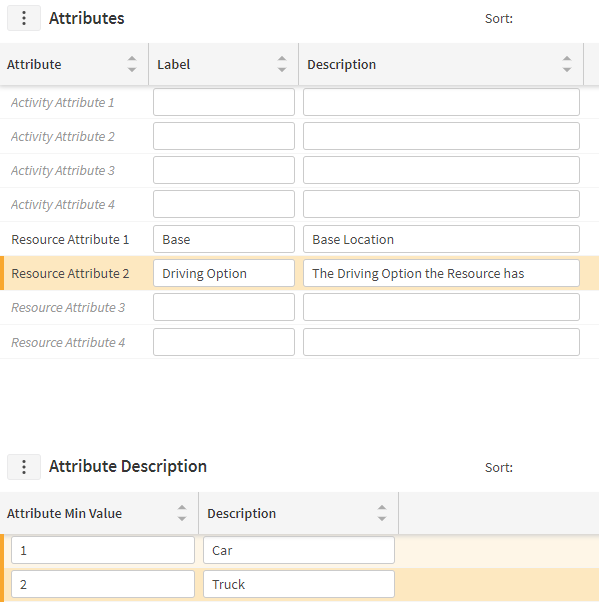
The Attribute Description screen can be used to set up the thresholds for these value groups. Note that if the value in the additional attribute is not in any of these value groups, the default value will be used (or description if that is specified in the Attributes Screen).
Note
Note that any of the activity or resource attributes or attribute descriptions can be changed at any time, but if so the changes will be stored as new ARC_Attribute_Value dimension table records. This way, the distinction between the dimension records when they are used in the fact tables as described above is clear when generating reports.
Clear Personal Data
This screen allows the personal details of a resource or user to be removed from the archive database.
This may be required to comply with GDPR requirements, and an employee's 'right to be forgotten'. See the administration guide for full details of steps required to comply with this requirement.
Removing Personal Resource Data
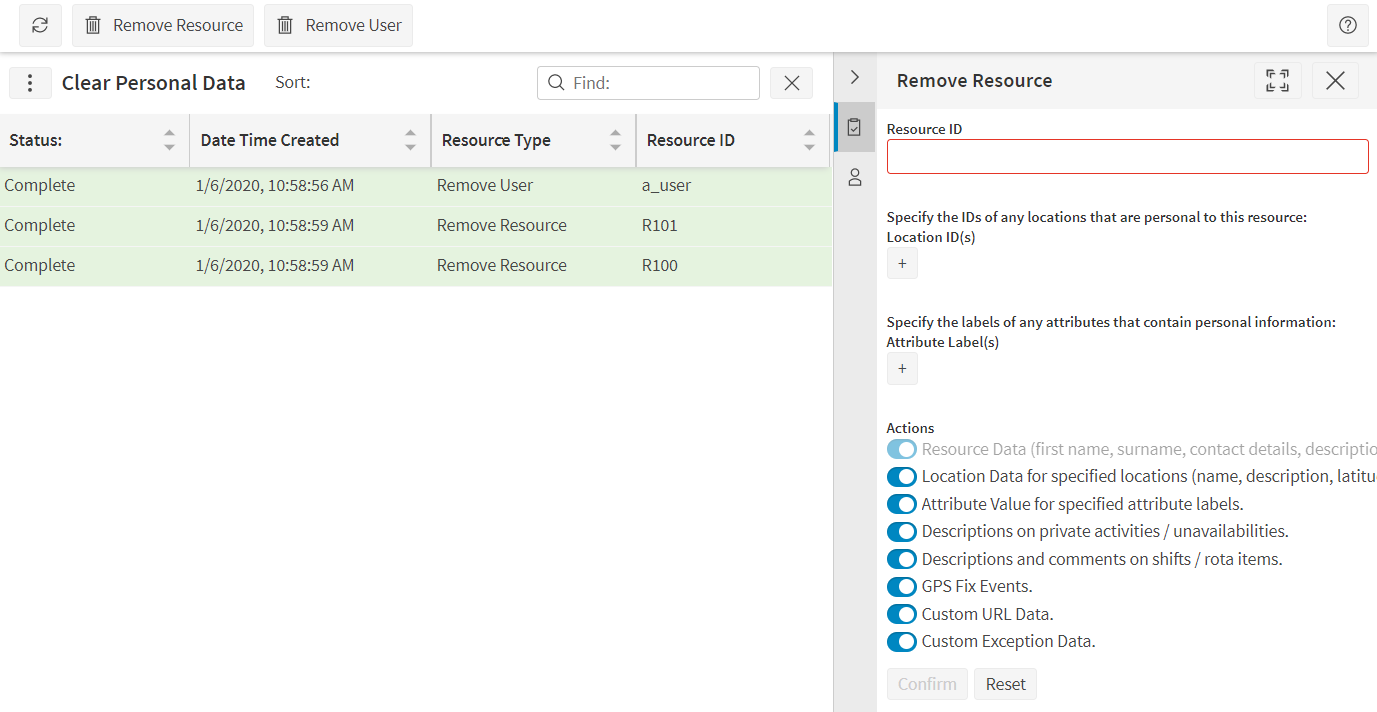
To clear the personal data for a resource, first click the Remove Resource button and then specify the ID in the panel on the right.
Please note that the ID itself will not be cleared, so personal data should not be used in any IDs.
The resource is likely to be linked to one or more locations, which may or may not be personal addresses for the resource. As such it is necessary to specify the IDs of any locations that are personal to the resource. If more than one location ID needs to be specified, use the '+' to add additional rows.
Personal data could also be contained in additional attributes. The labels of any attributes that do contain personal data should be specified. Once again, use the '+' to add multiple labels.
The 'Actions' section describes all the actions that will be taken to remove personal data. If any of these are not required they can be unchecked.
Removing Personal User Data
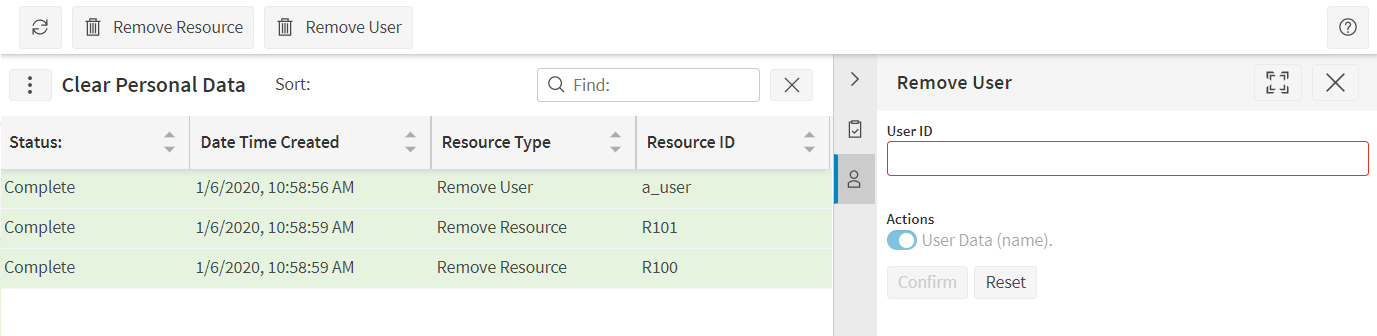
This consists only of the user name. To request this first click the Remove User button and then specify the user ID in the panel on the right.
Please note that the ID itself will not be cleared, so personal data should not be used in any IDs.
Confirming Removal
After entering the details for the resource or user, click the 'Confirm' button to request that the changes be made. This will then queue a request to remove the specified data. The request will appear in the 'Existing Requests' section in the main table where progress can be monitored.
The request will be carried out by the Schedule Archiving Service.
The 'Reset' button will reset the screen back to it's original state.
Failed Audits
The Failed Audits screen displays a list of Audits related to failed updates that occurred within PSO. The functionality of this screen is the same as the normal Audits screen. This screen can only be viewed if you have enabled the 'DataCaptureARCFailedAudits_View' permission.
Administration
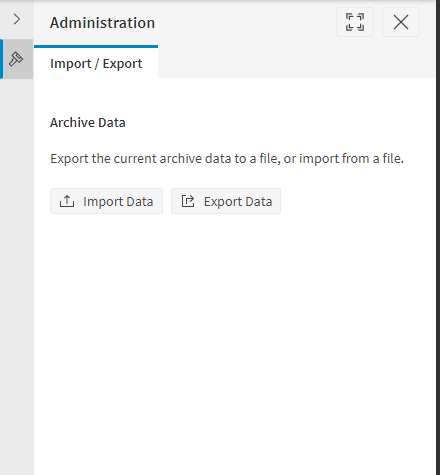
The administration section of the Archive workspace contains a tab for importing/exporting archive data.
Import/Export
This view allows the user to export and import Data Archive user data entry data, such as snapshot timetables, snapshot usages, attributes etc.