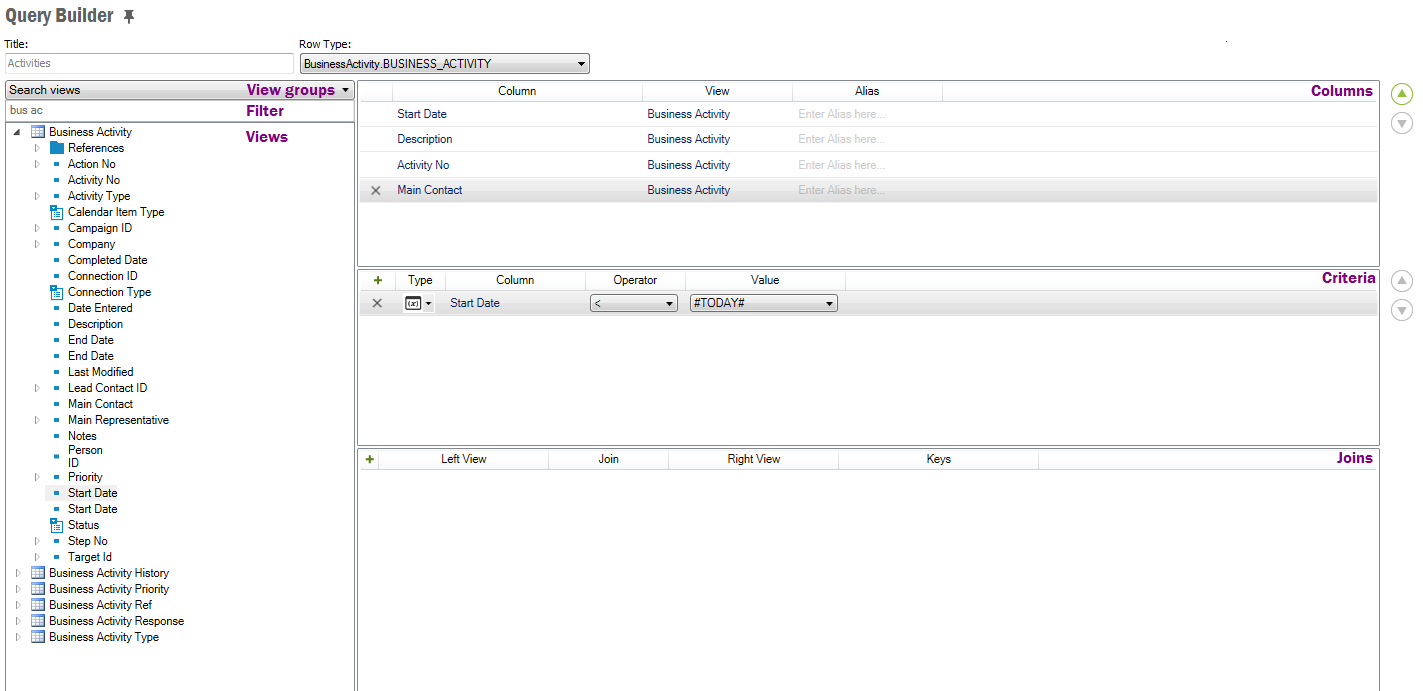
With Query Builder you can create reports without having to know SQL syntax or the names of columns and constants. The Query Builder knows the columns and its data types for a view, so you don’t have to remember how they are spelled or how to format dates and numbers or what available static codes a column can have. It also knows how many of the views are related to each other, making it really easy to join those views, i.e. you don’t have to remember which columns maps to each other.
You use translated names for views and columns which makes it a lot easier to create the report as the real names in the database can be a bit hard to understand. The translated view names are mostly in synch with the forms they are used on which makes it easy to find which ones to use.
Create Query Builder reports via the navigator node Reports/Ad-Hoc Reporting/Query Builder. Once you have saved the report you can run it via Reports/Ad-Hoc Reporting/Explore Query Builder Reports.
The reports are personal and will only be visible for the user who created them.
The result of the Query Builder is a Quick Report which is presented in a table/overview page.
By default all users are allowed to create their own Query Builder reports, but the administrator may have setup security differently, disallowing some users to create reports.
Search views – shows all views in the system, but you must provide a filter text. When the text is empty the list is also empty. Default when adding a new Query Builder report.
Related views – shows the views that are used in the report plus all that have reference to or from those views.
Query views – shows the views that are used in the report. Default when editing a Query Builder report.
Some columns are merely a key to another view. Often this is a LOV (List of values), and fact is that often you want to display more than the key, such as the full name of a person and not just the User ID. There are actually two ways to do this, either by joining the views or by using the built in support for function columns. I call them function columns as they are displayed as a column, and can be used as columns, but they really are function calls.
The columns that have function columns are expandable. To show them just expand the node and then you can add them to the report as if they were normal columns (with the exception that certain restrictions apply if used in criteria).
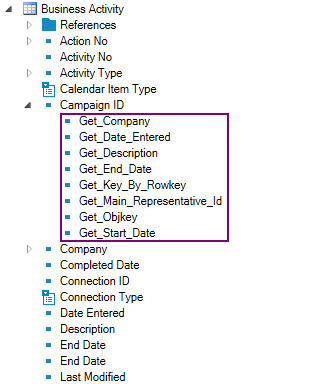
Note! Beware that if you use a function column in Criteria that the report can get very slow as using a function here will always cause the database to scan the whole table, i.e. it has to check every single row in the database. The database cannot use indexes when you have a function call in the criteria.
Criteria corresponds to the WHERE clause in SQL, which is where you filter the records to show only the ones you are interested in. The Query Builder helps you with formatting of dates and numbers and also the syntax regarding how to add parameters to the report.
There are three types of criteria: Preset Value, Substitution Variables and User Input.
Preset value is the default type of criterion value. This is the type of criterion you add when you want the same criterion every time you run the report.
If you want to have dynamic values in the report, e.g. “Today”, you can do this by changing the Type of the criterion to Substitution Variable; when you do that you will get a drop down list of values that are applicable for the data type of the column in the criterion. A substitution variable will evaluated when the report is executed.
To add Report Parameters you change the criterion Type to User Input. The value part will change to a question mark and you will be prompted to provide the value when you execute the report.
You can have more than one criterion in the report; just add more columns to the pane. When you add another column an AND operator will automatically be added for you. Change this to OR if you want in the drop down selector. You can also add operators manually by clicking on the plus sign in the header of the criteria pane.
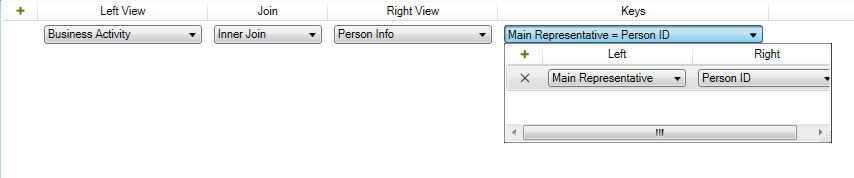
When you add columns from more than one view to the report you always need a join expression that tells how the views are connected. When the Query Builder already knows the connection between the views it will automatically add the join expression for you. If however the Query Builder doesn’t know the connection, then you will need to add the join manually.
.
When you execute the report, in the resulting report, there is a context menu command on the rows, View Details…, this command will navigate to the detail view for the entity you based the report on. So if you have a report that shows Business Activities you can from each row navigate to the Business Activity page and see all information for that record. However, when you have a report that joins two views, you need to say which view to use when navigating from the report. You can only choose one view. This choice is done with the Row Type selector. Default is to use the first view you add to the report.
The Row Type can also enable menu commands that are specific for the type selected, such as Mail merge which is available for views like Person and Customer.