Admin Studio
The Admin Studio of the Lifecycle Experience Center (LEC) provides a centralized authentication and authorization mechanism for its administrator users to manage admin tools and users.
Note: With the recent update, the use of ServiceNow (SNOW) forms for granting or revoking access has been discontinued. All access management tasks, including assigning and removing roles, must now be performed directly in LEC Admin Studio.
Before you begin, please check how the existing user role is migrated to LEC. For more information, please refer to: Migration of existing LE Portal user roles to new LEC user roles.
The users of the Lifecycle Experience Center (LEC) are classified into two primary categories: Admin Level and Studio Level.
Admin Level Users
The Customer Administrator is the Admin Level User responsible for assigning another Customer Admin or a Studio-Level User.
Studio Level Users
This category encompasses roles associated with studio-specific operations. All roles, except those designated under the Admin Level, fall within the Studio Level classification.
You must have the Customer Administrator (Customer Admin) privileges to access the Admin Studio and utilize its functionalities by granting/ revoking permission to other user roles. In general, roles can be assigned to users directly in LEC Admin Studio. However, the Customer Admin role has an additional prerequisite: the user must be registered with an IFS Portal account before the role can be assigned. If the user is not registered, complete the IFS Portal registration first. For detailed instructions on registering a user in the IFS Portal, refer to the article How to request a user account to access the Service Center.
- New LEC users - The user email added as primary and secondary contact during onboarding will be assigned as the Customer Admin in Admin Studio. Next, the Customer Admin can grant or revoke access to another Customer Admin or a studio-level user role to any studio in LEC. Once a new role is assigned to a user for a particular studio in LEC, an email notification is sent to the relevant users with the details.
- Existing LEC users - The Customer Admin is the user who previously had the Build Place User Admin Role for the Build Place.
To log in, click Admin Studio in the left main sidebar of the LEC Home Page.
 |
|---|
| Figure 1 -Admin Studio in LEC |
When you open the Admin Studio, the main screen is displayed.
 |
|---|
| Figure 2 -User Role Management View |
User Management in Admin Studio
Under User Management, select User Role Management to grant or revoke user role permissions.
Within User Role Management:
The Assign User Role tab allows you to grant access and assign roles to users.
The Remove User Role tab allows you to remove roles that have already been assigned.
Assign User Role
- Select the Application/ Service type: Admin Level or Studio Level.
 |
|---|
| Figure 3 -Assigning a User Role |
Then, select the Studio/ Platform that you need to grant access to from the Applications/ Services dropdown. After selecting a Studio or the platform (LEC) from the Applications/Services dropdown, a list of assigned users appears at the bottom of the page, allowing you to view the user roles associated with that studio.
Next, select the Studio/Instance ID from the Instance ID dropdown.
After that, select the appropriate user role from the Role dropdown and enter the corresponding email addresses in the Customer Email and IFS User Email fields. Use Customer Email to add any customer contacts and use IFS User Email if you want to add someone internal to IFS.
- When adding Customer Admins, ensure the selected user is registered with an IFS Portal account to appear in the Customer Email field. This field displays a prepopulated list of eligible users who can serve as Customer Admins for the specified customer. For detailed instructions on registering a user in the IFS Portal, refer to the article How to request a User Account to access the Service Center.
Please ensure the email address is entered exactly as provided, maintaining the correct uppercase and lowercase letters.
- Finally, click Next.
 |
|---|
| Figure 4 -Assigning a User Role |
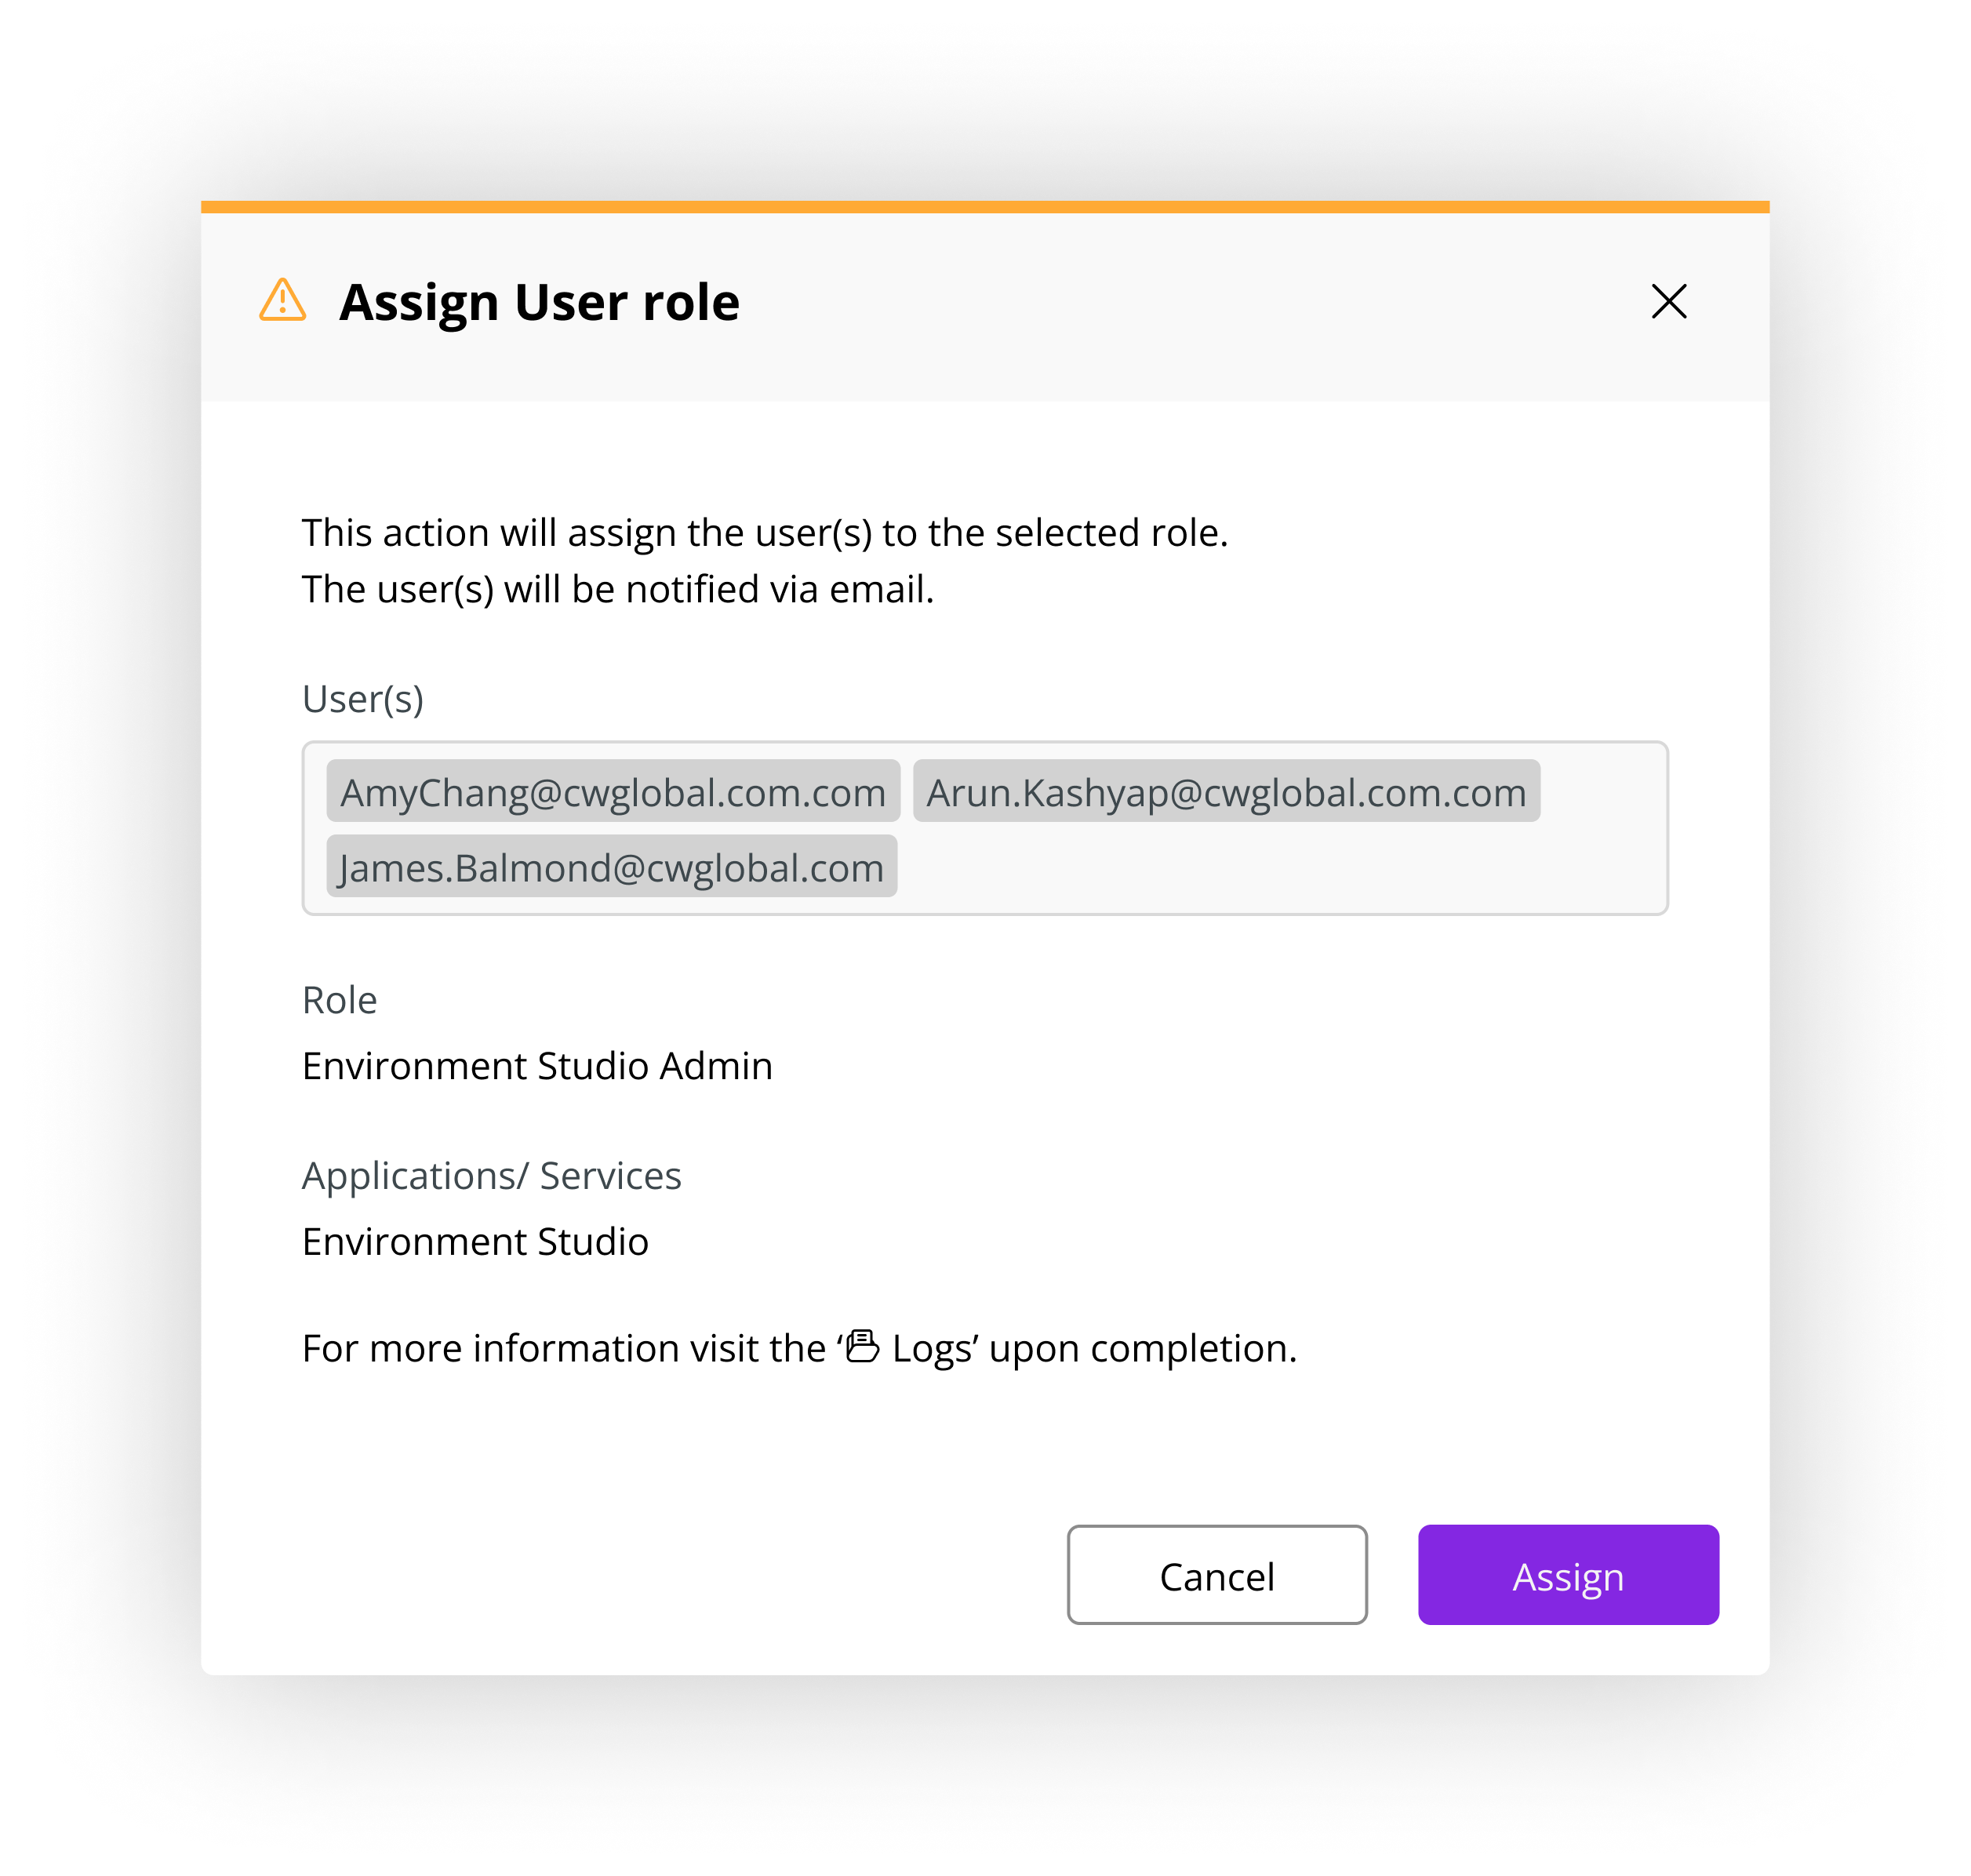
- The Assign User Role dialog appears, confirming the assignment of the users. Click Assign to proceed.
 |
|---|
| Figure 5 -User Role Assignment Confirmation |
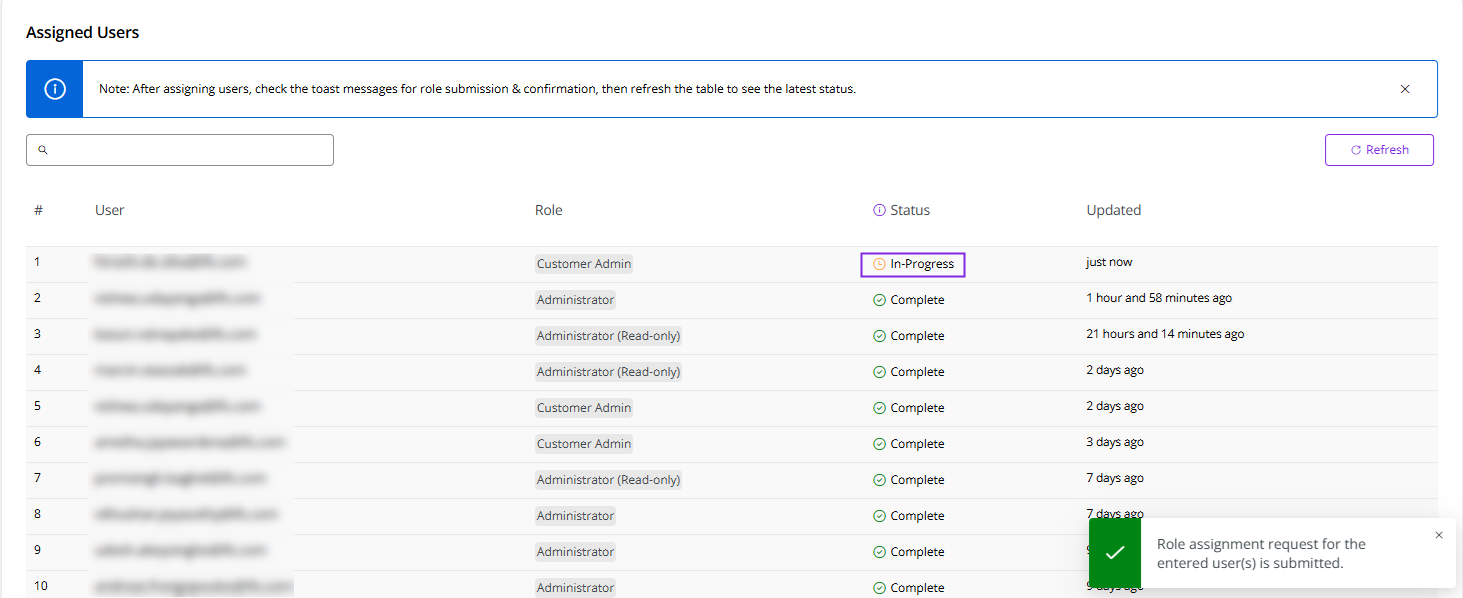
- Then, a toast message appears at the bottom of the page confirming that the user assignment request has been submitted. Refresh the Assigned Users table to view the assignment status, which is now In-Progress.
 |
|---|
| Figure 6 -User Role Assignment In-Progress |
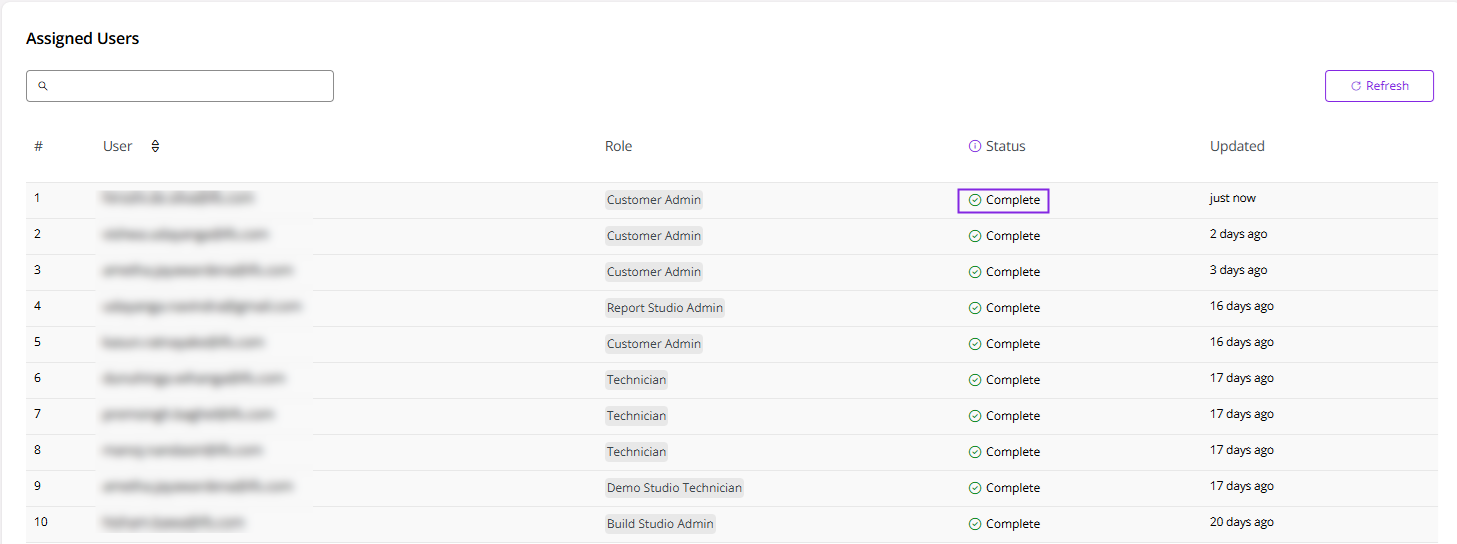
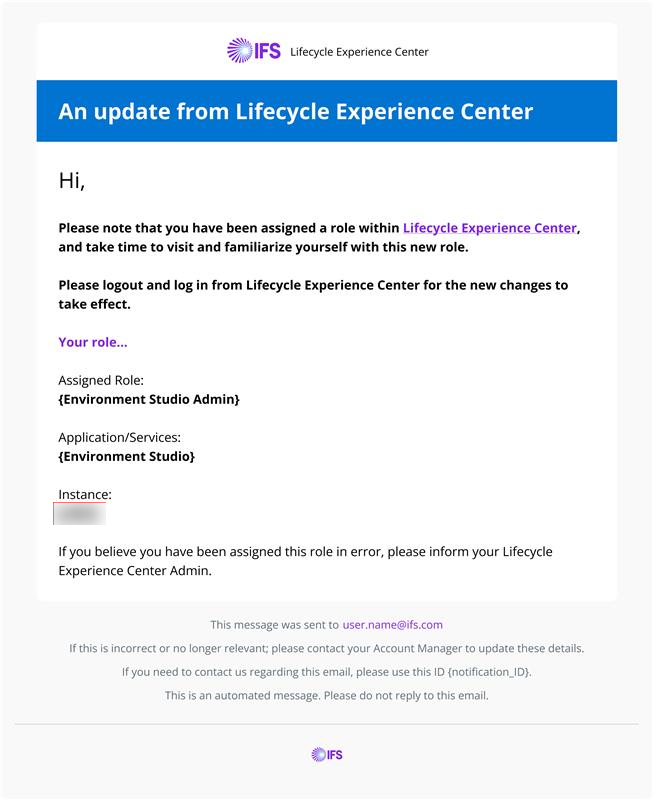
- Once the user is assigned successfully, another toast message confirms the successful assignment, and an email notification is sent to the user. Check the Complete status in the Assigned Users table.
 |
|---|
| Figure 7 -User Role Assignment Completed |
 |
|---|
| Figure 8 -E-mail Notification on User Assignment |
- If the user assignment fails, the status of the user is updated to Fail in the Assigned Users table. You can retry the assignment, after which the user record status changes to In-Progress.
- Furthermore, you can search for a specific user in the Assigned Users table by email, role, and status.
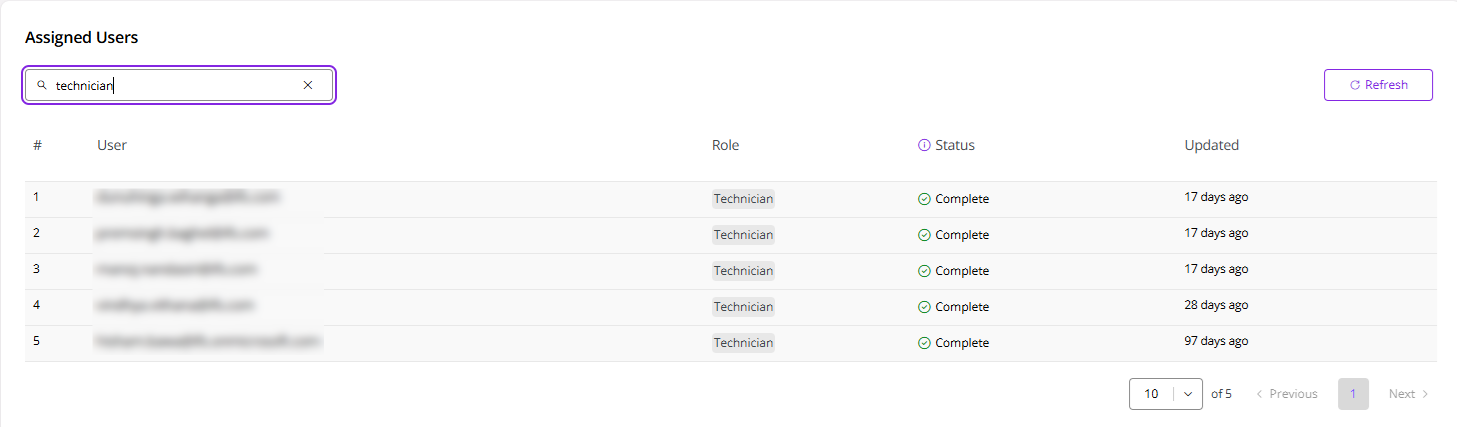 |
|---|
| Figure 9 -Search Assigned Users |
Note
Each user can be assigned only one user role at a time for a given Build Place. Assigning multiple roles to the same user is not permitted.
Remove User Role
- Go to the Remove User Role tab to revoke user permissions.
Note
Each Studio must have at least two Customer Admins. Therefore, removing a Customer Admin is not allowed if it would result in fewer than two remaining.
- In the Remove User Role tab, select the role you want to revoke and click Remove. If a user has multiple roles, ensure you select the specific role you want to remove so that only that role is revoked.
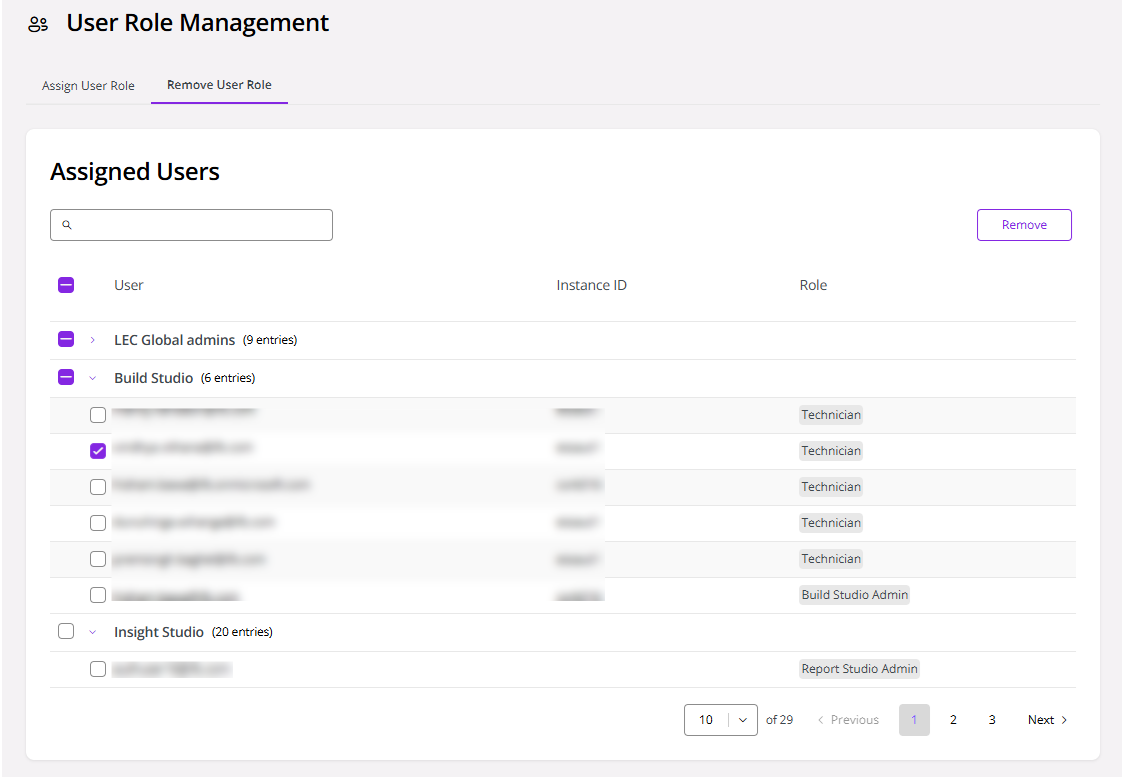 |
|---|
| Figure 10 -Remove User Role Tab |
- Then, a confirmation message is displayed. Click Remove again to proceed.
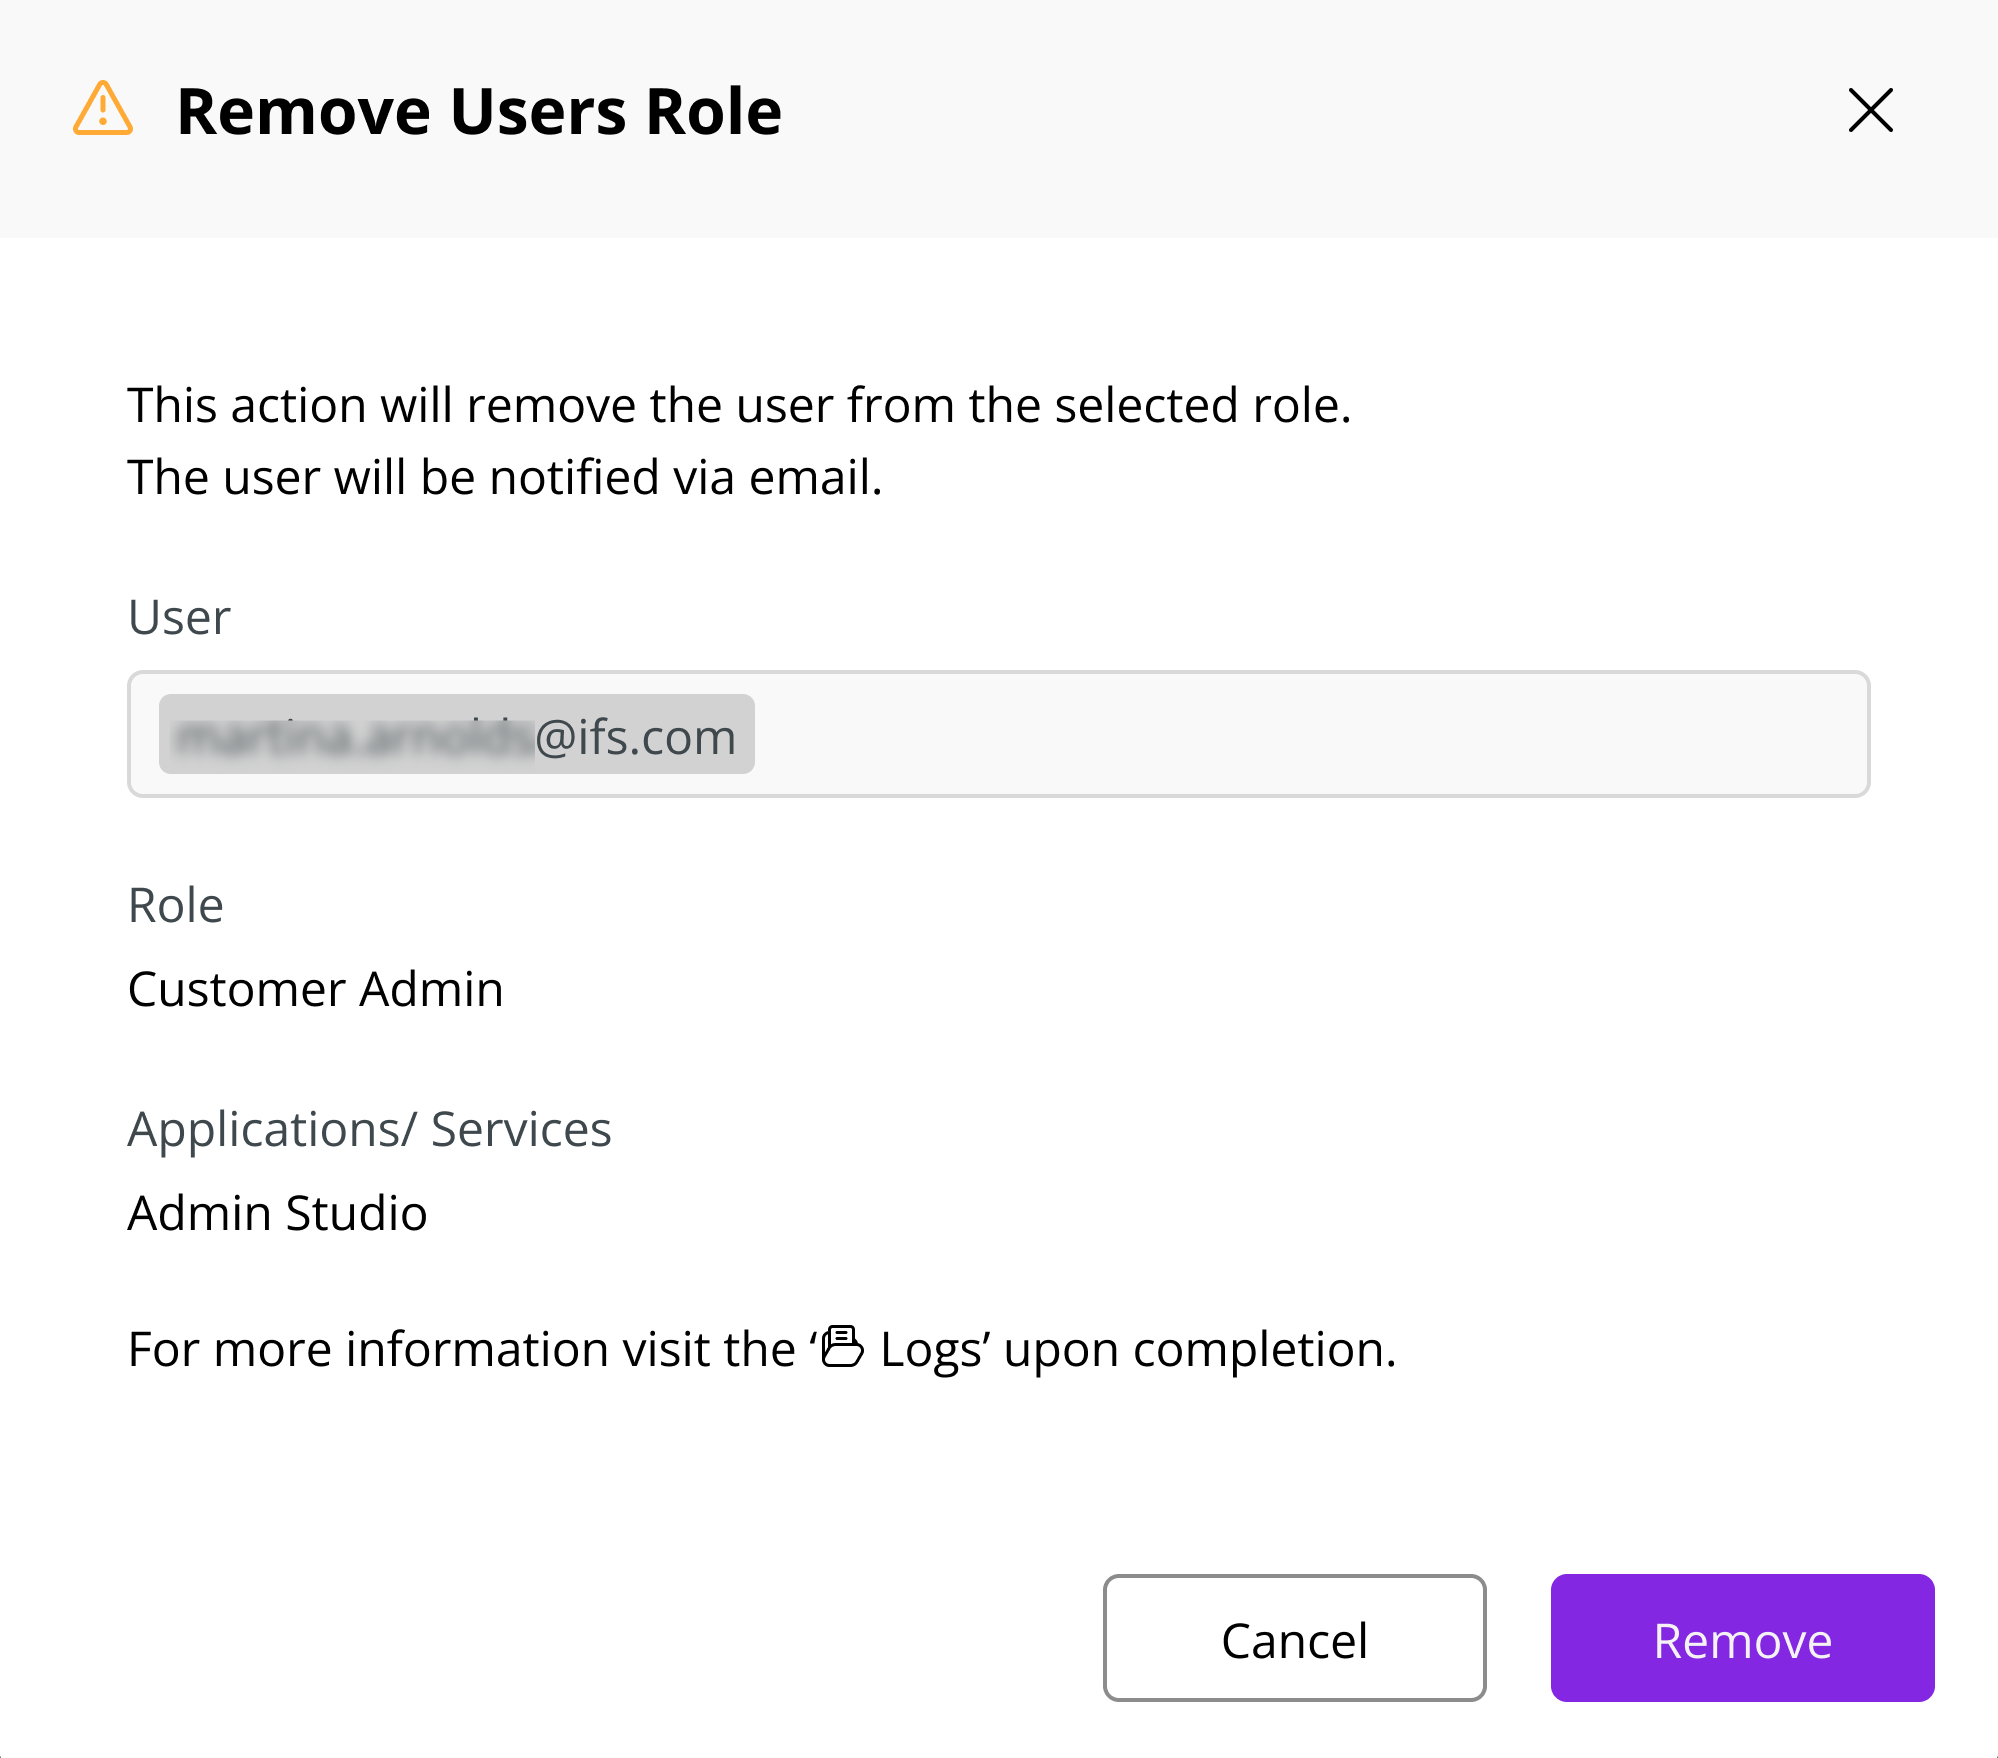 |
|---|
| Figure 11 -Remove User Role Confirmation |
Logs
Click Logs under Monitoring in the sidebar.
In the User Role Management Logs tab, you can view the activity log, which has the history of the user role assignments and revocations.
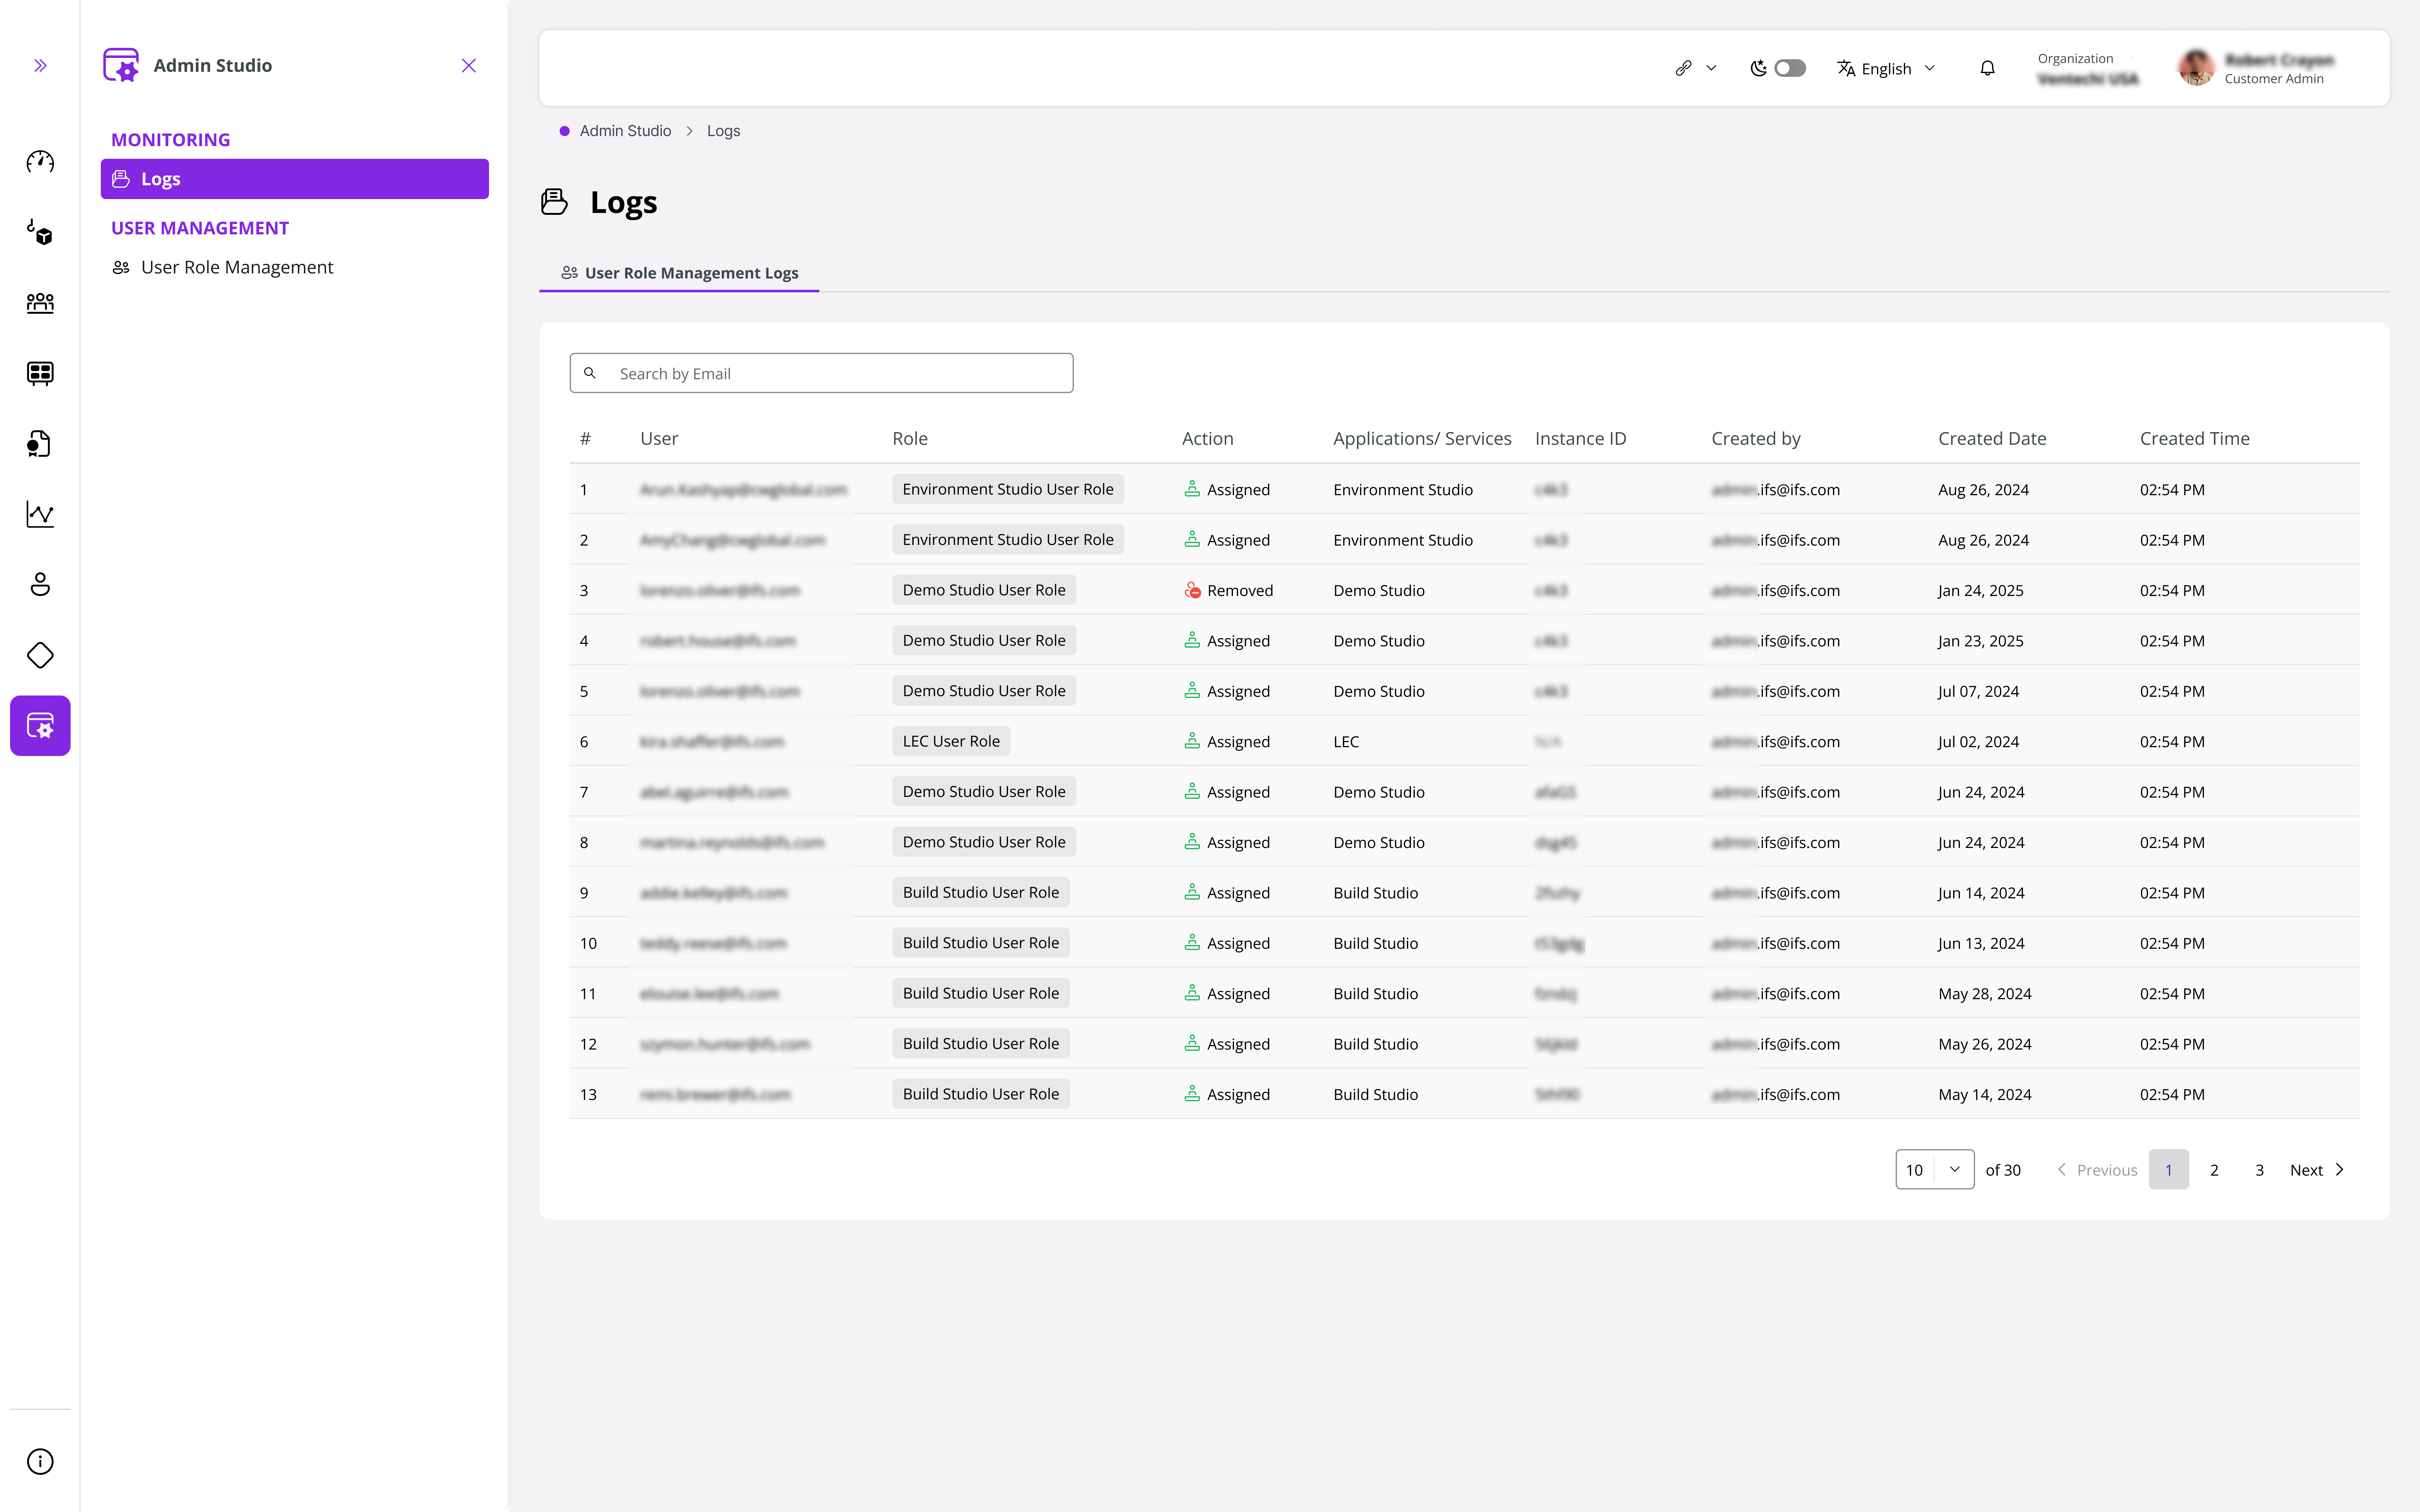 |
|---|
| Figure 12 -User Role Management Logs |
To view the user roles assigned within a Studio, go to the User Management section in each Studio. This section provides a detailed list of all users associated with the Studio, along with their assigned roles and permissions.
Users who need to view or download their environments' Delivery Deployment Logs must be explicitly added as Environment Studio Admins through Admin Studio, as the Delivery Deployment Logs are available in Environment Studio.