Configuring Mode of Implementation
Overview
The Set Mode of Implementation functionality was introduced in 21R2 as a method ensuring that the appropriate Mode of Implementation is selected at the time of setting up the Build Place. By allowing this to be done by a customer or a customer nominated user, it helps to ensure that we avoid situations where the Mode of Implementation is incorrectly set during the onboarding process. For example, customers who technically deploy the Use Place as a fresh installation can sometimes be onboarded incorrectly as an Upgrade. The reason for such misunderstanding is that customers often confuse a Cloud Solution re-implementation with an Upgrade, and vice versa during sales discussions. In such instances, rectifying this requires manual repairing of the Build Place which is a complex and time-consuming process that often results in delays and adds cost to the implementation projects. It had been observed that an implementation project generally discovers the incorrect setup of the Mode of Implementation at the time of creating the first Delivery to the Use Place.
As a method of ensuring the Mode of Implementation is correctly specified, the setting up of the Mode of Implementation is authorized only to a Build Place Technician during the Build Place setup and activation.
*A Technician could be a customer or customer-nominated user
The following are the Modes of Implementation a Build Place could have:
- New- A new customer purchasing IFS Cloud
- Re-implementation- AppX customer building a new solution in IFS Cloud
- Upgrade- AppX customer moving the existing solution with data to IFS Cloud.
The following section describes how this functionality fits into the existing Build Place Initialization and Activation flow.
Build Place Initialization and Activation User Flow
 |
|---|
| User Flow of Build Place Initialization and Activation |
[1 Customer onboarding request] > [2 Build Place Initialized] > [3 Build Place Activated] > [4 Welcome Email sent to customer] > [5 Access granted to users] > [6 Setup Mode of Implementation] > [7 Configuring Environment Shutdown time] > Build Place ready for use
| Step | Role |
|---|---|
| 1 | IFS Onboarding team |
| 2 | IFS Onboarding team |
| 3 | IFS Onboarding team |
| 4 | Service Now workflow upon completion of the RITM ticket |
| 5 | Customer Admin (New LEC User Role, refer to User authorization of the system) |
| 6 | BP Technician |
| 7 | BP Technician |
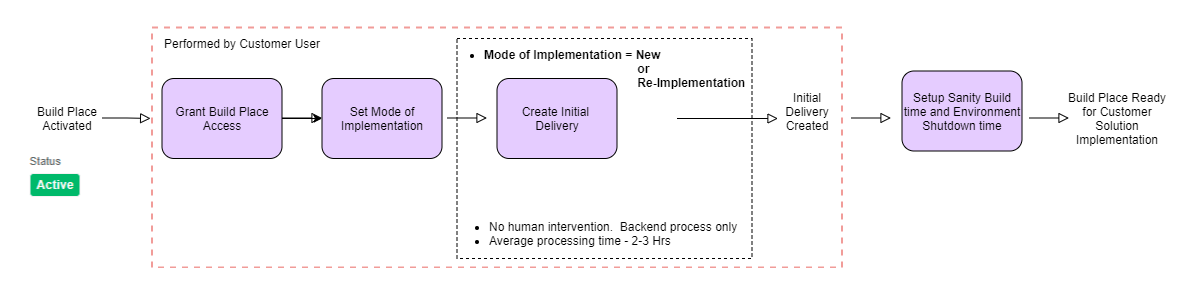
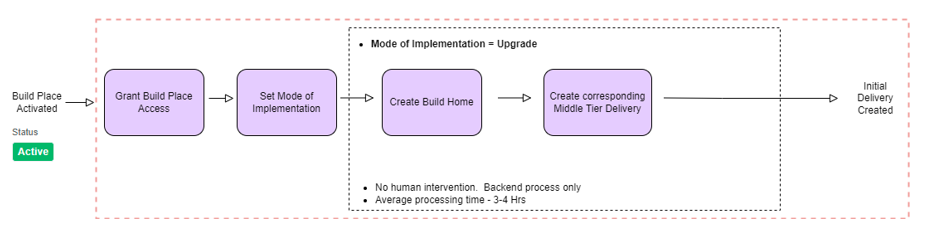
Depending on the Mode of Implementation selected in step 6, the operation initiated by the Lifecycle Experience Center (LEC) differs, as shown below.
Mode of Implementation = Fresh or Re-Implementation
 |
|---|
| Fresh or Re-Implementation Mode Workflow |
Mode of Implementation = Upgrade
 |
|---|
| Upgrade Mode Workflow |
When the Mode of Implementation is selected as Upgrade, the Create Build Home functionality will be executed, resulting in a new Build Home and the Initial Delivery.
Set Mode of Implementation
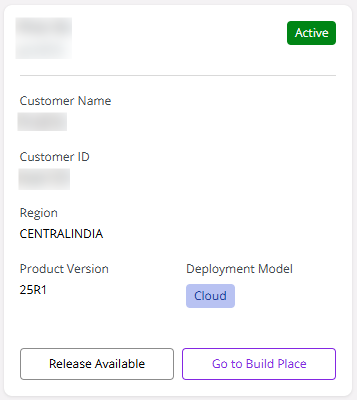
Once the Build Place has been activated and the user roles have been created, the next step is to set up the Build Place for use. The first step in this process is to Set the Mode of Implementation. At this time, the Build Place card appears as shown below.
 |
|---|
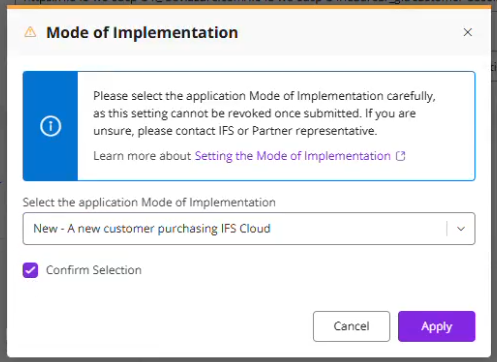
The user can now click Go to Build Place which then results in the Select Mode of Implementation dialog.
 |
|---|
| Mode of Implementation Dialog |
From the Mode of Implementation dialog:
Select the applicable Mode of Implementation from the three options given in the dropdown:
New implementation
Re-implementation of the current solution
Upgrade of the current solution
Upon selecting each of the options, the explanation text will give a short description of what each selected Mode of Implementation means.
The Warning text educates the user on the importance of choosing the applicable Mode of Implementation carefully and who to contact in case of doubt.
Reconfirm the choice by checking Confirm Selection check box.
The Apply button only becomes available once a valid mode of implementation is selected, and the confirmation check box has been ticked.
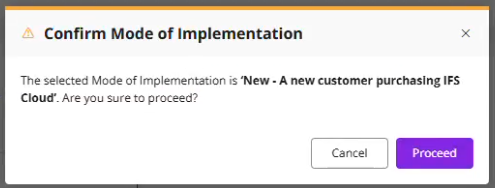
Clicking Apply prompts the user with the following confirmation dialog box that states the Mode of Implementation selected and provides the user one more opportunity to review their choice.
 |
|---|
| Confirm Mode of Implementation Dialog |
- Clicking Proceed saves the Mode of Implementation selected and does one of the following:
a. If the Mode of Implementation selected is either New implementation or Re-implementation of the current solution, it initiates the Create Initial Delivery operation. The Initial Delivery will be based on the latest Sanity-OK Tag which the system will automatically pick.
b. If the Mode of Implementation selected is Upgrade, it initiates the Recreate Build Home operation.
- The toast messages below confirm the successful update of the Mode of Implementation and triggering of either the Create Initial Delivery pipeline or the Recreate Build Home pipeline. The Mode of implementation selected will now be visible next to the Build Place name in the detail view.
 |
|---|
| Success Toast on Updating Mode of Implementation |
 |
|---|
| Success Toast on Initial Delivery Pipeline |
Behavior while Initial Delivery or Build Home creation is in progress
While the Initial Delivery or Build Home creation is in progress which can take up to 4 hours, the Build Place will be unavailable for other operations and the following banner will be shown to the user in the Build Place detail view.
 |
|---|
| Banner Showing the Configuration of Implementation Mode |
Once the Initial Delivery creation has been completed, the Build Place will be accessible for the user to complete the next step of the user journey which is setting up the Environment Shutdown time before the Build Place is ready to use.