This section details further IIS configuration options.
IFS recommends that the Touch Apps Server is only available over HTTPS for connections over the internet. The SSL connection can either be terminated in a proxy server or on the Touch Apps Server machine itself. If you want the Touch Apps Server machine to listen to HTTPS, specify the HTTPS address as the Site URL in the IFS Touch Apps Installer. If you want to terminate the secure channel on a different machine, specify an HTTP address as Site URL and set the External URL to the HTTPS address.
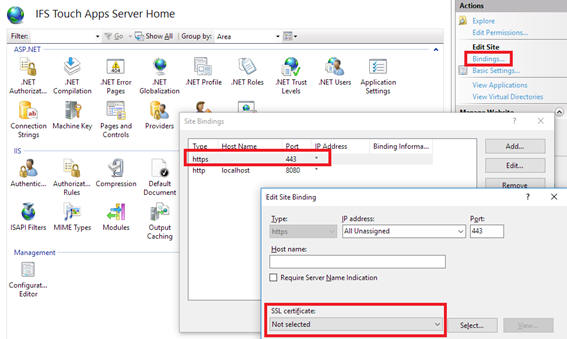
When the Site URL is set to HTTPS the installer will create the required site binding in IIS and update web.config accordingly. However, the installer will not set a certificate for the binding. This must be done manually once the installer has been run. This is done in the IIS Manager. Go to Bindings, select the HTTPS binding and select a valid (trusted) certificate.
Please note that the SSL certificate must have been issued by a trusted certificate authority (CA). Self-signed certificates are not supported.
Always follow the latest security recommendations. For example, TLS1.0 and TLS1.1
are no longer considered secure, so should be disabled both for incoming requests
(i.e.: where the TAS is acting as a server) and for outgoing requests to the IFS Middleware
Server (i.e.: where the TAS is acting as a client).
Tools exist that help with SSL configuration; for instance,
IIS
Crypto by Nartac
Software and SSL Labs Server Test.
The Open Web Application Security Project (owasp.org) is an open community dedicated to enabling organizations to conceive, develop, acquire, operate, and maintain applications that can be trusted. The following configuration changes come from the OWASP Testing Guide.
Web Servers often identify themselves in every HTTP response header.
HTTP/1.1 304 Not Modified
Accept-Ranges: bytes
Server:
Microsoft-IIS/10.0
X-Powered-By: ASP.NET
Date: Mon, 09 Oct 2017 14:21:46
GMT
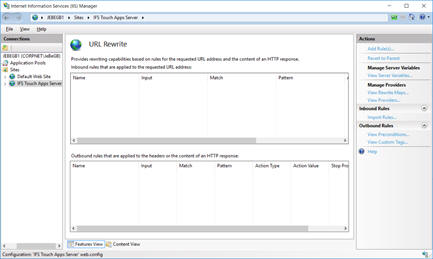
The Server header can be removed using the URL Rewrite module. This could previously be installed using the Web Platform Installer, but since it is now discontinued, it can be downloaded directly via IIS.net. Alternatively, you can do an internet search for URL Rewrite.
In IIS Manager, navigate to the IFS Touch Apps Server Site and open the URL Rewrite Feature.
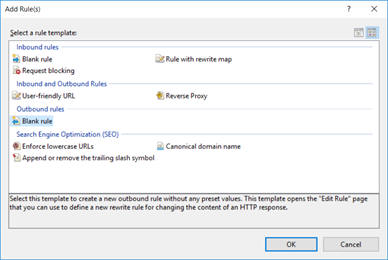
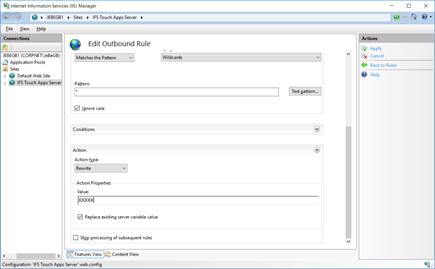
Select Add Rule(s) and create a Blank Outbound Rule.
Type a rule name. The Matching scope is Server Variable; the Variable name is RESPONSE_SERVER and we are Using Wildcards with the Pattern *.
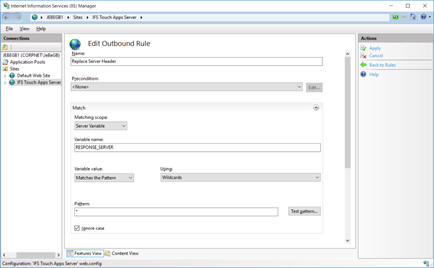
The Action Properties Value is XXXXX (or anything you wish). Click Apply to create the rule.
The Server response header is now
HTTP/1.1 200 OK
Cache-Control: private
Content-Type: text/html;
charset=utf-8
Server: XXXXX
The HTTP response header can also disclose the framework used to deliver a web application. By default, IIS adds the X-Powered-By: ASP.NET HTTP Response header.
This can be removed using the HTTP Response Headers feature in IIS Manager.
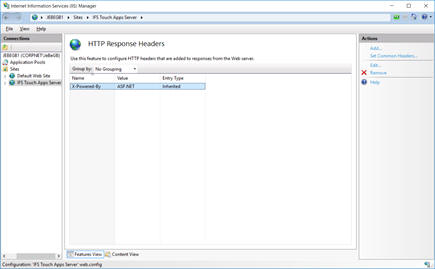
Select the X-Powered-By header and click Remove.
The HTTP Strict Transport Security header is used to ensure all traffic must be sent over HTTPS.
The header is added using the HTTP Response Headers feature in IIS Manager as in OTG-INFO-008 Fingerprint Web Application Framework. Click Add
![]()
Click OK.
The Customer Portal on the IFS Touch Apps Server is the administration interface for the IFS Touch Apps Server instance. Access to the Customer Portal is controlled by authenticating against either the IFS Applications instance, or the local Administrator account on the machine (or VM) that IFS Touch Apps Server is installed on.
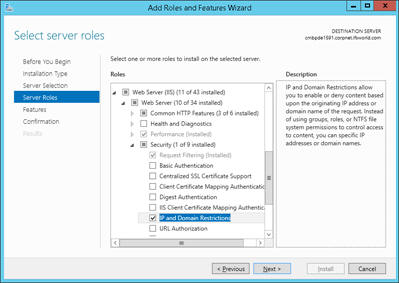
Access to the Customer Portal can be further restricted via IIS configuration options. The recommended way of doing this is by adding an IP and Domain Restriction rule.
On Windows Server 2016, this is done by adding the IP and Domain Restrictions server role from the "Add Roles and Features" wizard.
Once this is added, open the IIS Manager and navigate to Sites\IFS Touch Apps Server. On the right-hand pane, switch to Content View. Select SignIn.aspx, right click on it, and select Switch to Features View.
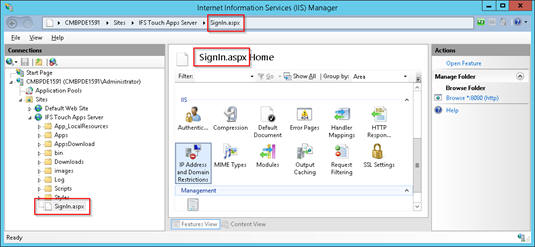
Confirm that SignIn.aspx now appears on the left pane's navigator, the address bar, and the top of the right pane. Now double click on IP Address and Domain Restrictions, and from here you can add Allow or Deny entries appropriate to your situation. Note that these changes now apply only to SignIn.aspx. The recommendation is that you add specific Allow Entries for the IP addresses that should be able to reach the Sign In page, and deny all else.

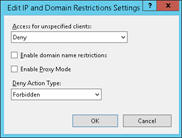
See https://www.iis.net/configreference/system.webserver/security/ipsecurity for details on how to do this on IIS.
An alternative approach is to add a Hidden Segment entry for SignIn.aspx from the Request Filtering configuration page. This does not require any new components to be installed, so is quick, but since it applies to all incoming requests, is not the recommended approach. If this is used, the Hidden Segment must be temporarily deleted when access to the Customer Portal is needed (for example to deploy, enable or configure a Touch App), and then added again.
Please refer to the Touch Apps Server Administration for more information on using the Customer Portal.
The easiest way to change settings is through the Application Settings feature of IIS Manager.
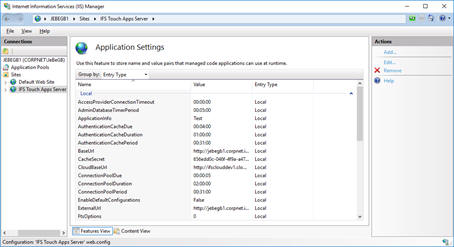
Each Touch App consists of a server part and one or more clients. The server parts are .NET assemblies that the TAS server reads from a folder.
By default, the web.config/appSettings/ResourceLocation parameter is not set. The TAS then looks for resource assemblies in the App folder of the web application. Change this parameter to a valid path if resource assemblies should be loaded from another location.
By default, a trace listener is set up to write errors to the file TASTrace.log in the Log folder. The Configuration Editor feature in IIS Manager can be used to change the file location or logging level.
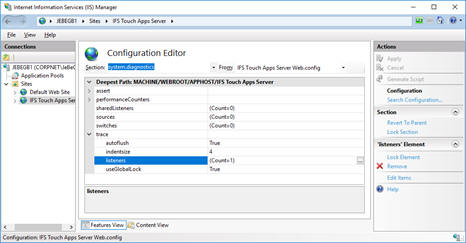
The listeners can be configured using the relevant button.

In the filter, set initializeData to Verbose to get all trace messages. A list of logging levels can be found here. In traceOutputOptions you can check Callstack to get exception call stacks in the log file.