IFS Constraint Based Scheduling (CBS)
This document describes how to set up your IFS Constraint Based Scheduling (CBS) server and/or Communication Bridge and
how to prepare your system to support a successful installation.
Contents
For a typical installation, only one CBS
Bridge per database instance and one CBS Server per scheduled site are required. The optimal installation would
have the CBS Bridge and CBS Servers either on separate servers or on separate CPUs of a multi-processor server.
Running other high CPU utilization programs on the same machine as the Scheduling Server and/or Communication Bridge
may impact CBS performance and is therefore not recommended.
Note: CBS is a 32bit application. As a result it can only utilize up to 2GB of RAM in a 32bit
operating system. This is a limit set by the OS. However in a 64bit platform it can utilize up to 4GB of RAM. For more
information please refer Appendix E.
Note: See Appendix C for special instructions on setting up CBS with Oracle Real Application
Clusters (RAC).
The following are the major features of the CBS setup program:
- Support for the installation of a Communication Bridge and/or Scheduling Server.
- Support for the installation of multiple instances of a Communication Bridge, Scheduling Server, or both,
including separate folders, registry keys, Services.
- Verification of the connection to the database through OCI.
- Automatic detection of the host IP address.
- Automatic generation of the Scheduling Server’s listening port.
- Automatic creation of Service for Scheduling Server and Bridge.
- Unique uninstallation entries in the Add/Remove Programs dialog box in the
Microsoft Windows Control Panel for each instance of a Communication Bridge or
Scheduling Server.
- Removal of all folders, registry keys, and Service associated with a selected instance of a Communication
Bridge or Scheduling Server during uninstallation.
Certain systems and configurations must exist on your system before you install IFS Constraint Based Scheduling. The
CBS setup program does not install or configure an IFS Applications database or the Oracle setup procedure necessary to
connect to a specific database.
The following steps are required before installing the CBS server or Communication Bridge.
- The database that the Communication Bridge and/or Scheduling Server will run against must already be set up, and your
site must exist in the database (refer Setting Up the CBS Site).
- Oracle Client software must be installed. Set up a SQL*Net connection to the database (or RAC node) to which you will
connect your Scheduling Server and/or Communication Bridge.
- Your CBS user name and password must be active and have the proper permissions (refer
Setting Up the CBS User Name and
Access Permissions).
- Microsoft .NET Framework 4.0 (or higher) must be installed.
- If the Scheduling Server is to connect to the database via the IFS Access Provider, the following files must be available
for the setup program. Alternatively, once installation is complete, these files may be manually copied to the folder which
contains the Scheduling Server executable file.
- Ifs.Fnd.AccessProvider.dll
- Ifs.Fnd.AccessProvider.Interactive.dll
- Ifs.Fnd.Buffer.dll
- Ifs.Fnd.Core.dll
- Ifs.Fnd.Data.dll
- Ifs.Fnd.Diagnostics.dll
Note: CBS/APB is a 32bit application. Therefore it cannot load 64-bit libraries. As a result it will not support a 64-bit Oracle client. In order to work on a 64-bit machine, a 32-bit Oracle client should be used.
The path of the directory that contains 32bit oci.dll, (usually <32bit Oracle
Home>/bin) must be included in system wide path environment variable.
Note: If both 64bit and 32bit Oracle clients are
installed on CBS server machine for the use of other applications, path of
directory containing 32bit oci.dll do not have to appear before 64bit oci.dll
path in the path environment variable.
Note: If CBS, CBS Bridge or CBS installation program is
unable to locate oci.dll and crash as a result, you can create a system wide
environment variable named 'OCI_PATH_FOR_CBS' containing the path of directory
where 32bit oci.dll is located (usually <32bit Oracle Home>/bin). When it is
defined, CBS installation program, CBS Server and Bridge will attempt to load
32bit oci.dll from location specified in 'OCI_PATH_FOR_CBS' environment
variable. Support for 'OCI_PATH_FOR_CBS' was introduced in LCS patch 143710 and
it must be applied for CBS to recognize it. When 'OCI_PATH_FOR_CBS' is used,
path of 32bit oci.dll is not required to be included in path environment
variable.
For the Scheduling Server or Communication Bridge to be able to communicate with the database, there must be an entry
for the database instance in the Oracle client’s tnsnames.ora file. An entry can be added by using Oracle’s
Net Configuration Assistant or you may use a text editor to add the entry manually.
- The location of your tnsnames.ora file may vary depending on your version of the Oracle client. In
most cases it will be found under the %ORACLE_HOME%\network\admin subdirectory.
- Add an entry for your specific database. If the database is an Oracle Real Application Cluster (RAC), refer to
Appendix C for special configuration information. You will need to know the SQL*Net alias and
the host and port of the machine hosting the database. An example entry is shown below (Figure 3-1).
Note: Remember that this name is case sensitive when you enter it in the SQL*Net Alias for
Database field in the CBS Database Settings dialog box during the CBS server installation. Make this name UPPERCASE in
tnsnames.ora, since the CBS installer converts the database alias that you enter during installation to
uppercase.
Note: If multiple oracle homes are installed on CBS
server machine, make sure to add connection details in the correct tnsnames.ora
file depending on which oracle home will be used by CBS and the value of
TNS_ADMIN environment variable if defined.
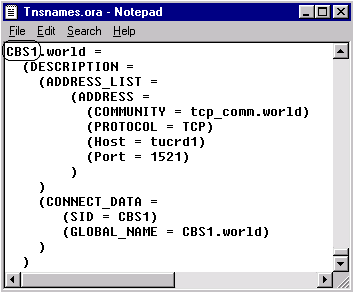
Figure 3-1 Database SQL*Net alias (circled) in tnsnames.ora
For the CBS setup program to configure the database with “Scheduling Server host” and “socket listening port
information” for your Scheduling Server site, the site must already exist in the database. The steps for creating your
site are as follows:
For the CBS setup program to configure the database with “Scheduling Server host” and “socket listening port
information” for your Scheduling Server site, the site must already exist in the database. The steps for creating your
site are as follows:
- Log on to IFS Enterprise Explorer.
- Open the Site window.
- On the toolbar, click New to create a new site.
- Enter information in all columns, and click Save on the toolbar to save your settings.
Note: Remember that the site name that you entered in this step must also be entered later
during the CBS server installation, in the Site ID field in the CBS Database Settings
dialog box (Figure 4-6 or Figure 4-7).
- Open the Sites per User window.
- On the toolbar, click Populate. In the User ID
field, select the user name of the application owner.
- Click New on the toolbar to create a new line.
- Place the cursor in the Site column of the new line. Use the
List of Values to select the site that you created previously.
- On the toolbar, click Save to save your changes.
The Scheduling Server requires an user with the appropriate permissions granted to be able to access the
database. Only one CBS user per database is required. If you are installing more than one Scheduling Server (Scheduling
site) against the same database (or more than one Bridge for an Oracle RAC), the user name and access permissions need
to be configured only once.
During installation of IFS Applications, when the CBS database files are installed, a user for the CBS Server (CBSSERVER)
and a role (CBS_SERVER) containing the all of the required permissions are created. Upon creation, this
user is set to locked with the password expired.
The user must be created in the company before running the CBS Server Setup.
Before installing the CBS Server, using SQL*Plus, log in to the database and prepare the user by issuing the
following commands:
ALTER USER CBSSERVER ACCOUNT UNLOCK;
ALTER USER CBSSERVER IDENTIFIED BY <new_password>;
To install IFS Constraint Based Scheduling, follow these steps:
- If installing from a build of IFS Applications, run the IFS Applications Installation Wizard (setup.exe)
program, which is in the root directory of the build. Select Server Environment installation type and then select
IFS Constraint Based Scheduling from the list of components to be installed.
If not installing from an IFS
Applications build, launch the CBS installation program (setup.exe) file from the
\Win32Server\Constraint Based
Scheduling\execute directory.
- During the file extraction process, a progress bar is displayed on the screen. Once the installation files are
extracted, the first window of the installation wizard will appear. This window displays a welcome message.
Verify the information on the screen and then select
Next to continue to the next step in the wizard.
- The Choose Destination Location wizard
window will prompt for the base directory location for the Scheduling Server
or Communication Bridge files. When installing, a subdirectory specific to the component being installed will be
created with a name that includes the database and site information, so that multiple servers or bridges can be
installed without directory name conflicts. Click
Browse to select a folder other than the default, or click
Next
to accept the default folder and continue the installation.
Note: During installation, the
system automatically creates subfolders beneath the root folder for the Bridge and the Manufacturing Scheduling Server if selected in the installation. You are not prompted to choose the names of
these folders.
- In the Select Components wizard window, select the check boxes indicating the applications and subcomponents
that you want to install. You can install either a Bridge or a Manufacturing Scheduling Server or both.
"Install Server - MFG" will extract the manufacturing server files to the hard drive, collect the information about
the database and site and write values to the registry for the installed servers. It will also make a connection to
the database and update the internal tables for the site to set the newly installed servers as the designated
servers for the site. Selecting the "CBS Bridge" component will extract and copy the
Bridge files to the hard drive. It will also present a wizard window to collect the data for the database
configuration and write the settings to the registry for the Bridge. Once you have completed your component
selection, click Next to continue to the next step in the wizard.
- The Server Connection Interface wizard window appears if you have chosen to install scheduling server. Use
this window to indicate the method used by the CBS Server to connect to the database. To establish direct
communication with the database, select "Using Oracle Call Interface". Otherwise, select
"Using IFS Access Provider". "Using IFS Access Provider" option is primarily for installations where the CBS Server(s) are not allowed to
access the database directly due to security reasons. This option can result in slower performance and higher memory
consumption by the system. Click Next to continue.
- If Using IFS Access Provider option was selected, the setup program will attempt to locate the .dll files
required by this option. (See
Preparing Your System for Installation.) If these files could not be located
automatically, the next step is to enter the location for these files in the IFS Access Provider Path field or to copy them manually by selecting the
I will manually copy IFS Access Provider files after installing CBS
Server check box. Then click Next to
continue to the next step in the wizard.
- The next step in the wizard depends on which options were selected in the previous Select Components window. If
one of the CBS Server options were selected, then the Database Info wizard window is displayed to collect the
database/extended server, site, application owner and username credentials. If only a
bridge is being installed, the site information is not required and the Bridge Database Info wizard window will be
presented to collect the database information needed for the bridge. Complete the following fields as
indicated below, and then click Next to go to the next step in the wizard.
| Field Name |
Values |
Database Alias
(required when using the Oracle Call Interface option) |
Enter the name of your database. This name must match the name that exists in the tnsnames.ora file.
This should be the specific node alias for RAC installations. |
| Extended Server Address (required when using the IFS Access Provider option) |
Enter the host of the IFS Extended Server along with the port number used, in the following format.
<Host Name>:<Port Number> |
| Site ID (Existing) for CBS Server to Connect To |
Enter the name of the site against which you will be running the Scheduling Server. This site must exist
before you install the server. This field is not shown in this wizard window if you have chosen not to
install the server. |
| Application Owner |
Enter the name of the Application Owner for the database. The application owner name is required as a
prefix for function calls that belong to the application owner. It is not used to logon to the database. |
|
CBS Server Username /
CBS Bridge Username |
Enter the username that the Scheduling Server and/or Communication Bridge will use to connect to the
database. As one of the prerequisite steps outlined earlier, you should have already created an account in
IFS Applications and granted the proper permissions using the grant script. The name suggested previously
in this document was CBSSERVER. |
|
CBS Server Password /
CBS Bridge Password |
Enter the password associated with the CBS Server Username / CBS
Bridge Username.
|
|
Encrypt logon information in registry |
By enabling this option, the username and password information used to connect to the database will be
stored in an encrypted form in the system registry. If this is not selected, then the username and password
are stored as plain text in the registry. It is probably a good idea to encrypt the information since the
CBS Server user may have additional rights that normal users do not have.
|
Note: A utility (PasswordUtility.exe) has been provided to facilitate changing of the CBS
Server username and password. This utility is able to locate the settings for an existing Scheduling Server or
Communication Bridge and write encrypted username and password entries to the registry. See Appendix A for more
information about the Password Utility.
- If, in the Select Components window, you have chosen to install a CBS server, you will see the
CBS
Server Log settings window as the next step. Scheduling Server can write log files to show commands sent from the
database in the input log, and responses sent from the Scheduling Server to the database in the output log. The
Server’s notification log will record any errors that occur when commands are issued. Together these can be a good
tool for diagnosing problems if they occur. The default settings are to write these three logs to their own separate
files with a maximum file size set for each one. You may choose to change the size of the log file. You may also
change the location of the log files. By default they will be written to the same directory where the Scheduling
Server is installed. When you are satisfied with the choices click
Next to proceed.
| Field Name |
Values |
| Server Input Log |
Select this check box to create a Scheduling Server input log. |
| Server Output Log |
Select this check box to create a Scheduling Server output log. |
| Server Notification Log |
Select this check box to create a Scheduling Server notification log. |
| Merge logs into a single file |
Select this button to put the output of the logs into one file instead of three separate files. This is sometimes
useful to gauge relative times that messages were received and responses sent but most of the time it is best to
keep the logs in their own files for clarity. |
| Maximum Log Size (kb) |
The largest size, in kilobytes, to which a log file can grow.
Note: The default value, 1024, is equal to one
megabyte. |
| Manufacturing Log Directory |
The folder in which the log files will be placed. By default, this is a subfolder of the folder in which your
Manufacturing Scheduling Server will be installed. You can change this setting by entering a new path in this field. |
- In the CBS Server Language wizard window, select the language used to present the graphical user interface.
The default language is English.
- If, in the Select Components window, you have chosen to install a bridge, you will see the
Bridge Settings
window. This will contain default values which you may accept or modify. The Log file name can be
changed along with the maximum size of the log file. The default path for the log file will be the directory where
the bridge is installed. The idle timeout for open sessions and the logon retry time can be specified as well. You
can edit these values or accept the default ones and click
Next to proceed.
| Field Name |
Values |
| Log file name |
The name of the log file. |
| Maximum log size (kb) |
The largest size, in kilobytes, to which a log file can grow. The default value, 1024, corresponds to one megabyte. |
| Log Directory |
The folder in which the log files will be placed. By default, this is a subfolder of the folder in which your Bridge
will be installed. You can change this setting by typing in a new path in this field, or by clicking Browse and
selecting a folder. |
| Maximum idle time for open sessions (hours) |
The longest time, in hours, that an idle connection to a database will be left open. |
| Logon retry delay (seconds) |
The amount of time, in seconds, that must elapse without a response from the database before the logon attempt is
considered to have failed. When this happens, the logon must be reattempted. |
- At this point the setup program has gathered all of the necessary information for setting up the Manufacturing Scheduling Server and Communication Bridge. The wizard will show the
CBS Installation Settings
window with a list of what it is about to install. You can verify the settings and then click
Next to
continue with the installation.
- The Setup Status window is displayed on
your screen. This window contains a progress bar that
shows the current status and progress of the installation. During this process, one or two MS-DOS windows (depending
on which components you are installing) are displayed briefly on your screen. Normally, these windows disappear
after a few seconds. Depending on your system’s MS-DOS configuration, you may need to press
Enter to close the
windows and resume the installation.
- Once the install process is complete there may be a few other wizard windows that appear. If everything is
working correctly the setup program will proceed to the final wizard window to report that the setup is complete and
you may move on to step 14. If there were problems with the database connection or if the database had previously
been configured for another Scheduling Server then some optional wizard windows will appear to help you correct any
problems or verify new settings.
- If there was a problem connecting to the database with the information entered, you may see an Oracle error
message if the host name was not found in the tnsnames.ora. Following any error messages, you will see the
Database
Configuration Results window with some suggestions of what should be done to verify that the database information is
correct. Click
Next, and the setup program will return to the
Database Info window (Step 7). this time showing what has been entered previously to allow you to make any corrections necessary. Verify that the entries are correct and verify that the database is running and is accessible and you can try the
connection again by clicking Next.
- If the database and site you specified for this installation had previously been configured for a Manufacturing
Scheduling Server, the setup program will present the
Override Existing Host and Port window. Here
it shows the existing configuration in the database and the new settings that will be applied. By clicking
Next you
will override the setting in the database with the new settings for this Scheduling Server installation.
Note: It is no longer recommended to configure the server on port 5000, since this port is reserved on Windows XP.
The installer has been changed to start at port number 5100 and increment by 100 until it finds a free port on the
host machine.
- Once everything has been configured the final wizard window
InstallShield Wizard Complete will appear and report the components that have been installed on the machine. Click
Finish to exit the setup program.
- At this point, a Windows service will have been installed to automatically start up the Manufacturing Scheduling Server and Bridge. If you reboot the machine, services should start automatically. You
may also start them manually the first time without rebooting by going to the
Services window in windows control panel / Administrative Tools, and locating the name of the CBS Server or Bridge that you have just installed. The names will
start with IFS CBS Bridge - <database name> or IFS CBS Server – CBS_<database>_<site>_MFG. Highlight the
service you wish to start and with the RMB menu select Start.
The Interactive Client is launched from an IFS Enterprise Explorer; therefore the files for the interactive client must reside in
the same directory as the IFS Enterprise Explorer. In a typical installation, this is
either a shared runtime folder
(containing IFS Enterprise Explorer, Foundation1 DLLs and other runtime files)
or a client runtime folder deployed in Application Server.
When the IFS Applications build (using the IFS Configuration Builder) was performed, several CBS files were copied
to the client/runtime directory of the build. These files include
schedserv.exe,
Ifs.Cbs.AccessProviderWrapperBridge.dll, Ifs.Cbs.AccessProviderWrappers.dll,
Ifs.Cbs.GraphWrapperBridge.dll, Ifs.Cbs.GraphWrappers.dll, msvcp100.dll,
msvcr100.dll, xmllite.dll, ZedGraph.dll, default.xml and all of
the language translation files Cbsxx.xml, where “xx” is the
language code.
The Scheduling Server looks for language files named xx.xml, so the language files in the runtime folder must be
renamed from Cbsxx.xml to xx.xml.
Note: During installation and upgrade of CBS components, care must be taken to ensure that the file
schedserv.exe in
the runtime directory is the same version and date/time stamp as in each Scheduling Server installation.
To recover from problems encountered during the installation process,
uninstall the Bridge and/or Server (Uninstalling IFS
Constraint Based Scheduling), correct the underlying problem with the
CBS Server machine or database, and run the installation program again.
- Start the Bridge service if not already running.
- Check the IFS Communication Bridge
window and Help ->
About dialog box.
If IFS Communication
Bridge is connected to the database it will indicate the oracle database
and user, transaction manager status, oracle pipe names that are used
for communication, no of database locks acquired, number of active
communication sessions, and number of consecutive connection errors.
- Examine the file bridgelog.txt for any errors. This file
is located in the directory configured for Bridge log files during
installation.
- Start the Scheduling Server service if not already running.
- Examine the file notificationlog.txt for any errors. This
file may not exist if there have been no errors detected since
installation. This file is located in the directory configured for
Scheduling Server log files during installation.
Using an IFS Enterprise Explorer follow the
navigator to Shop Order Scheduling Basic Data. On
the Scheduling Server tab, click the
Get Scheduling Server Date button and verify that a date
is returned. There will be a
spike displayed on the IFS Communication Bridge activity monitor.
To uninstall either the Bridge or the Scheduling Server, or both of these
components, follow these steps:
- Navigate to the Control Panel, and
click Programs and Features. In the list
of installed software locate the entries for CBS Server installation
that need to be removed.
Note: that the list of installed software
includes separate entries for the Bridge and the Scheduling Server. This
means that you can remove these components separately.
- From the list of installed programs, select the component to remove,
and then RMB click Uninstall/Change.
- If prompted, click Yes to verify
that you want to remove the component from your system.
- After confirmation, the InstallShield Wizard
progress bar is displayed on the screen while the system configures the
uninstallation files and then removes the actual programs, registry
entries, and NT services associated with the removed application. During
this process, an MS-DOS window is displayed briefly. Normally, this
window disappears after a few seconds. Depending on the system’s MS-DOS
configuration, you may need to press Enter
to close the window and resume the uninstallation.
- When a message box appears telling you that the uninstallation is
complete, click Finish to close the box
and return to the Programs and Features
dialog box. If desired, repeat steps 2–5 to uninstall the other
component.