| Foundation1 / Development Guide / User Interface / Ee Dev / Apf Development / References / Window Level Activities / |
To arrange the layout in the designer you simply drag and drop your controls to the desired location. Each control can be dragged by itself or in a group with other controls.
Some forms contains controls that shouldn't be visible at runtime (Visible property set to false). Normally they are visible in design time and that can make it difficult to design the form. You can select to show/hide the hidden controls by selecting the menu item IFS Development Tools/Show Hidden Controls. When the menu item is checked the hidden controls are shown.
Note: Fields connected to a picTab aren't affected.
To select a single control, click on the control on the design surface.
To select a group of controls, click on each control to be selected while holding down the Ctrl key. You can also select a group of controls by using a selection rectangle: click on the design surface, hold down the mouse button while moving it. A selection rectangle will show up between the original clicked point and the mouse cursor. Drag such a rectangle to include all the controls that you want in your selection, then release the mouse button.
When arranging the layout you should always pay attention to control alignment. The page Layout Standards provides information on how to layout components on forms. Control alignment is one of the key aspects when creating a good quality layout. Fortunately, the Visual Studio IDE provides rich support in this work. The basic grouping of tools to use when aligning controls is found in the Format menu. Here you can align controls in any direction, generalize sizes and spacing between controls.
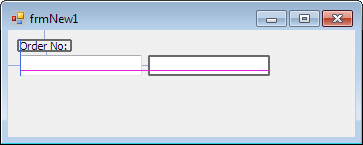
One of the most powerful tools is the various snap lines provided directly on the design surface. If you drag the control you will see that the designer will guide you with position and alignment lines directly in the designer. In Figure 1 below you can see some examples of the snap lines composed together.
Figure 1: Window designer displaying some of the snap lines in action.
All forms require some attention to tab order (the order in which the controls receive input focus when the user presses the tab button). It is easy to forget about this when rearranging controls in an existing layout. When you rearrange controls you should always investigate the tab order and adjust it if needed. The tab order should be set up so that it follows the order in which the layout is primarily designed to be filled out.
In situations where the intended tab order does not correspond to the current field positions you should consider rearranging the controls. The best user experience is achieved when the window layout and tab order work together so that the visual and logical order match.
Each control has a Tab Index property which is an ordinal number that can be adjusted on each control. There are however more efficient ways to reorder the Tab Index property.
To get a better overview of your layout you can make use of the window designer's Tab Order mode.
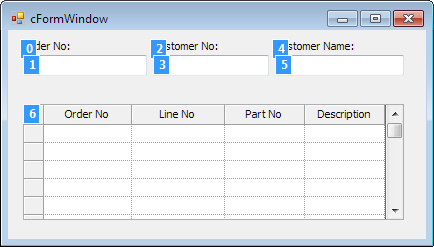
Figure 2: Window designer in tab order mode.
This method works great for smaller windows with a limited number of controls, but for larger windows this will be very tedious. For windows with lots of controls spanning over multiple tab pages, this method is almost impossible to use.
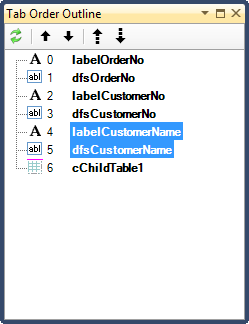
For larger windows the Tab Order Outline plug-in can be used. This will show all the window's controls in a tree structure ordered by their corresponding tab index.
Figure 3: Tab Order Outline plug-in showing a window's controls ordered by tab index.
The tab order is the way that the framework resolves the relation between a field
and its label. A field label should have the tab ordinal number preceding the field.
If this is not the case, the framework will not recognize the relationship. There
are several framework concepts that rely on this relation. For example field descriptions
in property, query and LOV dialog boxes and framework functions like the Sal.HideFieldAndLabel.
Figure 2 shows a correct tab order relation between the labels and fields.
In application forms development the tab order must be considered when it comes to logical parent connections and parent key connections. Parent key fields referred by a child table column must have a lower tab index to make the master detail connection work. In Figure 2 the child table column Order No is related to the parent field Order No. This requires that the child table has a higher tab index than the parent field, as in the example.
The Application Forms framework implements resize functionality much like the native C# anchor functionality. The resize property should be used to make controls size relative its parent and sibling controls. The control resizing behavior can be modified.
Note: .NET resizing is currently not supported for Application Forms Development. F1 resizing must be used.
To change column order in a table designer, the column designer order arrows are used.
Removing of columns in a table window or child table behaves slightly different depending on if the table is ported or created from scratch. For tables created from scratch you can just press the delete key to remove a column. But for ported tables this will not work due to the fact that they are sub classed. Instead ported columns must be deleted with the "Delete Column" designer verb on the column.
Note: The Commands panel is hidden by default in some Visual Studio versions. Check the "Commands" menu item in the context menu for the Properties window if you do not see the Commands panel.
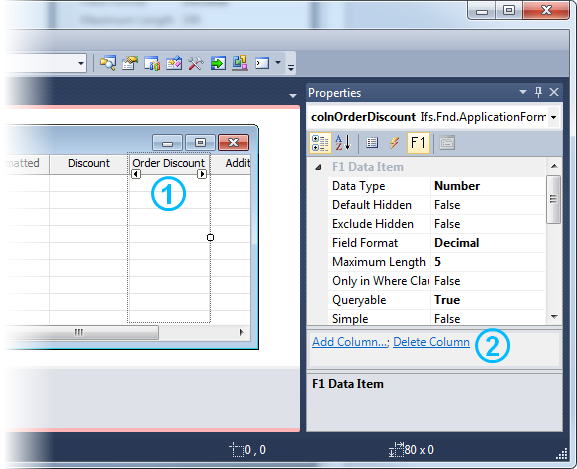
Figure 4: How to delete a column from a ported table window.
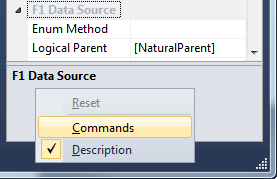
Figure 5: How to show the commands panel.