| Foundation1 / Development Guide / User Interface / Ee Dev / Apf Development / References / Field Column Activities / |
"List of values" (LOV) is a usability tool that assists the end user to select the correct data while editing. In that sense an LOV is the same as a combo box or a date picker. The LOV works where an attribute is a reference type. Typically this is true for a foreign reference. What the LOV dialog is doing is enumerating a grid with data from the referenced view that match the current key values.
A user can edit an LOV enabled field value directly as he could any other field, but with the addition that if he needs help selecting the correct value, an LOV dialog can be opened. The difference between a combo box and an LOV enabled field is that the LOV is designed to handle much larger data quantities and presents the list of values with additional help information. The LOV also provides search and sorting functionality.
To enable the LOV, set the field LOV Reference property. The LOV Reference specifies a view to use in the dialog and when zooming. Comma separated columns can be added after the view to add custom where conditions in the LOV dialog. Example: VIEW(COLUMN1, COLUMN2).
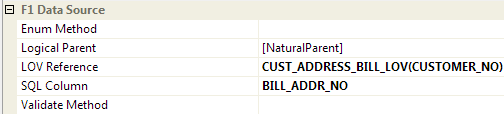
Figure 1: LOV Reference set for the dfsBillAddressNo field.
When the IFS DataSet Toolbox is used to create controls any attribute holding an LOV reference will set this property automatically.
Opening a modal dialog means that the feature toolbar can no longer be used. In cases where the dialog should provide support for functionality normally available through the feature toolbar, the support now must be made available on the dialog. The normal way of providing LOV functionality is to add a "List.." button to the dialog.
How to add a "List.." button to a dialog:
Select Designer... from the context menu on the commandManager in the components pane.
 .
.cCommandButtonList.#region Member Variables SalWindowHandle currentFocus = SalWindowHandle.Null; #endregion #region Event Handlers private void commandList_Execute(object sender, Ifs.Fnd.Windows.Forms.FndCommandExecuteEventArgs e) { e.Handled = true; currentFocus.PostMessage(Const.PM_DataItemLov, Const.METHOD_Execute, 0); } private void commandList_Inquire(object sender, Ifs.Fnd.Windows.Forms.FndCommandInquireEventArgs e) { e.Handled = true; // Store current focus in member variable. // When the List button is clicked the focus is moved to the button so we need to // remember the focus when execute is run. currentFocus = Sal.GetFocus(); ((FndCommand)sender).Enabled = currentFocus.SendMessage( Const.PM_DataItemLov, Const.METHOD_Inquire, 0); } #endregionExample 1: Implementation of List button event handlers.
Note: When creating the event handlers in step 5 you should remember to move the generated handlers to the Event Handlers region in the code.
The standard LOV functionality will set the value for the field that launched
the dialog. In some cases even other values from the selected record is of interest.
To get hold of additional values from the result of an LOV operation PM_DataItemLovDone is to be used. PM_DataItemLovDone is sent to a field when the
LOV dialog is closed. The message parameter lParam will hold the whole
selected record. Example 2 shows an example where an additional value is used for
a field.
private void colsAttributeKey_OnPM_DataItemLovDone(object sender, WindowActionsEventArgs e)
{
    e.Handled = true;
    this.nNum = SalString.FromHandle(e.LParam).Tokenize("", ((SalNumber)Const.CHAR_RS).ToCharacter(), this.sRecords);
    this.nNum = this.sRecords[1].Tokenize("", ((SalNumber)Const.CHAR_US).ToCharacter(), this.sUnits);
    if (this.sUnits[0] == "TEXT")
    {
        this.colText.Text = this.sUnits[1];
        Sal.SetFieldEdit(this.colText, true);
    }
}
Example 2: Get additional values from the selected LOV record.
Add Custom LOV
When the user invokes an LOV, the framework sends
PM_CreateLovto the window. Catching this message makes it possible to override the standard dialog and launch a custom variant. Creating a custom LOV that is derived fromcDialogDynamicLOVthat implements smaller changes is quite straight forward.
- In Visual Studio Solution Explorer, select your project
- Open the context menu for the project and select Add -> Class
- Open the created class file and change the declaration to derive from
cDialogDynamicLOVpublic class dlgDialogDynamicLOVCustom : cDialogDynamicLOV- For the field that you want to run the custom dialog, catch
PM_CreateLovmessage(For description on how to handle messages see Handle Messages)
- Create the custom dialog in modal mode, passing the message parameters as parameters to the dialog.
private void dfsCustomer_WindowActions(object sender, WindowActionsEventArgs e)
{
    switch (e.ActionType)
    {
        case Const.PM_CreateLov:
            e.Handled = true;
            dlgDynamicLovCustom.ModalDialog(Sys.hWndForm, Sys.wParam.ToWindowHandle(), SalString.FromHandle(Sys.lParam));
            break;
    }
}
Figure 3: Example of how a custom LOV dialog is launched.
For more details about how the LOV can be further extended see also PM_DataItemLov,
PM_CreateLov, PM_DataItemLovQueryValue, PM_DataItemExcludeFromLov,
PM_DataItemLovUserOrderBy, PM_DataItemLovUserWhere,
PM_LovQueryMultipleSelection.
