| Foundation1 / Development Guide / User Interface / Ee Dev / Layered Application Forms Dev / Create Iee Customization / |
Starting a new customization project is as easy as starting a completely new project in Visual Studio thanks to an Add-in available with the latest Tool-Disk. This guide will go through step by step instructions on how to create a new customization project and how to add customization items (Dialogs, forms and table windows) to the new project. To learn more about client development in layered manner, please refer to: Layered Application Forms client development
This section describes how to create a new customization project
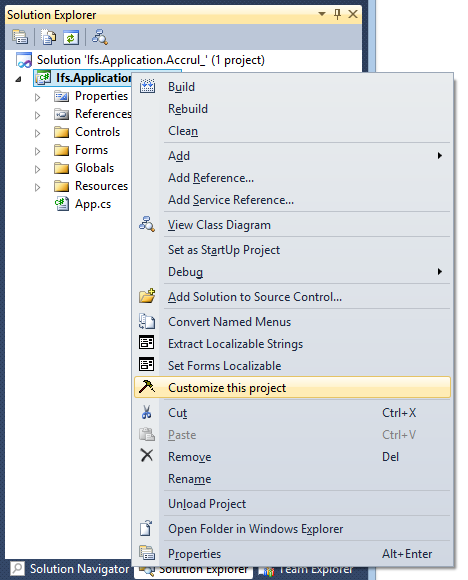
Locate the parent project in 'Visual Studio Solution Explorer' window, RMB on the project node and select 'Customize this project' menu option as in below image.
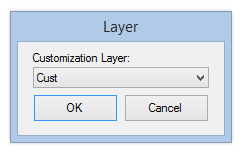
'Layer' dialog will pop up to select the new layer name of the new customization project as in below image. If developer does this on a core project, drop-down of the 'Layer' dialog will contain both 'Ext' and 'Cust' selections but if the developer does this on an extension project, the drop down will only contain 'Cust' in its selection. To learn more about layers and their naming, refer to: Layered Application Forms client development
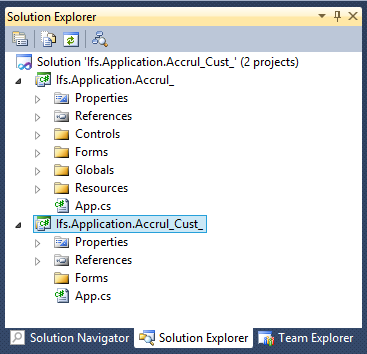
After selecting the correct layer, press OK. Then the visual studio add-in will create a new solution having the customization project with all required files and assembly references. After this step, 'Solution Explorer' of Visual Studio will look like below.
Developer can verify the process by compiling newly created customization project. If it compiles without errors, developer can move on to next step: customizing items in the core project.
Customization add-in automates following steps in order to create a new customization project
This section describes how to start customizing dialogs, form or table windows available in parent project.
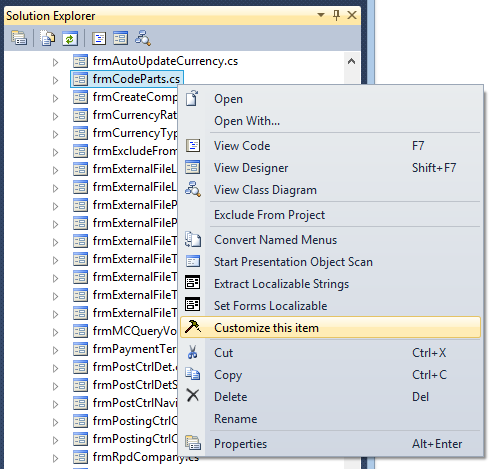
Locate the parent item inside the parent project, RMB on the parent item and select 'Customize this item' as in following image.
The add-in will create new derived item inside customization project using correct naming standards and will open it in designer mode. Developer can now start customizing the item. For a step by step example on how to customize a client form, refer to: A Simple Client Customization.
If multiple layers are present in the solution, the new item always added to the layer indicated by the suffix of the opened solution. Example: If the Developer has opened a solution with the name: Ifs.Application.Accrul_Cust_ and if it contains projects corresponding to three layers: 'Core', 'Ext' and 'Cust', Then invoking 'Customize this item' on any item available with 'Core' or 'Ext' layer will results in creating a new derived item inside 'Cust' layer. Also make sure that the visual studio is not in debug mode when attempting this step.
If a developer is customizing a non window class, i.e. a class that appears inside 'Classes', 'Controls' or 'Globals' folders etc, again the newly derived class is created in the customization project following a similar folder structure as in the parent project. After customizing, these classes can then be used as templates to create new classes. However, it should be noted that this customization will not affect classes derived from the original parent class of the core project in any way.
Customization add-in automates following steps in order to create a new customization item
Following table contains errors and information messages that can occur during the add-in usage and possible resolutions to avoid them.
| Error or the Information message | Resolution |
|---|---|
| Please build the parent project <project name> before attempting to customize! | Build the parent project as Add-in requires the assemblies for parent project in order to add assembly references. |
| 'Cust' layer cannot be customized further! | Are you trying to customize 'Cust' layer? It is not allowed through the add-in! |
| Items in 'Cust' layer cannot be customized further! | --Message is self explanatory-- |
| Customized project <project name> already exists at <path> ! | --Message is self explanatory-- |
| Customized item <item name> already exists! | Check for an item with same name with suffix '_<layer name>' exists in the customization project. |
| Please add this item manually! | Unexpected error may have occurred! Try to add the item manually |
| During the creation of customization project, a new solution will be created and both parent and new project will get added to it! | --Message is self explanatory-- |
| Please create customization project before start customizing items! | 'Customize this item' only works if customization project is available and its solution is already opened in Visual Studio. |
