| Foundation1 / Development Guide / Integration / Connect / Transport Connector Development / |
IFS Connect allows you to develop your own Connect Readers and Senders. This page describes how to prepare a proper project structure to be possible to develop a new Reader or Sender.
Short summary over the steps described below that prepare a connector project:
build.xml in your connector project folder.build.xml in
<project>/workspace/<component>/source/<component> to point out
the build.xml in your connector project folder.Connector Reader and Sender framework is implemented as a number of POJO Java classes
and interfaces (Plain,
Ordinary Java Objects, not bound by any special restriction) packed within the
IFS Connect framework JAR file (ifs-fnd-connect.jar) inside the Enterprise
Application EAR (i.e. ifsapp-int.ear), deployed to the Middleware
Server's Integration cluster.
The framework has to have access to custom readers and senders located outside the
IFS Connect JAR file,
Therefore the custom readers and senders have to be implemented as POJO classes
as well and packed to JAR
files available for the entire Enterprise Application, i.e. located in the
lib folder of the actual EAR file (ifsapp-int.ear).
The EAR file is packed by the IFS Applications build process therefore the JAR files with custom readers and servers have to be copied to the server/dist/int/lib folder prior to packaging the EAR file.
To achieve this the custom reader or sender Java source code should be therefore put into a proper ANT project folder structure with a build file capable to compile and build the final JAR file. The project should be located somewhere in the actual component folder structure and be referred from the build script located in the component's source folder.
The simplest way to do that is to create a Free-Form Java project in NetBeans
(or IFS Developer Studio).
A Free-Form project expects an existing build.xml file, so you have
to start with preparation of the proper directory structure for the project with
such a file. As mentioned the project directory has to be located somewhere in your component
structure, i.e. somewhere in the structure of an existing IFS Developer Studio
project.
So start with preparation of a proper folder structure in your component. The
examples below are located in component fndint, in folder
source/fndint/connectors,
within an IFS Developer Studio project Apps10. Note also that the example snapshots
contain only the important folders.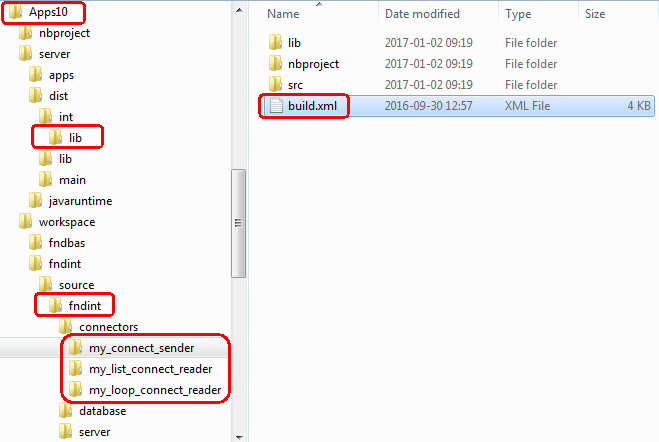
Important files and folders in the component structure.
When you create a
new project in IFS Developer Studio, in that example Apps10,
the project's top directory will contain, among others, some important
subdirectories: nbproject with NetBeans
configuration files, lib with Developer
Studio specific libraries and workspace
containing component directories that you have checked out from the repository.
Each component directory contains some subdirectories, among them
source/<component_name> with component's source
code. This directory contains a build.xml ANT script that is
automatically called by the main build process. You have to put the source code
of your custom reader or sender somewhere within this folder structure in your
component and modify the mentioned build.xml script to call build
script in your reader or sender.
Once you have build your project by running ant build (or
executing _ant_compile.cmd script) in directory
workspace/fndbas/build, you'll get some more
directories, among them: build with
generated code and server with files and
directories used for building the final applications.
Structure of the server directory:
ifsapp-main.ear and
ifsapp-int.ear.ifsapp-main.ear and ifsapp-int.ear.ifsapp-int.ear only.ifsapp-int.ear.ifsapp-main.ear only.ifsapp-main.ear.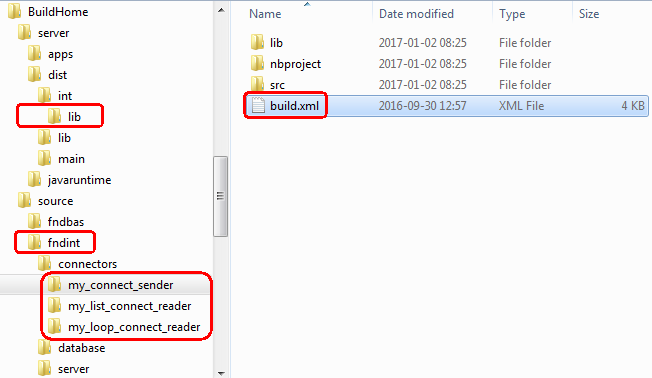
Important files and folders in the Build Home structure.
When you run the
IFS Configuration Builder tool it will create a folder structure we'll
refer to as Build Home structure. It takes files from component
structure, i.e. structure in the repository (SVN, Harvest,
workspace directory in your project) where each
component has it's own top directory, and merge all components together omitting
the component's top directory. So your
<component>/source/<component> directory will be just
source/<component>. After building the
application (by executing ant build or _ant_compile.cmd
from build directory) you'll also get,
among others, a server directory with the
same structure as described above for the component structure.
So first create a folder corresponding to your reader or sender project. Create subfolder that is supposed to host the Java source code files (src) and, if necessary, a lib folder with required third-party jar files.
Next create a build.xml ANT file for your project. Define all necessary
properties and targets:
<?xml version="1.0" encoding="UTF-8"?>
<project name="My Connector" basedir="." default="build">
  <description>Builds the project My Connector</description>

  <!-- Properties -->

  <property name="component"    value="fndint"/>
  <property name="dev.root"     value="../../"/>
  <property name="development"  value="TRUE"/>
  <property name="modules.root" value="${dev.root}../../.."/>
  <property name="server-home"  value="${modules.root}/../server"/>
  <property name="javaruntime"  value="${server-home}/javaruntime"/>
  <property name="distribution" value="${server-home}/dist"/>

  <property name="src"      value="${basedir}/src"/>
  <property name="lib"      value="${basedir}/lib"/>
  <property name="doc"      value="${basedir}/doc"/>
  <property name="build"    value="${basedir}/build"/>
  <property name="dist"     value="${distribution}/int/lib"/>
  <property name="jar.file" value="myconnector.jar"/>

  <path id="classpath">
    <fileset dir="${lib}">
      <include name="**/*.jar"/>
    </fileset>
    <fileset dir="${javaruntime}">
      <include name="**/ifs-fnd-connect.jar"/>
      <include name="**/ifs-fnd-common.jar"/>
      <include name="**/ifs-fnd-j2ee.jar"/>
    </fileset>
    <fileset dir="${distribution}">
      <include name="**/fndconnectframework-ejb.jar"/>
    </fileset>
  </path>

  <!-- Targets -->

  <target name="all" depends="clean-build"/>

  <target name="clean-build" depends="clean, build" description="Clean build"/>

  <target name="clean" description="Clean everything">
    <delete dir="${build}"/>
    <delete file="${dist}/${jar.file}"/>
    <delete dir="${doc}"/>
  </target>

  <target name="-init">
    <tstamp/>
    <mkdir dir="${build}"/>
    <mkdir dir="${dist}"/>
  </target>

  <target name="compile" depends="-init" description="Compile the source code">
    <echo message="Compiling ..."/>
    <javac srcdir="${src}"
           debug="on"
           debuglevel="lines,vars,source"
           optimize="yes"
           deprecation="on"
           source="1.8"
           target="1.8"
           destdir="${build}"
           includeantruntime="false">
      <compilerarg value="-Xlint:unchecked"/>
      <classpath refid="classpath"/>
    </javac>
  </target>

  <target name="build" depends="compile" description="Build the jar file">
    <jar jarfile="${dist}/${jar.file}" basedir="${build}"/>
    <delete dir="${build}"/>
    <copy todir="${dist}">
      <fileset dir="${lib}" includes="**/*.jar"/>
    </copy>
  </target>

  <target name="run" depends="build">
  </target>

  <target name="doc">
  </target>

</project>
Note especially properties 'development' and 'dev.root'
– they can be set by the calling script and can vary depending on if
the project is build from a component or Build Home structure.
Note also destination to which your final JAR file (together with possible third
party JARs) has to be copied to be included in right place within
ifsapp-int.ear (server/dist/int/lib).
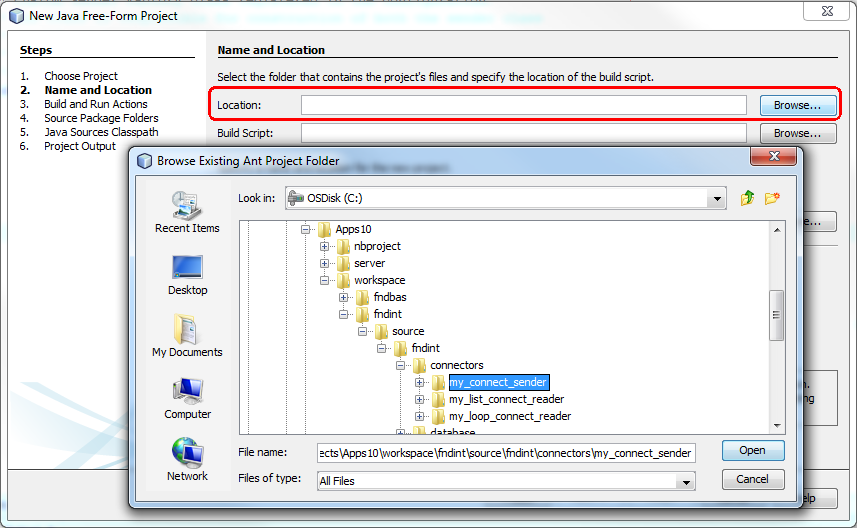
Now create a new Free-Form Java project in NetBeans or IFS
Developer Studio by pointing out your project folder (the one containing
build.xml file):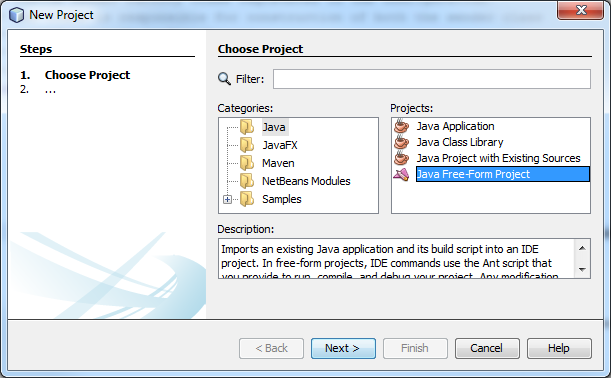
Beside of the possible third-party jar files located in the projects
lib folder, you have to add following jar files
to Java Sources Classpath to your NetBeans project: ifs-fnd-connect.jar,
ifs-fnd-common.jar, ifs-fnd-j2ee.jar and
fndconnectframework-ejb.jar. The first three files are located in
server/javaruntime folder, while the last
one is located in server/dist.
You my need to add additional jar files, both to project's Java Sources
Classpath specification and the build.xml script, if your
classes have more dependencies.
IFS Applications build process searches after build.xml
files located in components source directories, i.e. <component>/source/<component>.
To ensure your connector (reader or sender) will be built during the build process, you have to point
out the project's build script from this one.
So update the build.xml file in the component's source folder. The script has to
build your connector project (the example below builds three connectors: one
sender and two readers):
<?xml version="1.0" encoding="UTF-8"?>
<project name="fndint" default="build" basedir=".">

  <!-- properties 'dev.root' and 'development' are set by the main build process -->
  <property name="dev.root"    value="../../"/>
  <property name="development" value="TRUE"/>

  <target name="build">
    <!-- some actions here... -->

    <!-- Call the build target in our custom connector projects -->
    <ant dir="connectors/my_connect_sender"      target="build" inheritall="true"/>
    <ant dir="connectors/my_list_connect_reader" target="build" inheritall="true"/>
    <ant dir="connectors/my_loop_connect_reader" target="build" inheritall="true"/>

    <!-- some more actions here... -->
  </target>
</project>
If your component is missing the
build.xml file, simply create one according to the example above.
This documentation is supplied with some example connector projects, that can be downloaded from here. You can just copy one of the examples to your component structure, adapt to your needs and open it in NetBeans or IFS Developer Studio for further development.
