| Foundation1 / Development Guide / Integration / Ifs Applications Business Components / Riva Integration / |
The purpose of this page is to provide instructions that are needed for the RIVA integration developments.
The default configuration will be provided during the installation of CCTI (Calendar, Contact and Task Integration) component. This section describes how to create a new schema in IFS applications.
You have to first enter the new RIVA area and fields in Integration Package Area window.
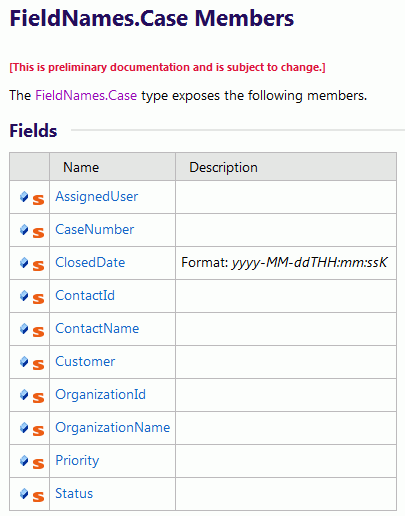
Note: Refer the RIVA sdk for identifying the fields related to RIVA area. Following fields are related to Case RIVA area mentioned in RIVA sdk.
Next step is to enter a new schema type in Schema Types window. This new schema type can be used in the Integration Schema window.
We need to map the new RIVA area and fields with IFS Sync Entity and fields. You need to create a new sync entity in order to do the mapping. For example, if you need to do a mapping for Case area then create a new sync entity called CctiSyncCase. The naming convention for an IFS sync entity LU is CctiSync<Riva module>.
Note: Refer the CctiGenSchemaTemplate utility package located in CCTI component (ccti/template/ccti).
This is a template that you can use to create your sync entity. This consists of all methods required for creating a normal sync package. Rename this utility (Ex: CctiSyncCase) and add your code inside this. Refer the procedures in CctiSyncOpporunity or any other sync entities as a reference.
Following are some steps you can follow,
Give the RIVA area name (Ex: Case) and sync view name (Ex: CCTI_SYNC_CASE) for the variables declared in the Private Declarations section
Create the meta view in Create_Meta_View__(). Use user_tab_columns and fnd_col_comments since this procedure will be called from Post_Instation_Object()
Create the meta view in Create_Meta_Dictionary_View___(). Use dictionary_sys_view_column since this procedure will be called when you are recreating the sync view from client.
Create the sync view in
Create_Sync_View___(). Refer the Meta view in order to select the
columns that you have added before.
Specify the Key column of sync view in
Get_Key_Column() function. Normally this would be
OBJKEY.
Add the logic to create, update and delete IFS records in Create__(), Update__() and Delete__() procedures (Refer CctiSyncAppointment or any other sync entity implementation regarding this).
Implement the Get_Categories() function in order to return the probable Category values use by the sync view. The sync column which contains those category values should be mapped with RIVA Categories column. It can be schema type or connection type (appointment).
Handle the sync column prompt translations in Get_Column_Prompt(). Since sync view was built based on IFS entity views, you can refer those views to fetch the correct prompt transitions of columns. Columns which you have defined only for sync view should be handled separately.
Grant the sync entity to CCTI_RIVA_SYNC_USER permission set. Grant Full Access to the new entity. Use Permission Set window (ifswin:Ifs.Application.SecurityAdministration.PermissionSetDetail) in order to grant database objects in CCTI which is located in Calendar, Contact & Task Integration node under Database Objects tab.
After completing with sync entity and view, next step is to do the mapping in Integration Schema window.
The CCTI SDK DLL (Ifs.Application.Ccti.Riva.dll)
is the IFS implementation of the interfaces RIVA has defined in their SDK for
building a service library for integrating with RIVA. It acts as a translator
between RIVA and IFS and handles all connections to the IFS installation. It can
be built manually using Visual Studio 2013 and .NET 4.5.2. If you need to open
the project in visual studio 2013, you have to install the Microsoft extension
from
https://visualstudiogallery.msdn.microsoft.com/9abe329c-9bba-44a1-be59-0fbf6151054d
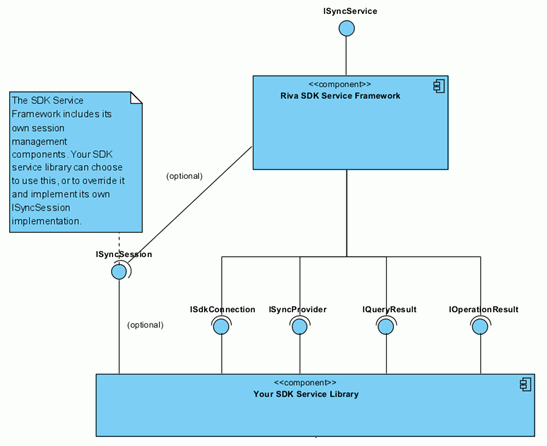
SyncSession
The iSyncSession interface is not being used by
the IFS service library.
Connection
The Connection declares what the service library
can do and handles new connection per synchronization.
SyncProvider
The Sync Provider exposes a number of methods to
RIVA which are used for e.g., polling the IFS system for changes, getting
attachments (e.g. contact pictures), inserting, updating and deleting records in
IFS due to changes in the email system.
DataProvider
The Data Provider holds most of the specifics on
how to connect to the IFS database. It is typically called from the Sync
Provider or Connection classes.
Relationship Management
In some sync entities, especially Appointments,
there is a need to handle relationships between a sync record and records in
other sync entities.
For the Tasks, there is a relationship against the Contacts for the
Company field in Outlook.
For Appointments, all attendees are considered relationships in RIVA and can be
against Contacts, Users or Leads.
If the new schema is a simple one similar to Opportunity then you do not need to do any changes to this dll. But, in case if you need to implement some specific logic such as relationships (ex: Appointment and attendee), and handling “query by” queries then you have to implement an different sync providers and other classes in this dll.
If you did any changes to this dll, make sure to commit the MSI (ccti\win32server\IFS Riva Integration\Install) which will be built with this project. Further make sure to check the assembly version of CCTI SDK project when modification or patch has been done.
Debugging
Add some break points in CCTI SDK code. In order to do debugging on CCTI
SDK, use “Attach to Process…” in debug menu option of visual studio. Make
sure to check the “Show processes from all users” check box in Attach to
Process dialog and select “Omini.Riva.Sdk.Service.exe” process from the
available processes list and press attach. It should now hit your break points
in the code when processing the sync cycle.
Log Files
There will be some log files created inside the Riva/Logs. Refer the log
file named such as “sdk-log(2015-09-30).txt” for find out the traces handled in
CCTI SDK. To enable more extensive logging from the CCTI SDK, you can edit the
file Ifs.Application.Ccti.Riva.dll.config
(located in Riva/Sdk).
Find the line which specifies the log level, typically something like:
<level value="INFO"/>And change the value to be DEBUG and restart the
Omi Riva SDK Sync Service Windows service. Apart from Sdk log, there are
some other logs will be created related to RIVA. Please refer more information
about these logs in
http://kb.omni-ts.com/entry/640/
This section describes how to add a new mapping for existing schema. There can be a need for adding more mappings to existing schema. For example, by default customer contacts will be mapped with Contact RIVA area fields. If you need to synchronize supplier contacts then you need to add a new mapping for existing Contact schema. Similarly if you need to map HR appointments to existing Appointment schema then you need to follow the below processes. It is important to note that header and sub schema sync package and view names should be different if you go for this method. This needs following processes,
Create sub sync entities
Modify the header sync entity
A new mapping for existing schema
Note: Probably, you do not need to modify anything in CCTI SDK dll, since you are adding schema for an existing one.
Refer the CctiSubSchemaTemplate
utility package located in CCTI component (ccti/template/ccti). This is a
template that you can use to create your sub sync entity. This consists of all
methods required for creating a sub sync package.
Rename this utility (Ex: CctiSyncCustContact) and
add your code inside this. Refer the procedures in
CctiSyncCustContact or CctiSyncSuppContact
as a reference. It is important to use the prefix
CctiSync and followed by a name (connected with the area name).
Follow the steps given in
Create Sync Entity. Add the logic for create, update and delete IFS records
in Add(), Modify() and Remove() procedures (Refer
CctiSyncCustContact or CctiSyncSuppContact
regarding this).
If you have different sub sync entities than the main
sync entity then main sync entity should be changed to handle multiple sub
schemas. Refer the CctiUnionSchemaTemplate
utility package located in CCTI component (ccti/template/ccti).
This is a template that you can use to create your main sync entity which
consists of union sync view (create by referring sub schema sync views) and the
create, update and delete logics.
Rename this utility (Ex: CctiSyncContact) and add
your code inside this. Refer the procedures in
CctiSyncContact as a reference. The naming convention for this entity is
CctiSync<Riva module>.
Give the RIVA area name (Ex: Contact) and sync view name (Ex:
CCTI_SYNC_CONTACT) for the variables declared in
the Private Declarations section. Other necessary code is already provided in
the template.
CctiIntegrationCommon Utility
This utility has been used to reduce the load from main sync entity.
This is a generic utility package which can be referred by main sync entities.
This utility will redirect the calls such as add, modify and remove for correct
sub sync packages.
Further, this will handle some complex operations such as unpack/ pack attribute
strings and creating union sync view.
Refer Support for Supplier Contacts section in Technical Guide.
