This section describes how to handle files in customer harvest when applying a new IFS Update to a customer installation. Here the focus is only on handling layered core files and non layered files in customer harvest. The process described here cannot be used to handle Cust and Ext layer files.
In a customer harvest there can be single patched and/or customized files. As mentioned above Cust and Ext layer files are not considered here.
Take a file in harvest where some single patches are applied and all those single patches are included in the target Update. If there are no other changes in that file then all changes in the file become obsolete due to the Update. In other words the file is obsolete in harvest. On the other hand if there are changes that need to be kept and corresponding file in IFS Update also has changes then they need to be merge to the file in customer harvest.
The Update apply process describes how to merge and obsolete files in customer harvest using ISD 2 together with the Update Extractor file (.updx) generated from LCS.
Prerequisites: Understanding of "Handover UPD" process and how to create a UPD customization package in LCS.
Step 1: Generate the Update Extractor file from the customization package.
Step 2: Open Update Extractor file in ISD2. (File menu: File> Import UPD File)
All files which have to merge and marked as obsolete will be listed in the Download tab. Files which contain non-superseded changes are listed as files to be merged.
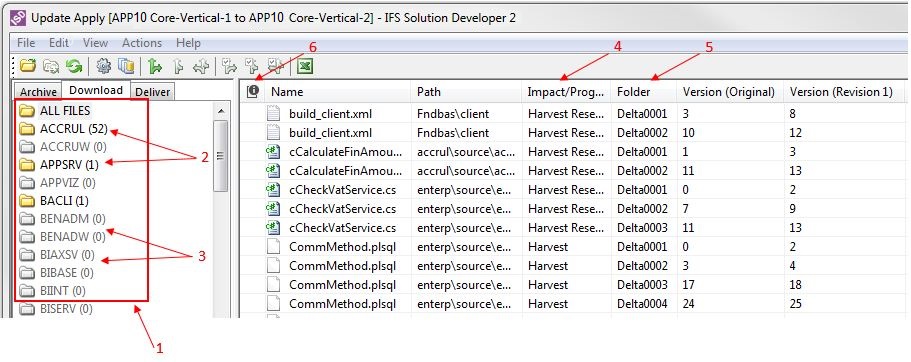
1. Components in customer installation
2. Grayed out folders do not have files to be merged or make obsolete due to the Update.
3. Affected file count is displayed in front of component name.
4. At this step Impact/Progress column states are
Make Obsolete - All the single
patches applied to the file are included in the Update to be
applied. The file can be made obsolete.
Harvest - File is in harvest
Harvest Reserved - File is reserved in harvest. File should be unreserved before
the merge step. (Select File: RMB > Unreserve)
5.
Folder - Multiple versions can be
superseded in a file. If those versions are not continuous and/or
non-superseded versions lies before and after, there could be non-superseded
version groups. Each of these non-superseded version groups are shown as
separate entries in the table while the Folder column shows the delta folder
where each of them belongs to.
E.g: In the above image, for file cCheckVatService.cs, versions 3 to 7 and 10 to 11 are superseded. So ISD shows three delta folders for the file indicating that we have three non-superseded groups to merge.
6. Files with no changes, but contains superseded packages - This indicates customer harvest files which are not changed, but obsoleteble. The file's version list must contain at least one version which is not a _STD package.
Step 3: Set files marked as Obsolete, obsolete in harvest. Select file RMB> Make Obsolete>, select All Files or Selected Files.
The files will be set to obsolete in harvest using harvest package in UPD customization package. The Impact/Progress column will be set to 'Obsolete'

Step 4: Merge the other files.
First checkout the 'Harvest' files for update. Select file RMB> Reserve and Download File(s) for Merge>, select All Files or Selected Files.
In the pop up dialog give a location to checkout the file(s).
Harvest files will be reserved and necessary files will be downloaded to Original and Revision folders, then files in the target update will be copied to separate folders. The Impact/Progress column will be set to 'Ready for Merge'. The checkout folder will have the following structure,

To merge select file RMB> Delta> Extract/Apply, select All Files or Selected Files.
This will pass the files in Delta Folders to the Delta Engine (Refer Working with Delta Engine for more information) .
Delta Engine will open merged output or manual mode window to merge files. Merged files will be saved in the checkout folder.

1. Files in target Update
2. Files downloaded from Harvest
3. Merged Files
When merging is done Impact/Progress column will be set to 'Merged'.
Step 5: Check in files. Select file RMB> Check In Merged Files>, select All Files or Selected Files.
The files will be checked in using harvest package in UPD customization package. The Impact/Progress column will be set to 'Completed'.
When check in, there can be some files which are identical to the latest file version in harvest. In such cases check in process may fail. But these files should be checked in, otherwise ISD will fail to fetch the correct file version in the delivery process. So the identical files will first checked in with a dummy change and then ISD will check in the same file without the dummy change (This adds an extra version to the file, but it reduce the complexity of the whole process). You can see these details in the ISD log.
When all the files are checked in or made obsolete the Update Apply process is completed. The following dialog will be shown and the Download tab can be cleared from there.
Finally the following dialog is shown to remove the remaining files in checkout folder and the .updp file (.updp file is created by ISD to keep information like harvest information, Impact/Progress state, information from delta engine, ect.. ).
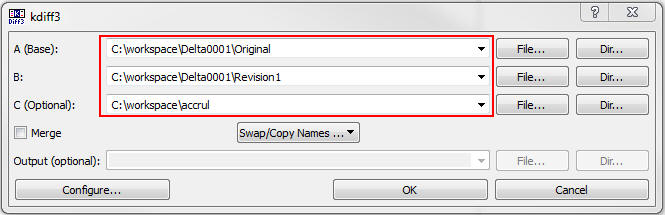
In the process described in Update Apply Process section, merging is done using Delta Engine. Alternatively you can use any merge tool of your choice to do the merge. The files to be merged can be setup for the external diff merge tool in ISD2. After opening .updx file (in Step2) select file RMB> Prepare For External Merge Tool>, select All Files or Selected File.
In the pop up dialog give a location to checkout the file(s).
All the necessary file versions in customer harvest will be downloaded to the selected folder and the files in target update will be copied to separate folders.

Provide the three locations to the external diff merge tool and merge the files.
e.g.: KDiff3