State Machine
A business object's lifecycle can be described by a state machine. A state machine can have several states. Events are executed for transiting the business object from one state to another. The transitions between the states are controlled by the state machine.
The state machine, including the available set of transitions to perform for each state, is set up in the entity model.
In the simplest case a state machine only holds two states, e.g. Active and Inactive and the transiting event could be Deactivate and Activate.
Typical business objects where the state machine is used are customer orders and payments. For such objects, the state machine can be rather complex.
State machine can be layered, meaning that they can be extended.
Definitions
State
One attribute in the entity that holds the current state. This attribute is stored as a regular column called rowstate in the base table. In the base view, the same column is called objstate. Here you also find the column state, which shows the current state translated into the local language. You do not need to add these columns as attributes in the entity model, they are added automatically when you define your entity to act as a state machine.
Event
The action that is responsible for the transiting of a business object from one state to the next state. Normally a method in the entity package.
Transition
The piece of code that actually changes a business object from one state to the next state.
Modeling
Easiest way to model the state machine is to list the states and events directly in the model editor in Developer Studio.
Follow these steps to model a state machine (compare with the example below):
- Create a base entity and add keys and attributes.
- Define your entity to contain a state machine by enter the states code generation property
- Add a startstate and what state that should be the start value (transitionTo).
- Add relevant states for the business object.
- For each state, add zero, one or several events. Add a condition name tag if extra conditions need to be fulfilled before a state can be changed, or an action name tag if extra actions should be performed. At this state you only enter the names of the condition or action, the actual coding is done later in the plsql file.
- For each event, add what status the entity should have after the event has been performed.
- Optionally add an endstate. The specific with this state is that there is no return from here, the object should be considered as read only once this state has been reached.
- Generate code for the entity. Database files, .cre, .api and.apy, are generated.
For complex situations, you can group the several substate into one superstate.
Examples
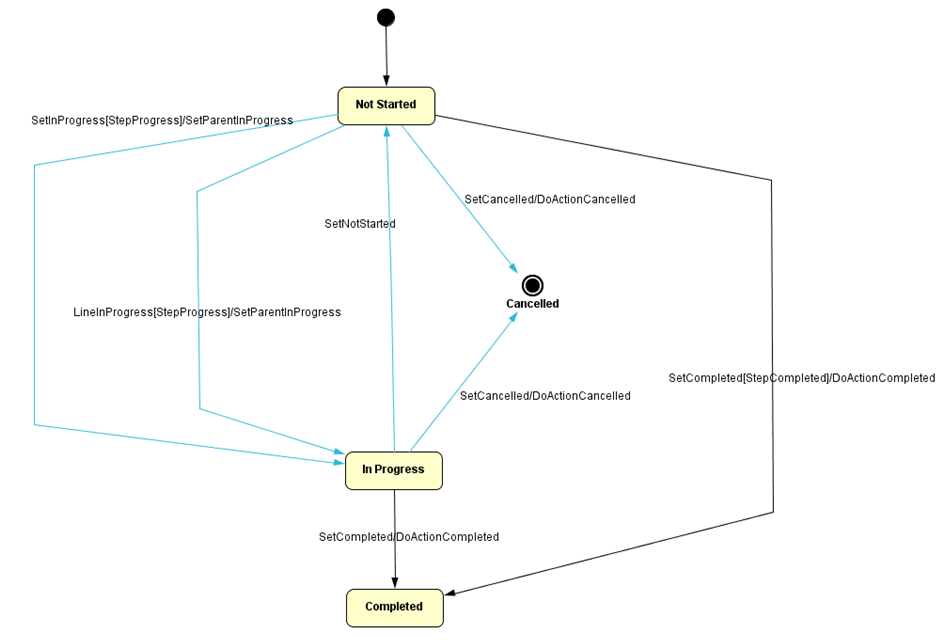
A simple state machine containing the states Not Started, In Progress, Completed, and the endstate Cancelled. From the states Not Started and In progress, you may transit to other states. The condition name tags [StepProgress] and [StepComplete] indicates that extra validations need to be done before the state is transit from Not Started to either In Progress or Completed. SetParentInProgress, DoActionCompleted, and DoActionCancelled are examples of extra actions that are executed together with the transitions.
This example shows how the state machine looks like in a graphical diagram.
Generated Code
Several methods for the state machine are generated into the api and apy files, a majority of the methods are ready after the code generation but some must be completed. The most important generated method is probably the Finite_State_Machine___.
The Finite_State_Machine___ is the true engine for handling states within the entity. It reflects what has been defined in the model when it comes to available transitions on each state but it also do the actually transition (by calling the method Finite_State_Set___).
More in Finite_State_Machine___, you find calls to methods for the extra conditions (e.g. IF (Step_Completed___...) and actions (e.g. Do_Action_Cancelled___) discussed earlier. The code generator provide you with a skeleton for these method so you only need to add the business logic. By coding in these methods, override and overtake of the the base methods for the state machine should not be needed. Very briefly how they may look like are shown below.
Example of a method where you check an extra condition:
Example of a method where you do additional actions:
Note: Even though you get a skeleton from the tool, these methods are not considered as base methods, i.e. you should annotate them with @Override or @Overtake. However, you might want to override/overtake these methods in the cust layer if the methods are added in the core layer.
There are also base methods generated to be used for transiting between states from the client. These methods are typically named Set_Cancelled__, Set_In_Progress__, i.e. "Set" followed by the state you want to transit into.