A user is defined by a user id. Apart from the user id, each user should have a description (typically the full name), a preferred language, a default time zone, and a directory id.
Note: It is recommended to use US-ASCII character set in user name and password to avoid issues that arise from unsupported character sets in HTTP Basic Authentication.
The directory id is required for the user to access the system through a client. The directory id should be the same as the users identity in the directory server used. For example if ADFS or Azure AD are used as the identity provider then directory id should be the login id used by the respective identity provider, if Oracle is used directory id should be the Oracle user name etc. If this sounds confusing, then check the page about Understanding user concepts in IFS Application.
A user can be set as inactive. This means the user will not be able to logon IFS Applications. To do this click on the Active User link. You can later click the link again to reactivate the user.
When creating a new user, if the corresponding Database User already exists, then the Database user will be updated with the relavent information.
A user can be activated/deactivated by clicking on the Active User link
on the user form. This will bring up a dialog where you can activate/deactivate
or set the user account life time interval.
Deactivating a user account will make it impossible for a user to logon. You can
later click the link again to reactivate the user.

If the user account life time interval is set the activation/deactivation is done automatically by a scheduled task , called Validate Timespan For Users. Setting the interval can be done either in the user detail form or in the Editable Overview - Users form.
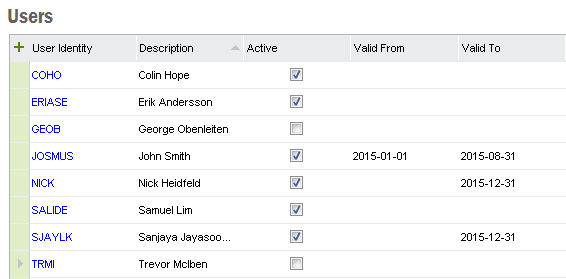
Activating users by entering an interval can be convenient to use for temporary users or users that are beginning or have resigned their employment. The scheduled tasks runs every day at midnight looking for users that are in the interval and if they are in the interval the users either are activated or deactivated.
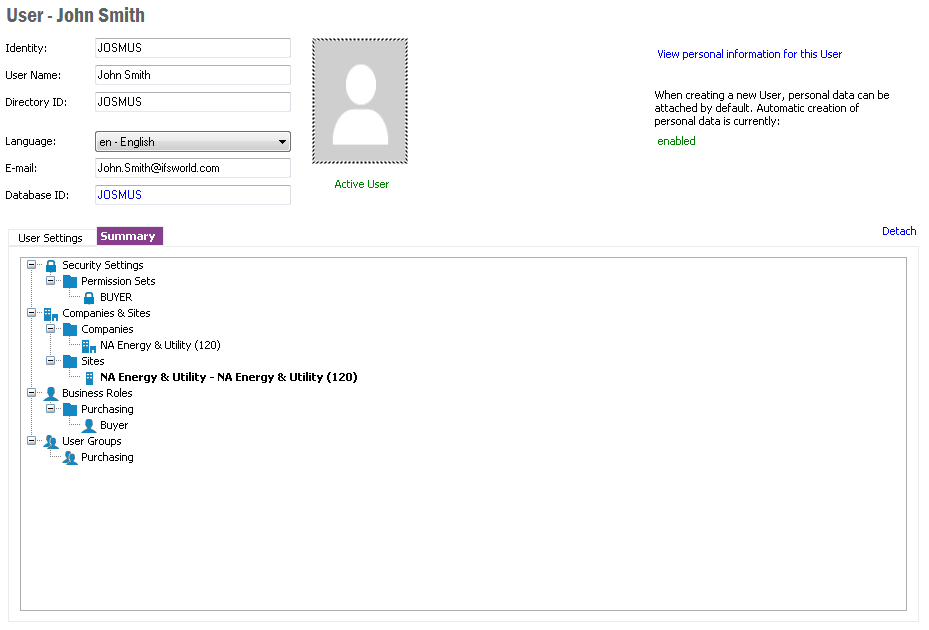
A user can be assigned a number of Permission Sets. Expand the Security Permissions node in the User Settings tree to set the permissions for the current user. The new permissions are persisted once you save and the security cache is automatically refreshed. You can view the total summary of the users permissions by clicking on the View Security Summary link on the Security Permissions pane. The Security Permissions pane shows all the Permission Sets directly granted to the user. It also shows the indirect Permission Sets that the user also is granted since they are defined as functional Permission Sets on the granted end user permission sets that user is given access to. You can select the list, tree or grid mode to view this information. The tree mode shows for each permission set how many functional Permission Sets that is granted this Permission Set and also the total number of Permission Sets in the whole structure below.
To view or change which companies or sites a user operates on open the Companies and Sites node in the User Settings tree. Set the companies and sites that should be available to the user. Selecting a site for a company which is not selected will prompt you to also select the company.
The users role is managed in the Business Roles nodes in the User Settings tree. You may assign or remove a business role to a user by setting/unsetting the corresponding checkbox. Some roles are dependent on other roles and for many roles it is also required that a person is created for the user.
User Groups can be used to group a number of users in to logical groupings. You can assign a user to any of the user groups shown in the user groups nodes in the User Settings tree.
The User Profile settings are shown when you select the User Profile node in the User Settings tree. You can assign a profile to the user here.
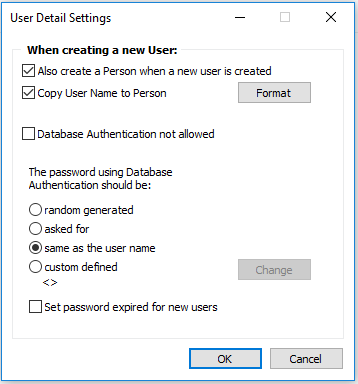
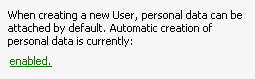
The person object in the system defines information which is valid for the person and not necessarily for a user of IFS Applications, such as addresses, phone numbers and picture. You can connect a user to a person by clicking on the Connect User to Existing Person link in the user form. You can also choose the Create a Person for this User link to create a new person object which is connected to this user. After saving the user object you can navigate and view the person object. If you always want to create a person when you create a new user you can click on user settings in the toolbar and select "Also create a Person when a new user is created".
If you want the user name to be used as the Person's name then select the Copy User Name to Person option. This will also be used when the user information is updated.
The same dialog can also be opened from the link which tells whether automatic create person function is enabled.
General properties on a user used by the application can be defined in the User Properties form available by right-click on the user form and select User Properties. This dialog shows the properties for this user and you may change or create new properties. The documentation for the area where user properties are used will guide you how each of those properties should be setup. Example of this is the property "CUSTOMER_ID" used in a Business To Business web application.
When the user is created a corresponding database account is also created for this user. There are different options how to set the password on this Database User. The password will be used by the user when logging on IFS Applications if the system is setup to use database authentication. In the Settings dialog (right-click on the user detail form header and select settings) you can define if you should be prompted to type a password each time you create a new user or if the password by default always should be the same as the user id or you can select a custom password to be used. If you do not use database authentication ,password generation is set to random generated.
To get a quick overview of the settings for this user open the tab page Summary. This will show only the settings for this user and exclude all other possible settings.
Other than using the delete button in the menu bar, a user can be deleted
using the RMB option "Delete Cascade". Here, it deletes the Foundation1 user
including its associated Oracle account and all database objects owned by the
user. Before attempting to remove the Foundation1 user, it checks all the
references to the Foundation1 user and based on the type of reference, it may
remove the relevant data or if it's not possible, will show an error. If an
error is shown, you will need to remove the referenced data manually and then
try to remove the user again.