| Foundation1 / Development Guide / User Interface / Ee Dev / Apf Development / References / Window Level Activities / |
The Tree List Box class cTreeListBox is used to show a tree structured view
of information. A typical usage of the Tree List Box is a master detail layout
where the tree list is used as an object browser.

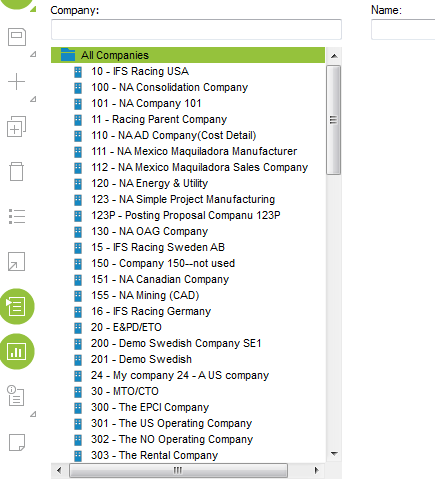
Figure 1: The picture shows an example where companies are displayed.
cTreeListBox control onto the
form.Usually the Tree List Box is used together with a Resize Splitter to get a movable splitter bar between the Tree List Box and the rest of the content on the form.

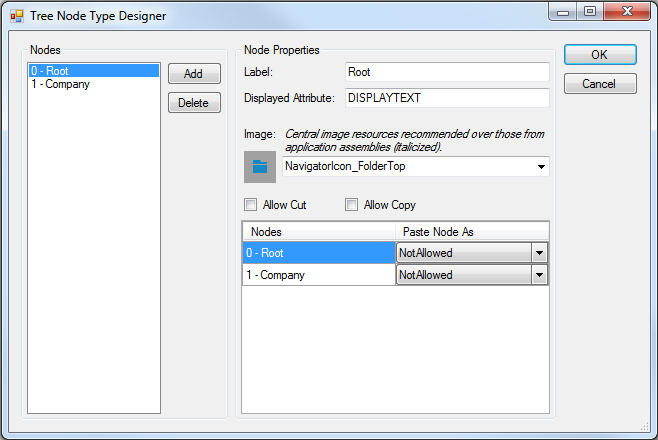
Figure 2: Property editor for the two node types.
There are a few properties that can be set for each node.
There is no automatic data bound node enumeration functionality in the
cTreeListBox. Setting up the node types is only about the layout. To fill the
tree with nodes you have to implement some additional logic. Basically the
cTreeListBox will inform the subscriber when a node is selected or activated,
the rest is up to the programmer.
When a node is expanded, PM_TreeListNodeExpand is sent and can
be captured on the cTreeListBox. This needs to
be implemented in the event handler for WindowActions
for the cTreeListBox instance. See
how to handle events for more information.
The PM_TreeListNodeExpand message carries the node type of
the expanded node and its handle.
TREELIST_NodeTypeRoot
is passed when the cTreeListBox is created.The following example message handler for a cTreeListBox instance handles creating a root node and expansion of one
node type.
/// <summary>
/// PM_TreeListNodeExpand event handler.
/// </summary>
private void cTreeListBox1_OnPM_TreeListNodeExpand(object sender, WindowActionsEventArgs e)
{
	e.Handled = true;

	cMessage msg = new cMessage();
	SalNumber nFetch = 0;

	cTreeListBox1.TreeListBeginLoad();

	switch ((int)e.WParam)
	{
		case Ifs.Fnd.ApplicationForms.Const.TREELIST_NodeTypeRoot:
			msg.Construct();
			msg.AddAttribute("DISPLAYTEXT", "All Companies");
			cTreeListBox1.TreeListNodeInsert(0, -1, msg, false);
			break;

		case 0:

			Ifs.Fnd.ApplicationForms.Var.g_Bind.s[0] = cmbsCompany.Text;
			Ifs.Fnd.ApplicationForms.Var.g_Bind.s[1] = dfsName.Text;

			DbPrepareAndExecute(cSessionManager.c_hSql,
			"select COMPANY, NAME from COMPANY order by COMPANY into :g_Bind.s[0], :g_Bind.s[1]");

			while (DbFetchNext(cSessionManager.c_hSql, ref nFetch))
			{
				msg.Construct();
				msg.AddAttribute("COMPANY", sCompany);
				msg.AddAttribute("DISPLAYTEXT", Ifs.Fnd.ApplicationForms.Var.g_Bind.s[0] + " - " + Ifs.Fnd.ApplicationForms.Var.g_Bind.s[1]);
				cTreeListBox1.TreeListNodeInsert(1, e.LParam, msg, true);
			}
			break;
	}
	cTreeListBox1.TreeListEndLoad();
}
Figure 3: Example implementation of a TreeListNodeExpand event handler.
Nodes are added by sending a cMessage structure to the
TreeListNodeInsert method. The message can contain any attribute data you wish the node to have.
The only mandatory attribute is the chosen Display Attribute that is
defined for the node, which is used as node label in the tree.
The TreeListBeginLoad and
TreeListEndLoad methods should be used before
and after updating the cTreeListBox content, to
ensure a good user experience.
Note: You can use the available Code Snippet TreeListNodeExpand in Visual Studio to quickly get the above structure in place as a template.
A node can be selected and/or activated. By traversing the tree structure with the
keyboard or using the mouse, the user selects nodes. If a node is double clicked
or the enter key is pressed on the keyboard, the node is activated. Typically
any detail information should be updated on activation rather than selection.
There is no strict design rule here though, and to accommodate different
scenarios the PM_TreeListNodeActivate can
be captured to modify default behavior. If action needs to be taken on node selection
then the design time property Activate Node when Selected should be set:
The following two code samples together provide an example of how to capture
PM_TreeListNodeActivate in order to take
specific action in a corresponding detail. See
how to handle events for more information.
/// <summary>
/// Window Actions for cTreeListBox1
/// </summary>
private void cTreeListBox1_WindowActions(object sender, WindowActionsEventArgs e)
{
	switch (e.ActionType)
	{
		case Const.PM_TreeListNodeActivate:
			this.cTreeListBox1_OnPM_TreeListNodeActivate(sender, e);
			break;
		case Const.PM_TreeListNodeExpand:
			this.cTreeListBox1_OnPM_TreeListNodeExpand(sender, e);
			break;
	}
}
Figure 4: WindowActions method for the PM_TreeListNodeActivate
message.
/// <summary>
/// PM_TreeListNodeActivate event handeler.
/// </summary>
private void cTreeListBox1_OnPM_TreeListNodeActivate(object sender, WindowActionsEventArgs e)
{
	e.Handled = true;

	// Check if selected node is a site node.
	if ((int)e.WParam == 2)
	{
		cMessage msg = new cMessage();
		if (cTreeListBox1.TreeListNodeGet(e.LParam, msg))
		{
			// Refresh the detail pane of our splitter
			frmSiteDetail.FromHandle(cResizeSplitter1.SplitterGetSecond()).Refresh(msg);
		}
	}
}
Figure 5: Example implementation of the TreeListNodeActivate method where the tree list box is used in a master detail layout.
The Tree List Box also allows "Cut", "Copy" and "Paste" functionality for the nodes in the structure. These operations can be controlled by the design time settings. They are
The first two conditions are to control the operations available on the node type and the third option is used to control the two operations' behavior.
The "Cut", "Copy" and "Paste" options are available from the context menu on
the nodes and from the keyboard. The "Cut" and "Paste" function can be
performed by a drag-drop operation. The respective messages sent are
PM_Cut, PM_Copy
and PM_Paste.
The messages contain the following values
METHOD_Inquire /
METHOD_ExecuteWhen the "Cut" or "Copy" operations are performed the node information is
stored in the global variable TreeListBoxCut_Data. The variable is of the type
__cCutCopyPasteData. The information in memory can be accessed using the public
functions available in cTreeListBox.
The drag-drop functionality is similar to the cut-paste functionality, except for that it is performed without the menu. In the "Copy" and "Paste" function only a record is inserted to the new position.
The context menu of a tree list box can be modified, see Create Context Menus.