Workflow Tooling
In IFS Cloud, following main tools are available to perform various workflow configurations.
- Workflow Registration
- Workflow Designer
- Troubleshooting
- Workflow Observations
- Workflow Status
- Workflow Templates
- Workflow Management
- Workflow Commands
- Transfer Workflows with Application Configuration Packages
- Workflow Execution Logs
Workflow Registration
Process Definition
This section provides a user interface to manage the available Workflow in the IFS Cloud.
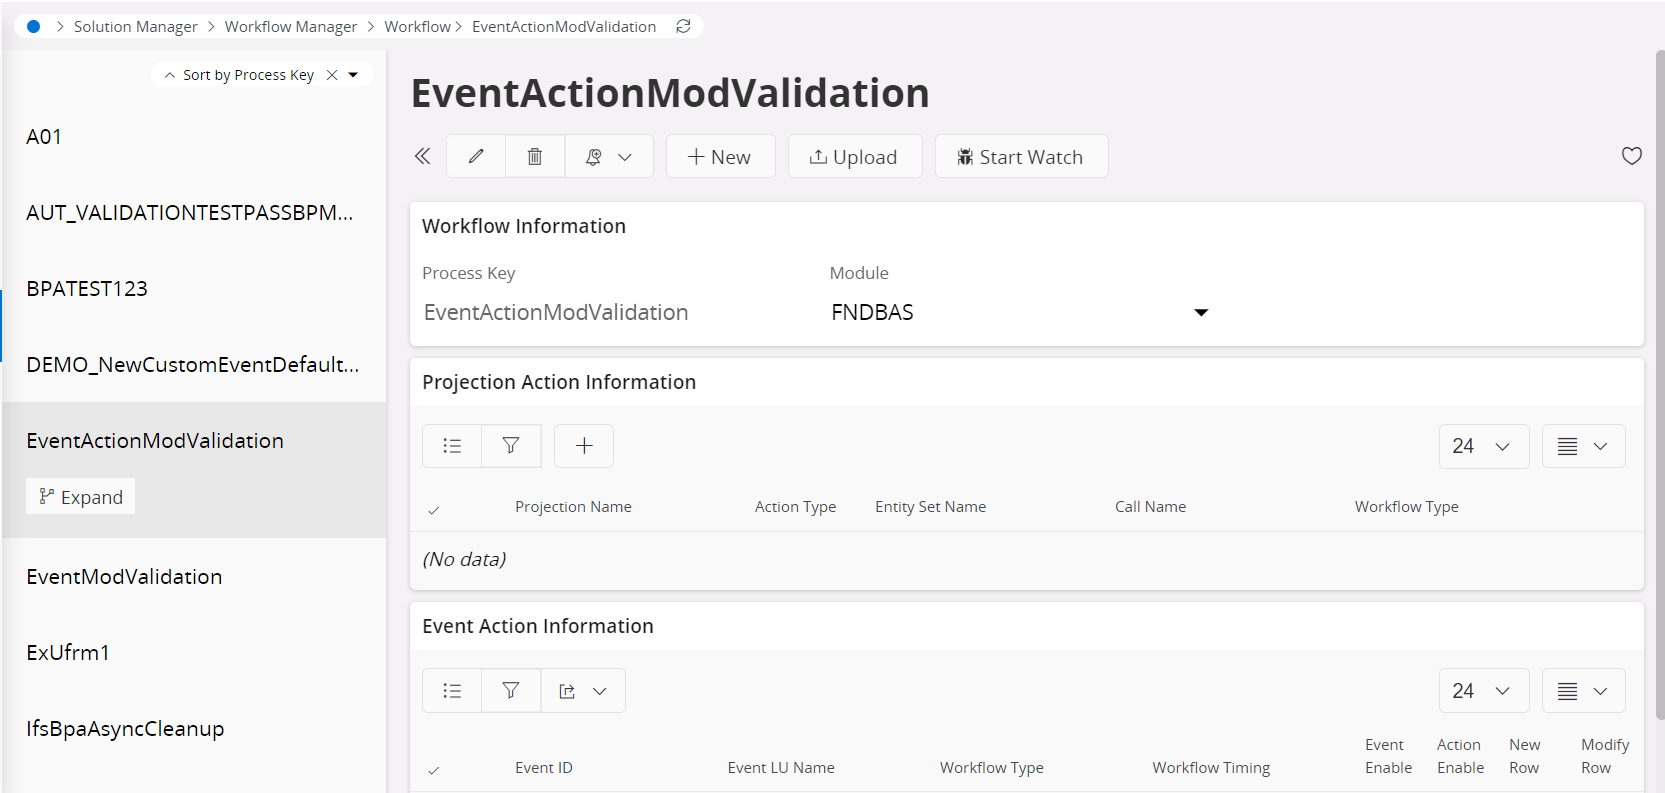
On the left, it displays all the Process Keys for each Workflow which is either created or uploaded by the User.
- Process Key: Unique key that distinguishes between different Workflows
- Module: List down all the IFS Components. If the Workflow is triggered via another component the Module will consist with the component name, else the user could select the Module from the drop-down.
Deletion of a Workflow is only permitted when all the versions under the Workflow are undeployed.
| Control | Description |
|---|---|
 |
Used to create a new Workflow or a Workflow Template. |
 |
Used to upload a BPMN file from the File System. |
 |
Used to start watching a workflow. More information can be found in Workflow Observations |
Process Version
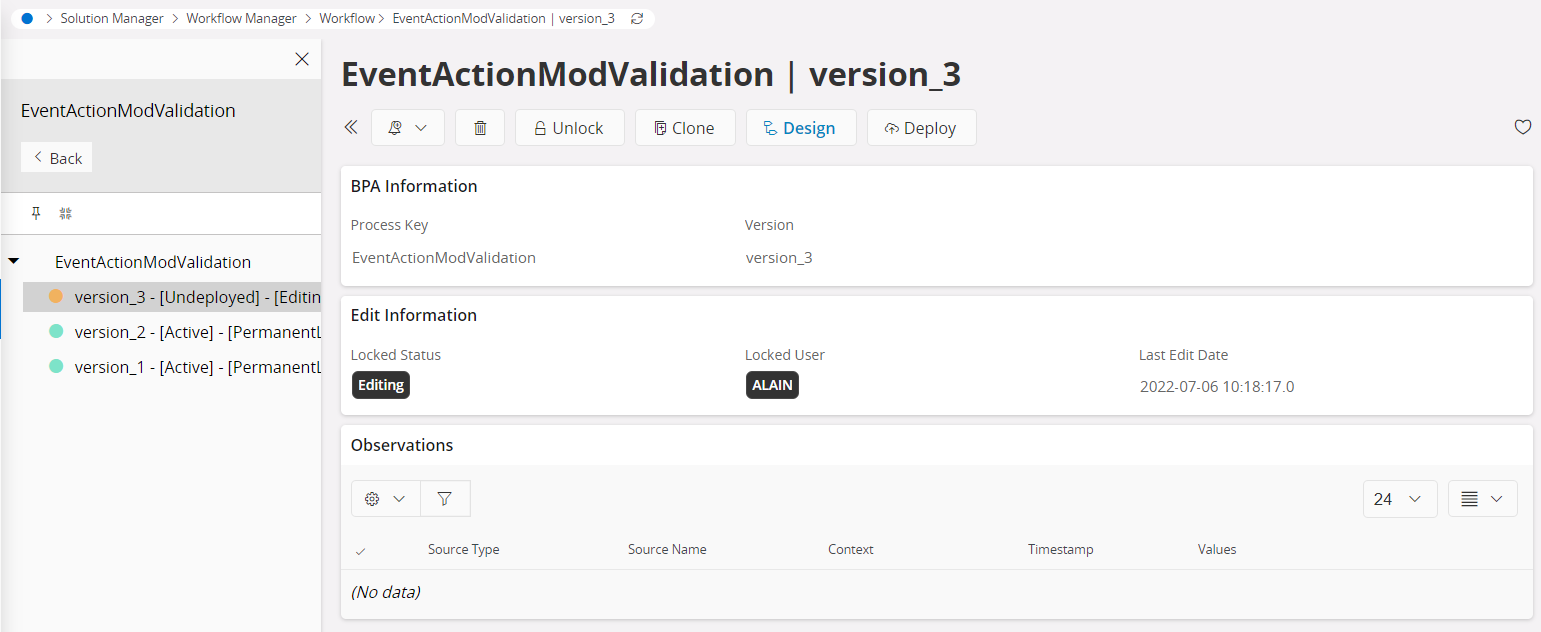
Each Workflow could consist of different versions based on the changes to the Workflow. Versioning will enable the users to maintain different versions of the same workflow and enabling them to deploy based on the requirements.
| Control | Description |
|---|---|
 |
Opens the User selected version in the Work Designer. |
 |
Copies the existing version and creates a new version with a user-defined version. |
  |
User can lock a undeployed Workflow version for Editing, which restricts other users from doing changes to that version until the locked user unlocks it. A Workflow admin can unlock the Workflow version by any user. If the Workflow version is deployed, the Lock Button will disappear. |
 |
User can deploy a Workflow version to the server which is then ready to be actioned/used. More information can be found in Workflow Management. |
 |
User can un-deploy a Workflow version from the server. More information can be found in Workflow Management. |
Deletion of a Workflow Version is only permitted when the version is in the Undeployed status. Further deleting the last Workflow version under a Workflow will delete the entire Workflow from the system.
Workflow Information Section

Consist with the unique Process Key and the specific Version selected by the User.
Edit Information Section

| Label | Status | Description |
|---|---|---|
| Locked Status | Open | The workflow version is open for changes. |
| Editing | The workflow version is currently being edited by a User. | |
| Permanent Lock | The workflow version is the currently deployed version, and no changes are allowed on this version. | |
| Locked User | - | Displays the User who has locked the specific version. |
| Last Edit Data | - | Timestamp for the latest changes in the specific version. |
Deployment Information Section

| Label | Status | Description |
|---|---|---|
| Deploy Name | - | Deployment name is specified when deploying the Workflow version. |
| Deploy Status | Active | Currently deployed version. |
| Inactive | Previously deployed version. | |
| Undeployed | Version is never deployed. | |
| Last Deployment Date | - | Workflow version deployed Timestamp. |
| Locked User | - | Displays the User who has deployed the specific version. |
The user can only have one active deployment from the workflow versions created.
Projections
A Workflow can be configured to run when a specific projection is called. This is done through a projection action that is attached to the workflow.
What is a Projection Action?
Projection Action is the configuration that links a Workflow with a Projection to trigger the Workflow when the Projection is invoked.
There are three types of Workflow Timings in which a Workflow can be executed. These timings are defined relative to the Projection Execution Time.
- Before
- After
- Asynchronous
Sometimes all of these timings might not be available based on other options that are configured in the Projection Action Configuration. Refer Workflow Timings section for more details about Timings.
There are two main types of projection actions.
- DATA
- CALL
The 'DATA' action type is for reacting to CRUD operations. The 'CALL' type reacts to functions or actions within a projection. When there is a CRUD operation or function/action being performed, workflow will be triggered.
Creating a Projection Action
Below are the steps to create a projection action.
Select the workflow from Workflow Manager. Below view is presented when selected.
Click the below control under the "Projection Action Information" section.
| Control | Description |
|---|---|
| Open Add Projection Action Wizard |
The "Projection Action Configuration" wizard will open. This will guide you through setting up a Projection Action. In the first section, "Projection General Info", select the Projection Name from the searchable drop down list.
Note: Entity Service APIs are not listed for reaction to projection.
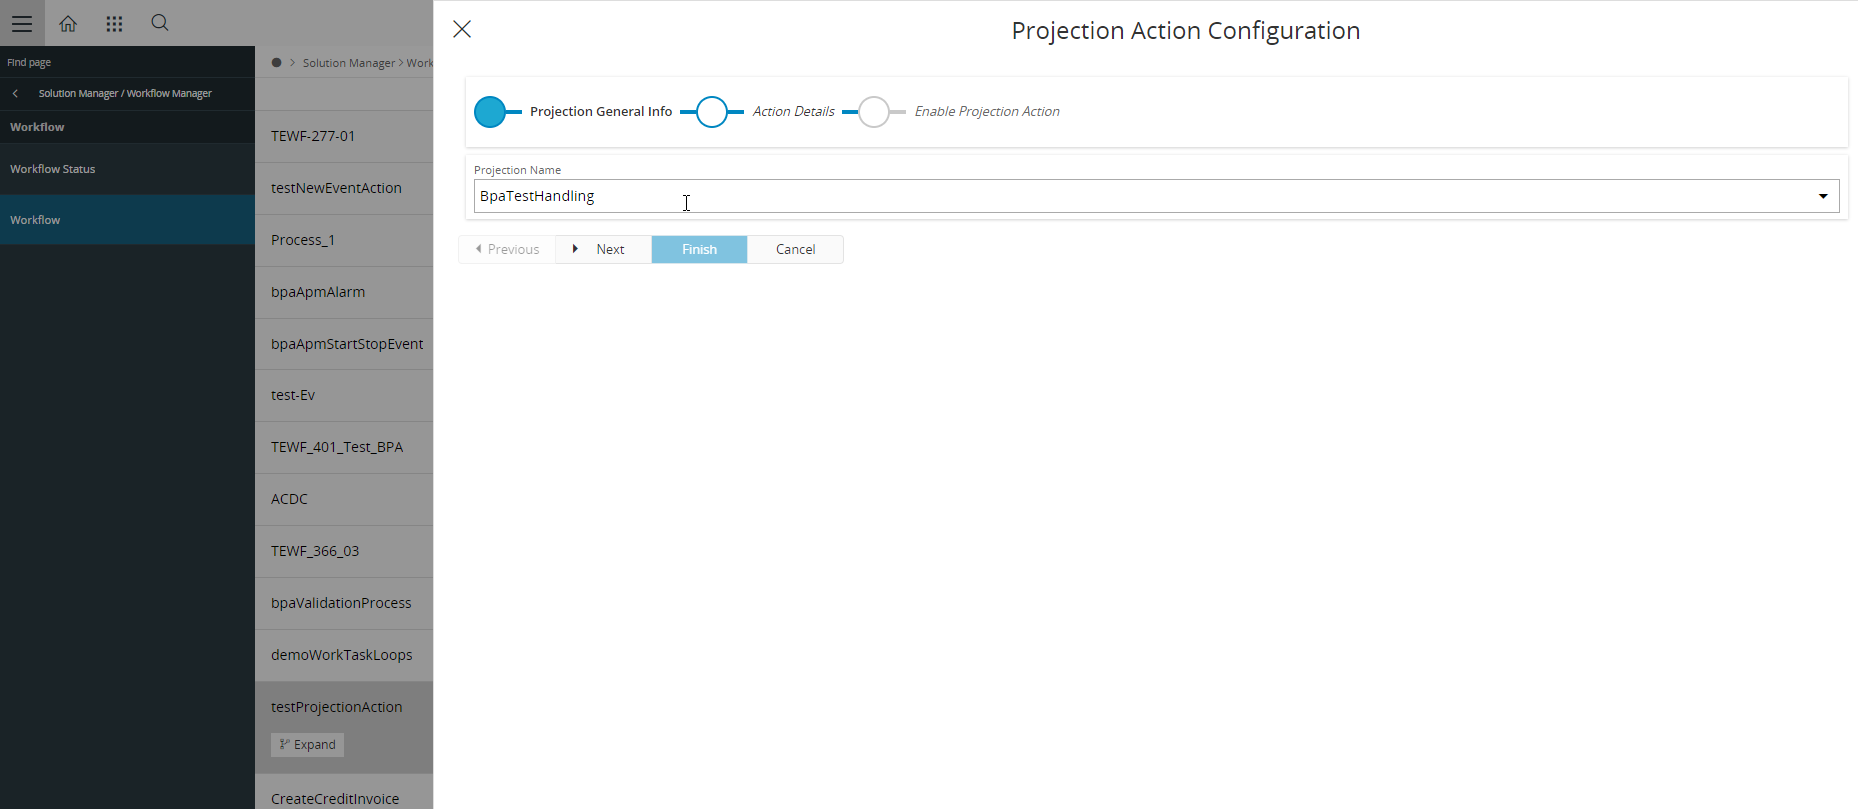
Click on "Next".
Next section of the "Projection Action Configuration", "Action Details" will open.
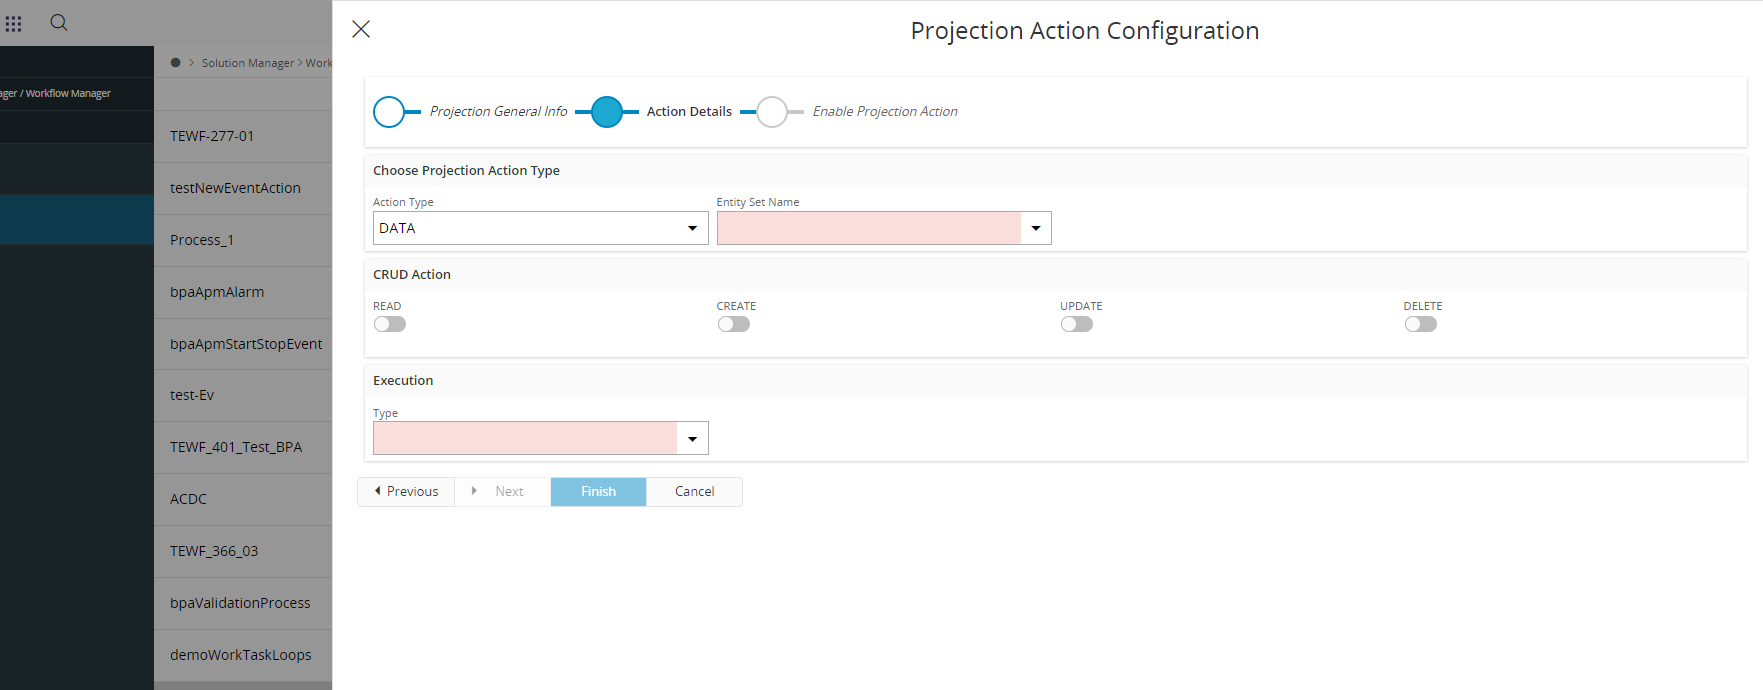
These are the Different options available in the "Action Details" section.
Action Type
| Option | Description |
|---|---|
| DATA | Projection action type is Data |
| CALL | Projection action type is Call |
Entity Set Name
Displayed when the selected "Action Type" is "DATA", the list includes both primary entity sets and nested data collections related to a parent entity instance.
Call Name
This dropdown will only appear if the selected "Action Type" is "CALL". All the Functions/Actions attached to the selected projection from "Projection General Info" section will appear here.
CRUD Action

This Section will only appear if the selected "Action Type" is "DATA". Multiple options can be toggled. This tells IFS Cloud Web client to run the workflow if the Projection does any of the Toggled Actions on the Selected Entity Set.
Type
| Option | Description |
|---|---|
| Validation | Attached workflow type is "Validation" |
| Process Enrichment | Attached workflow type is "Process Enrichment" |
| User Interaction | Attached workflow type is "User Interaction" |
To read further about Workflow Types, please refer Workflow Types.
Timing
Set of options this dropdown can have will change based on what's selected for "Type".
If "Type" is,
- Validation
| Option | Description |
|---|---|
| Before | Workflow will execute before the action done by projection |
| After | Workflow will execute after the action done by projection |
- Process Enrichment
| Option | Description |
|---|---|
| Before | Workflow will execute before the action done by projection |
| After | Workflow will execute after the action done by projection |
| Asynchronous | Workflow will execute Asynchronous of the action done by projection |
- User Interaction
| Option | Description |
|---|---|
| After | Workflow will execute after the action done by projection |
Select the desired options and click "Next". Then "Enable Projection Action" will display. Enable Projection Action and click "Finish".
Now the workflow is attached with the projection and will be run if the above configured conditions are met.
Executing a Workflow using a Projection
This section will show how to run a Workflow attached to a Projection Action.
Pre-requisites: ADCOM component should be enabled in the environment to run this Workflow.
-
Upload the diagram testProjectionAction.bpmn and deploy.
-
Set up a projection action for uploaded bpmn as below.

-
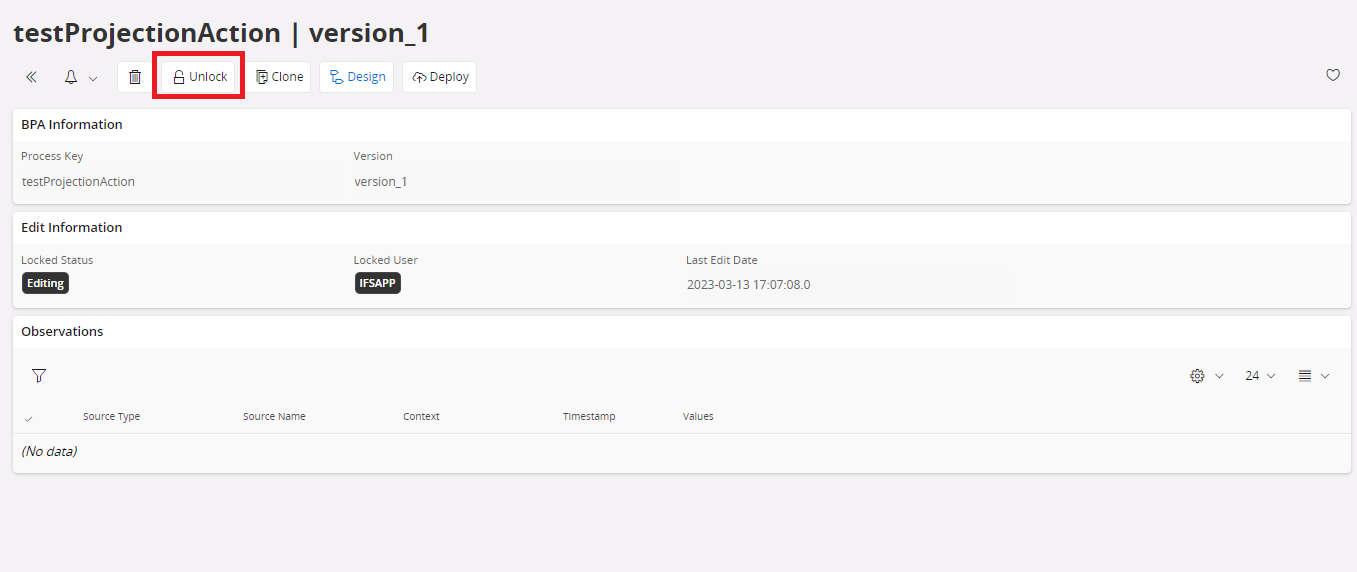
Now, whenever you click the Lock/Unlock command in the Workflow version page, the testProjectionAction Workflow will run and create (if not exist) a Regulatory Body record with RegulatoryBodyCode PRACT.
| Control | Description |
|---|---|
  |
Click the Lock/Unlock command to trigger the Projection Action |
Initiating Workflows from a Projection Delegate
A projection call resulting in an IFS API Task execution within a Workflow can also be used as the starting point for another Workflow. This is done by creating a Projection Action for the second Workflow with details of the Projection call that is done by the IFS API task of the first Workflow.
Below steps show how to create this kind of sample cascade relationship between 2 workflows using Projection Actions.
Pre-requisites: ADCOM component should be enabled in the environment to run this Workflow.
- Follow Executing a Workflow using a Projection steps (If not already done).
- Upload testProjectionActionCascade.bpmn and deploy.
- Set up Projection Action for testProjectionActionCascade.bpmn as below.

Now, when the Lock/Unlock command is clicked in the Workflow version page, A regulatory body is added and from testProjectionAction.bpmn. Workflow testProjectionActionCascade.bpmn is then run as testProjectionAction.bpmn invokes RegulatoryBodyHandling -> create RegulatoryBodySet.
Note:
Make sure to delete the Regulatory body with the code 'PRACT' from list when testing is done.
Events
Relationship between a Workflow, Camunda Deployment and Event Configuration
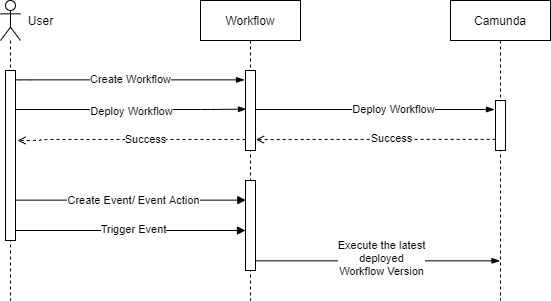
A user can create a Workflow using the Workflow Manager in the IFS Cloud Web. The Workflow Manager enables the user to manage multiple Workflow versions of the same Workflow. Once a Workflow version is deployed to the Camunda Engine Camunda will refer to this version as the latest version. The user can create an Event for a particular Workflow and at runtime, the Event action will be associated with the latest deployed version in Camunda Engine. Upon triggering the Event the latest deployed Workflow version in the Camunda Engine will be executed. Therefore, even if the deployed Workflow version is not available in the Workflow Manager the user will still be able to execute the event action successfully.
Invoking A Workflow
To invoke a Workflow within IFS Cloud Web the following are required:
Custom Event
To be able to invoke a Workflow, a Custom Event needs to be configured within the system. The information for this can be found in the Custom Event section.
Business Process Automation Configured In Workflow Designer
The Workflow is then required to be set up within the Workflow Designer with the relevant BPMN steps of the Workflow to configure the output that is required. Refer to the Workflow Designer and BPMN sections for more information.
Event Action
A new Event Action Type named “Workflow” has been added to allow the invoking of a Workflow within IFS Cloud Web, the Event Action then needs to be referenced to the Custom Event that has been created along with providing a description.

Then hit Next:
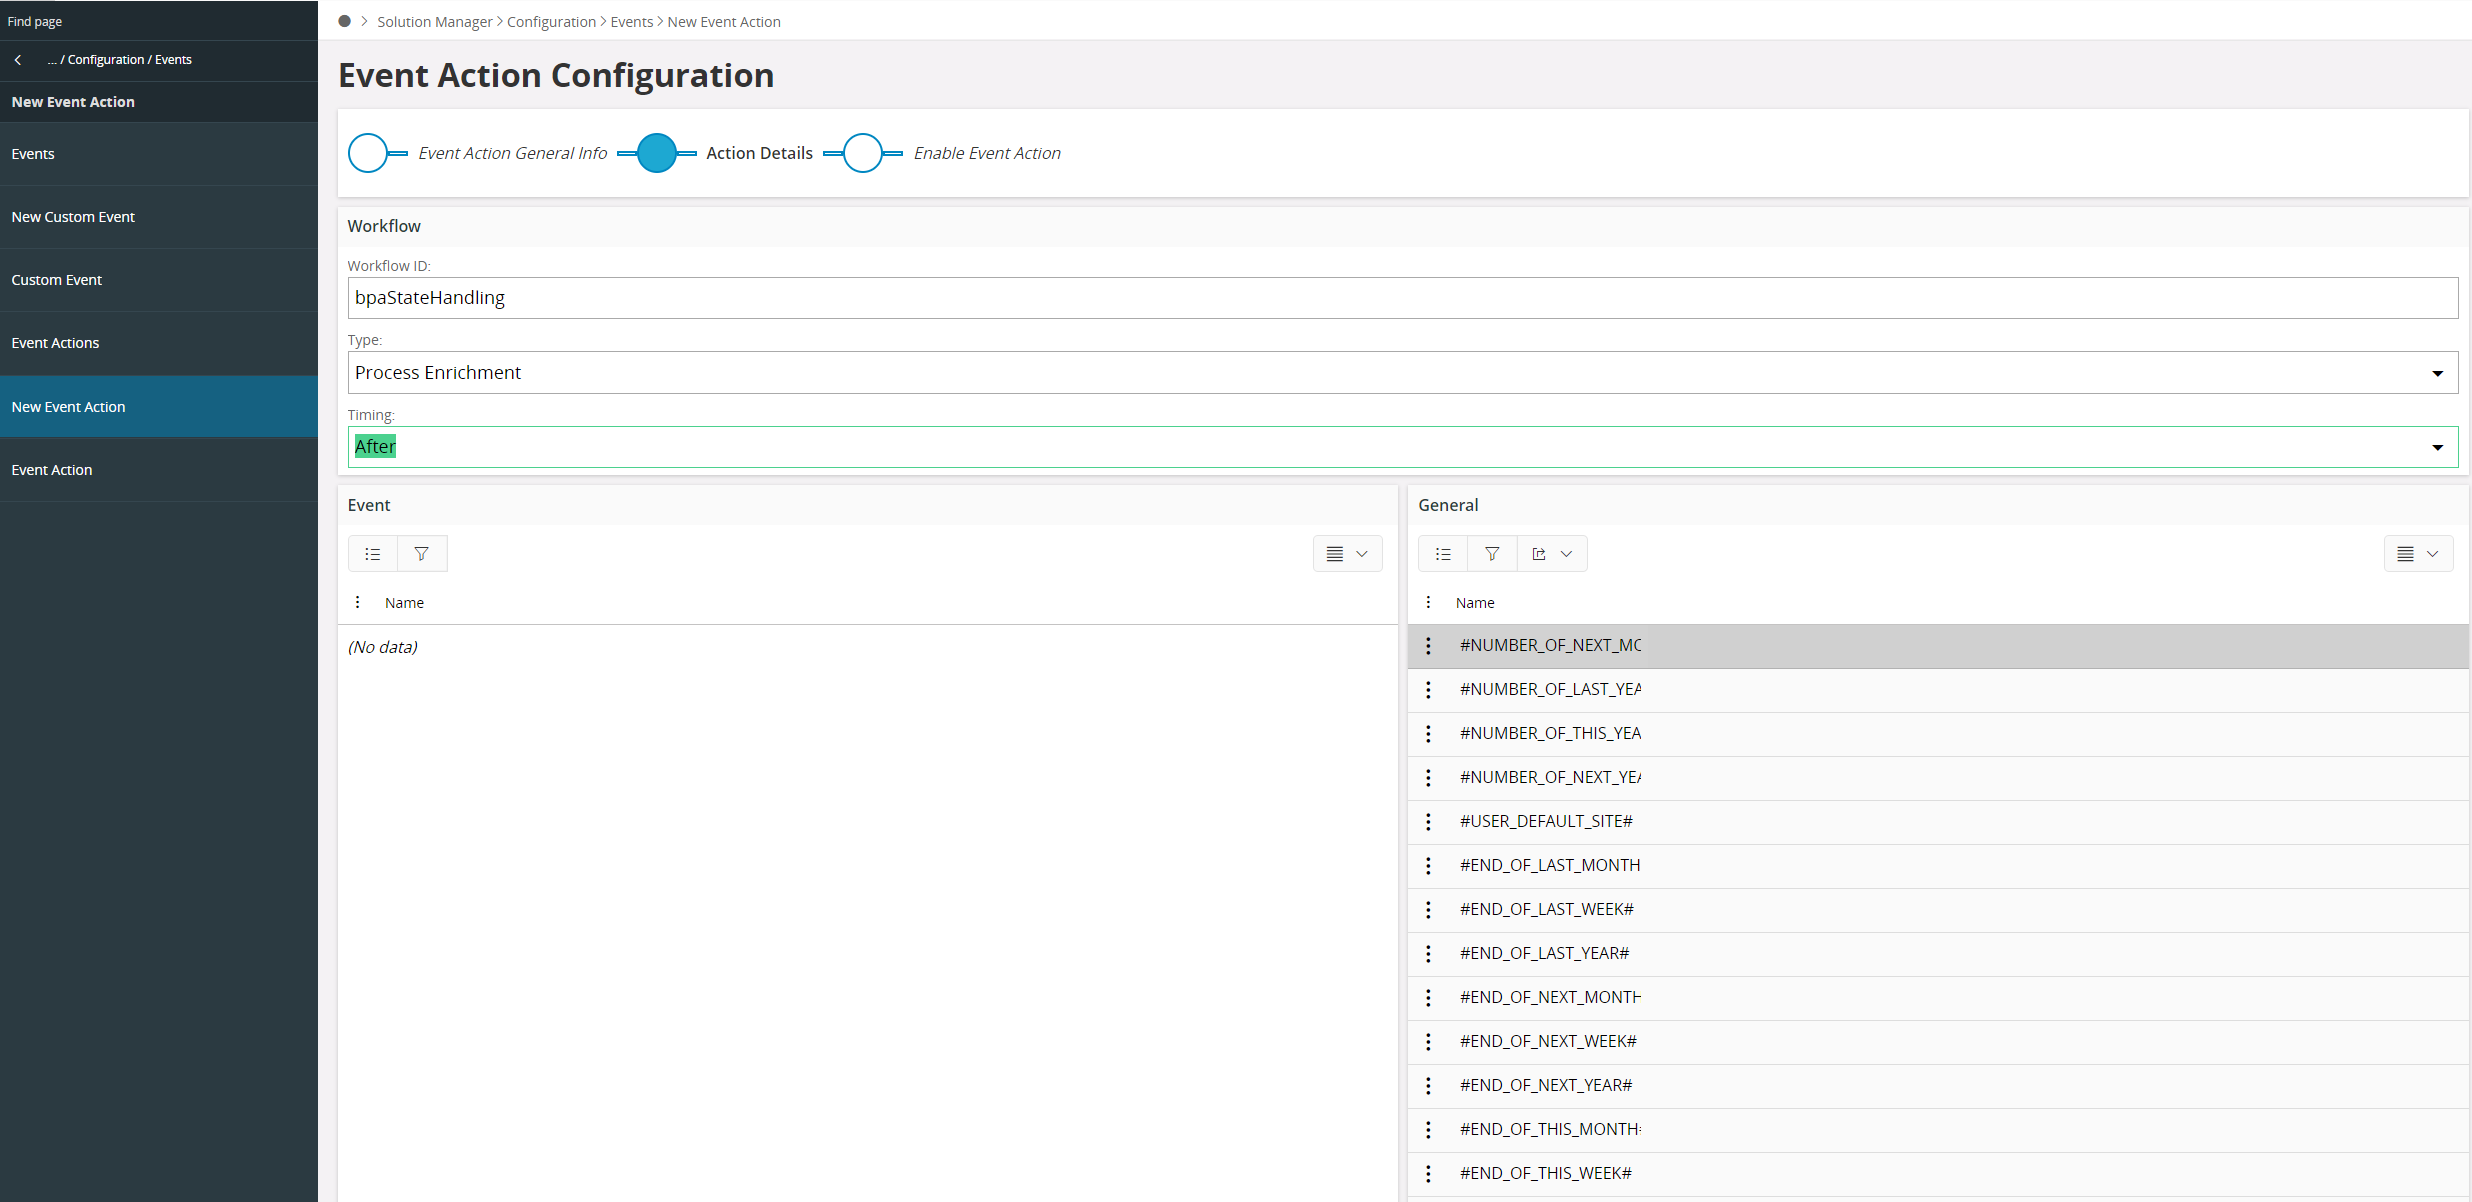
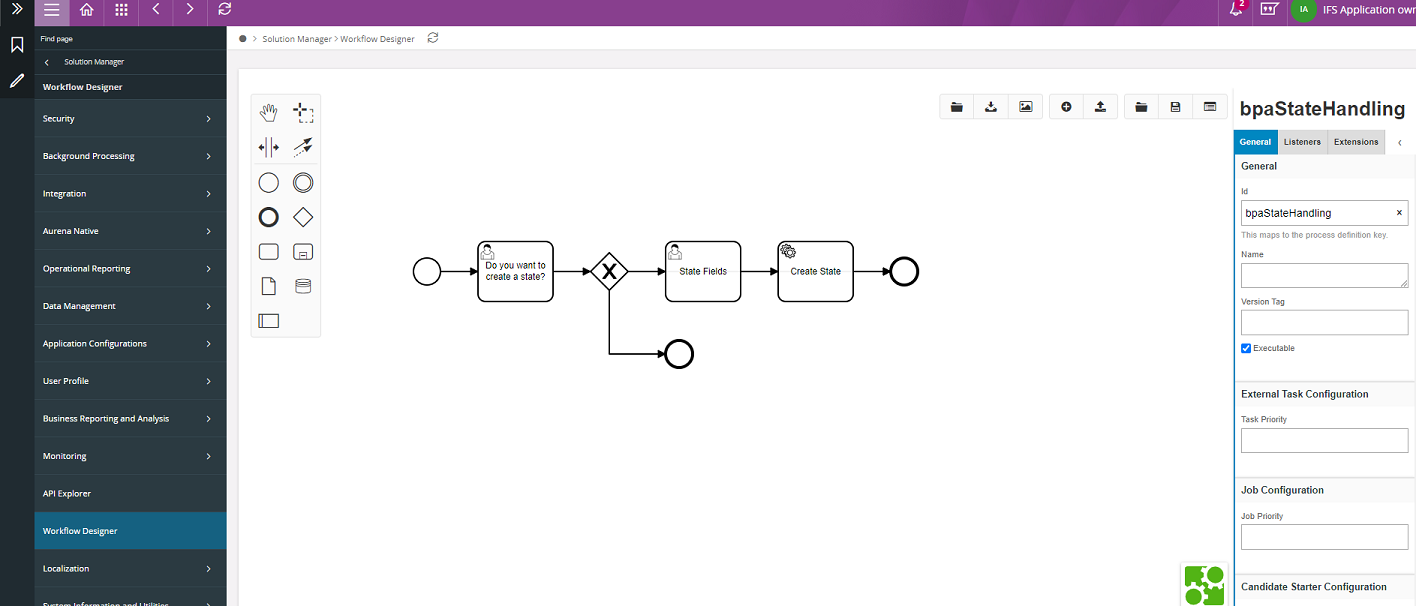
The Workflow key that is assigned to the Workflow within the Workflow Designer needs to be referenced in the Workflow ID field of the Event Action. The Workflow key is located when you click off of any of the BPMN shapes in the Workspace area and the key is then visible on the Properties Panel. The following example shows the key bpaStateHandling:
The next step of the Event Action creation is to choose the type of Workflow; the different types of Workflow are explained in the Type of Workflow section.
There are two different timings relative to the Event Action when a Workflow can be invoked; the different types of workflow timings are explained in the Workflow timings section. These timings represent different stages of a transaction, or REST request where the Workflow can be invoked. Once the Event Action has been enabled, then the Workflow is ready to be tested to ensure it works as expected.
Event Action Information Section

Event Action Information section lists all the Event Actions assigned for the specific Workflow version. Refer invoking a workflow section for more information on events.
Workflow Designer
IFS Cloud Web includes the ability to edit business processes using the Workflow Designer, embedded within the Workflow Manager. This UI allows the users to configure Workflow using a drag and drop user interface. It provides our users with the ability to visually see what the correct output would be based on the conditions provided by the user and provides the ability to model BPMN graphical flow charts.
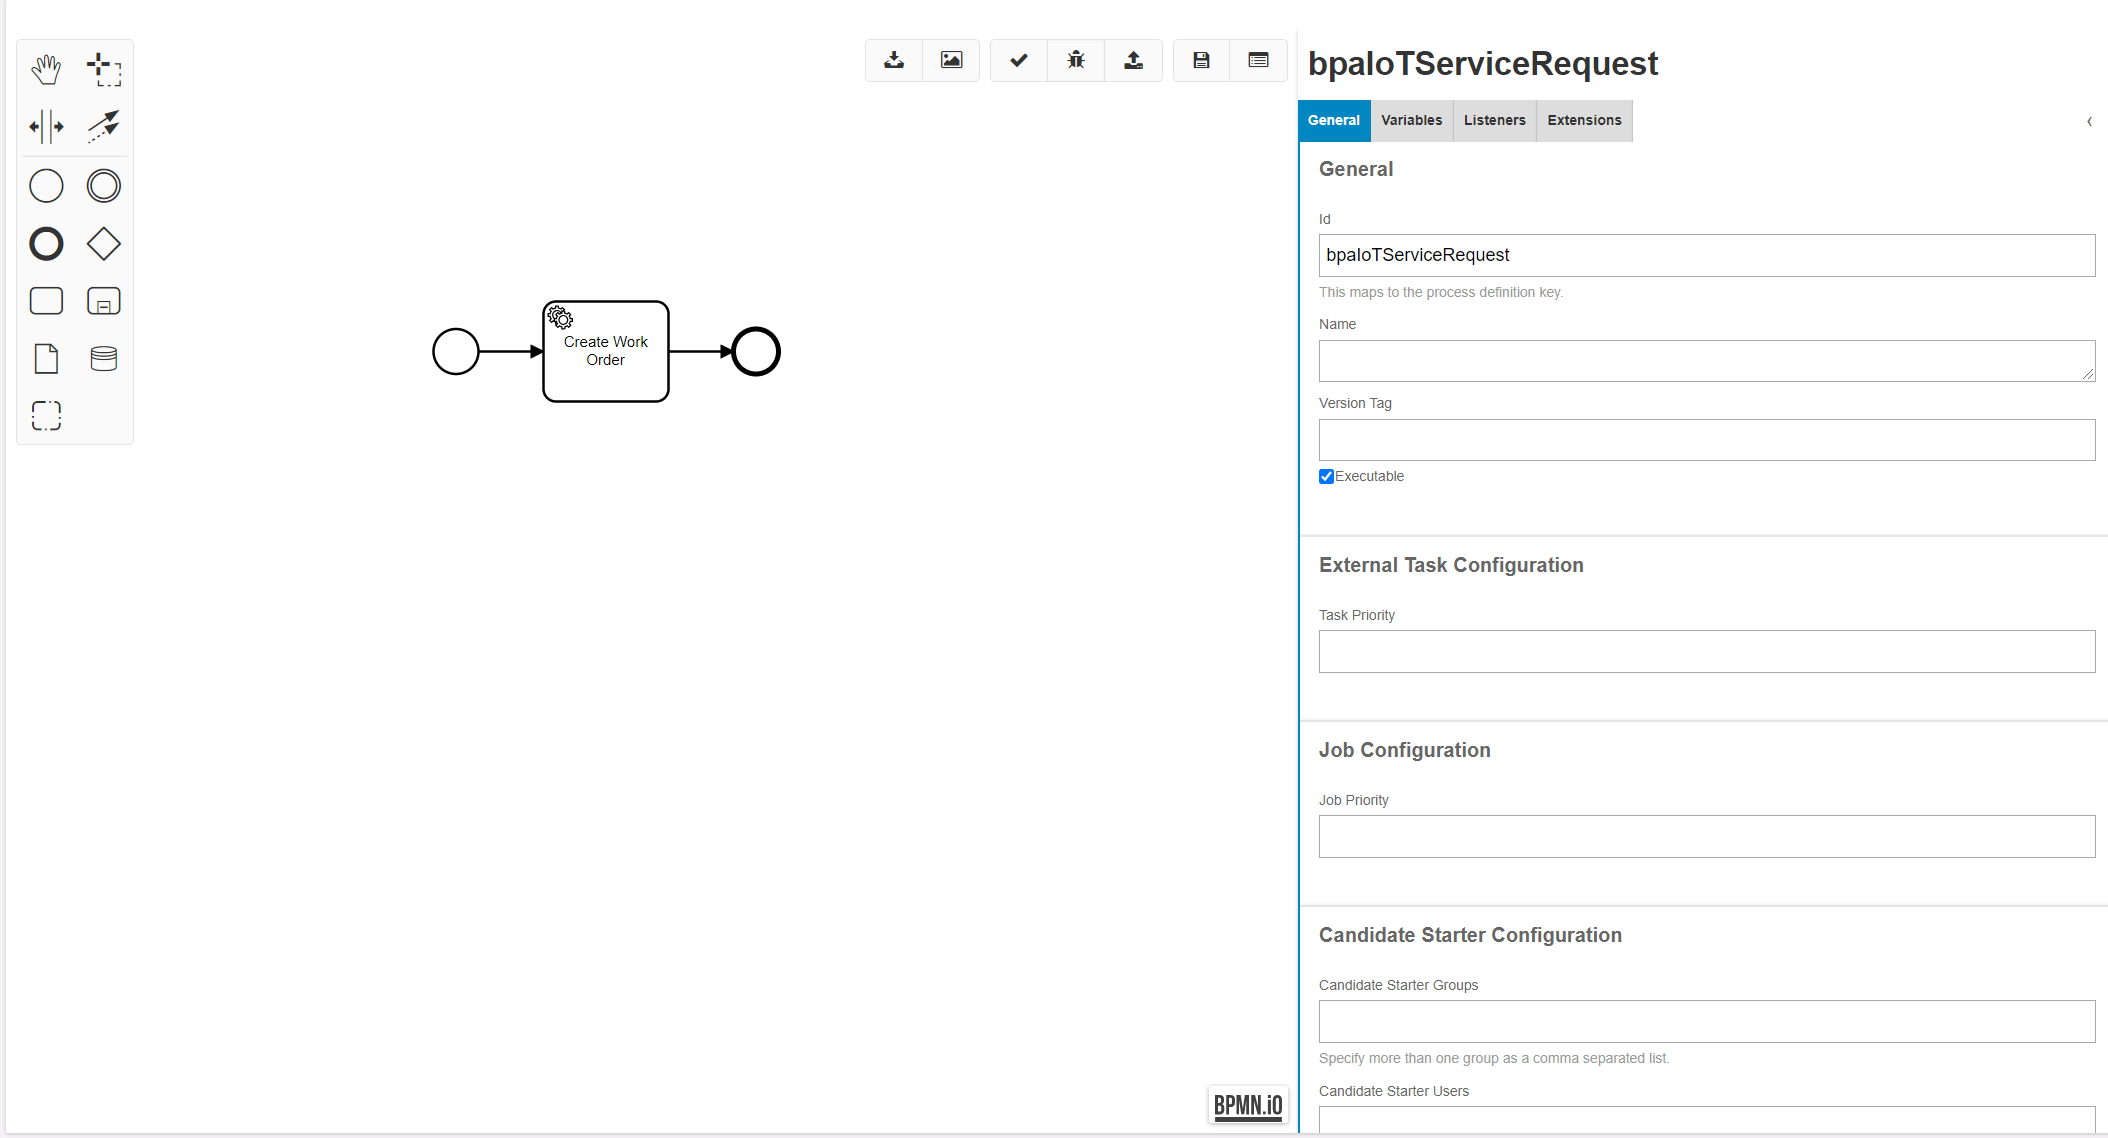
The Workflow Designer is separated into 4 sections:
Toolbox
The toolbox is where all the different BPMN shapes are situated. This is where the different tasks, events, and other tools the Workflow Designer has allows the user to perform drag and drop functionality. A symbol can be dragged to the workspace which can then be used to construct your Workflow.

| Control | Description |
|---|---|
 |
Used to drag and move the Workflow within the Workspace to a different point of the screen. |
 |
Used to group the different BPMN symbols within the workspace, to then perform actions such as move or delete. |
 |
To create space between BPMN symbols. |
 |
To connect BPMN symbols. |
[^need to change this line]:
Workspace
This is where you add your different BPMN shapes to the Workflow itself which is in between the Toolbox and the Properties Panel.

Control Panel
Need to upload new image.
Allows the user to perform the following actions,
| Control | Name | Description |
|---|---|---|
 |
Download Workflow | Ability to download the Workflow BPMN file from within the browser. |
 |
Download as SVG Image | Download the Workflow as an image. |
 |
Validate BPMN Diagram | Validates the current BPMN Diagram and displays the validation errors. |
 |
Inspect BPMN Diagram | Ability to Troubleshoot Workflow. |
 |
Deploy Workflow | Deploys the diagram to the server which is then ready to be actioned/used |
 |
Save Workflow As | Save Workflow To Server. |
 |
Toggle Properties Panel | Show/Hide Properties Panel. |
Properties Panel
This is a dynamic panel based on which BPMN symbol you have selected within the Workspace. The Properties Panel is used to enter the additional configuration information required for a specific task, event, etc.

Troubleshooting
Troubleshooting allows the user to execute a Workflow and inspect the execution path, along with the relevant variables through the Workflow designer. This functionality would enable the capability to troubleshoot the Workflow before any deployments.
Troubleshoot a Workflow
Through the below button, the User can start troubleshooting. Troubleshooting can be done for an already deployed Workflow or a newly created Workflow.

Once clicked, the below window will appear, and the User can provide the inputs required for the Workflow execution.
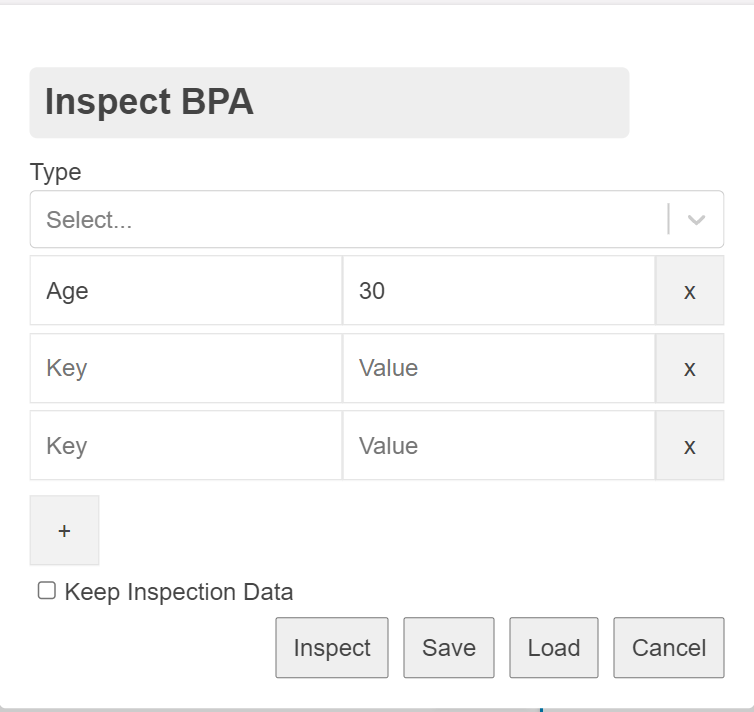
Note: The above values are subjected to changes based on the Workflow.
In case, the Workflow consists of any event action configured, the drop-down from the above dialog box could be used to select it. Through this selection, there is no business value to the troubleshooting functionality, but it will automatically fill the input fields according to the configured logical unit in the event action.
Below elaborates a scenario where an Event Action is configured,
E.g. Assume an Event Action, which consists of a logical unit as 'StateCodes'. In such a scenario, once the event action is selected, the properties defined for the 'StateCode' will be automatically filled as inputs.
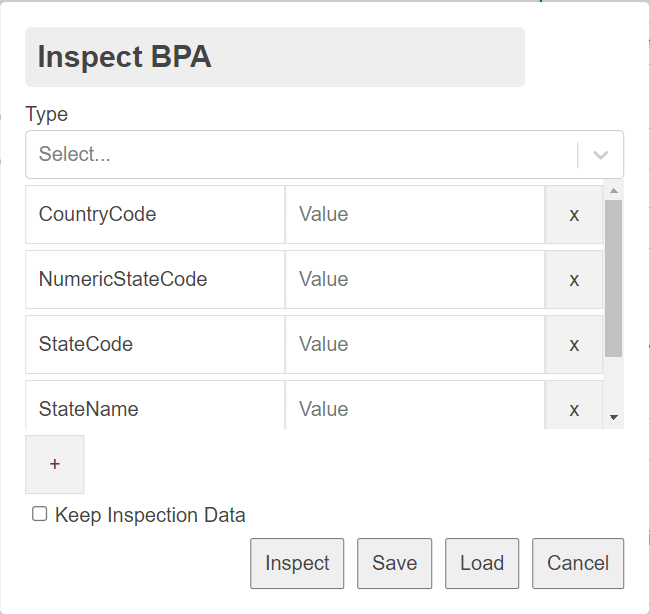
Note: Troubleshooting could be enabled without any inputs.
Save, Load and Keep Inspection Data
Users can save their inspection data for future use by clicking the save button on the 'Inspect BPA' popup dialog. It will automatically download a JSON formatted file named 'info.json' and it can be loaded later.
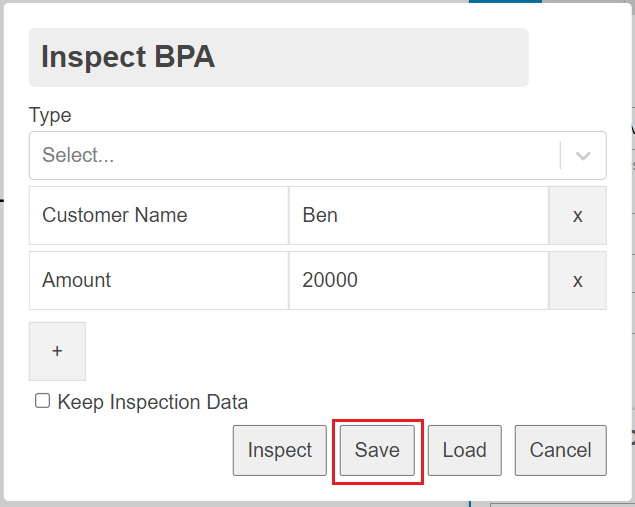
The saved 'info.json' file can be loaded by clicking on the 'Load' button.
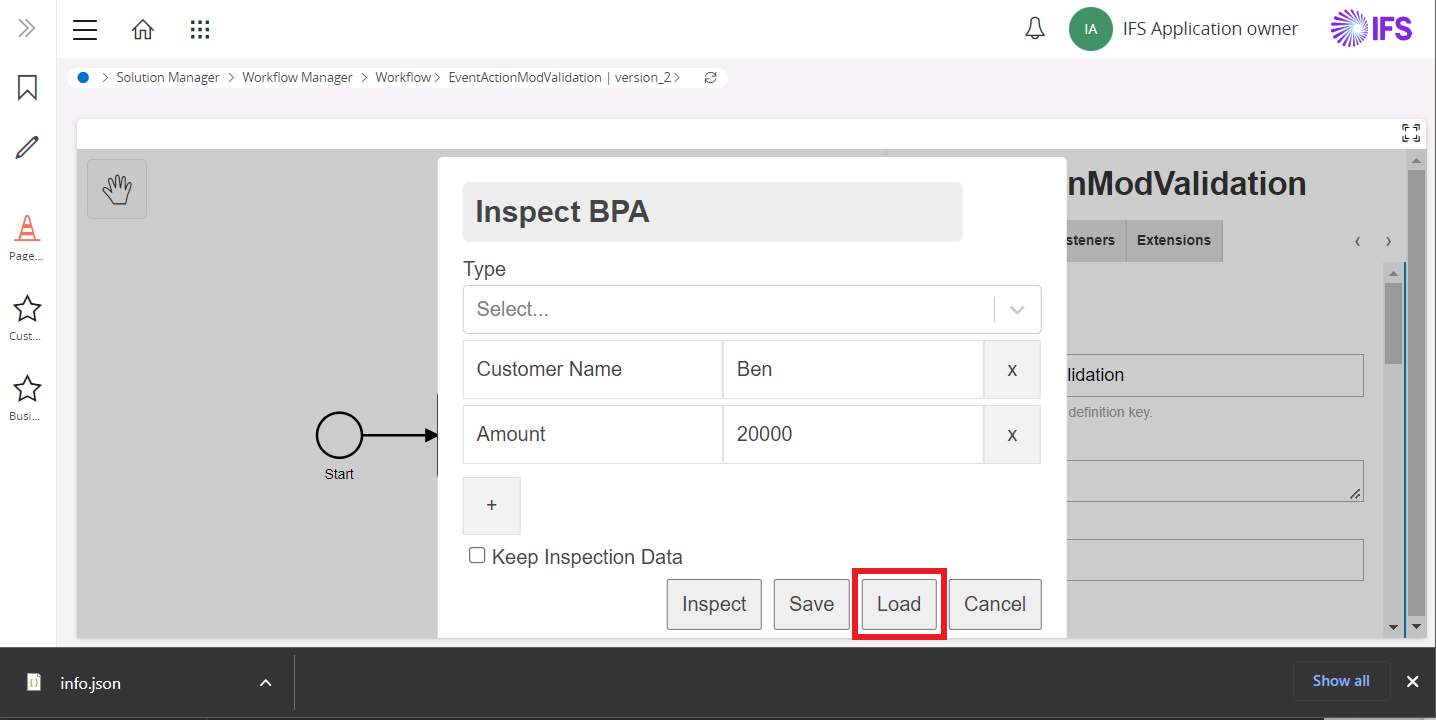
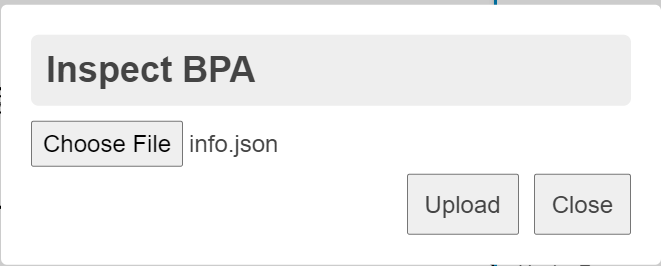
It will popup the 'Upload file' dialog and select the downloaded 'info.json' file to upload it.
It will load the previously saved inspection data successfully with a toast message.
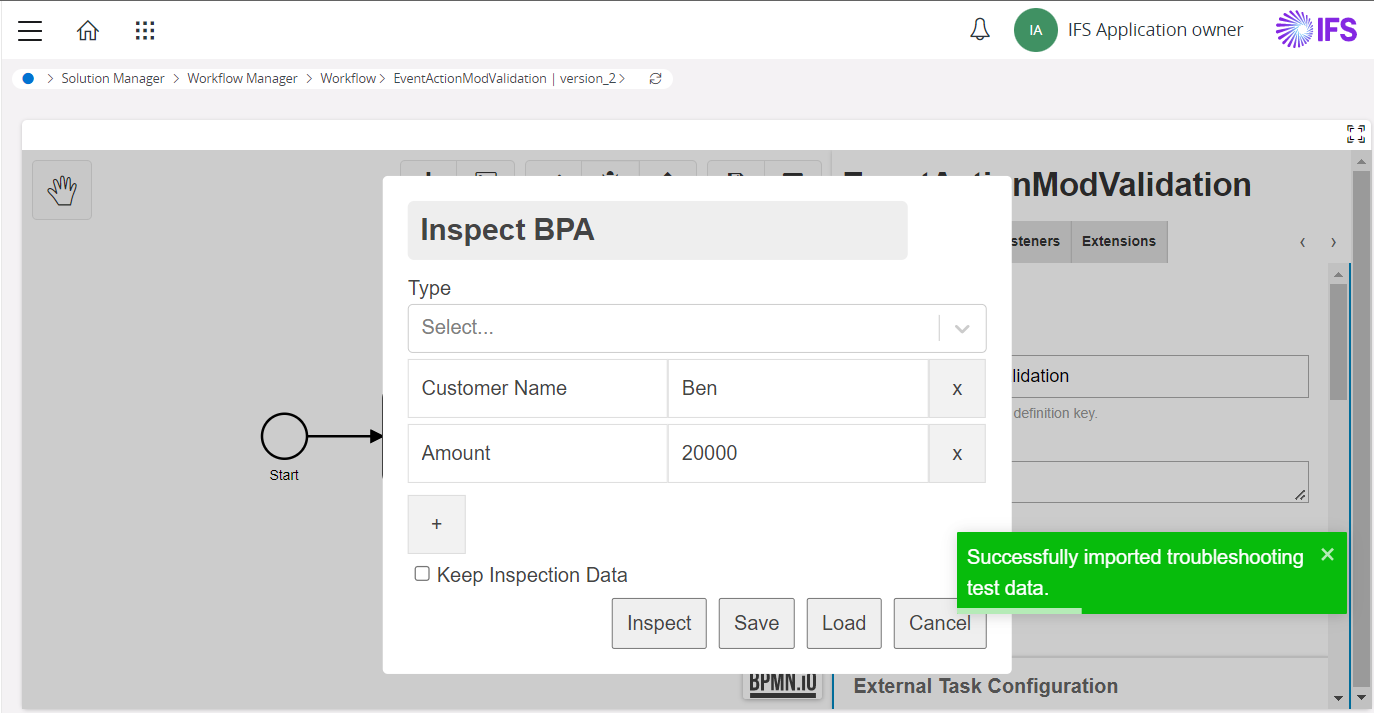
Clicking on the 'Keep Inspection Data' checkbox will enable you to keep your inspection data for this session and no need to add data again and again.
Underlying Process in Troubleshooting a Workflow
Upon clicking the 'Inspect button', the execution path of the Workflow will be displayed to the User. The below diagram elaborates the high-level tasks that occur in the background.
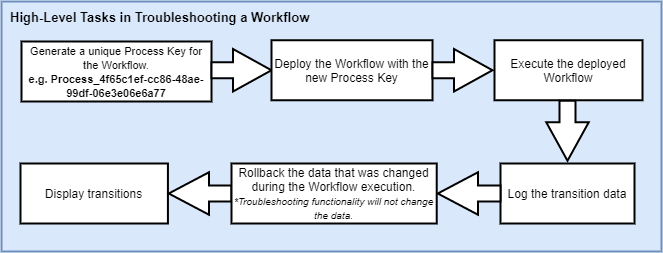
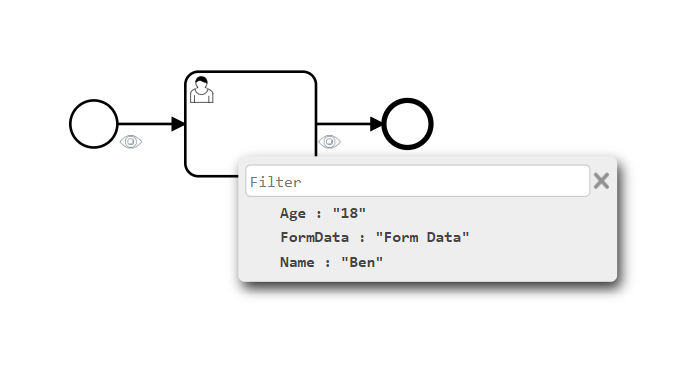
Below displays the results of troubleshooting a Workflow, where the eye icons show the execution path. Users can hover through the eye icons and view the variables and their values at each occurrence.
Troubleshoot a Workflow with User Forms
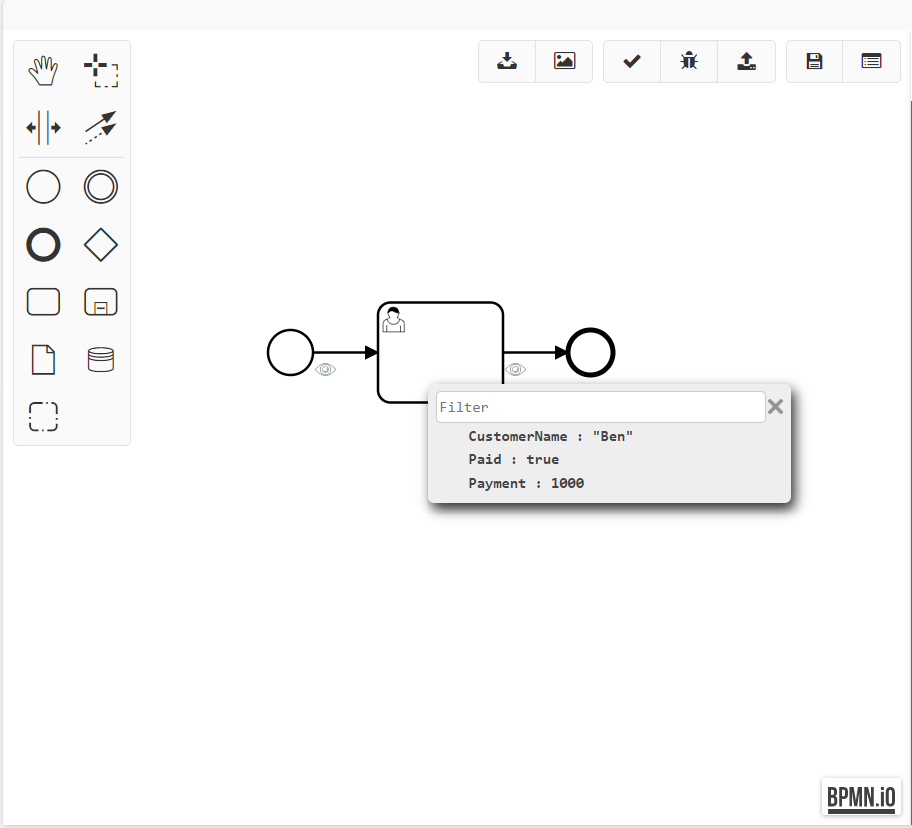
When a Workflow contains User Forms, troubleshooting functionality will prompt the user to enter values. It executes the Workflow by considering the values entered. Below contains the scenario of a User Form.
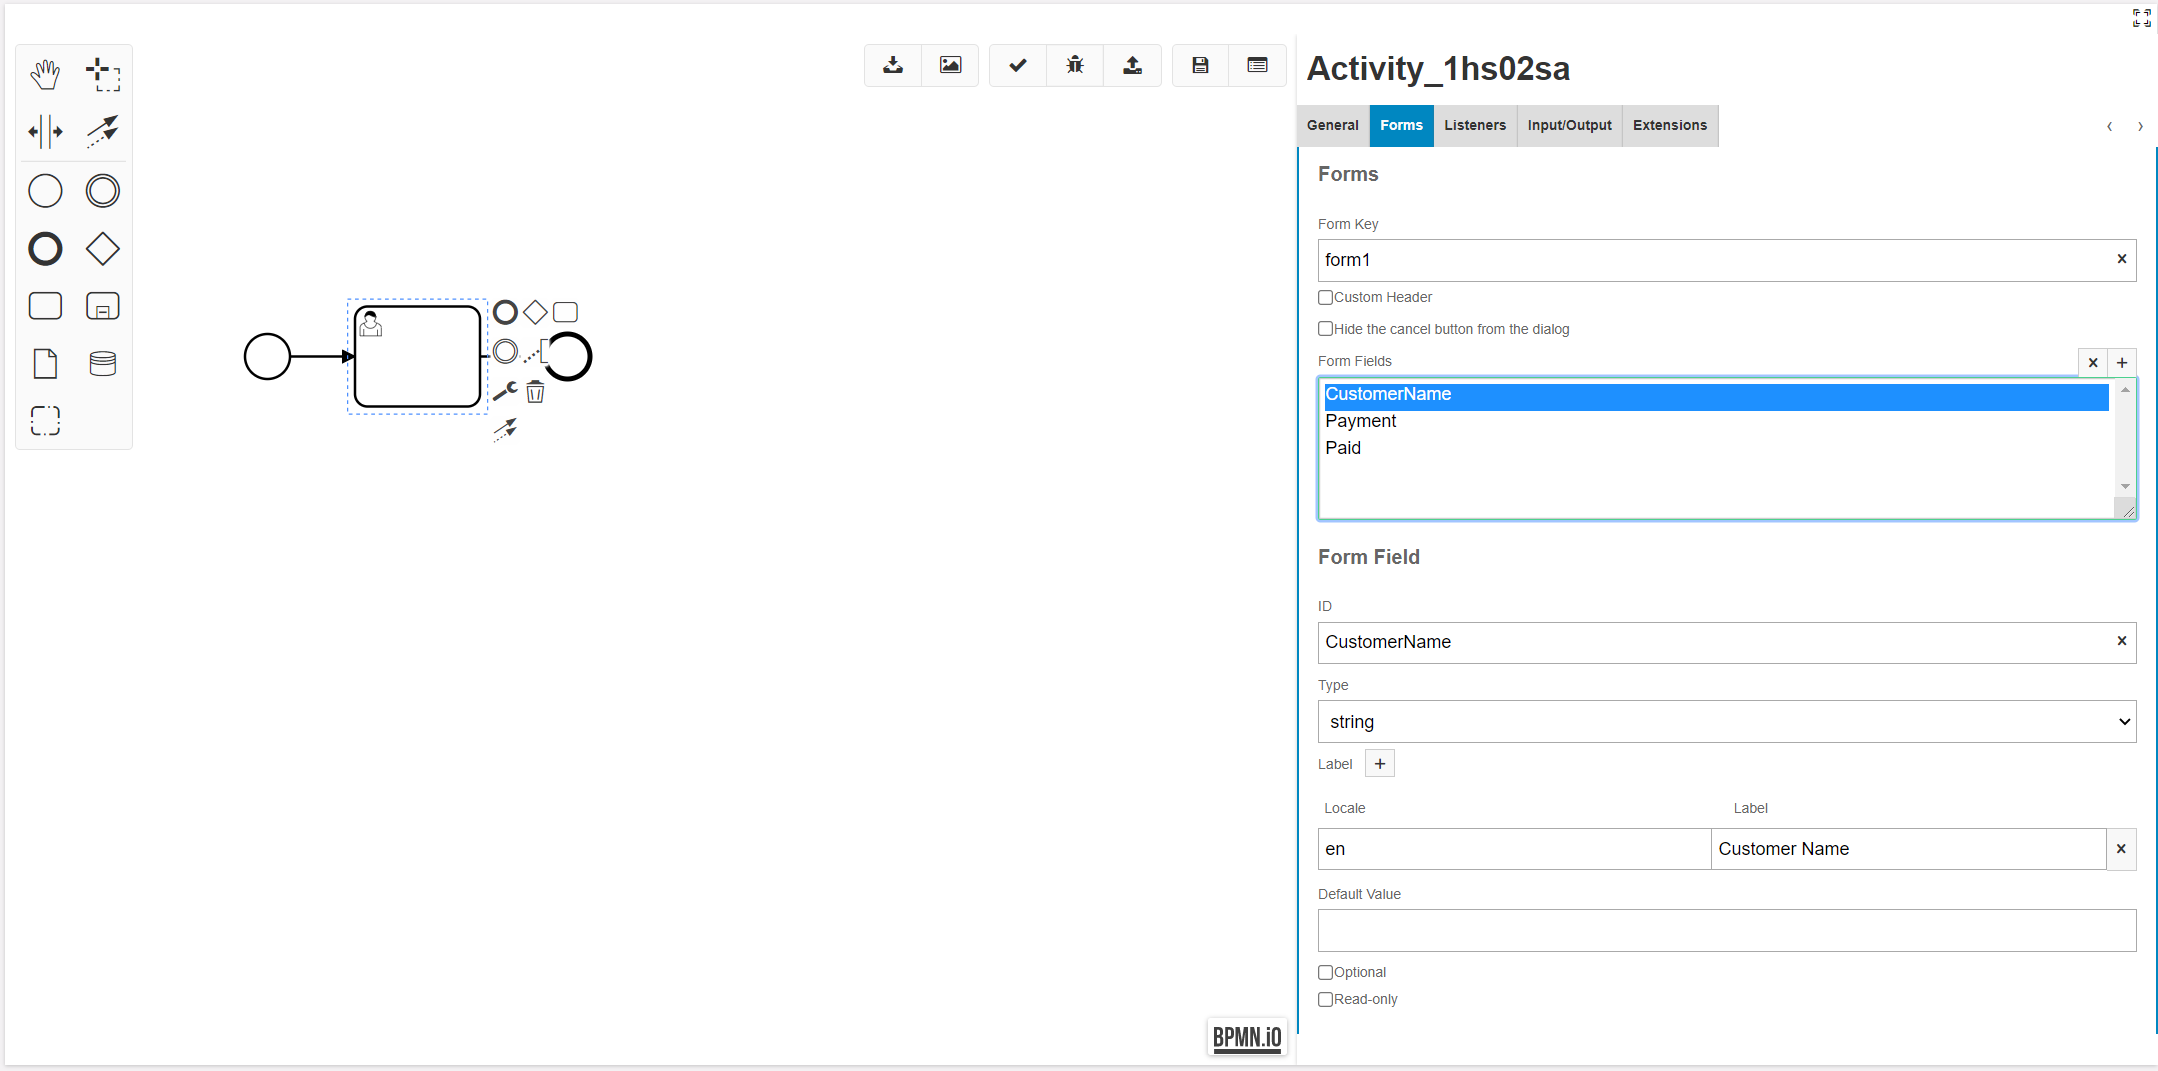
<bpmn:userTask id="Activity_1hs02sa" camunda:formKey="form1">
      <bpmn:extensionElements>
        <camunda:formData>
          <camunda:formField id="CustomerName" type="string" />
          <camunda:formField id="Payment" type="long" />
          <camunda:formField id="Paid" type="boolean" />
        </camunda:formData>
        ................................................
    </bpmn:userTask>
Once the user clicks on troubleshoot button, then the user form will be prompted.
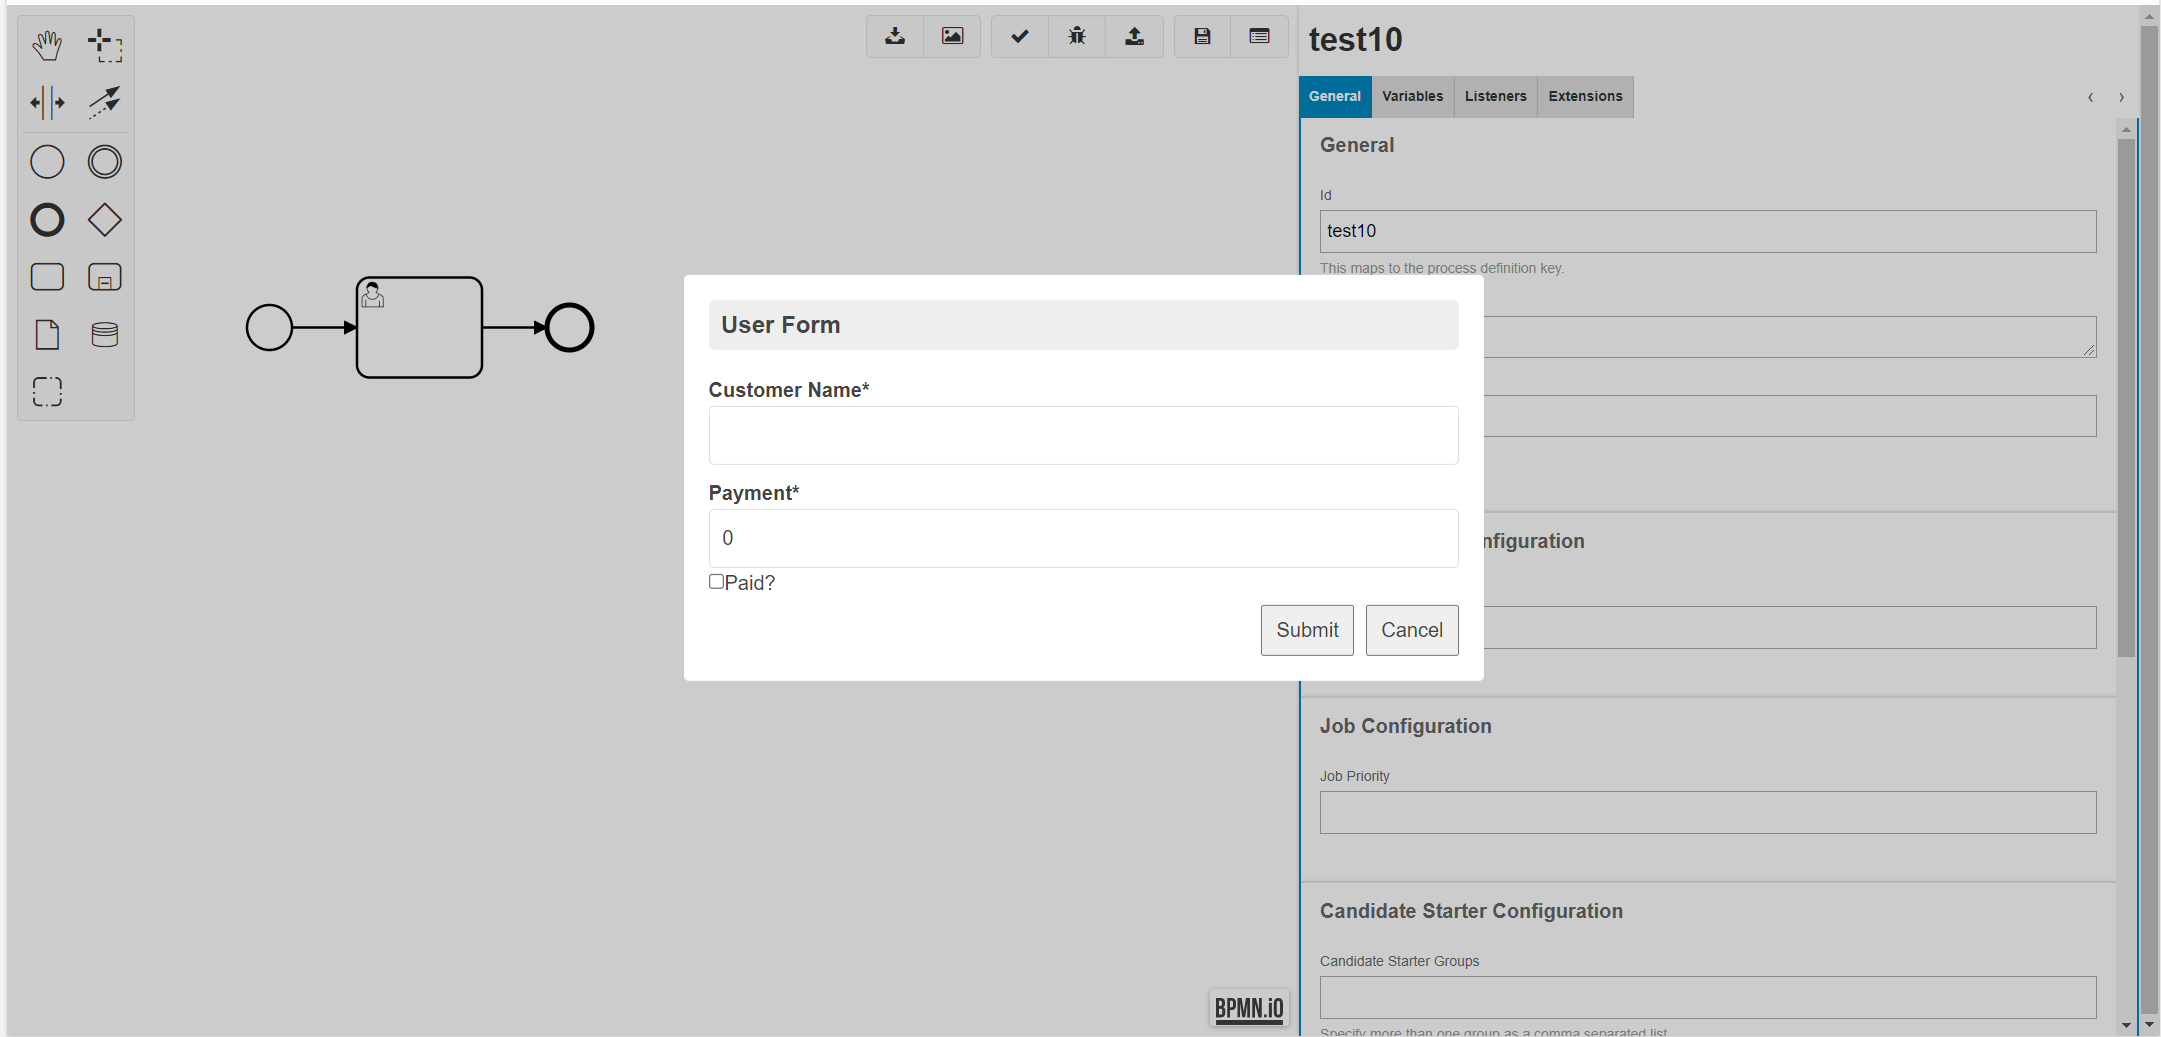
User should enter the mandatory values and the optional values will be replaced by default values.
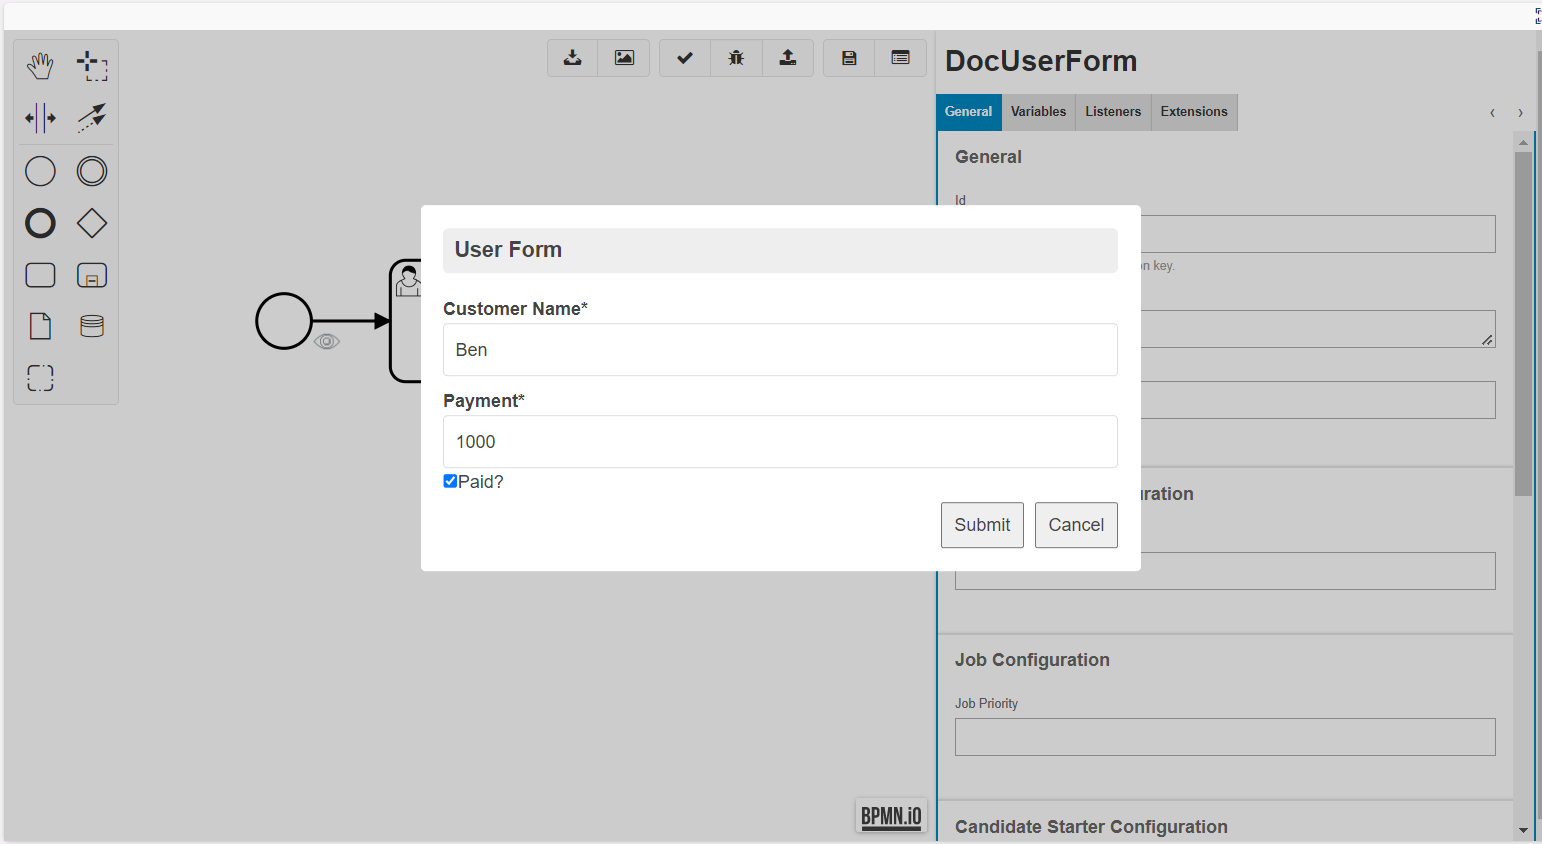
Below are the results of troubleshooting a Workflow with user form, where the eye icons show the entered user form data. Users can hover through the eye icons and view the variables and their values.
Troubleshoot a Workflow with Loops
The Troubleshooting tool supports looping. The below workflow contains a collection of records, and the sub process activities loop through it.
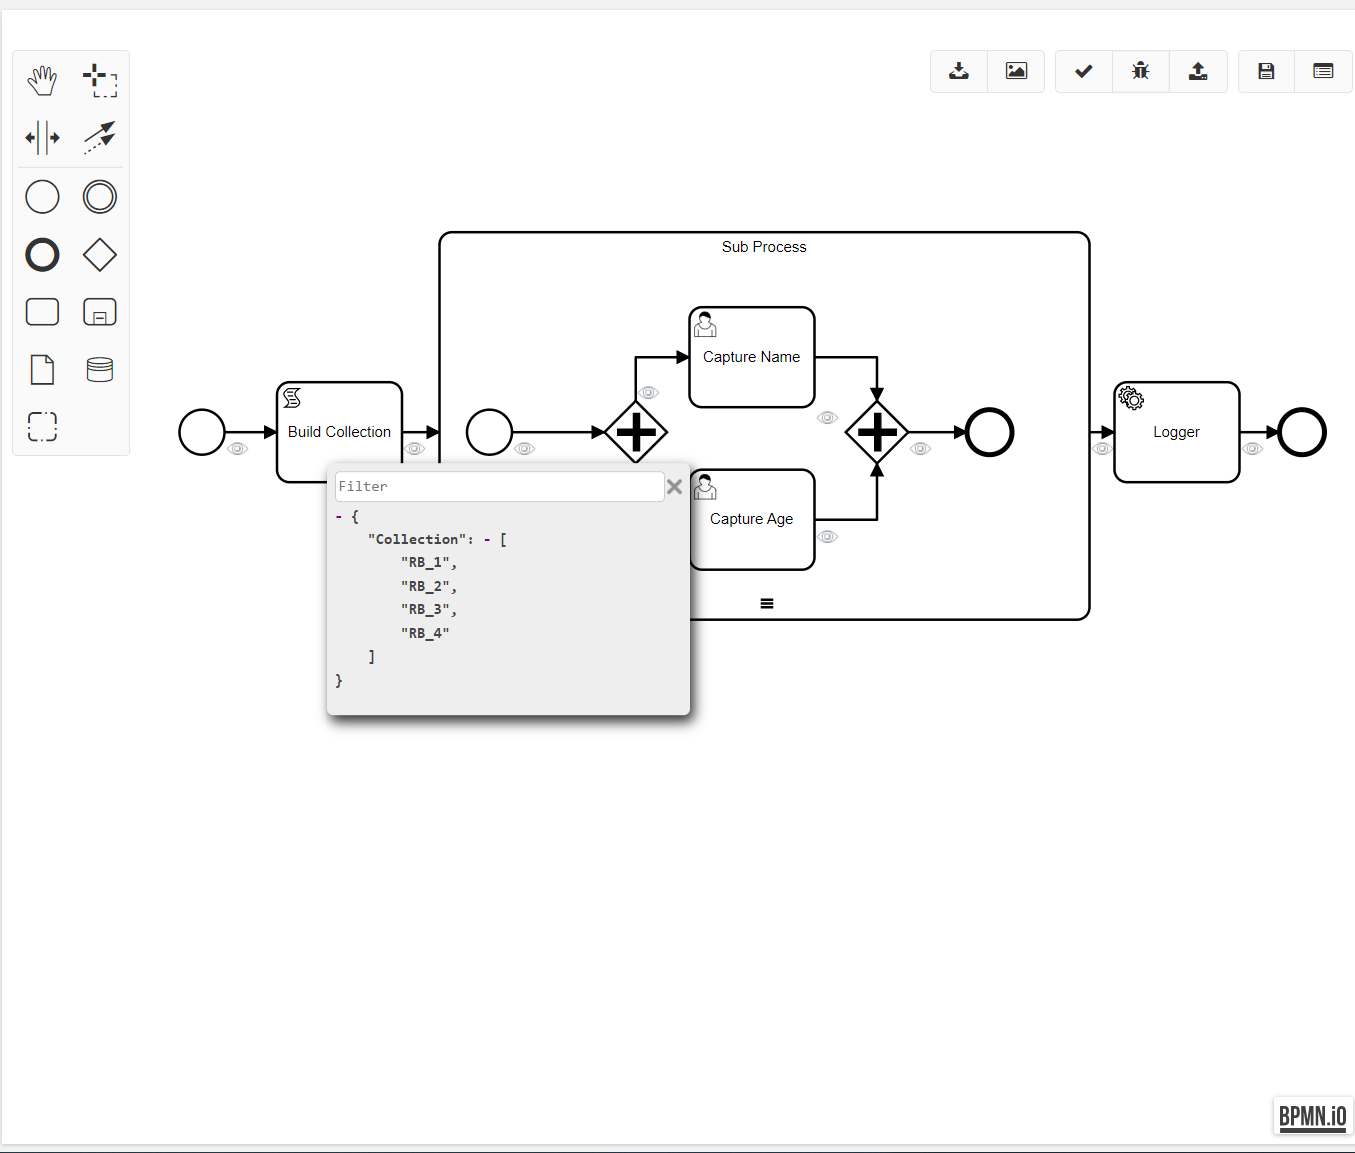
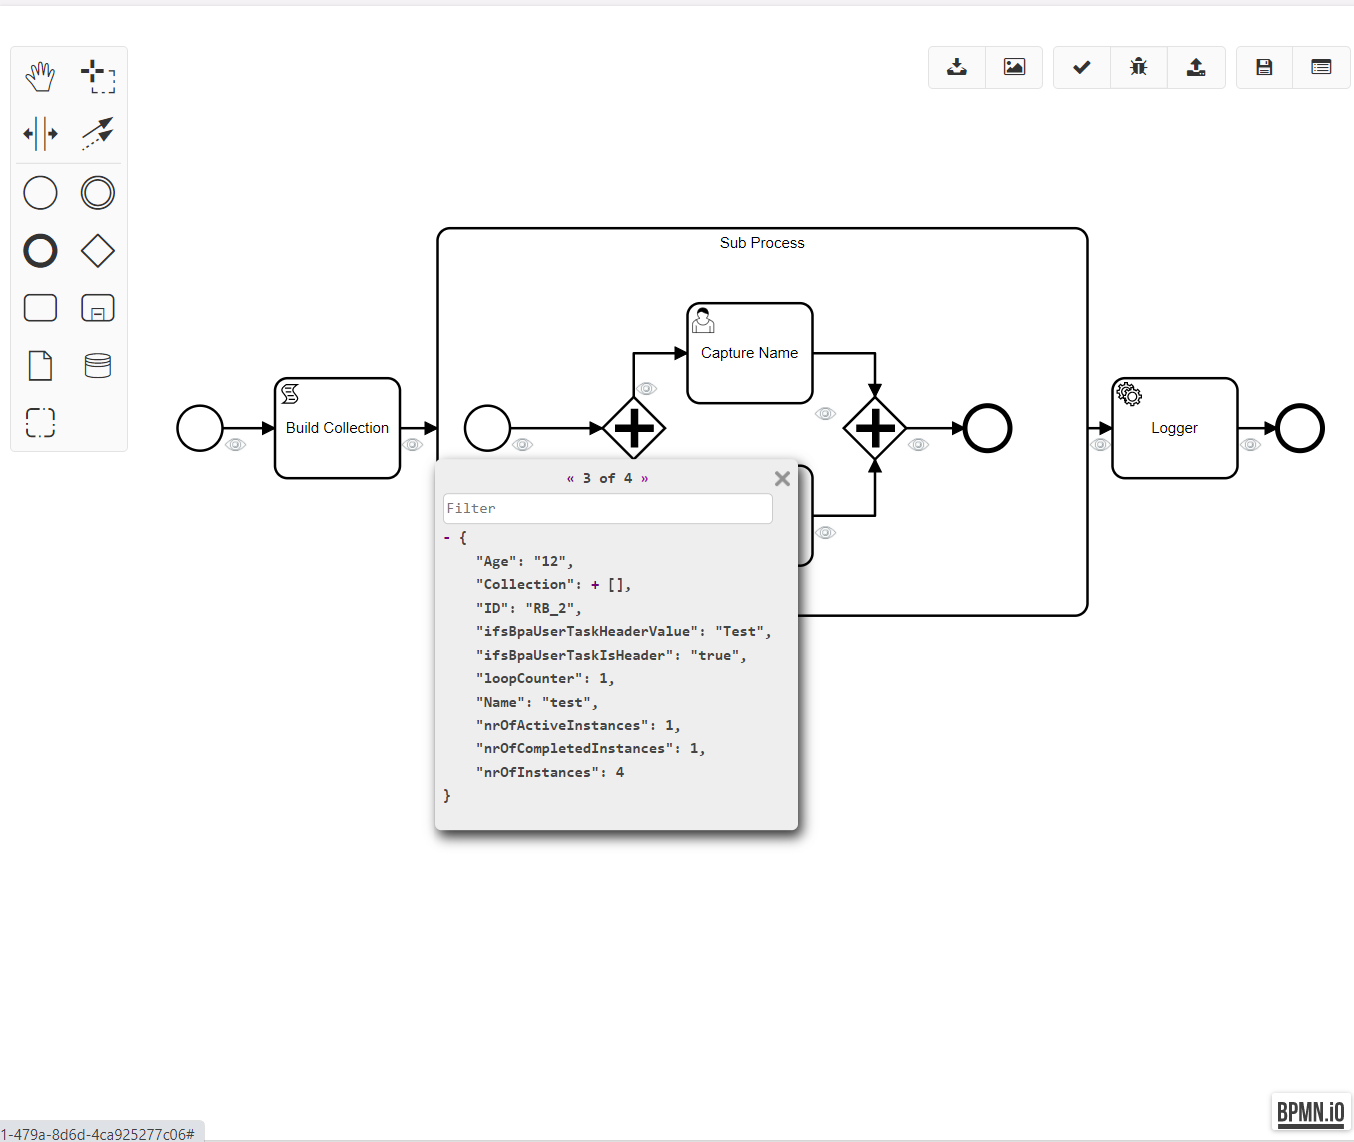
User forms will be prompted to enter data in each cycle. Once user clicks on the troubleshooting eye icon, then the data will be shown per each cycle as a pagination. The below image shows the data values of the first iteration.
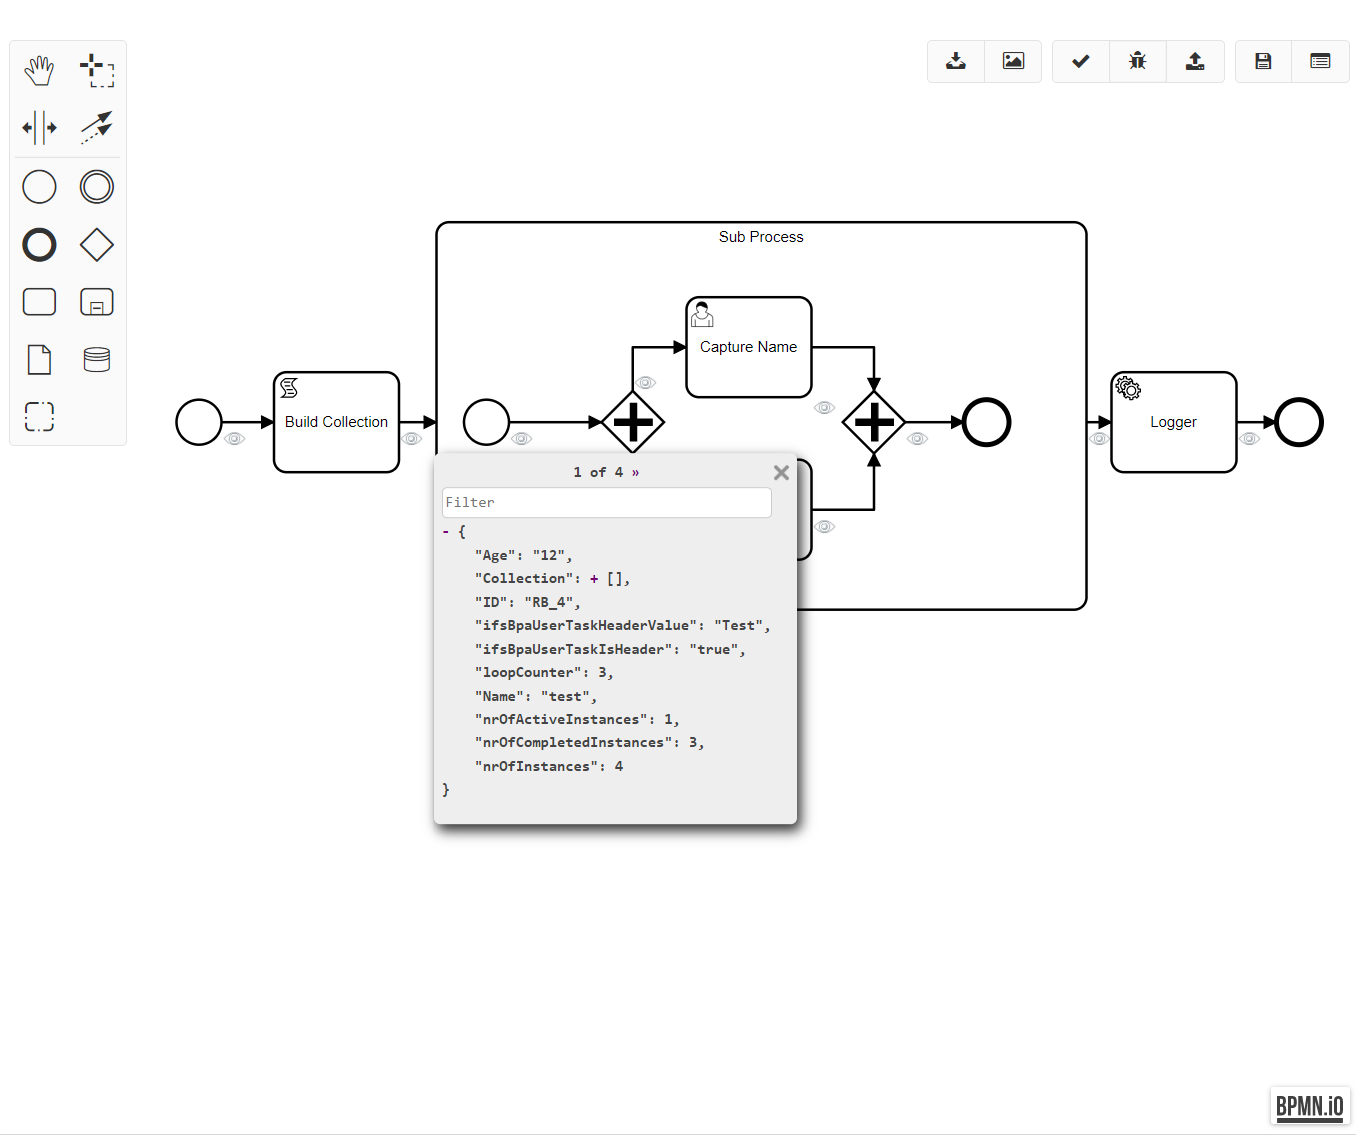
Users can click on the left or right arrows of the pagination to checkout the data values for each iteration.
Troubleshoot a Workflow with Cascades and Projection Actions
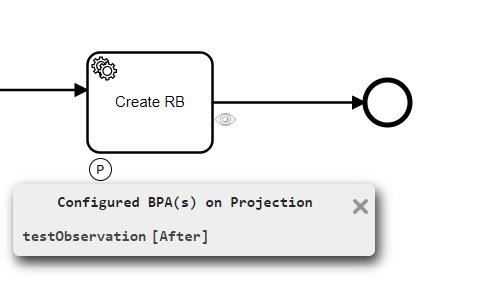
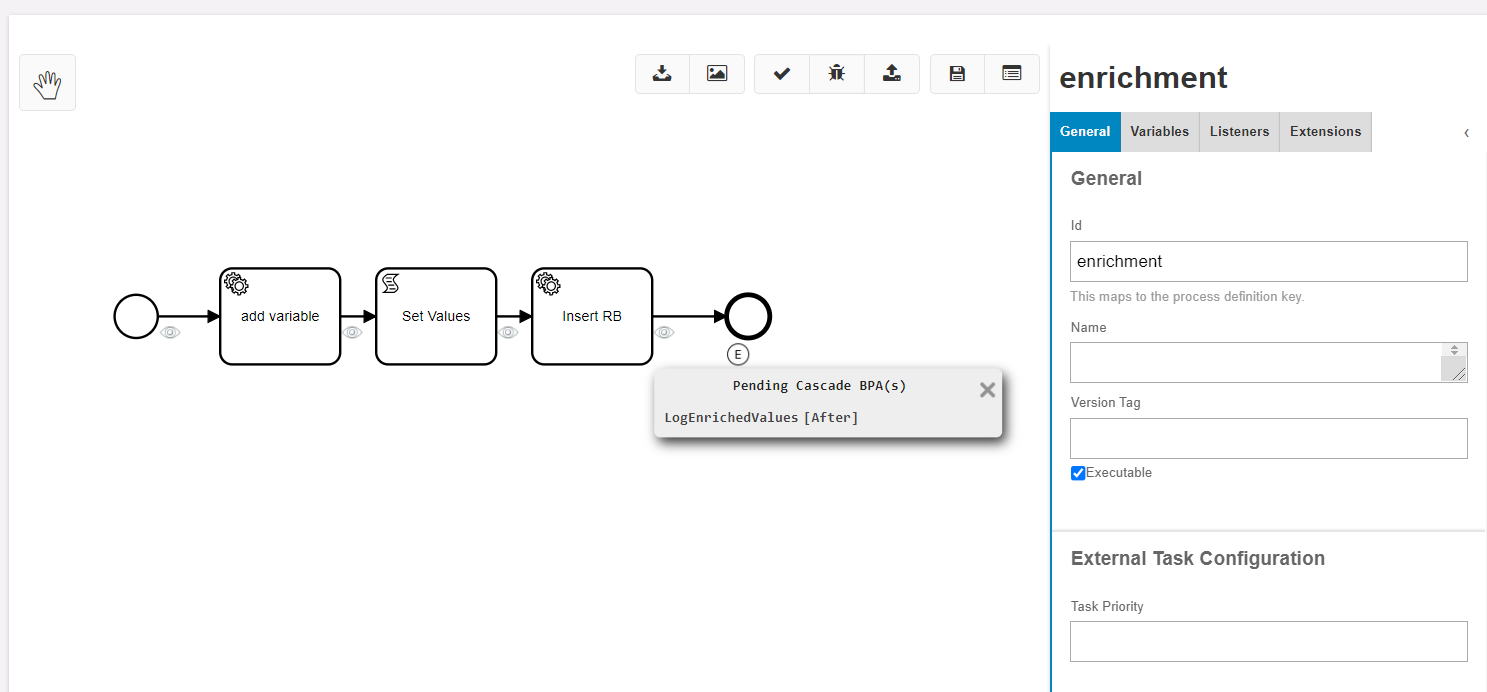
Troubleshooting supports workflows that contain cascades and projection actions. There are two new icons have been used to indicate that the cascade or projection action has been triggered.
- P - The 'P' icon has been used to indicate that there is a projection action has been triggered.
- E - The 'E' icon has been used to indicate that there is a cascade has been triggered.
Troubleshooting Errors
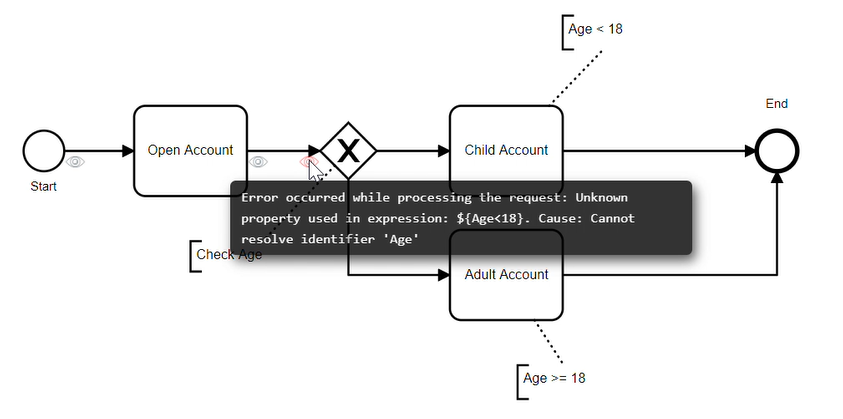
Whenever there is an error in Workflow execution, that will be shown to the user in a meaningful manner. The execution eye icons will be displayed up to the point where the error occurs, and another red-eye icon will be displayed at the last point. Users can see the error message by hovering over the red icon. Refer to the below scenario.
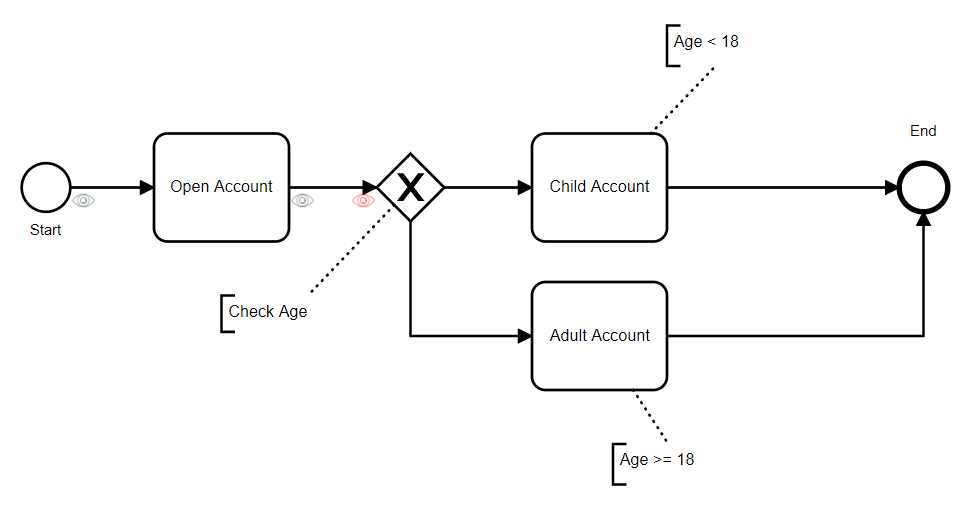
The above Workflow requires Age as an input, when it is troubleshooting without the required input below error is visible at the gateway.
Workflow Observations
Workflow observations tool can be used to record inputs to workflows for later use within troubleshooting tool.
Start Watching
Users can start watching a workflow by clicking on the 'Watch' button in the workflow manager.
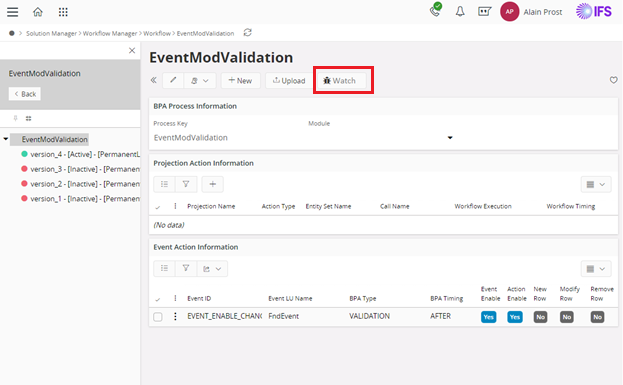
This will Start logging executions of Workflows for this Process until either 15 minutes have passed, the Workflow is re-deployed or the user disabled watching. Starting logging deletes all previous logs for this User / Process combination. Additionally, a toast will be displayed reminding the user that watching will be available for 15 minutes.
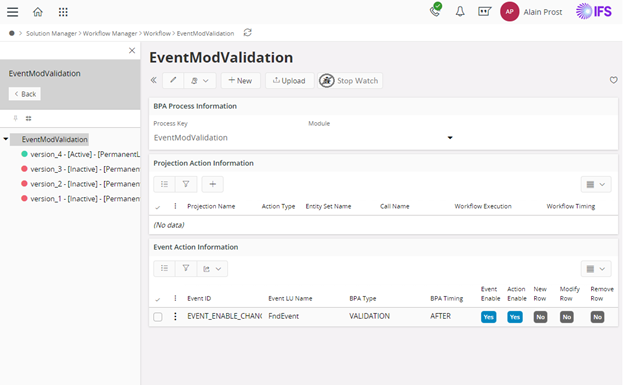
Stop Watching
The 'Stop Watch' button will disable watching the start of workflow invocations for this process.
View Executions
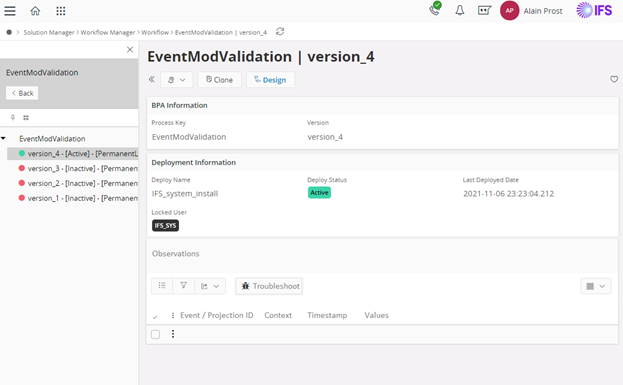
Observations: Shows all observations registered in the most recent ‘Watch’ that were logged in the last hour. Troubleshoot: Launches the Troubleshooting dialog with values pre-populated (see next step) for a single observation. The following data is displayed (Read Only)
- Event Id or Projection Name triggering the Workflow
- Context (oData / Delegate) in which the Workflow was triggered
- Timestamp of when the Workflow was triggered (useful for sorting)
- Logged Values – ideally displayed using the same format as persisted in the Troubleshooting dialog
Troubleshoot an Execution
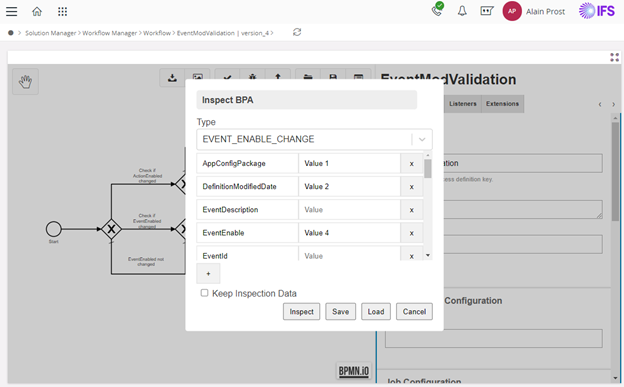
When Troubleshooting is invoked from an Observation the Workflow Designer is launched with the Troubleshooting dialog active and populated. All the other Troubleshooting tools will remain available, including the ability to Save the data for use in the future.
Workflow Status
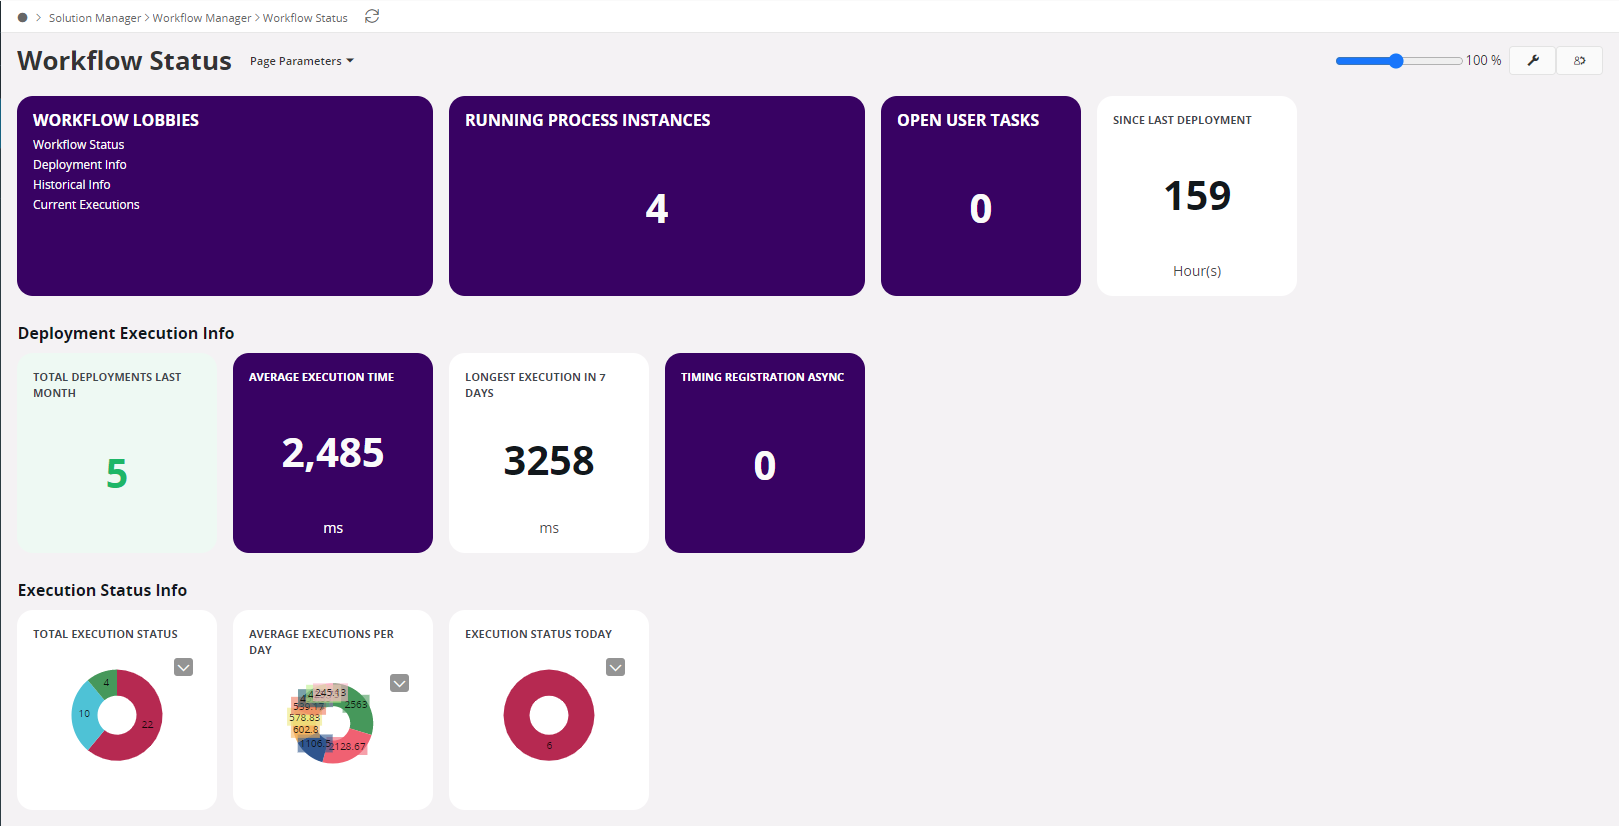
The Workflow Status provides the user with an at-a-glance view of information related to Workflows.
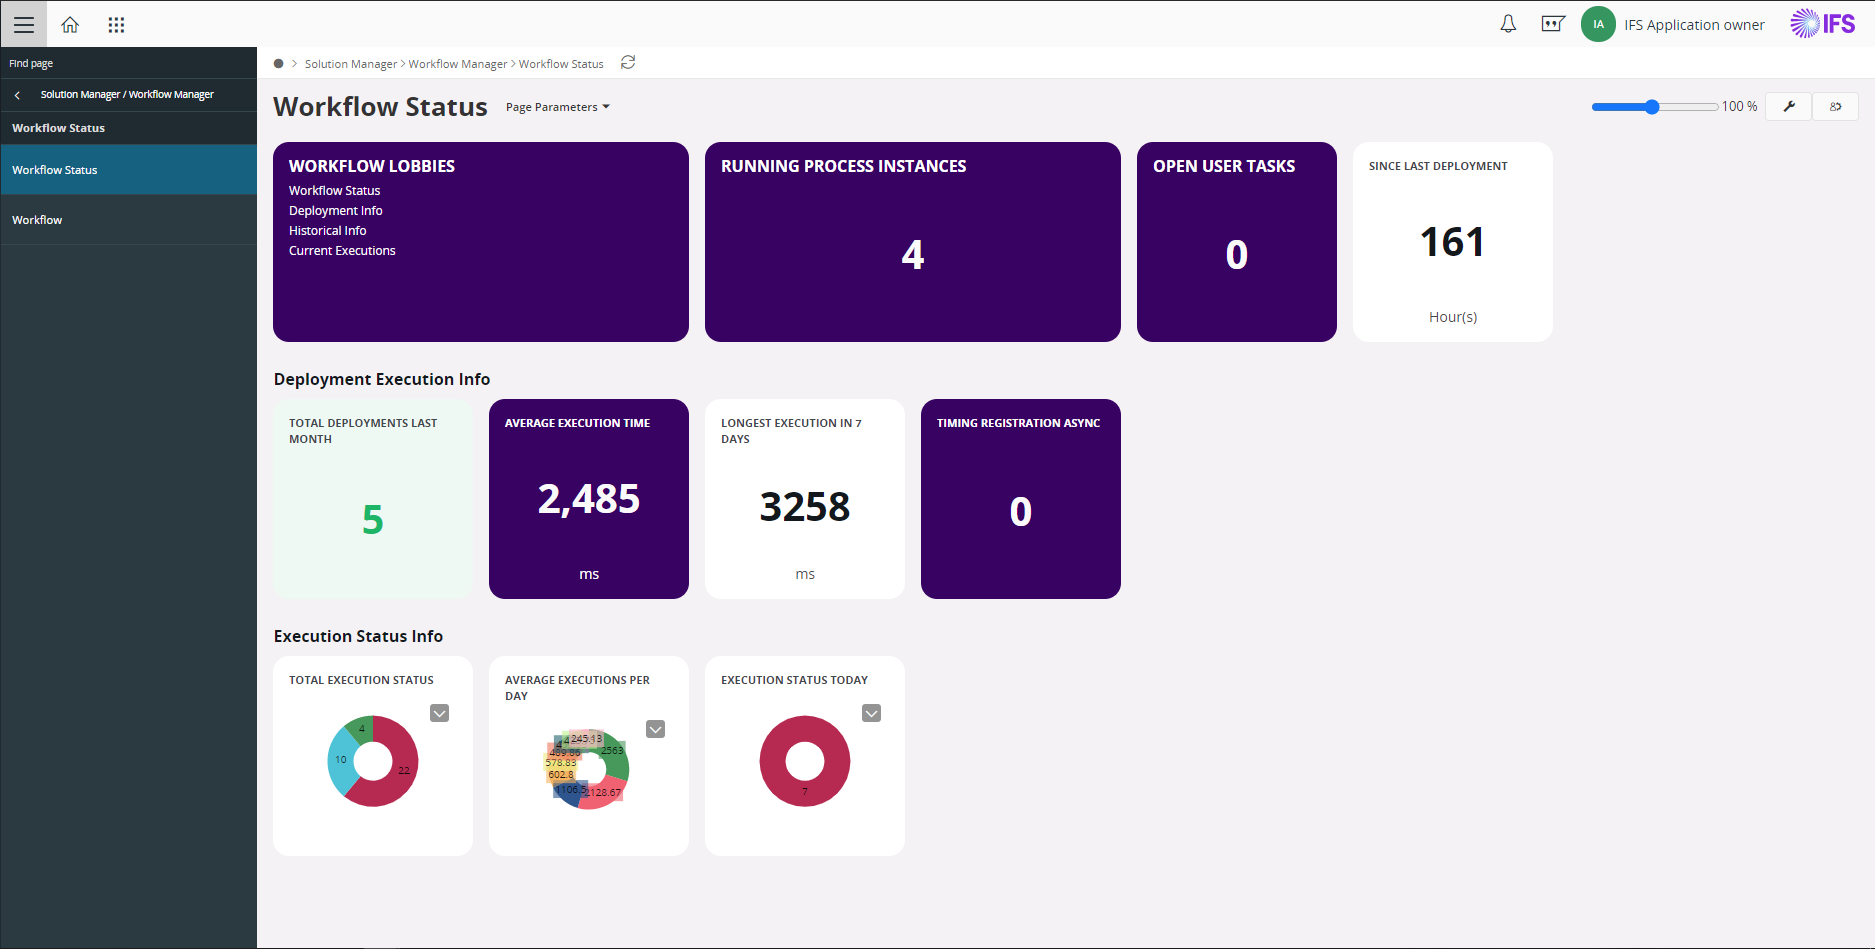
Below are the Workflow Lobbies available for a user to view required information,
Workflow Status
| View | Name | Description |
|---|---|---|
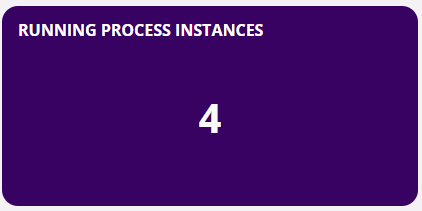 |
Running Process Instances | The number of currently running Workflow. |
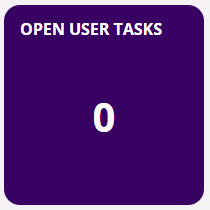 |
Open User Tasks | The number of open user tasks. |
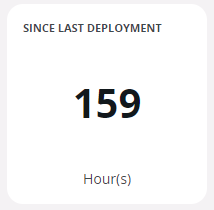 |
Since Last Deployment | Time in hours, since the last deployment has happened. |
Note: Above numerical values are subject to changes based on Workflow executions.
Deployment Execution Info

| Name | Description |
|---|---|
| Total Deployments Last Month | The number of Workflow deployments done during the previous month. |
| Average Execution Time | Average execution time in milliseconds. |
| Longest Execution in 7 Days | Longest execution time taken during the last 7 days. |
| Timing Registration Asynchronous | The number of ASYNC Workflows in the system. |
Note: Above numerical values are subject to changes based on Workflow executions.
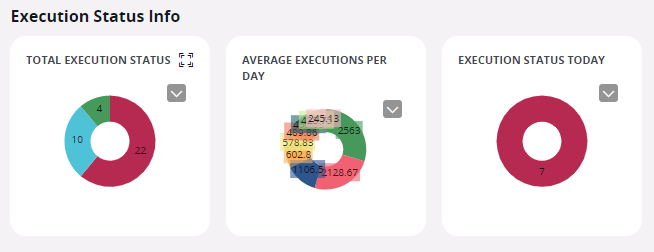
Execution Status Info
| Name | Description |
|---|---|
| Total Execution Status | Number of Workflows that are Deployed, Active and Inactive in the system. |
| Average Execution Per Day | Average execution time of the Workflow each day. |
| Execution Status Today | Number of Workflows executed during the current day categorized on deploy status. |
Note: Above numerical values are subject to changes based on Workflow executions.
Workflow Deployment Data
Users could browse to Workflow Deployment Data by clicking on Deployment Info from the Workflow Lobby.
| View | Name | Description |
|---|---|---|
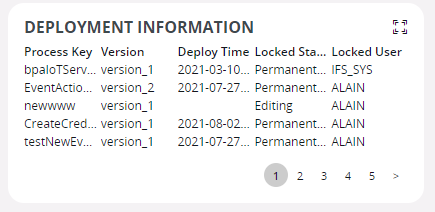 |
Deployment Information | The deployment information for each Workflow. |
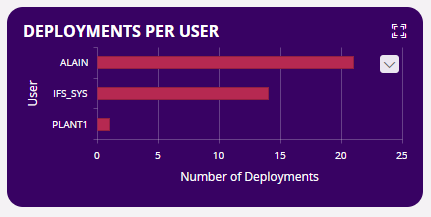 |
Deployments Per User | The number of Workflow deployments per user. |
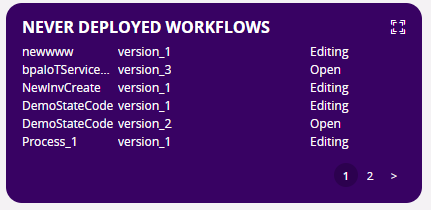 |
Undeployed Workflows | The number of Workflows that are under the UNDEPLOYED status. |
Workflow Historical Data
Users could browse to Workflow Historical Data by clicking on Historical Info from the Workflow Lobby.
| View | Name | Description |
|---|---|---|
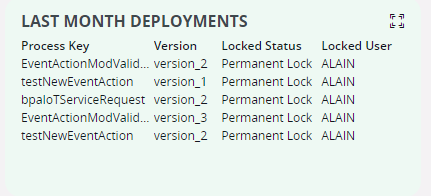 |
Last Month Deployments | Workflow deployment information for the previous month. |
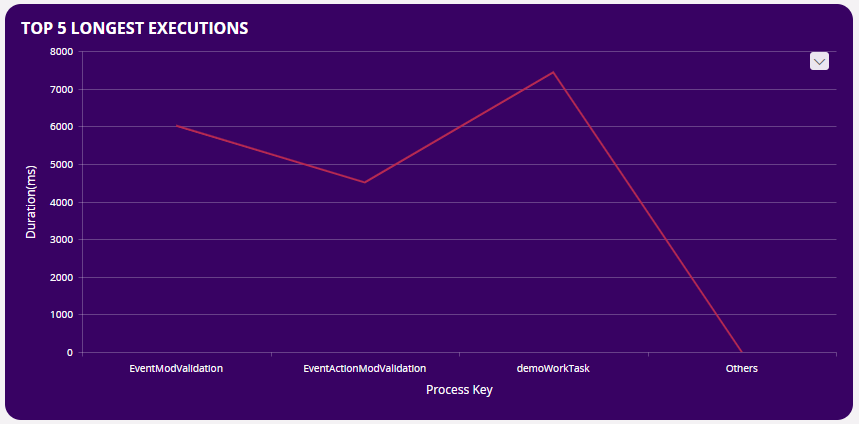 |
Top 5 Longest Executions | Displays the top 5 Workflows which are having the longest execution time. |
Workflow Runtime Data
Users could browse to Workflow Runtime Data by clicking on Current Executions from the Workflow Lobby.
| View | Name | Description |
|---|---|---|
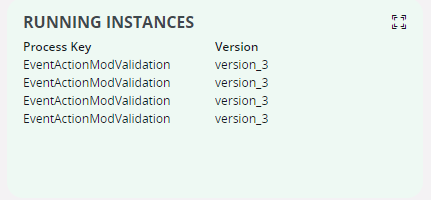 |
Running Instances | Detailed information regarding the currently running Workflow. |
 |
Events | Event details related to the Workflow. |
 |
Open Tasks | Detailed information related to the currently open user tasks. |
 |
Open Task Variables | Detailed information regarding open task variables. |
Workflow Templates
Workflow patterns and best practices can be easily understood by referencing a Workflow used to solve a similar problem. Workflow templates provide users with the ability to manage and view templates within the application which can be leveraged and built upon. Workflow templates are intended to create and deliver patterns to users by including a few examples of best practices.
Workflow templates are not executable but can be inspected. The troubleshoot functionality works the same as non-template workflows allowing users to understand how the Workflow could benefit IFS Cloud Web users. The 'Is Template' attribute is shown in the 'Workflow Information' section, indicating whether the Workflow is a template or executable.

Create a Workflow Template
Step 1: Click the “New” button.
| Control | Description |
|---|---|
 |
Used to create a new Workflow or a Workflow Template. |
Step 2: Provide the Process Key, and enable "Is Template".

Clone a Workflow Template
Step 01: Click the “Clone” button.
| Control | Description |
|---|---|
 |
Copies the existing version and creates a new version. Or copies the existing version and creates a new Workflow with a user-defined Process Key. |
There are two ways to clone a Workflow Template:
Step 2a: Click 'Clone version for Same Workflow'.
Copies the existing Workflow Template version with a user-defined version under the same Workflow Template.

Step 2b: Click 'Clone as a new Workflow'.
Users can copy the Workflow Template version as a new non-template Workflow with a user-defined process key.

Mark Workflow as a Workflow Template
Step 1: Click the "Mark As Template" button.
| Control | Description |
|---|---|
 |
Mark a non-template Workflow as a Workflow Template |
The eligibility criteria to Mark a Workflow as a Workflow Template is as follows,
- The workflow should be a Non-Template Workflow.
- All Workflows versions of the Workflow should be in the un-deployed status (If a Workflow has at least one Active/ Inactive version, then it cannot be marked as Workflow Template).
Upload a Workflow Template
Users can set the 'isExecutable' attribute in the BPMN XML file to false. Use the existing “Upload” button available within the Workflow page to upload the Workflow as a Workflow Template.
Workflow Management
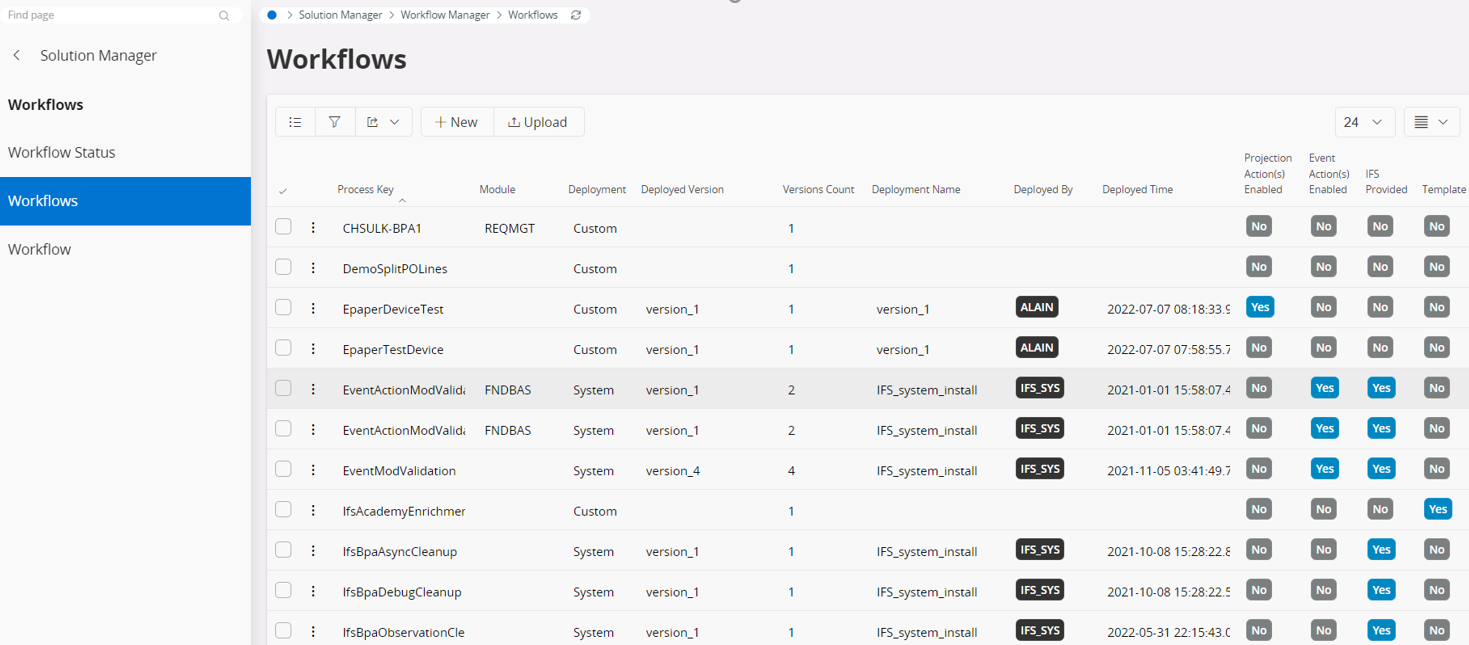
The Workflows page is accessible within the Solution Manager section in IFS Cloud Web for users to manage the existing Workflows within the system. The page also displays information about the deployments, improving the filtering and searching experience.
Deploy a Workflow
Step 1: Select a currently inactive or undeployed Workflow.
Step 2: Click the "Deploy" button.
| Control | Description |
|---|---|
 |
Deploys the diagram to the server which is then ready to be actioned/used. |
The 'Deploy' button will be visible only for Undeployed or Inactive Workflows. The deployment will take place the same as in the Workflow Designer. More information can be found in Getting Started with Workflows.
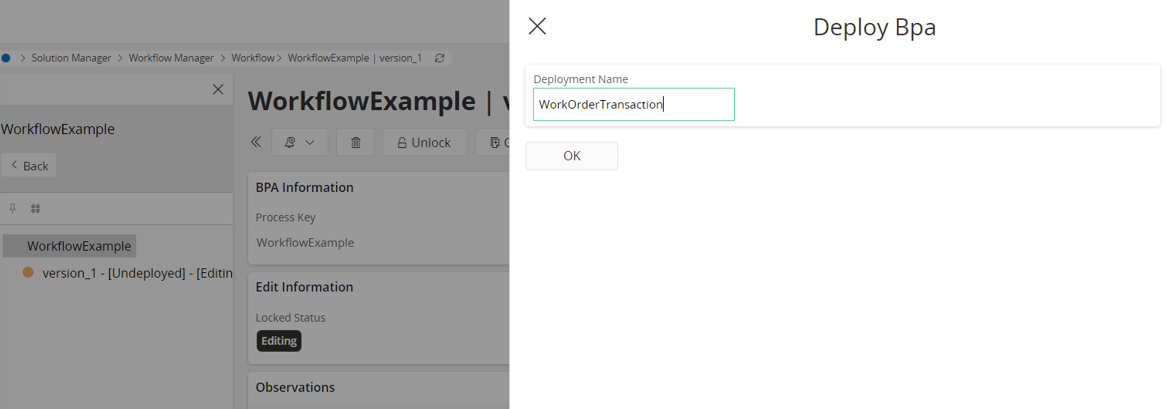
Step 3: Provide a deployment name.
Un-deploy a Workflow
Step 1: Select the Workflow Version.
Note: Un-deployment is not available for system installed Workflows. (If the Deployment Name is 'IFS_System_install' or the column header IFS Provided is set to 'Yes').
Step 2: Click the "Undeploy" button.
| Control | Description |
|---|---|
 |
Un-deploys the diagram from the server. |
The un-deployed Workflow version will be set to undeployed status and is allowed to edit.
Note: If a Workflow consists of only one version and contains any active configurations (Projection Action Configurations/ Event Action Configurations), un-deployment is not permitted.
When multiple Workflow Versions are deployed for the same Workflow, the previously deployed Workflow Version will be automatically activated as the deployed version. For example, the below Workflow consists of two Workflow Versions, where version_1 is Inactive (previously deployed version) and version_2 is Active (currently deployed Workflow Version).
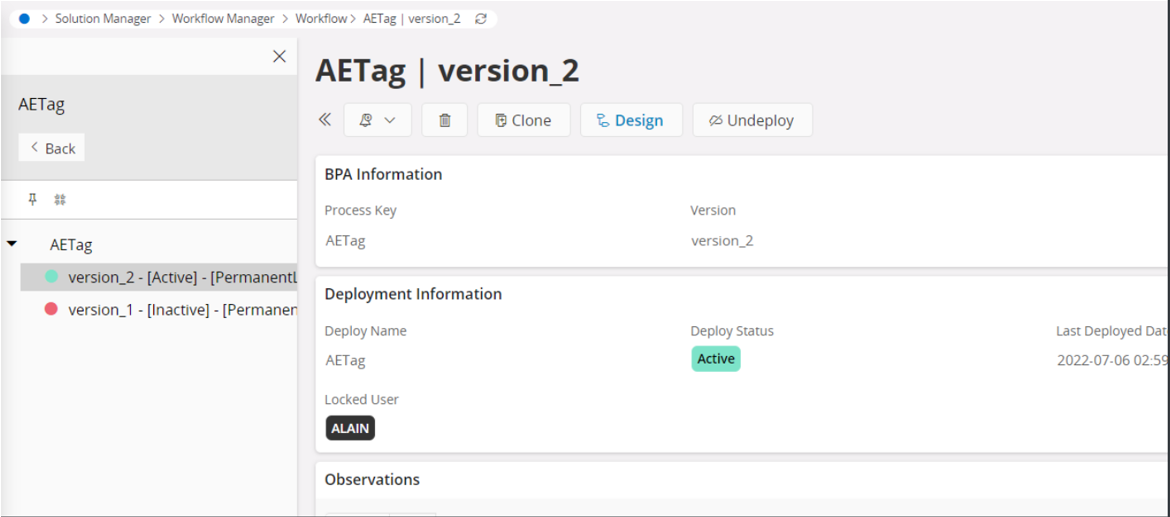
When version_2 is undeployed, the system will automatically activate the previous deployment and version_2 will be set to undeployed status, also allowing for editing to occur.

Workflow Commands
Introduction
Workflow Commands are another way of executing Workflows that hails from Custom Commands feature. The enhanced user experience allows users to directly interact with their automated process definitions.
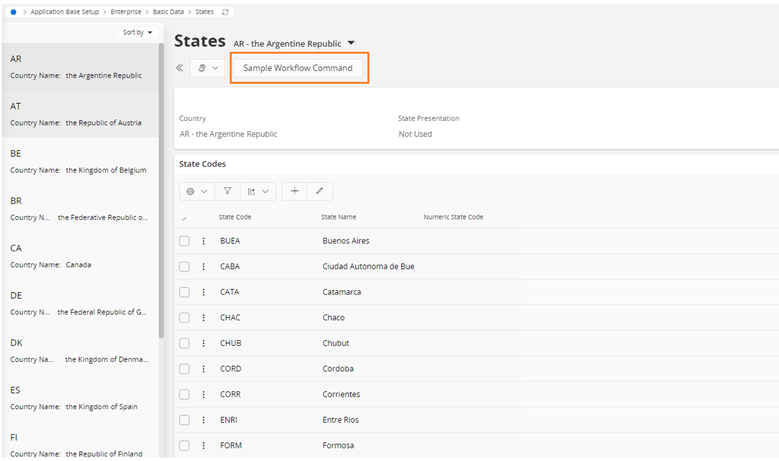
Why Workflow Commands?
Workflow execution is typically associated with automation designed to augment an existing IFS Cloud Web process by reacting to an API call (Reaction to Projection) or data change event. Using a Workflow command, a user’s intention to invoke a Workflow for execution is captured and acted upon directly from IFS Cloud Web.
How to add a Workflow Command
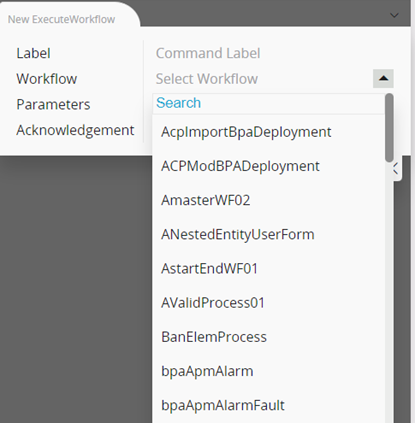
Please refer to the Contents of "Adding an ExecuteWorkflow type command" under Adding Commands for detailed guidance.
Note: Workflow command implementation enables determining eligibility for commands while deploying any workflow irrespective of its usage as a command. Therefore, instead of listing down all the deployed workflows, we could simply omit the workflows that are marked as not eligible appearing in the list.
Workflow Command Validations
The essence of Workflow command validations boil down to the fact that Workflows attached to any command should either be executed to a completion or failures. Any other intermediate state should be void as the user has no other means of knowing the state of execution or to manually intervene reviving any workflow that has been halted. For instance, some configurations might force executing workflows in the background, and the user won’t get notified in such scenarios.
Next Workflow commands should be aware of security risks it may pose, executing unverified external codes or enabling other unverified workflows within are some of the concerns.
The following list contains a summary of validations that are carried out in the context of Workflow commands.
Common
- All asynchronous transitions including multi-instance loops
- User Tasks and Validation End Events (TerminateEventDefinition) in the same Workflow
Asynchronous Elements
- SendTask
- ReceiveTask
- ManualTask
- CallActivity
- SubProcess triggered by Events
- Gateways (EventBasedGateway, ComplexGateway)
- Event Based Start and End Events (Ex: SignalEventDefinition, MessageEventDefinition, ErrorEventDefinition)
- Any other Events excluding start and end events
Unsupported Elements
- Transaction
- Participant
- External Type Service Task
- StartEvent with Extension formData
Java Class Implementation
- Service Task java class implementations should be extended from TransactionalDelegate
Transactional Listener Check
- CamundaExecutionListener’s camunda class should be an implementation of TransactionalListener, ActivityLogExecutionListener or SubProcessStartListener classes
Implementing Validations
There are two validation mechanisms in place to ensure Workflow commands are validated before use.
- Implicit validations
- Explicit validations
Implicit validations
- Registering a Workflow command created via Page Designer
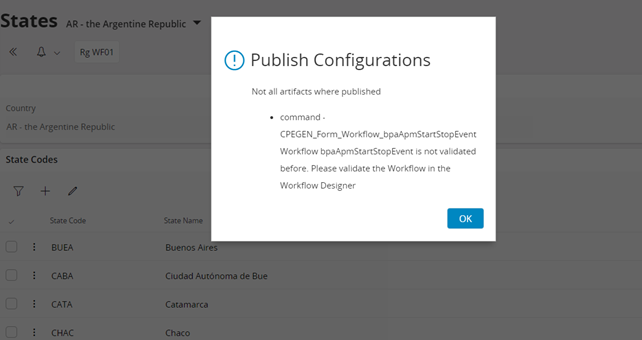
Once you create and save the command changes in Page Designer, you can choose to publish changes either via the Page Designer component itself or Page Configuration Admin as illustrated in below diagram.
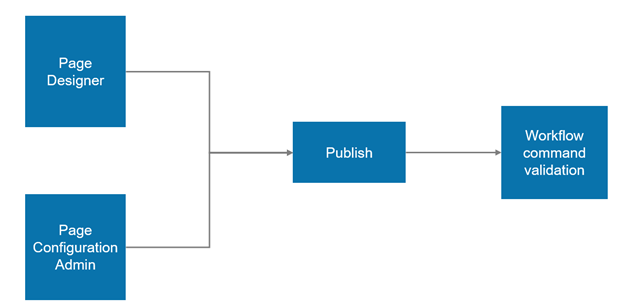
These validations ensure that the workflow you have initially picked for the command remains valid at the time of publishing.
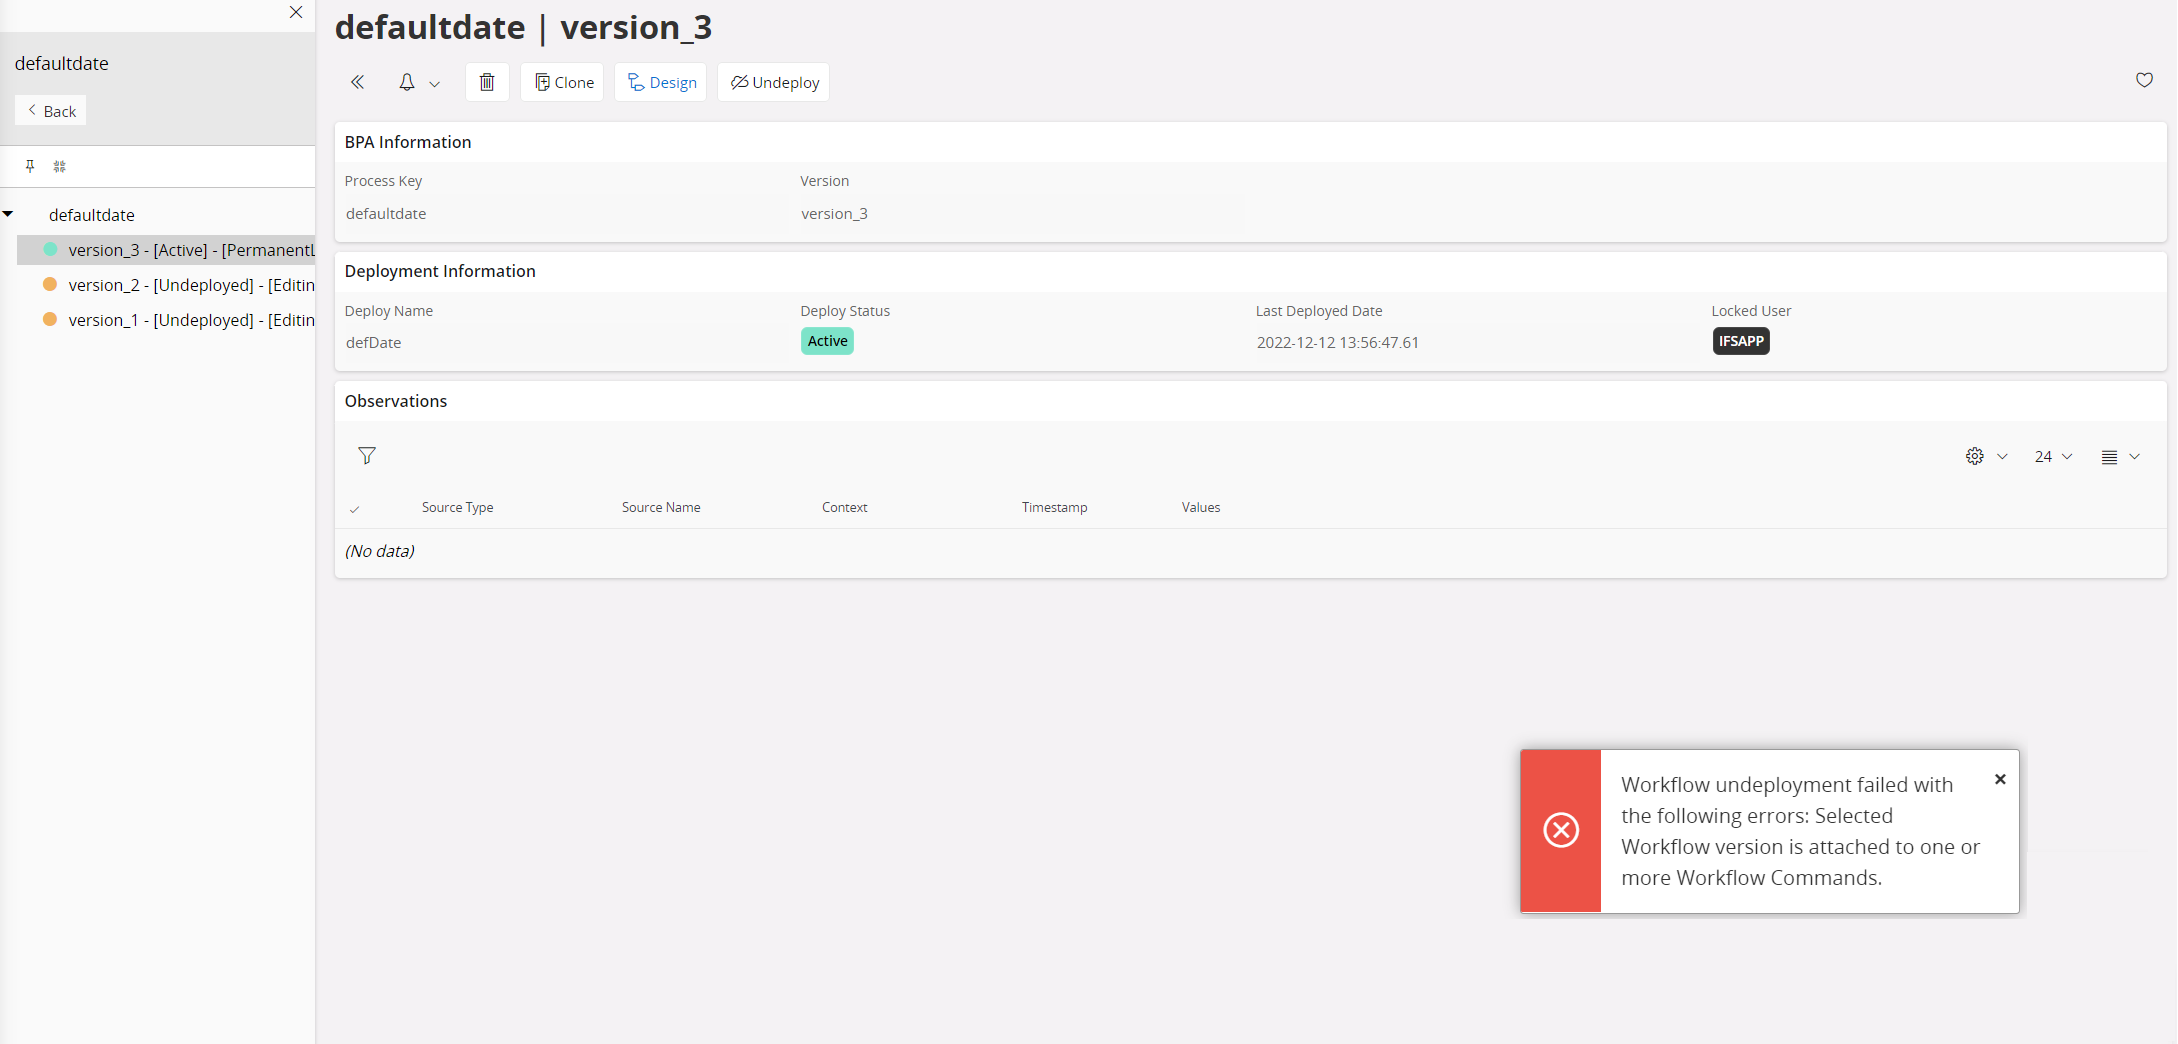
- Deploy/Un-deploy a Workflow that is already attached to a command
Even if a workflow is already attached to a command, you could make it incompatible for commands by activating a different version of the same workflow. Therefore, validations are in place against deployment or un-deployment operations to prevent any undesired version from getting activated. Further, it makes sure that you are not allowed to un-deploy when there is only a single deployed version preventing runtime errors.
Explicit Validations
The Workflow command validation button has been introduced in the model designer as a supportive feature to the Workflow commands, serving two purposes.
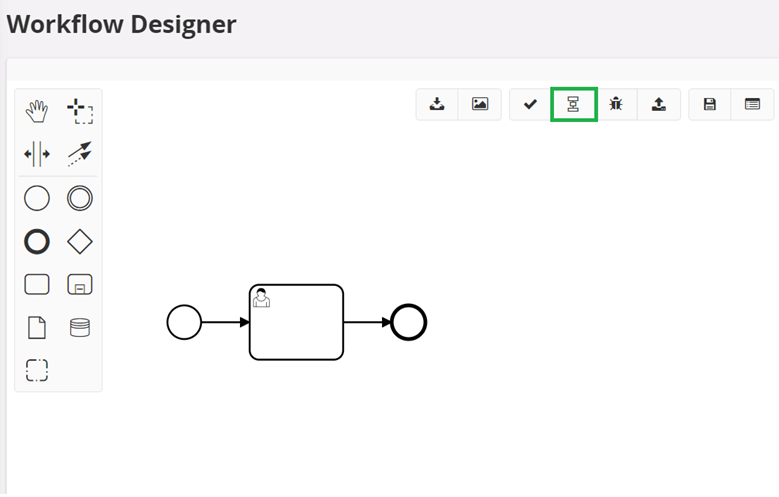
1 - Validates Workflow for the commands early at the design stage
This is quite useful when you design a workflow that is meant to be used as a command. Since it is already validated before deployment, you do not need to worry about implicit validations unless you activate a new version of the same workflow.
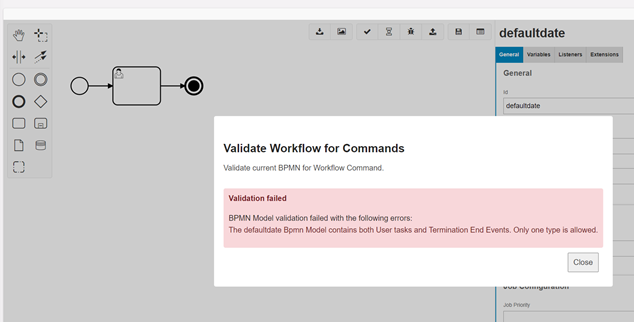
2 - Sets legacy workflows eligible for Commands
When there are legacy workflows that are deployed before Workflow command implementation, cannot be directly applicable as a Workflow command since command eligibility information is not available. Even if you try to publish it as a command, implicit validations may detect that the Workflow is not pre-validated for the command. In such situations, you could validate the deployed version with the introduced validation button and make it eligible for commands.
Transfer Workflows with Application Configuration Packages
Workflows and associated configurations can be managed as a group, and be exported and imported using Application Configuration Packages(ACP).
Add Workflows to ACP
Workflows can be added to an ACP via the Workflow page.
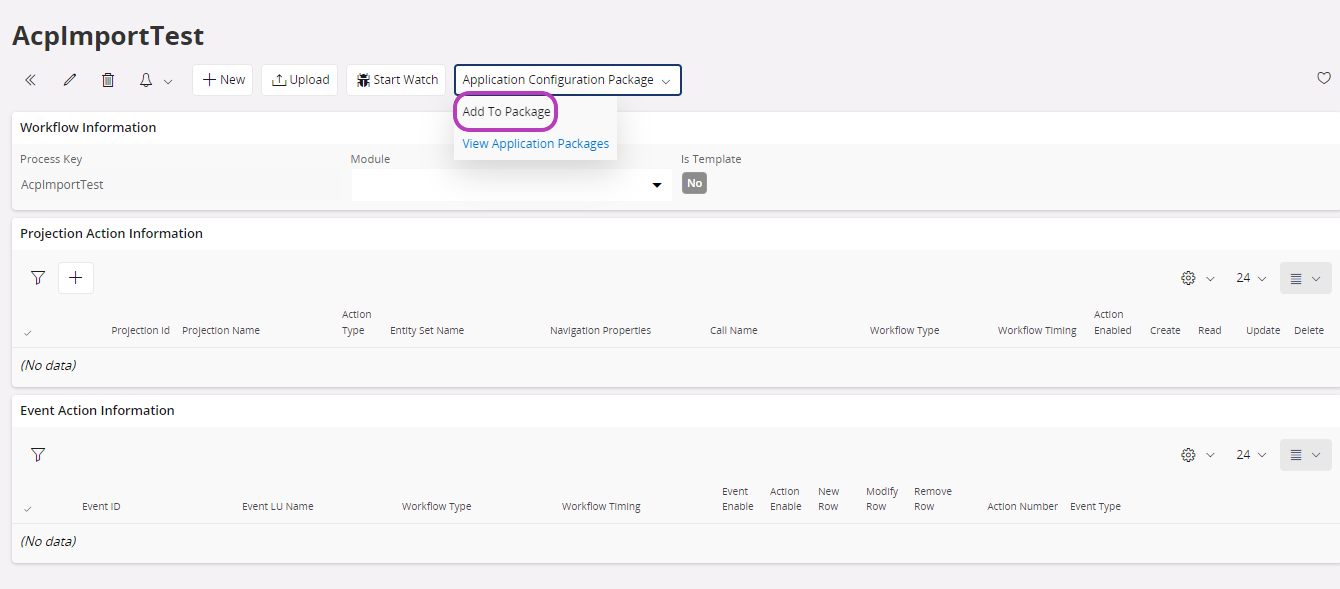
NOTE: When exporting a Workflow that has multiple versions always export the version with ‘Active’ status. When a version with ‘Active’ status does not exist, always export the latest modified version.
The Workflow, associated projection action(s), and custom event action(s) configurations will be automatically added to the ACP. If any event actions are associated with the workflow, the custom event linked to that event action will also be added to the ACP.
Remove Workflow from ACP
A Workflow can be removed from an ACP Via Workflow page. The Workflow, associated projection action(s), and custom event action(s) configurations will then be removed from the ACP.
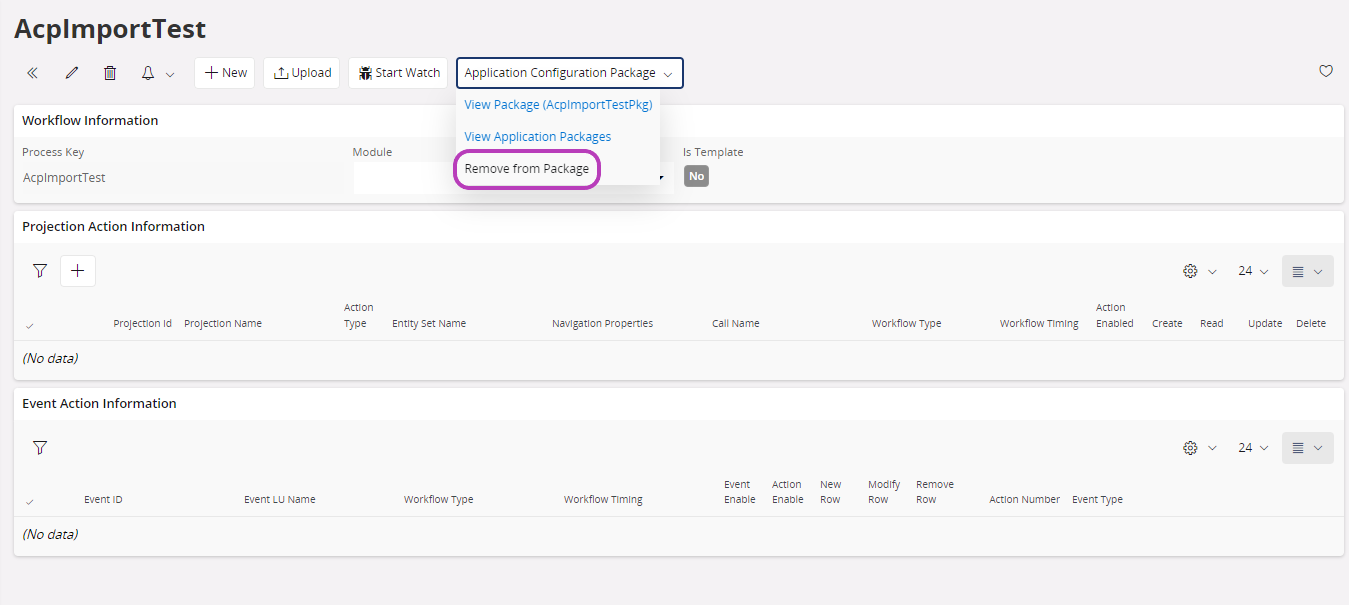
Import Workflows
A Workflow can be imported to the target environment using IFS Cloud installer or manually. If the Workflow item status is ‘New’, a new Workflow in the target environment is created with the same process key and version as in the source environment. If the Workflow item status is ‘Modified’, a new version is created under the corresponding process key. If the Workflow is ‘Active’, it will automatically get deployed in the target environment when importing the ACP irrespective of importing manually or by IFS Cloud installer.
Import Workflows in ACP via IFS Cloud Installer
Refer here to understand how to use IFS Cloud Installer to import an ACP. In this case, system will automatically execute steps, which a user typically preforms using the user interface.
Workflows imported by an ACP and deployed by the installer can be identified in Workflows page as shown in below image. In the image AcpWorkFlow1 (process key) is deployed via the installer.

Observe the following changes which can see on the above image.
- The deployment name always will be ACP_system_install. In this way users can easily identify what Workflows installed via the installer. But if a user undeploy and redeploy with a different deployment name, the new name will appear here.
- The Workflow always owned by the ACP_SYS user. The reason behind this is, because when the installer is running, system does not have any active logins. So, it gets defaulted to ACP_SYS user.
Following points describe the required steps based on the deploy status, to edit or update Workflows imported by an ACP from the installer.
- For Active Workflows
In this case both deployed user and the locked user will be ACP_SYS. In order start editing, first it is required to undeploy (Press the Undeploy button) the workflow. This is possible for any Admin users.
Once undeployed, the locked user becomes the current logged in user. Please check following image to understand how the screen changed after the Workflow undeployment process (check the Locked User and the Locked status).
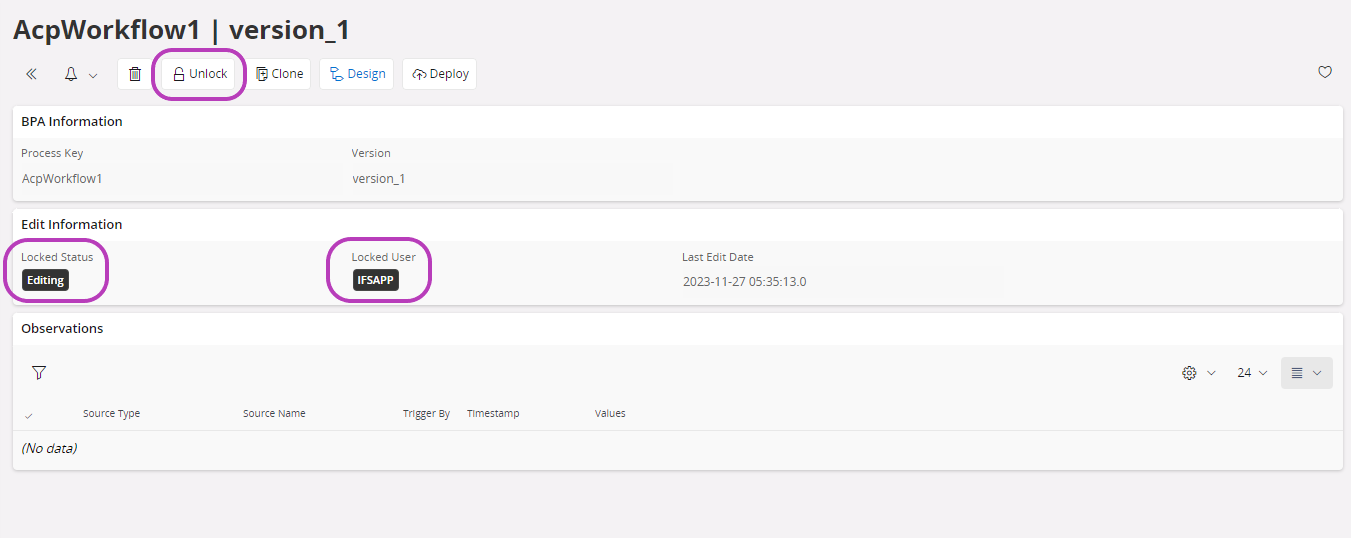
If the Admin user wants someone else to edit the Workflow, then he/she can just Unlcok (Press the Unlock button. Refer the above image) the Workflow so, that anyone can edit it.
- For Undeployed Workflows
In this case also both deployed user and the locked user will be ACP_SYS. So, to start with editing, first it is required to Unlock the Workflow. Any Admin use can perform this task.
Known Limitations
Assume an active Workflow with an enabled projection configuration is included in an ACP. In case this Workflow fails to deploy when installing the ACP by the installer, the projection configuration will continue to install in enabled state. This can cause runtime errors since there is no active Workflow to trigger when the projection action is executed.
Import Workflows manually
Refer here to understand how to manually import an ACP.
Import Workflows in Different Types (Template or Non-Template)
There can be a situation where both the source and target environments contain a Workflow with the same name, and their types are different, that is source environment Workflow is a Template Workflow, and the target environment Workflow is a Non-Template Workflow and vice versa.
In that case, importing the ACP will raise validation errors for the Workflow item and associated items as follows. All the items with validations errors will be ignored during the import.

Note that there can be errors during import with related to Workflows even though the validation is successful and validation status is indicated as valid. Therefore, it is not recommended to rely on validation summary to decide the success of Workflow installation in the environment.
Rename Workflow Item
In a situation where a Workflow and associated configurations can't be imported due to validation errors as mentioned in the above scenario, the Workflow can be renamed using the 'Rename Workflow Item' button and it can be imported with a different name. This button is visible only for WORKFLOW type items.

Upon clicking on the 'Rename Workflow Item' button, a dialogue will pop up to enter the new name for the selected workflow.
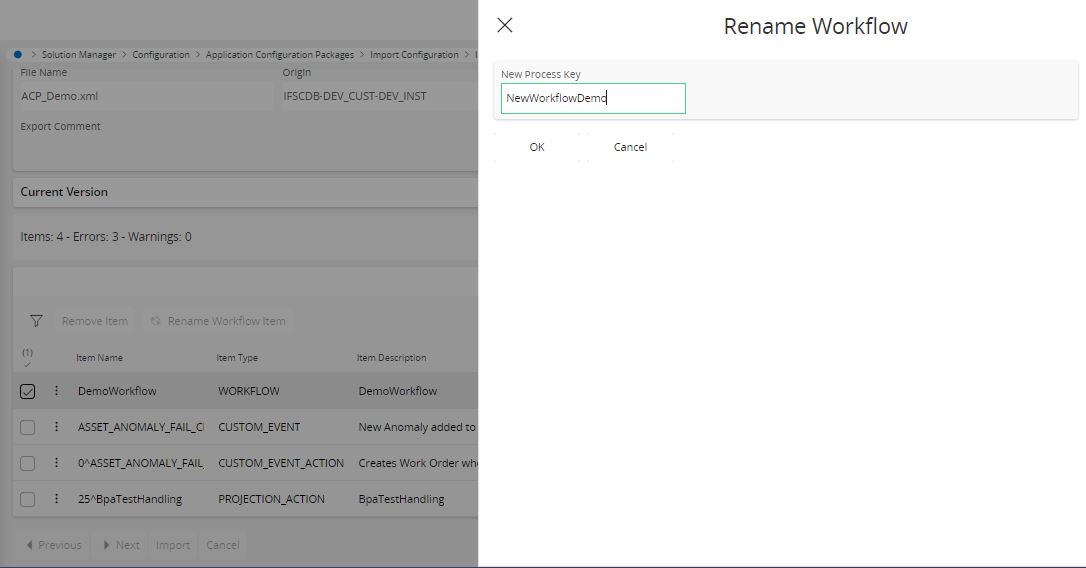
Once you submit the dialogue, Workflow will be renamed. In addition, associated projection actions and event actions will be linked to the newly created Workflow as well.

NOTE: All the items will be re-validated.
Workflow Execution Logs
Workflow Execution Log can be used to trace the Workflows that have been executed for a particular request.
How to Enable Trace Details
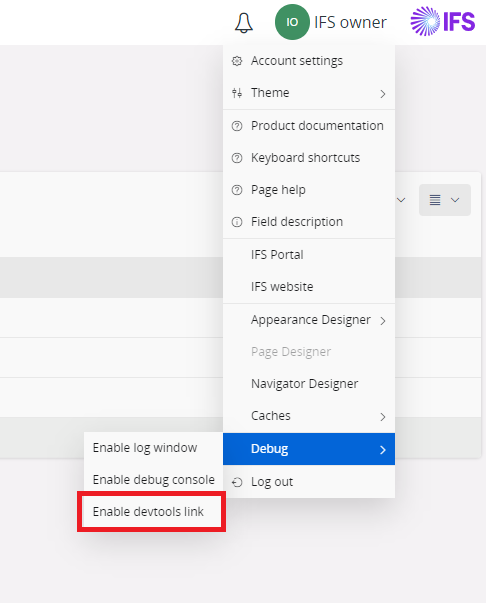
To enable the trace log details users need to enable the devtools link in the IFS Cloud Web.
Steps:
- Navigate to Profile and Settings >> Debug >> Enable devtools link.
- To trace the Workflow execution details you need to install the latest IFS Cloud Web DevTools Chrome Extension.
Once these configurations are done, you will see the trace details in the IFS Cloud extension under Logs >> Network

How to Filter Workflow Execution Logs
When there is a request that has a Workflow execution(s) involved, the Workflow related traces will be logged under that request. Once you click the request in the devtool console, you’ll see the trace details in the ‘Trace’ tab.

Also, you will have the “Workflow” category to filter out Workflow related logs only.

Workflow Execution Log Details
Workflow execution trace will be logged in order as they are executed. The following details will be logged for each type of Workflow execution:
- Projection Action: ProcessKey, ProcessType, ProcessTiming, Action Type, Projection Name, Entity set and CRUD Action
- Event Action: ProcessKey, ProcessType, ProcessTiming, LU Name, EventId
- Workflow Commands: ProcessKey, ProcessType, SourceType
| ProcessKey | Name of the executed Workflow |
|---|---|
| ProcessType | Type of the Workflow (i.e., Validation, Process Enrichment, User Interaction) |
| ProcessTiming | Execution timing (Before, After, Async) |
| Action Type | Action type of the API (DATA, CALL) |
| Projection Name | Workflow triggering API Name |
| Entity set | Entity set of the API |
| CRUD Action | CRUD Operation Action if Action type is DATA |
| LU Name | Logical Unit name of the event |
| EventId | Event Id |
| SourceType | Workflow command related source (REST) |
Note:
- For asynchronous workflow executions, the “POSTED” prefix indicates that an Asynchronous Workflow has been posted for the request.
- Trace details within the workflow executions, will not be logged.
- Workflows that are triggering for an asynchronous workflow execution will also not be logged