Workflow Examples
Workflow examples enable users to easily understand the Workflow patterns and best practices. This section provides the multiple Workflow examples that illustrate the common problems users might face while using the Workflow and how Workflow can be utilized to solve business scenarios. All examples define in this section are available in the IFS Cloud as Workflow Templates.
Common Scenarios
This section describes a set of common problems you might encounter when designing the Workflows and how to overcome them. As mentioned early, all these Workflows examples are available in IFS Cloud as Template Workflows. You could simply execute these Workflows in troubleshooting mode and observe the execution results against each activity without deploying them.
Script Handling
You cloud see the underline JavaScript implementation as shown below, If selected any of the Script Task in provided examples.

Date Example
This Workflow demonstrates that how to manipulate date values using script tasks. Please check the latest version of the Workflow "DatesExample" in IFS Cloud.
Execution of this Workflow in troubleshooting mode.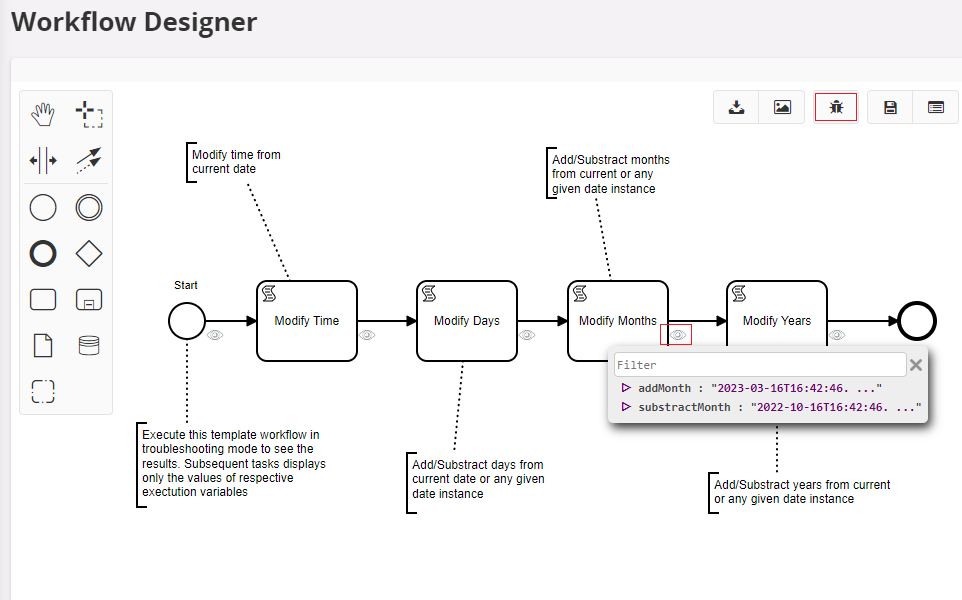
Arithmetic Example
This Workflow demonstrates that how to use arithmetic operations using script tasks. Please check the latest version of the Workflow "ArithmeticExample" in IFS Cloud.
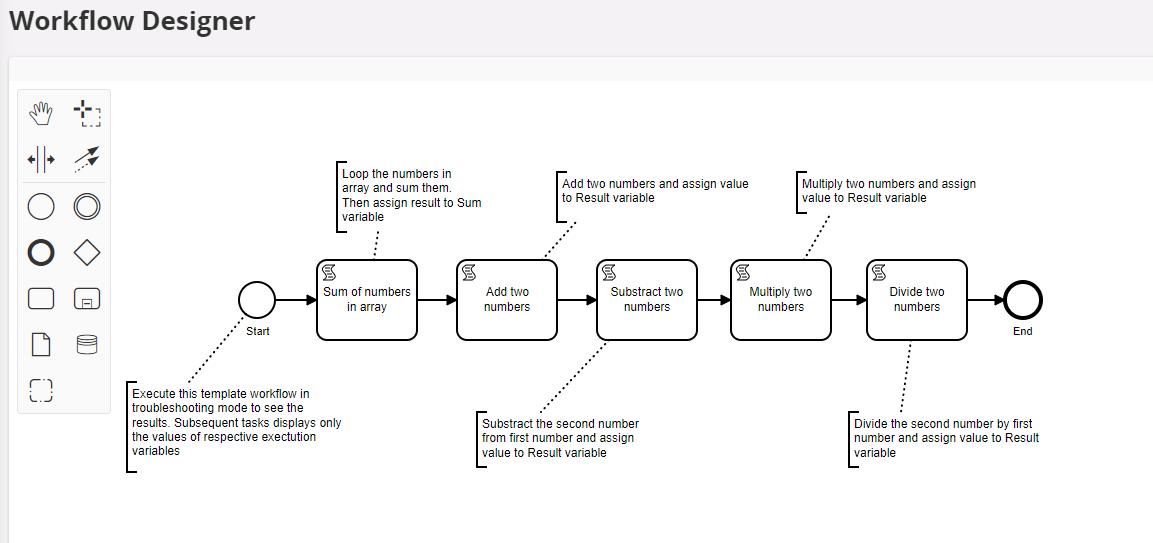
Execution of this Workflow in troubleshooting mode. 
Split Attributes from Record Selector
There is a common pattern in IFS Cloud for passing the information of a selected record from client to middle tier. That is, represent the selected record as a single string by separating the attributes by a delimiter. Below example shows the request payload for "Copy Lines" request for selected record.
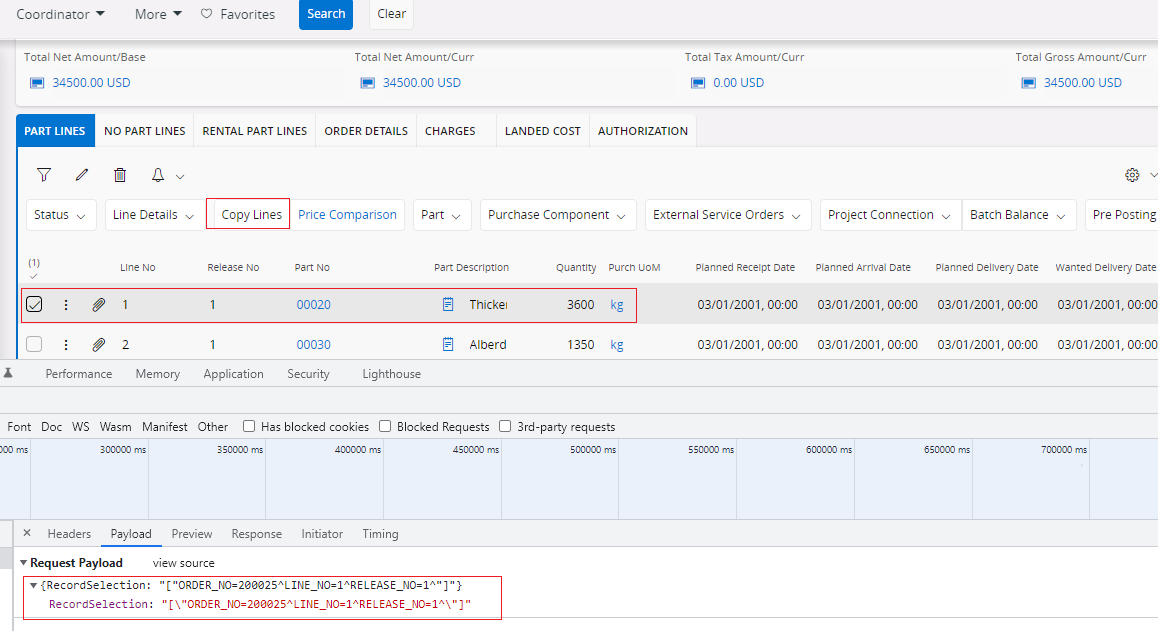
If it required to access the attributes of the selected record inside a Workflow, then Workflow Script Task can be used to split the attributes from this single string.
Template Workflow SplitRecordSelectorExample, which is available in IFS Cloud, demonstrates that how script task can be utilized to spit the attributes from selected record. Please check the latest version of the of this Workflow.
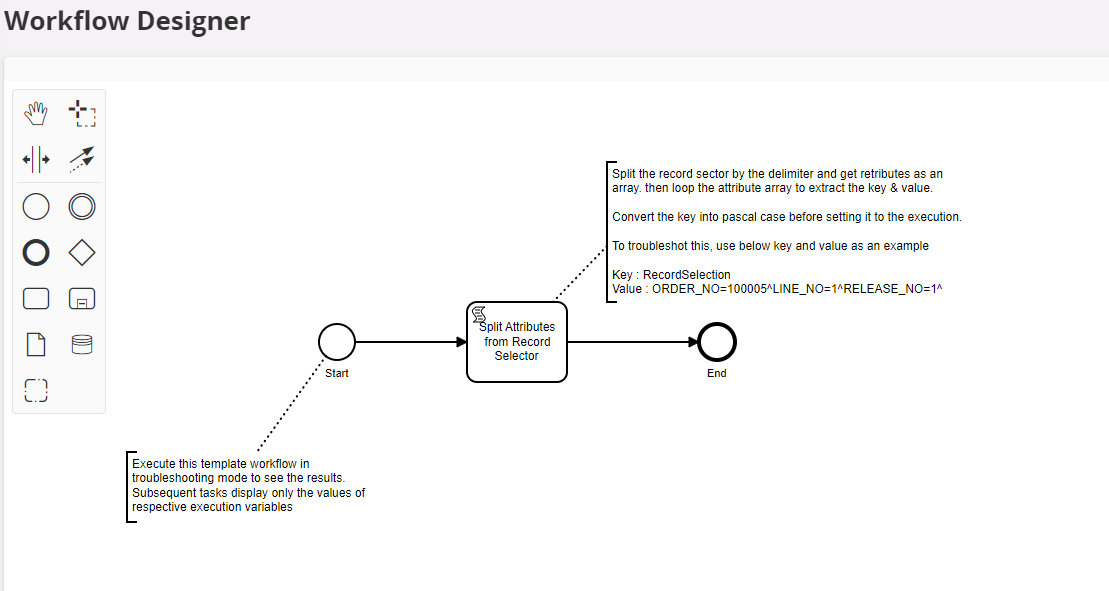
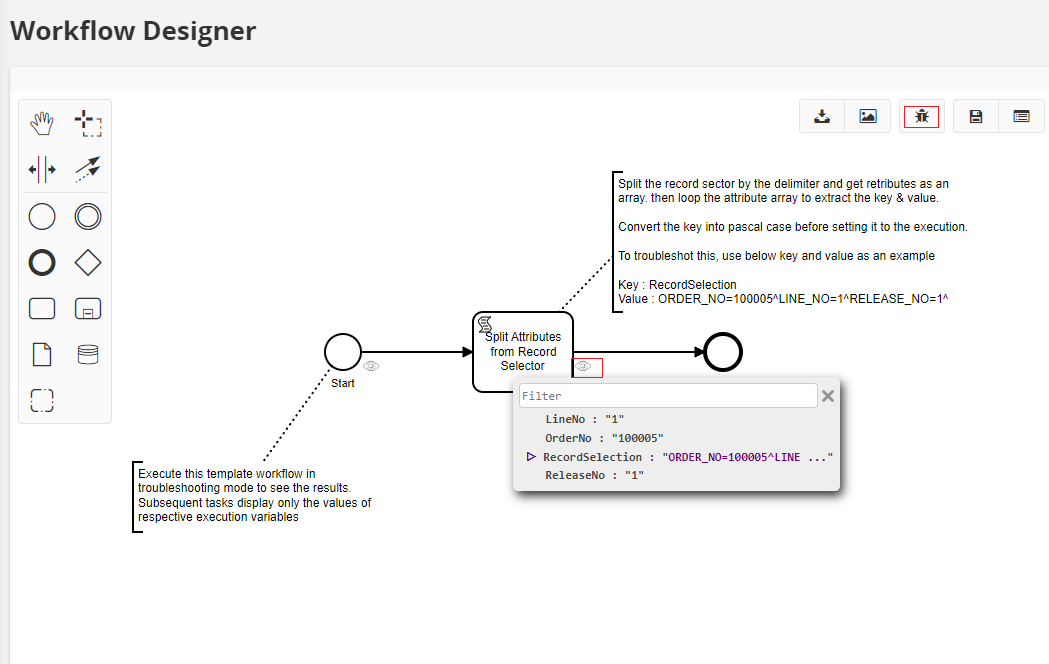
You could execute this workflow in troubleshooting mode. Below key and value can be used as an example to troubleshoot it.
Key : RecordSelection , Value : ORDER_NO=100005^LINE_NO=1^RELEASE_NO=1^
**Detect Recursion Example **
Possible Case of Recursion:
There can be a recursion in the update scenario described below.
Pre-requisites:
ADCOM component should be enabled in IFS Cloud.
Scenario:
Assume we have the below projection action configuration and workflow configuration.
Configuration:
1.Projection Action Configuration
Enable the RegulatoryBodyHandling projection action and execute it in a Regulatory Body update process as described below.

2.Workflow Configuration
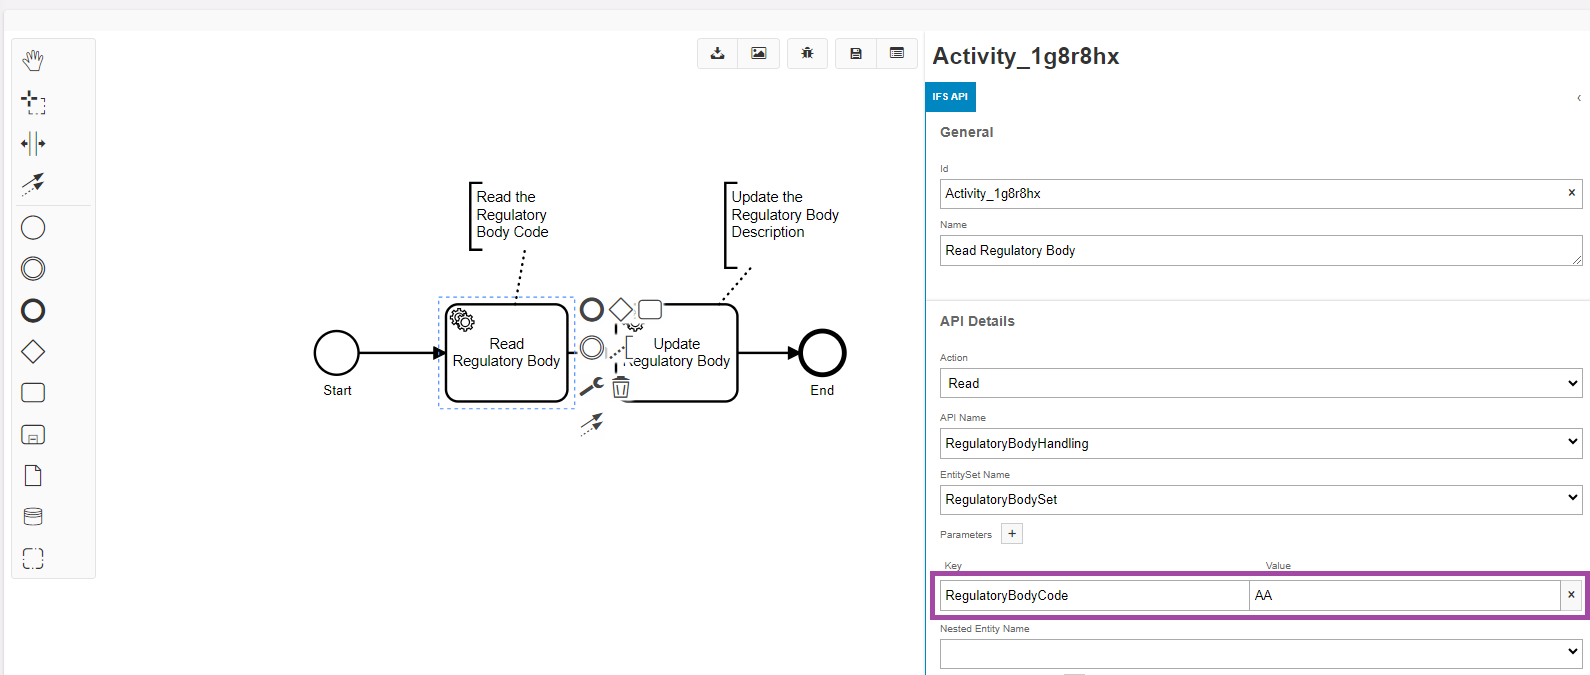
Here read one of the record (RegulatoryBodyCode = ‘AA’) of Regulatory Body and update its description as “ATest2” while executing the below Workflow. assumed that the Regulatory Body record with RegulatoryBodyCode = ‘AA’ is already available in the application.

2.1 Read Regulatory Body
2.2 Update Regulatory Body

‘Update Regulatory Body’ projection action is triggered through the update process, and it executes the ‘Update Regulatory Body’ Workflow. The recursion process happens in that scenario. Therefore, the following error message is returned.

Solution:
We have introduced a new Workflow to detect recursion and perform actions to avoid or end the Workflow. Please check the latest version of the Workflow “DetectRecursionExample” in IFS Cloud.
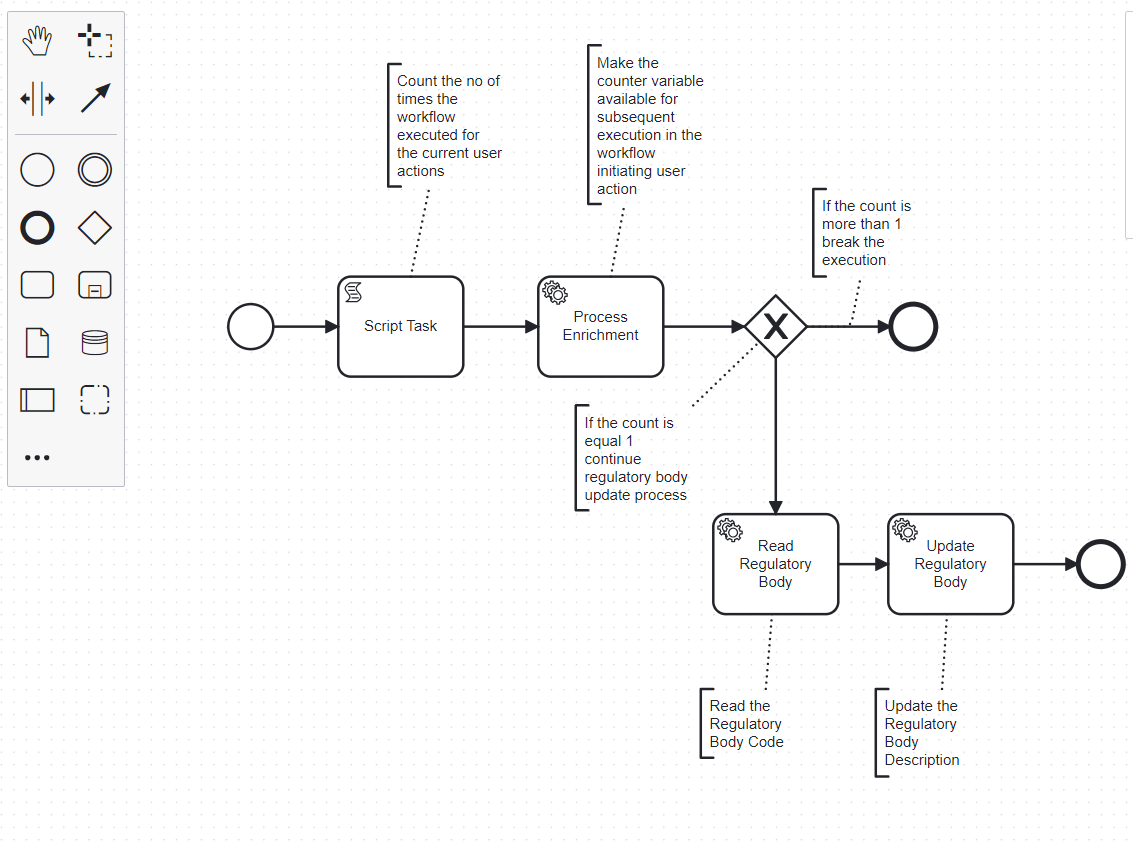
Execution of this Workflow in troubleshooting mode.
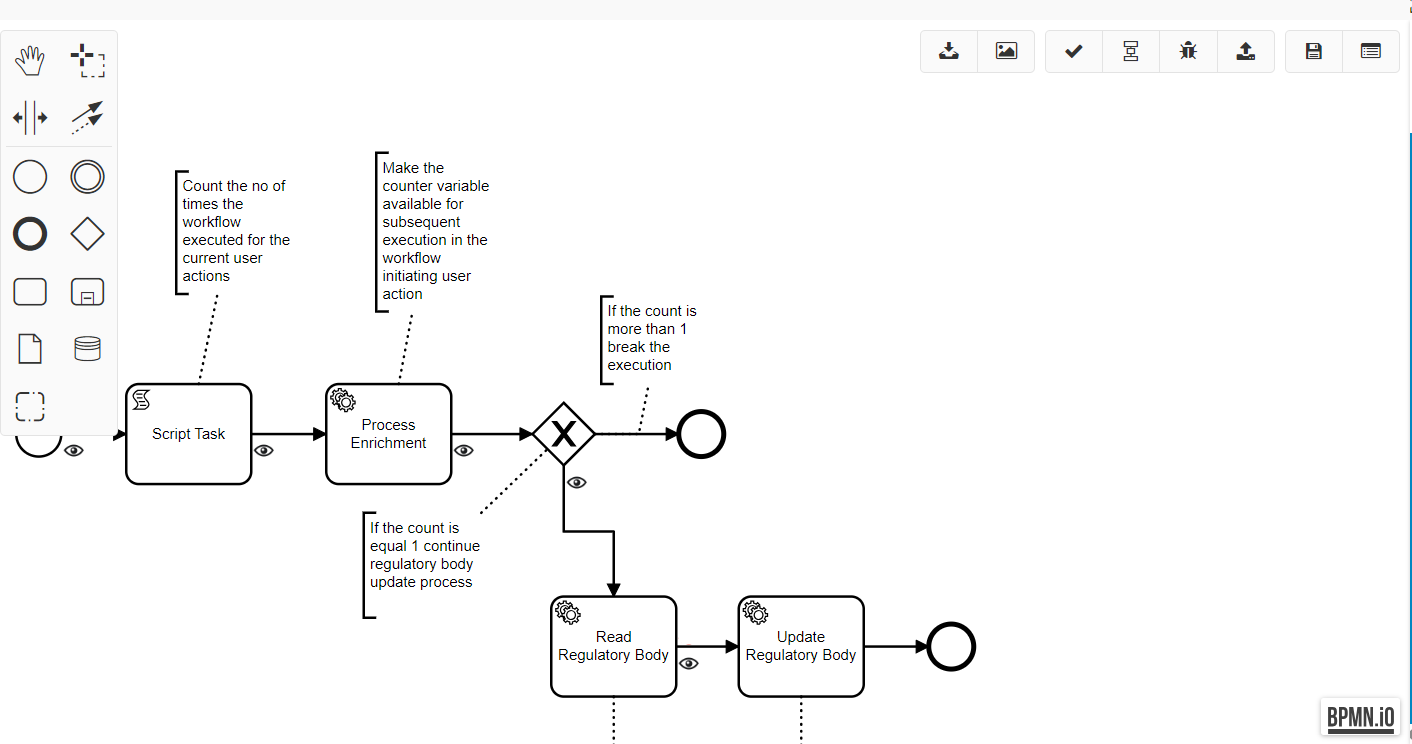
When you execute the above Workflow, recursion does not happen, and the error message will not appear on the screen.
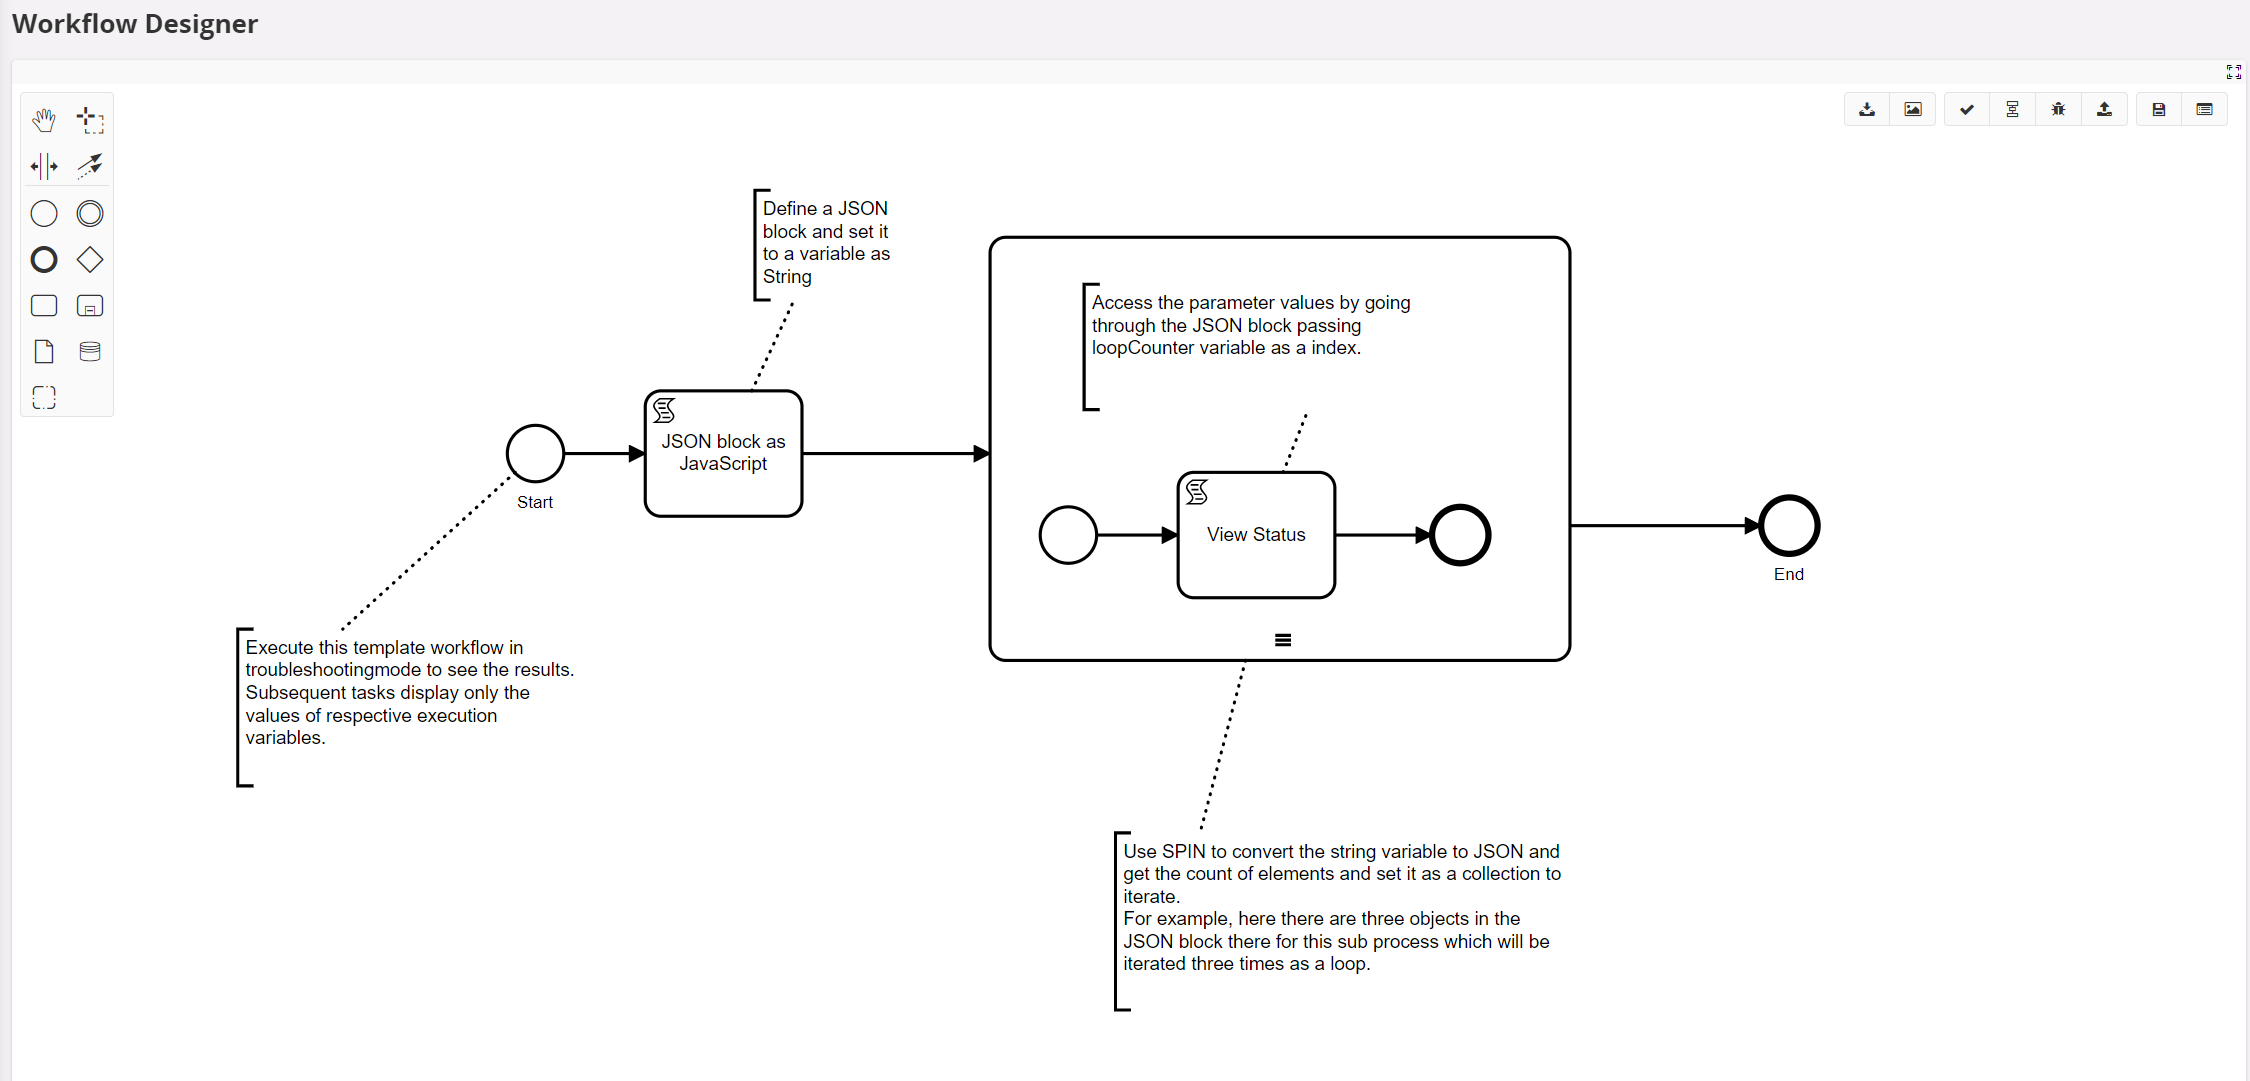
Define a JSON block as JavaScript for use in a Loop
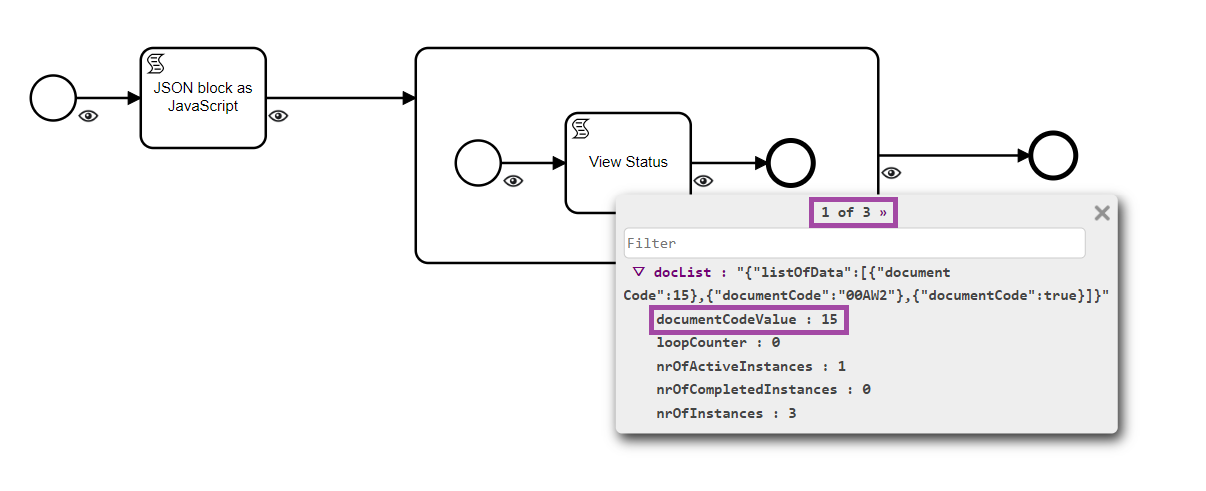
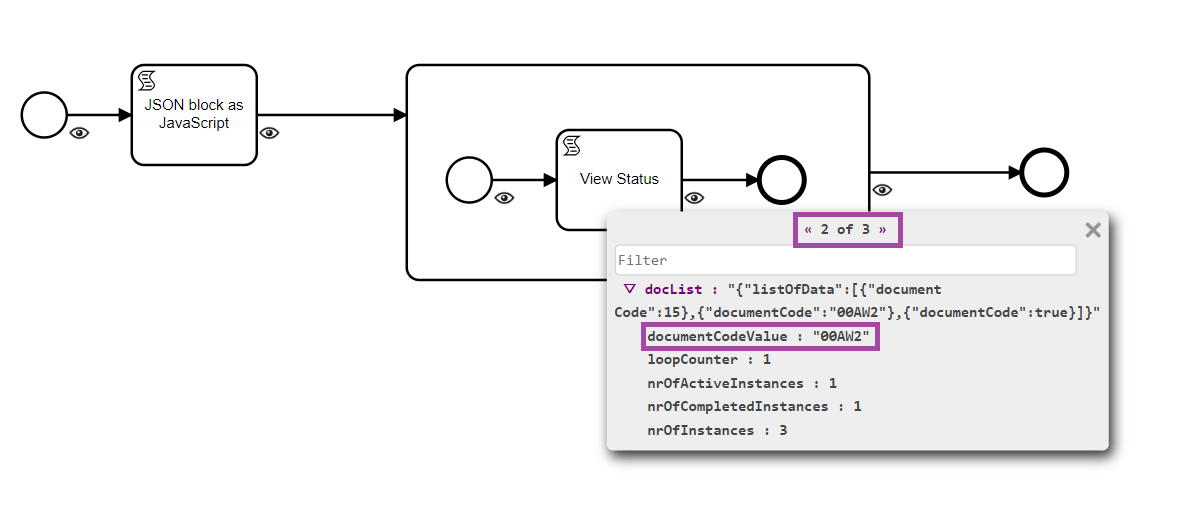
This Workflow demonstrates how to define a JSON block as JavaScript for use in a loop. Please check the latest version of the Workflow "LoopJsonBlockExample" in the IFS Cloud. Execute this template Workflow in troubleshooting mode to see the results. Subsequent tasks display only the values of their respective execution variables.
Pre-requisites:
None
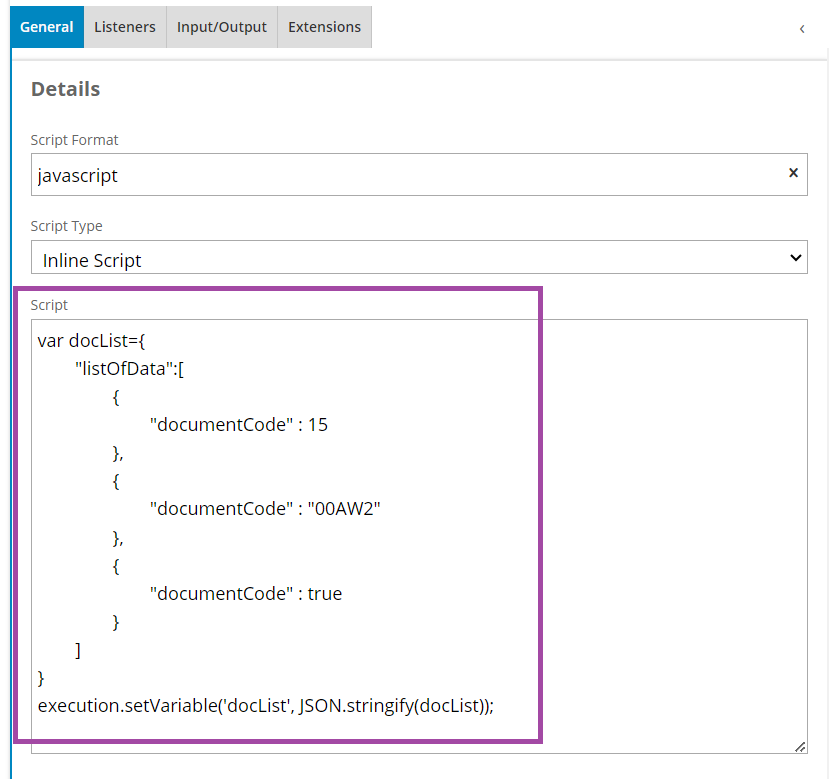
In this Workflow, there is a script task to define a JSON block and set it to a variable as stringified JSON. The JavaScript inline script is displayed below.
var docList={
"listOfData":[
{
"documentCode" : 15
},
{
"documentCode" : "00AW2"
},
{
"documentCode" : true
}
]
}
execution.setVariable('docList', JSON.stringify(docList));
In the subprocess that expects to loop, we need to set the count of elements in the given stringified JSON variable by converting it into a Camunda SPIN JSON object under the "Collection" setting in the "Multi Instance".

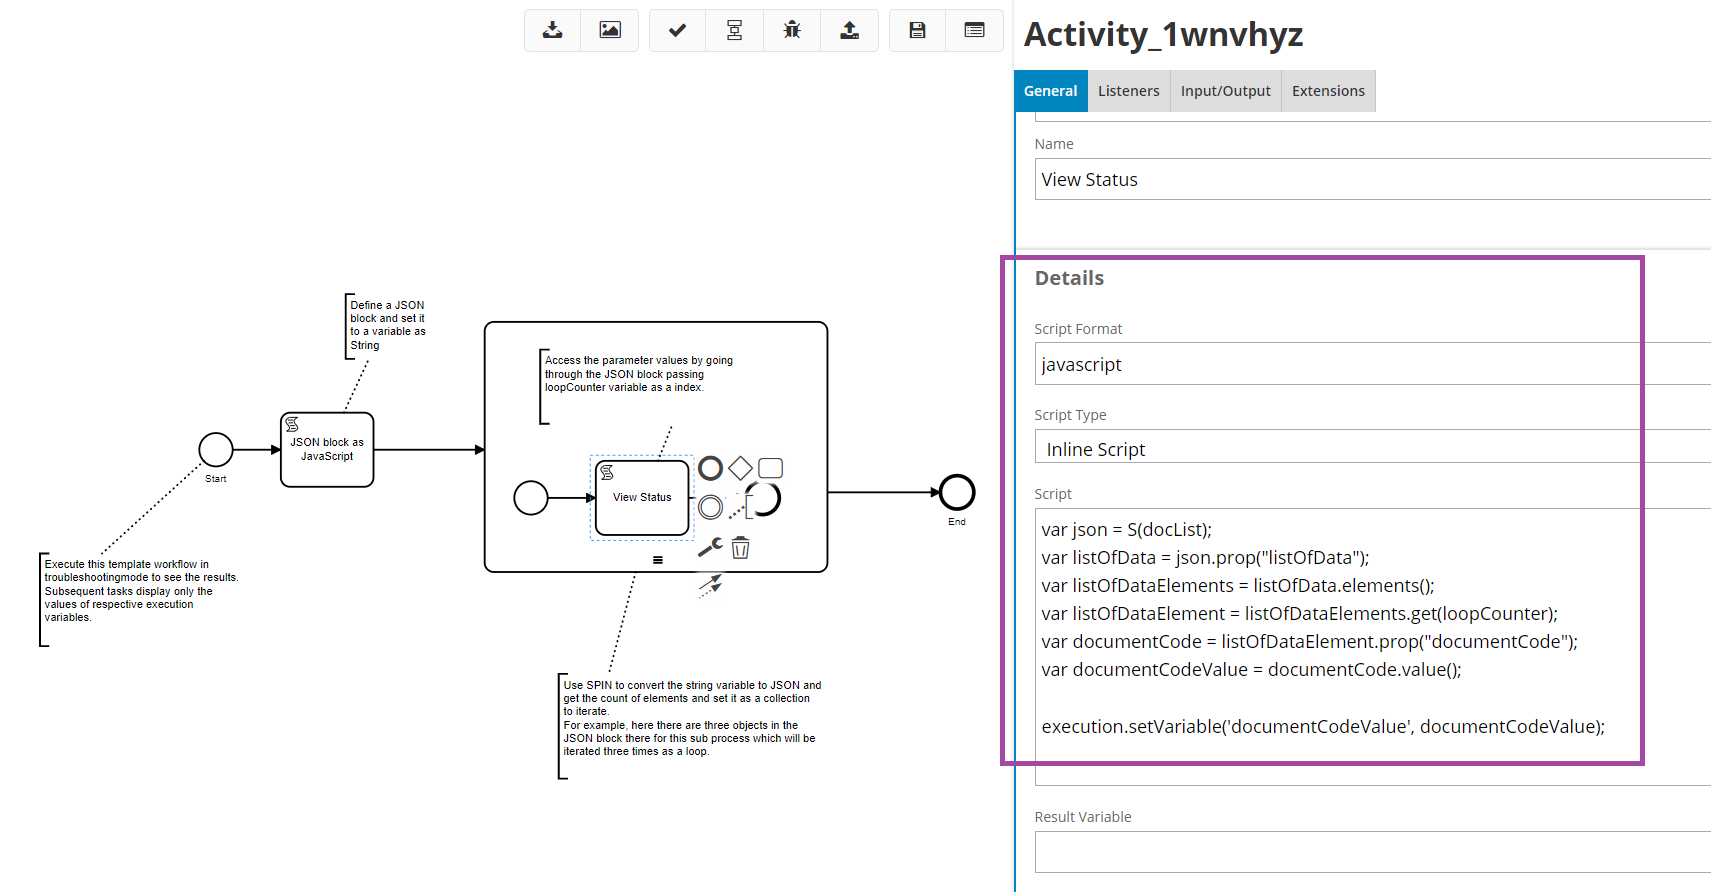
In the subprocess, a script task accesses the parameter values from the JSON block, going through the properties, passing the "loopCounter" variable as an index, and setting the final output to a variable "documentCodeValue" as shown below.
var json = S(docList);
var listOfData = json.prop("listOfData");
var listOfDataElements = listOfData.elements();
var listOfDataElement = listOfDataElements.get(loopCounter);
var documentCode = listOfDataElement.prop("documentCode");
var documentCodeValue = documentCode.value();
execution.setVariable('documentCodeValue', documentCodeValue);
Results:
When executing this template workflow in troubleshooting mode, click on the icon below and see the results by clicking the eye icon.

1 When troubleshooting the initial script task, the value of the given stringified JSON variable can be seen.

2 Clicking the eye icon on the script task in the subprocess allows you to see the three expected outputs received from the subprocess iteration.

Business Scenarios
Below is a set of examples that demonstrates how Workflow can be used to solve business problems.
Split Purchase Order Lines
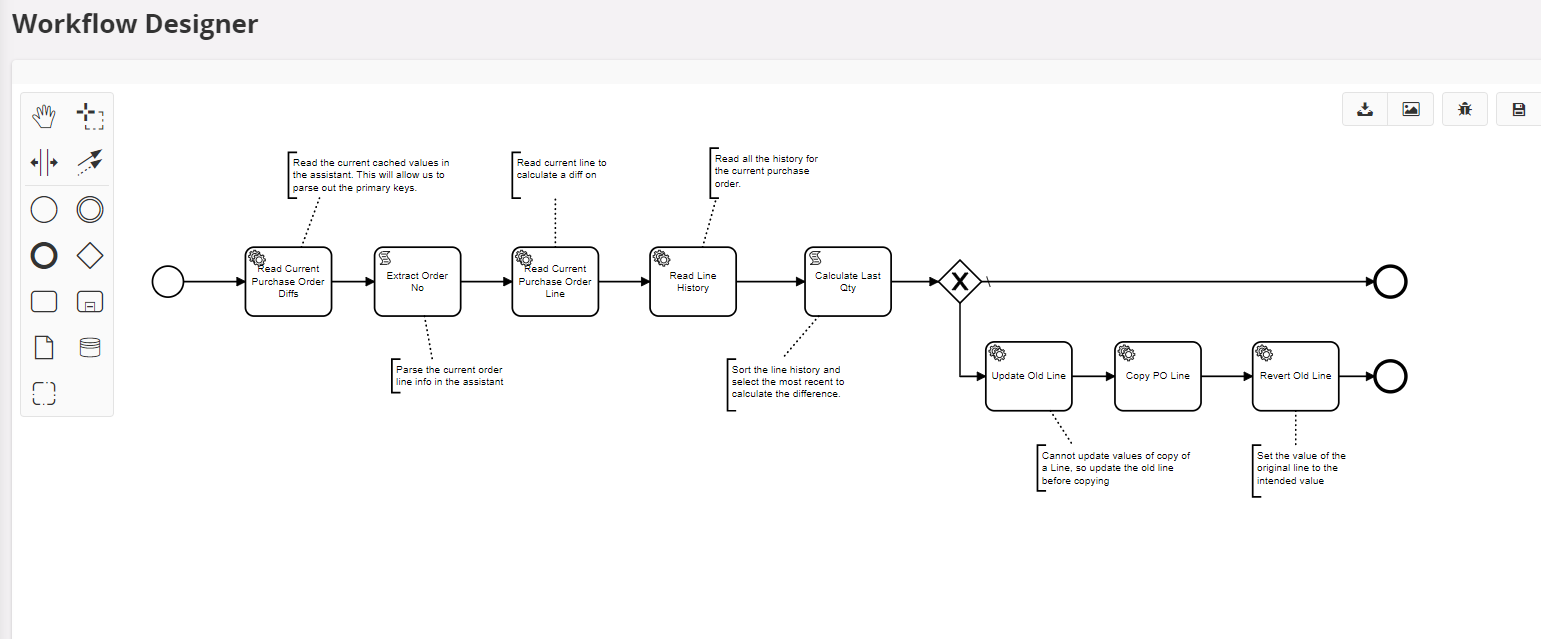
The Split Purchase Order Lines workflow was created as a demo to replace a customization in Apps 10 which allowed a user to receive a portion of a Purchase Order without completing the transaction. The ability to leave a Purchase Order open for extended periods of time is crucial to manufacturing and service organizations with complex delivery terms over a longer period. In this instance, the organization could be able to recognize revenue at an earlier date, as each vehicle was delivered.
Workflow DemoSplitPOLinesExample is available on IFS Cloud as a Template Workflow together with the projection action configuration. You can try this out by following the below mention steps.
Pre-requisites:
PURCH component should be enabled in IFS Cloud
Steps to Follow:
1 Clone the DemoSplitPOLinesExample Workflow as a new Workflow and deploy it. Then add the below projection action for the deployed workflow.

2 Create a purchase order for a supplier.

3 In the above purchase order, we have 8 racing tires. Think of the scenario supplier delivered just 4 tires, and the other 4 will come in a future shipment. So we have to
- Change the current line's quantity to 4 and confirm.
- Add a new line to tally with remaining 4 tires, which will be delivered next.
The workflow we just set up automates adding new line step. Select the order line and click "Confirm Order Lines with Differences"

4 Change the quantity into 4 in the assistant screen that comes up, save the change and click on "Confirm". Confirm the popup that comes next as well.

5 Now a new purchase order line is added automatically by the workflow with the remaining quantity (8-4=) 4.

Create Task Purchase Order
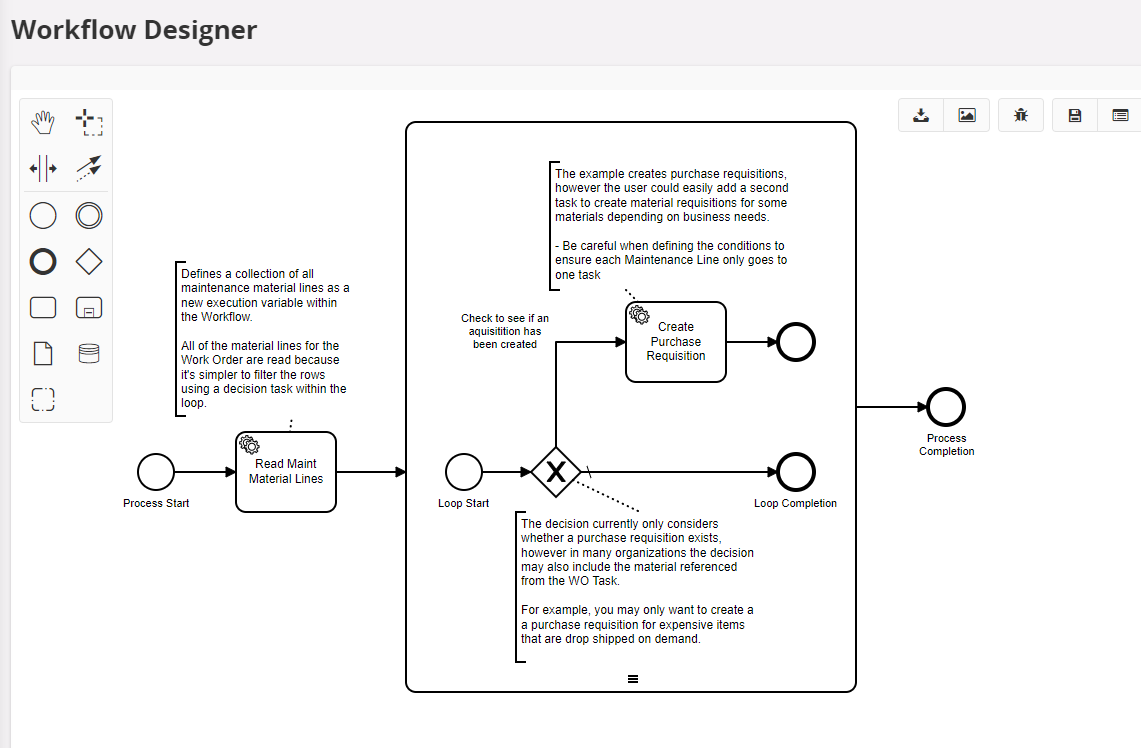
The Create Task Purchase Order workflow was created to demonstrate how automation can help both the back office and field operations save time and improve customer satisfaction. In scenarios where a drop ship supply chain is utilized for expensive items, automating purchase requisitions for those tasks improves efficiency in the back office and ensures the materials are ready for use at the necessary time, reducing customer frustration from an unnecessary visit.
Workflow DemoCreateTaskPOExample is available on IFS Cloud as a template Workflow including the projection action configuration. Please refer to the following steps to try out the workflow.
Pre-requisites:
WO component should be enabled in IFS Cloud
Steps to Follow:
-
Clone the DemoCreateTaskPOExample Workflow as a new Workflow and deploy it. Then add the below projection action configuration for the deployed workflow.

-
Create or select a Work Order that contains one or more work tasks and status is under "WorkRequest"

-
Select any Work Task under the work order and navigate to the details

-
Create a material entry if there is none. Then you could see purchase requisition options.

-
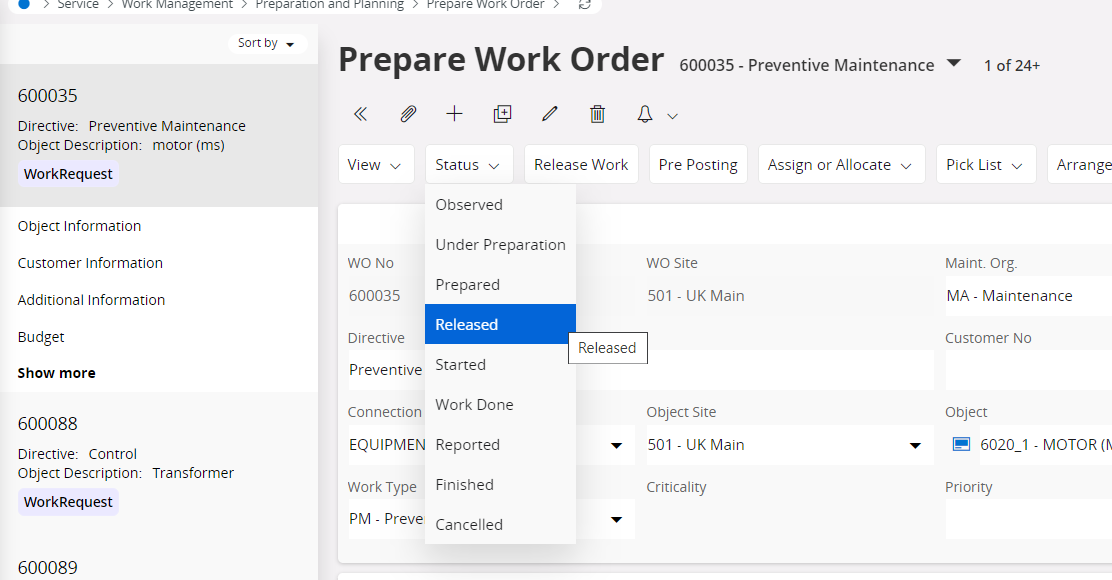
Then go back to the work order and set the status to "Released".
-
Once work order is released, navigate to the Material section of the work task and then we can observe that purchase requisition options are no longer available as it is already handled by the workflow.

Improve Data Quality in Customer Order Creation Process
The Customer Order PO Workflows were created to demonstrate how using automation to improve data quality earlier in a business process can reduce rework and customer frustrations later in the same process. Workflows "DemoAddCustomerPONoExample" and "DemoValidateCustomerPONoExample" are available on IFS Cloud as a Template Workflows including the projection action configuration.
The first Workflow demonstrates how the user can be prompted to provide missing data which can them be automatically applied on their behalf along with any necessary calculations. The second Workflow demonstrates how the system can be augmented to refuse data, which is not up to business standards, including the use of context (customer) specific logic in these validations.
Pre-requisites:
ORDER component should be enabled in IFS Cloud
Steps to Follow For the First Example:
First Workflow checks the Customer’s PO No filed when creating a Customer Order record for Customer 1000 and prompt a User Form to enter the Customer’s PO No if it is blank.
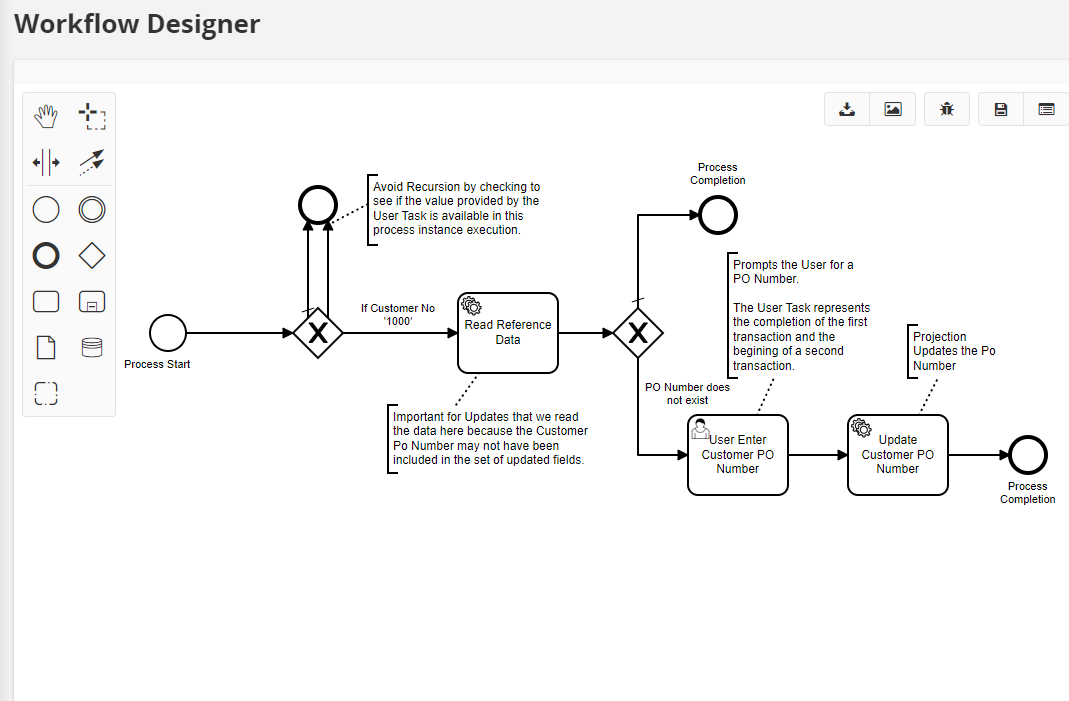
1 Clone the DemoAddCustomerPONoExample Workflow as a new Workflow and deploy it. Then add the below projection action configuration for the deployed workflow.

2 Create new customer order with customer 1000, keep the other values as default and Customer’s PO No as blank.

3 Save the Customer Order record. Upon saving the record, Workflow User Form dialog will pop up to enter the Customer’s PO No.
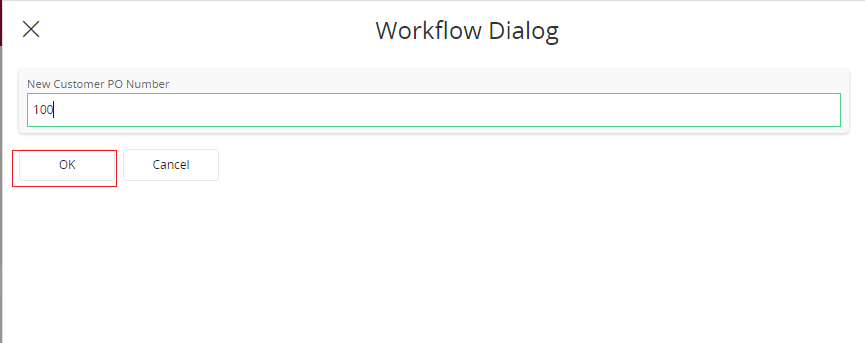
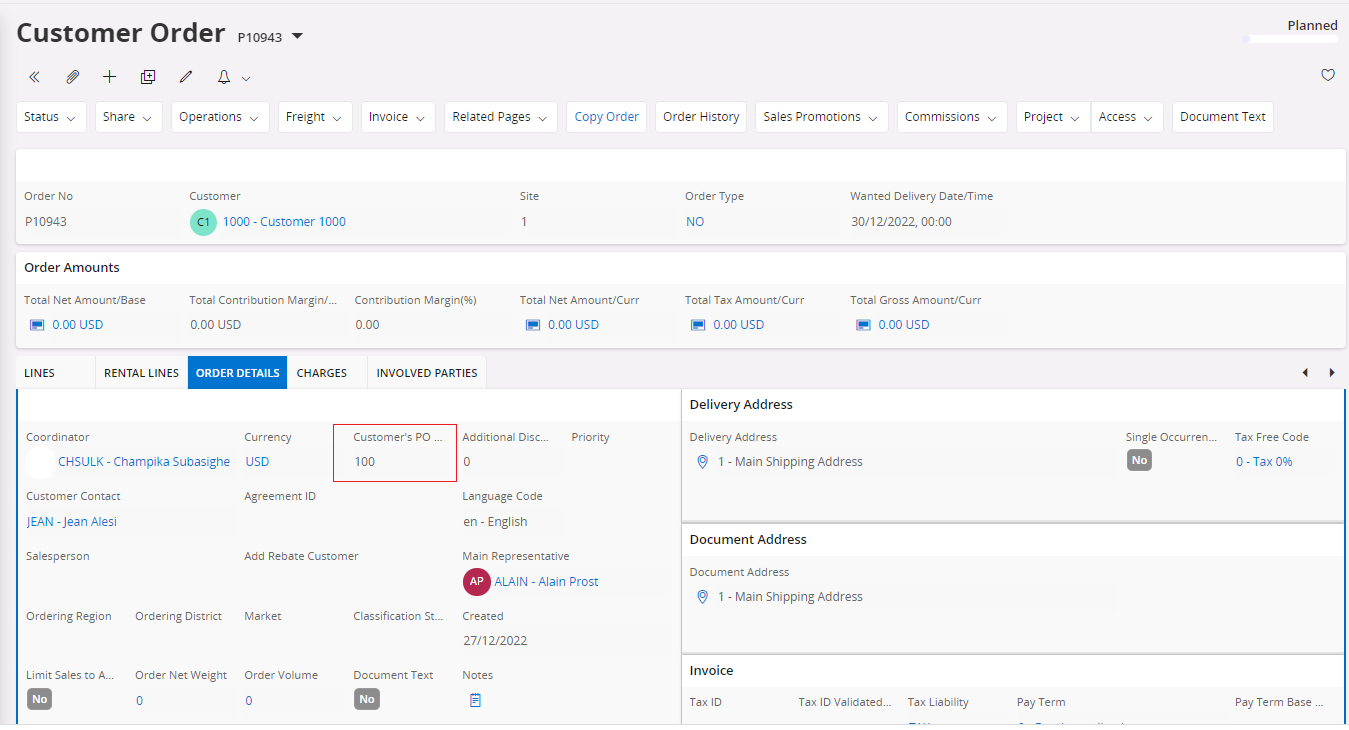
4 Enter the Customer’s PO No and submit the Workflow User Form. Then refresh the page. Provided Customer’s PO No has been added to the newly created Customer Order record.
Steps to Follow For the Second Example:
Second Workflow checks the Customer’s PO No filed when creating a Customer Order record for Customer 1010 and prompt a validation error if it is blank.
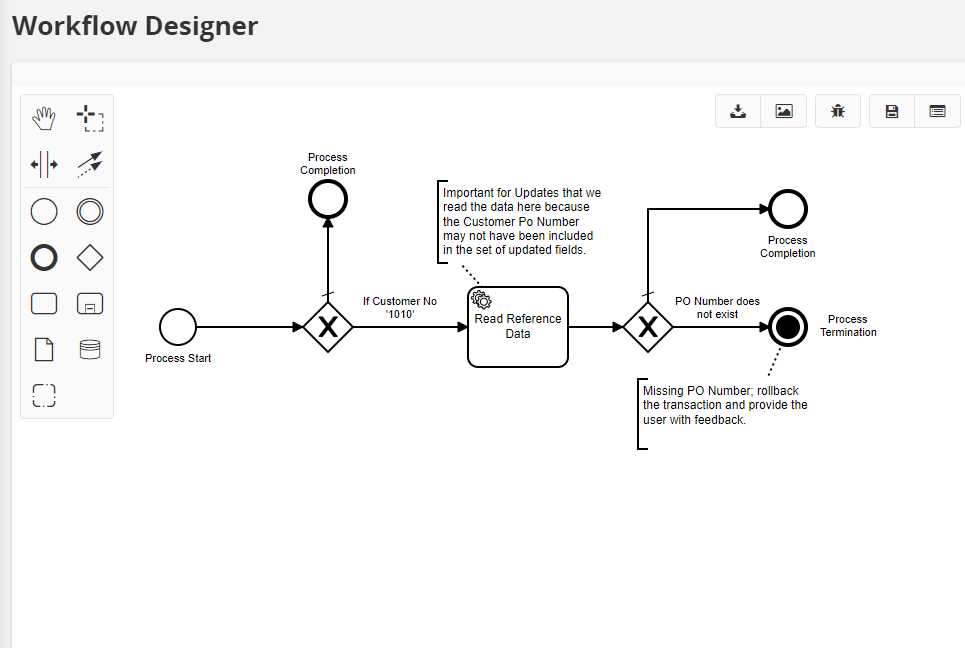
1 Clone the DemoValidateCustomerPONoExample Workflow as a new Workflow and deploy it. Then add the below projection action configuration for the deployed workflow.

2 Create new customer order with customer 1010, keep the other values as default and Customer’s PO No as blank.
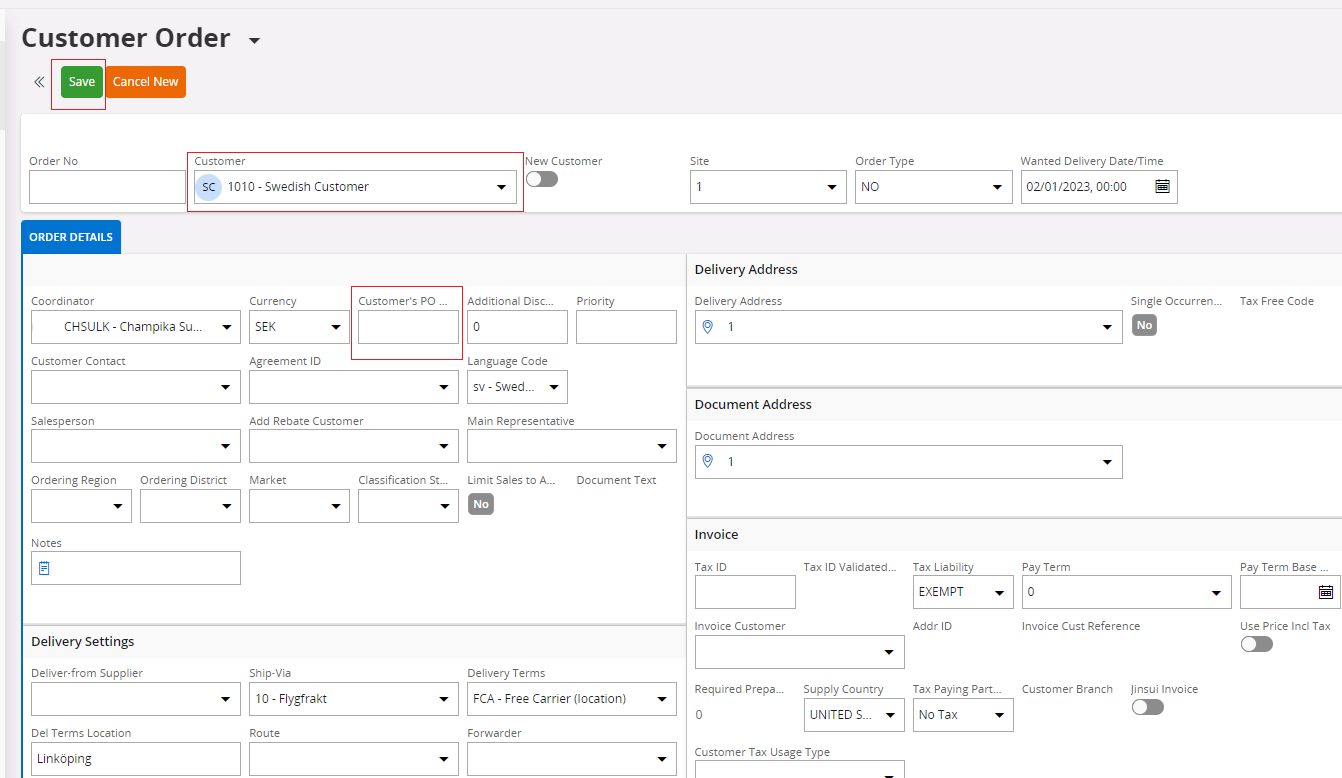
3 Save the Customer Order record. Upon saving the record, the validation error is triggered from the Workflow. 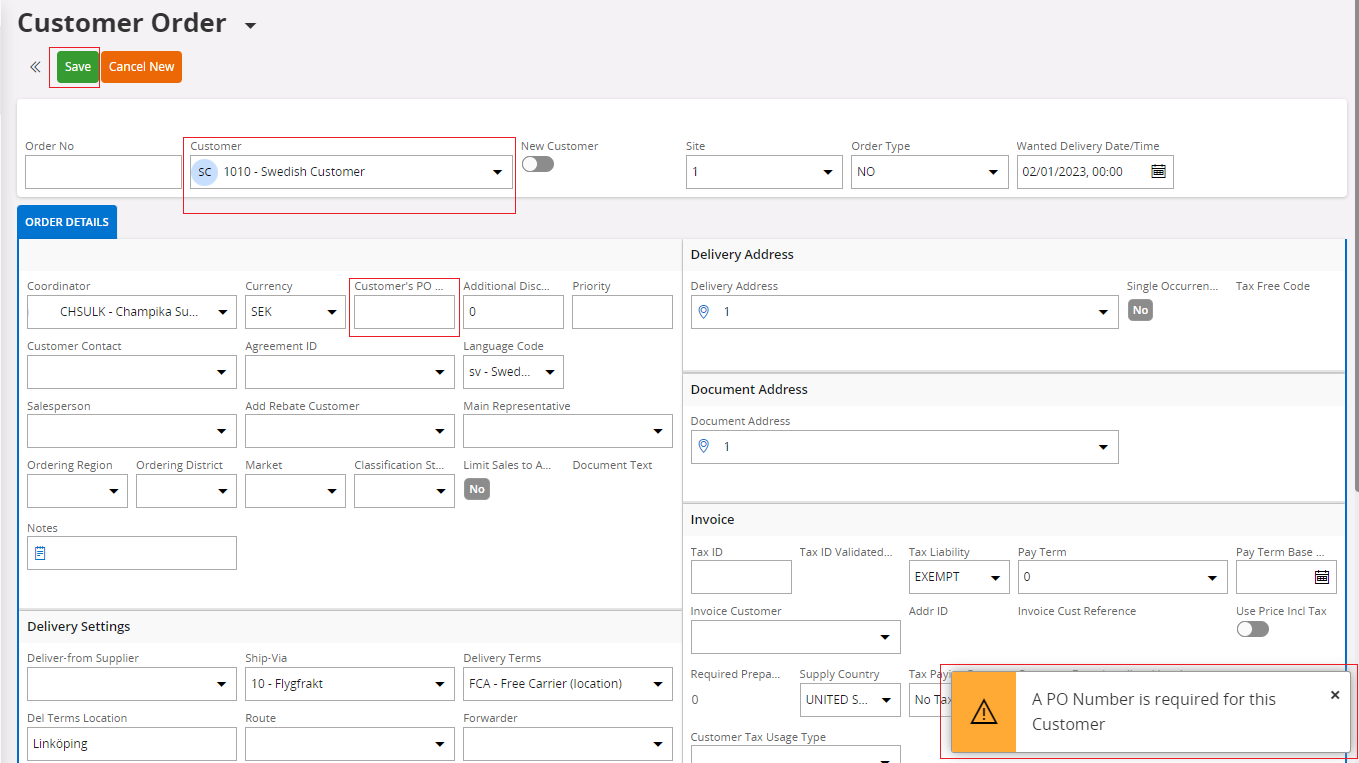
E-mail Example
Scenario:
This Workflow demonstrates how to send an e-mail without using the existing online SQL event action of PL/SQL. Please check the latest version of the Workflow “EmailExample” in the IFS Cloud.
Pre-requisites:
1 Create the Custom Entity and do the following configurations:
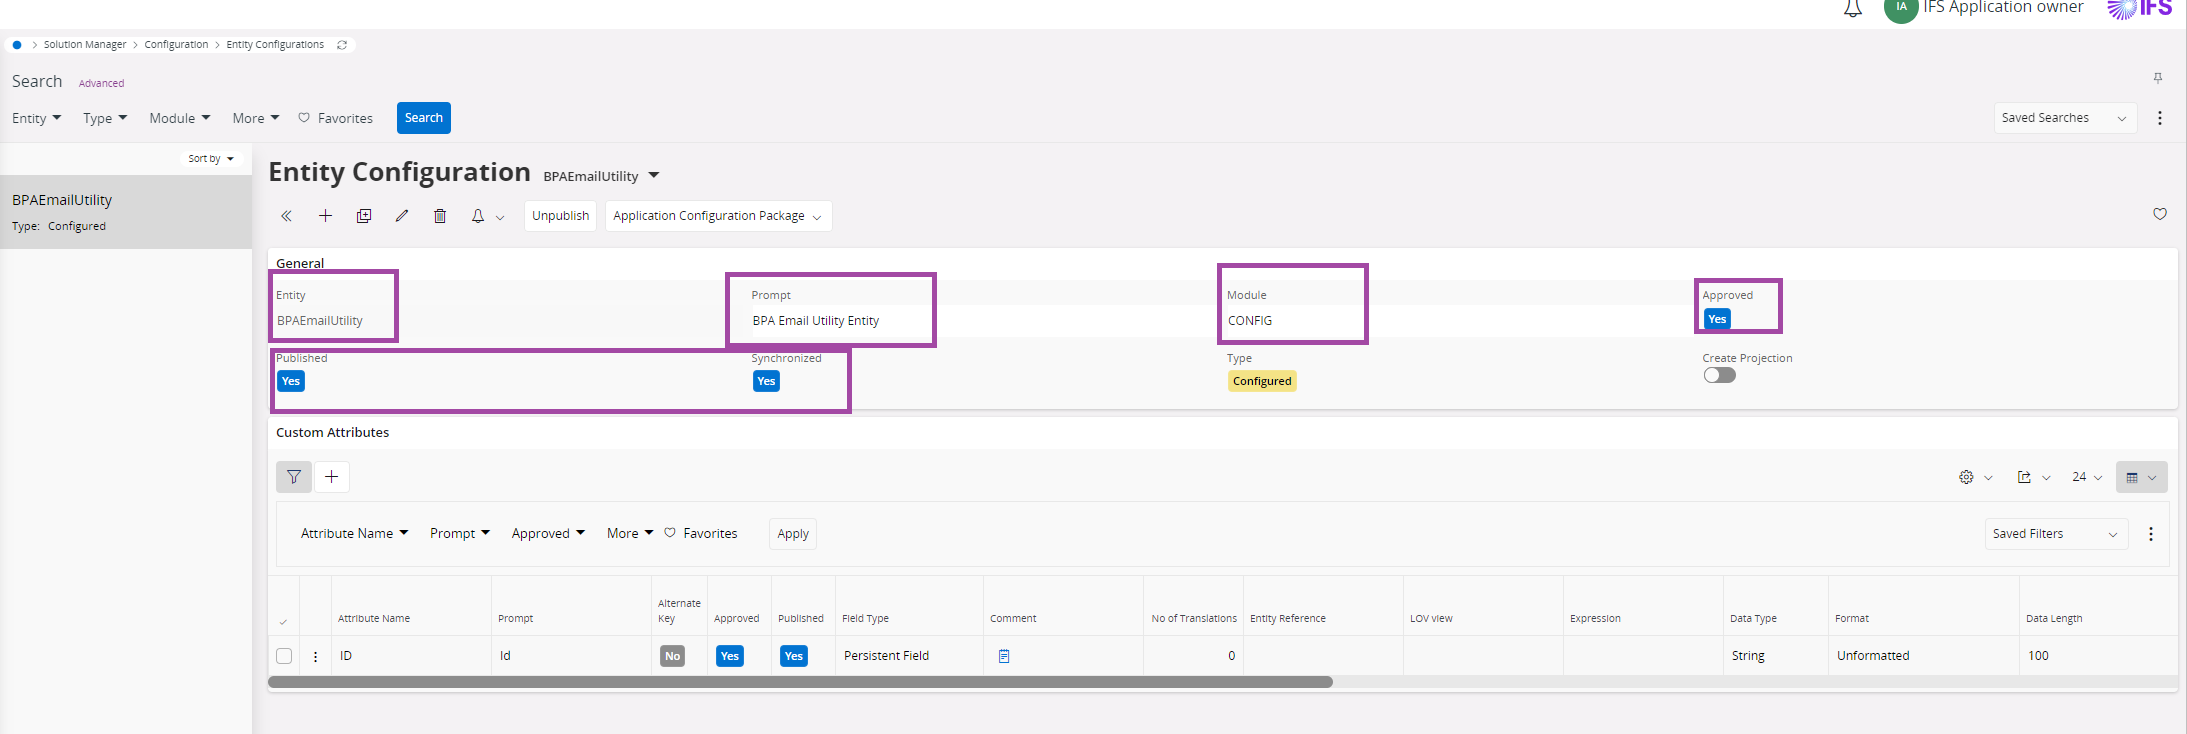
2 Create the Custom Projection action using the previously created Custom Entity in step 1, and configure the COMMAND_SYS.MAIL as follows:
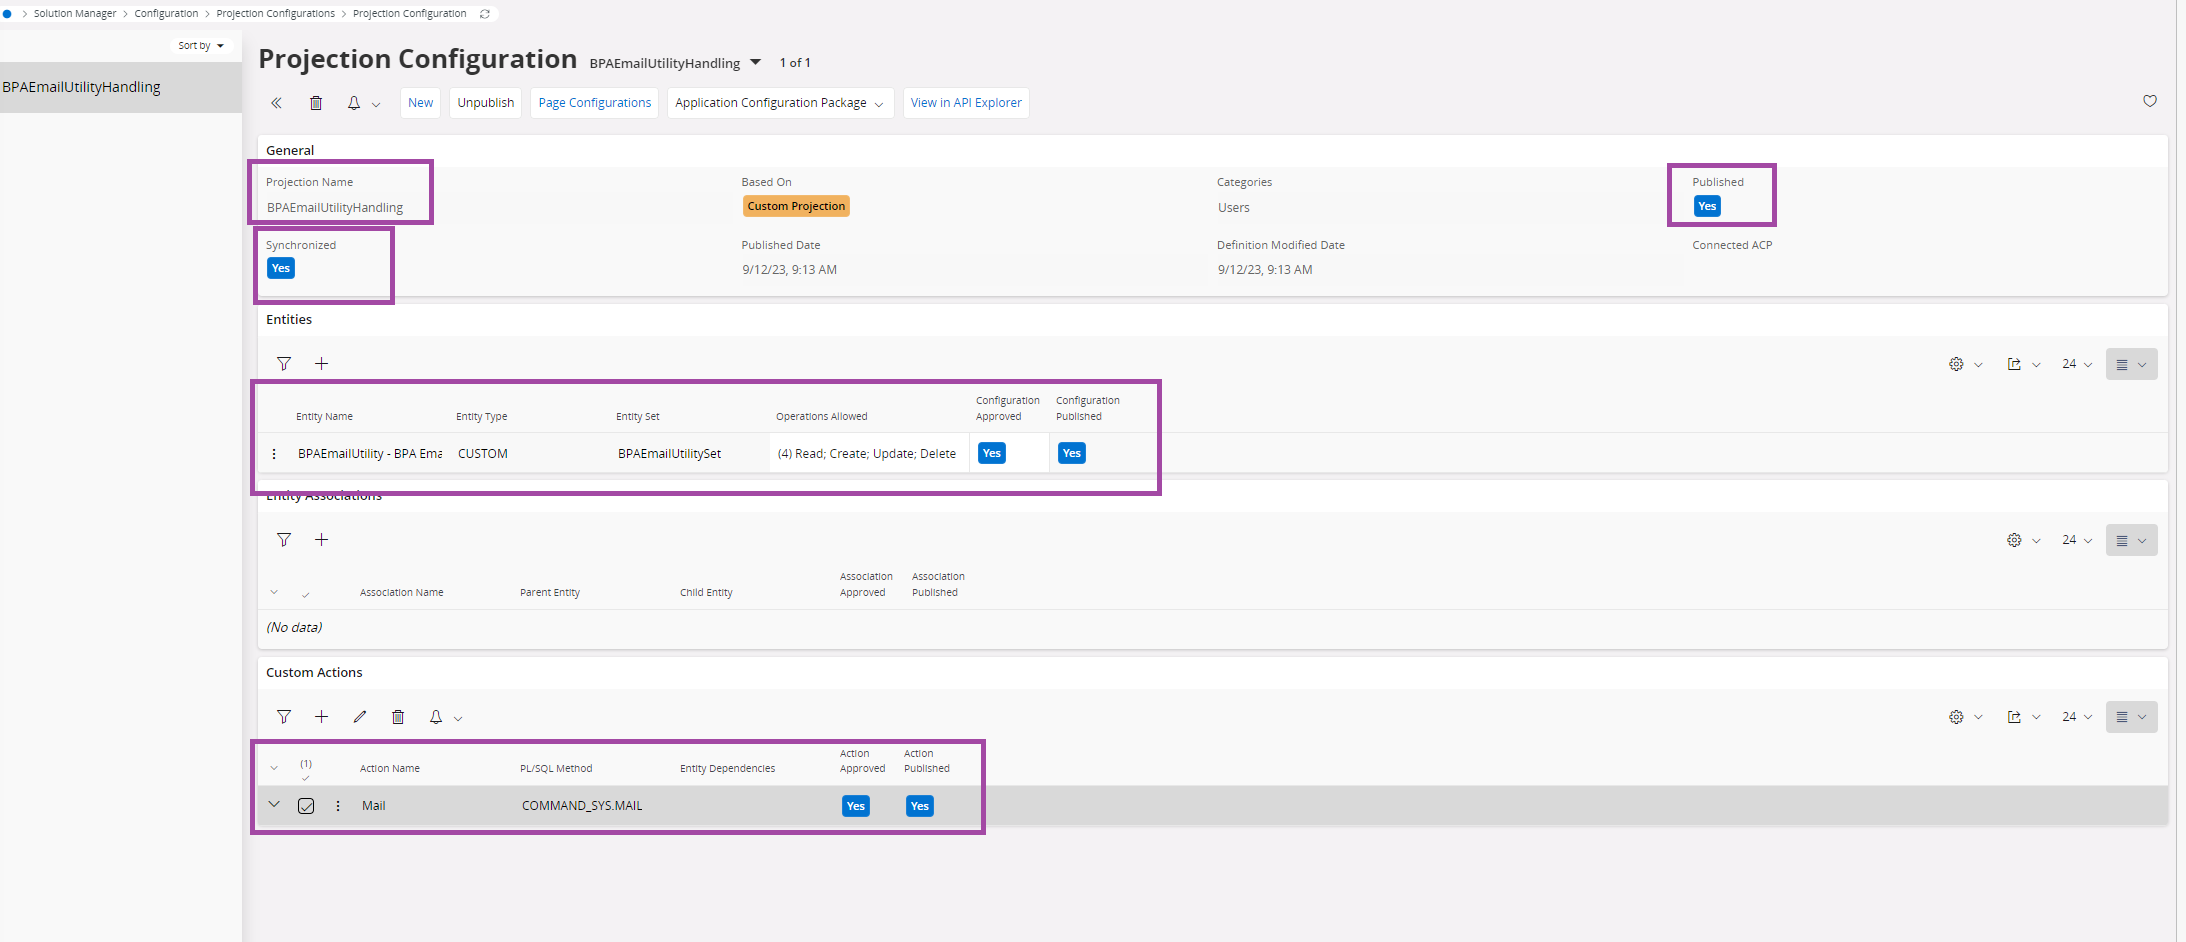
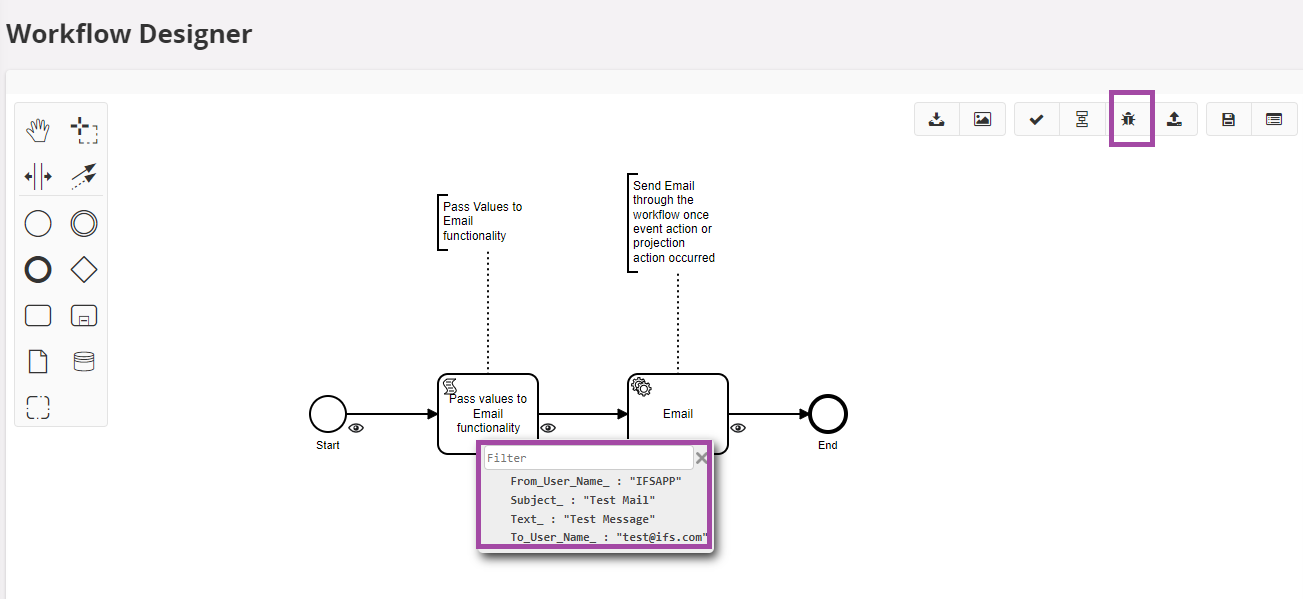
Afterward, we can send the emails through the Workflow, using the above configured custom projection.
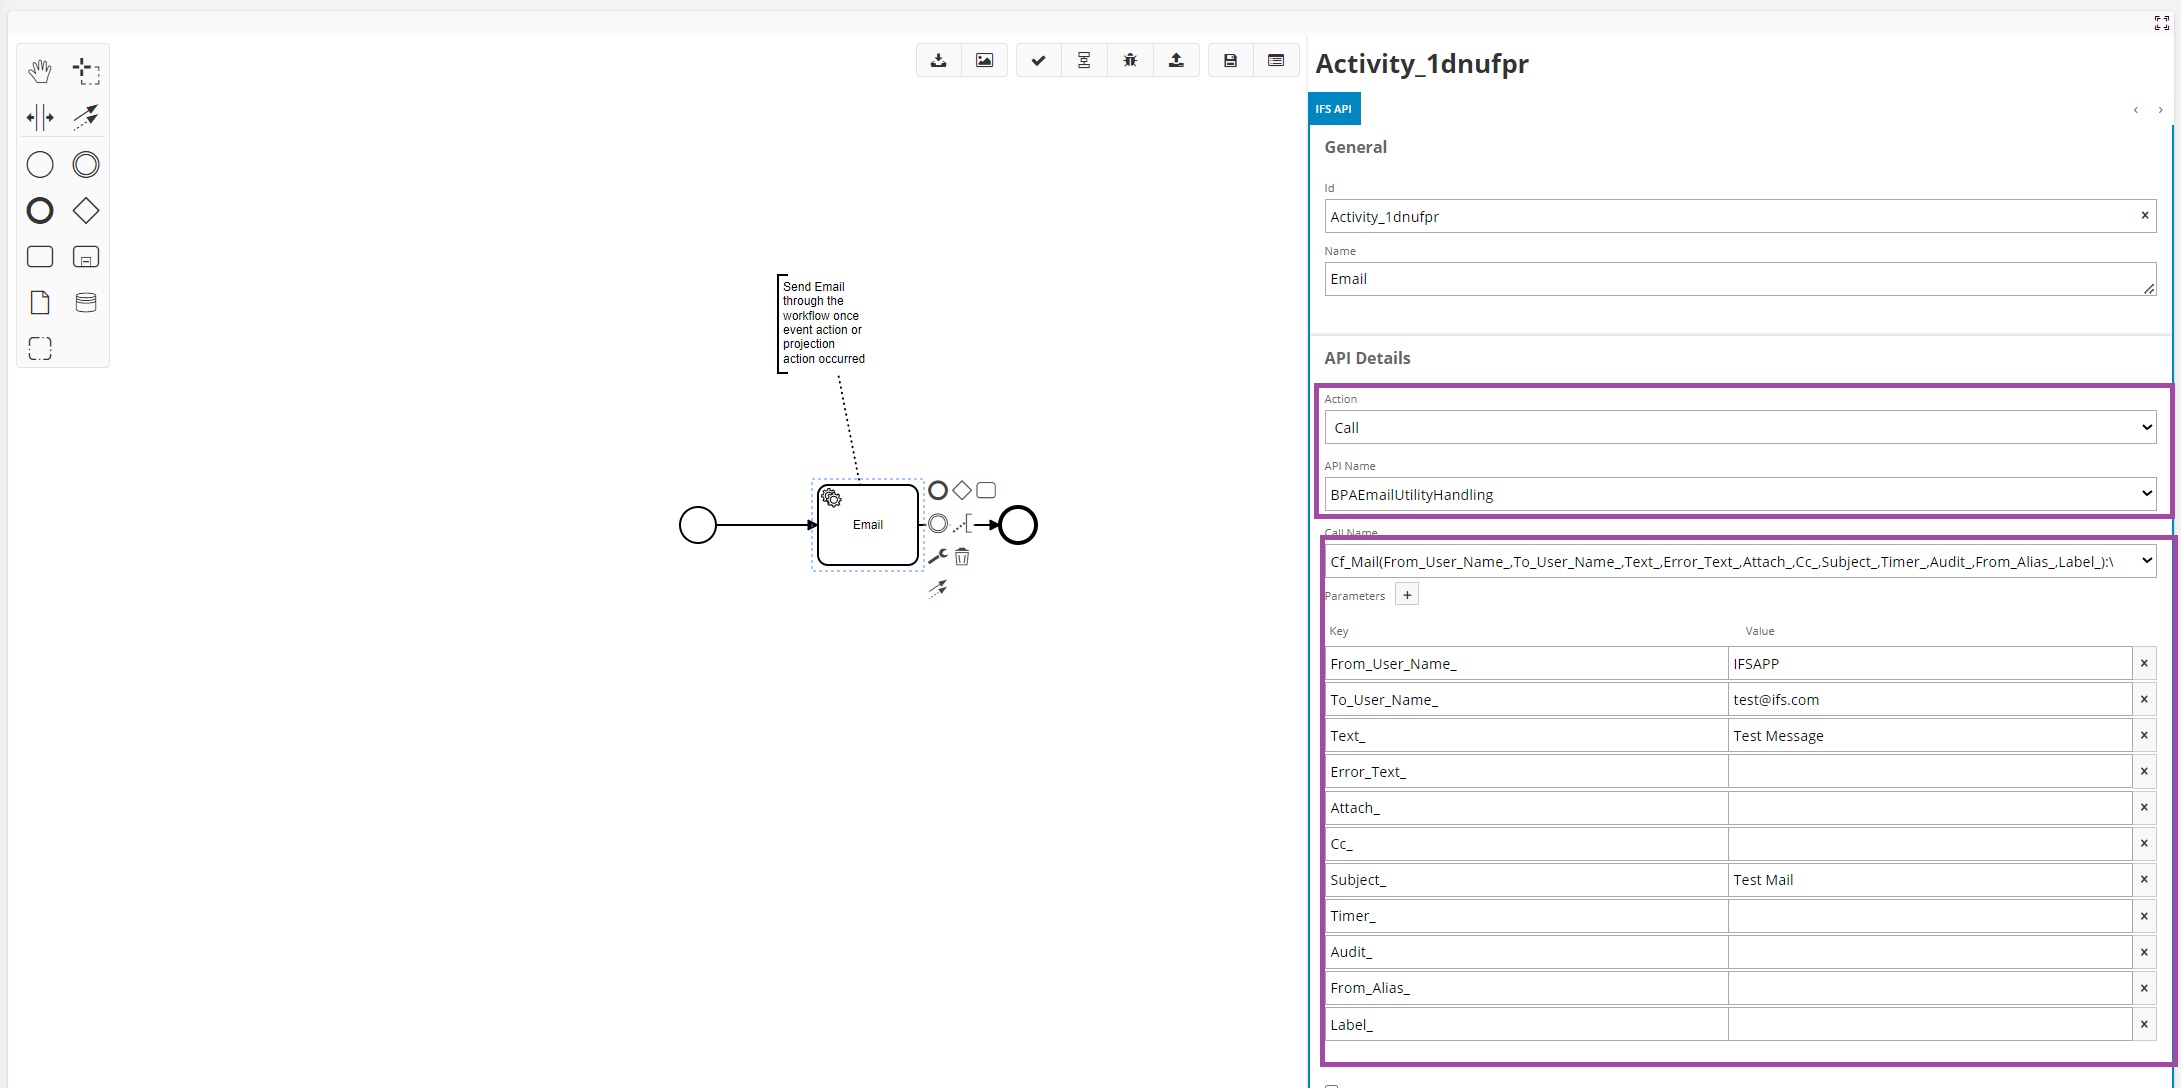
Workflow execution in troubleshooting mode is shown in the below figure.
Use Entity Service APIs
Scenario:
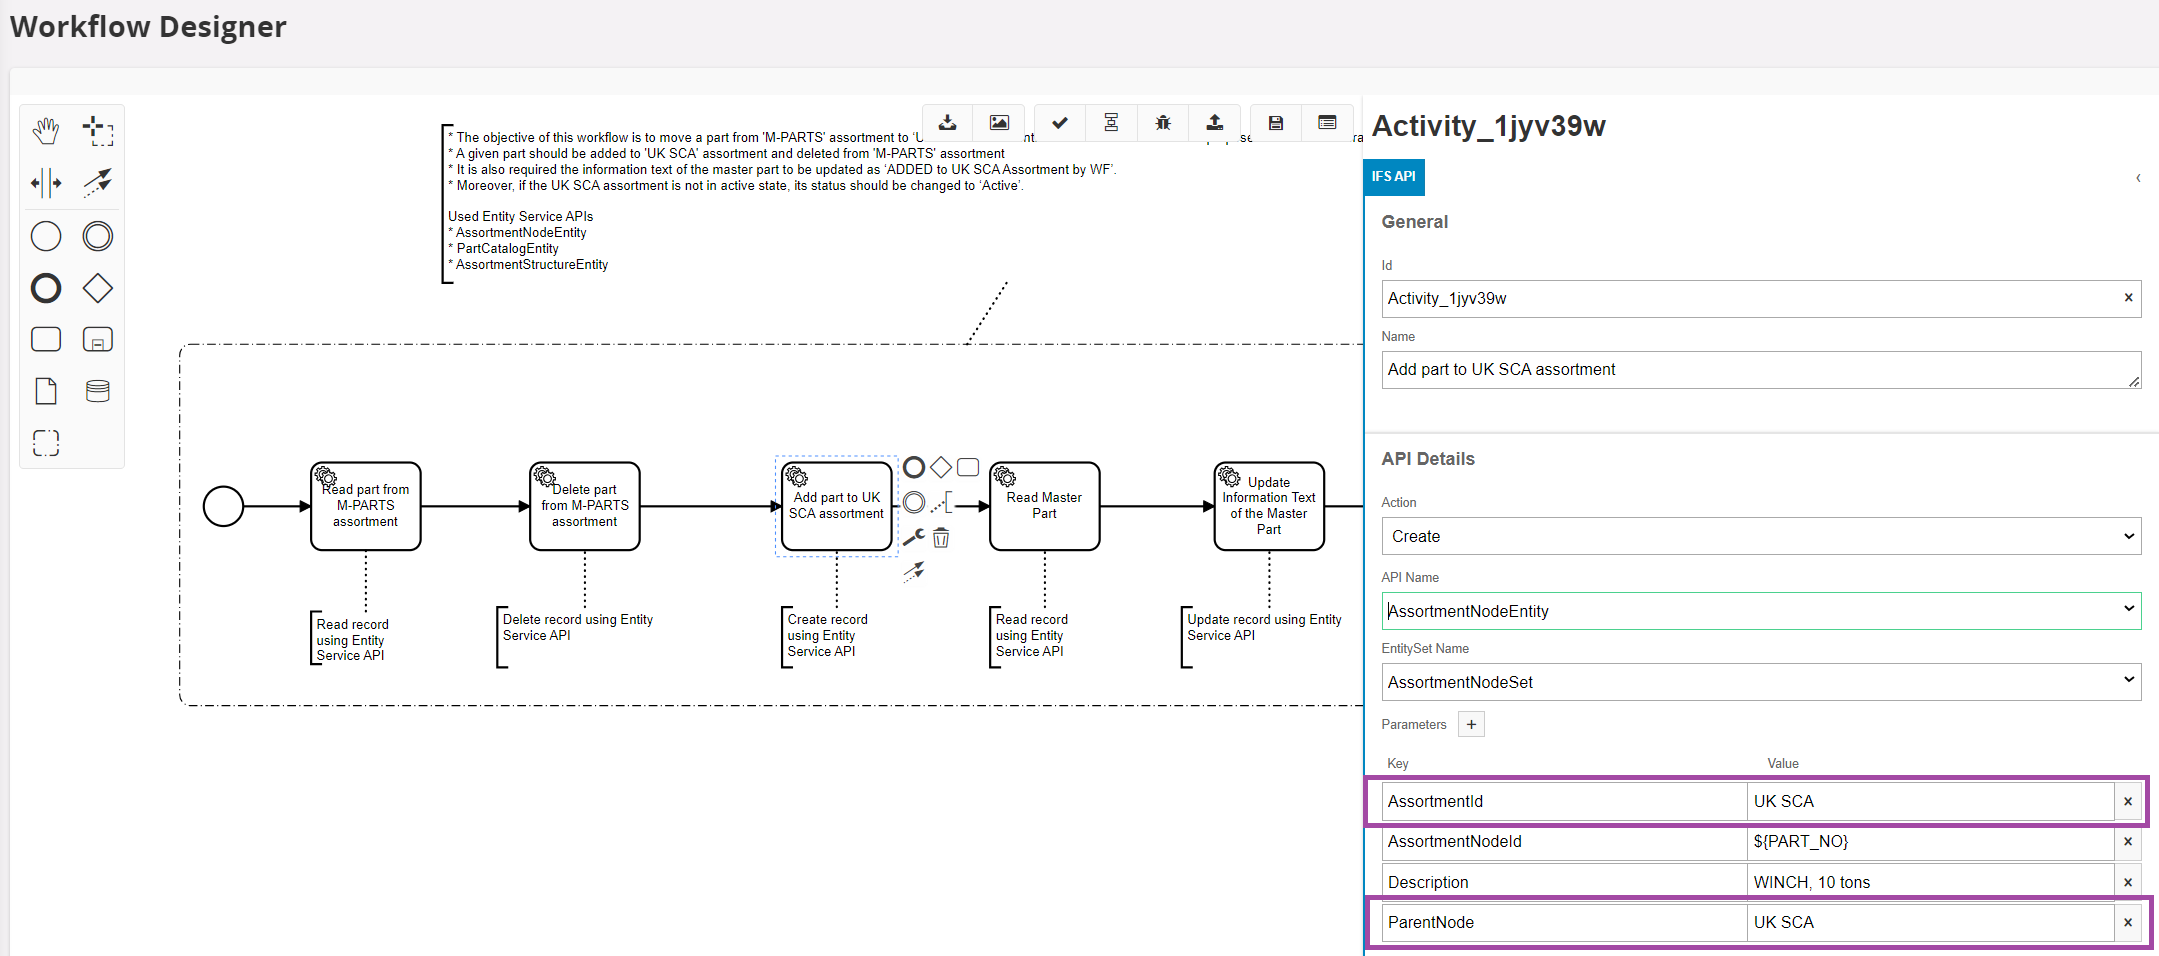
This Workflow demonstrates how to utilize the Entity Service API within a Workflow. The objective of this Workflow is to transfer a new part from the 'M-PARTS' assortment to the 'UK SCA' assortment when it is added to the 'M-Parts' under the 'UK' category.
Moreover, change the status of the 'UK SCA' assortment to 'Active’ if it is not in an active state. To achieve this, we will utilize the Entity Service APIs, which are more easily discoverable, and trigger the Workflow using an event action.
Workflow DemoEntityServiceAPIsExample is available on the IFS Cloud as a Template Workflow. Please check the latest version of it. You can try this out by following the below mentioned steps.

The 'UK SCA' assortment has been included as the AssortmentId and ParentNode in the Workflow parameters to create a new part in 'UK SCA'.
Pre-requisite:
Activate the below APIs through API Explorer.
- AssortmentNodeEntity
- PartCatalogEntity
- AssortmentStructureEntity

Steps to follow:
1 Clone the DemoEntityServiceAPIsExample Workflow as a new Workflow and deploy it. Then add the below event action for the deployed Workflow.

2 Setup event for part creation and select attributes as below.

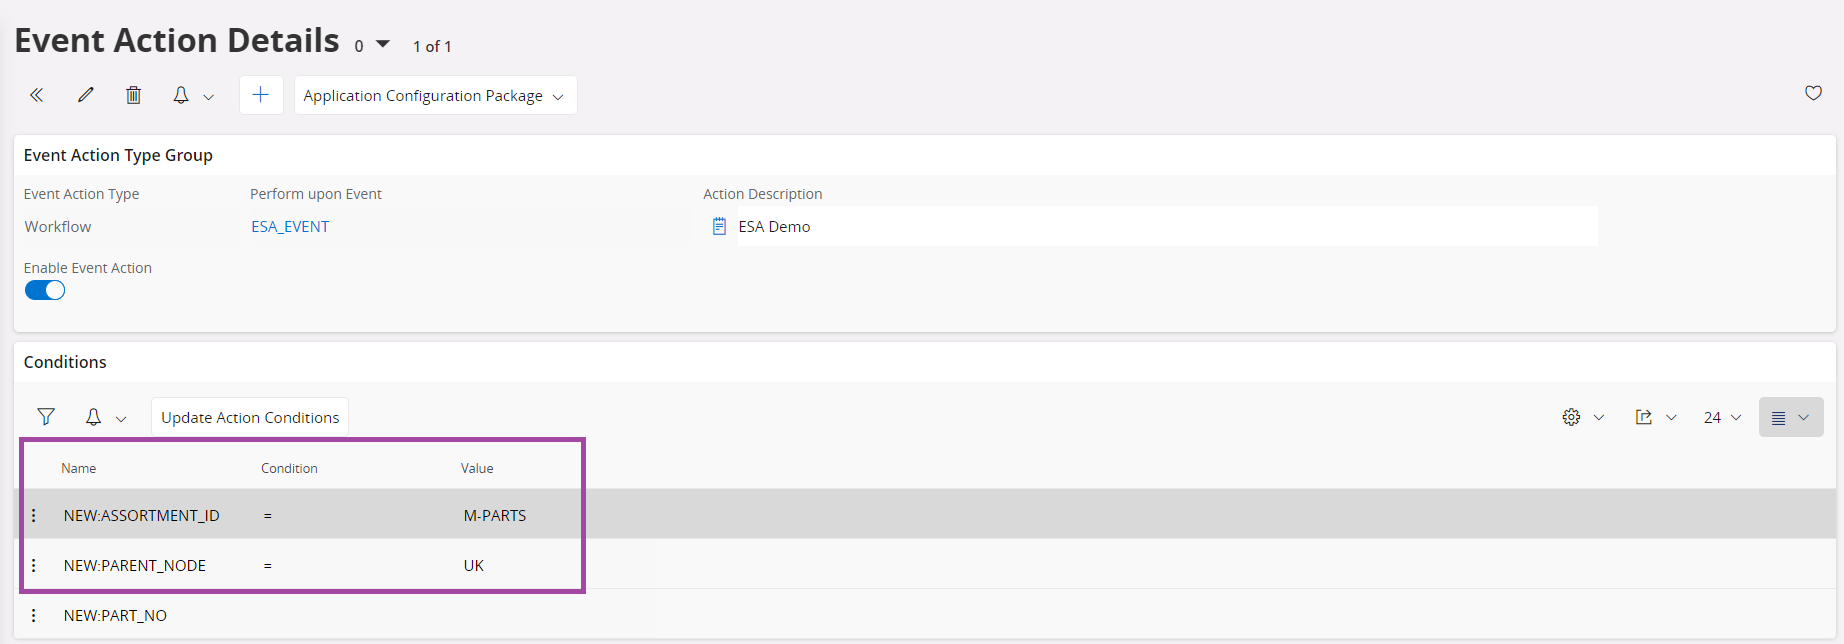
3 Add the following action conditions to trigger the Workflow, only when the part is connected to ‘M-Parts’ under the ‘UK’ category.
4 Create the ‘UK’ category under the ‘M-Parts’ Assortment (Part Master Data -> Assortment ).


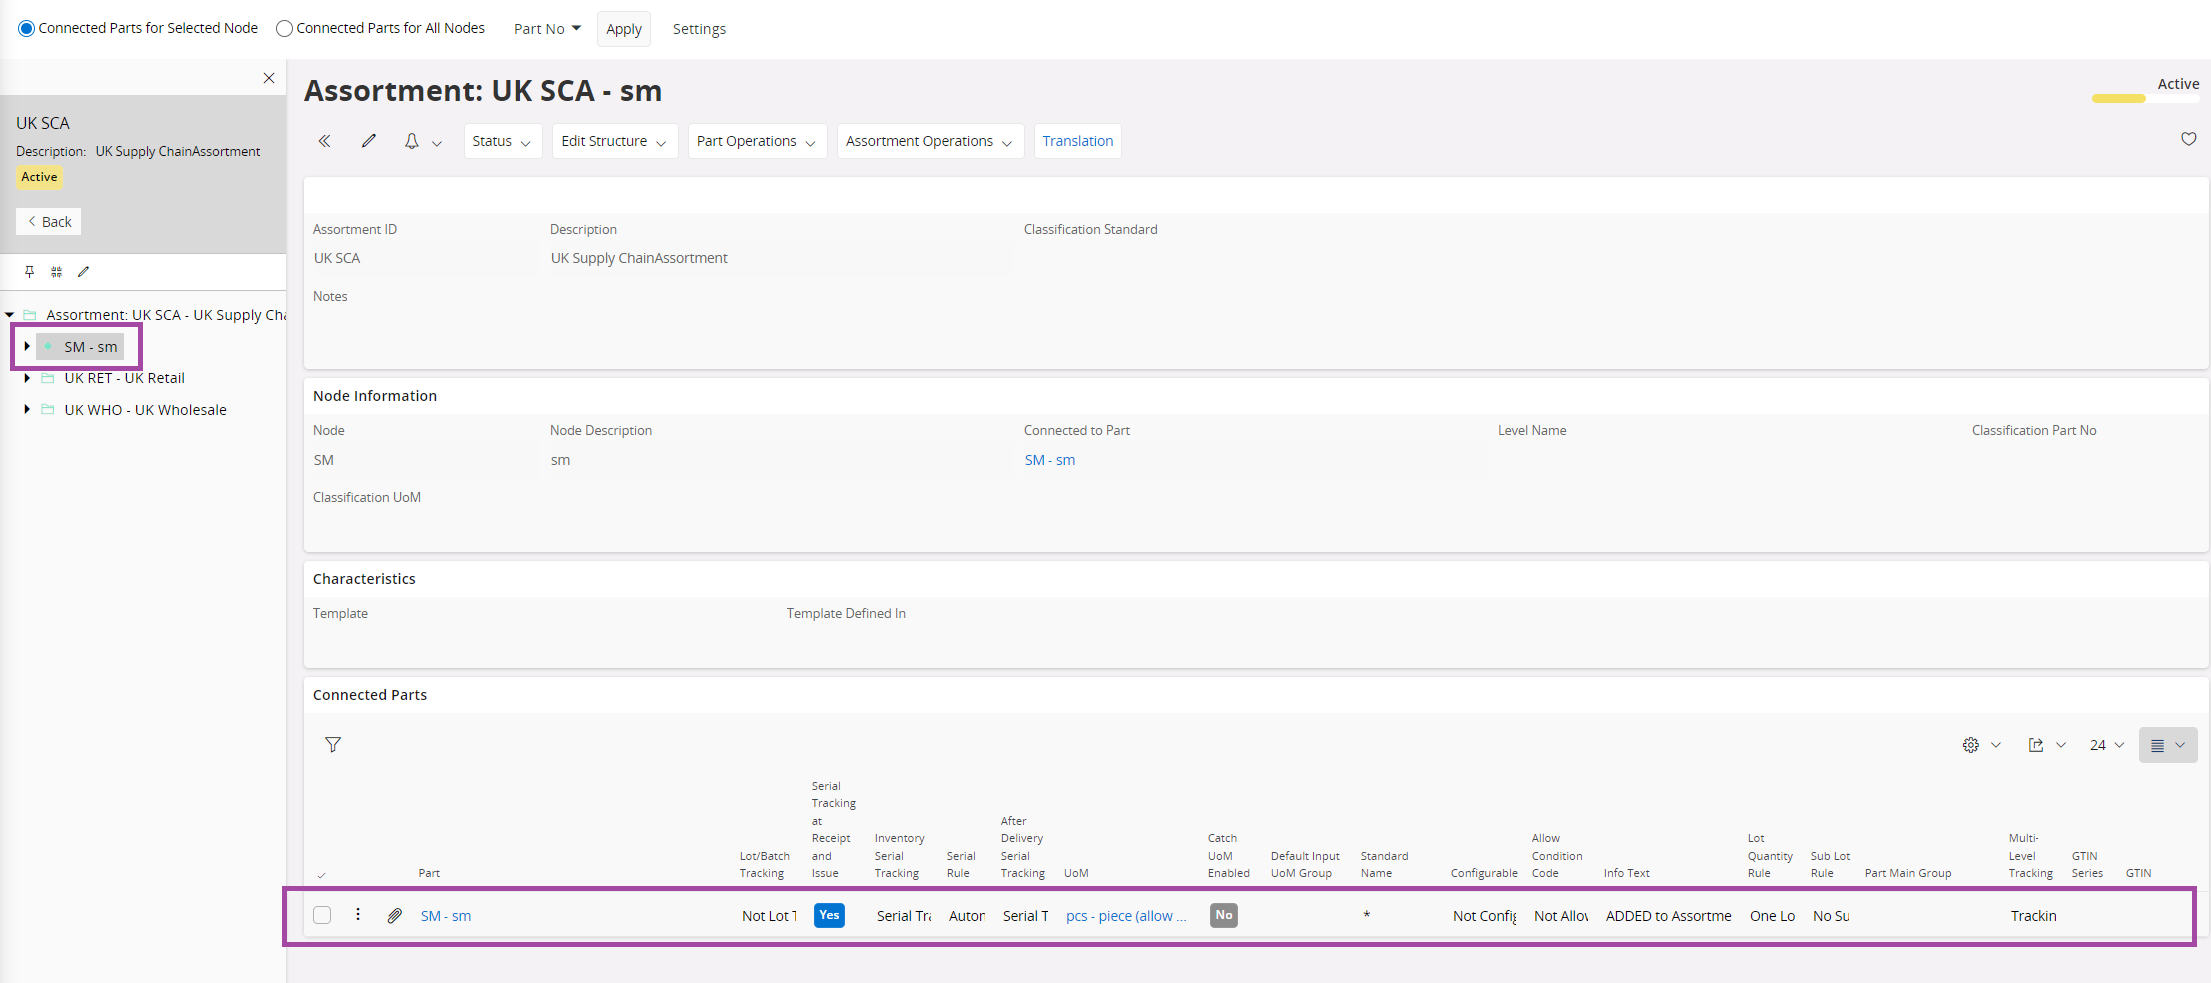
5 Connect new parts to the ‘M-Parts’ under the ‘UK’ category.


6 Now, the connected part has been transferred to the 'UK SCA' Assortment successfully.
State Change
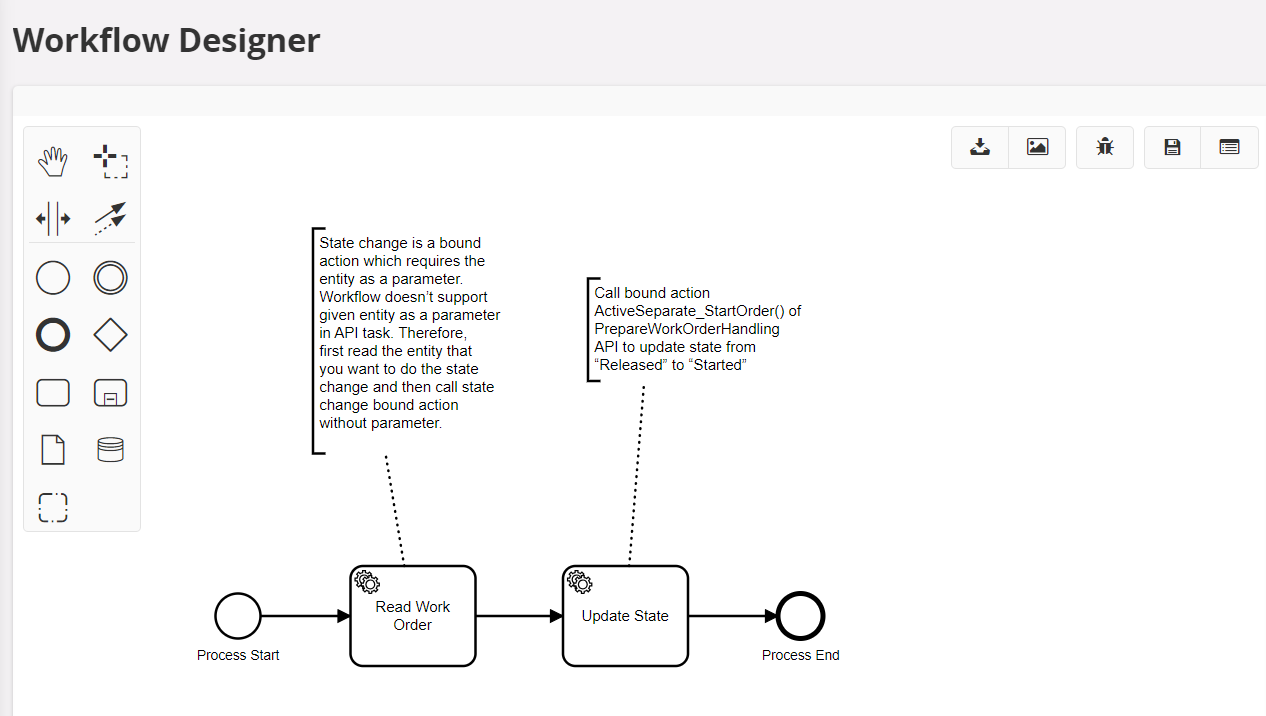
This State Change Workflow was created as a demo to automatically change the state of a work order from “Released” to “Started” when it is released.
Workflow DemoStateChangeExample is available on IFS Cloud as a Template Workflow, together with the projection action configuration. You can try this out by following the below mentioned steps.
Pre-requisites:
The "WO" component should be enabled in the IFS Cloud.
Steps to follow:
1 Clone the DemoStateChangeExample Workflow as a new Workflow and deploy it. Then add the below projection action for the deployed workflow.

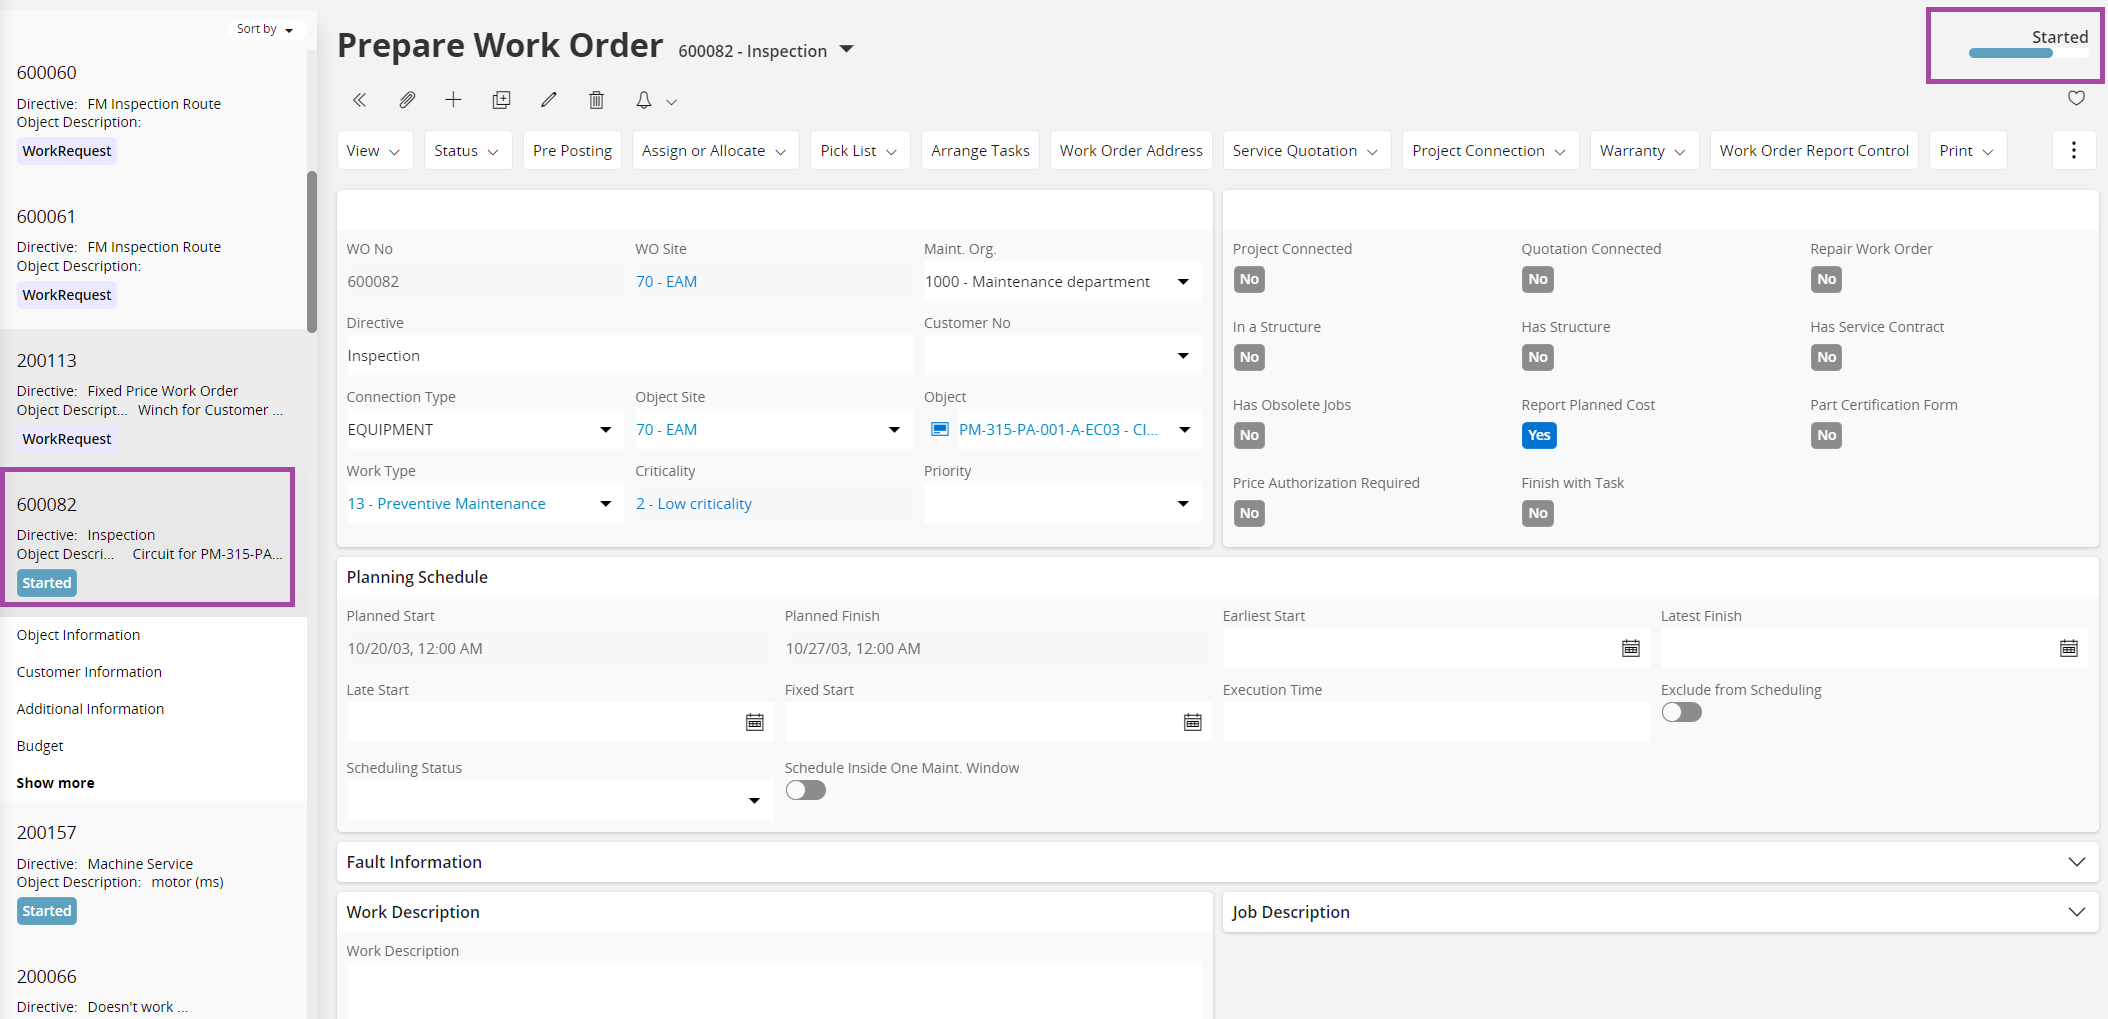
2 Manually update the State from “Work Request” to “Released” of a work order on the Prepare Work Order Page.

3 The Workflow updates the Work Order State from "Work Request" to "Started" when the State is manually changed from "Work Request" to "Released"
