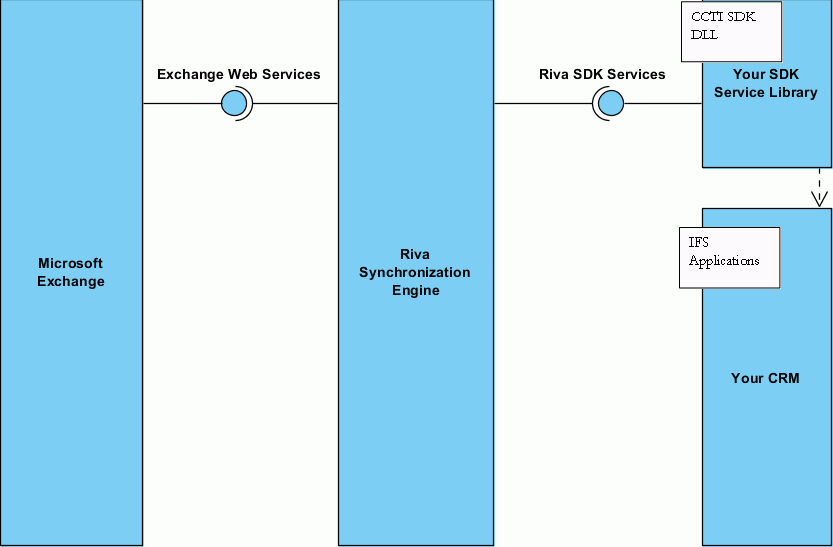
The purpose of this document is to provide information about the integration between IFS Applications and third-party product RIVA. From IFS Applications, a component called CCTI (Calendar, Contact and Task Integration) is developed to provide a generic integration framework to integrate with RIVA.
The requirement is to synchronize contacts, appointments,
tasks, opportunities, etc. between user’s exchange account and IFS. In order to
achieve this we have used a 3rd party product called RIVA CRM
Integration. RIVA enables server-side, two-way, synchronization of appointments,
tasks, contacts, leads, etc. between supported e-mail systems and IFS.
More information about RIVA can be found in
http://www.rivacrmintegration.com/
This document describes the Technical implementation of the integration between
IFS and RIVA.
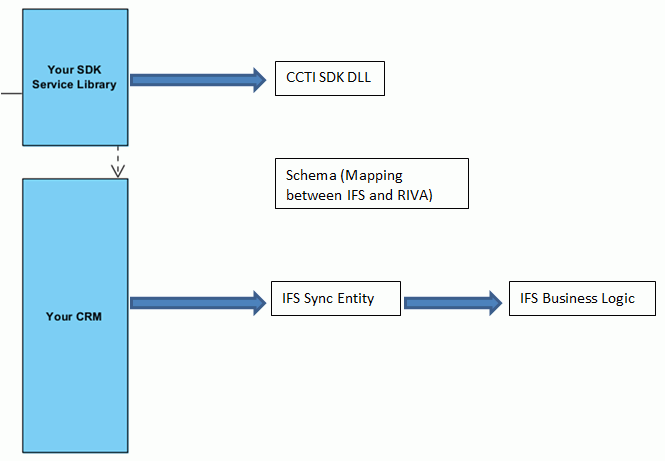
The RIVA Synchronization Engine
acts as the controller of the synchronization and initiates all calls to the
mail system e.g., Microsoft Exchange and the IFS
installation. The IFS developed SDK Service Library
uses the Riva SDK framework and receives those calls from the RIVA
synchronization engine and queries the IFS database or calls methods in the IFS
database sync entities to change the data, i.e.,
insert new records, update existing records or in some cases remove records in
IFS.
All configurations for synchronization schedules etc. is done in the RIVA
client.
Please, refer the CCTI installation Guide.
After the installation, you have to do the
necessary configurations of RIVA using Riva.exe.
Please, refer CCTI Installation Guide for more information on this.
How to set custom options? You can apply these to a Sync policy or to a target user. Refer http://kb.omni-ts.com/entry/312/.
Delete Safety Mechanism
RIVA has an internal mechanism call “Delete Safety” which will raise an
error if any one poll result indicates that there are a large number of
items to be deleted. Then there will be an error raised by default (Ex:
“[Appointment] Error - [CA] Poll result returned more deletes than allowed
[37%/10%]. Aborting to prevent data loss”).
In order to disable or avoid this error use,
Sync.Crm.DeleteSafety.Disabled = true
This article has more information about this feature:
http://kb.omni-ts.com/entry/1081/
In order to synchronize the deletions of IFS
records to the e-mail system, you have to enable the following setting,
Sync.Crm.PollBySnapshot = true
If you have enabled this, you can control how often RIVA will detect
deletions done in CRM in a separate sync cycle. In order to set up this, use
Advanced Scheduling and select Minimum interval to
verify CRM for deletions. Use this option to reduce the amount of
sync work RIVA performs to remove stale data.
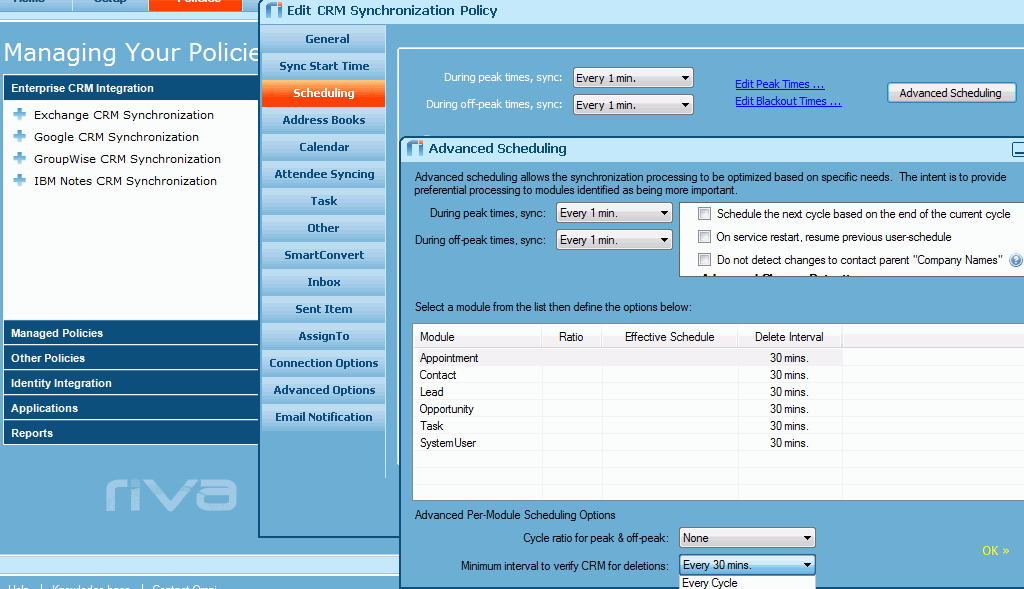
The recommendation is to not do a delete sync
during normal office hours as it involves fetching and processing significantly
more data and reading all the records from the sync views.
If you want to transfer contact pictures from
IFS to Exchange, use the following custom option,
Sync.Crm.ContactPicture.Enabled = true
If you need to transfer contact pictures from
Exchange to IFS, use the following custom options,
Sync.ExToCrm.ContactPicture.Enabled = true
If you need to show more information in the
body of the Appointment, Task or Contact (apart from mapped column example
Notes), use the following option,
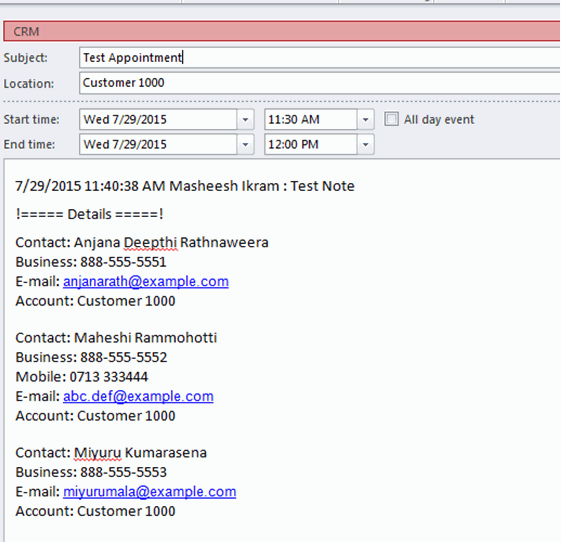
Sync.Crm.AppendDetailsHyperDescription.[Module] = true
This feature will append a specially marked up portion to the body of an
appointment, task or contact in the From-CRM
direction, to display additional information that may be relevant to the
user. If you use this for the appointment module, RIVA will extract some
basic information from the contacts connected to appointment, such as name,
e-mail address, phone number and display them in the body.
If you want to customize the fields displayed
on a per contact basis, you can use the option:
Sync.Crm.HyperDescription.ContactDetails.UseCrmObjectWithFormatterThe value can be a formatted string similar to below,
Name: {Fields[FirstName]} {Fields[MiddleName]} {Fields[LastName]}

	Email: {Fields[Email]} Office Phone: Fields[OfficePhone]}

If you want to customize the entire details
section for the whole object instead of just on a per contact basis, you can
use the option:
Sync.Crm.AppendDetailsHyperDescription.Format.[Module]
The value of this option should provide the format for the entire section
and will be evaluated against the main object, not the related contact
objects.
For example, if you wanted to display the owner name in the body of the
Appointment you could add the RIVA area column name like this:
Owner Name: {Fields[OwnerName]}
You can specify multiple columns to be displayed in a separate file and use
it in this option.Sync.Crm.AppendDetailsHyperDescription.Format.Appointment = @file=~\AppointmentDetailsFormat.txt
This file should be located in folder
Riva\Application\{Base or current version}
Example:
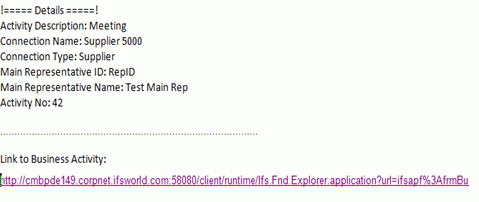
file can contain fields like,
Activity Description: {Fields[Name]}
Connection Name:
{Fields[Location]}Connection Type: {Fields[Categories]}Main Representative ID:
{Fields[OwnerId]} Main Representative Name:
{Fields[OwnerName]}Activity No: {Fields[Custom.LinkToActivity]}
It is possible to include any information in the file and that information
will be displayed in the body. For example if you need to have a link to
business activity, it is possible by adding the URL to the file. You can map
the activity number to RIVA custom field (Ex: Custom.LinkToActivity) and specify that field in the URL.
Example:
http://cmbpde149.corpnet.ifsworld.com:58080/client/runtime/Ifs.Fnd.Explorer.application?url=ifsapf%3AfrmBusinessActivity%3Faction%3Dget%26key1%3D{Fields[Custom.LinkToActivity]}%26COMPANY%3D10
These will be shown in the appointment body as below,
Comm_Method_API.The naming convention for an IFS sync entity LU
is CctiSync<Riva module>.
CctiSyncContact
CctiSyncLead
CctiSyncTask
CctiSyncAppointment
CctiSyncAttendee
CctiSyncOpportunity
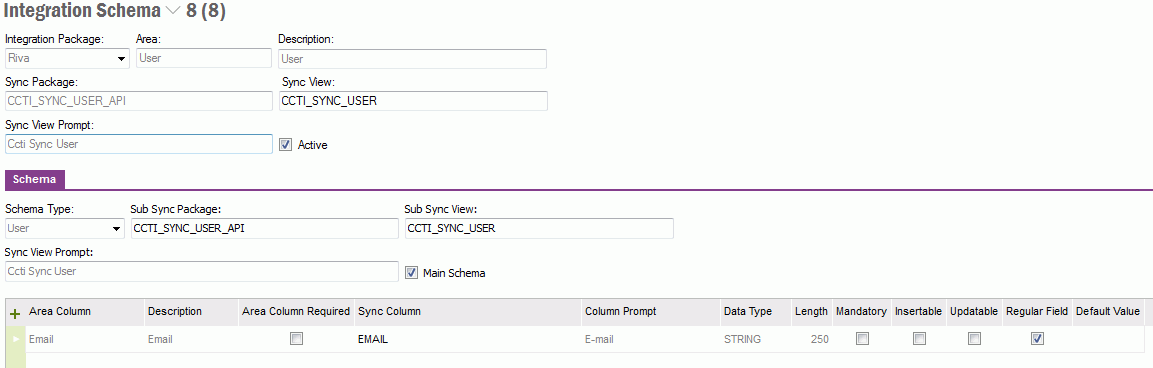
CctiSyncUser
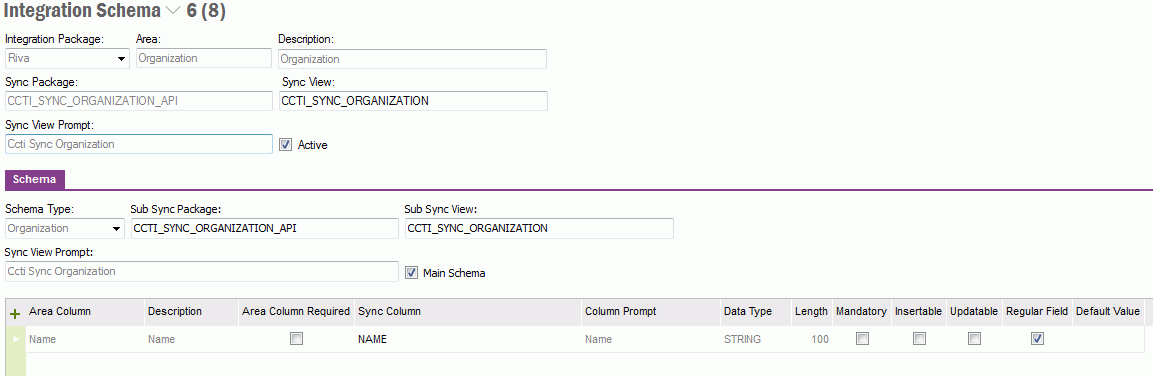
CctiSyncOrganization
Since IFS fields
and RIVA fields differ, we need to create a translation mapping between them.
This mapping will be used in every synchronization cycle.
There is a window to map the fields. A default mapping is inserted during the
installation of the component.
Some key points to consider in this schema window,
Only Active schemas will be considered in synchronization.
If you have created a custom field or added a field to a LU (connected to schema) and if you need to use that field for mapping then you should select the RMB option “Recreate Sync view”. This operation will re-create the sync view with latest fields and refresh the dictionary cache.
Key column of Sync view (often it will be an OBJKEY column) will be mapped to a hidden “ID” column of RIVA area. This will be done automatically when you have given header entries of the window.
Area and fields should be defined in the basic data form. Any additional fields added should have an area column name starting with “Custom.” followed by something descriptive.
In order to import and export schema data use Migration Jobs.
The CCTI SDK DLL (Ifs.Application.Ccti.Riva.dll)
is the IFS implementation of the interfaces RIVA has defined in their SDK for
building a service library for integrating with RIVA. It acts as a translator
between RIVA and IFS and handles all connections to the IFS installation.
Please, refer more information in
CCTI Development Guide.
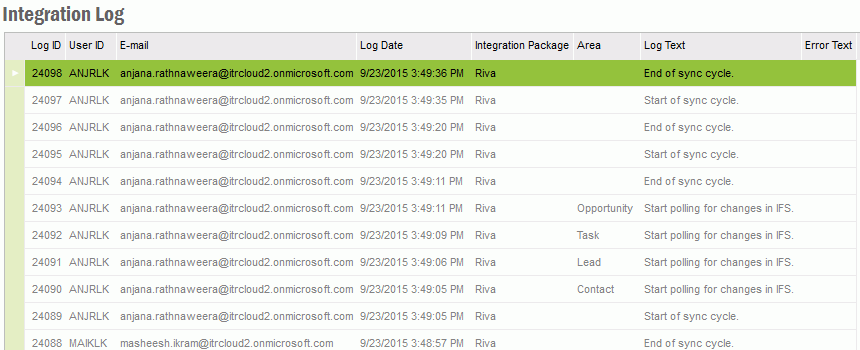
A new window has been added to show basic logging
information related to the synchronization.
Main log items:
Start of sync cycle
Validation error messages when do insert/update/delete in IFS side and also other exceptions that can occur in synchronization.
End of sync cycle
Please note that there will be detailed log files generated where the RIVA is
installed.
In order to clean up the records in the
Integration Log window, a database task will be
created by default. Change the DAYS_TO_KEEP_
parameter value according to your requirement. This parameter will be used to
delete the log records older than the value mentioned. Using this database task,
create a schedule to automate the deletion of the log records periodically.
To enable more extensive logging from the IFS
service library, you can edit the file
Ifs.Application.Ccti.Riva.dll.config.
Find the line which specifies the log level, typically something like:
<level value="INFO"/>
And change the value to be DEBUG and restart the Omi
Riva SDK Sync Service Windows service.
It is also possible to get more details in the RIVA log files by following the
instructions here:
http://kb.omni-ts.com/entry/67/
All log files are created in the RIVA installation, in the Logs folder, e.g.
C:\Riva\Logs
It is possible to synchronize customer contacts and lead contacts to exchange and vice versa. These two kinds of contacts can be identified in exchange using the categories defined in the RIVA configuration.
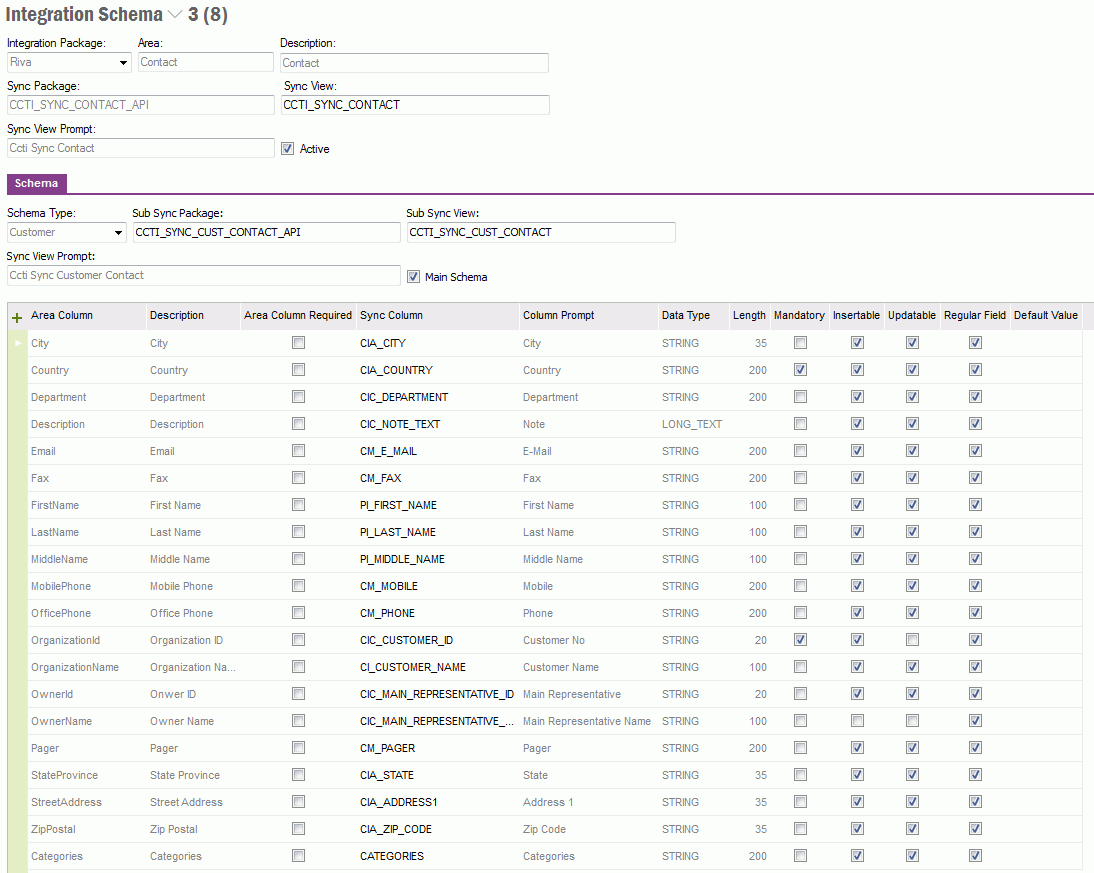
Sync view for contact is called Ccti_Sync_Contact. This view contains the mapped fields of Ccti_Sync_Cust_Contact view (in order to support supplier contacts, this view has been defined). Ccti_Sync_Cust_Contact view consists from different LUs connected with customer contacts. They are Customer_Info_Contact, Customer_Info_Address, Person_Info, Comm_Method_Info (person) and Customer_Info. This view will consist of all fields (including custom fields) of Customer_Info_Contact, Customer_Info_Address and Person_Info. Customer name of Customer_Info and some communication methods like email, phone no, mobile no, etc. will be also included.
Contact sync view columns should be mapped with
RIVA contact fields. By default there will be some columns mapped.
Sync columns contain prefixes such as “CIC_”, “CIA_”, “PI_”, “CM_” and “CI_”. These are used to identify the correct LU in sync package when insert/update or delete relevant IFS records.
Using the above mapping window, it is possible to implement to synchronize supplier contacts as well. Sync package and sync view are available by default for supplier contacts. They are called Ccti_Sync_Supp_Contact_API and Ccti_Sync_Supp_Contact. If you need to synchronize supplier contacts, then you need to do the mapping first. RMB and select Create Schema from the Schema tab. This RMB option is only available if the schema is a Main Schema or an empty schema. Fill the necessary fields in the dialog box and click OK.
Note: If the schema is empty (probably when you are creating a new one) then use the same Create Schema dialog box in order to create the sub schema. “From Schema” will be empty in the dialog box.
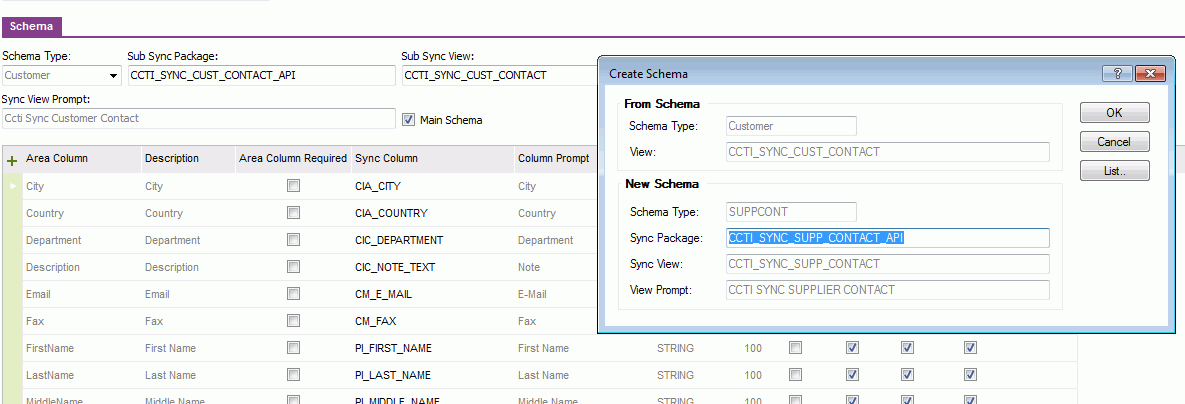
This will copy the main schema (Customer contact) mapping
to new supplier contact schema.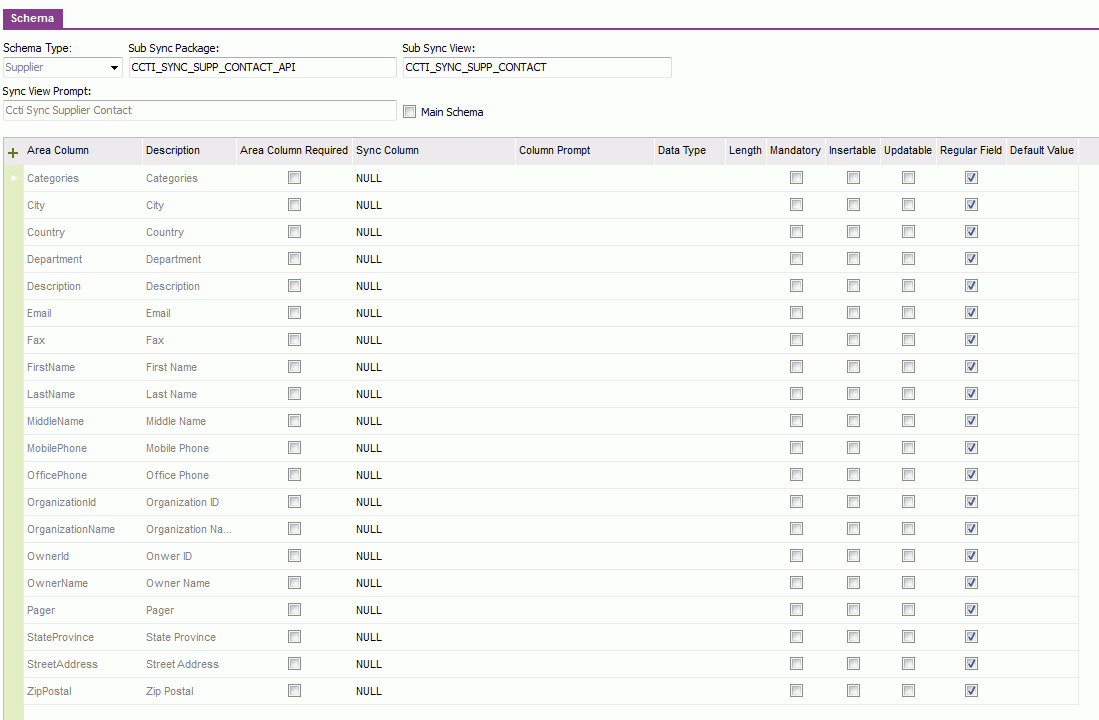
Sync column will contain value as “NULL” by default. You
need to give the proper sync column using the List of Values. Refer the below
image. Keep “NULL” if you do not find a proper column to use for the mapping.
Some key points to consider here,
In multiple schemas such as customer and supplier contacts, you can add, edit, delete mapping only for main schema.
Any changes done for main schema will be affected to other schemas (non-main schema) such as supplier contact.
If you have multiple schemas (under the Schema tab), then it is important to map the RIVA “Categories” column to Sync column “CATEGORIES” which will return the schema type as the value. Schema type will be displayed in Outlook as a category and this will make it easy to identify the different contacts (Customer/Supplier).
After creating sub schemas, you have to RMB and select Recreate Sync View from the header. Header view Ccti_Sync_Contact will be then recreated using union of sub sync views (containing with mapped columns).
If a schema contains only one sub schema then Sync view and sub sync view can be same ex: Appointment
When the schema is active, customer contacts will be synchronized to exchange
(according to last modified date). In IFS, you can connect same person to
different customers as contacts, therefore there will be duplicated contacts
shown in exchange (but connected to different customers).
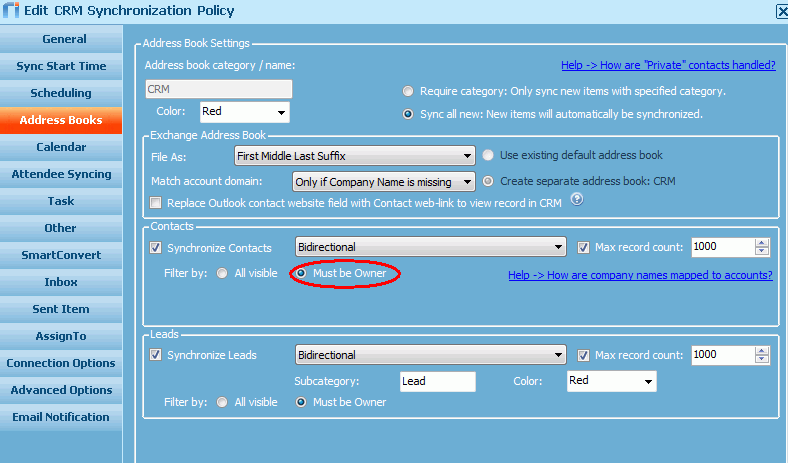
If you have set “Must be Owner” in the RIVA policy, only the contacts which the
current user is set as Main Representative will be synchronized.
This can be synchronized to exchange and vice versa by activating the relevant custom options (refer RIVA Custom Options)
In order to effect the deletion of the record over to exchange as well, you have to activate the PollBySnapshot setting in RIVA.
In order to synchronize the new exchange contact to IFS as a customer contact, you have to specify the correct value to Company field (which is mapped to customer name/ID in IFS). Select the Address Book category defined in the RIVA policy, if RIVA option is set to Require Category when creating new contacts.
Note: If you synchronize both Customer and Supplier contacts, then it is important to add the correct category (Customer or Supplier) to the new contact as well.
If you specify just a value then system will take that value as the customer
name and it will search the customer record in IFS by customer name. If you have
specified the company value with “#” prefix then company value will be taken as
Customer ID and it will search the customer record in IFS by customer ID. If no
related customer is found then an error will be raised and the exchange contact
will be not synchronized to IFS.
If you do not know the customer ID/name of the contact then keep the company
field blank and set the contact category as Lead. This contact will be then
connected to a Lead (dummy lead in this case).
Contact creation logic in sync package
1. If company value has a value then it will search and fetch the customer record (if customer record is not found or company value is empty then system will raise an error).
2. Try to match the E-mail address in person’s communication method. If not found then create a new person and add other communication method information (Also this will update the custom field values of person as well if available).
3. Add the new/existing person as a new contact to the customer record.
4. Update custom field values of customer info contact if have any.
5. If contact has address information, then these will be added as a person’s address.
Note: Normally customer address will be synchronized to exchange contact. But from exchange to IFS, no customer address will be created (only updates will be transferred).
Update ContactThe updated contact information (relevant for mapped fields) will be synchronized to IFS.
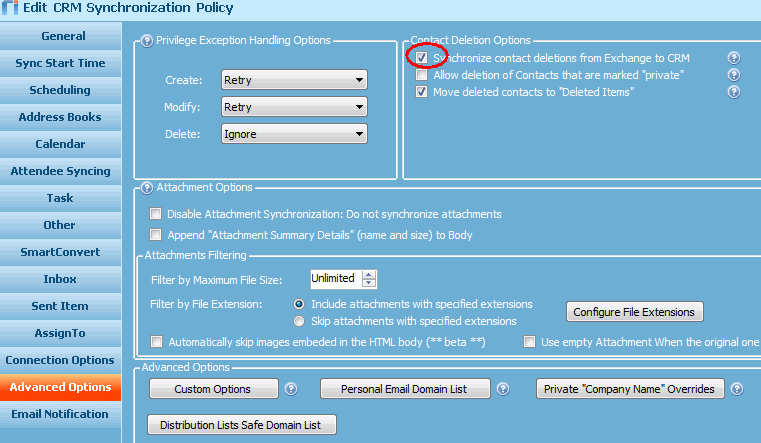
Delete contact from Exchange/Lotus notes
When you delete a contact in exchange or Lotus notes, by default IFS customer
contact or lead contact will not be deleted. You have to select the following
check box in order to do so. Please, refer more information in
http://kb.omni-ts.com/entry/253/
Business Lead contacts will be synchronized to exchange and those will use Lead category in contacts of exchange.
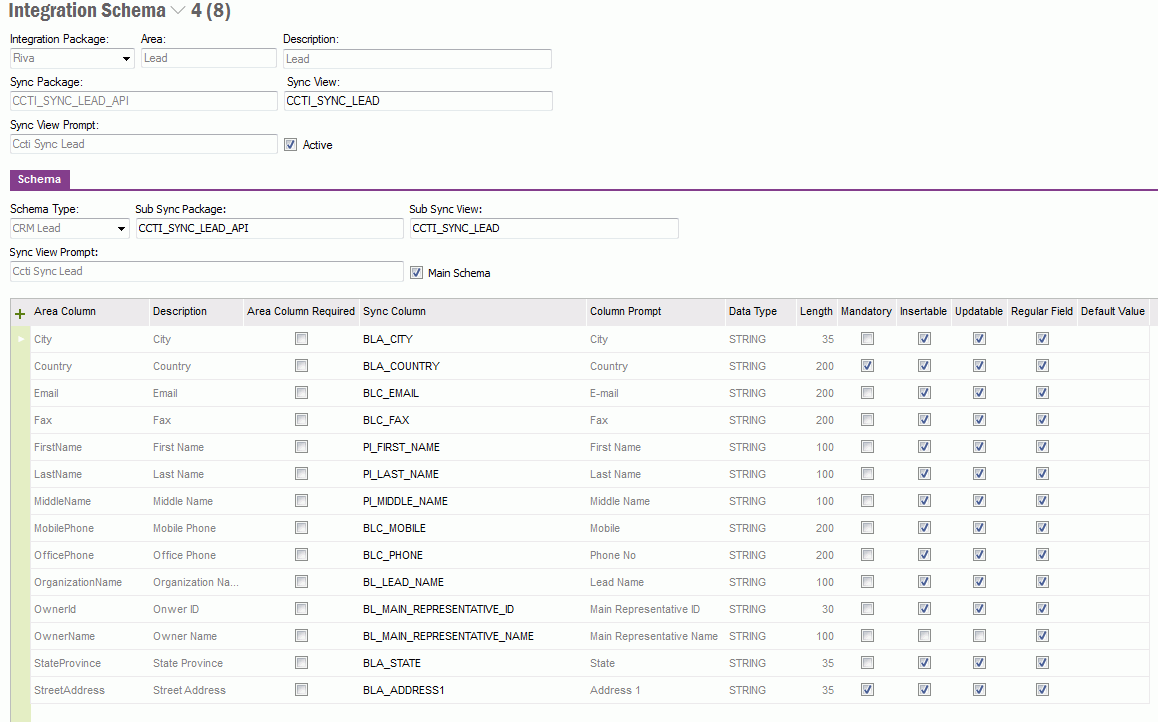
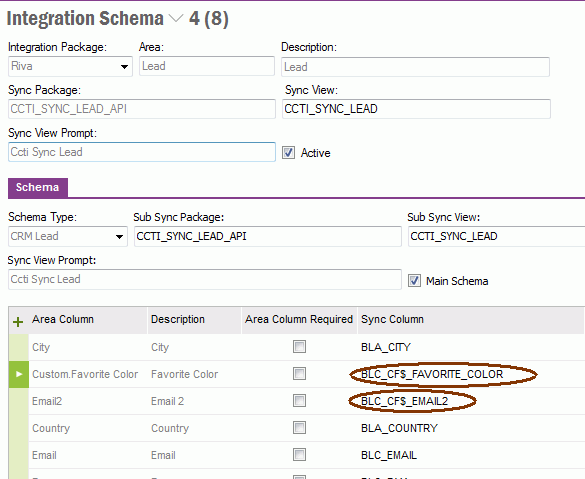
Sync view for lead contact is called Ccti_Sync_Lead. This view contains fields from different LUs connected with Business Lead contact. They are Business_Lead_Contact, Business_Lead_Address, Person_Info, Comm_Method_Info (person) and Business_Lead. This view will consist of all fields (including custom fields) of Business_Lead_Contact, Business_Lead_Address and Person_Info. Lead name of Business_Lead and some communication methods like e-mail, phone no, mobile no, etc. will be also included.
Lead Contact sync view columns should be mapped with RIVA lead contact fields. By default there will be some columns mapped.
Sync columns contain prefixes such as “BLC_”, “BLA_”, “PI_”, “CM_” and “BL_”. These are used to identify the correct LU in sync package when inserting/updating or deleting relevant IFS records.
Note: Sync view and sub sync view are same here. If you need to add a different schema to lead (similar to supplier contact) then you should change the sub sync package and view names (refer contact implementation).
When the schema is active, lead contacts will be synchronized to exchange (according to last modified date). If you have set “Must be Owner” in RIVA policy, only the lead contacts for which the current user is set as Main Representative will be synchronized.
Delete contact from IFS
In order to effect the deletion of the record over to exchange as well, you
have to activate the PollBySnapshot setting in RIVA.
EXCHANGE TO IFS
Create Lead Contact
In order to synchronize the new exchange contact to IFS as a business lead
contact, you have to specify the correct value to Company field (which is mapped
to lead name/ID in IFS) and exchange category which uses for Lead. If you
specify just a value in the Company field then system will take that value as
the lead name and it will search the business lead record in IFS by lead name.
If you have specified the company value with “#” prefix then company value will
be taken as lead ID and it will search the business lead record in IFS by lead
ID. If related lead record is not found then system will create a new lead using
the name provided in company field and attach the contact to it. If the company
field is blank then contact will be attached to a dummy lead (lead name of dummy
lead would be {userid}_ccti).
Exchange task will be mapped with Business Activity (Calendar item type = “Task”). You can synchronize all types of business activities to exchange (Customer, Business Lead and Supplier). Connection name will be mapped with company field of Task. If you need to see different tasks (separate with categories) then you should map “Connection Type” with RIVA Categories field.
Cccti_Sync_Task sync view will contain all the columns of Business Activity where calendar item type = “Task”.
Sync view columns should be mapped with RIVA Task fields. By default there will be a mapping.
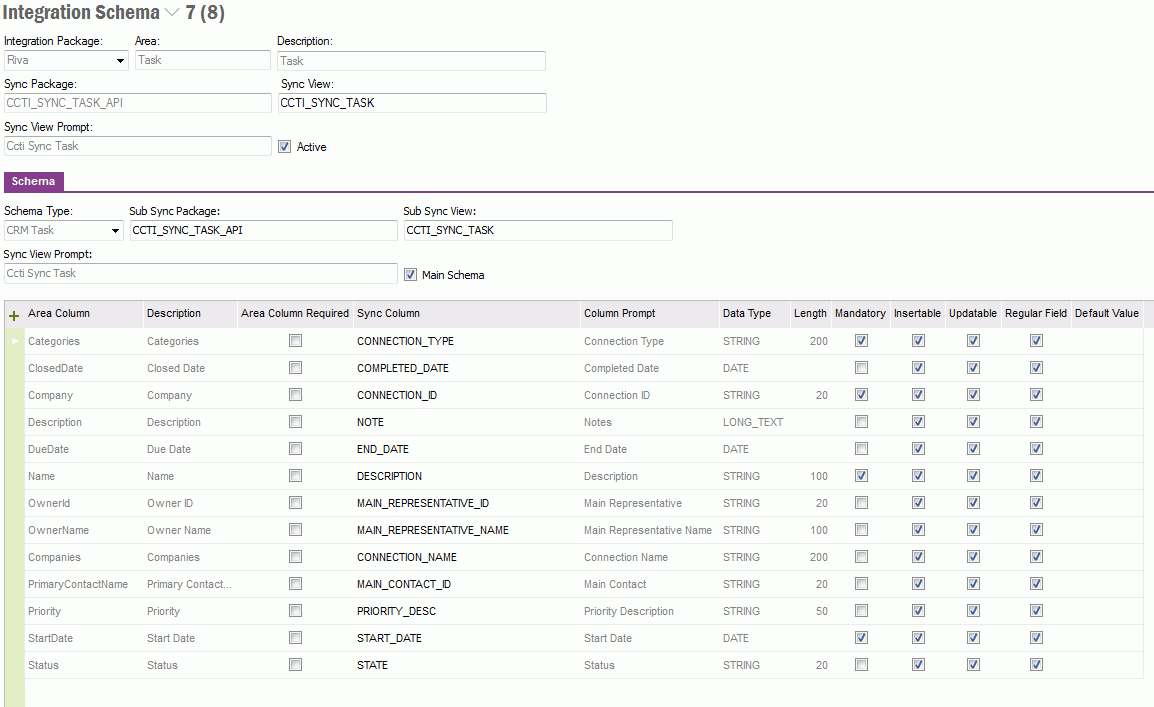
Note: Sync view and sub sync view are same here. If you need to add a different schema to Task (similar to supplier contact) then you should change the sub sync package and view names (refer contact implementation).
When the schema is active, then business activities (Task) will be
synchronized to exchange (according to last modified date). Main Representative
will be used as the owner of records and only the records which current user is
set as main representative will be synchronized.
Connection Type
If you mapped the connection type to RIVA categories field then, you can see
secondary categories such as customer, supplier and business lead in exchange.
Activity Type
The default Activity Type of Business
Activity when creating from CCTI can be defined in Relationship
Management\CRM and SRM\Basic Data\CRM and SRM Basic Data\Default Values.
For Tast, it has to be defined in the context ‘Default Business Activity Type
when creating Task type Business Activity from CCTI’
Create Task
In order to synchronize the new exchange
appointment to IFS as a business activity, you have to specify the correct value
to Company
field (which is mapped to connection
name/ID in IFS) and set up the secondary exchange category which refer as
Customer, supplier or business lead.
Secondary category is important to identify the connection type. If you have not
given that then the task will be treated as a customer type.
If you leave the company blank and set the secondary category as “Business Lead”
then the new task will be transferred to IFS as a new business activity and will
be connected to the dummy lead.
Update Task
Update of exchange task will be synced back to relevant business activity.
Delete Task
If you deleted a task then the corresponding business activity will be deleted
in IFS.
Exchange appointment will be mapped with Business Activity (Calendar item
type = “Appointment”). You can synchronize all types of business activities to
exchange (Customer, Business Lead and Supplier). Connection name will be mapped
with location field of Appointment. If you need to see different appointments
(separate with categories) then you should map “Connection Type” with RIVA
Categories field.
Following is the order that identifies Connection Name
to synchronize between exchange and business activity;
Note: The connection can be of Customer, Supplier or Business Lead.
Defining tags:
Default tags are defined in Application Base
Setup/System Setup/System Definitions – Object Property tab. It is possible to change default
tags. The start default tag is [ and the end default tag is
]. When you change
default tags, if you enter only one character, the same will be used as both
start and end tags.
Cccti_Sync_Appointment sync view will contain all the columns of Business Activity where calendar item type = “Appointment”.
Sync view columns should be mapped with RIVA Appointment fields. By default there will be a mapping.

Note: Sync view and sub sync view are same here. If you need to add a different schema to Appointment (similar to supplier contact) then you should change the sub sync package and view names (refer contact implementation).
When the schema is active, then business activities (Appointment type) will be synchronized to exchange (according to last modified date). Main Representative will be used as the owner of records and only the records for which the current user is set as main representative will be synchronized. If you mapped the connection type to RIVA categories field then, you can see secondary categories such as customer, supplier and business lead in exchange. All representatives and contacts connected to business activity will be added as Attendees in exchange appointment.
Delete Business Activity from IFS
In order to effect the deletion of the record over to exchange as well, you have
to activate the PollBySnapshot setting in RIVA.
Create Appointment
In order to synchronize the new exchange appointment to IFS as a business
activity, you have to specify the Connection ID/Name within tags in the
Appointment subject/body and set up the secondary exchange category which refer
as Customer, Supplier or Business lead.
Following are two examples of using
default tags;
Otherwise for example, if the Location field is mapped to Connection Name in IFS, then you have to specify the correct value to location field.
Connection Type
Secondary category is important to
identify the connection type. If you have not given that then the appointment
will be treated as a customer type. If you leave the company blank and set the
secondary category as 'Business Lead' then the new task will be transferred to
IFS as a new business activity and will be connected to the dummy lead.
Attendees added to the appointment will be synchronized as representatives and
contacts in Business Activity.
Activity Type
The default Activity Type of Business
Activity when creating from CCTI can be defined in Relationship
Management\CRM and SRM\Basic Data\CRM and SRM Basic Data\Default Values.
For Appointment, it has to be defined in the context ‘Default Business Activity
Type when creating Appointment type Business Activity from CCTI’
Update Appointment
Update of exchange task will be synced back to relevant business activity.
Delete Appointment
If you deleted a task then corresponding business activity will be deleted
in IFS.
Opportunity will be added as a custom object in exchange. This will be mapped with Business Opportunity. Records will be synchronized only in one direction (IFS to Exchange).
Cccti_Sync_Opportunity sync view will contain all the columns of Business Opportunity.
Sync view columns should be mapped with RIVA Opportunity fields. By default there will be a mapping.
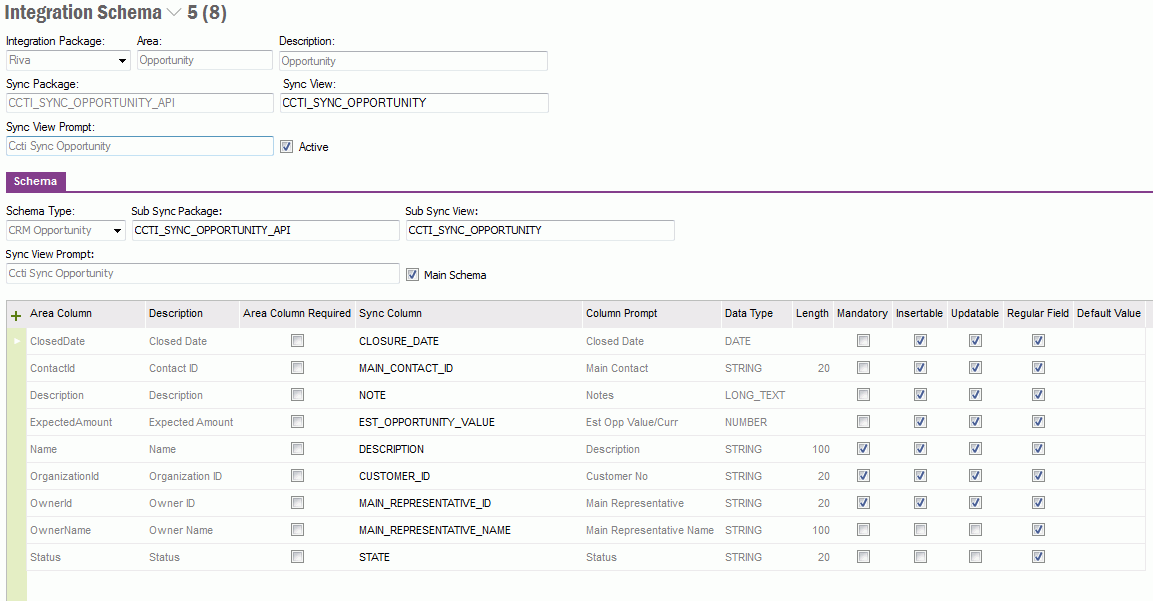
When the schema is active, business opportunities will be synchronized to
exchange (according to last modified date). If you have set the filter by owner,
then Main Representative will be used as the owner of records and only the
records for which the current user is set as main representative will be
synchronized.
Delete Business Opportunity from IFS
In order to effect the deletion of the record over to exchange, you have to
activate the PollBySnapshot setting in RIVA.
Opportunity records will be read only in Exchange side.
These entities are not synchronized to Exchange, but should always be active as they are used by RIVA during the synchronization. They can be considered ‘System’ sync entities.
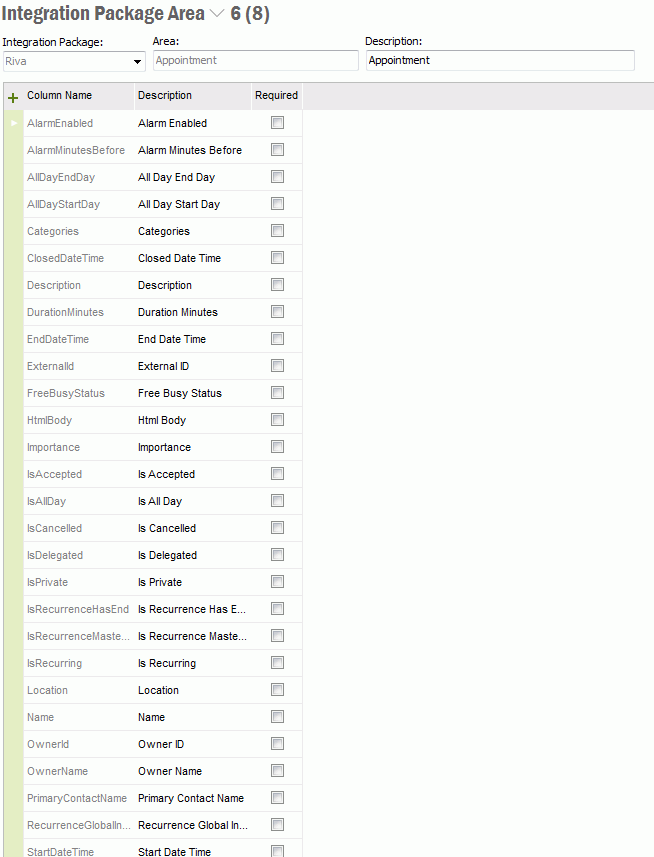
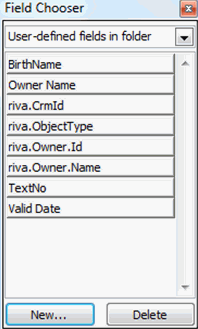
Any fields that are to be added to the list of user defined fields, you need
to add them to “Integration Package Area” basic data window for a specific area
first.
Refer the following syntax in order to add a custom field,
Custom.{fieldname} – String type. Ex: Custom.Favorite
Color
Custom.Boolean.{fieldname} – Boolean type
Custom.Currency.{fieldname} – Currency type
Custom.Date.{fieldname} – Date type
Custom.Double.{fieldname} – Double type
Custom.Integer.{fieldname} – Integer type
After adding the fields to basic data, add the mapping for the fields in the
integration schema window. You can map these RIVA custom fields with any IFS
fields which are available for the specific sync view. After a synchronization
of records from IFS to RIVA, these custom fields will be available in the user’s
exchange system. You can then include these fields in different views in
Exchange.
Note: Any new fields you add might not immediately show up in Outlook. You might need to do some kind of refresh (shift from Contacts to Mail and back etc. or possibly re-start Outlook) to see the new fields under the user-defined list.
When you add a custom field in IFS to an LU which is connected with integration then you need to select the RMB option Recreate sync view in the integration schema window for the sync entity. This will recreate the sync view and include the custom field to the view. After that you can use it for mapping.
Adding custom field will be useful in case you do not find a perfect match between RIVA fields and standard IFS fields.
Please, refer the CCTI Development Guide.