SCIM Configuration Example - Okta
This configure example descibes how to setup User provisioning from Okta to an IFS Cloud installation. Keep in mind that not all Identity Managers will look and work the same way, but a similar type of setup will need to be configured. The implementation of SCIM in IFS Cloud is done through exposing endpoints that the Identity Manager will communicate with. Only the main endpoint will need to be added to the Okta provisioning. The correct endpoints within the SCIM service will be used based on the type of request that is made from Okta (Get, Create, Update and Delete).
Note: Setting this up with a Cloud service requires a secondary/external URL for your system to be enabled. This can be disregarded if using a service or application that is running on-premise.
Process Overview
Setting up provisioning with SCIM requires a few preparations. These steps are made to give a overview of the process as a whole.
- Make sure the IFS_scim client is enabled. This will not be enabled in a fresh installation. This can be done in the Identity and Access Manager.
- In order to utilize the SCIM endpoints, a new Service User must be created. This user needs to be created with the Directory Id value IFSSCIM. Identity and Description can be configured to your own liking. User Type must be set to Service User. 3.Once the Service User has been created, this user needs to be granted the correct permissions. Go to the User Permissions tab and press Grant Permission Sets. Search or scroll down until you have located the Permission Set FND_SCIM_ADMIN. Grant this to your Service user.
- Generate a new SCIM Offline Token to be used for the Admin Credentials. This can be done on the SCIM Access Manager page.
- Use an existing application in Okta that supports SCIM provisioning (SAML/SWA) or create a new application from which you can provision your users. A SCIM app may be used, this can be found by navigating to Browse App Catalog and search for SCIM 2.0 Test App (OAuth Bearer Token).
- Add the SCIM connector base URL and token generated in step 3 to the provisioning integration.
- Enable Create/Update/Deactivate Users in the “to App” settings.
- A custom attribute mapper needs to be added in the Profile Editor. This is a mandatory field, and the provisioning will not work until this is added. For more information about the SCIM to IFS attribute mapping.
Configuring SCIM provisioning in Okta
The configuration will look different depending on what type of application being used. For this reason, the initial setup will be split up into two separate paragraphs. Use the one that applies to the application of your choice.
SAML/SWA
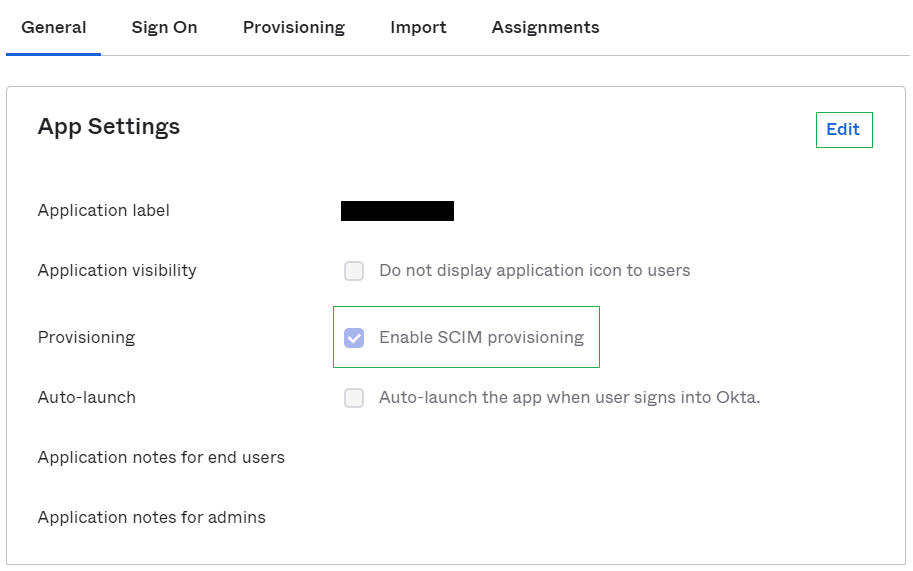
Navigate to the General tab of your application. Edit your App Settings to enable SCIM provisioning.
To start setting up the User provisioning select the third option Provision User Accounts. Continue by selecting Edit provisioning in the small top menu of the next page. Select Automatic in the dropdown menu Provisioning Mode. Expand the Admin Credentials tab and two fields, Tenant URL and Secret Token, will appear.
After enabling this a new tab, Provisioning, should be visible. Navigate to that tab and hit edit.
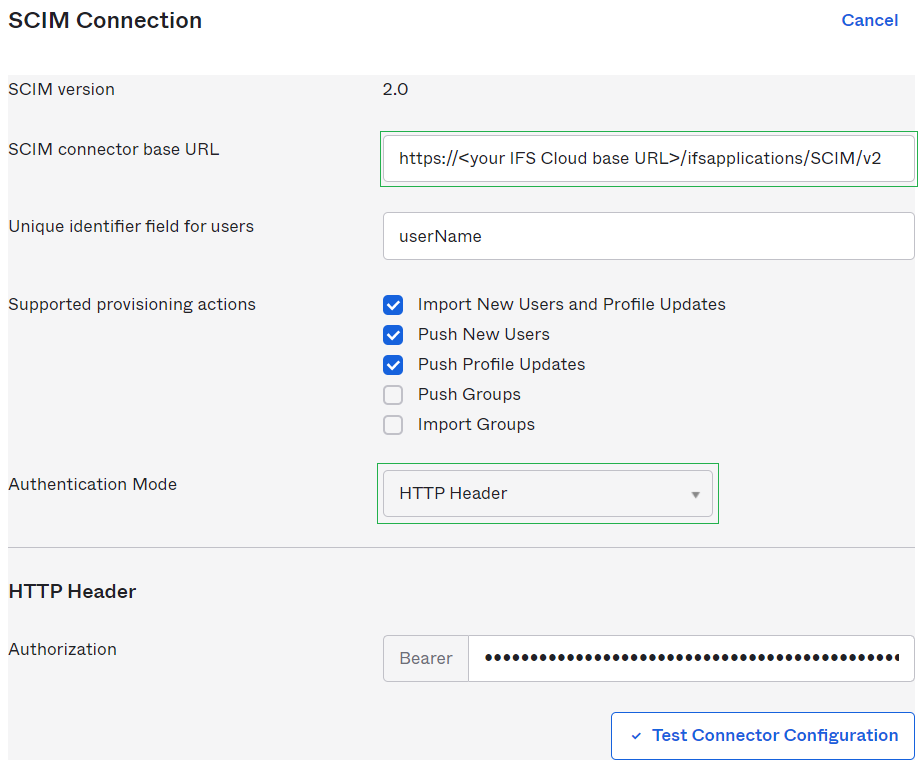
The SCIM connector base URL field requires the main endpoint of IFS Scim to be added. In this case Okta is running as an external service, which means I need to add the external URL. For information on how to configure a secondary/external URL please refer to this this page.
Set the Unique identifier field for users to userName.
Select the actions you wish to use for provisioning. Group provisioning is not supported, leave those fields unchecked.
Set Authentication Mode to HTTP Header. Authorization field will require an Access Token. Normal access tokens have a limited lifetime and will expire shortly after being issued. This is circumvented by using an Offline Token, which is a type of refresh token. This token will not expire unless it is revoked. Offline Tokens can be generated in your IFS Cloud Application in the SCIM Access Manager page. Paste your generated token in the Authorization field.
Once all information has been added test the connection to make sure valid information has been added. A successful will generate a pop-up window telling you the connector configured is successful. Close this window and proceed to press save.
Please continue the setup from Enabling App settings and Custom attribute mapping, if you want to setup using a different type of Application.
SCIM 2.0 Test App (Oauth Bearer Token)
The SCIM 2.0 App will already have SCIM provisioning enabled, this means you can navigate to the Provisioning tab of the application directly. Hit Configure API Integration.
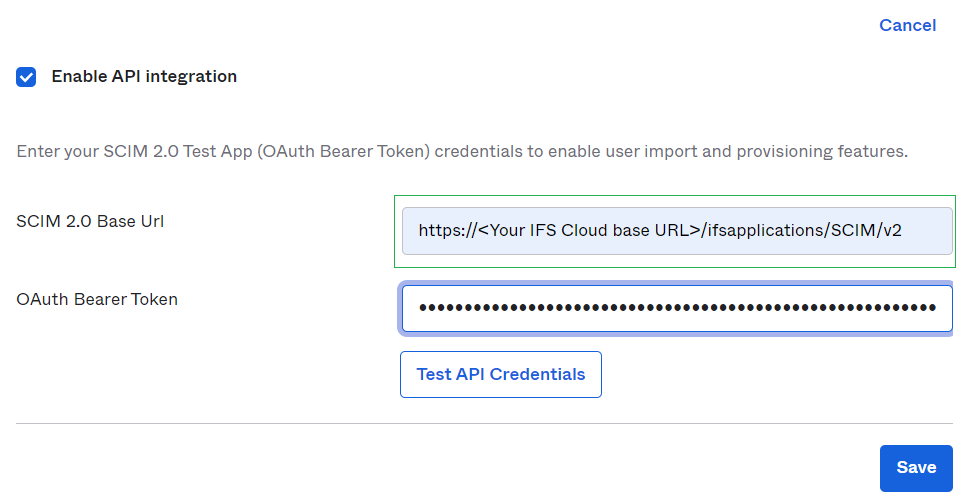
The SCIM 2.0 base Url field requires the main endpoint of IFS Scim to be added. In this case Okta is running as an external service, which means I need to add the external URL.
The OAuth Bearer Token field will require an Access Token. Normal access tokens have a limited lifetime and will expire shortly after being issued. This is circumvented by using an Offline Token, which is a type of refresh token. This token will not expire unless it is revoked. Offline Tokens can be generated in your IFS Cloud Application in the SCIM Access Manager page. Paste your generated token in the Authorization field.
Press Test API Credentials to make sure the information has been entered correctly. If the verification is successful press save.
Enabling App settings and Custom attribute mapping
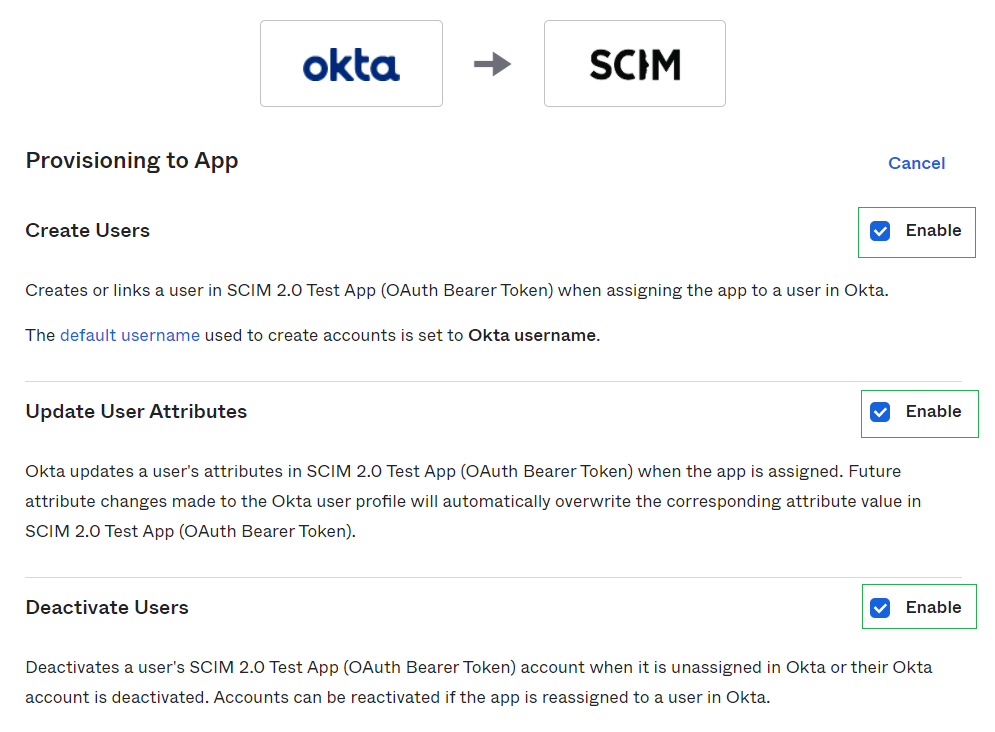
Once the base connection to the IFS SCIM API has been configured we can continue to enable the to App settings. Hit Edit and select provisioning settings we want to enable. Hit save once you have selected your desired options.
Custom Attribute Mapping
Scroll down further in the to App tab of Provisioning. Hit Go to Profile Editor to start navigating to the attribute mapper. In here you can edit the mapping of the attributes. We will need to add a new custom mapper in order to map one of the mandatory fields of the IFS SCIM integration. Hit + Add Attribute.

A mapper for formatte name (name.formatted SCIM attribute). See picture below for configuration for this attribute.
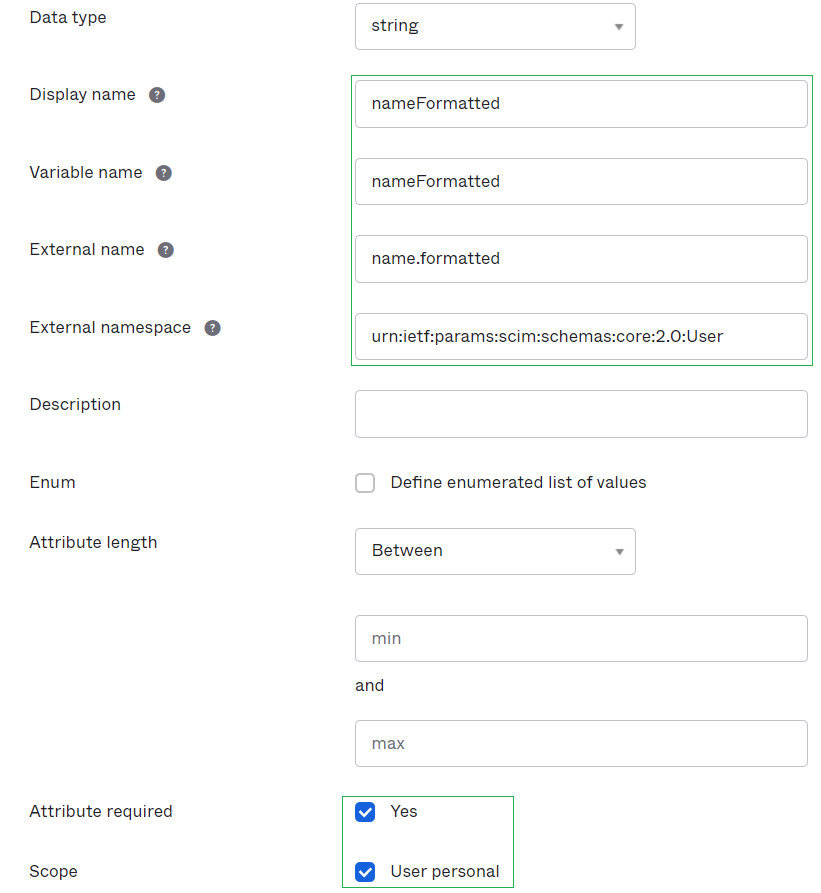
Once the mapper has been added navigate back to the to App page in the Provisioning tab of your application. Scroll all the way down and you will find the new attribute that was added but is not yet mapped. Hit the edit button of that attribute.
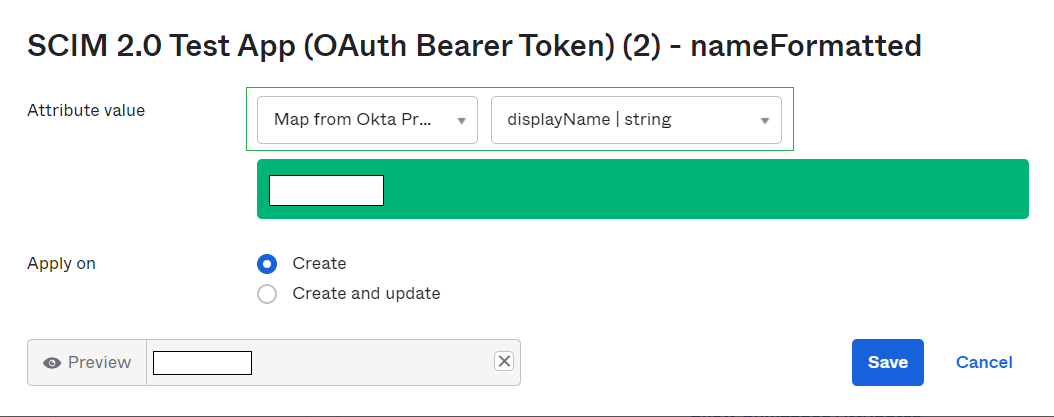
The application should now be ready to provision users from Okta to your IFS Cloud Application.