Lobby Page Designer
A Lobby page provides an at-a-glance view of information in IFS Cloud based on the individual, role, or process. It contains links and shortcuts to other lobbies or pages.
When a page is opened it's displayed with 100% size. In the upper right hand corner is a size scrollbar you can use to adjust the page to the available screen page. The setting will be stored in the user profile.
Configure Page
Click on the Wrench button in the upper right corner to reveal the toolbar. In the toolbar, click the Edit icon to enter configuration mode. In configuration mode you can configure the page, e.g. add, remove, move elements. In this mode you also have access to the Element Browser on the left hand side of the page, this contains all created Lobby elements.
Note: A page can be protected from editing. In that case there are two options available, copy the page or unlock for editing via the Configuration dialog you open with the Configuration (Cogwheel) button.
To add an element to the page, simply click on that element in the Element Browser.
Note: In the future it is planned to support drag and drop from the element browser, but has not yet been implemented.
When you add an element it will automatically be placed in a new group, at the bottom of the page. If you want the element in another group you can simply move that element to the group you want to place it in, then you can click the delete icon and delete that empty group.
If you want two elements to "stick together" place them inside the same group.
Use drag and drop to rearrange elements. If you want to rearrange a group with all its content, click and drag the groups header.
If you want to make the last element of the group to vary it's width(dynamic width) in order to fill the remaining space in the line within the group, drag it to the 'Dynamic Width Element' inside the group.

Figure 1: Flex Element Section
Note: elements will only grow in order to fill the space and it will not shrink less than its default width given to fill a given space.
Remove an element from the page is done by clicking the X icon next to its title. Clicking the Cogwheel icon will reveal a dialog where you can override its size, only on this lobby page.
If you want to change an element added to a lobby page clicking the Navigate icon next to the title will take you to the element designer with that element loaded in the designer.
Note: in the IEE it was possible to group elements in two dimensional groups (both horizontally and vertically). Now, in IFS Cloud, we can only arrange elements in the order we want them to appear and they will flow horizontally from left to right within the group. When the elements can't fit withing the row due to the width of the viewport they will then line break and keep on flowing from left to right on the row below. The groups will stack vertically and be placed on top of each other.
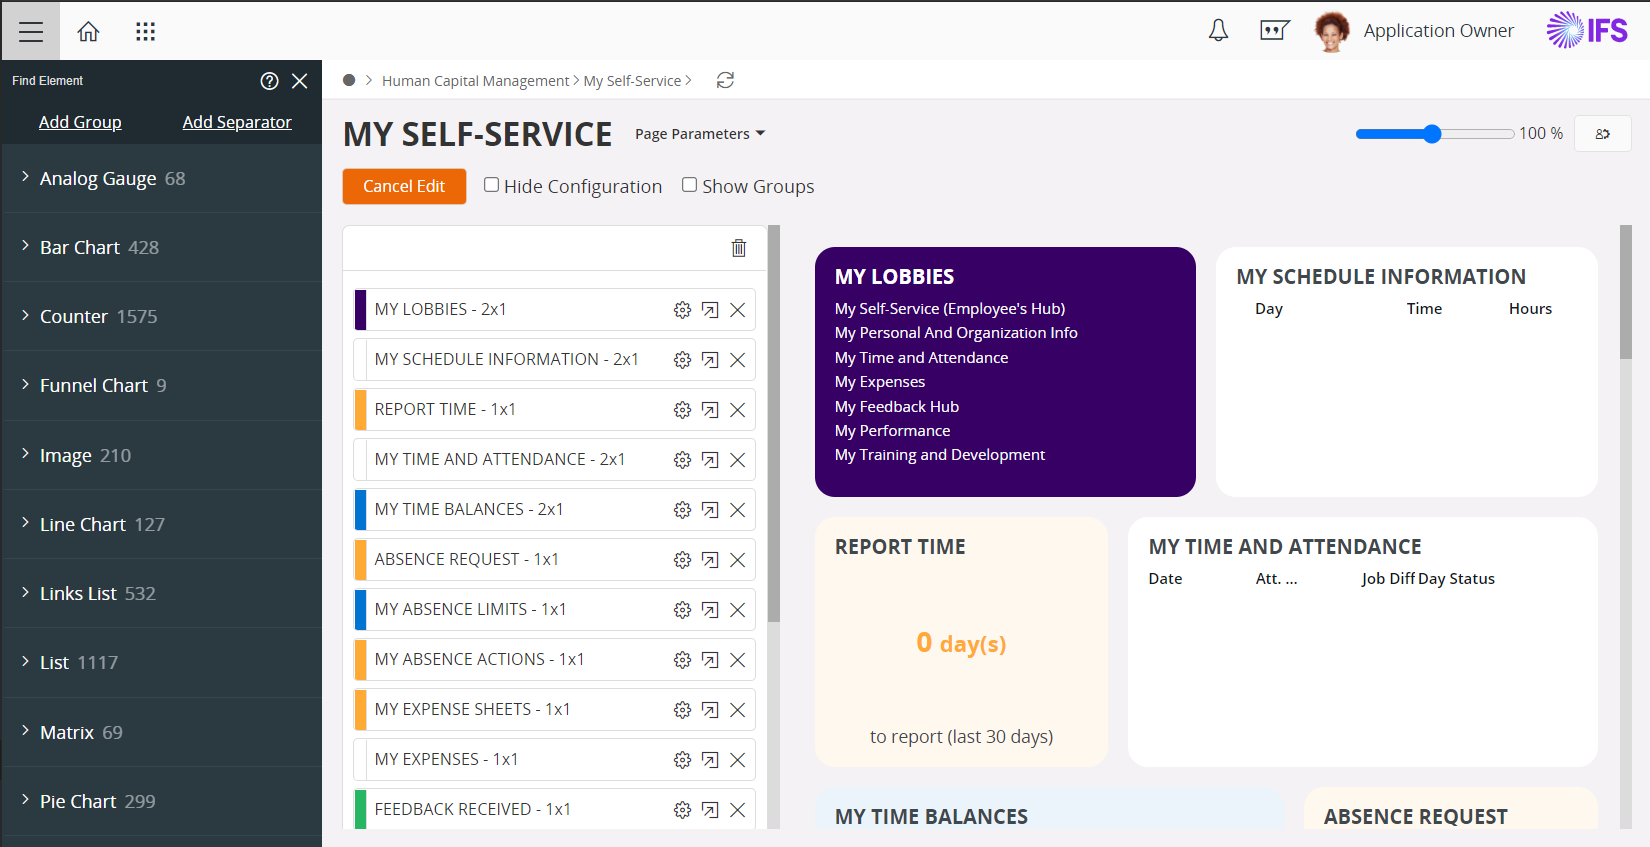
Figure 2: Lobby Page in edit mode
Page Property Configuration
Click the Cog Wheel button in the toolbar to change the properties of a page. This opens the Page Property Configuration dialog which contains three groups.
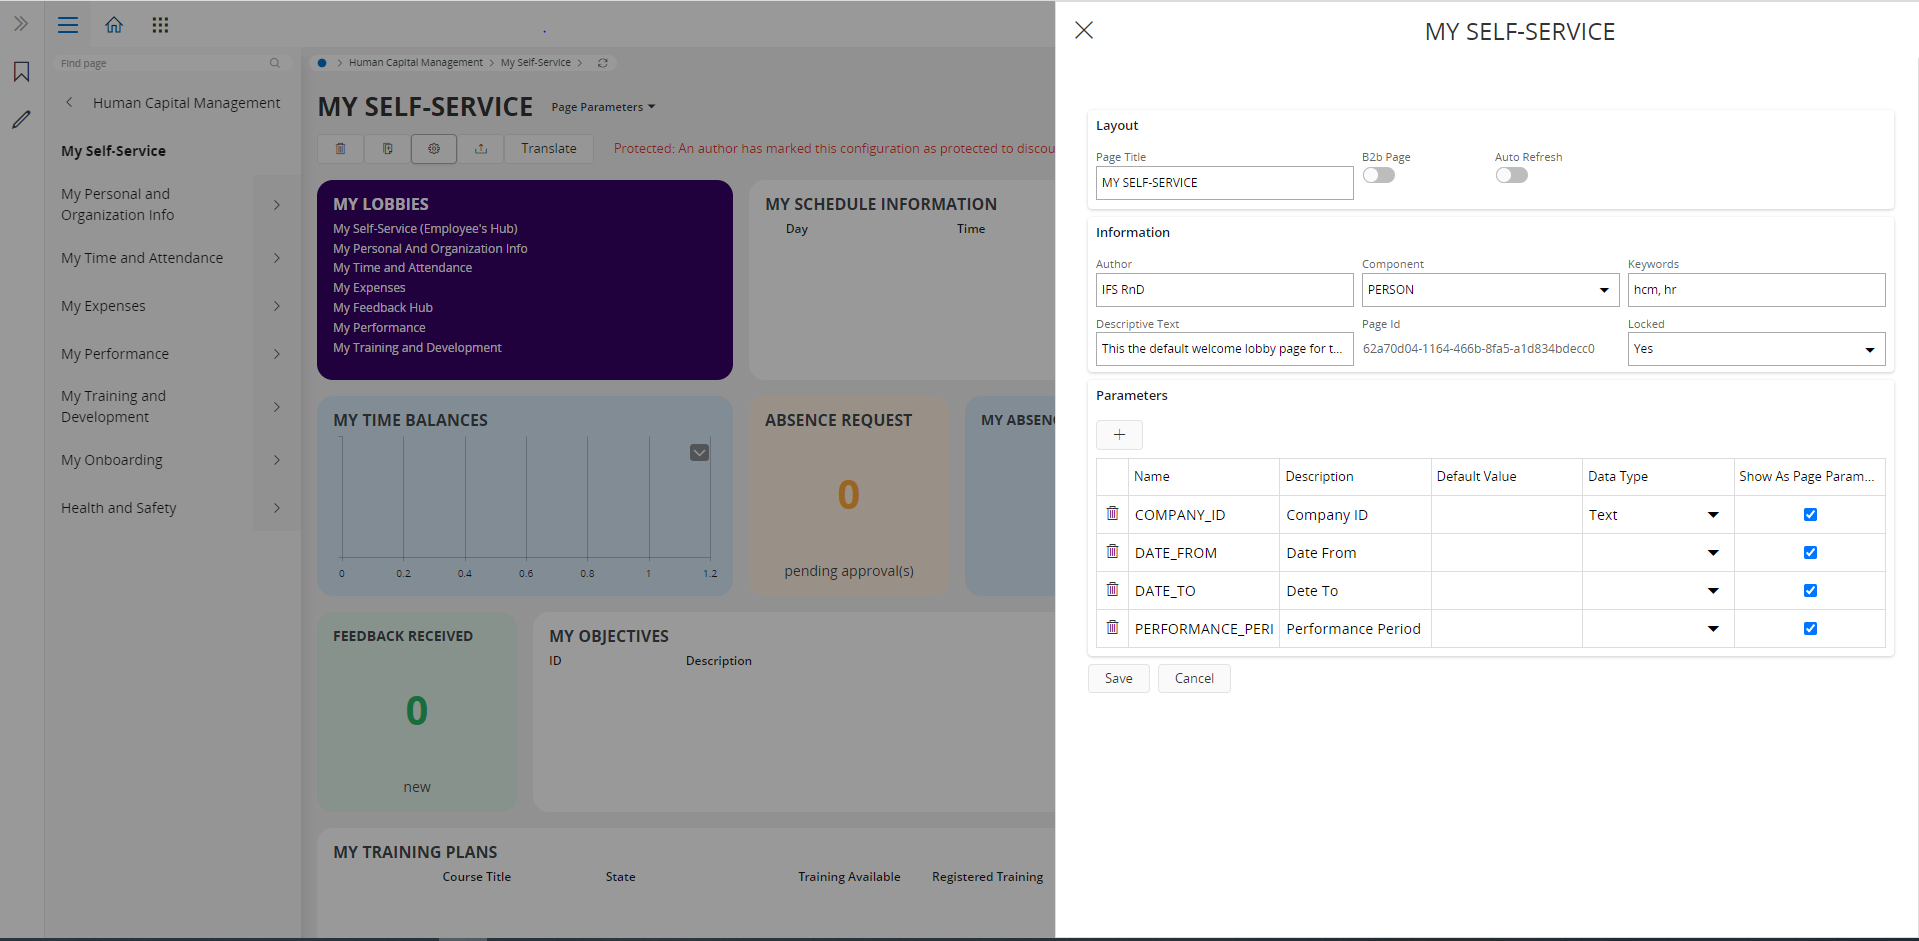
Figure 3: Config dialog in lobby page
- Layout: This is where you define Page title, Client Type and setting up auto refresh for you lobby.
- Page Parameters: It is possible to add parameters to use as variables for the content in elements. When the user is viewing the page, he/she can use the variables to filter on e.g. Company, Site etc., see Page Parameter. You can check/uncheck the 'Show As Page Parameter' checkbox to show/hide page parameters in the page. The page parameters can be used in Sql queries, titles and texts in an element, see Element Designer.
- Information: In this section you can see/modify the author of the page, define key words to make it easier to find the page in the Lobby Overview and write a text with additional information about the page. In addition you can see if the page is copied from another page. There is a link for the presentation object created for the page. Navigate to the following page Solution Manager/Security/Permission Sets/Presentation Object Grants where you can define the security settings for the page. Read more in Installation and Security. Once you have completed your configuration of a page use the Locked dropdown to protect the configuration from changes. If a page is locked for changes a warning is displayed in the header of the configuration dialog. In this warning there is a button , Edit Anyway, which you can use to continue to make configurations.
In the toolbar there is a translation button launches the translation tool. Read more about Translation.
Element Browser
The Element Browser displays all elements in the repository. There are different types of elements, e.g. Image, Counter, List etc. and elements are placed under these sections. Number of elements is displayed for each element type.
A section can be expanded and collapsed by clicking the group title.
The Element Browser has an option to search for all types of elements. To search for an element, type the search criteria in the search textbox. The search result will be shown instantly. The search functionality has the following search criteria:
- Search for the element's name
- Search for the element's title
- Search for the element's keywords
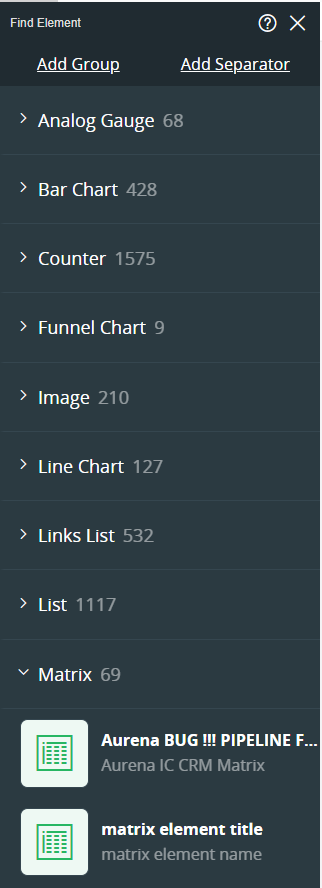
Figure 4: Element Browser
From the Element Browser you can do the following:
- Add element to page
- Add a Divider to the page
- Add empty group to the page.
Element Zoom
Click on the Fullscreen icon on an element and it will be expanded to full size. This is useful if you want to see details in the element. Another click on the icon will make the element be shown in its original size.
Element Navigate
A single click on the element will navigate to a corresponding IFS Cloud page and display related date or other location defined in the element. Use the back button to go back to the Lobby page.
Using Parameters
At the top of the page there is an dropdown list where all parameters applicable for the page are shown. In this list it is possible to change values for the parameters. Changing a value trigger a refresh of all elements that uses the parameter.
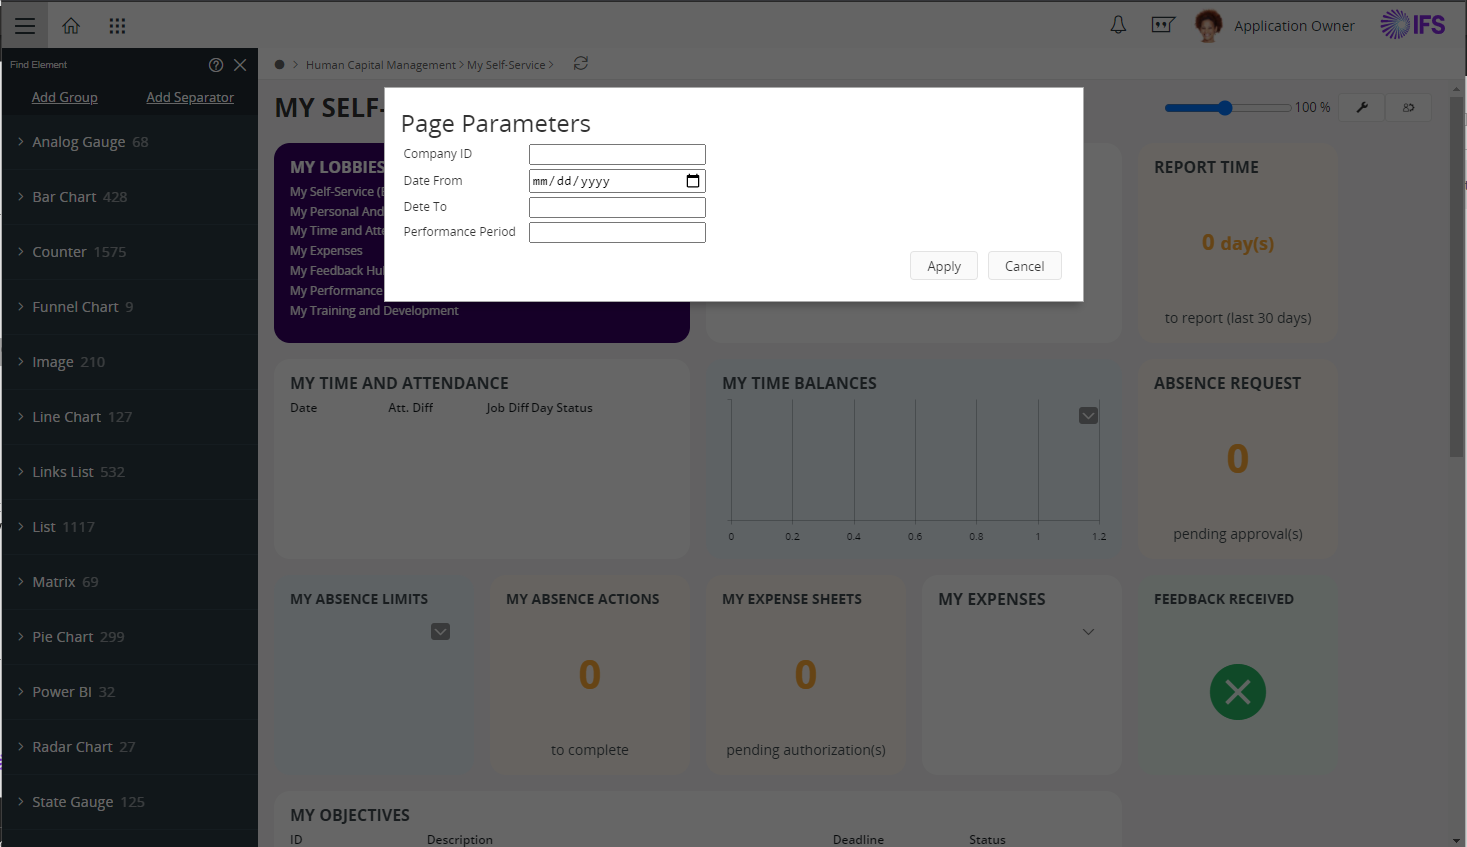
Each parameter is specified as a value of different data types ( text, number, boolean and date). When an end user enters data in to the page parameter, input control will be shown according to the data type set for the parameter.
Eg: Date picker for Date type
Export Pages
Exporting a page can be done in two ways.
- Full format - a full page including elements and data sources
- Zip archive - the structure above but zipped
The exported page xml in a folder tree and zip contains reference id's to data sources and elements but in the full format it contains all information
Solution Sets
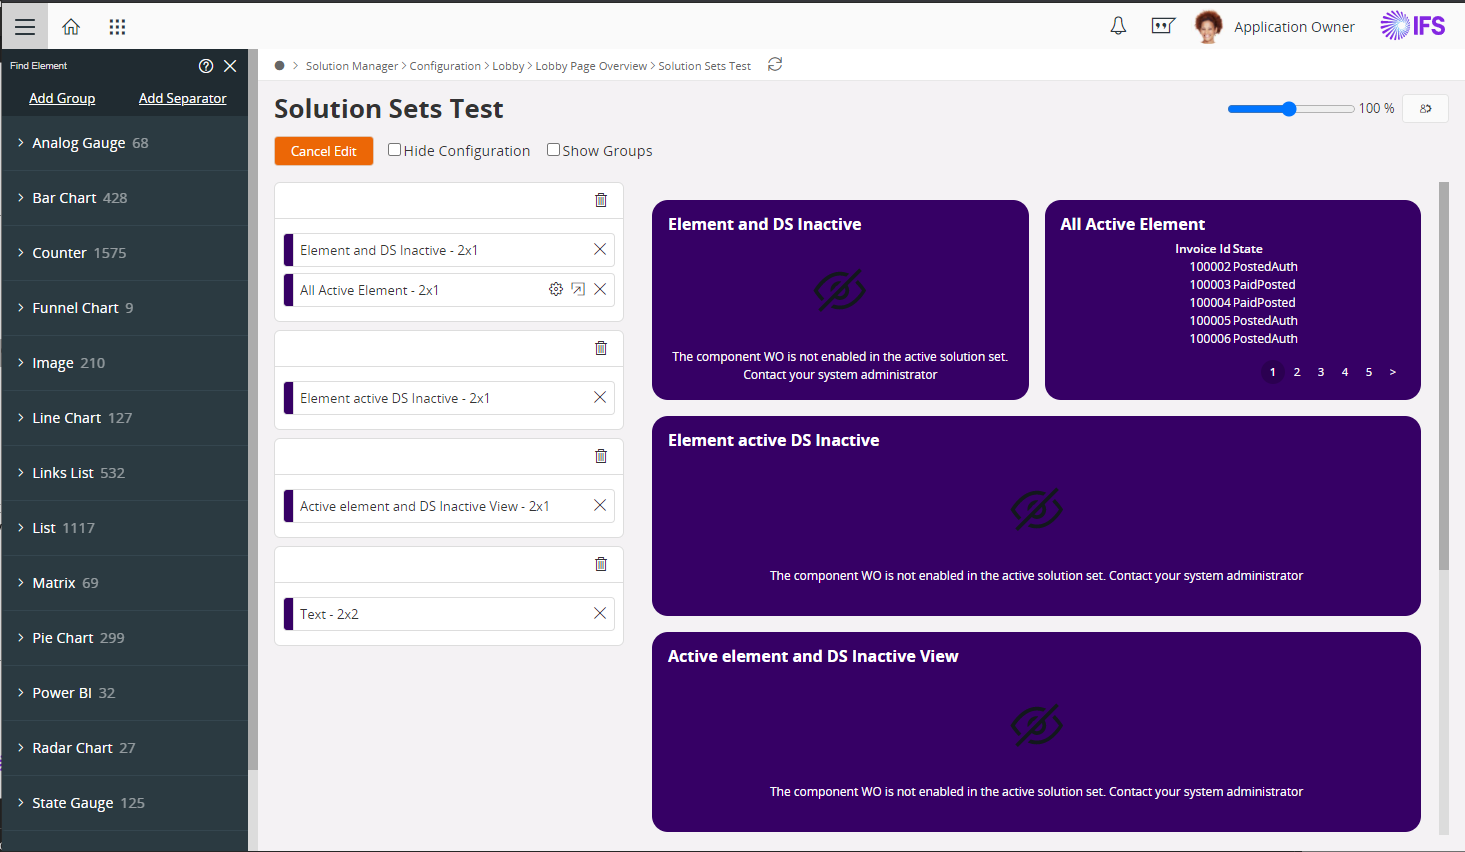
Installing IFS Cloud includes all technical components but only a subset of them are considered as active and able to use. This concept is called Solution Sets. We introduced an indication in lobby page designer mode to inform the user of the unavailability of lobby elements if inactive components are present.
When a lobby page is loaded
-
Lobby elements with inactive components
-
Lobby elements using data sources with inactive components
-
Lobby elements using data sources which uses views with inactive components
are not shown to the end user.
However, in the edit mode such elements will be visualized as in following image.
Event Driven Lobby Elements
Lobby elements within a page are now enabled with an event driven framework, which gives the capability of communicating with each other within a page. Previously, page parameters were the only way to give a user input to the lobby runtime. However with this feature the user will be able to populate a lobby element using data of another lobby element within the page.
Mainly this functionality consists of two parts:
- publisher
- subscriber.
Publisher
A lobby element that is capable of emitting certain event/s depending on the user interaction. Usually an event has an attached payload.
Eg: ContextChangedEvent, SubProcessSelectedEvent, RowDataEvent
Eg: A list element -> ROW_DATA (clicking on a row)

Payload: selected row
- These events are not configurable.
- One publisher can publish multiple types of events depending on the element type.
Available publishers:
- List
- Bar Chart
- Funnel Chart
- Pie Chart
- Matrix
Subscriber
A lobby element that responds to the event data sent by a publisher/s by filtering / redrawing /etc
- An element can subscribe to multiple publishers /events
- Self subscriptions are also possible.
- Default subscription to "Page parameters dialog"
Still the priority is given to page parameters.
The lobby page is initially loaded with page parameter values provided via the dialog (and defaults). After the user clicks on a publisher, the subscribers are loaded accordingly. If a page parameter value is changed, the whole page is reset with page parameter values.
Configuration
This functionality is built upon the data source parameters: the placeholders defined in the lobby data sources as $PLACEHOLDER$.
Previously, these parameters were collected and supplied to the page via Page parameters dialog in runtime. With this feature, those placeholders can be filled with an event coming from a publisher element at the runtime as well.
1. Data Source Configuration
Publisher Datasource:
Create the datasource as required. No change to the standard process.
Subscriber Data Source:
When it comes to subscriber element, data sources can be configured using the following placeholder ($PARAMETER_NAME$). The only difference is relevant column names of the publisher element should be added as parameters in the subscriber element’s where clause.
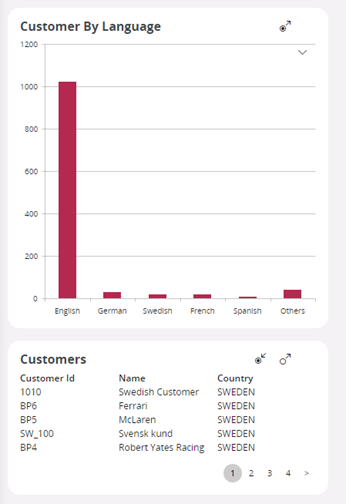
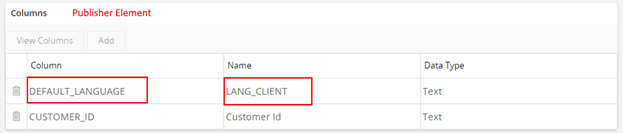
Here is an example. Let’s assume there is a data source which shows a list of customers who speaks a given language.
- Publisher Element Configuration of Data source.
- Subscriber Element Configuration of Data source.
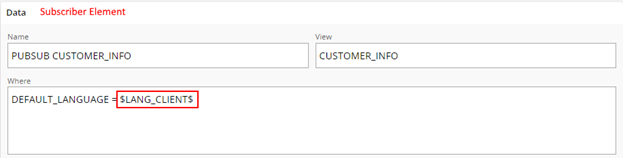
According to the above example LANG_CLIENT (alias) is the relevant publisher column name (DEFAULT_LANGUAGE can also be used). Once subscriber element is configured as above $LANG_CLIENT$ is considered as a page parameter.
User can set some default values in the page properties dialog (otherwise element is not loaded until user clicks on the relevant publisher) for the elements using it.
Note: Both SQL and Projection datasources are supported.
2. Element Configuration
Lobby element configuration process has not changed.
3. Lobby Page Configuration
Create the lobby page by adding required elements.
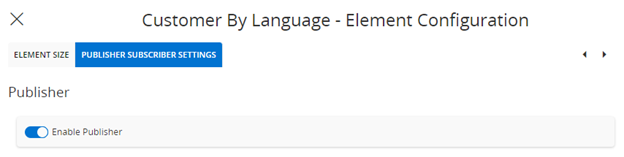
How to enable the publisher capability of a lobby element ?
-
Go to page edit mode.
-
Open element settings dialog.

-
Go to ‘PUBLISHER SUBSCRIBER SETTINGS’ tab.
-
Enable ‘Enable Publisher’ toggle in ‘Publisher’ section.
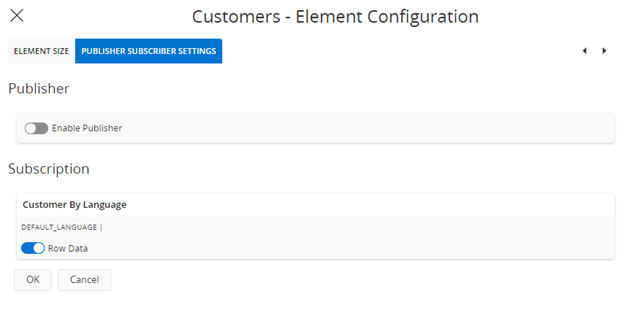
How to subscribe to an element ?
- Go to page edit mode.
- Open element settings dialog.
- Go to ‘PUBLISHER SUBSCRIBER SETTINGS’ tab.
- There will be a list of available publishers and their events in the ‘Subscription’ section.
- You can subscribe to events by toggling relevant toggle buttons.
How to identify whether the element is a publisher or subscriber in a lobby page at runtime ?
An icon is shown on top of each element if it is a publisher/ subscriber in order to identify easily. The icon deifinitions are given below:
- Publisher : Element is a publisher. Clicking on the element will emit configured event.

-
Active Publisher : Element is currently actively emitting an event .

-
Active Subscriber : Element is currently actively listening to an event from a publisher.

When it comes to an active subscriber, a card is shown when the icon is clicked. This card shows the parameters sent by the publisher for this subscriber element.

Example:
Following example shows a bar chart has been defined as a publisher and there is a list element which subscribes to the bar chart.
The lobby designer should consider creating a meaningful layout for the elements in a page that are connected with these publisher-subscriber associations.