EBR Preparations for Reporting & Crystal Integration
Considerations:
The Delivery Continuity feature is not supported when using Crystal Reports.
If Crystal Reports integration needs to be enabled after applying the EBR-related changes, refer to the Reverting Changes to Enable Crystal Reports Integration section.
Overview
IFS Cloud 25R2 introduces the Delivery Continuity feature, which is designed to minimize application downtime during deliveries. To enable this, the databases must be Oracle Edition-Based Redefinition (EBR) compliant, ensuring seamless online updates.
With Oracle EBR, database objects are categorized as either:
- Editionable – such as Views and Packages, which can have multiple versions across editions.
- Non-editionable – such as Tables and Materialized Views, which remain common to all editions.
Adopting EBR allows IFS to introduce schema changes or update application logic without significant downtime, making systems more robust and flexible.
In the context of Reporting, this requires adjustments to RDFs (Report Definition Files) to comply with EBR standards.
For a full introduction to EBR and its concepts, see the Oracle Edition-Based Redefinition (EBR) in IFS Cloud.
EBR Preparations for Reporting
Required Adjustments to Manual RDFs
To align RDFs with EBR requirements and decouple them from deprecated components:
- Identify the affected code blocks
Search for Report_SYS.Should_Generate_Result_Set('&VIEW') in your RDFs to locate the relevant logic.
- Remove data insertions, updations and deletions (DML) into
_RPTsuffixed tables
Removed the located Report_SYS.Should_Generate_Result_Set method call in the rdf and Remove the entire code line including variable declaration, and initialization. Carefully remove only _RPT specific insertions. If additional custom logic is present, retain only what is needed. These tables were only used for Crystal Report integrations and should no longer be populated.
Remove any code blocks which are inserting,updating or deleting data into _RPT suffixed tables. These data insertions could be inside IF conditions as well.
Once all specified code blocks have been removed, the changes must be committed to the relevant source control repositories.
- Product-specific data handling
If your product requires data storage outside reporting needs, create separate tables following the General EBR Guidelines without using report specific _RPT tables. Do not use _RPT suffixes for product-specific tables to avoid conflicts.
Required Adjustments to Model based RDFs
Model-generated RDFs (RDFs generated directly from a marble model without manual modifications) require the following adjustments:
- Regeneration from the Model: The RDF must be regenerated from the source marble model using Developer Studio. This ensures that the RDF reflects the latest schema and logic updates defined in the model.
- Source Control: Once regenerated, the RDF files must be committed to the relevant source control repositories.
EBR-Compliant Modifications to Report Tables (_RPT)
When modifying an existing report table, such as changing a column size or data type, the modification must be implemented in an EBR-compliant manner.
General considerations
The following considerations apply to both manual and model-based RDFs:
- The full report table name must not exceed 30 characters.
- Do not modify the attributes of an existing column directly. Instead, create a new column with the required attributes and add it to the table definition.
- A specific
_RPTtable must not be shared by multiple reports unless the reports use the same table structure, including the number of columns, column sizes, and data types. - Do not delete or obsolete columns from an
_RPTtable or its related Editioning Views (EVs), as this can affect Operational Reporting functionality. - If an RPV View already exists in the RDF, retain it. The
_REPview should point to the RPV, and the RPV should point to the EV. Removing the RPV can result in the loss of Row-Level Security (RLS) benefits. - Do not remove or obsolete the existing
_RPTtable after implementing the EBR-compatible changes unless it has been verified that there are no direct or indirect references to the table. - If data must be copied or moved as part of the modification, use an appropriate DML source in accordance with the General EBR Guidelines.
- When the target
_RPTtable might not exist in the database for some releases or Service Updates, the DML source must check for the table's existence before copying or moving data. - If the
_RPTtable was previously created through a.crefile, modifications to its definition must be handled through Database Change Models. - For FND (Framework) components, use the same
#methodsas the examples, but use theInstallation_SYSdatabase package instead ofDatabase_SYS.
Manual RDFs
For manual RDFs, use the following steps when modifying an existing _RPT table.
Step 1: Create a new _RTB table
Change the existing _RPT table name in the RDF to include the _RTB suffix.
For example:
| Existing report table | New report table |
|---|---|
LICENSE_METRIC_RPT | LICENSE_METRIC_RPT_RTB |
The new table should contain the required column definition. For example, the following changes the DESCRIPTION column from VARCHAR2(200) to VARCHAR2(600) and introduces DESCRIPTION_$1 as the new column:
PROMPT Creating report table LICENSE_METRIC_RPT_RTB
DECLARE
   columns_ Installation_SYS.ColumnTabType;
   table_name_ VARCHAR2(30) := 'LICENSE_METRIC_RPT_RTB';
BEGIN
   Database_SYS.Reset_Column_Table#(columns_);
   Database_SYS.Set_Table_Column#(columns_, 'RESULT_KEY', 'NUMBER', 'N');
   Database_SYS.Set_Table_Column#(columns_, 'ROW_NO', 'NUMBER', 'N');
   Database_SYS.Set_Table_Column#(columns_, 'PARENT_ROW_NO', 'NUMBER', 'N');
   Database_SYS.Set_Table_Column#(columns_, 'ROWVERSION', 'NUMBER', 'Y');
   Database_SYS.Set_Table_Column#(columns_, 'CUSTOMER_ID', 'VARCHAR2(200)', 'Y');
   Database_SYS.Set_Table_Column#(columns_, 'CUSTOMER_NAME', 'VARCHAR2(200)', 'Y');
   Database_SYS.Set_Table_Column#(columns_, 'INSTALLATION_ID', 'VARCHAR2(200)', 'Y');
   Database_SYS.Set_Table_Column#(columns_, 'TAKEN_AT', 'DATE', 'Y');
   Database_SYS.Set_Table_Column#(columns_, 'METRIC', 'VARCHAR2(30)', 'Y');
   Database_SYS.Set_Table_Column#(columns_, 'DESCRIPTION_$1', 'VARCHAR2(600)', 'Y');
   Database_SYS.Set_Table_Column#(columns_, 'VALUE', 'VARCHAR2(4000)', 'Y');
   Database_SYS.Create_Or_Extend_Table#(table_name_, columns_,
      '&IFSAPP_REPORT_DATA', NULL, TRUE);
END;
Step 2: Pre-create the new table through a DDL source
The new _RTB table must be pre-created through a DDL source using the existing table structure.
For example:
@CodeRegistration RegistrationName
DECLARE
   columns_ Installation_SYS.ColumnTabType;
   table_name_ VARCHAR2(30) := 'LICENSE_METRIC_RPT_RTB';
BEGIN
   Database_SYS.Reset_Column_Table#(columns_);
   Database_SYS.Set_Table_Column#(columns_, 'RESULT_KEY', 'NUMBER', 'N');
   Database_SYS.Set_Table_Column#(columns_, 'ROW_NO', 'NUMBER', 'N');
   Database_SYS.Set_Table_Column#(columns_, 'PARENT_ROW_NO', 'NUMBER', 'N');
   Database_SYS.Set_Table_Column#(columns_, 'ROWVERSION', 'NUMBER', 'Y');
   Database_SYS.Set_Table_Column#(columns_, 'CUSTOMER_ID', 'VARCHAR2(200)', 'Y');
   Database_SYS.Set_Table_Column#(columns_, 'CUSTOMER_NAME', 'VARCHAR2(200)', 'Y');
   Database_SYS.Set_Table_Column#(columns_, 'INSTALLATION_ID', 'VARCHAR2(200)', 'Y');
   Database_SYS.Set_Table_Column#(columns_, 'TAKEN_AT', 'DATE', 'Y');
   Database_SYS.Set_Table_Column#(columns_, 'METRIC', 'VARCHAR2(30)', 'Y');
   Database_SYS.Set_Table_Column#(columns_, 'DESCRIPTION', 'VARCHAR2(200)', 'Y');
   Database_SYS.Set_Table_Column#(columns_, 'VALUE', 'VARCHAR2(4000)', 'Y');
   Database_SYS.Create_Or_Extend_Table#(table_name_, columns_,
      '&IFSAPP_REPORT_DATA', NULL, TRUE);
END;
The important distinction is that the DDL source creates the new physical table using the existing structure, while the generated RDF can subsequently use the modified structure.
Note: The current code generator does not automatically generate the required
.ddlsource. The required DDL source must therefore be created manually until automated support is available.
Step 3: Create an Editioning View
Create a new Oracle Editioning View pointing to the _RTB table.
For example:
PROMPT Creating report editioning view LICENSE_METRIC_DATA_RPT

CREATE OR REPLACE EDITIONING VIEW LICENSE_METRIC_DATA_RPT
AS
SELECT
   result_key result_key,
   row_no row_no,
   parent_row_no parent_row_no,
   rowversion rowversion,
   customer_id customer_id,
   customer_name customer_name,
   installation_id installation_id,
   taken_at taken_at,
   metric metric,
   description_$1 description,
   value value
FROM LICENSE_METRIC_RPT_RTB;
The EV should explicitly select the required columns. Do not use SELECT \*.
Step 4: Update the _REP view
Update the _REP view to point to the EV created in the previous step.
For example:
CREATE OR REPLACE VIEW LICENSE_METRIC_REP AS
SELECT RESULT_KEY,
       ROW_NO,
       PARENT_ROW_NO,
       ROWVERSION,
       CUSTOMER_ID,
       CUSTOMER_NAME,
       INSTALLATION_ID,
       TAKEN_AT,
       METRIC,
       DESCRIPTION,
       DESCRIPTION_$1,
       VALUE
FROM LICENSE_METRIC_DATA_RPT t
WHERE EXISTS (
   SELECT 1
   FROM allowed_report a
   WHERE a.result_key = t.result_key
)
WITH READ ONLY;
If an RPV already exists, retain the existing RPV and ensure that the relationship remains:
The guideline specifically recommends retaining the RPV where it is already present because of its RLS benefits.
Step 5: Update references and add the @OnlineCompatible comment
Update other RDF references to the previous table and database objects as required.
Add the following comment to the RDF comments section:
This identifies RDFs that have been transitioned to an EBR-compatible implementation and can subsequently be used by tooling.
Model-based RDFs
For model-based RDFs, the same overall approach applies, but the changes are made through the report model.
Step 1: Enable EBR-compatible code generation
Add the OnlineCompatible code-generation property to the report model:
This enables the code generator to generate EBR-compatible code for the report model.
Step 2: Specify the real database column name
For the column being modified, add the DbRealColumnName attribute.
For example, when changing the DESCRIPTION column from VARCHAR2(200) to VARCHAR2(600):
The guideline uses this attribute to tell the code generator that the modified logical column corresponds to the new physical database column.
Step 3: Generate the RDF
Generate the code from the report model using Developer Studio. This generates the RDF and the corresponding table/EV code.
The generated table code follows the same _RTB approach as the manual RDF implementation.
Step 4: Pre-create the _RTB table
Make sure the generated _RTB table is pre-created through a DDL source using the existing table structure.
The generated EV will then reference the new _RTB table, for example:
CREATE OR REPLACE EDITIONING VIEW LICENSE_METRIC_DATA_RPT
AS
SELECT
   result_key result_key,
   row_no row_no,
   parent_row_no parent_row_no,
   rowversion rowversion,
   customer_id customer_id,
   customer_name customer_name,
   installation_id installation_id,
   taken_at taken_at,
   metric metric,
   description_$1 description,
   value value
FROM LICENSE_METRIC_RPT_RTB;
Step 5: Validate the generated RDF
Verify that:
- The intended table and column changes are reflected in the generated RDF.
- References to the previous
_RPTtable have been replaced where required. - The generated RDF references the new
_RTBtable and EV. - The
@OnlineCompatiblecomment is present.
Note: The current code generator does not automatically generate the required
.ddlsource. Until this is supported, the required DDL source and PL/SQL code must be created manually in an EBR-compatible manner.
Testing RDFs for EBR (Delivery Continuity Focus)
Testing ensures that RDFs behave correctly across editions and the changes are isolated to the new edition.
For Manually Created RDFs
- Step 1: Make a visible change in order to Test the changes between EBR editions
Example: update a column comment in the RDF so it reflects differently in the IFS Cloud Report UI.


- Validation
In the Report Parameters page → the change should appear only in the new edition. The old edition should remain unchanged.
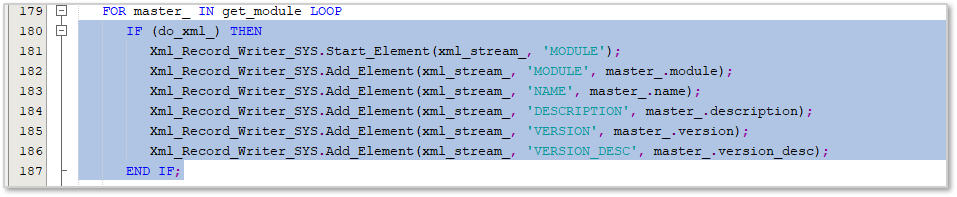
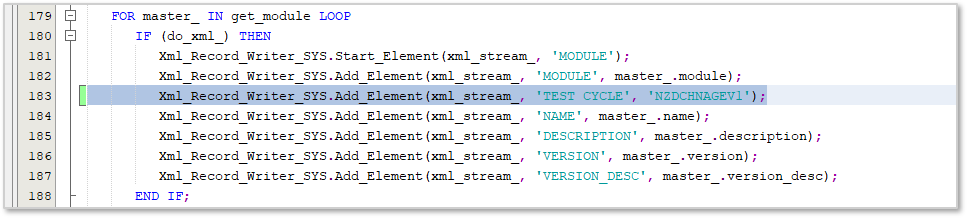
- Step 2: Modify XML generation code
Example: add a static XML element (TEST_CYCLE = NZDCHANGEV1) or remove an existing element.
- Validation
Generate and download XML via the Report Data Ordering process in IFS Cloud. Confirm that the new edition’s XML reflects the change, while the old edition’s XML remains unaffected.

For Model-Based RDFs
Step 1: Add a new attribute to a report aggregate and regenerate the code.
Step 2: Inspect the RDF to confirm correct XML element creation.
- Validation
Ensure report ordering, previewing, and printing work correctly across both editions. The new edition should reflect the intended changes without affecting the old edition.
Important Notes
- You have to ensure that no new data is inserted, updated or deleted from
_RPTsuffixed tables from RDFs. Validate this as part of your RDF compliance checks. - If temporary or custom tables are used in RDFs, handle them in accordance with the General EBR Guidelines.
- for any customized customer specific reports a script should be written to disable to set
do_result_set_ = FALSE.
Key Takeaways
- For modifications to existing
_RPTtable definitions, follow the EBR-compliant report table modification procedure above. Do not modify existing_RPTcolumns directly. - Remove
_RPTinsertions, updations and deletions to_RPTsuffixed tables and adjust RDF logic accordingly. - Follow the instructions provided above in the Testing RDFs for EBR (NZD Focus) section to ensure changes only affect new edition.
- For specific needs (outside to reporting framework) create separate tables and follow the general EBR guidelines (Do not use
_RPTas a suffix in the new table names).
Reverting Changes to enable Crystal Reports Integration
If the required modifications have already been applied and Crystal Reports functionality needs to be enabled, this section provides an overview of the reversion process, which is only applicable if the RDFs were modified according to NZD or EBR guidelines
- To enable Crystal Reports integration, revert removal of code blocks which are inserting, updating or deleting data into _RPT suffixed tables for both Manual RDFs and Model-based RDFs.
- Once the changes are completed ensure schema and logic changes are correctly reflected. Then test and commit to the relevant source control repositories.
| Manual RDFs | Model-based RDFs |
|---|---|
| Undo RDF changes introduced for EBR compliance of reports. Revert removal of code blocks which are inserting,updating or deleting data into _RPT suffixed tables. | Install IFS Developer Studio to ensure RDF code generation to enable Crystal Reports integration. Open the relevant report model from developer studio and Regenerate RDF. Commit the regenerated .rdf files to source control repositories after validation. |
| Validation | Validation |
| Set appropriate toggles for "Generate XML" and"Generate Result Set" in Report Definition page according to your business needs. Order, and Print or Preview the Operational Reports from IFS Cloud Web. Test the changes in an Oracle EBR editioning enabled environment to make sure Reports are working as expected. | Test the changes in an Oracle EBR editioning enabled environment then validate Crystal Reports integration to make sure it is working as expected. |
Editioning Strategy Enable Methods for Data Removal
A convenience method has been introduced to simplify the staging of Report metadata tables. This method enables all relevant metadata tables to be staged through a single call, eliminating the need to invoke multiple individual staging methods, which is particularly useful when preparing to remove Report Definitions.
Usage Scenario: Removing Report Definitions
When removing Report Definitions, this method can be used to stage the necessary metadata tables as part of the preparation process. It replaces the need to manually call multiple staging methods.