Create a simple IFS Aurena Client page
This section describes how to set up the development environment, create a projection and client, to be able to have a basic page up and running, and accessible in the navigator.
Prerequisites
Tools and accounts
- Access to a Subversion account
User knowledge and training
- Basic skills in the Marble language.
- Good experience in PL/SQL.
- Basic knowledge about the Subversion
Setting up the development environment (Developer Studio)
- Go to the EnvironmentWeb.
- Select a local environment to use as base for the development (for example DEV LKP for Linköping).
- In the Tools menu, click Setup Dev Tools.
- In the Setup Development Tools start window, enter your password, then click Connect.
- Select a target folder where the development environment saves the the source code.
a. It is possible to checkout source code for components. Make sure to select the check box for the component
fndbas. - Select Install Developer Studio, then click Finish.
- Open Developer Studio to start the development.
Creating a project
A project needs to be created before creating any projection and client files. It is recommended to have a build home location defined for the project, to avoid the need to import all the components (for example entity models) into the local project. The environment then uses references to the components from the build home location.
- Open Developer Studio.
- Select File, or Right-click in the Projects tab, then select New Project.
- Select IFS R&D Core Project, then click Next.
- Type a name and location for the project. For example,
C:\SVN\Aurena\workspace\fndbas. - Select a Build home location as a reference to other components. For example,
\\lkppde1695\UXX_WAVE_Dev_LKP\Build\Home. - Select the check box Use Build home Target Version, then click Next.
- In Technologies, click Next.
- Add a database. It is recommended to use the database related to the selected Build Home location. For example,
jdbc:oracle:thin:@//LKPPDE1695:1521/S1695. - Click Finish.
Creating a projection
Create the projection
In Developer Studio in the components folder, there is a component called fndbas. Before the projection is created, there is nothing available in this component.
- In Developer Studio, right-click the component
fndbas, and select New > Projection model. - In the New file window, add a name for the projection, and then click Finish.
a. In this example, the created projection uses
EAPDemoas the model name. b. The projection is created, and is set with basic settings. c. The projection file is empty and without content, except for the areas MAIN ENTRY POINTS and ENTITY DETAILS. d. The projection file is stored in the folder Client inside the componentfndbas.
Add content to the projection
The first content to add to the projection is an entityset, which is a type of data source, or the entry point names for the OData entity access.
Entitysets are based on entities, and in this example the entityset is called CustomerOrders, and is based on the entity CustomerOrder which is already available in the build home. Refer to Figur 1 for the relation between the entityset and the entity.
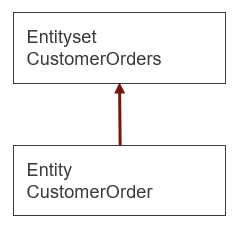
Figure 1 - Relation Entityset - Entity
- In the projection file under the area MAIN ENTRY POINTS, create the entityset
CustomerOrdersand base it on the entityCustomerOrder. a. If the entity is located in another component, insert a Dynamic Annotation before the entityset (@DynamicComponentDependency ORDER)
//Dynamic dependency
@DynamicComponentDependency ORDER
entityset CustomerOrders for CustomerOrder;
- Deploy the projection file.
projection EAPDemo; component FNDBAS; layer Core; description "Example of creating a projection"; category Users;  ------------------------- MAIN ENTRY POINTS --------------------------
//Dynamic dependency
@DynamicComponentDependency ORDER
entityset CustomerOrders for CustomerOrder;
 ------------------------ ENTITY DETAILS ------------------------------
Example code - Projection file
Set permissions (grant the projection)
Developers need to grant a created projection, to avoid errors when testing it inside IFS Cloud.
- In Developer Studio, open the Execute command window, and run the grant script. a. Right-click DataBase > Execute Command.... See Figure 2. b. Select Window > IDE Tools > Palette in the top menu, and expand Reports and Utilties. c. Double-click Grant Permission for projection. d. Insert the projection name in the script. e. Run Execute PLSQL Command in the SQL Command window.
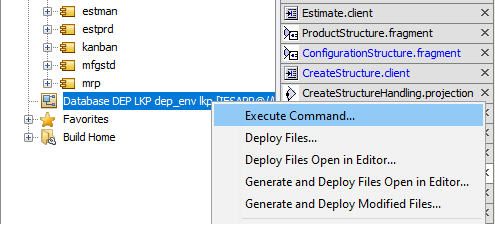
Figure 2 - Execute Command
    BEGIN
        Fnd_Projection_Grant_API.Grant_All('EAPDemo','IFSAPP_FULL');
        COMMIT;
    END;
Test the projection
The entityset in the projection can be checked using a URL, where the last parts in the URL consist of the name of the projection, the entityset name, and the query parameters. The domain (server and port) differs for the developer depending on location.
Various operations can be done using the OData query parameters, such as filter, order the data, select a few attributes from the entityset, and get the top numbers of a search.
//General url format
https://<server>:<port>/main/ifsapplications/projection/v1/<ProjectionName>.svc/<Entityset>?<QueryParams>

//Example URL
https://cmbpde1762.corpnet.ifsworld.com:58080/main/ifsapplications/projection/v1/EAPDemo.svc/CustomerOrders
- Go to https://cmbpde1762.corpnet.ifsworld.com:58080/main/ifsapplications/projection/v1/EAPDemo.svc/CustomerOrders
- Log in with the credentials
alain/alain. - Add
?$top=10to the end of the URL to restrict the number of records displayed, and refresh the browser. a. The projection is now available with an entityset calledCustomerOrders, and some other deployed content created for the projection. b. The data is accessed from the URL, and the top 10 records of the entitysetCustomerOrdersare displayed in XML format. - Continue to Creating a client to be able to access the same data from the Aurena client. At the moment, nothing is created related to the client.
Creating a client
Create the client
- In Developer studio, expand the component
fndbas. The created projection is now available here. - Right-click the component
fndbas, and select New > Client model. - In the New file window, add a name for the client, and then click Finish.
a. In this example, the created client uses
EAPDemo.clientas the name. It is not necessary to use the same name for the projection and the client, since the projection can have a mapping of one to many. NOTE! If it's not the same name, insert a projection referenceprojection <Projectionname>;below the layer declaration at the top of the client file. b. The client is created, and is set with basic settings. c. The client file is empty and without content, except for the areas MAIN PAGES, COMMANDS and VISUAL COMPONENTS. NAVIGATOR ENTRIES - This is the area where the navigator entries are defined that is implemented in the client. MAIN PAGE - This is the area where the pages are defined that is implemented in the client. VISUAL COMPONENTS - This area is where the visual components are created, like lists, groups, selector, and all other visual content. The idea is to define the visual components here separately, and reuse them inside the pages. COMMANDS - This is the area where commands are defined used behind visible buttons in the interface. d. The client file is stored in the folder Client inside the componentfndbas.
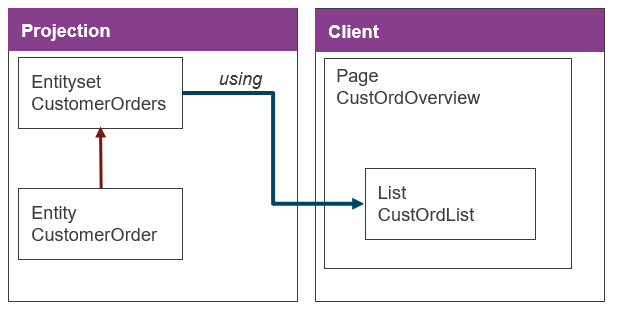
Figure 3 - Relation Projection - Client
Add content to the client
In the example the entityset CustomOrders based on the entity CustomOrder is created for the projection. Regarding the client, an overview page CustOrdOverview containing a list CustOrdList is created, which is populated with the entityset CustomerOrders. Fields are used to get the data, and present the results in columns.
Refer to Figure 3 for the relation between the projection and the client.
- In the client file under the area VISUAL COMPONENTS, create the list
CustOrdList, and base it on the entityCustomerOrder. a. All elements defined in the list must be attributes from the entityCustomerOrder. - Add a field called
field OrderNoto the listCustOrdList. a. In all places where a field is defined, data is presented. - Add more fields to the list
CustOrdList, as shown in the example code.
client EAPDemo;
component FNDBAS;
layer Core;
------------------------- NAVIGATOR ENTRIES --------------------------

------------------------- MAIN PAGES --------------------------

------------------------- COMMANDS ----------------------------

------------------------- VISUAL COMPONENTS -------------------
//Dynamic dependency
@DynamicComponentDependency ORDER
list CustOrdList for CustomerOrder {

    field OrderNo;
    field WantedDeliveryDate;
    field PrepaymentApproved;
    field StagedBilling;
    field PrintDeliveredLines;
    field NoteId;
    field ObjState;
    field PreAccountingId;
}
Example code - Client file
Add a page to the client
- In the client file under the area MAIN PAGES, create a page with the name
CustOrdOverview. - Add a label for the page with the text
Custom Orders.
page CustOrdOverview {

    label = "Customer Orders";
}
-
Add the list
CustOrdListwith the entityset ´CustomerOrdersto the page. The entitysetCustomerOrderscan populate the listCustOrdList` in two ways:- Alternative 1, adding it directly to the list with
list CustOrdList using CustomerOrders; - Alternative 2, adding the page with
page CustOrdOverview using CustomerOrders. All components inside the page are based on the same entity, and use the entityset as the data source. - Deploy the client file.
- Alternative 1, adding it directly to the list with
------------------------- MAIN PAGES --------------------------
page CustOrdOverview {

    label = "Customer Orders";

//Dynamic dependency
@DynamicComponentDependency ORDER
list CustOrdList using CustomerOrders;
}
Example code - Alternative 1, adding the data source to the list
------------------------- MAIN PAGES --------------------------
//Dynamic dependency
@DynamicComponentDependency ORDER
page CustOrdOverview using CustomerOrders {

    label = "Customer Orders";
    list CustOrdList;
}
Example code - Alternative 2, adding the data source to the page
client EAPDemo; component FNDBAS; layer Core; ------------------------- NAVIGATOR ENTRIES --------------------------
------------------------- MAIN PAGES --------------------------
//Dynamic dependency
@DynamicComponentDependency ORDER
page CustOrdOverview using CustomerOrders {

    label = "Customer Orders";
    list CustOrdList;
}
------------------------- COMMANDS ----------------------------  ------------------------- VISUAL COMPONENTS ------------------- list CustOrdList for CustomerOrder {      field OrderNo;     field WantedDeliveryDate;     field PrepaymentApproved;     field StagedBilling;     field PrintDeliveredLines;     field NoteId;     field ObjState;     field PreAccountingId; }
Example code - Client file with added page
Test the client file
The result of the client can be checked using a URL, where the last parts in the URL consist of the name of the client and the page.
//General url format
https://<server>:<port>/main/ifsapplications/web/page/<ClientFilename>/<PageName>

//Example URL
https://cmbpde1762.corpnet.ifsworld.com:58080/main/ifsapplications/web/page/EAPDemo/CustOrdOverview
- Go to the test site for
CustOrdOverview: https://cmbpde1762.corpnet.ifsworld.com:58080/main/ifsapplications/web/page/EAPDemo/CustOrdOverview - Log in with the credentials
alain/alain.
The page is displayed with the defined list and various functions, such as filtering, sorting,and hiding or showing the columns.
Add the page to the navigator
- In the client file under the area NAVIGATOR ENTRIES, define a toplevel navigator entry
EAPDemo. a. Define an index of10to the entry, because this is a toplevel entry that shows in the navigator. - Add a label with the text "EAP Demo Pages" inside the entry.
- Add sub-entry
CustOrdOverview. - Add a label with the text "Customer Orders" inside the sub-entry.
- Define the page
CustOrdOverviewin the sub-entryCustOrdOverview. - Deploy the client file. a. When the client file deploys, the entries are saved in the navigator table.
- Go to the test site for
CustOrdOverview: https://cmbpde1762.corpnet.ifsworld.com:58080/main/ifsapplications/web/page/EAPDemo/CustOrdOverview a. When the client loads the navigator, theCustomer Orderspage is available from the navigator. See Figure 4.
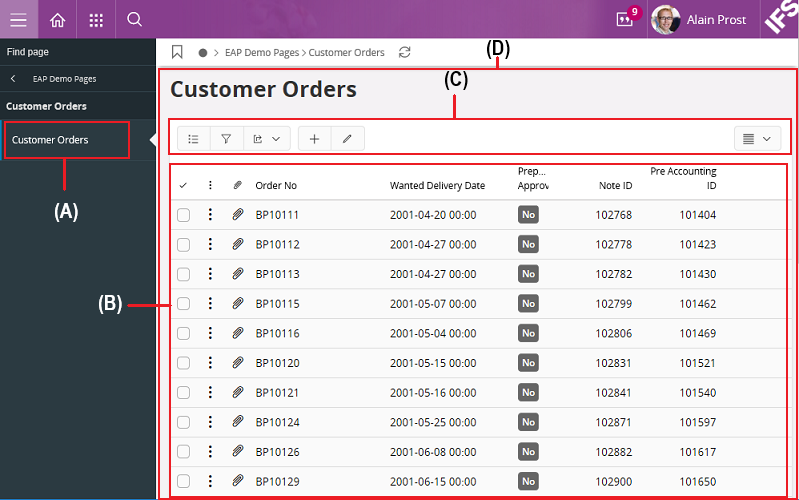
Figure 4 - Final result in client
(A) - Navigator
This is the Customer Orders page available from the navigator.
(B) - List
The list CustOrdList is populated by the entityset CustomerOrders. The fields OrderNo, WantedDeliveryDate, PrepaymentApproved, NoteId and PreAccountingId for the list CustOrdList shown in this example as columns (more fields are available for the list).
(C) - Functions
Various functions for the defined list CustOrdList, such as filtering, sorting, and hiding or showing the columns.
(D) - Page
The Customer Orders page with all the content.
------------------------- NAVIGATOR ENTRIES --------------------------
navigator {
    entry EAPDemo toplevel at index 10 {
        label = "EAP Demo Pages";
        entry CustOrdOverview;
    }
    entry CustOrdOverview {
        label = "Customer Orders";
        @DynamicComponentDependency ORDER
        page CustOrdOverview;
    }
}
Example code - Client file with added navigator
client EAPDemo;
component FNDBAS;
layer Core;
------------------------- NAVIGATOR ENTRIES --------------------------
navigator {

    entry EAPDemo toplevel at index 10 {
        label = "EAP Demo Pages";
        entry CustOrdOverview;
    }
    entry CustOrdOverview {
        label = "Customer Orders";
        @DynamicComponentDependency ORDER
        page CustOrdOverview;
    }
}
------------------------- MAIN PAGES --------------------------
page CustOrdOverview using CustomerOrders {
    label = "Customer Orders";
    list CustOrdList;
}

------------------------- COMMANDS ----------------------------

------------------------- VISUAL COMPONENTS -------------------
list CustOrdList for CustomerOrder {
    field OrderNo;
    field WantedDeliveryDate;
    field PrepaymentApproved;
    field StagedBilling;
    field PrintDeliveredLines;
    field NoteId;
    //field ObjState;
    field PreAccountingId;
}
Example code - Complete code for getting started