Excel Migration
A migration job with procedure type Excel Migration can be executed through MS Excel and an authorized end user could load / manipulate data in the specific logical units related to the given migration job. The IFS Data Migration Excel Add-In uses the Excel Migration procedure type and is an extension to the standard data migration functionality in IFS Cloud. The Excel Migration procedure is somewhat similar to a source migration job. But this procedure has some special features.
This document describes how to set up and configure Excel Migration type jobs using IFS Data Migration. For more information chek the User Manual
Creating a Excel Migration job
Creating an excel migration job is similar to creating a source migration job. First create a Migration Header, define method list, map source columns and configure the rules.
Note: For existing migration jobs in the environment if regenerating the package is necessary use the Re-Generate Excel Migration command to recreate all dynamic projection, IC table and packages for the selected job.

Job Header
In the Migration Job page, create a new job with the Procedure Name to EXCEL_MIGRATION. You have to specify a 'View Name'.
see naming conventions.
Note: When naming the migration job set the Job ID with capitals separating with an underscore. e.g. TEST_EXCEL_JOB
Define Method List
Here define the logical unit you want to migrate the data into. See Migration Job/Method List.
You can add condition for executing a method by giving values forColumn Name, Column Value.

In the above configuration, the methods will only execute when the CONTRACT value is equal to one. A similar filtering can done for querying data by specifying a WHERE condition for the FETCHCONDITION.
If you specify multiple LUs, and want the job to be queryable, you would need to specify a join condition specifying the relationship between the LUs in the FETCHCONDITION rule.
You can also use methods other than New__, Modify__ by specifying them in the Method Name field. These methods will be invoke only when the user presses the execute button. When the user validates New__ and Modify__ methods are executed in 'CHECK' mode and other methods are not executed.
Usage of BeforeLoop and AfterLoop actions are currently not recommended.
Usage of NoExecution action is allowed. This can be useful when you want to query from a view but do not want to modify data in them.
Use the 'Source Name' so that the source columns will be automatically mapped to column names in the source mapping tab. In most cases, this is the same as the view name.
Check 'On New Master' to avoid repeated execution for the same set of data if the master data is duplicated. For this to succeed the rows should be sorted by master's key values.
Check 'On First Row' to execute the method only for the first row of the data set.
Source Mapping
Here add/modify required columns for the migration job. Make sure Pos and Length are not set to 0. Enter a value for the Source Column if you want to display it as an input from the user in Excel. The Source Column names will be used when creating the IC table for migrating data.
Note the following restrictions for the Source column:
- Should not exceed 30 characters
- Should not have any duplicates
- Should not contain spaces
- Should start with a letter
- All mandatory fields of the logical unit(s) should have a Source Column value, unless there is a DefaultValue specified for the field.
- Value forData length field must be less than 4000
Important: If an input value need to be reused you can add the Source Column value of one record as the “Default Value” of another. By doing this, the user only have to give the value in one column in Excel. - if certain LU contains a composite PRIMARY KEY where, a key column is an Enumeration, the client value of that column should be deleted from MethodAttributeList.
You may have default values for fields (You can have default values either with a value for Source column or without)
Note the following when using default values,
- If a field has both Source Column name and Default Value specified, the default value will be only used if the input from the Add-in for that particular field is null.
- If the Source Column is not there with the default value, that value will always be used in creating/updating data.
- You can specify any relevant SQL as the default value if needed. (e.g. NVL(ADDRESS_COUNTRY_DB,COMPANY_API.Get_Country_Db('10'))
You may also change the Description of the item (can also be translated, RMB Translation…) and add notes to the mapped source column (information to the Excel user)
Always try to keep the number of columns shown to the end-user (those which has a value for Source Column) to a minimum.
Configuring Job Rules
Only the following rules are currently supported by an EXCEL_MIGRATION job.
- CREATEDET
Source columns will automatically be created in the Source Mapping tab - FETCHCONDITION
Keep this to Active if the job should have Query functionality from the Excel add-in (Query enabled jobs). If the job contains multiple logical units, this field should contain the join clause between the logical units.
e.g. SUPPLIER_INFO.SUPPLIER_ID = SUPPLIER_INFO_ADDRESS.SUPPLIER_ID AND SUPPLIER_INFO.SUPPLIER_ID = SUPPLIER_ADDRESS.VENDOR_NO..
If you want to add additional filtering you can add it here as well. (e.g. SUPPLIER_INFO.COUNTRY_DB = ‘LK’)
Granting Jobs to End-users
view more information in user grants
Executing the Job and correcting errors
Before granting the job for end-user use, you should first test the job. To do this log in to the add-in with a user who has access to the Excel Migration job. (Should be done either on Test data or Non-Production environment).
Load the Migration job. You will see that the Excel Worksheet will be populated with the available columns. Then enter some data and press validate, and see if you get any errors. The outcome of the process is shown in the Result Column and as an error message will be shown. For More debug details debug traces are available in the Logs. This can viewed in the Excel Web Add-In by expanding the Logs section in the footer section. Then go through the trace to find the issue. Most of the time it should be basic data issue. Redo the steps until the job is ready to use.
See the Add-In User Manual on how to use the add-In.
Handling LUs with Custom Fields
It is possible to create Excel Migration jobs which can query from and insert/update data into LUs with Custom Fields.
The supported Custom field types are: 1. Persistent field
| Type | Supported Formats |
|---|---|
| String | UnFormatted, UPPERCASE, lowercase |
| Number | unformatted, decimal, currency, percentage |
| Date | date |
| Enumeration | normal, custom, boolean, multiple |
| Reference | restricted, set null |
- Read Only fields
Migrate Data into Persistent Custom String,Number,Date Field
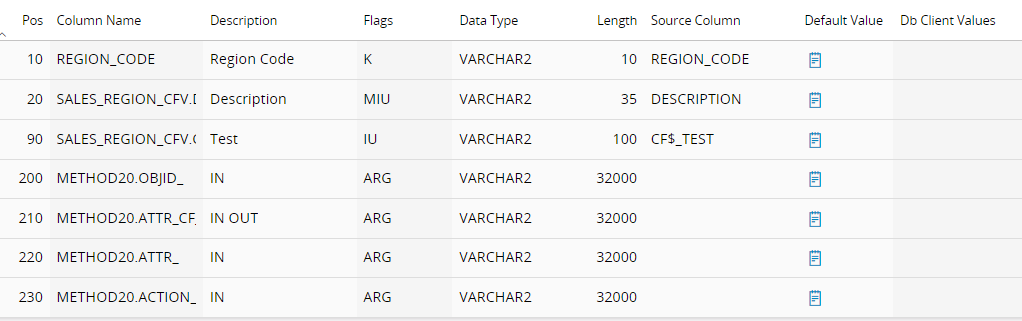
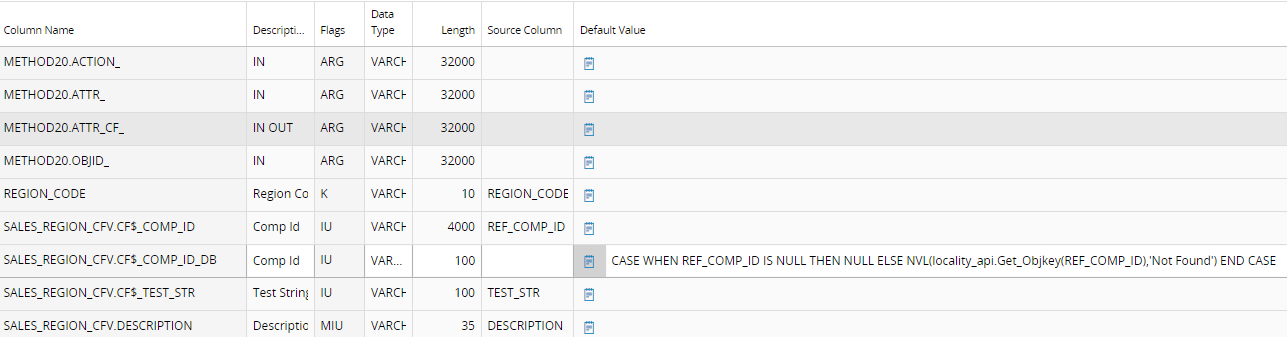
- Create the job header as usual and set the procedure name to EXCEL_MIGRATION and add view name as the LU with custom field (eg: SALES_REGION_CFV).

- Then add another method to in the Method List tab for the Custom Fields View (_CFV), the Method Name for the Custom Fields should have the method _CFP.CF_NEW__.

- The Method List Attributes for the _CFP.CF_NEW__ should only include the Custom Fields attributes(CF$_), INFO_, OBJID_, ATTR_CF_, ATTR_, ACTION_. Remove all the other attributes other than the custom field and method parameters. The configuration should be as the following. (OBJID_@10 holds the OBJID value returned after calling New__, Modify__ of the LU in method 10.)
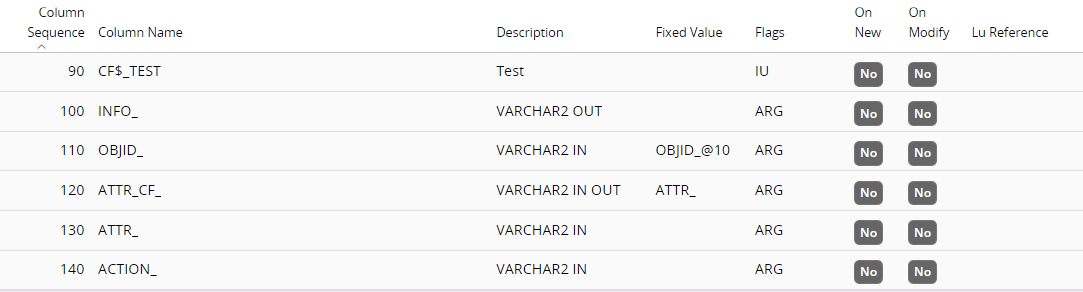
- Now the source mapping tab and enter values for the Source Column. When entering a View Name for the Migration Job Header when creating the job, most of the Source Columns would have been filled automatically. Make sure that you have entered Source Column values for the Custom Fields.
Migrate Data into Persistent Custom Enumeration Fields
This is very similar to the above configuration details (Migrate Data into Persistent Custom String,Number,Date Field). There’s only few modifications that should be done to migrate data to the Fields.
-
Create the job header.
-
Add the custom field view new method
-
The Method List Attributes for the _CFP.CF_NEW__ should include the Custom Fields attributes(CF$_) & (CF$_DB).
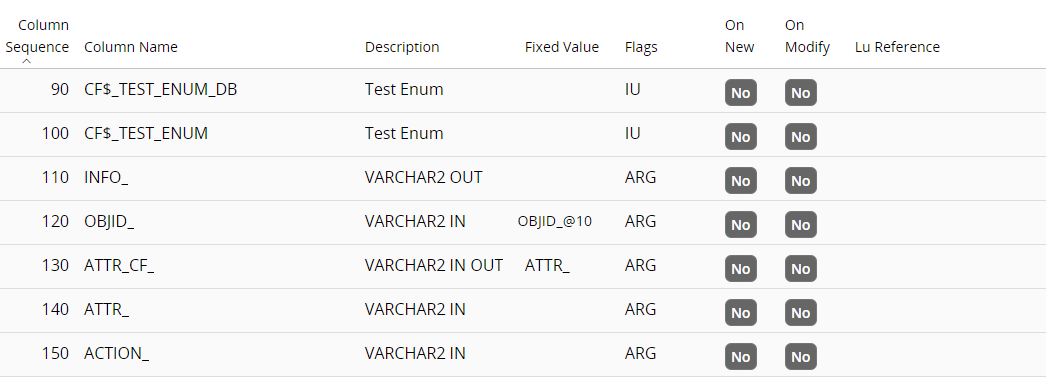
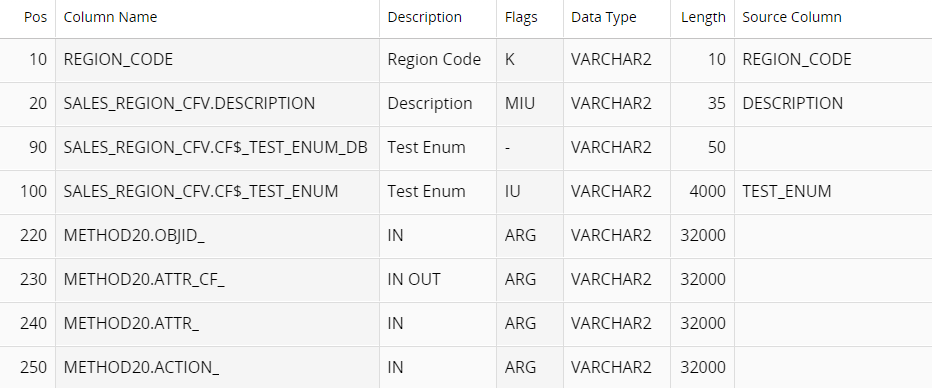
- In source mapping configuration add value to the source column of the enumeration client value. The (CF$_DB) value will be synced automatically to the entity upon New__ or Modify__.
Note: The multiple enumeration field can consist of one or more values. when adding values more than one through the Excel sheet make sure to seperate the values with a ; - Semicolon.
eg; value1;value2
Migrate Data into Persistent Custom Reference Fields
This is very similar to the above configuration details (Migrate Data into Persistent Custom String,Number,Date Field). There’s only few modifications that should be done to migrate data to the Fields.
-
Create the job header.
-
Add the custom field view new method.
-
The Method List Attributes for the _CFP.CF_NEW__ should include the Custom Fields attributes(CF$_) & (CF$_DB). Make sure the CF$_DB field is there for the Persistent Reference Fields.

- In source mapping configuration add the Default Value of CF$_DB column, add an expression which will return the ROWKEY from the given Client Value(Display Text). This is important because for Reference Fields, the ROWKEY will be saved in the database, and it will be fetched using the client value. Therefore make sure that the client value is unique.
Handling LU's with CLOB columns
Handling columns with CLOB data type is not supported as is in Data Migration. This is because CLOB data is not sent in the Attribute String which is used to insert/update data. CLOB data is handled separately.
But there is a workaround which can be used to migrate data into CLOB columns up to 2000 characters.
Create the job header as usual and set the procedure name to EXCEL_MIGRATION. Then add two methods to in the Method List tab. One for the Base LU View (e.g. Business_Lead), and another to set the CLOB field (e.g Note) using a procedure E.g. Write_Note_Excel__. This method is similar to procedure exist for most LUs with CLOB fields which will be called Write_[Fieldname]__ (e.g. Write_Note__). The difference is that the method's arguments should be VARCHAR2 instead of ROWID. Then provide values for Column Name and Column Value for the method. This is to ensure that the Note field has a value.

The Method List Attributes for the LU attributes (i.e Execute Seq 10) include the attribute for the NOTE field. Because the Note field is handled by the Write_Note_Excel__ uncheck On New and On Modify for it. The configuration should be as the following.

The Method List Attributes for the Write_Note_Excel__ include the attributes OBJVERSION_, OBJID_ and NOTE_. The configuration should be as the following.

OBJVERSION@10 and OBJID_@10 holds the OBJVERSION and OBJID values returned after calling New__, Modify__ of the LU in method 10.
Now go to the source mapping tab and enter values for the Source Column. If you have entered a View Name for the Migration Job Header when creating the job, most of the Source Columns would have been filled automatically. You also have the same column names coming from Write_Note_Excel__ method list. Remove METHOD20.OBJVERSION_ and METHOD20.OBJID_ as they are filled using the Fixed Value in Method List Attributes. Change Data Type to VARCHAR2 for the NOTE field, because CLOB cannot be handled. Change the Length to 4000. Enter NOTE in source column for Note field and NOTE in the Default Values for Note_ attribute.
When granting the job to the end-user make sure that all relevant view/package grants are given.