Demand Planning (DEMAND)
This document describes how to set up your Demand Plan Server, Client and how to prepare your system to support a successful installation.
Installation Locations
Demand Plan Client
The installation can be found on a Addon Page on the corresponding environment for example https://company.com/landing-page/add-on.html
Demand Plan Server
The installation can be found on the IFS build home structure. For example ..\BuildHome\artifact\demand\ifs-demand-server.zip. For IFS internal access it could be found in the Jfrog repository.
Installing the Demand Plan Client
The Demand Plan Main Client needs a MS Windows environment to run.
Installing the Main Demand Planning Client
The installation is started by running the SetupForecastClient.exe. Then follow the steps in the installer to complete the installation.
Logging on to the Demand Plan Main Client for the first time
The setup screen
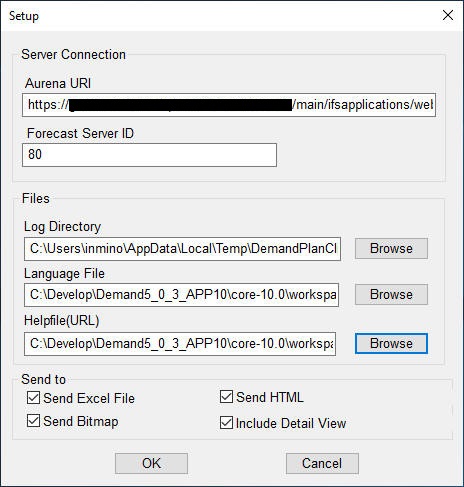
In the setup screen (File-Setup) you need to specify the IFS Cloud URI and which Server ID you want to connect to. An example on an IFS Cloud URI is shown in the figure below.
The IFS Cloud URI
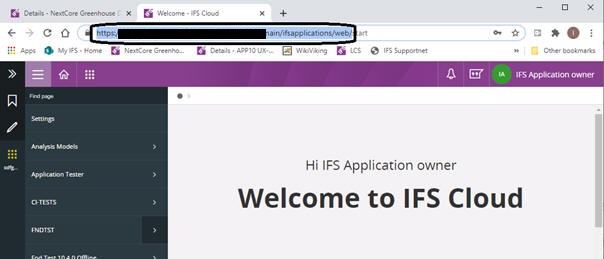
When the URI and Server ID is filled in, click OK and simply log on with your IFS user name/password from the log on screen
Login screen

Demand Plan Client Update
An upgrade can be done by running the SetupForecastClient.exe of the newer version. Simply follow the installation steps.
Demand Plan Client UnInstall
The Demand Plan Client Installation can be removed by running the unistall.exe file which can be found in the installation location of the Demand Plan Main Client
Prerequisites for Demand Plan Server
The Demand Plan/IPR Server (DP Server) cannot be containerized and it must run on a MS Windows environment.
Certain systems and configurations must exist on your system prior to installation of IFS Demand Planning. Demand Planning Setup does not install or configure an IFS Cloud database.
1. The database that Demand Planning will run against must already be set up and your site with data (transaction and inventory parts) must exist in the database.
2. Install Oracle Client software if this is not already installed. Configure a SQL*Net connection to the database you want to connect your Demand Planning Server. This must be done only on the computer where the Demand Plan Server is to be installed.
3. You can run the Demand Plan Server with the Appowner user, or you can use the Demand Planner service user. Make sure that the user is granted access to all tables and views needed. In order to do this, either you can use the scripts included in DEMAND (POST_Demand_DemandServerUser.sql) or you can use the schedule task "Set Demand Plan Server User Grants".
There are 2 ways to install the DP Server on a computer, manually or with a PowerShell script. Update/Patching can also be done either manually or through a PowerShell script.
Manual Installation/Manual Update/Patching Demand Plan Server
Manual Installation
The manual installation is started with running the SetupForecastServer.exe. Then follow the steps in the installer to complete the installation, 2 important steps in the installation have been mentioned below.
Add General Information
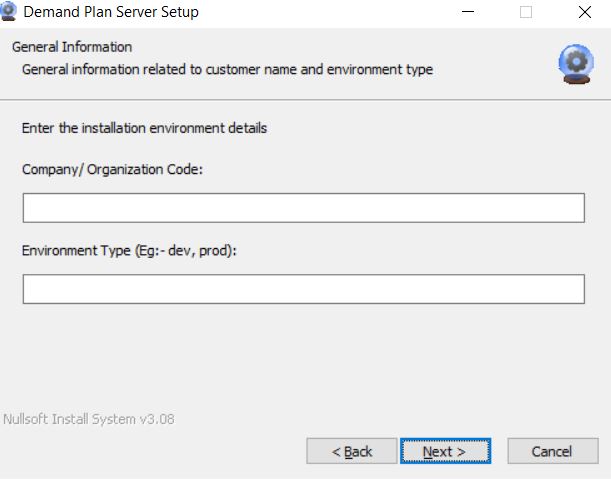
In this screen you will add the Name of the Company, the Environment (prod/test….)
The Company and Environment settings is the text that will be shown in the "http://<DP_SERVER:PORT>/metrics" web page
demand_server_status{ifsrole="dm", customercode=“IFS", environmenttype="prd", ifsversion="2020.1", buildversion=”20.1.3.23”, demandrole=’demand’} 1
Add Database Information
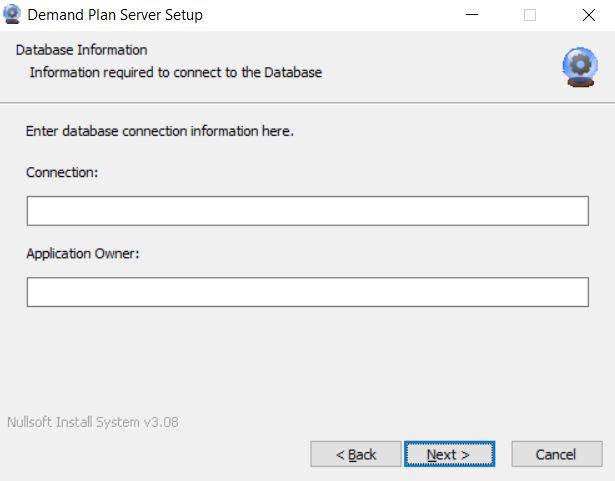
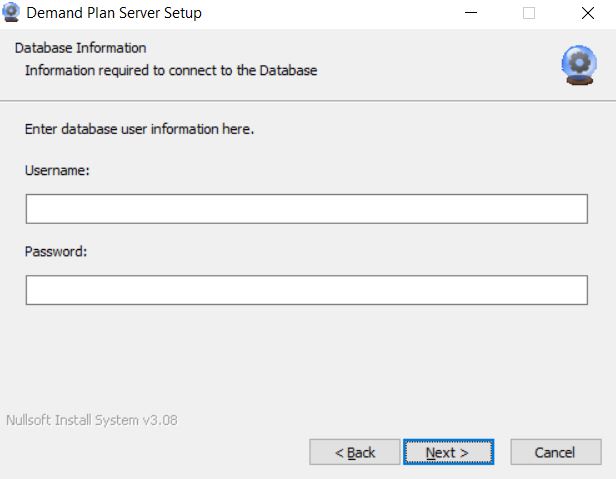
In the above screens you need to specify the database connection information.
Connection - This is the connection string to the database from the TNSNames.ora file
Application Owner - The Application owner user
User Name - The database user that the DP server should use for its database operations. Normally the Demand Planner service user or appowner user.
Password - The password for the database login for the user.
Follow the remaining steps in the installer to complete the installation.
Note:- A service will be automatically registered on the machine where the installation has been done.
Manual upgrade Demand Plan Server
An upgrade can be done by running the SetupForecastServer.exe of the newer version. Simply follow the installation steps.
Manual uninstall Demand Plan Server
The Demand Plan Server Installation can be removed by running the unistall.exe file which can be found in the installation location of the Demand Plan Server
PowerShell Script Installation Demand Plan Server
To be able to run the script you must open the PowerShell window in administrator mode and navigate into the folder which contains the dmsetup.ps1 script. You can use the below command to navigate to the correct folder.
*cd <path to folder which contains the dmsetup.ps1>Ex: - cd C:\Projects\demand\tools\DemandSetupScript*
Prerequisites
Make sure the below steps are followed before starting the installation.
-
Locate the path to SetupForecastServer.exe. Standard release package(zip) contains this in the default location (parent folder of the DemandSetupScript folder). Note If the server setup file is on a different location use "-path" parameter to specify the location during the installation. Use "-action help" command to see more details on this.
-
Locate the path to settings.json file and modify this file so that the Database connection related Information and environment information are updated. (Refer how to edit settings.json file section below in this guide). Note you can use an already existing settings.json file for this as well use "-configPath" for this.
-
Open the PowerShell in administrator mode and move to the directory where the dmsetup.ps1 script file is located.
How to edit the settings.json file
The figure below shows a section of the settings.json file
{

"Category" : "Database",

"Setting" : "Appowner",

"Value" : "<APPOWNER_USER>",

"DataType" : "TEXT"

},
The only parameter that can be changed is the “Value” parameter. The Other parameters should not be modified under any circumstance as it will result in crashing of the Demand Plan Server.
The values for “Category”, “Database” ** is a must and values for “Category” ,“Metric”,** used to indicate environment information. Under general configuration both these categories will hold values for their settings.
Below shows a summary on the general categories and their settings.
· “Category”: “Database” and “Setting”: “Connection” [Database Connection, host/sid or TNS name]
· “Category”: “Database” and “Setting”: “AppOwner” [Database Application Owner name]
· “Category”: “Database” and “Setting”: “UserName” [Database Username]
· “Category”: “Database” and “Setting”: “PlainTextPassword” [Database Password. Note: ** Always change this entry when you want to change the database user password. Once entered, during the start of Demand Plan Server the value of this field will be taken out and cleared. Before clearing, the entered password will be encrypted and stored on a different field name EncryptPassword. The value of "EncryptedPassword"** should not be modified manually ]
· “Category”: “Metric” and “Setting”: “customercode” [Customer code to identify the customer]
· “Category”: “Metric” and “Setting”: “environmenttype” [Customer Environment type to identify the environment of the customer, Ex:- prod, dev..]
· “Category”: “Communication” and “Setting”: “OverwriteServer”
[This value is used to set the publicly accessible Host Name URL/IP for the server so that any client which communicates with the Demand Plan Server will communicate using this Server URL. This needs to be used in a situation where the internal Host Name URL/IP is not accessible from client environments, which is the typical scenario when hosting the Demand Plan server on the cloud. Note This entry will not be there in the setting.json by default. But, once the server starts with general configuration, the entry will be automatically added to the settings.json by the Demand Plan Server which can be modified afterwards.]
Example of a settings.json file and the text to change between quotes in "Value" parameter (
{
"settings":[
{
"Category" : "Metric",
"Setting" : "customercode",
"Value" : "<CUSTOMER_ID_OR_NAME>",
"DataType" : "STR"
},
{
"Category" : "Metric",
"Setting" : "environmenttype",
"Value" : "<CUSTOMER_ENVIRONMENT_TYPE>",
"DataType" : "STR"
},
{
"Category" : "Database",
"Setting" : "Appowner",
"Value" : "<APPLICATION_OWNER_NAME>",
"DataType" : "TEXT"
},
{
"Category" : "Database",
"Setting" : "Connection",
"Value" : "<DATABASE_HOST/SID_OR_TNS_NAME>",
"DataType" : "TEXT"
},
{
"Category" : "Database",
"Setting" : "UserName",
"Value" : "<DATABASE_USER_NAME>",
"DataType" : "TEXT"
},
{
"Category" : "Database",
"Setting" : "PlainTextPassword",
"Value" : "<DATABASE_USER_PASSWORD>",
"DataType" : "TEXT"
}
]
}
You can also change the Settings.json file with the usage of the PowerShell script commands, see below for details.
Script Installation Demand Plan Server
Once you have the PowerShell opened in the directory which has the dmsetup.ps1, you can execute one of the following commands to Install the Demand Plan Server.
1. ./dmsetup -action Install [This will install the Demand Plan Server, the SetupForecastServer.exe should be in the parent directory of the directory in which dmsetup.ps1 is located and the settings.json should be located in the same directory as the dmsetup.ps1. Eg: If dmsetup.ps1 & settings.json is in ‘C:\IFS\Demand\tools\DemandSetupScript\’, then SetupForecastServer.exe is in ‘C:\IFS\Demand\tools\’. Standard IFS release package zip contains this structure ]
2. ./dmsetup -action Install -path <folder path to exe> [This will install the Demand Plan Server and the SetupForecastServer.exe should be in the folder provided in the path parameter. settings.json should be located in the same directory as the dmsetup.ps1]
3. ./dmsetup -action Install -path "<folder path to exe>" -configPath [This will install the Demand Plan Server and the SetupForecastServer.exe should be located in the folder path provided to the path parameter and settings.json should be located in the folder path provided to the configPath parameter]
4. ./dmsetup -action Install -customerCode <Customer code to identify the customer> -environmenttype <Customer Environment type to identify the environment of the customer> -Appowner <Database Appowner> -Connection <Database Connection> -UserName <Database Username> -Password <Database Password> [ This will install the Demand Plan Server after updating the Settings.json file in the default location(if not specified with -configPath) with the values given with the command. If no values are given, the Settings.json file will not be changed. It is possible to provide values only for the parameters that need to be updated and the rest of the parameters will remain unchanged.]
Note: - The paths should be provided to the folder level. All paths must have " around them like "C\TEMP" Ex: - ./dmsetup -action Install -path "C:\Projects\demand\ForecastServer" -configPath "C:\Projects\demand\ForecastServer\config"
The command implies that the SetupForecastServer.exe is in the path C:\Projects\demand\ForecastServer and settings.json is in the path C:\Projects\demand\ForecastServer\config
Script Update
Once you have the PowerShell opened in the directory which has the dmsetup.ps1, you can execute one of the following commands to Update the Demand Plan Server. NOTE: If you do not use the -force option (see below) remember that the Demand Plan Server service must be stopped before the update.
1. ./dmsetup -action Update [This will update the Demand Plan Server, the SetupForecastServer.exe should be in the parent directory of the directory in which dmsetup.ps1 is located. Eg: If dmsetup.ps1 is in ‘C:\IFS\Demand\tools\DemandSetupScript\’, then SetupForecastServer.exe is in ‘C:\IFS\Demand\tools\’]
2. ./dmsetup -action Update -path <folder path to exe> [This will update the Demand Plan Server and the SetupForecastServer.exe should be in the folder provided to the path parameter.]
3. ./dmsetup -action CopyConfig -customerCode <Customer code to identify the customer> -environmenttype <Customer Environment type to identify the environment of the customer> -Appowner <Database Appowner> -Connection <Database Connection> -UserName <Database Username> -Password <Database Password> [This will update and overwrite the existing setting in the Settings.json file with the new setting, you can provide as many of the settings as you need in the command.]
Note: - The paths should be provided to the folder level.Ex: - ./dmsetup -action Update -path "C:\Projects\demand\ForecastServer"
The command implies that the SetupForecastServer.exe is in the path C:\Projects\demand\ForecastServer -action Update -Force can be used to immediately take down the Demand Planner service and begin the update. If -action Update is used and Demand Planner Service is running, the action will not get executed. Once this command is successfully executed the demand plan server will be updated and the service will be running. -path should be used if the SetupForecastServer.exe in not in the default location.
Script Uninstall Demand Plan Server
Once you have the PowerShell opened in the directory which has the dmsetup.ps1, you can execute one of the following commands to UnInstall the Demand Plan Server.
1. ./dmsetup -action UnInstall [This will Uninstall the Demand Plan Server, but the SetupForecastServer.exe should be in the parent directory of the directory in which dmsetup1.ps1 is located. Eg: If dmsetup.ps1 is in ‘C:\IFS\Demand\tools\DemandSetupScript\’, then SetupForecastServer.exe is in ‘C:\IFS\Demand\tools\’]]
2. ./dmsetup -action UnInstall -path "<folder path to exe>" [This will Uninstall the Demand Plan Server and the SetupForecastServer.exe should be in the folder provided to the path parameter.]
Note:- The paths should be provided the folder level.Ex: - ./dmsetup -action UnInstall -path "C:\Projects\demand\ForecastServer"
The command implies that the SetupForecastServer.exe is in the path C:\Projects\demand\ForecastServer
-action Uninstall-Force can be used to immediately take down the Demand Planner service and begin uninstallation. If -action Uninstall is used and Demand Planner Service is running, the action will not get executed. Once this command is successfully executed the demand plan server will be uninstalled.
-path should be used if the SetupForecastServer.exe in not in the default location.
Script Command Summary
All Commands which can be executed in the script is listed below:
| Command | Description |
|---|---|
| -action Install | Install the Demand Plan Server, -path parameter can be provided if the SetupForecastServer.exe is in a different path |
| -action UnInstall | Uninstall the Demand Plan Server, make sure the Demand Plan Service has been stopped before running the command |
| -action UnInstall-Force | Uninstall the Demand Plan Server, Automatically Stops the Service and uninstalls the Demand Plan Server |
| -action Update | Update the Demand Plan Server, make sure the Demand Plan Service has been stopped before running the command. -path parameter can be provided if the SetupForecastServer.exe is in a different path |
| -action Update-Force | Update the Demand Plan Server, Automatically Stops the Service and updates the Demand Plan Server. |
| -action Start | Start the Demand Plan Service. Make sure the settings.json file has been updated with the database connection information. |
| -action Stop | Stop the Demand Plan Service. |
| -action Restart | Restart the Demand Plan Service. |
| -action Help | View the help guide. |
| -action CopyConfig | Update/overwrites the existing setting.json file. Can provide any/all of the parameters -customerCode -environmenttype -Appowner -Connection -UserName -Password depending on which parameters in the settings.json file needs to be updated. |
| -action Manage-User | Unlock or reset password of the Oracle user. Can reset the user with the -ResetPassword flag or can unlock the user with the -UnlockUser flag. Make sure to provide all parameters for -Appowner -Connection -UserName -Password. |
· -path Optional parameter to define the path to the SetupForecastServer.exe file
when running -action Install, -action Update, -action UnInstall commands.
· -configPath Optional parameter to define the path to the setting.json file when running -action Install command.
· -ResetPassword Optional parameter to reset the password of the oracle user when running -action Manage-User command.
· -UnlockUser Optional parameter to unlock the Oracle user when running -action Manage-User command.
Demand Planning and Machine Learning Setup
A new forecast model (ML Weather) has been introduced in demand planning which will calculate the forecast using machine learning and weather forecast information. This new forecast model involves communication with a Automation Service and once setup this is a completely autonomous process. The steps of communication are as follows.
- The Automation Service requests the items that need to be trained from the Demand Plan (DP) Server.
- DP server responds with the items that have been assigned the ML Weather forecasting model along with the full historical data of these parts.
- Automation Service does the actual calculations and sends back a 14-day forecast to DP Server.
The communication between Automation Service and the Demand Plan Server is done using a user that has been assigned the DEMAND_ML permission set. The API calls supported by the Demand Plan Server are as below,
-
https://<IFS_CLOUD_URL>/appsvc/demand/json/ai/flow_location
-
Returns a list over all flows in the DP Server and their geographical locations (longitude and latitude). On typical configuration, this get called once every week by the Automation Service.
-
This is in CSV format with following attributes
- Flow ID
- Latitude
- Longitude
-
Output Example:
flowid, latitude, longitude
0,52.9226,-2.80502
1,51.9226,-2.20502
2,52.5226,-2.80502
-
-
https://<IFS_CLOUD_URL>/appsvc/demand/json/ai/get_history
-
Returns a list over all flows in the DP Server and their geographical locations (longitude and latitude). On typical configuration, this get called once every week by the Automation Service.
-
This is in CSV format with following attributes
- Last Historical Aggregate Day
- Flow ID
- Part Number
- Array containing historical demand ( This is in reverse order. Which means for example first number is the demand for the last historical aggregate day and the second number is for the day before and so on in reverse order)
-
Output Example:
"2021-08-24",0,"4000-DM","10000,30000,0,0,11573,0,10000,0,0,30000,0,0,20000,0,0,0,0,0,0,0,10000,0,0,0,20000,30000,0,30000,0,20000,10000,30000,16164.8,10000,20000,10000,10000,0,0,10000,20000,0,50000,10000,10000,20000,10000,10000,10000,20000,10000,30000,10000,0,20000,0,10000,20000,20000,10000,30000,10000,10000,20000,20000,10000,0,0,10000,20000,10000,10000,30000,40000,0,30000,30000,10000,0,10000,10000,10000,0,10000,10000,11163.7,10000,0,10000,0,10000,20000,0,30000,20000,0,10000,29476.6,0,10000,10000,0,30000,0,0,0,10000,30000,30000,20000,0,10000,10000"
"2021-08-24",0,"4001-DM","40000,50000,0,0,21573,0,10000,0,0,30000,0,0,20000,0,0,0,0,0,0,0,10000,0,0,0,20000,30000,0,30000,0,20000,10000,30000,16164.8,10000,20000,10000,10000,0,0,10000,20000,0,50000,10000,10000,20000,10000,10000,10000,20000,10000,30000,10000,0,20000,0,10000,20000,20000,10000,30000,10000,10000,20000,20000,10000,0,0,10000,20000,10000,10000,30000,40000,0,30000,30000,10000,0,10000,10000,10000,0,10000,10000,11163.7,10000,0,10000,0,10000,20000,0,30000,20000,0,10000,29476.6,0,10000,10000,0,30000,0,0,0,10000,30000,30000,20000,0,10000,10000"
-
-
https://<IFS_CLOUD_URL>/appsvc/demand/json/ai/prediction
-
List over all parts and their forecast. On typical configurations, called once every day by the Automation Service.
-
This is in CSV format with following attributes
- Flow ID
- Part Number
- Array containing the forecast
- Start date of forecast
-
Output Example:
"0","1001-DM","87.9624,87.9624,87.9624,87.9624,423.144,423.144,87.9624,87.9624,87.9624,87.9624,87.9624,423.144,423.144,87.9624","2021-06-01 00:00:00"
"0","1000-DM","87.9624,87.9624,87.9624,87.9624,423.144,423.144,87.9624,87.9624,87.9624,87.9624,87.9624,423.144,423.144,87.9624","2021-06-01 00:00:00"
-
-
https://<IFS_CLOUD_URL>/appsvc/demand/json/ai/weather
-
List over the weather forecast for all flows received in the flow_location message. On typical configurations, called once every day by the Automation Service.
-
This is in CSV format with following attributes
- Flow ID
- Start Date
- tempC
- maxtempC
- mintempC
- totalSnow_cm
- windspeedKmph
- visibility
- humidity
- precipMM
- windGustKmph
- winddirDegree
- weatherCode
- weatherDesc
- cloudcover
-
Output Example:
"1","2021-06-16 00:00:00","20,21,23,10,21,14,21,18,14,18,18,10,15,24","20,21,23,10,21,14,21,18,14,18,18,10,15,24","8,11,14,-1,8,6,13,12,4,8,8,-1,6,12","0.0,0.0,0.0,0.0,0.0,0.0,0.0,0.0,0.0,0.0,0.0,0.0,0.0,0.0","23,21,15,11,8,12,14,23,15,16,11,14,18,13","10,10,6,7,8,4,8,10,10,10,10,7,6,9","59,69,88,93,68,93,80,80,86,49,58,92,98,52","0.0,0.6,4.7,24.3,0.0,18.2,0.0,5.2,5.5,0.0,0.0,3.9,6.5,0.1","14,18,14,11,5,7,10,20,19,14,11,8,23,8","14,18,14,11,5,7,10,20,19,14,11,8,23,8","116,176,176,308,116,302,122,302,302,116,116,176,302,116","Partly cloudy,Patchy rain possible,Patchy rain possible,Heavy rain,Partly cloudy,Moderate rain,Overcast,Moderate rain,Moderate rain,Partly cloudy,Partly cloudy,Patchy rain possible,Moderate rain,Partly cloudy","42,34,88,95,45,93,71,74,54,23,35,97,99,20"
"2","2021-06-17 00:00:00","29,29,29,29,29,28,27,28,28,28,28,28,28,28","29,29,29,29,29,28,27,28,28,28,28,28,28,28","26,27,27,27,27,27,26,26,26,26,26,26,26,23","0.0,0.0,0.0,0.0,0.0,0.0,0.0,0.0,0.0,0.0,0.0,0.0,0.0,0.0","19,17,17,16,22,23,23,23,24,26,25,24,25,26","10,10,10,10,10,7,6,7,9,8,9,8,8,10","80,81,81,81,81,84,86,84,83,83,83,84,85,83","4.4,2.4,0.8,1.3,2.7,43.5,60.5,36.0,16.2,22.8,27.7,25.9,20.4,5.2","20,19,19,18,23,39,40,37,31,39,38,37,36,34","20,19,19,18,23,39,40,37,31,39,38,37,36,34","176,176,176,176,176,308,308,308,302,308,308,308,308,302","Patchy rain possible,Patchy rain possible,Patchy rain possible,Patchy rain possible,Patchy rain possible,Heavy rain,Heavy rain,Heavy rain,Moderate rain,Heavy rain,Heavy rain,Heavy rain,Heavy rain,Moderate rain","55,65,58,69,69,73,64,64,66,68,69,67,75,62"
-
Prerequisites for Demand/Machine Learning
- Automation Service needs to be configured against the environment and should be up and running.
- Automation Service User needs to have DEMAND_ML permission set assigned.
- Demand Plan Server basic data setup needs to be in place
- Enable Machine Learning for preferred Demand Server ID
- Add Location information to Base Flows
- Through manage location command
- Through MapPosition Object connection service in attachment panel
- Aggregate daily job needs to be configured to run daily
- Demand Plan Server should be up and running with above configuration.
- Both Automation Service Jobs and Demand Planner Jobs needs to be synced
- On typical configurations, Automation Service API invocations mentioned above needs to be configured to run after the aggregate daily job in Demand Plan Server.
- Demand Plan Server uses the database time to schedule and execute the jobs.
- On typical configurations, Automation Service API invocations mentioned above needs to be configured to run after the aggregate daily job in Demand Plan Server.
Historical Data Files
The daily aggregated demand will be stored in data files for fast access. They will be stored in AppData\Roaming\ForecastServer\Historical path on Windows OS. Note: In some cases these get stored on windows installation drive Windows\System32\config\systemprofile\AppData\Roaming\ForecastServer\Historical otherwise those should be in Users\XXX\AppData\Roaming..
Demand Plan Server Metrics URL
Following URL can be used to check the status of the Demand Plan Server once it is setup. Replace the DP_SERVER accordingly(Host/IP where the Demand Server is installed) to get a valid URL.
http://DP_SERVER:PORT/metrics
demand_server_status 0 indicates an error 1 indicates OK status.
demand_server_status{ifsrole="dm", customercode="rusta", environmenttype="prd", ifsversion="2020.1", buildversion=”6.0.3.23”, demandrole=’demand’} 1
demand_server_job_engine 0 indicates an error, 1 if it is idle, above 1 would be the job id currently under execution by the server.
demand_server_job_engine{ifsrole="dm", customercode="rusta", environmenttype="prd", ifsversion="2020.1", buildversion=”6.0.3.23”} 1
demand_server_writeback_engine o indicate an error, 1 if it is under sleep mode, 2 if it is idle, 3 if its excuting a job.
demand_server_writeback_engine{ifsrole="dm", customercode="rusta", environmenttype="prd", ifsversion="2020.1", buildversion=”6.0.3.23”} 2
In general, after a successful installation the metrics URL should produce a reponse like below,
demand_server_status{ifsrole="dm", customercode="rusta", environmenttype="prd", ifsversion="2020.1", buildversion=”6.0.3.23”, demandrole=’demand’} 1
demand_server_job_engine{ifsrole="dm", customercode="rusta", environmenttype="prd", ifsversion="2020.1", buildversion=”6.0.3.23”} 1
demand_server_writeback_engine{ifsrole="dm", customercode="rusta", environmenttype="prd", ifsversion="2020.1", buildversion=”6.0.3.23”} 2
Demand Release Artifacts and Versioning
Following versioning practice will be followed for Demand Plan artifact releases. Version will be increased only when the corresponding artifact has a change during a service update. The version will be changed to denote the latest service update the artifact got changed. Note that demand server Installation package version last digit denotes the last service update where the powershell script got changed.
| IFS Cloud Version | 21.1E.0.0 | 21.1E.1.0 | 21.1.0.0 | 21.1.1.0 | 21.1.2.0 | 21.1.2.0 | 21.1.2.0 | 21.2E.0.0 |
|---|---|---|---|---|---|---|---|---|
| Demand Server Fix Exists | Y | Y | Y | Y | ||||
| Demand Server Version | 21.1E.0.0 | 21.1E.0.0 | 21.1.0.0 | 21.1.0.0 | 21.1.2.0 | 21.1.2.1 | 21.1.2.2 | 21.2E.0.0 |
| Powershell Installer Fix Exists | Y | Y | ||||||
| Powershell Installer Version | 21.1E.0.0 | 21.1E.0.0 | 21.1E.0.0 | 21.1.1.0 | 21.1.1.0 | 21.1.1.0 | 21.1.2.0 | 21.2E.0.0 |
| Demand Server Installation package version | ifs-demand-server-21.1E.0.0.zip | ifs-demand-server-21.1E.0.0.zip | ifs-demand-server-21.1.0.0.zip | ifs-demand-server-21.1.0.1.zip | ifs-demand-server-21.1.2.1.zip | ifs-demand-server-21.1.2A.1.zip | ifs-demand-server-21.1.2B.2.zip | ifs-demand-server-21.2E.0.0.zip |
| Demand Client Fix Exists | Y | |||||||
| Demand Client Version | 21.1E.0.0 | 21.1E.0.0 | 21.1E.0.0 | 21.1.1.0 | 21.1.1.0 | 21.1.1.0 | 21.1.1.0 | 21.2E.0.0 |
| Demand Middletier Fix Exists | Y | Y | ||||||
| Demand middle tier version | 21.1E.0.0 | 21.1E.1.0 | 21.1E.1.0 | 21.1.1.0 | 21.1.1.0 | 21.1.1.0 | 21.1.1.0 | 21.2E.0.0 |
Technical Notes
Update the Demand Plan Server Software
Updates of the Demand Plan Server, like installing new versions/service updates. It's important to do this when the Demand Plan Server is idle (not running any jobs like create forecast, refresh IPR data etc. ) to avoid loss of data. The Demand Plan Server writeback buffer should also be empty. Suitable time for doing updates will vary depending on how the Demand Planning is configured, but a general rule will be to avoid the first date of a month and 1 day of the week (Sunday & Mondays), and working hours is normally better than at night, since most Demand Plan Server jobs are scheduled at non working hours.
Demand Plan Server Port Configuration:
Demand Plan Server uses a specific port for the communication with Demand Plan Clients. When it comes to container configurations, both application services container and Odata container needs to have this specific port open for Demand Plan Server to facilitate server communication. This default port number can be found/changed in the settings.json file in the Demand Plan Server installation ("Category" : "Communication","Setting" : "Lisener"...). If changed then above container ports also needs to get changed correspondingly with the new port number.
How to verify Demand Server Installation and IFS Cloud Web Communication
**Verify the Demand Server Installation in the Host ** Once the demand plan server is started http://localhost:PORT/metrics should produce a success response in the host. Check for Demand Server Matrix URL section to verify the expected results.
**Verify the Demand Server Communication with Middletier ** Demand Server uses both Odata and Appsvc containers for the communication. CURL command issued against "CURL http://DPSERVER:PORT/metrics" from each(or atleast one) of this container should produce a success response. Check for Demand Server Matrix URL section to verify the expected results. Note that the Demand Server should be up and running on the host for this check.
Verify the Demand Server Host Visibility in Middletier This step is useful if the matrix end point( http://DPSERVER:PORT/metrics ) is not reachable from the containers mentioned in above step. This could be mostly due to a host name resolving failure. If the host name is not resolving from the middiletier container, follow these steps to register the IP address,
- Shutdown the Demand Plan Server
- Add the IP address of the Demand Plan Server host to, settings.json, OverwriteServer VALUE.
- Start the Demand Server
- Verify the Demand Server Visibility/Communication with Middletier again using the IP address (http://DPSERVER_IP:PORT/metrics)
Permission Sets
Following are the permission sets available for demand planning.
| Permission Set | Description |
|---|---|
| DEMAND_SUPER | This permission set has access to everything, the only user that can execute manual jobs in the Demand Plan Server from the Dashboard. Only user to create new user and edit access rights for the main Demand Plan Client. |
| DEMAND_GENERAL | The permission set has access to everything apart from the basic data set up. The user will be able to add and delete new forecast parts, publish forecast parts to DEMAND_FORECAST users, look at the finished forecasts. The user cannot create/delete/edit base or combined flows or do anything to the Demand Plan Server Setup but can view the Dashboard without being able to execute any jobs on the Demand Plan Server |
| DEMAND_FORECAST | This permission set has access only to the Demand Forecast Client. Will only be able to look, and evaluate the forecast published to the user in the Demand Forecast Client. |
| IPR_SUPER | This is a permission set has access to everything IPR related. Like the IPR Supply Plan, Manage IPR Supply Plan, Analyze Demand Derivation, Refresh Inventory Part Unit Cost Snapshot, IPR Planning Details for Inventory Parts, Planning Hierarchy Basic Data, the IPR Excel Sheet menu on Inventory Part Planning. |
| DEMAND_ML | This permission set is for Demand Planning/ Automation Service integration. The user configured on Automation Service needs to get assigned this permission set in order to communicate with the Demand Plan Server. |
Manual Actions
This section contains information related to manual actions for IFS Demand Planner that might be needed to be executed during an upgrade or installation.
| Action Description | Functional Conditions for Execution | Technical Dependencies | Consequences (of not executing) | Steps | Step execution |
|---|---|---|---|---|---|
| To run the Demand Plan Server, the Demand Planner service user should be in Active & Unlocked state. Therefore, use this manual action to set the Demand Planner service user as an Active user or to change the password or to unlock the Demand Planner service user. |
Only applicable if Demand Server is used and Demand Planner service user is Locked or Inactive. |
No | If Demand Planner service user is locked or inactive then this user cannot be used to run Demand Plan Server. | Use the Demand Powershell Setup Scripts to alter and unlock the Demand Planner service user in the database. Replace the <XXX> with the respective values. "./dmsetup -action Manage-User -ResetPassword -UnlockUser -username -password <New Password> -appowner <Database Appowner> -appownerpwd <Database Appowner Password> -connection <Database Connection>" |
Post - Anytime |