Setting up a Private Certificate Authority
The IFS Signing Service is dependent on a Certificate Authority (CA) for certificate issuance and verification. There are a multitude of open source and commercial options available. This documentation will show how to setup the open-source version of the widely used PrimeKey EJBCA Community Edition for reference purposes.
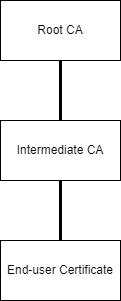
Certificate verification takes place by using a chain of trust. The chain starts from an anchor point which is usually a self-signed or self-issued certificate called a Root Certificate. To limit the chances of its private key being compromised, the root certificate doesn’t typically issue an end user certificate. This task is delegated to an intermediate layer called the Intermediate CA. One or multiple intermediate CAs can be set up depending on how you would want to organize the end-user certificates in your organization. A chain with a single Intermediate CA would look like the following:
This guide assumes that EJBCA Community Edition has already been setup and will only show the configuration parameters. EJBCA v7.4.3.2 was the latest at the time of this writing and screenshots could differ between versions.
Creating CA Certificate Profiles
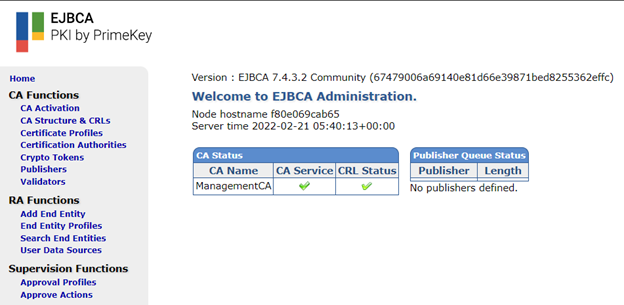
The EJBCA Admin GUI which is accessible at “{SERVER_URL}/ejbca/adminweb/” would look like the following for a fresh instance and comes pre-installed with a “ManagementCA”:
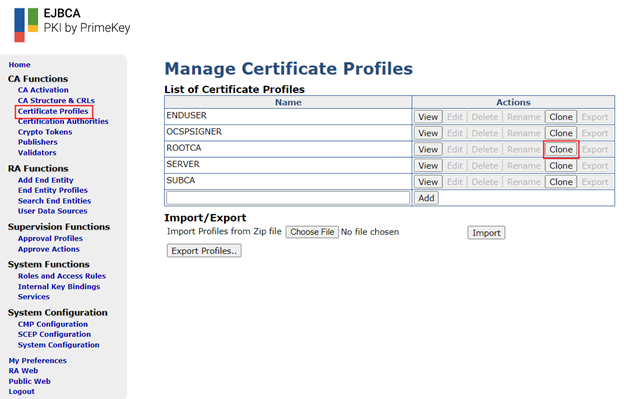
Before setting up the CAs, the default profiles that govern the cryptographic configurations of those need to be customized to reflect the industry accepted norms. Navigate to the “Certificate Profiles” menu.
Root CA Certificate Profile
Clone the existing “ROOTCA” profile to customize the settings for the Root CA that will be created.
Give it an identifier. Click “Create from Template” and the edit the profile that was just created.
Configuration Parameters – Root CA
The following describes what to change from the default set of values. These are deemed safe at the time of writing and will need to match the industry norms at the time of deployment.
| Parameter Name | Value | Description |
|---|---|---|
| Available Key Algorithms | Ctrl click ECDSA and RSA | ECDSA and RSA are widely used and considered secure depending on the key length used. |
| Available ECDSA curves | Ctrl click P-256, P-384, P-512 | According the NIST.FIPS.186-4 these curves are considered secure for ECDSA. |
| Available Bit Lengths | 4096 bits | Root CA certs usually are recommended to have long encryption key lengths: 4096bits for RSA |
| Signature Algorithm | SHA512withRSAandMGF1 | Matches the 4096bit RSA key length |
Finally Click Save.
Intermediate CA Certificate Profile
A similar approach should be taken to create the Intermediate CA Profile, but this time clone the “SUBCA” Template and edit the newly created profile.
Configuration Parameters – Intermediate CA
The following describes what to change from the default set of values. These are deemed safe at the time of writing and will need to match the industry norms at the time of deployment.
| Parameter Name | Value | Description |
|---|---|---|
| Available Key Algorithms | Ctrl click ECDSA and RSA | ECDSA and RSA are widely used and considered secure depending on the key length used. |
| Available ECDSA curves | Ctrl click P-256, P-384 | According the NIST.FIPS.186-4 these curves are considered secure for ECDSA. |
| Available Bit Lengths | 2048 bits | Intermediate CA certs have less validity time and key length is generally shorter than Root CA certs. usually are recommended to have long encryption key lengths: 2048bits for RSA |
| CRL Distribution Points | Check “Use” checkbox | Used to check if the certificate has been revoked. |
| Use CA defined CRL Distribution Point | Check “Use” checkbox | Used to check if the certificate has been revoked. |
| Authority Information Access | Check “Use” checkbox | Enables extensions needed to access the OCSP responder and issuer cert URL |
| Use CA defined OCSP locator | Check “Use” checkbox | Used to check if the certificate has been revoked. |
| Use CA defined CA issuer | Check “Use” checkbox | Used to retrieve the issuer certificate |
Finally Click Save.
Creating Crypto Tokens
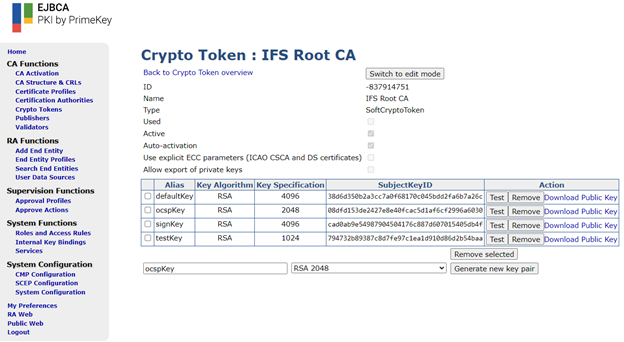
Before creating the actual CAs, they need to have a set of encryption keys defined. Navigate to “Crypto Tokens” in the admin GUI and click on “Create New”. Give it a name and a password for the “Authentication Code” field. Finally check “Use” on “Auto-activation” and click Save. Generate four new keys you could pick between ECDSA and RSA depending on the requirement. The end result should look as follows:
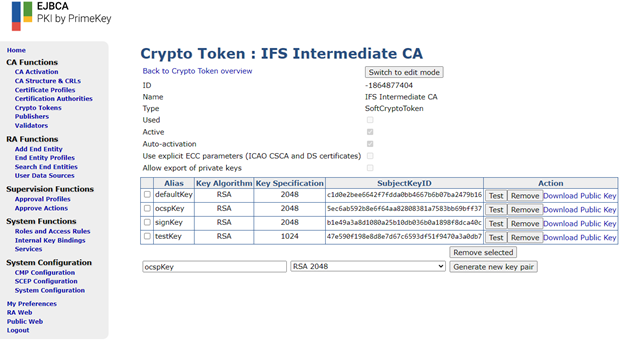
Repeat the same steps to create a Crypto Token for the Intermediate CA. Shorter key lengths can be used but for RSA, the default and sign encryption key length must be 2048 bits long and is considered secure at the time of writing. The end result should look as follows:
Creating the Root CA
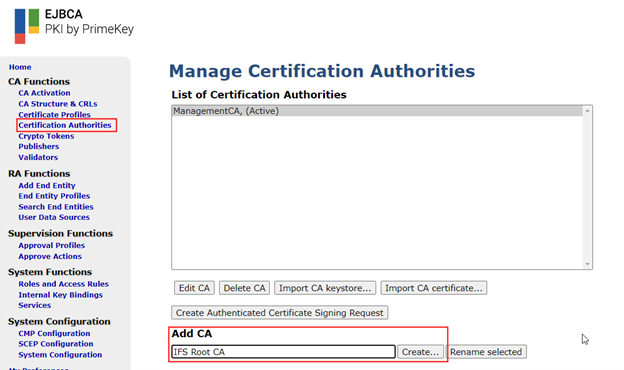
Navigate to “Certificate Authorities” in the admin GUI and add a new CA. Type an identifying label and click “Create”.
Configuration Parameters
The following describes what to change from the default set of values. These are deemed safe at the time of writing and will need to match the industry norms at the time of deployment.
| Parameter Name | Value | Description |
|---|---|---|
| Crypto Token | Select the Root CA Token created in the earlier step | |
| Signing Algorithm | SHA512withRSAandMGF1 | Root CA certs usually are recommended to have long encryption key lengths: 4096bits for RSA and 384 for ECC. In this case we opt for RSA but SHA384withECDSA is also a good option. |
| defaultKey | defaultKey | |
| certSignKey | signKey | The key to use for certificate issuance |
| keyEncryptKey | defaultKey | The key to use for CRL signing |
| testKey | testKey | Key used internally by EJBCA health-check to verify that the Crypto Token is usable |
| Certificate Profile | Select the Root CA Certificate Profile created in the earlier step | |
| Validity | 25y | Root CA certs have long validities generally in the range for 20 to 30 years. |
| Default CRL Distribution Point | Click generate button | CRL endpoints are hosted on non-secure http endpoints. The value once generate is clicked should correspond to a URL that is accessible from where the IFS Signing Service is deployed. This might need to be changed manually if depending on the network setup. |
| Default CRL Issuer | Click generate button | Should match the common name of the CA. E.g.: “CN=IFS Root CA” |
| OCSP service Default URI | Click generate button | OCSP endpoints are hosted on non-secure http endpoints. The value once generate is clicked should correspond to a URL that is accessible from where the IFS Signing Service is deployed. This might need to be changed manually if depending on the network setup. |
Finally click the create button. If everything is successful, the CA should be visible on the list of CAs.
Creating the Intermediate CA
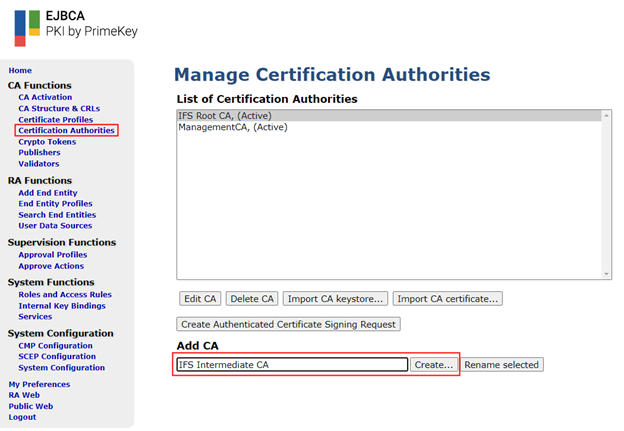
Navigate to “Certificate Authorities” and add a new CA. Type an identifying label and click “Create”.
Configuration Parameters
The following describes what to from the default set of values. These are deemed safe at the time of writing and will need to match the industry norms at the time of deployment.
| Parameter Name | Value | Description |
|---|---|---|
| Crypto Token | Select the Intermediate CA Token created in the earlier step | |
| Signing Algorithm | SHA256withRSAandMGF1 | Root CA certs usually are recommended to have long encryption key lengths: 2048bits for RSA and 256 for ECC. In this case we opt for RSA but SHA256withECDSA is also a good option. |
| defaultKey | defaultKey | |
| certSignKey | signKey | The key to use for certificate issuance |
| keyEncryptKey | defaultKey | The key to use for CRL signing |
| testKey | testKey | Key used internally by EJBCA health-check to verify that the Crypto Token is usable |
| Signed By | Select the Root CA created in the earlier step | Intermediate CA certs are signed by the Root CA |
| Certificate Profile | Select the Intermediate CA Certificate Profile created in the earlier step | |
| Validity | 10y | Intermediate CA certs have less validity than the CA root certs. Generally, in the range for 10 to 15 years. |
| Default CRL Distribution Point | Click generate button | CRL endpoints are hosted on non-secure http endpoints. The value once generate is clicked should correspond to a URL that is accessible from where the IFS Signing Service is deployed. This might need to be changed manually if depending on the network setup. |
| Default CRL Issuer | Click generate button | Should match the common name of the CA. E.g.: “CN=IFS Intermediate CA” |
| OCSP service Default URI | Click generate button | OCSP endpoints are hosted on non-secure http endpoints. The value once generate is clicked should correspond to a URL that is accessible from where the IFS Signing Service is deployed. This might need to be changed manually if depending on the network setup. |
| CA issuer Default URI | *Check procedure in the “Determining the Root CA PEM encoded certificate’s publish URL” section below |
Finally click the create button. If everything is successful, the Intermediate CA should be visible on the list of CAs.
Configuration Parameters
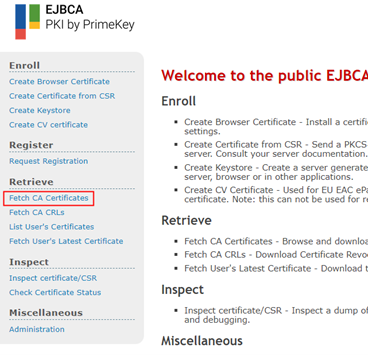
Navigate to “Public Web” at “http://{EJBCA_ROOT}/ejbca” and click on “Fetch CA Certificates”
Right click and copy the link address of the PEM encoded certificate of the Root CA. Use this for the “CA issuer Default URI” in the above step. The URL might need to be adjusted so that it is publicly accessible i.e., from the IFS Signing Service.
Creating the End-user Signing Certificate Profile
Like the CA certificate profiles, a profile for the signing certificates also needs to be created. Do this by navigating to the “Certificate Profiles” menu in the admin GUI and cloning the “ENDUSER” template. Then edit the newly create profile.
Configuration Parameters – End-user Signing Certificate
The following describes what to change from the default set of values. These are deemed safe at the time of writing and will need to match the industry norms at the time of deployment.
| Parameter Name | Value | Description |
|---|---|---|
| Available Key Algorithms | Ctrl click ECDSA and RSA | YubiKey version 5 supported only ECDSA and RSA algorithms at the time of writing. |
| Available ECDSA curves | Ctrl click P-256, P-384 | YubiKey version 5 supported only P-256 and P-384 ECC curves at the time of writing. |
| Available Bit Lengths | Ctlr click 2048, 4096 bits | YubiKey version 5 supported only 2048 and 4096 bits for RSA encryption at the time of writing. |
| Validity or end date of the certificate | Customize to the needs of your organization | The certificate would expire after this period. |
| CRL Distribution Points | Check “Use” checkbox | Used to check if the certificate has been revoked. |
| Use CA defined CRL Distribution Point | Check “Use” checkbox | Used to check if the certificate has been revoked. |
| Authority Information Access | Check “Use” checkbox | Enables extensions needed to access the OCSP responder and issuer cert URL |
| Use CA defined OCSP locator | Check “Use” checkbox | Used to check if the certificate has been revoked. |
| CA issuer URI | *Check procedure in the “Determining the Root CA PEM encoded certificate’s publish URL” but select the URL of the Intermediate CA and not the Root CA | The Intermediate CA signs all end-user certificates so the certificate location of the Intermediate CA must be used here. |
| Available CAs | Select the Intermediate CA created in one of the previous steps | Only the Intermediate CA would be used to sign all end-user certificates. |
Finally Click Save.
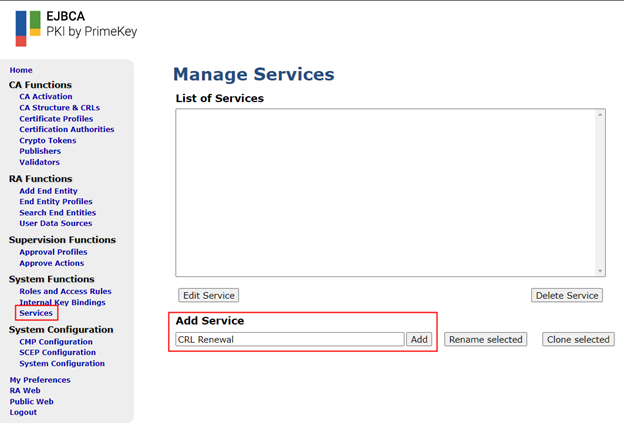
Setting up a Certificate Revocation List (CRL) renewal service
CRL’s as its name suggested tracks certificates that have been revoked. The CRL itself is a signed document which expires after one day if sticking to the default settings. EJBCA needs to be configured to automatically renew the CRL before expiry. To do that, navigate to the “Services” in the admin GUI, give it a name and click “Add”.
Select the newly created service and click “Edit Service”. Leave the defaults and change as follows: | Parameter Name | Value | Description | | :---------- | :--------- | :---------: | Select Worker | CRL Updater | | | CAs to Check | Ctrl Click the Root and Intermediate CAs created earlier | Only need to renew the CAs that were manually created | | Active | Check the Active checkbox | This activates the periodic background service |
Clicking on save should configure and activate the new background service.
## Setting up an Online Certificate Status Protocol (OSCP) responder OCSP responders are also responsible for keeping track of revoked certificates and is a newer protocol that CRLs. The IFS Signing Service queries for certificate validity from the OCSP responder first and if for some reason the service is unreachable, falls back to checking via CRL. OCSP responses themselves are signed by the corresponding CAs and the key bindings must be configured as follows.
Navigate to “Internal Key Bindings”. Select the OCSPKeyBinding tab then click “Create New”.
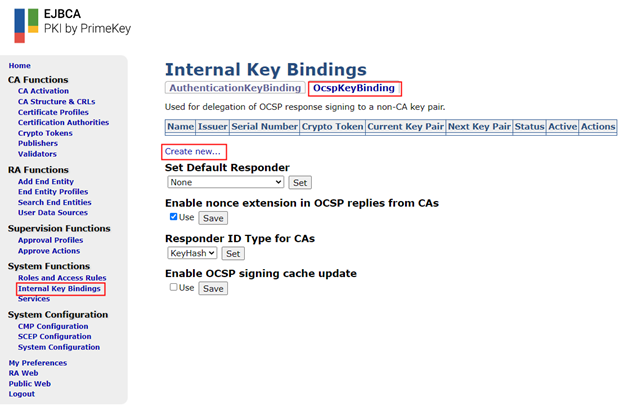
Create a key binding for the Root CA with the following settings:
| Parameter Name | Value | Description |
|---|---|---|
| Name | Any identifier | |
| Crypto Token | Select the Crypto Token created for the Root CA | The Root CA token holds the ocsp key pair used to issue OCSP responses |
| Key Pair Alias | ocspKey | OSCP requests are signed with this key |
| OCSP Extensions 1 | Select Archive Cutoff and click on “Add”. Make sure to check the “Issuer's notBefore” checkbox in the “Archive Cutoff” section | Archive Cutoff is used enable the CA to keep track of expired certificates |
| OCSP Extensions 2 | Select Certificate Hash and click on “Add” | CertHash is a method to qualify a positive OCSP response by including a secure hash of the certificate. This is a further tamper proofing of the protocol, as the default reply is signed using only the certificate's serial number, leaving other fields open to abuse. Including a hash based on all relevant values in the certificate increases the security for the client. |
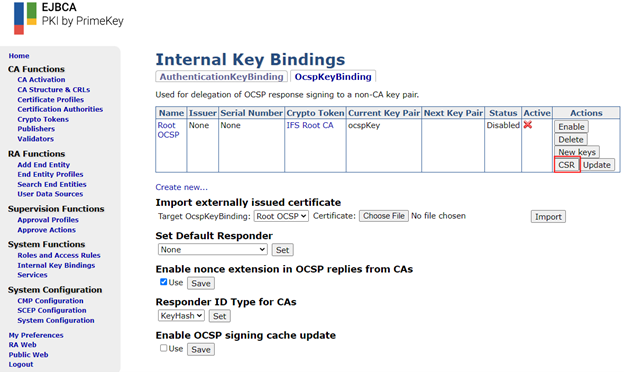
The final result should look the following:

Finally click save and then “back to overview”.
The next step is to attach a certificate to the OCSP responder. Do this by first creating a CSR.
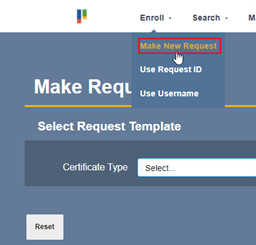
Issuing a certificate against a CSR
Navigate to “RA Web” from the Admin GUI and click on Enroll then “Make New Request”
Fill in request with the following data:
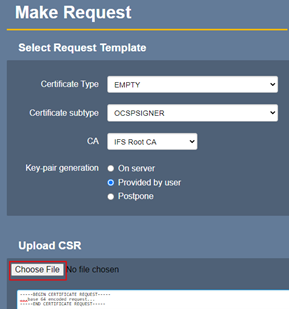
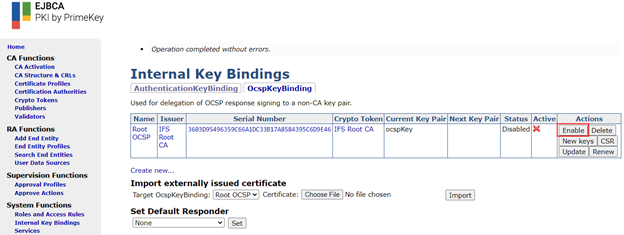
Click “Choose File” and pick the CSR that was downloaded from the OCSP responder in the previous step. Finally click on “Download PEM” after scrolling right to the bottom. Navigate back to the “OcspKeyBindings” page in the previous step and select the OCSP binding created earlier in the “Import externally issued certificate” section and click choose file. Give the downloaded PEM certificate file from the previous step. Finally click on “Import”. Then “Enable” the OCSP binding for the Root.
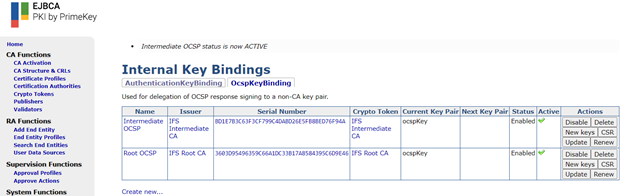
If everything is configured correctly, status should change to Enabled and “Active” should get checked. The same must be done for the intermediate CA with its corresponding values. The final outcome should be as follows:
Creating End Entity Profiles
Navigate to “End Entity Profiles” in the admin GUI and add a new profile. Then edit the newly created profile.
| Parameter Name | Value | Description |
|---|---|---|
| Default Certificate Profile | Select the End-user profile created in the “Creating the End-user Signing Certificate Profile” step. | This will restrict the RA GUI to only include the correct profile |
| Available Certificate Profiles | Select the End-user profile as above. | |
| Default CA | Select the Intermediate CA | Only the Intermediate CA will be responsible issuing end-user certificates. |
| Available CAs | Select the Intermediate CA |
Finally click on “Save”. The CA configuration is complete.
Issuing End-user certificates against a CSR
Once the end-user generates a CSR using their YubiKey, it needs to be signed by the CA. This is done using the “RA Web” GUI. Navigate to “RA Web” from the Admin GUI and click on Enroll then “Make New Request” as shown in the “Issuing a certificate against a CSR” step. Fill in the request as follows:
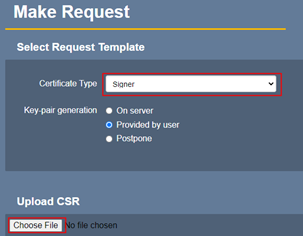
Certificate type would be the “End Entity Profile” that was created earlier. Select the CSR that the end-user generated and finally click on “Download PEM” after scrolling right to the bottom. This file is the signed certificate that needs to be imported back into the YubiKey.