SCIM Configuration Example - Azure AD
This configure example descibes how to setup User provisioning from an Microsoft Azure Application to an IFS Cloud installation. Keep in mind that not all Identity Managers will look and work the same way, but a similar type of setup will need to be configured. The implementation of SCIM in IFS Cloud is done through exposing endpoints that the Identity Manager will communicate with. Only the main endpoint will need to be added to the Azure provisioning. The correct endpoints within the SCIM service will be used based on the type of request that is made from Azure AD (Get, Create, Update and Delete).
Note: Setting this up with a Cloud service requires a secondary/external URL for your system to be enabled. This can be disregarded if using a service or application that is running on-premise.
Process Overview
Setting up provisioning with SCIM requires a few preparations. These steps are made to give a overview of the process as a whole.
- Prepare the Active Directory by adding the Users you would like to provision, if that is not already prepared. No specific groups are needed to be created for these users as of now. Groups will not be supported in this release.
- Make sure you have access to an external URL for your IFS Cloud installation if you are going to provision users from a solutuion that is not on-premise.
- Make sure the IFS_scim client is enabled. This will not be enabled in a fresh installation. This can be done in the Identity and Access Manager.
- Generate a new SCIM Offline Token to be used for the Admin Credentials. This can be be done on the SCIM Access Manager page.
- Add the SCIM endpoint and SCIM Offline Token to the Admin Credentials field in the provisioning tab of your Azure Application. A test button can be used to verify that the connection is successful.
- Open up the Mappings tab on the same provisioning tab to edit the attribute mappings of your user data. Many of these may be preconfigured to match the correct target attribute. The IFS Attribute Mapping table can be used to verify this.
- To verify the setup use Provision on demand to provision a single user. Verify the User in IFS Aurena.
- If the previous step looks good, the provisioning can be started.
SCIM Admin Role
In order to utilize the SCIM endpoints, a new Service User must be created. This user needs to be created with the Directory Id value IFSSCIM. Identity and Description can be configured to your own liking. User Type must be set to Service User.
Once the Service User has been created, this user needs to be granted the correct permissions. Go to the User Permissions tab and press Grant Permission Sets. Search or scroll down until you have located the Permission Set FND_SCIM_ADMIN. Grant this to your Service user.
Configuring SCIM provisioning in Azure AD
Once you have signed in to your Azure Enterprise Application you will see an overview on the landing page. If you wish to update or add users before setting up the provisioning you can do this by clicking the first option Assign users and groups.

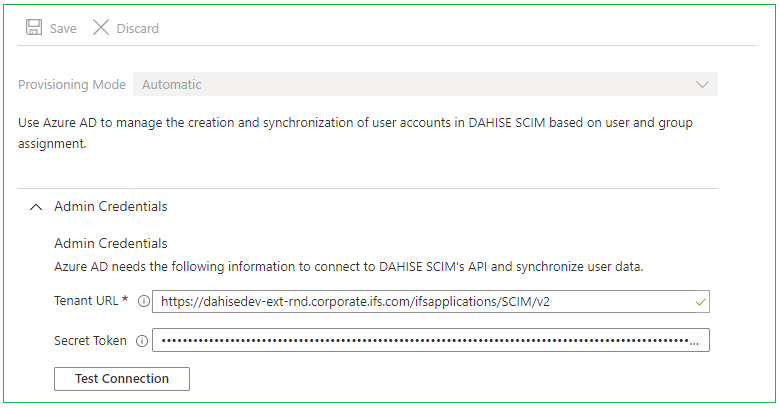
To start setting up the User provisioning select the third option Provision User Accounts. Continue by selecting Edit provisioning in the small top menu of the next page. Select Automatic in the dropdown menu Provisioning Mode. Expand the Admin Credentials tab and two fields, Tenant URL and Secret Token, will appear.

The Tenant URL field requires the main endpoint of IFS Scim to be added. In this case Azure AD is running as an external service, which means I need to add the external URL. For information on how to configure a secondary/external URL please refer to this page.
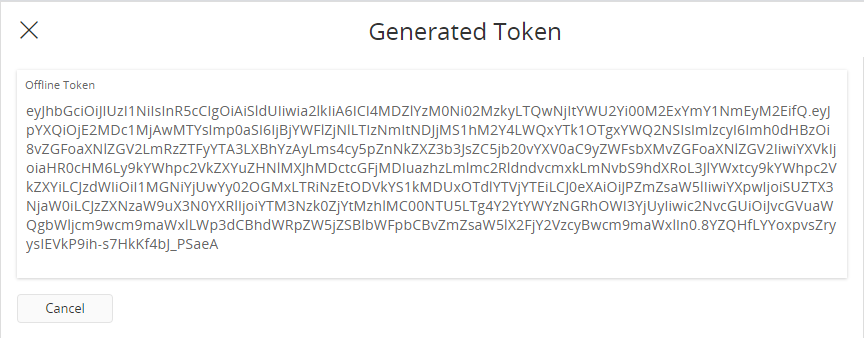
The second field, Secret Token, requires an Access Token. Normal access tokens have a limited life time, and will expire shortly after being issued. This is circumvented by using an Offline Token, which is a type of refresh token. This token will not expire unless it is revoked. Offline Tokens can be generated in IFS Aurena on the SCIM Access Manager page.

Note: Do Not Delete ifsscim user.
When pressed, a assistant will appear with a long text string in it. This is the Offline Token, copy the content and paste it in the Secret Token field.

By pressing Test Connection it is possible to validate the token and endpoint setup. If the connection is OK, press save.
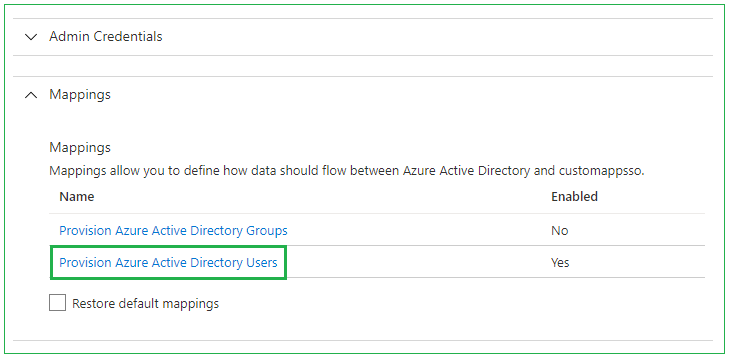
Directly below the Admin Credentials dropdown, you will find Mappings. Expanding this will allow Attribute mapping setup. Azure AD Groups can be disabled. Enter the User mapping by pressing the Provision Azure Active Directory Users field.

The Attribute Mapping page allows us to choose which attribute we map our User Data to. In the picture below we an see that the Azure AD attribute userPrincipalName is being mapped to the SCIM attribute userName. This can be changed by pressing a selected row. By using the IFS Attribute Mapping we can decide what a certain value in Azure AD will end up being mapped to in the IFS Cloud database.

Note: Azure uses a SCIM patch request to update users. The SCIM patch request supports filters in attributes such as address. For example, addresses can be filtered using the type as follows:
SCIM Attribute IFS DB Attribute addresses[type eq "work"].country person_info_address.country However, for filters to work in the patch request, the filtering attributes must exist in the IFS Cloud database. If not, the patch request will fail. Therefore, when configuring the attribute mapping in Azure, make sure to map address attributes without filters to the IFS DB attribute. Use the below sample mapping for reference:
SCIM Attribute IFS DB Attribute addresses.formatted person_info_address.address addresses.streetAddress person_info_address.address1 addresses.locality person_info_address.city addresses.region person_info_address.state addresses.postalCode person_info_address.zip_code addresses.country person_info_address.country
Once you are satisfied with your mapping, press save. You can now return to the main Provisioning page of Azure. Here you can either chose to test your configuration by pressing Provisioning on demand or go ahead and press Start provisioning to start your automatic provisioning. More features can be configured in Azure AD and other User Management providers. For more information about those please refer to their available documentation.
Mapping User Attributes
During the setup of provisioning with SCIM the attribute mapping of the user data from the external user manager to the IFS user database have to be configured. The Administrator will need to configure what attribute (in this case Azure AD attribute) should point to what SCIM attribute. The IFS Attribute Mapping table can then be used to see how the SCIM attributes correlates to the IFS User attributes.
