IFS Connected Factory - Bi-directional Communication with Crosser
IFS Connected Factory - Bi-directional Communication with Crosser
As part of the Connected Factory solution Bi-directional communication is a highlighted capability which allows to issue commands from IFS Cloud all the way to the physical machine.

Setting up a Crosser edge node in an Azure Linux VM (Virtual Machine)
Setup an Azure VM select Ubuntu Server version 18.X/20.X as the Linux version (4gb RAM machine is enough for testing purposes). You can use Azure Bastion or Putty client to access the VM. (Note down the username/password)
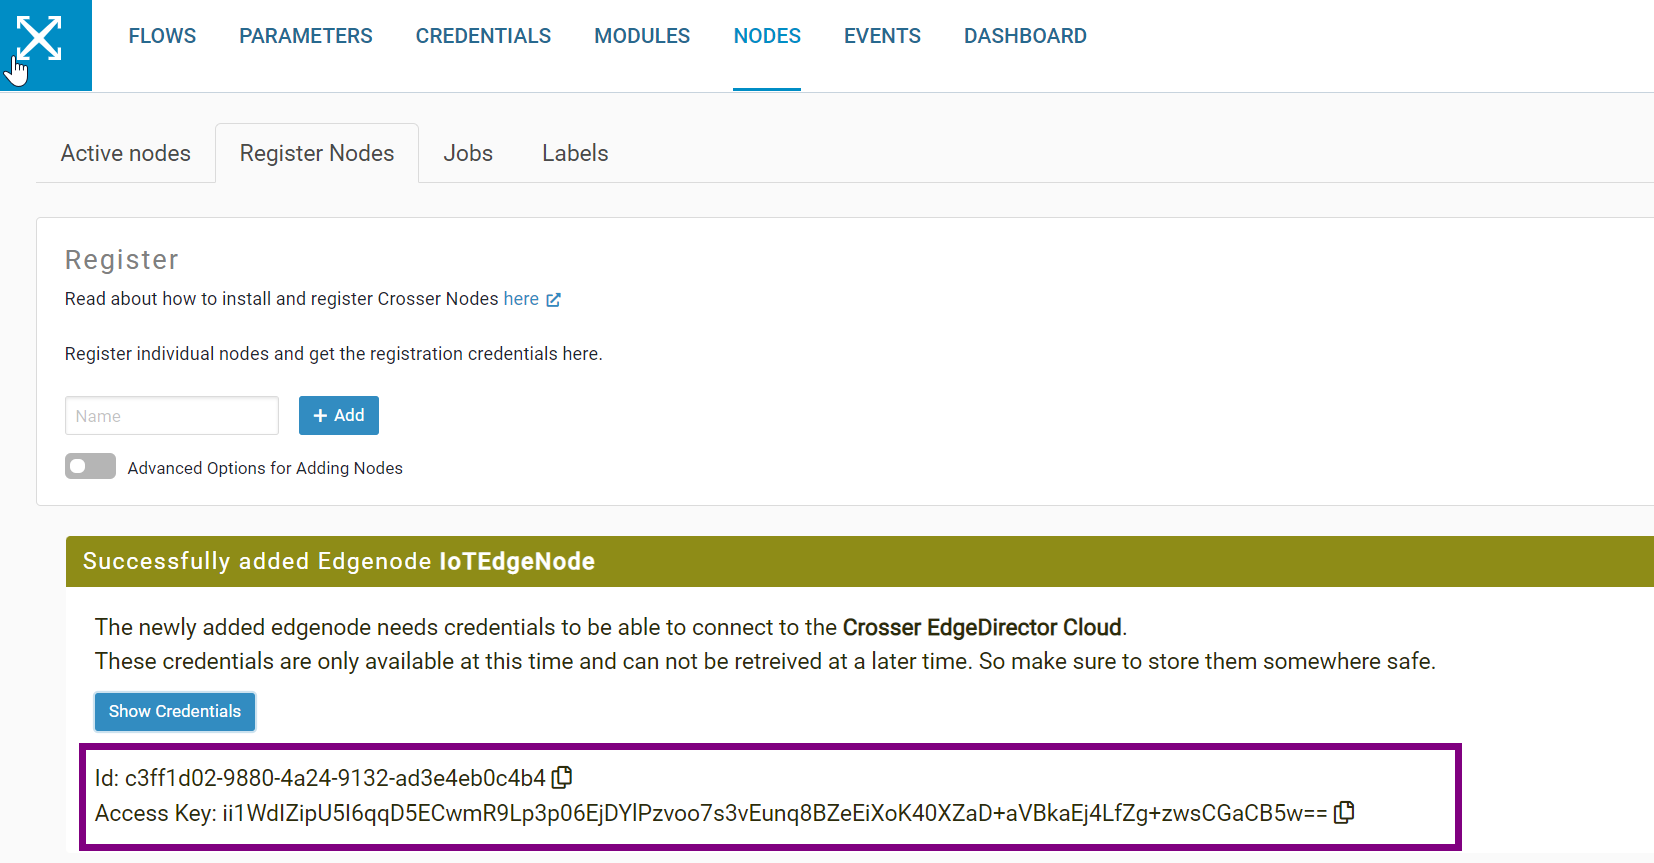
Login to Crosser and navigate to Register nodes. Then create a node and copy the ID and Access key as it will be needed for step 5.
Install docker and docker compose in to the VM. Follow below two links.
  Docker – https://www.hostinger.com/tutorials/how-to-install-docker-on-ubuntu
  Docker Compose - https://docs.docker.com/compose/install/
Login to docker from the VM. Docker Credentials mentioned in the Crosser portal - https://cloud.crosser.io/#/edgenodes
run -sudo docker login https://docker.crosser.io
Add "docker-compose.yml" file into the current directory of the VM by running below command.
run - cat > docker-compose.yml
Copy paste below content into the created "docker-compose.yml" file. Replace NodeId & AccessKey using the values created in setp 2 and save.
version: '3.5'

services:
  edgenode:
    image: docker.crosser.io/crosser/edgenode:latest
    container_name: crosser-edgenode
    restart: always
    environment:
      - SecurityConfiguration__Credentials__NodeId=ENTER-YOUR-NODEID-HERE
      - SecurityConfiguration__Credentials__AccessKey=ENTER-YOUR-ACCESS-KEY-HERE
    ports:
      - 9090:9090
      - 9191:9191
      - 1883:1883
    volumes:
      - "./data:/application/data"
    logging:
      driver: json-file
      options:
        max-size: "50m"
        max-file: "2"
Usually, Azure VMs are open to public so unless you have added any additional proxy/VPN settings to the VM, you should be able to start the edge node inside your VM by below command. If it is a success. The node that was created in should be displayed in green color inside crosser.
run - sudo docker-compose up -d
After that you need to open port 9090 in your vm for the incoming traffic as this port will be used by the Crosser edge node to listen to incoming traffic.
Securing Crosser edge node
Crosser documentation - https://support.crosser.io/portal/en/kb/articles/securing-http-and-mqtt-endpoints
Currently only the Basic auth is supported. For setting up follow the above linked crosser doc. By default, traffic is in HTTP so to Encrypt it in HTTPS follow the above linked crosser doc and create a certificate. Note down the “CertificatePassword” and replace it in step 4.
Then go inside the cd data folder and create mkdir certificates folder.
Then copy the created cert file inside to sudo cp edgenode.pfx data/certificates.
Next edit vim httpconfiguration.json file with below file and save. Then restart the edge node. Now the node will accept HTTPS traffic.
 {
    "HttpConfiguration": {
        "HttpEndpoints": [
            {
                "Address": "0.0.0.0",
                "Port": 9090,
                "Name": "---",
                "AuthenticationType": "None",
                "AuthenticationEncryption": "MD5",
                "AuthenticationFolder": "authentication",
                "AuthenticationFile": "httpAccess9090.config",
                "CertificateType": "FileCertificate",
                "StoreCertificate": {
                    "Subject": "",
                    "StoreName": "My",
                    "StoreLocation": "LocalMachine",
                    "AllowValidOnly": true,
                    "SslProtocols": "Tls12"
                },
                "FileCertificate": {
                    "CertificatePath": "edgenode.pfx",
                    "CertificatePassword": "{ replace }",
                    "SslProtocols": "Tls12"
                }
            }
        ]
    }
 }
Sending requests to the Crosser edge node from IFS Cloud
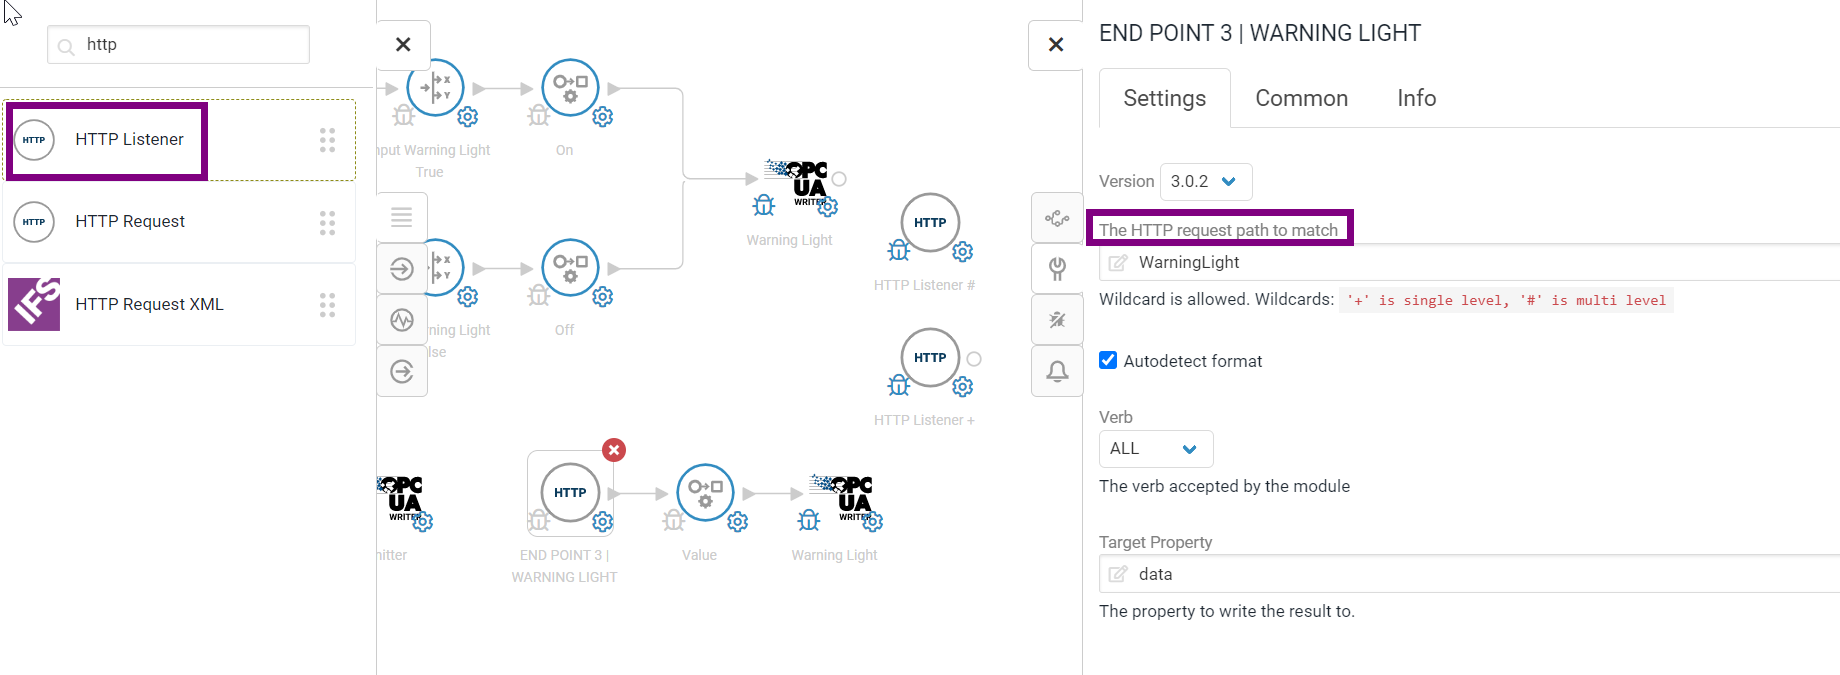
First a HTTP listener module needed to be setup in a Crosser flow. The HTTP request path to match can be of any meaningful value and that value needed to be matched in the URL for incoming requests from IFS Cloud. Make sure the Crosser flow is connected to the edge node created above and is started.
URL format
*https://{IP Address of VM}:{port}/{request path to match}
A third-party client like Postman can be used to test if the URL is working as expected. Do not forget to add basic authorization if it is set up in the edge node.
Note: Only JSON format is supported in the payload.
Depending on port configurations in IFS Cloud, outbound calls on certain ports are blocked. Need to make sure the use of a supported port in this step (Ex: port 80). To check this please reach out to a person who is involved in deploying the IFS Cloud instance.
Incoming requests will be displayed in the Crosser flow like below. (Need to enable debug in the module and outputs will be visible in the debug section)
The payload, which was sent, always will be inside a JSON object called data.
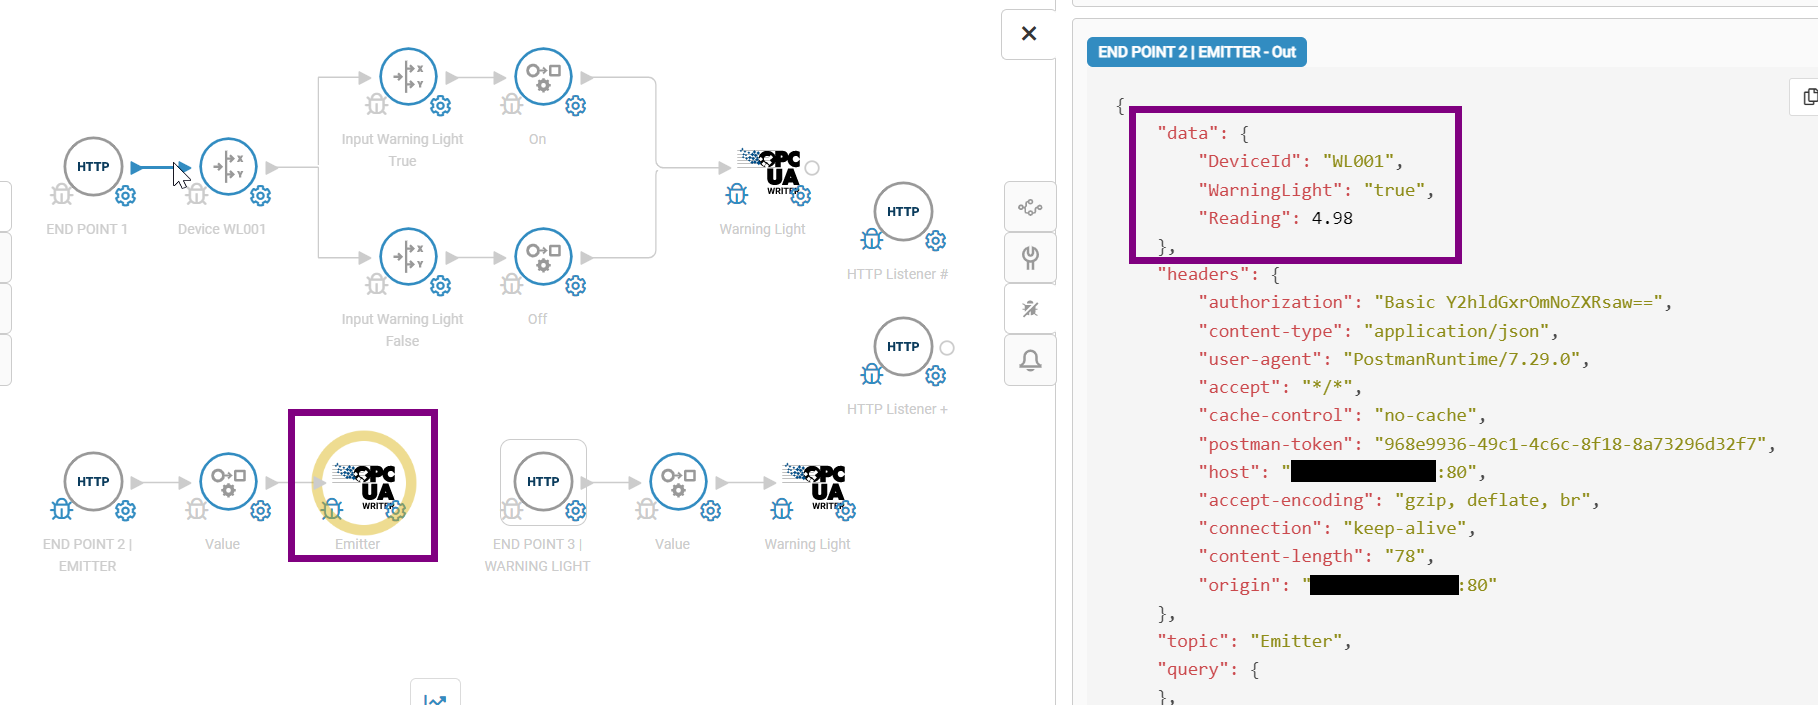
Example data JSON object
  "data": {
    "DeviceId": "WL001",
    "WarningLight": "true",
    "Reading": 4.98
 }
IFS Connect or IFS Business Process Automation (Workflow) can be used to create outbound requests to a Crosser flow.
Request through IFS Connect
The request will be done through IFS connect using application messages, routing addresses and routing rules.
For HTTPS set up the SSL certificate of the URL needed to be imported to the IFS Cloud instance.
Please note the following configurations will be different based on the server method used.
In this example the JSON asynchronous method is used.
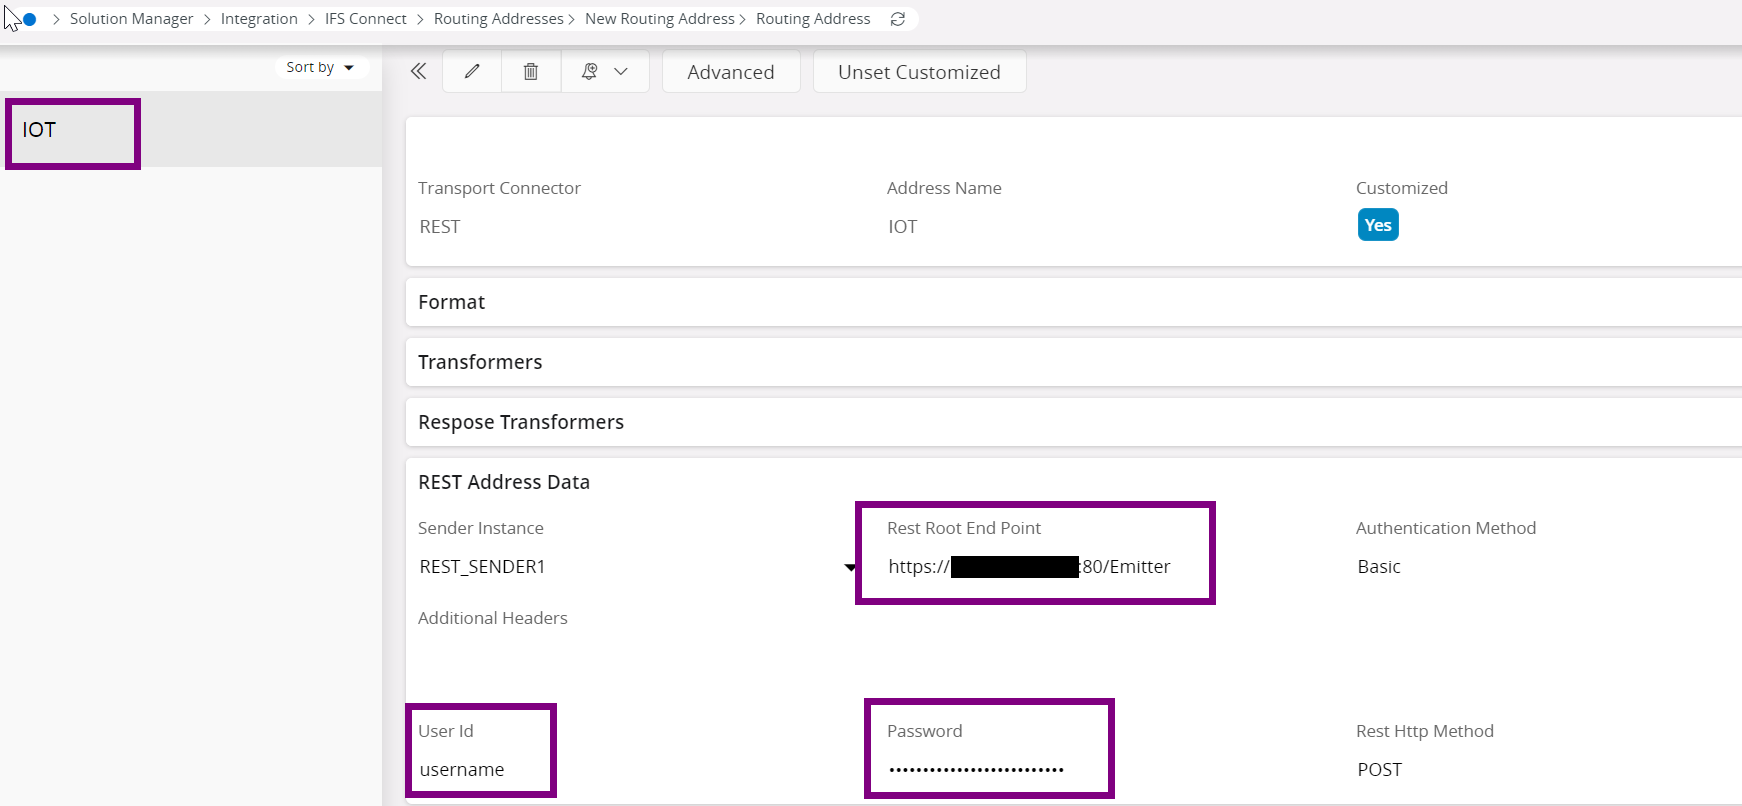
Create a Routing Address for the URL endpoint and make sure to add basic authorization information as well.
Routing rule of Outbound type
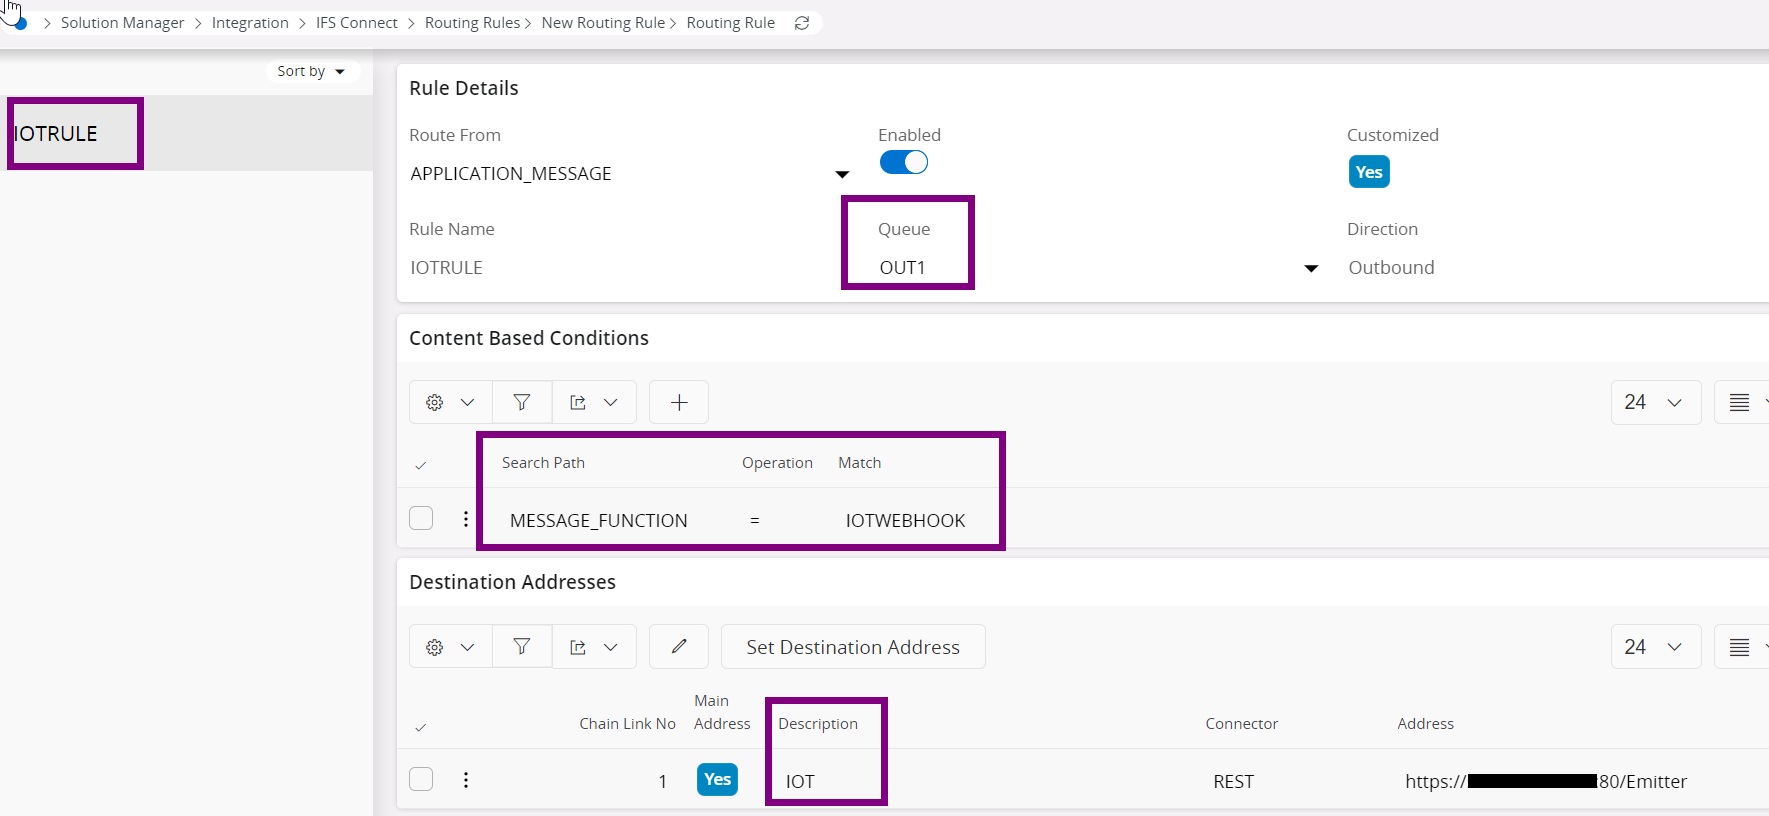
As per this example, a queue is defined, and the condition is the message function. For destination address add the routing address created in the above step.
The following is how to invoke the Rest API (Application Programming Interfaces) through a PLSQL method call.
 **declare**

 message_ CLOB;

 **begin**

 message_ := '{"DeviceId":"WL001",
                "WarningLight":"true",
                "Reading":4.98}';
 Plsql_Rest_Sender_API.Call_Rest_EndPoint_Json(rest_service_ =>'IOTWEBHOOK',
               json_ => message_, http_method_ =>'POST',
               receiver_ => 'IOTWEBHOOK');

 **end;**
In this example for each invoke an application message will be created and that can be monitored for any errors when invoking the URL.
For more information about IFS Connect please refer to the relevant documentation.
The manufacturing product team has released a functionality based on this architecture called Manufacturing Execution System (MES). For more information about that solution please refer to the relevant documentation.
Request through IFS BPA (Business Process Automation)/ Workflow
Need a BPA flow with task IFS Rest Call
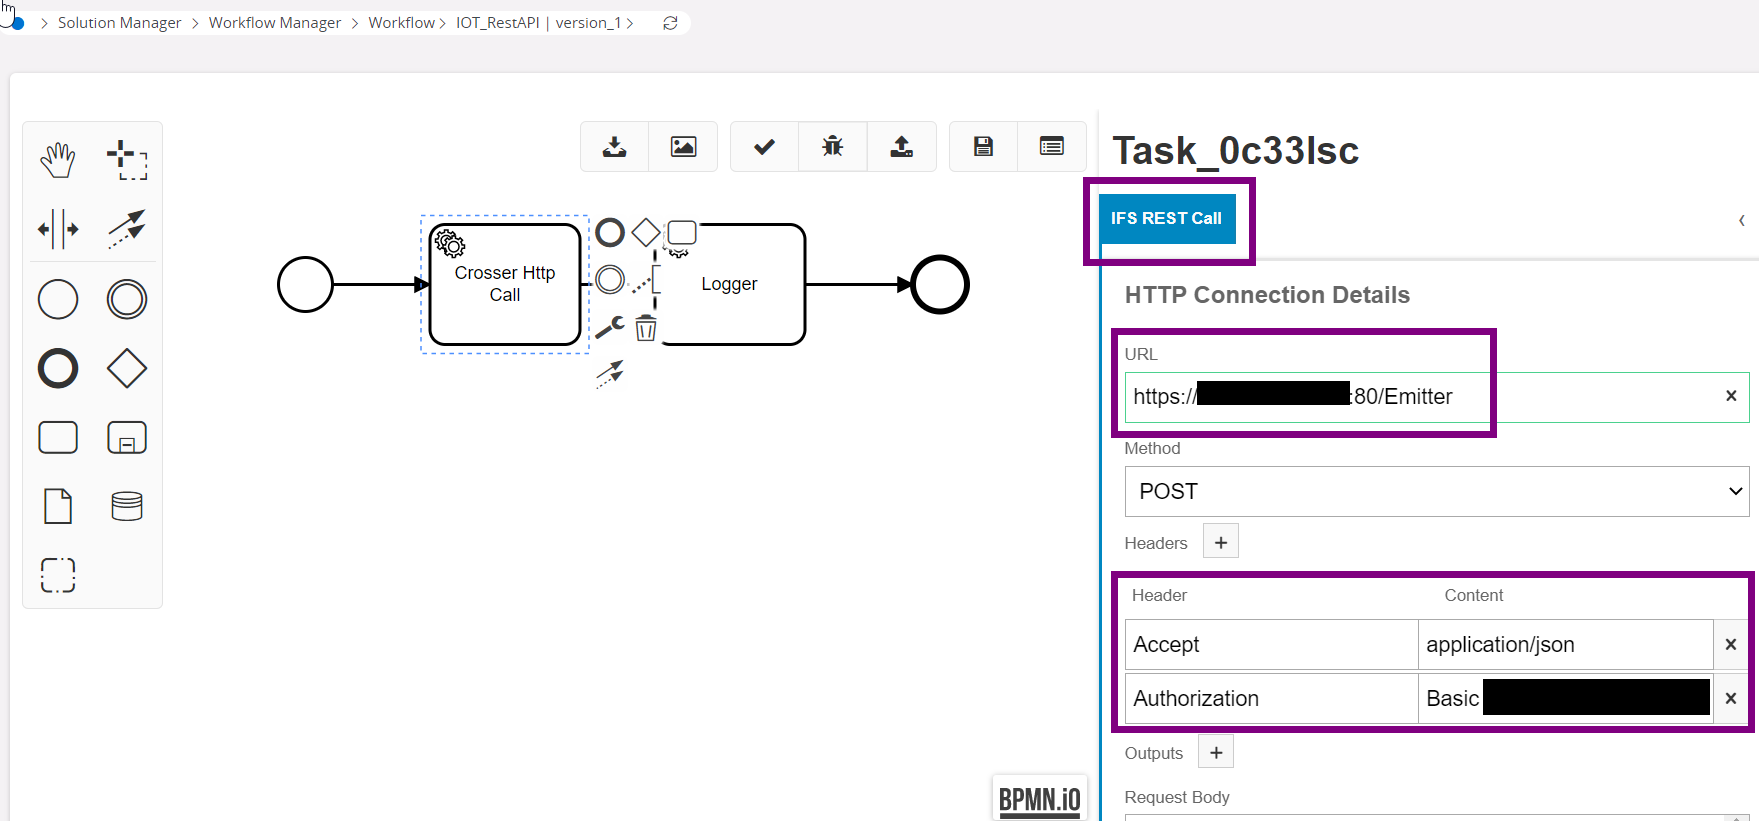
Need to have following headers
Content-Type: application/json
Authorization: Basic
(Ex: Basic dXNlcm5hbWU6cGFzc3dvcmQ=)
Once this BPA flow is invoked a rest call will be made for the Crosser HTTP module.
For more information about BPA please refer to the relevant documentation.
Configuring HTTP Listener module/s
Single HTTP Listener module
Here in the payload need additional information like device id to identify which device the request belongs to. Split modules based on the device id, or any other identifier can be defined in the flow. Based on the condition then the command can be propagated to desired device.
HTTP Listener module per device
Here in the Crosser flow, there are multiple HTTP Listener modules which each path is unique using request path to match in each module. In this architecture only the relevant value to be written can consist of the payload. No additional properties like device ids are needed.

Hybrid setup
Here also, there can be multiple HTTP Listener modules which each path is unique using request path to match in each module. But one HTTP Listener module can be for a group of devices. For example, one per all section 1 devices etc. Again, here unique identifiers in the payload are needed to differentiate.
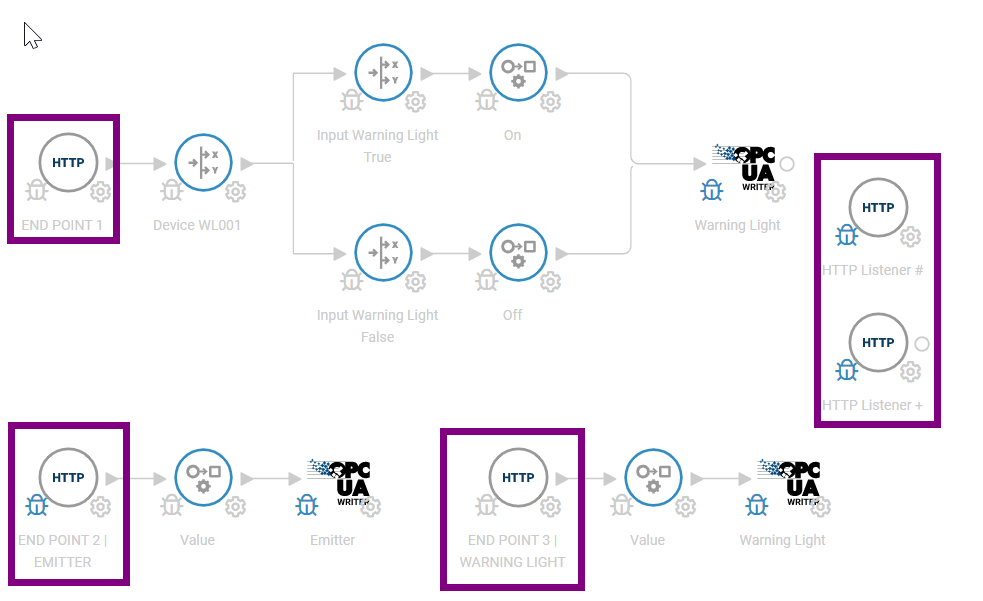
Above is a sample Crosser flow with 5 HTTP listener modules. Two modules are dedicated to warning light and emitter devices. One listener module with device check. Two wild card modules which are explained in the next section.
Wild cards
Wild cards are supported in the HTTP Listener module as well. In the request path to match # or + can be defined.
For example, if the request path to match is Section1/# then the following URLs are valid
https://{IP Address of VM}:{port}/ Section1/Device1
https://{IP Address of VM}:{port}/ Section1/Device2
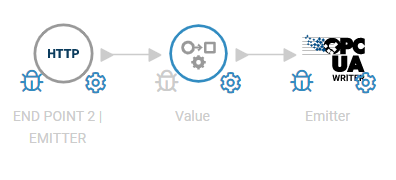
Writing to a device
Crosser supports the most common IIoT (Industrial Internet of Things) protocols along with Rest call capability. Once the needed data is extracted from the payload from the HTTP Listener module, the JSON object data can be accessed in the Crosser flows. For example, in the example below single listener module per device is set up. In the payload we get only the value to be written to the machine. The OPC UA protocol is used to do so.