Input Container
Input container is a common ground for mapped legacy data in each project extracted from different sources where user can filter based on source/all sources, migration object and target table.
The Input container is a generic table to be used for all Target Tables. It is using Meta Data to define each Target Table. Each field size is 4000 character, which makes it possible to store the Legacy Data as its original format and then use Meta Data information to validate and find out what needs to be transformed to fit all meta data requirements. This enables the Data Migration Manager to receive the Legacy data is it looks, without any adjustments before importing it. Because the data is stored in the Input container in its original format, it is possible to compare latest imported data with the previous imported data and flag for what records are new and what records have been changed. This is the basis for the Change Control feature for Data Migration Manager.
The Meta data stored along with target table data is column name, column description, size, type, enumeration name, enumeration values, reference, auto generated flag, basic data extraction flag, basic data validation flag and check for duplicates flag. The last 2 meta data rows are Rules, one for Transformation Rules and one for Default values.
The input container allows user to transform, validate and eliminate duplicates. When a data record is transferred to the input container, a unique value is generated to a concatenated value that combines Source ID and respective key field values of the given target. It is called 'Key Col UID' and it helps to uniquely identify a record throughout the flow up to the deployment container
In order to see any data in the Input Container, the Filters have to be set for a specific Migration Object and Target Table. There are two different Data Status fields in the Input Container and two status fields that reflect the status of the given data line in the Output Container. The Record Status shows the evolvement of the Record from, New, Modified, Existing or Deleted. The Data Status handles the quality of the Data in the Record like, Not Validated, Error, Validated by Rule Ready for Transfer and Validated Ready for Transfer. These Status fields can be used to select for Rerun of Validation Test.
User cannot edit data in this container except the 'Exclude from Transfer' and 'Exclude Comment' column. As mentioned before this container has a generic table structure with 12 columns to store key field values, 400 columns to store non-key field values and all those 412 columns has adjacent columns to store the messages that are generated during validations. Other than them 5 columns called 'Unique Column', 1 column called "Unique Column Concat" and 1 column called "Key Column Concat" along with message columns are there for the duplication check functionality.
Extract data to the Input Container from an Environment
If user wants to load data from an environment (in cases like to check duplicates, perform bulk updates), that is facilitated as well by creating a source at the back end for the given connected environment. It is encouraged to load Master or Transactional Data.
Meta Data Validation
To run the Meta Data Validation, the Source needs to be selected. If any Errors occur, they will be clearly marked in the Message Column.
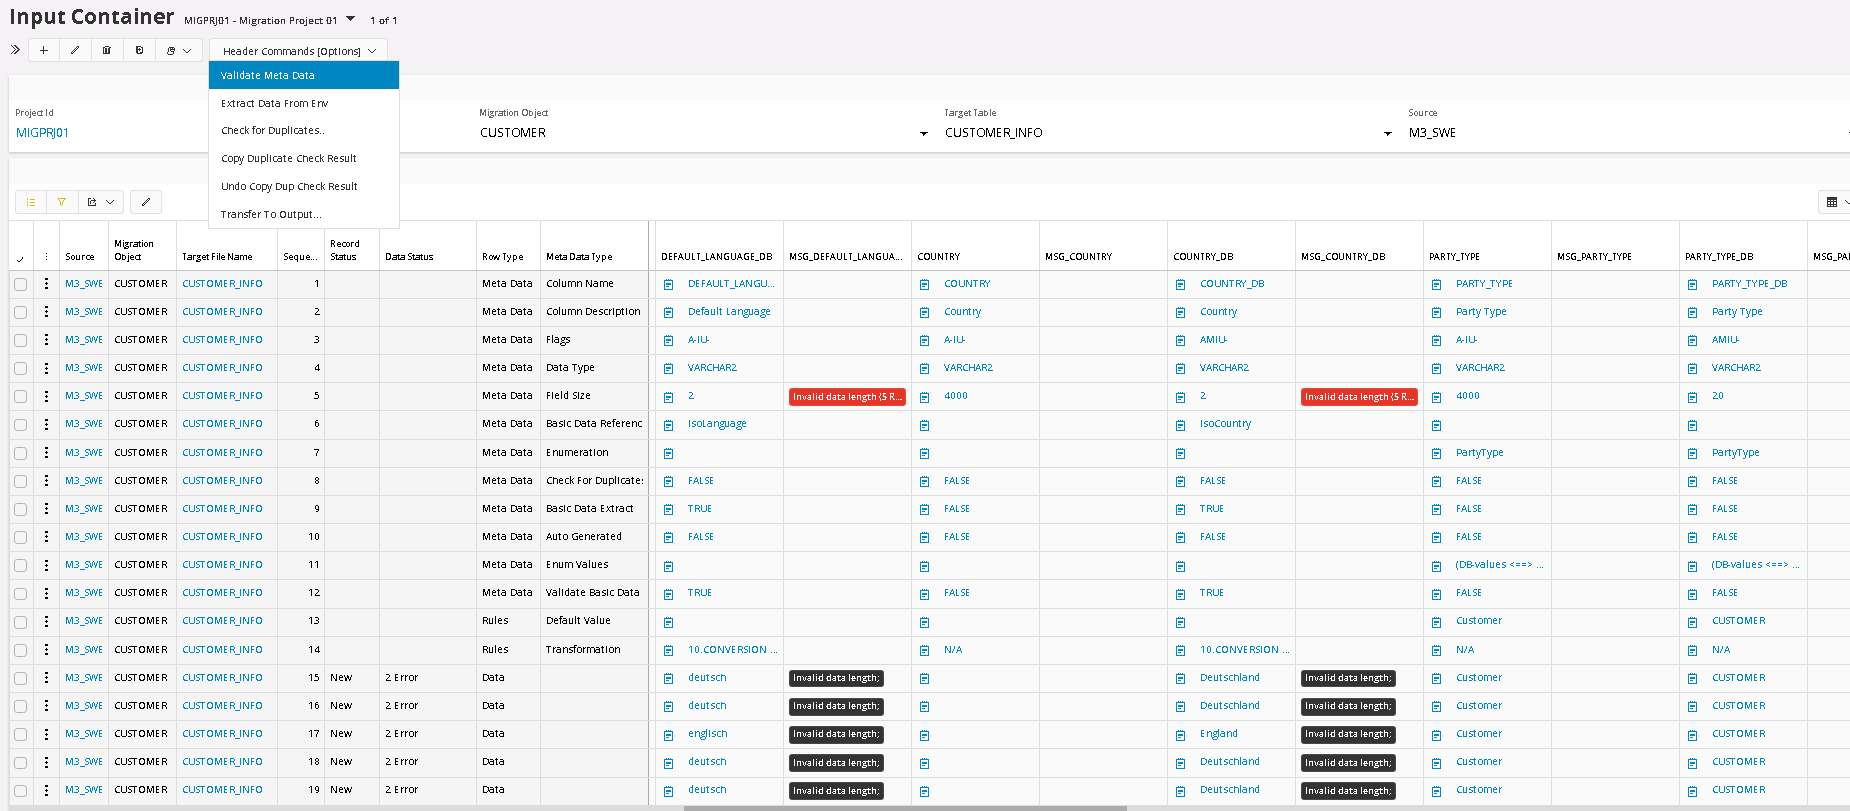
It is clear what causes the errors, so next step would be to fix these errors. In this case we choose to create a Transformation Rule, called Conversion List.
Meta Data Line 14 holds the Transformation Rules and to create a new Transformation rule for one of the columns, where we have errors, simply click on the Hyperlink N/A (Not Applied) or if there is a transformation rule already connected from the Template Project, you click on that Hyperlink. Then you will go to the Transformation Rules screen. In the example above there was already a Conversion List added for the Language Code, via the Target Table Definition. It comes from the Template Project, that is used for this Migration Project, so we don’t need to create it, just update it. It saves time.
Apply Transformation Rules
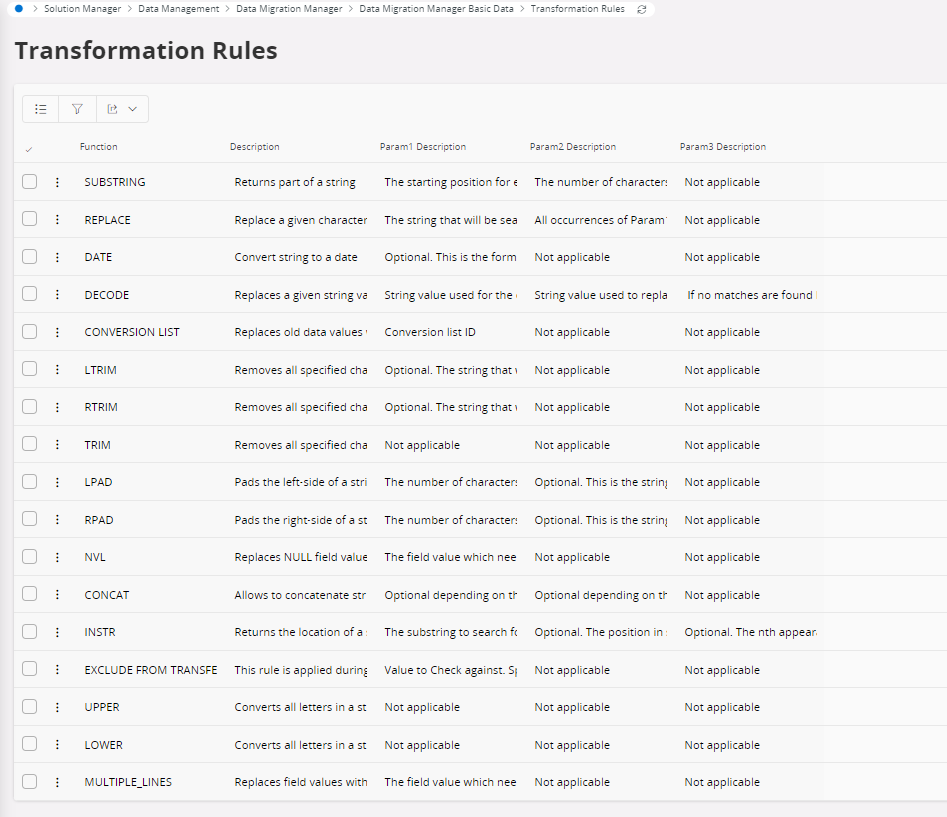
If any data transformations are needed E.g. to get rid of a meta data validation error that can be fulfilled by applying a transformation rule. Then these transformations will be considered during the meta data validation and when the records are transferred from Input to Output container. By Clicking on the 'N/A' value of the transformation rules type meta data line, a new transformation rule can be added.
Note: The transformation rule only simulates the changes when it is used in the Meta Data Validation. The actual changes only take place when transfer the data from Input to Output container. There is one exception, and that is the Transformation Rule, Exclude from Transfer, that sets the Exclude flag when Meta Data Validation is executed.
The description of transformation rules implemented in the Data Migration Manager is listed here. Over time, new Transformation Rules will be created by the Data Migration Manager and they will be added to this list and then can be selected when needed. In this form it is also possible to see the available Transformation Rules as of today, but also how they should be used.
Conversion Lists
Conversion List is a Transformation Rule that converts values based on a list of values. Each Conversion List is generic and converts values for specific fields, like Part number or Customer IDs, that could exist in several Target Tables. The data in the Conversion List can be defined for a specific Source or for all Sources.
In the Conversion List function, there is a smart option to fill the Conversion Table, with all its needed values. This way, users don’t have to manually go through, potentially hundreds of rows, to see what needs to be converted. It saves a lot of time.

When we use the function to Autofill Conversion List with values to convert, there are some options to decide what values to add. First, we need to decide if the conversion should be generic for all sources or if we should create the conversion list with a Source key word for each value. If we select all, then we will be able to use the same conversion for all source, assuming that the other sources have the same values and should be converted in the same way of course.
Next option is to decide what values that should be added. It can be All or Missing or Erroneous values. In some cases, we might want to do a conversion, even if it is not an Error. And If we have some values created for generic conversion, we might want to add the missing values for a Source specific conversion. In this case we select Erroneous values.

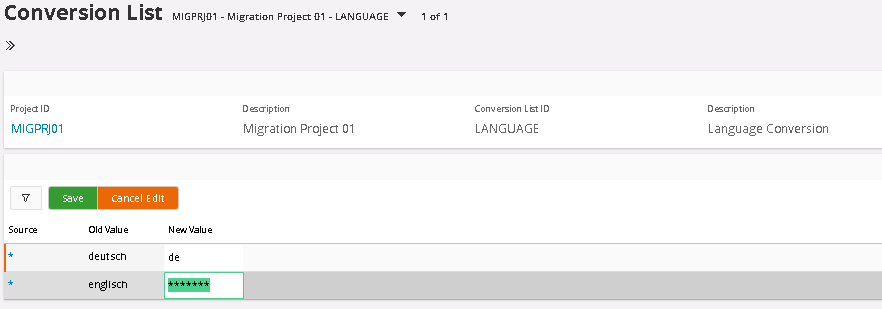
Next step is to add the values that should be the result of the conversion. And that needs to be done manually, of course. The conversion list is global and should be used for all tables, where the field is used so the same conversions is done everywhere where the field is used.
The first field Source, controls for what source this conversion should be made for. Asterixis means all sources. If we would choose, source specific, then we would use the Source Code, meaning it would only convert values from that source. Newly added values get the default value of 7 Asterixis so it is easy to identify if the value has been updated or not. A tip is to sort or filter the List around the New Value and then you will get all values that needs updating sorted together.
Duplication Control
Duplication Control is another function in the Input Container. The purpose is to be able to harmonize data between different sources. The Duplication Control function is defined in the Target Table Definition, where up to 5 different fields can be set for Duplication Control per Target Table. These fields can be changed, and duplication control can be executed again with new settings until the validation is ok. Key fields are handled separately besides the 5 duplication fields. All key fields are concatenated together so they can be controlled explicitly if wanted. In the example below we will search for duplicates in the Customer Info table with values from 2 sources, M3_SWE and SAP_GER, where M3_SWE has a higher priority (see Project Basic Data, Source configuration), if a duplication is found. This means that by default, the SAP_GER values that are duplicated will be suggested to be excluded or blocked for transfer to Output.
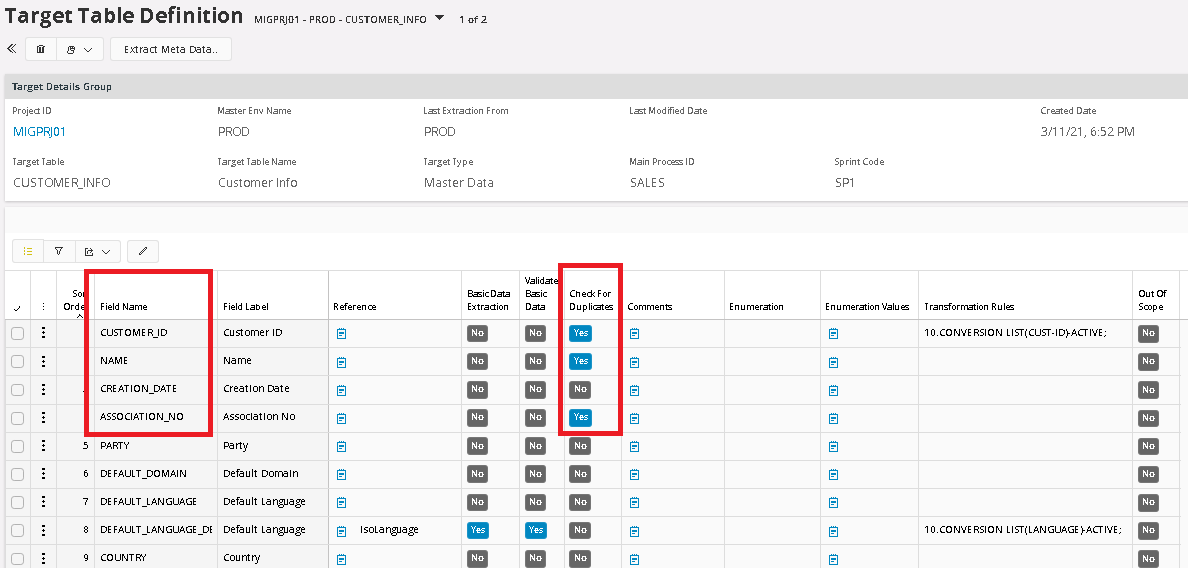
In our example we have chosen Target Table Customer Info, with the fields Customer ID, Name and Association Number to check for duplicate.
To run the Duplication control, the column filter should show values for All sources. As the tool works right now, you also need to set the Source filter in the Top Panel as well then you select the menu option Check for Duplicates.
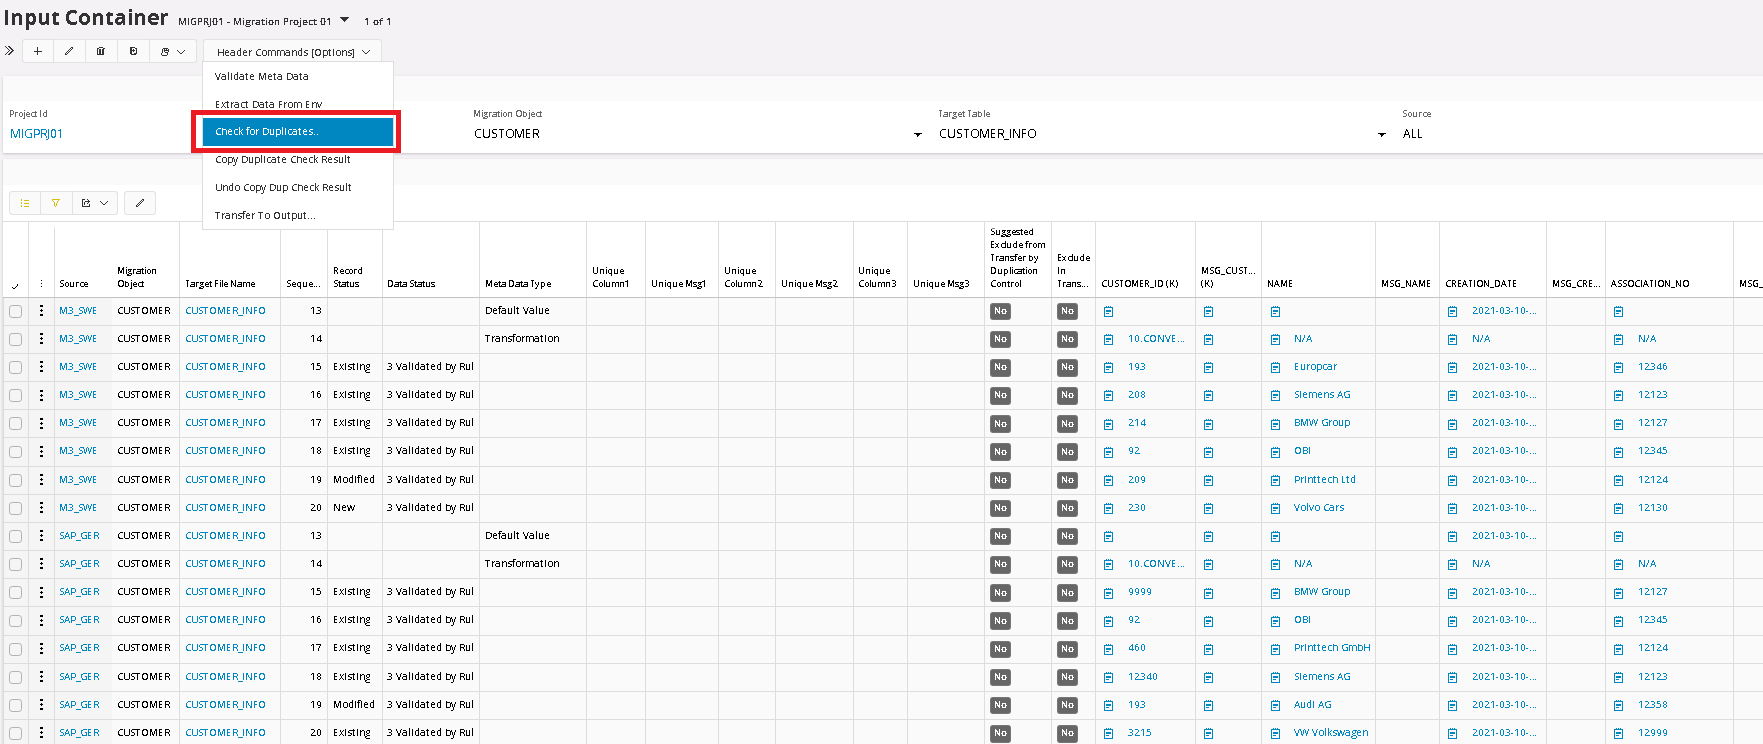
When the Check for Duplicate function is executed, it copies the values from the selected fields over to the columns Unique Column1, Unique Column2 and Unique Column3. If there is an active Transformation Rule, in any of the selected fields, then the transformed value will be copied instead of the original value.
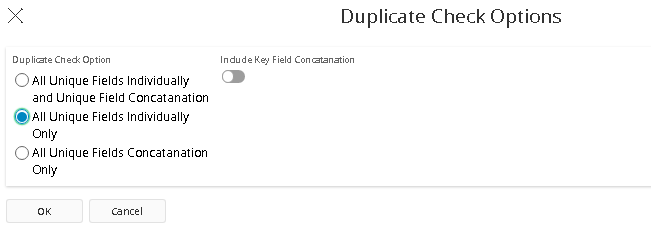
When starting the function, different execution options can be selected. In this case we want all unique fields to be compared individually.
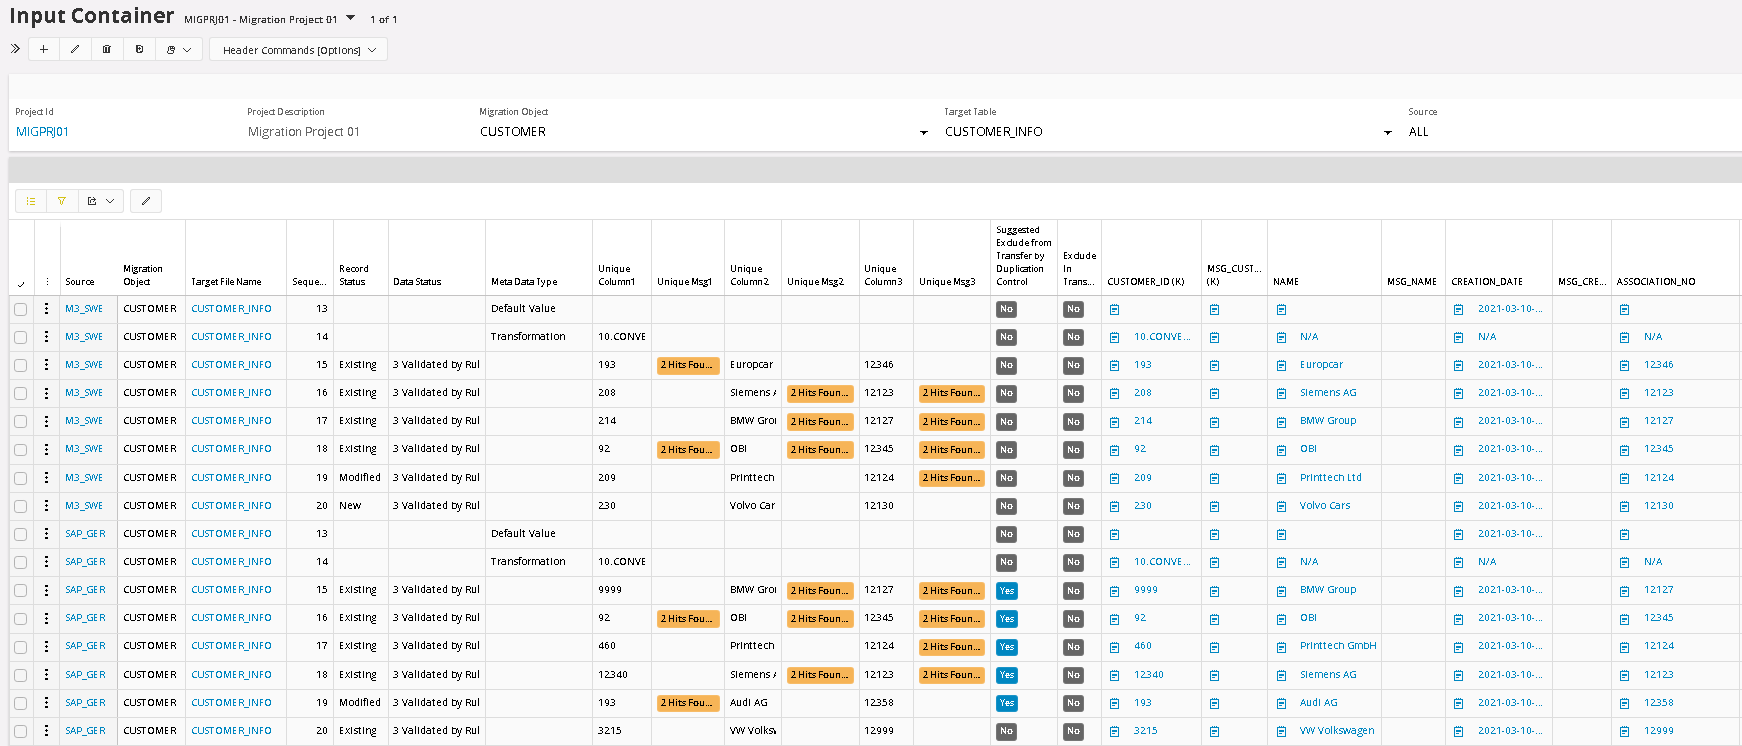
After the execution, all duplicated values are clearly highlighted in the corresponding Unique Msg columns.

To analyze the result, filter and sort each of the Message column. In this case we are filtering Message Column 1 for No Blank fields.

When filtered the list only shows rows with values, next step is to sort the list by clicking on the column header. Now all duplicated pairs (or more) will be next to each other, which simplified the analyze.
In this first column analyze we can see:
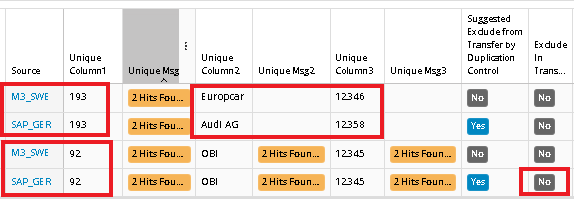
This result gave us 2 pairs. Customer 193 exists in both M3_SWE and SAP_GER but the name and Association number seems to be different. This seems to be 2 different customers that have the same Customer ID. Both should be transferred to Output but one of them needs to convert its Customer ID to something else. The suggested Exclude flag is set for SAP_GER because of the lower Priority number. So the suggestion will be to convert Customer ID 193 for the Source SAP_GER to something else and the Run the Duplication control again to see if a new error occurs.
Customer 92 seems to be the same customer though, so in this case it will be enough to set the flag Exclude in Transfer to block the customer from SAP_GER to be transferred over to Output container.

Next analyze will be for Column2 where we see following:
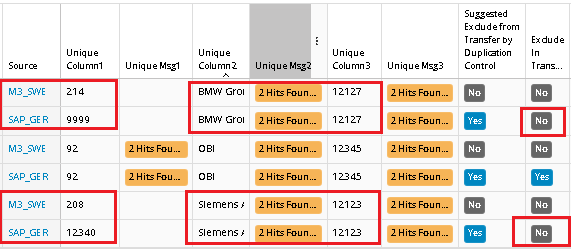
Two new pairs are shown, the middle one is already taken care of. In these cases, we can see that the Names are the same as well as the Association No’s, but the Customer ID is not the same. This means that it is the same customer, so Customer ID 9999 from SAP_GER should be Excluded from Transfer but also have the Customer ID value Converted from 9999 to 214, because that is what this customer will be called in the Output Container and all corresponding records in other tables that are using this Customer ID will have to be converted as well. This means that it is important to make sure that the same Conversion Table is used in all other Target Tables that contains the field Customer ID. The conversion value should be conditioned to the Source SAP_GER.
Same goes for the other pair as well. And the third Column can be analyzed the same way as well.
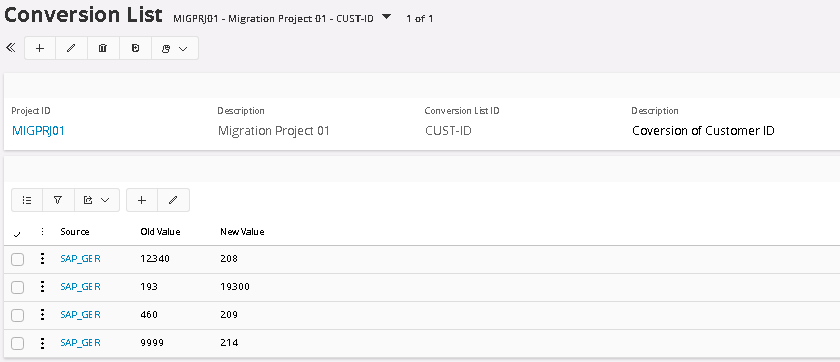
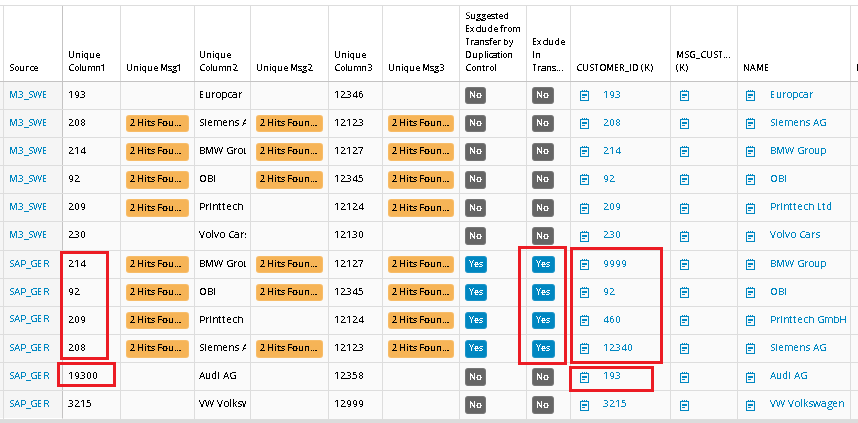
The Conversion List for Customer ID in this example, is updated with above values for source SAP_GER. If we run the Duplication Control function once again, we can now see that the new converted values have been copied to the Unique fields. The records that should be transferred have got a new unique value and the records that should be stopped have got the same value as the corresponding record in M3_SWE. These records are now also blocked for transfer to Output Container:
Transferring data to the Output Container
When the Validation work is done in the Input container, the next step is to transfer the data to Output container.
To transfer all the records from Input to Output, Top Panel filter field should be set to All and the Transfer to Output option selected in the Header button:
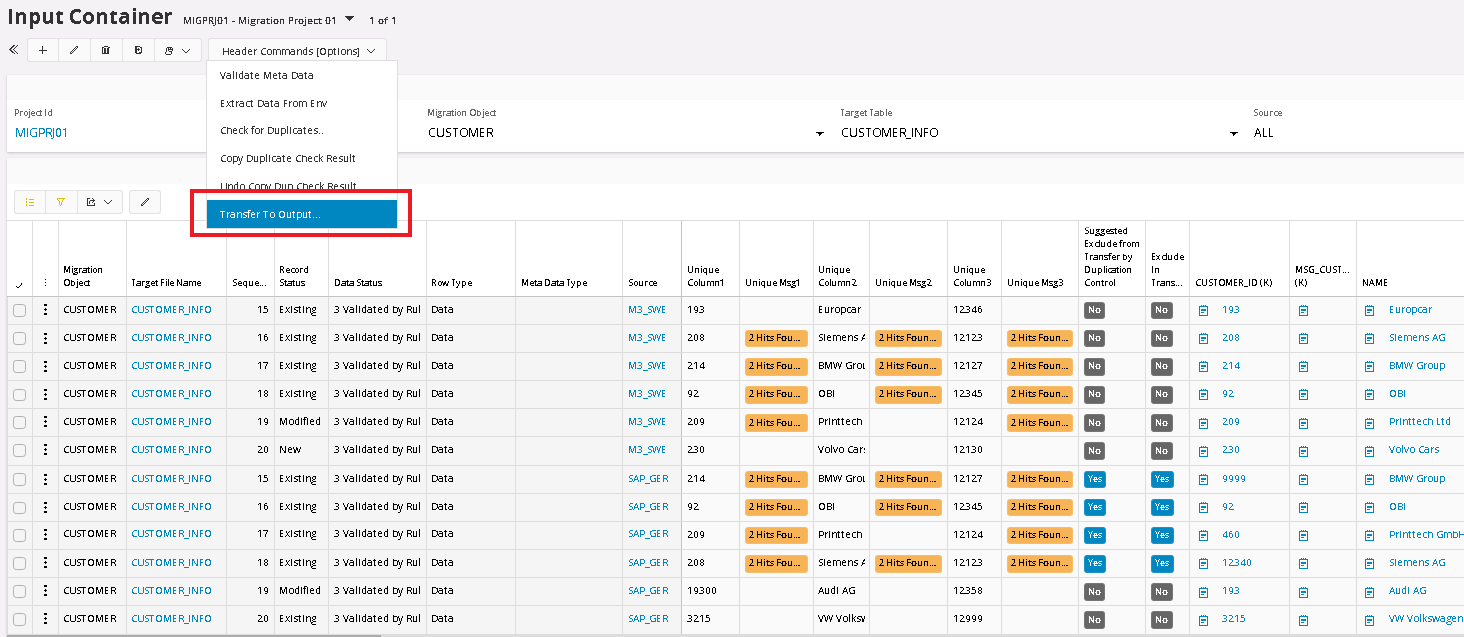
It is possible to choose a subset of the list, but in this example, we chose All, which means all records except the blocked ones.

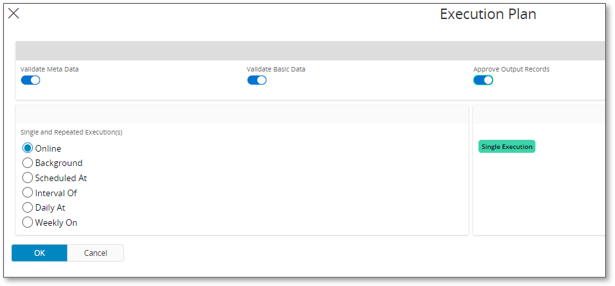
When moving the data from Input Container to Output Container. This execution can automatically start, Meta Data Validation, Basic Data Validation and approving the Data. One, two or all three of them at the same time.
Bulk Delete
In the Bulk Delete function, it is possible to Delete a large number of data based on a number of filter field values. This way it is easy to correct errors if any has occurred.
Before Executing the Deletion, the number of records, that are filtered and will be deleted, is presented in the statistic field.