Ordering Corrective Deliveries
What is a Corrective Delivery?
The purpose of the Corrective delivery is to provide the capability to add some 'cherry-picked' changes to an existing delivery. One use case of this would be to fix a bug that was found in the earlier delivery after it was released. The bug had been fixed in the most recent code, but in this case, not all the recent changes are required to be applied to the existing delivery, only the fix.
Steps of Creating a Corrective Delivery
The fix needs to be implemented in the 'master' branch prior to proceeding with the following steps.
-
First, locate the delivery baseline where you want the change to be done. Once the baseline is identified, look for the corresponding repository tag. To locate the tag, navigate to the Customer Solution Repository URL in Build Place. Then, click on Repos and select Tags.

-
All the repository tags are available here. This is the point where you should note down the successful delivery tag that is identical to the selected Delivery Baseline.
For example;
if,
Delivery Baseline: del-ifs-cloud-22.2E.0-gatest7-1.0.0-20220303T103434Z-OK
then,
Delivery tag: del-ifs-cloud-22.2E.0-gatest7-1.0.0-20220303T103434Z-OK -
Once the Delivery Tag has been found, it is highly recommended to use a separate topic branch for any new change needed to support the fix.
git checkout mastergit pull origin mastergit checkout -b <topic_branch_name> <delivery_tag> -
Then apply changes to the Delivery Branch from the 'master' branch. Depending on the changes done in the 'master', and the complexity of the fix that needs to be applied, the user can decide whether to use the 'Git cherry pick' command or to manually implement the fix in the created topic branch.
If you are using the 'Git cherry pick' command
git cherry-pick <commit_id> -
Then Git add, commit and push local changes (Refer to Naming Standards to use when working with GIT for the commit message naming standard)
git addgit commit -m "meaningful commit message"git push origin <topic_branch_name>This way, all changes done to the code will be persisted in the remote topic branch.
-
It is necessary to generate the Delivery Branch based on the tag.
Please note that the new branch name should be the same as the Delivery tag.
For example:
if,
Delivery tag: del-ifs-cloud-22.2E.0-gatest7-1.1.0-20220303T103434Z-OK
then,
Delivery Branch name: del-ifs-cloud-22.2E.0- gatest7-1.1.0-20220303T103434Z-OK -
To create a branch, use the following Git commands in the local repository.
git checkout mastergit checkout -b <delivery_branch_name> <delivery_tag>git push origin ref/heads/<delivery_branch_name> -
In the end, the changes in the topic branch should be merged with the delivery branch using a pull request (PR). Please refer to standards when creating PRs.

Follow the below steps to order the corrective delivery environment from the Build Place:
Prior to 22R2
Please note that if you are a customer with a Build Place prior to 22R2, first click on the Order Delivery button to open up the panel on the right side. Then click on the Delivery type drop-down list and select the corrective delivery option to order a corrective delivery.

22R2 and Beyond
-
To order a corrective delivery, from the IFS Lifecycle Experience portal, go to a Build Place and select Corrective Delivery.

-
Then, select the Impact Analysis option from the available list as shown in the below image.

-
Upon clicking on the Impact Analysis option, the following dialog box opens up.
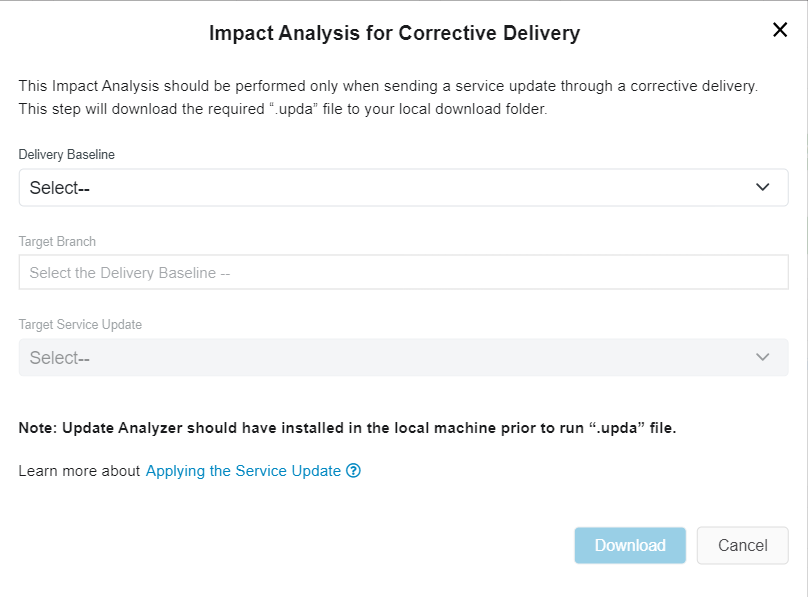
-
Select the particular Delivery baseline tag from the dropdown[1].
-
Once you select the Delivery Baseline, the Target Branch field gets automatically filled up with the relevant Delivery Tag [2]. Finally, select the target Service Update version to run the impact analysis.
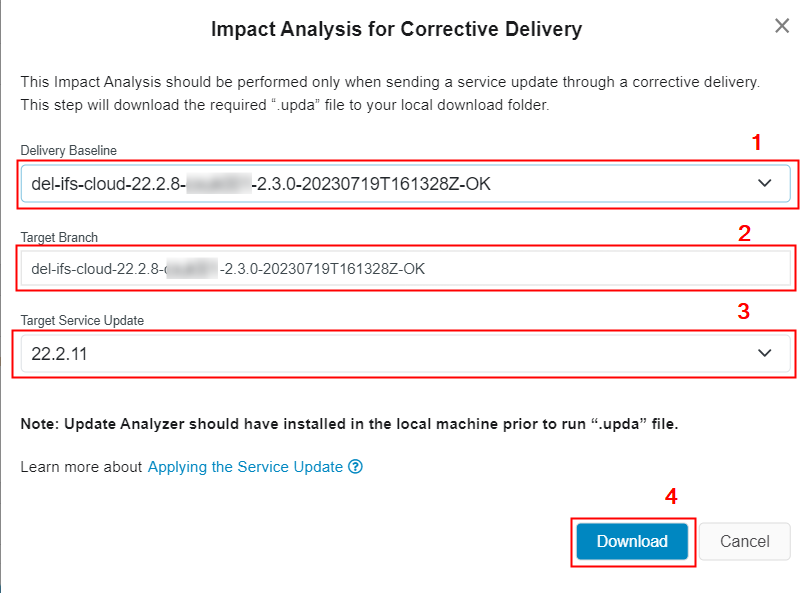
The target Branch field is automatically filled up only if a branch exists in the Azure customer solution repository with a branch name similar to the selected tag. If there is no such branch exists, the Target Branch field will be filled with the following error message: "No matching branch found for the selected delivery baseline tag".
-
Once the impact analysis is run, refer the generated impact analysis report to fix the issues.
-
Now, select the Corrective Delivery option from the available list as shown in the below image.

-
Once you select the Delivery Baseline [1], the Target Branch field gets automatically filled up with the relevant Delivery Tag [2].

-
Finally, click on the button Order.[3]
In case of repair script needs to be deployed to a specific environment of the Use Place using corrective delivery, Refer Deploying a Correction script on a specific environment on Use Place.
Delivering a Service Update in a Corrective Delivery
There could be instances where the user wants to include a service update in a delivery that is already created. One example of this would be to fix a bug that was found in the earlier delivery after it was deployed in the use place. Further, there could be scenarios where the bug had been fixed in the most recent service update, but it cannot be delivered in the service update as a normal delivery due to untested changes existing in the customer solution master branch. In such scenarios, it is recommended to use the option of corrective delivery for the chosen service update.
The main consequence of this would be that the existing deployed delivery will serve as the baseline, and from there, a new delivery will be generated, incorporating the chosen service update.
Prior to 22R2
-
Follow the steps mentioned in the following sections:
-
Fetch the service update to the customer baseline repository
-
Apply the service update to the customer solution repository
If the critical issue is occurring in the customers' use place, please follow the following steps to resolve the issue by delivering a Service Update in a corrective delivery:
- Checkout the master branch of the customer solution repository
git clone <customer-solution-repo-url>
cd customer-solution
- Add an upstream to Customer Solution repository pointing to Customer Baseline repository
git remote add upstream <customer-baseline-repo-url>
- Create a branch from the delivery tag which corresponds to the delivery that is applied in the customers' use place environment, and checkout the branch. The branch name should be similar to the tag name.
git checkout <tag-name> -b <delivery-tag-branch-name>
-
Analyze the impact of the service update on the customer's use place.
-
Provide the information to Update Analyzer GIT-Info dialog as in analyze the impact of a service update section mentioned in this document.
-
In addition to the above information, after entering the Customer Solution Repository URL, click on the radio button 'Delivery Branch'. Delivery Branch dropdown will be populated with delivery branch names in the given Customer Solution Repository.
-
Select the above checkout (delivery-tag-branch-name) Delivery Branch from the dropdown where the critical issue occurred.

-
Once all input fields are filled in, click on the button 'Checkout Files'.
-
Update analyzer will create three folders inside the location given to checkout files.
-
Base folder: Will contain a shallow clone of Base UPD tag
- Target folder: Will contain a shallow clone of Target UPD tag
-
Cust folder: Will contain a shallow clone of the selected Delivery Branch of the Customer Solution Repository
-
Once all three clones have been completed, click on the button 'Proceed Analysis' and perform update analysis.
-
Pull from upstream (i.e. from Customer Baseline repository master branch)
git pull upstream master
Resolving conflicts when merging service update as a Corrective Delivery
If the git pull operation errors out due to conflicts, follow below steps to resolve the conflicts.
- List down the files with conflicts
git status
- Open the files with conflicts through an editor, look for the standard "<<<<<<< HEAD" marker and resolve the conflicts.
- Once done, stage the files
git add
- Verify the changes
- Git commit and push local changes
git commit -m "meaningful commit message"
git push origin refs/heads/<delivery-tag-branch-name>:refs/heads/<delivery-tag-branch-name>
- Order a delivery from the IFS Lifecycle Experience Portal to create a corrective delivery for the service update.
22R2 and Beyond
Below is the description of the workflow required to implement a service update within a corrective delivery.
- First, follow the previous steps mentioned in this document
step 1: Apply service update to customer-baseline repository
step 2: Impact Analysis for new customer-baseline repository version
step 3: Apply service update to customer-solution repository
The following additional steps must be performed if the service update is required to solve a critical issue occurring in the customers' use place.
- Create and checkout the Corrective Delivery branch
If the cloned customer-solution repository exists locally in the machine
-
Checkout the master branch of the customer solution repository and update the master branch with the latest changes in the remote repository.
git checkout mastergit pull origin master -
Create a branch from the delivery tag which corresponds to the delivery that is applied in the customer's use place environment, and checkout the branch. The branch name should be similar to the tag name.
git checkout <tag-name> -b <delivery-tag-branch-name> -
Then push the created branch from the tag to the remote repository.
git push origin refs/heads/<delivery-tag-branch-name>:refs/heads/<delivery-tag-branch-name>
If the cloned customer-solution repository does not exist locally in the machine
-
Go to Azure customer-solution repository (Figure 3.7).
-
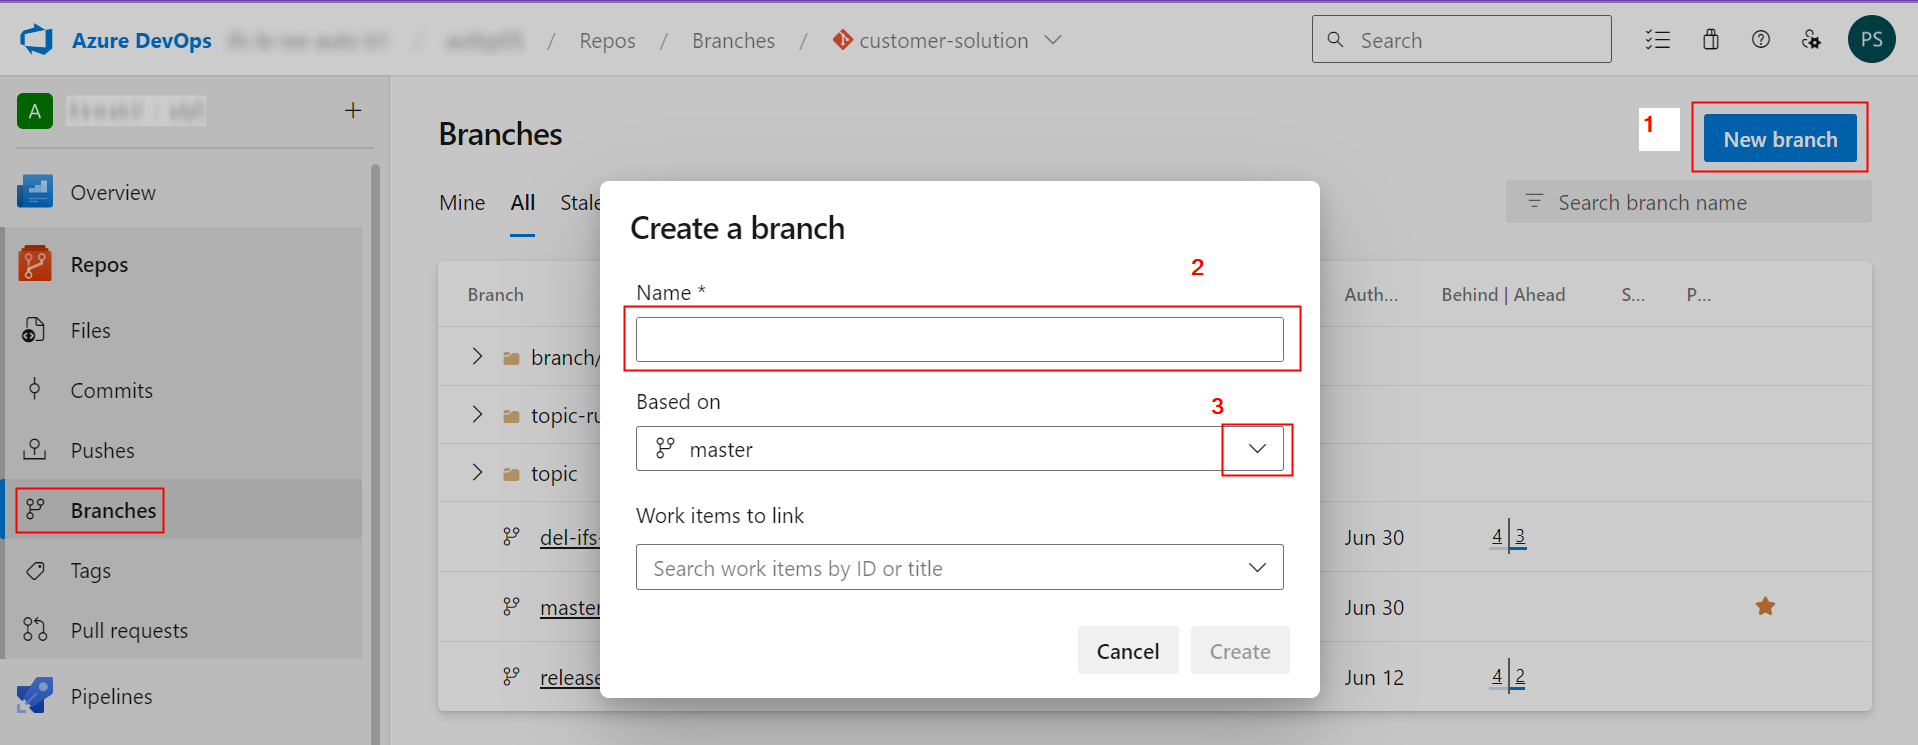
Click on the New branch button (Figure 5.1) [1] .
-
Fill the Name field with the name corresponding to the delivery that is applied in the customer's use place.
Eg: del-ifs-cloud-23.2.1-abc001-2.2.0-20230713T175538Z-OK [2]
-
Click on the Based on drop-down list and choose from the list [3].
 |
|---|
| Figure 5.1 - Create Corrective Delivery Branch |
-
Switch to the Tags tab (Figure 5.2) [1].
-
Select the delivery tag which corresponds to the delivery that is applied in the customer's use place, from the tag list.
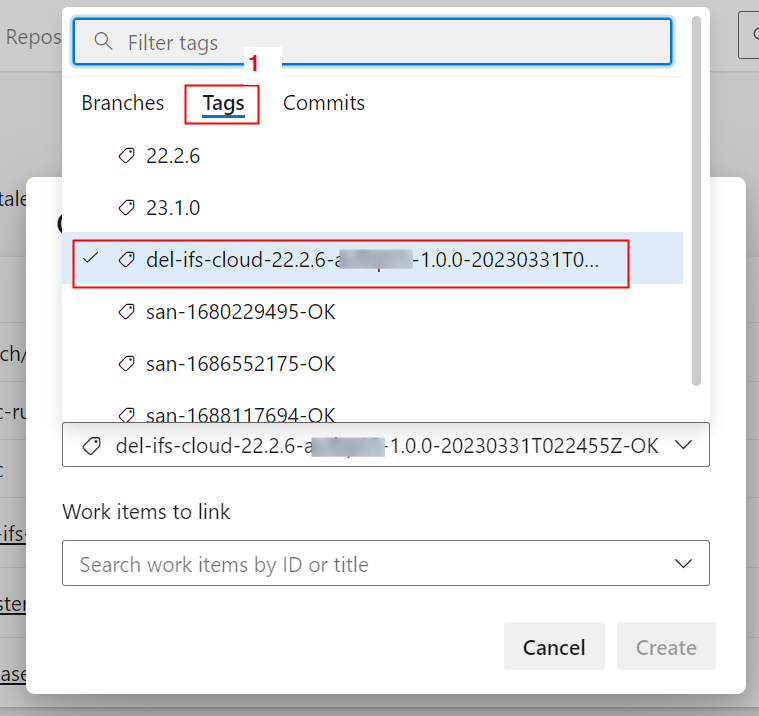
Figure 5.2 - Select the base delivery tag for the delivery branch Note: The name of the delivery tag selected here and delivery name given in the above step must be equal.
-
Click on the Create button. (Figure 5.3)
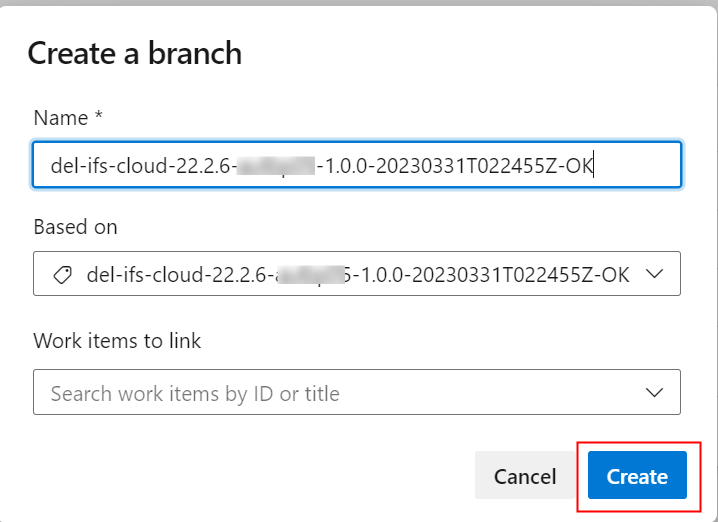
Figure 5.3 - Create corrective delivery branch -
Run the below git command to clone the delivery branch to the local machine.
E.g:
git clone --branch del-ifs-cloud-22.2.6-abc001-1.0.0-20230331T022455Z-OK --depth 1 https://azure-org@dev.azure.com/azure-org/abc001/_git/customer-solutiongit clone --branch <delivery-tag-branch-name> --depth 1 <repository-url>cd customer-solution
Follow the steps below to add changes to the corrective delivery branch.
-
Open the customer solution Azure repository (Figure 3.7).
-
Download the version.txt file from the master branch. (Figure 5.4)
-
Go to Files in Customer Solution Azure Repository [1]
-
Select the master branch from drop-down list [2]
-
Navigate to the folder in "fndbas" => "source" [3]
-
Click on More options icon in the version.txt file [4]
-
Select Download from available options [5]

Figure 5.4 - Download version-txt file from master branch -
Copy the downloaded version.txt file from your local download folder and replace it with the version.txt available in created delivery branch, "fndbas" => "source" folder.
The next step of delivering a Service Update in a Corrective Delivery is to analyze the impact of the service update on the customer's use place.
Steps to analyze the impact of the service update on the customer's use place are described below.
- Click on the Corrective Delivery button in the BuildlPlace view (Figure 5.5).
 |
|---|
| Figure 5.5 - Corrective Delivery button |
- Then select the Impact Analysis option from the available list as in the image below (Figure 5.6).
 |
|---|
| Figure 5.6 - Corrective Delivery - Impact Analysis option |
- Upon clicking on the Impact Analysis option the following dialog box will be opened up (Figure 5.7).
 |
|---|
| Figure 5.7 - Impact Analysis for Corrective Delivery Dialog |
The purpose of this popup-dialog box is to get the required inputs including the Delivery Baseline tag, and theTarget Service Update tag that requires for generating the .upda file to perform the Impact Analysis.
 |
|---|
| Figure 5.8 - Impact Analysis for Corrective Delivery Dialog when no branch availble for selected Delivery Baseline |
-
Please note that this will download the .upda file and the requirement of this step (Figure 5.8).
-
Select the particular delivery baseline tag from the dropdown[1].
-
The target Branch section will be filled automatically with the name of the branch which is created from the particular delivery tag.[2]
Note
The Target Branch section will be filled automatically only if a branch exists in Azure customer solution repository with a branch name similar to the selected tag. If there is no such branch existing in the Target Branch section it will give the No matching branch found for the selected delivery baseline tag error message (Figure 5.9).
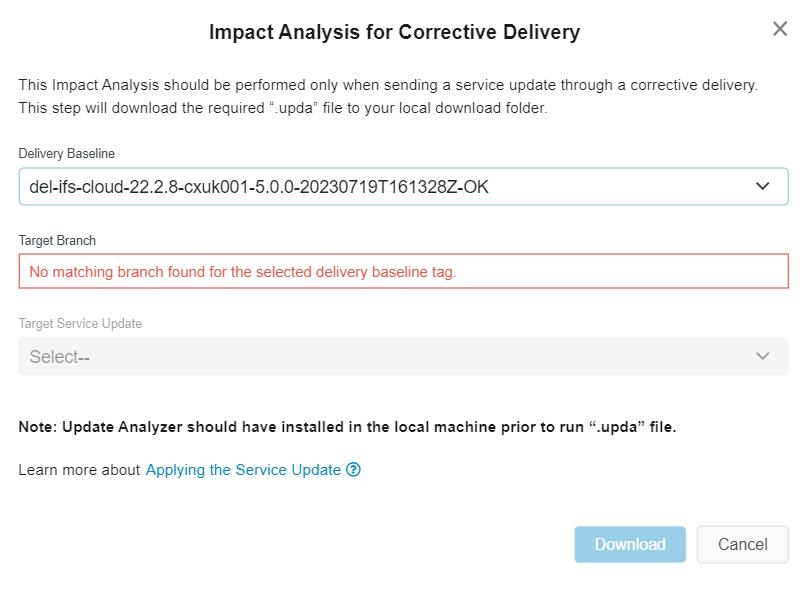 |
|---|
| Figure 5.9 - Impact Analysis for Corrective Delivery Dialog when no branch availble for selected Delivery Baseline |
- Select the Target Service update from the available list which is expected to apply to the customer's use place.[3]
After selecting the Target Service Update tag, the Download button will get enabled. [4]
-
Click on the Download button. [4]
-
Once clicked on the Download button, a file with the .upda extension will be downloaded within two-three seconds to the user's download folder.
-
Analyze the impact of the service update on the customer's use place using the pre-installed Update Analyzer Tool.
Follow the steps similar to Impact Analysis for new customer-baseline repository version section in this document to perform an impact analysis using the downloaded file.
-
If there are any customizations identified in the update analysis,
-
Uplift those customizations.
- There are some existing features in the Update Analyzer Tool that can be used to make the process of handling the impacts of non-layered easily. Handling impacts of non-layered files
-
Git add, commit, and push local changes (Refer Naming Standards to use when working with GIT for the commit message naming standard)
Note
Even if there is no customization related to local changes, it's mandatory to add, commit, and push as the version.txt file change is available in the local branch.
git add .
`git commit -m "meaningful commit message"
git push origin <delivery-tag-branch-name>
The final step of delivering a Service Update in a Corrective Delivery to the customer's use place is to order a delivery from the portal.
- Order a delivery from the IFS Lifecycle Experience Portal to creating delivery for the service update.