Lifecycle Experience Center (LEC) Troubleshooting
Overview
This troubleshooting guide addresses common Lifecycle Experience issues and the steps to resolve them.
LEC Error Codes
There are two types of error toasts:
Error message with a specific code
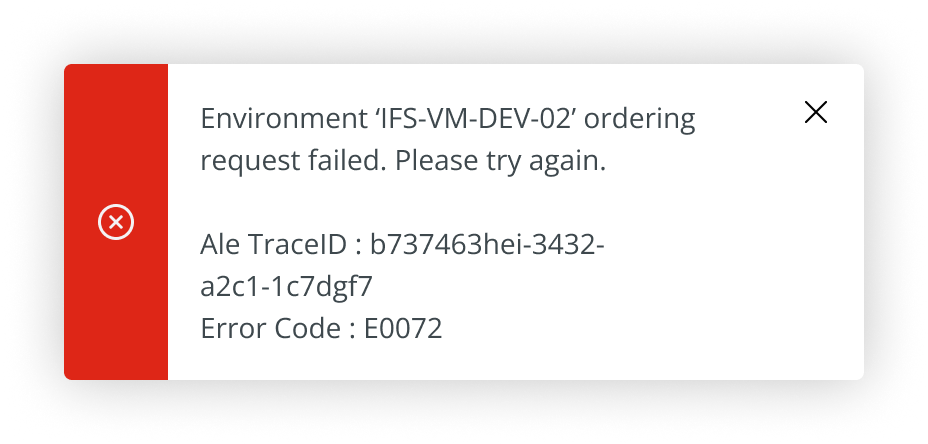
Figure 1 - Sample Error Message with an Error Code Error message only
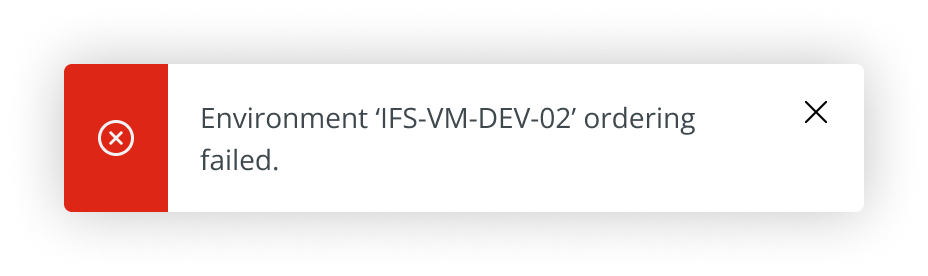
Figure 2 - Sample Error Message without an Error Code The reason for having error toasts with/ without error code is that the LEC Error Handling Framework is an ongoing development, and the error codes will continuously improve and grow as the framework is improved. When an error toast is displayed, a support ticket must be created with a screenshot of the same. This will help the IFS Support teams receive more descriptive support issues and will make the troubleshooting much easier.
Cannot login to IFS Lifecycle Experience Center
This can happen due to a browser caching issue. To verify that, open the browser in incognito mode (Shortcut for Chrome is Ctrl + Shift + N) and try to log in again.
Contact IFS support and check whether the user account exists in IFS Azure Active Directory (using Azure portal). If the user account does not exist, then it is an issue with identity management. Contact COS to rectify the issue. Contact IFS Support, if LEC cannot be accessed even though the user account is properly created.
 |
|---|
| Figure 3 - Azure Active Directory |
Cannot See the Build Studio in the IFS Lifecycle Experience Center
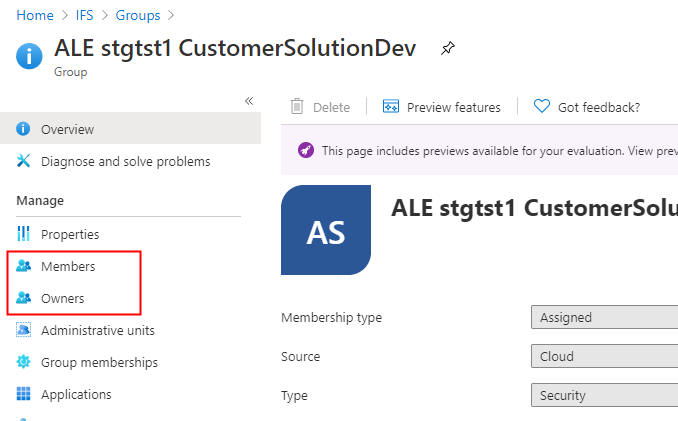
- Check whether the user exists in the correct Active Directory group (For more information on Active Directory groups, refer User Authorization of the System). Go to Azure Portal > Azure Active Directory > Groups > Search for the groups of the Build Studio by typing the 'ale ' and the Build Studio name. Select the relevant group and check the members of the group. If the user does not exist in the correct group, contact one of the owners in the relevant group to get the user added to the required group.
 |
|---|
| Figure 4- Active Directory Groups |
 |
|---|
| Figure 5- Active Direcotry Group Options |
- If you do not have sufficient permission to view the Active Directory group, contact IFS Support to perform the above action.
- Contact IFS Support if the Build Studio is not visible even though the user is added to the correct Active Directory group.
Cannot Access the Build Studio Repositories
- Check whether the user is added to an Active Directory group that has rights to access the repositories. Refer to User Authorization of the System for more information.
- If the user cannot access the repositories even though the user is added to the correct user group, create a support issue and contact IFS Support. Note: When a user is newly added to an Active Directory group, on some occasions, Re-Evaluation of Group Rules is needed in order to have proper Azure DevOps organization access to the user.
Error When Ordering an Environment
If the network share is accessible, check the logs to identify whether it is a compilation error or a deployment error. If so, resolve the issue in the source code and reorder the environment.
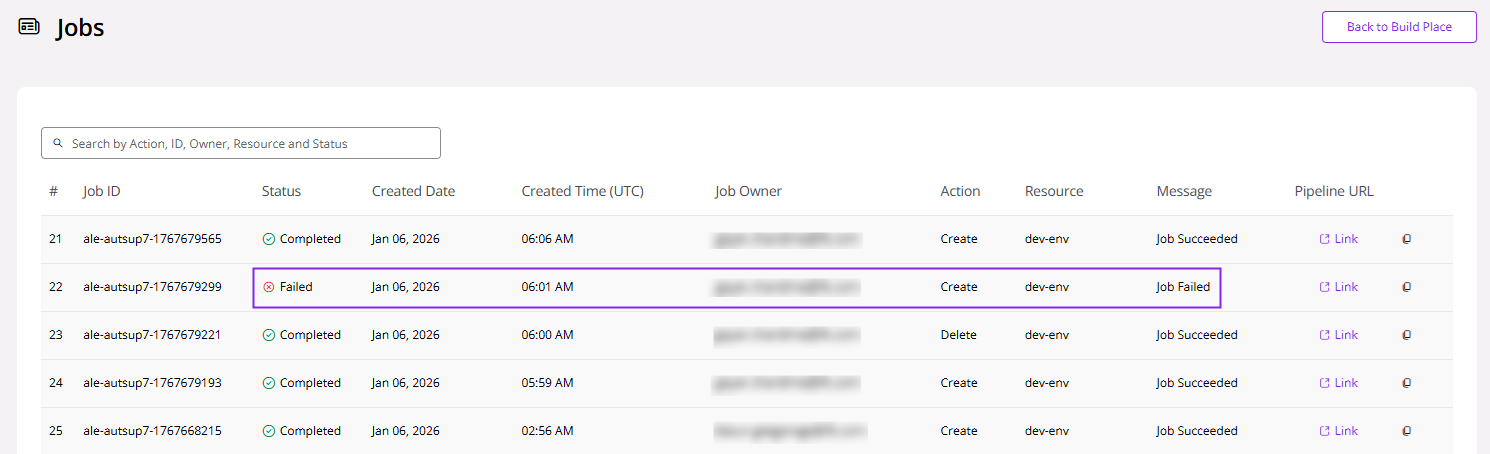
If it is not a compilation error or a deployment error, go to the Jobs table in the Build Studio of the IFS Lifecycle Experience Center. Find the relevant job for the environment ordering request.
Go to the pipeline URL and check the Execute Build Place action to find the error.
 |
|---|
| Figure 6- Environment Failed |
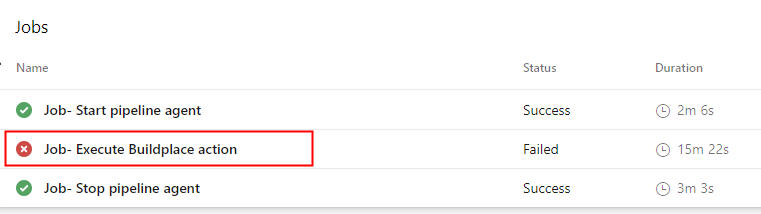 |
|---|
| Figure 7- Execute BP Action |
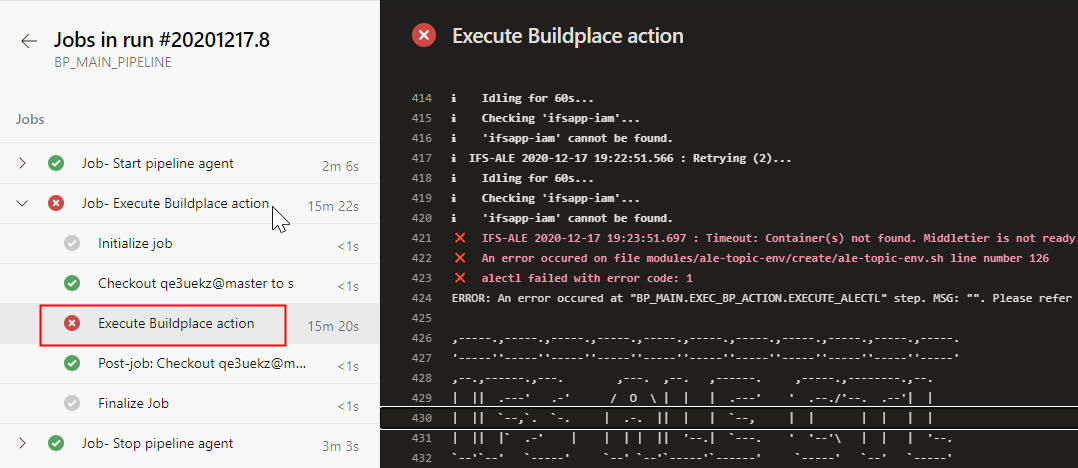 |
|---|
| Figure 8- Pipeline Log |
- If the error cannot be self-rectified, create a support issue to contact IFS Support. Copy the pipeline log content to a text file and attach it to the support issue. Attach the logs available in the network share to the support issue if the network share is accessible.
Error When Applying a Service Update
- Check the pipeline log as described in the Error When Ordering an Environment section.
- If the error cannot be self-rectified, create a support issue and contact IFS Support. Furthermore, copy the pipeline log content to a text file and attach it to the support issue.
Known Issues When Applying Service Update Deliveries
- PLS-00907: cannot load library unit CUSTORD_SUPPLY_DEMAND (referenced by CUSTORD_SUPPLY_DEMAND) error at line no:0
This issue has been noticed when updating from service update 21.1E.0 to 21.1E.1.
If the error log states the above issue, please re-run the delivery deployment/ sanity build.
- PLS-00907: cannot load library unit CONFIG_EVALUATION_API (referenced by CONFIG_EVALUATION_API) error at line no:0
This issue has been noticed when updating from service update 21.1E.1 to 21.1E.2
Please re-run the delivery deployment/ sanity build if this error is present in the log.
Cannot Connect to the VPN
Verify whether the correct username and password are used
Check whether background apps are enabled and the Azure VPN Client is enabled to run as a background app in Windows settings
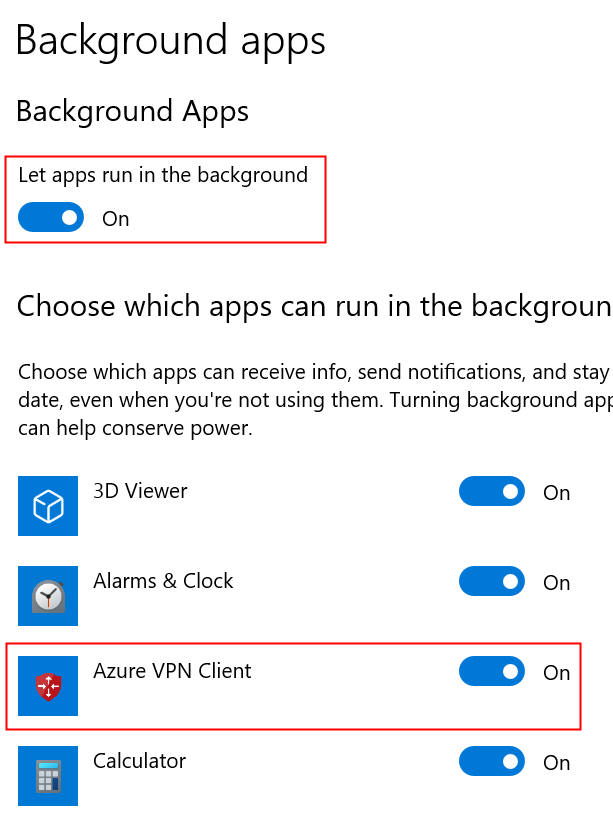 |
|---|
| Figure 9 - Background App |
Run the command "ipconfig /flushdns" in a command prompt console. This may help to resolve the issue if it is related to cached DNS entries.
If the above steps do not resolve the issue, create a support issue and contact IFS Support. Attach a screenshot of the error message to the Cloud Deployment team.
Check whether the Active Directory group is correctly added to the service principal user. First, find the Application ID of the service principal user from Azure Portal > Resource Groups > ale-'buildplace name'-rg > ale-'buildplace name'-vnet-gw > Point-to-site configuration. Copy the Application ID from Audience field.
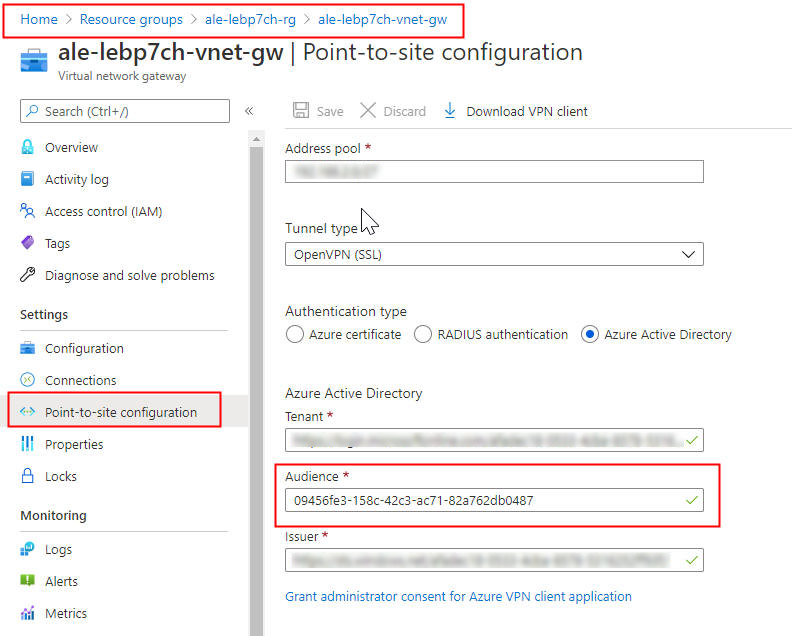 |
|---|
| Figure 10 - Audience |
- Find the name of the service principal user from App registrations.
 |
|---|
| Figure 11 - App Registrations |
- Check whether the Active Directory groups are added from Enterprise applications > 'service principal user name' > Users and groups. Search for the Active Directory groups of the buildplace by typing 'ale buildplace_name'
 |
|---|
| Figure 12 - Enterprise Apps |
Add the Active Directory groups if not added properly. Note: authentication for nested AD groups will not work here. It is the current limitation in the solution. E.g.: Suppose there are 2 AD groups called A, B and there are members in both of them. If group B is added as a member to A and only Group A is added to the VPN configuration, only users listed as direct members of group A will be granted access. Due to the above mentioned nested group limitation, users of Group B will not be authenticated.
- Check whether there is an issue with the VPN gateway of the Build Place using Azure Portal. Go to Resource Groups > ale-'buildplace name'-rg > ale-'buildplace name'-vnet-gw > Resource health.
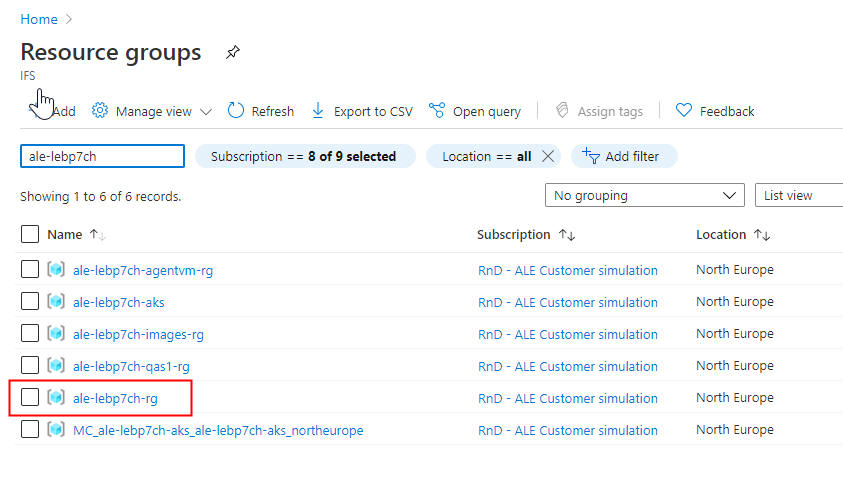 |
|---|
| Figure 13- Resource Group 1 |
 |
|---|
| Figure 14- Resource Group 2 |
Cannot Access or Cannot Log In to the Build Place Environment - IFS Cloud
- In case the application is not accessible, check whether it is possible to log in to the database and whether it is possible to access the network share. If those are also not accessible, stop the environment and start again. Check whether the application can be accessed after restarting the environment.
- If the login fails or the application is not accessible even after restarting, delete the environment and re-order. If environment reordering is successful, but the issue still exists, create a support issue and contact IFS Support.
- If the environment reordering fails, follow the steps in the Error When Ordering an Environment Section.
Cannot Log In to the Database
- Ensure that you are connected to the VPN. If not, establish a VPN connection and retry the database connection.
- Check whether there are compilation errors or deployment errors using the logs available in the network share. If so, resolve the issue in the source code and reorder the environment.
- If there are no compilation errors or deployment errors, and you still cannot log in to the database, contact the technician.
- If the issue cannot be rectified with the support of a technician, create a support issue and contact IFS Support.
Artifacts are Not Available in Storage (Sanity Logs, Deliveries, etc.)
- Check the pipeline log for the relevant job as described in the Error When Ordering an Environment section.
- If the issue is in the source code, resolve the issue in the source code and redo the task.
- If the issue still exists, follow the steps related to the task (e.g. If sanity logs are not available, follow the steps in Error in Sanity Build)
Error in Sanity Build
From the storage window, find the logs and check whether there are compilation errors or database deployment errors. If so, resolve the issue in the source code and reorder a sanity build.
If there are no compilation errors or database deployment errors, check whether reordering a sanity build solves the issue.
Check the pipeline logs. Click Jobs in the Build Studio of the IFS Lifecycle Experience Center. Find the relevant jobs for the sanity ordering.
If the sanity build fails in the Build Studio, check the sanity-pipeline job in Build Place Jobs.
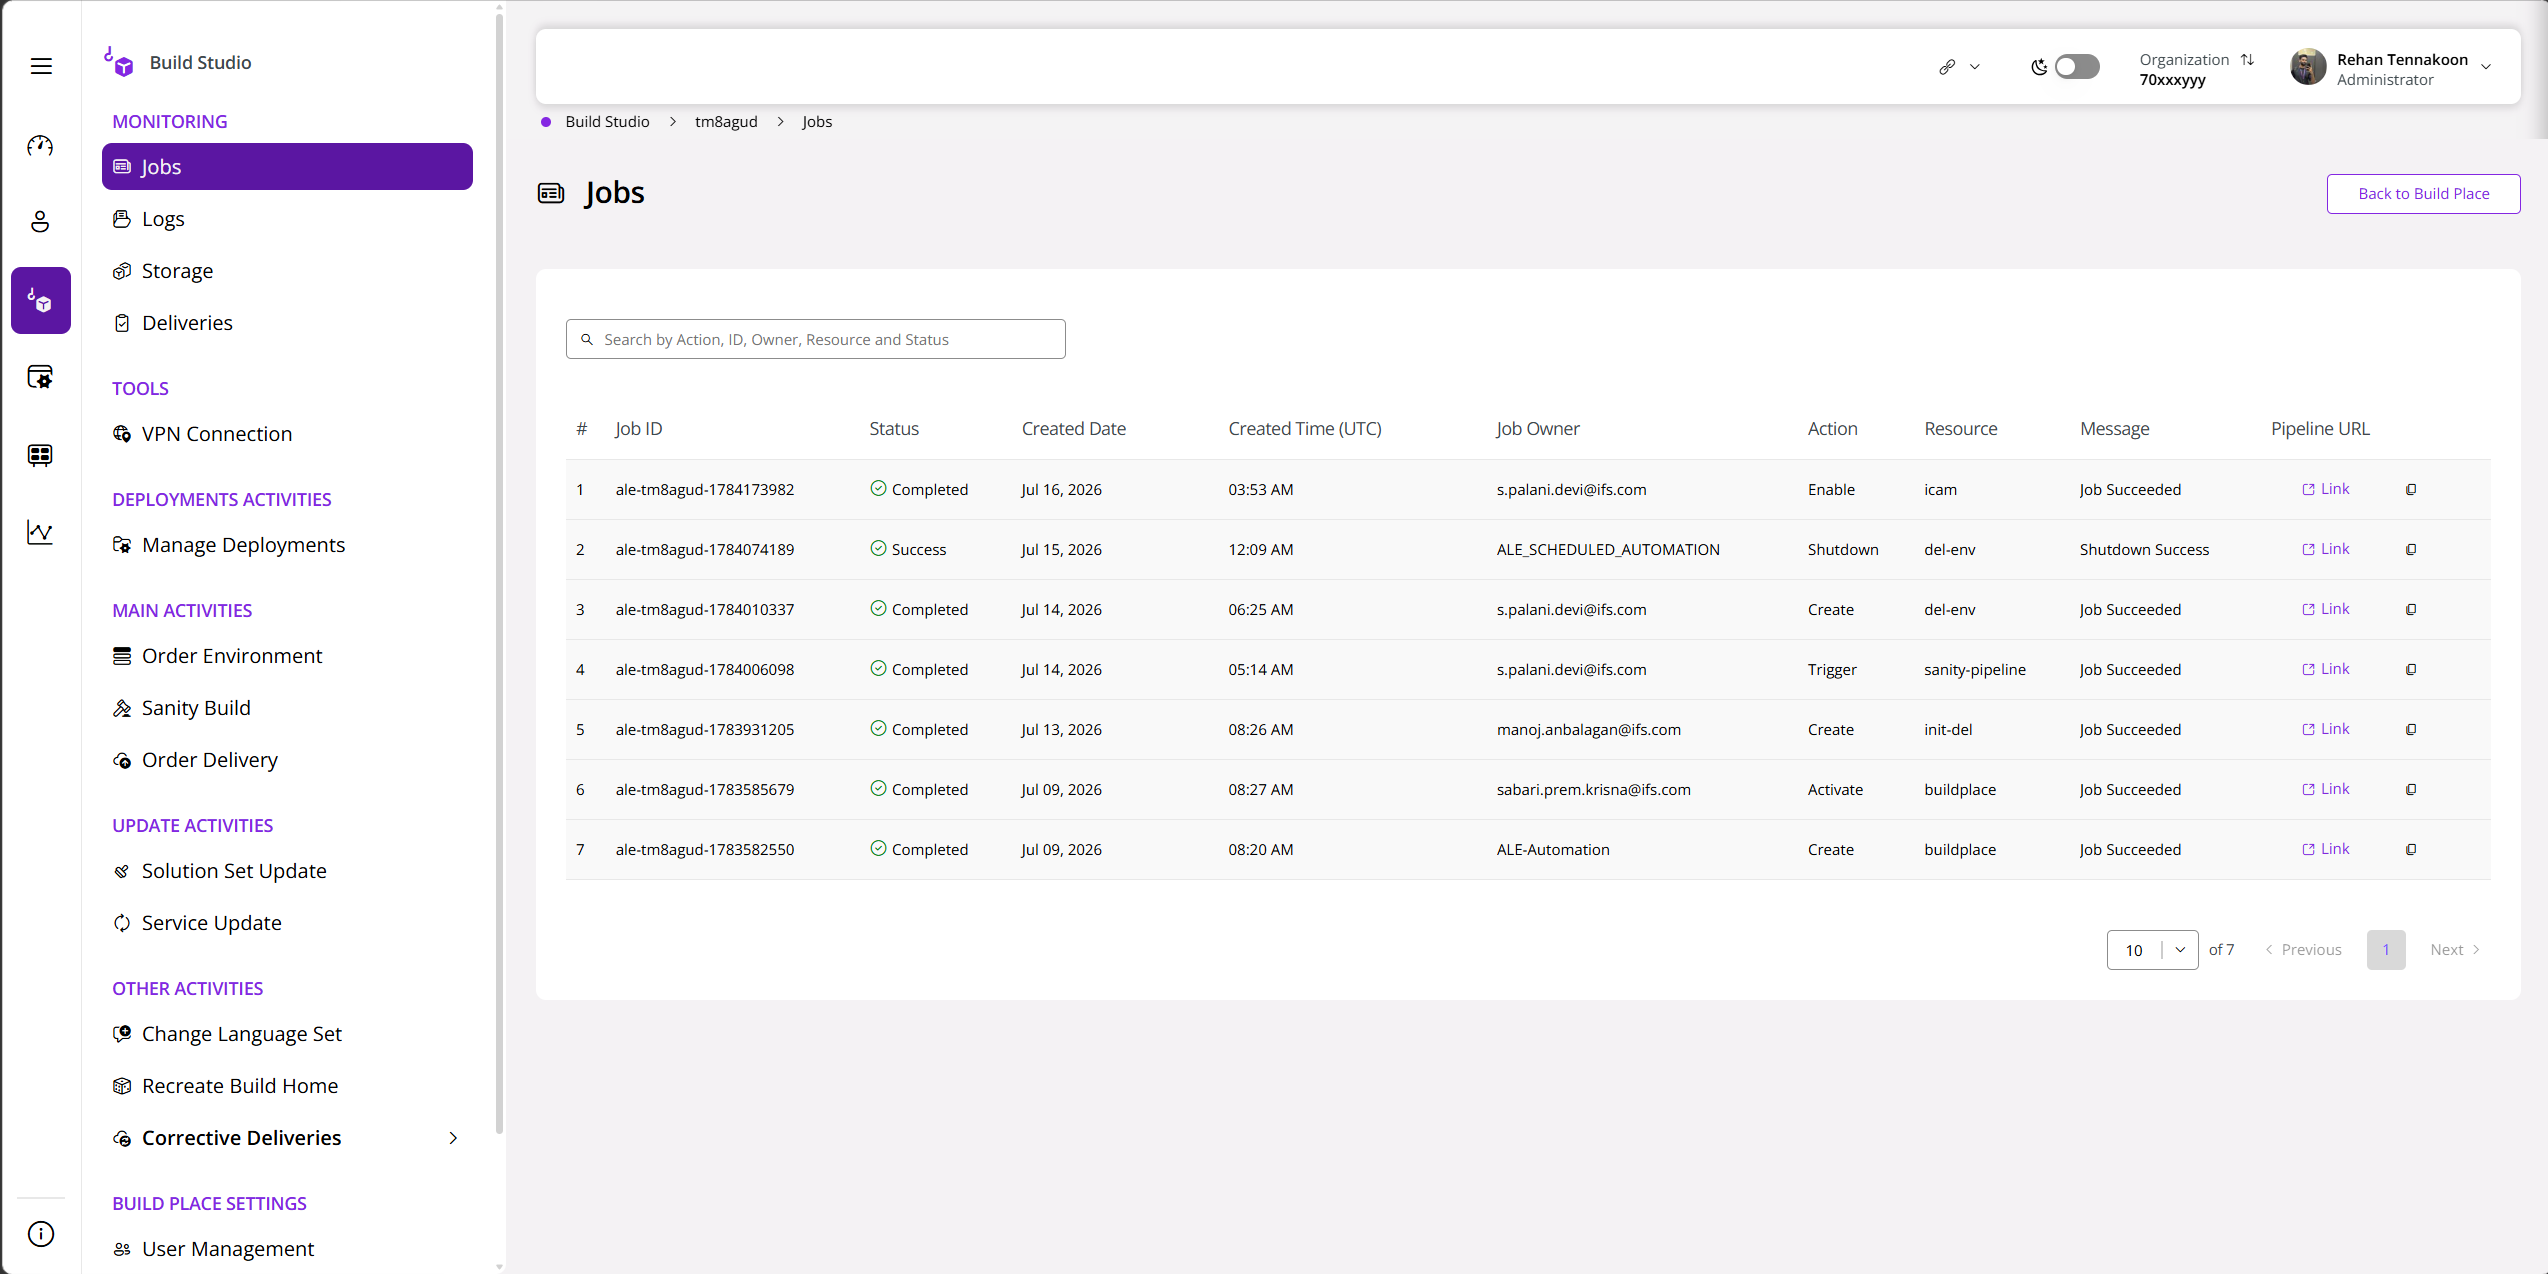
Figure 15- Sanity Pipeline If the sanity build fails in the Release Update Studio, check the sanity-image job in Release Studio Jobs.
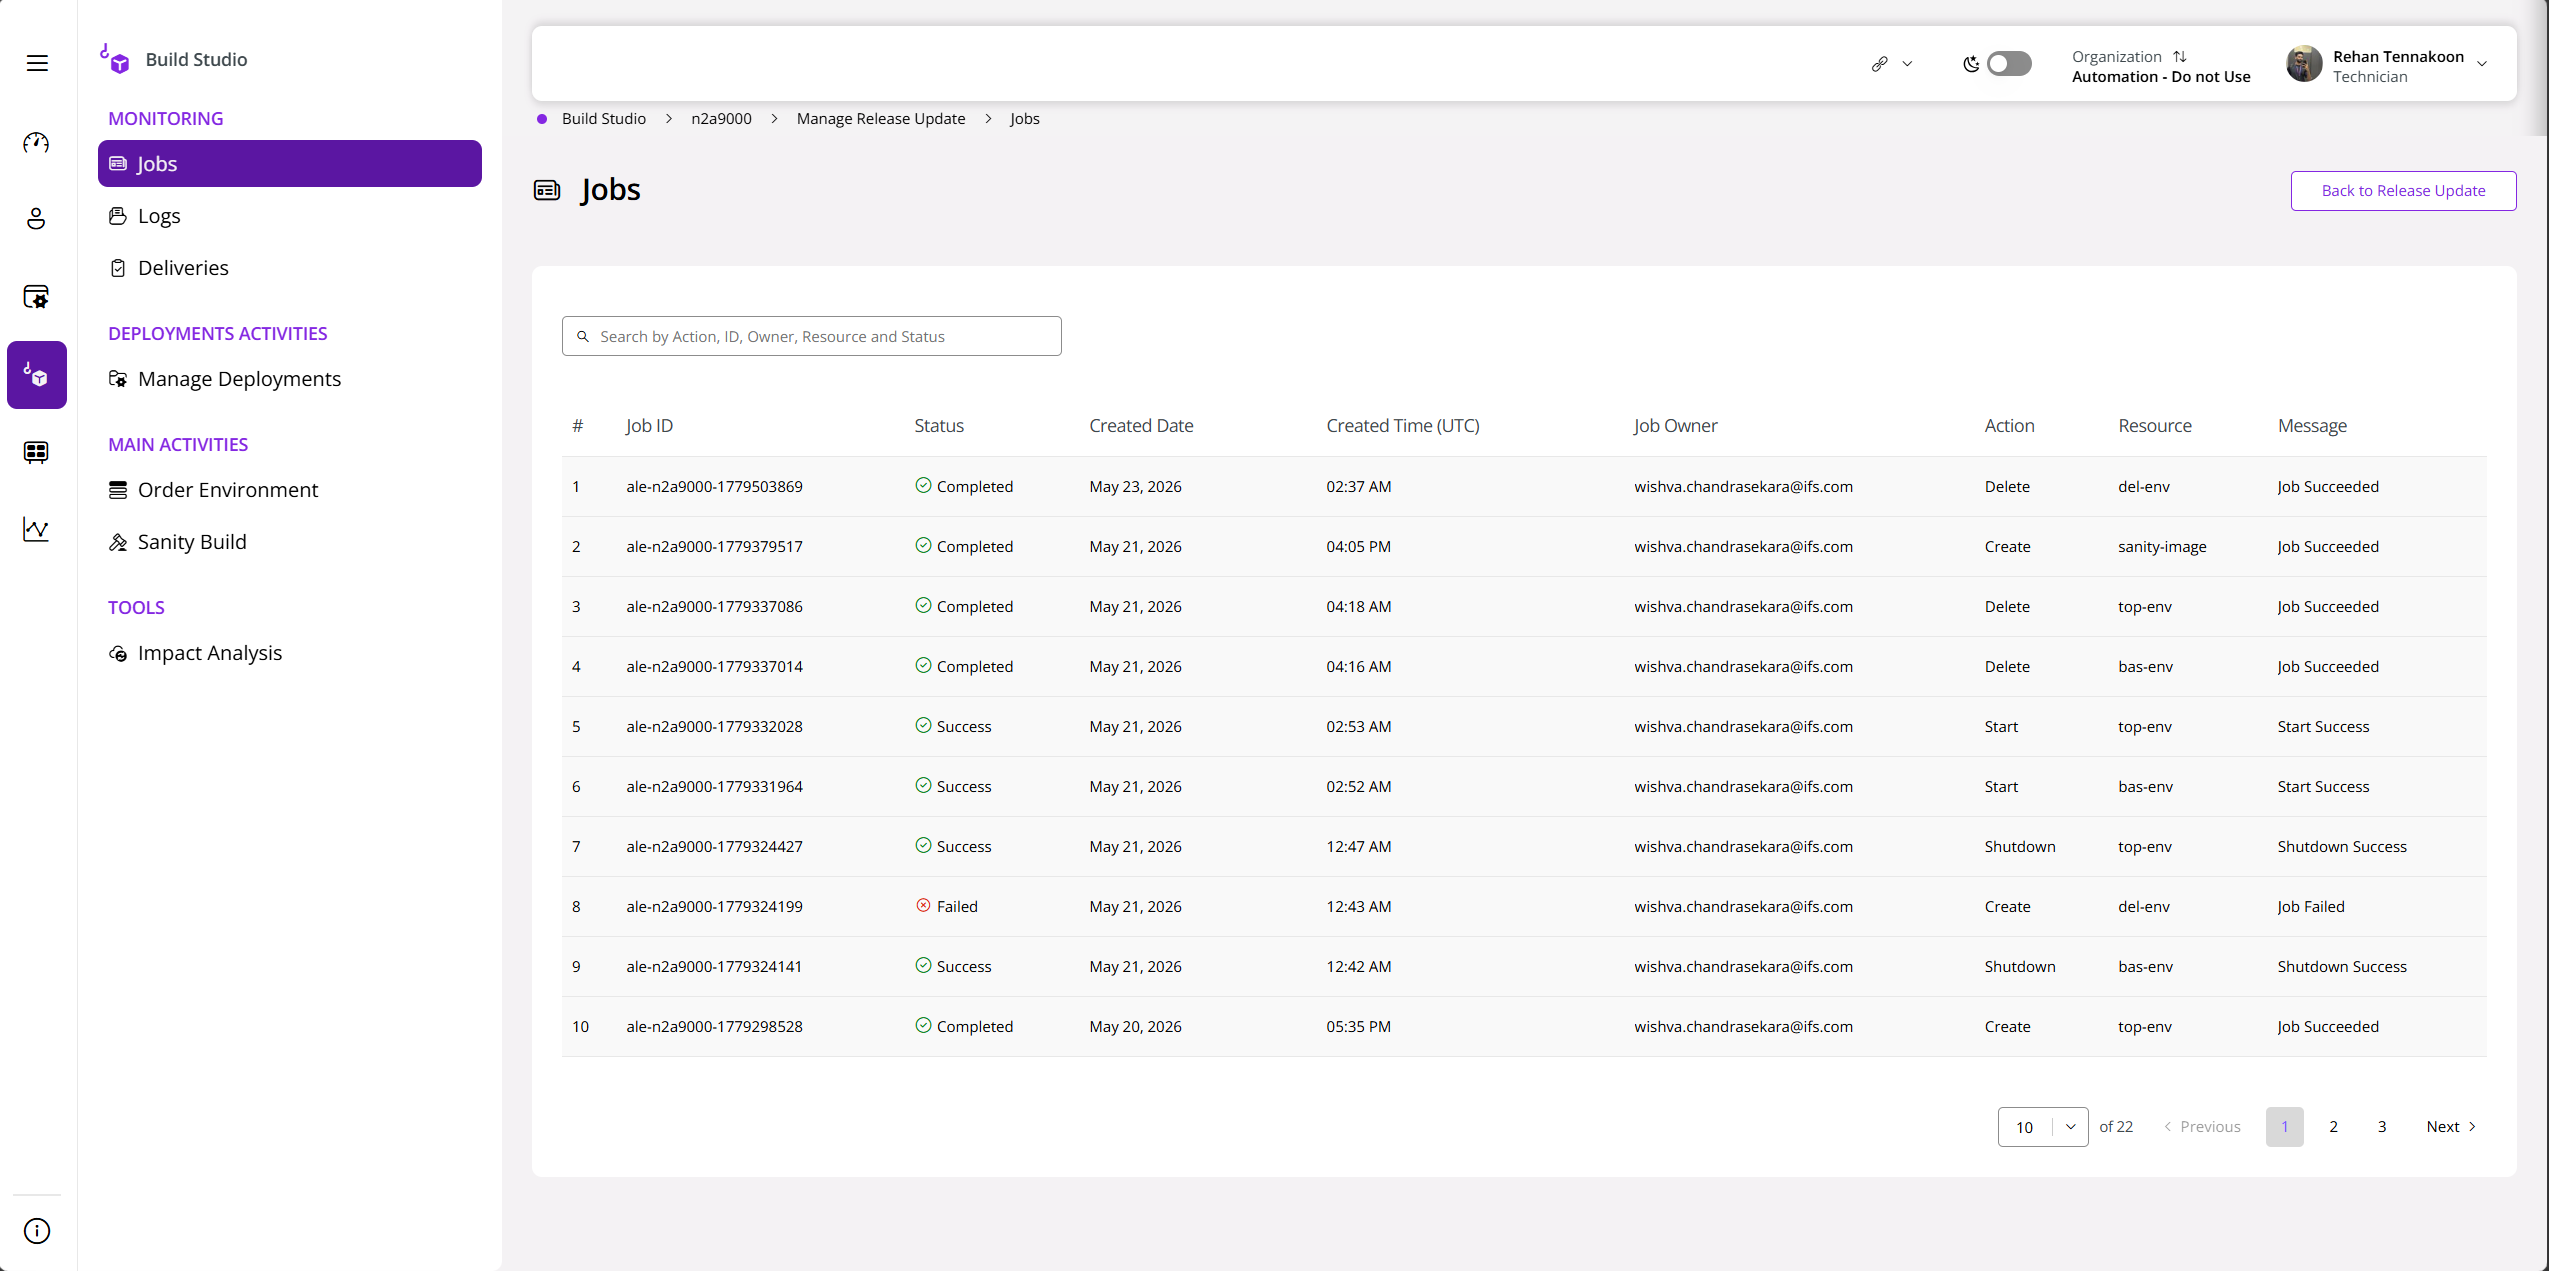
Figure 16- Sanity Image Click the pipeline URL to see whether there are errors in the pipeline log.
Create a support issue to be investigated by the IFS Cloud Operations team. Copy the log content to a text file and attach it to the support issue.
 |
|---|
| Figure 17- Sanity Error |
CDB Files Not Deployed
- If CDB files are not deployed, it could be that the module is installing as a fresh install. In a fresh install, CDB files are not deployed.
- An incorrect module version registered in the database can cause this behavior. Verify whether the module is registered by any database script. Eg:
 |
|---|
| Figure 18- Module Registration Block |
- If the module is registered by a script, remove the registration code block/file or set the version to the correct value as in deploy.ini (only if it cannot be removed).
- Run a new Sanity Build to reflect the correct module version and the CDB files needed to be committed again to deploy them correctly.
View Logs
While in operation, users have access to logs, which would enable a detailed view of the process.
Automation-related logs can be downloaded from the logs page.
Build Place Logs
Logs related to Build Place reside in the Logs view.
Available log types :
- Sanity Build Logs
- Environment Build Logs
- Build Delivery Logs
- Deployment Delivery Logs
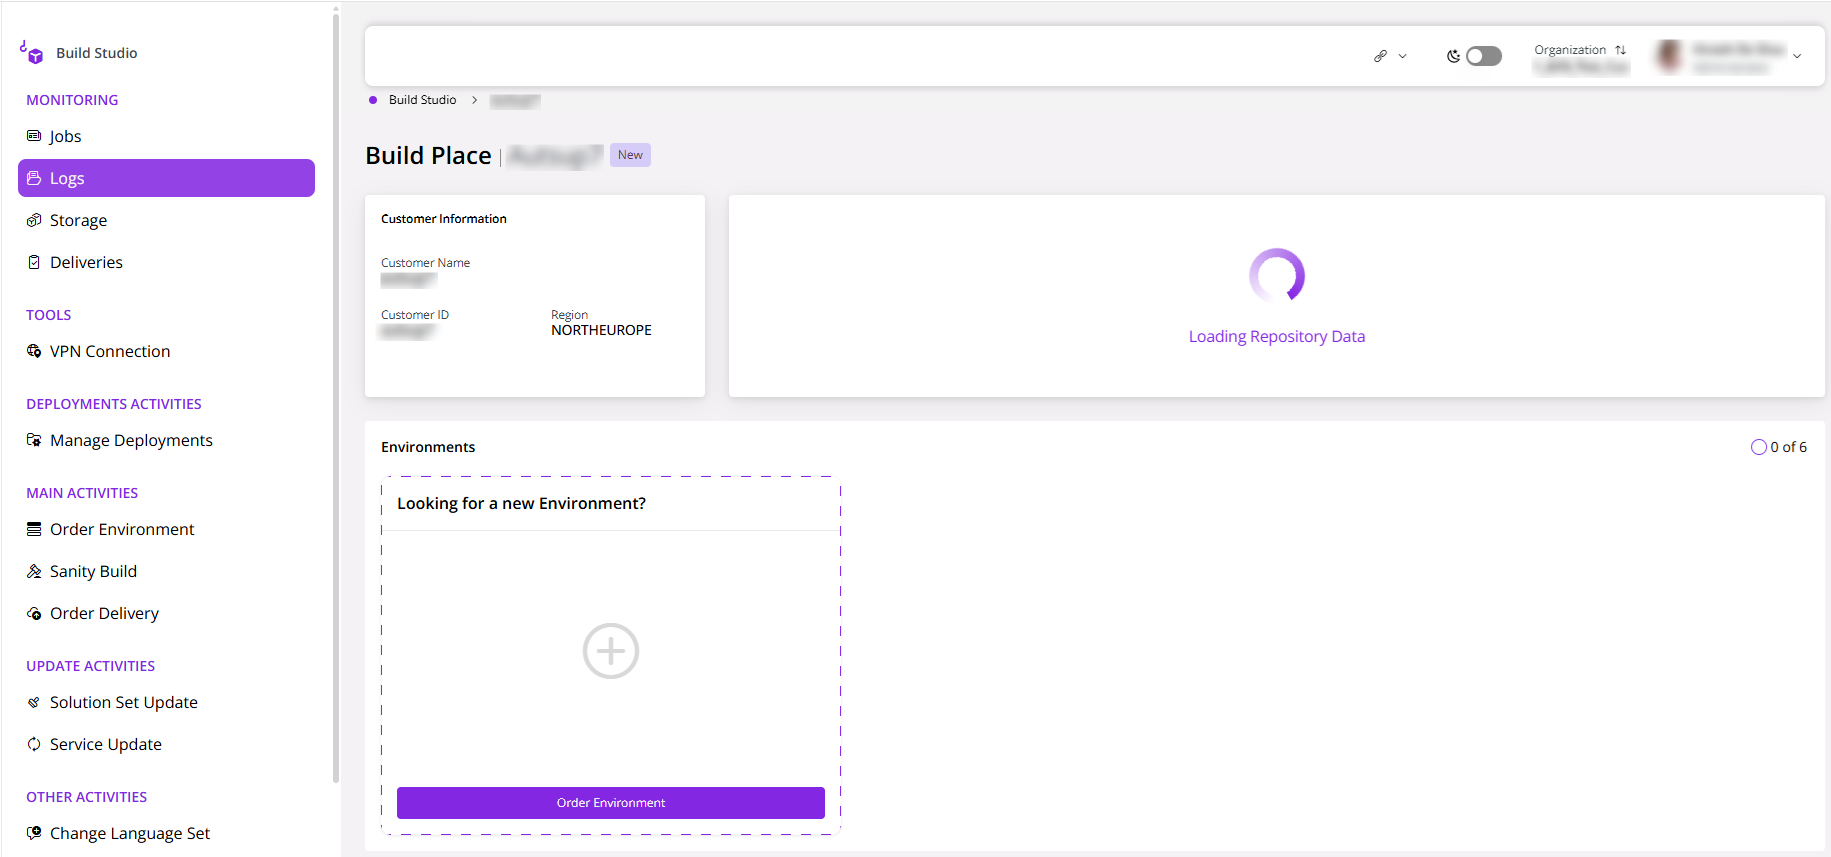 |
|---|
| Figure 19- Build Place Logs |
The Build Place Logs appear in separate tabs, and they are listed in descending order with the latest log placed on top.
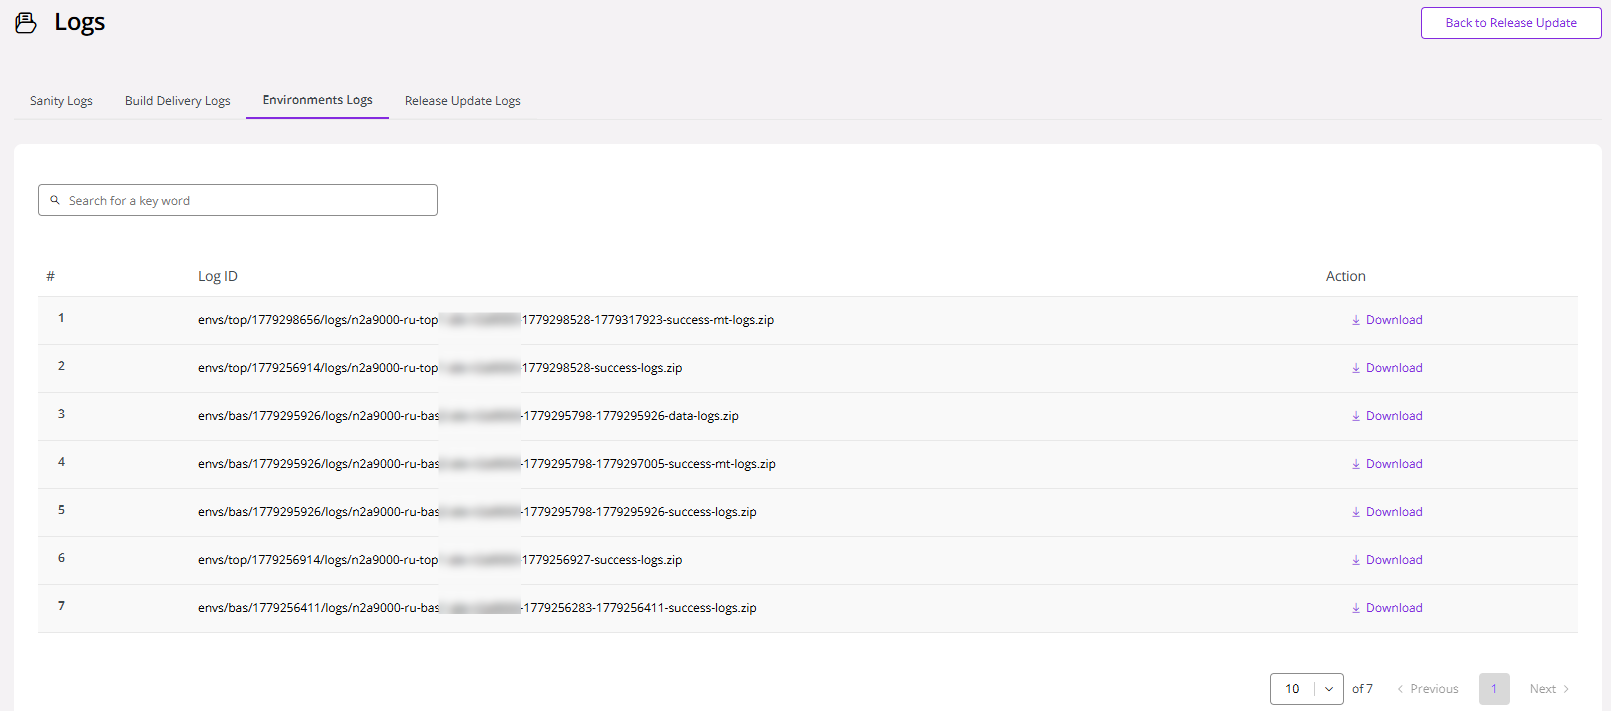 |
|---|
| Figure 20- Logs View |
Release Studio Logs
Release Update Logs (Only available inside the RU Studio Logs view)
Logs related to Release Update Studio reside here.
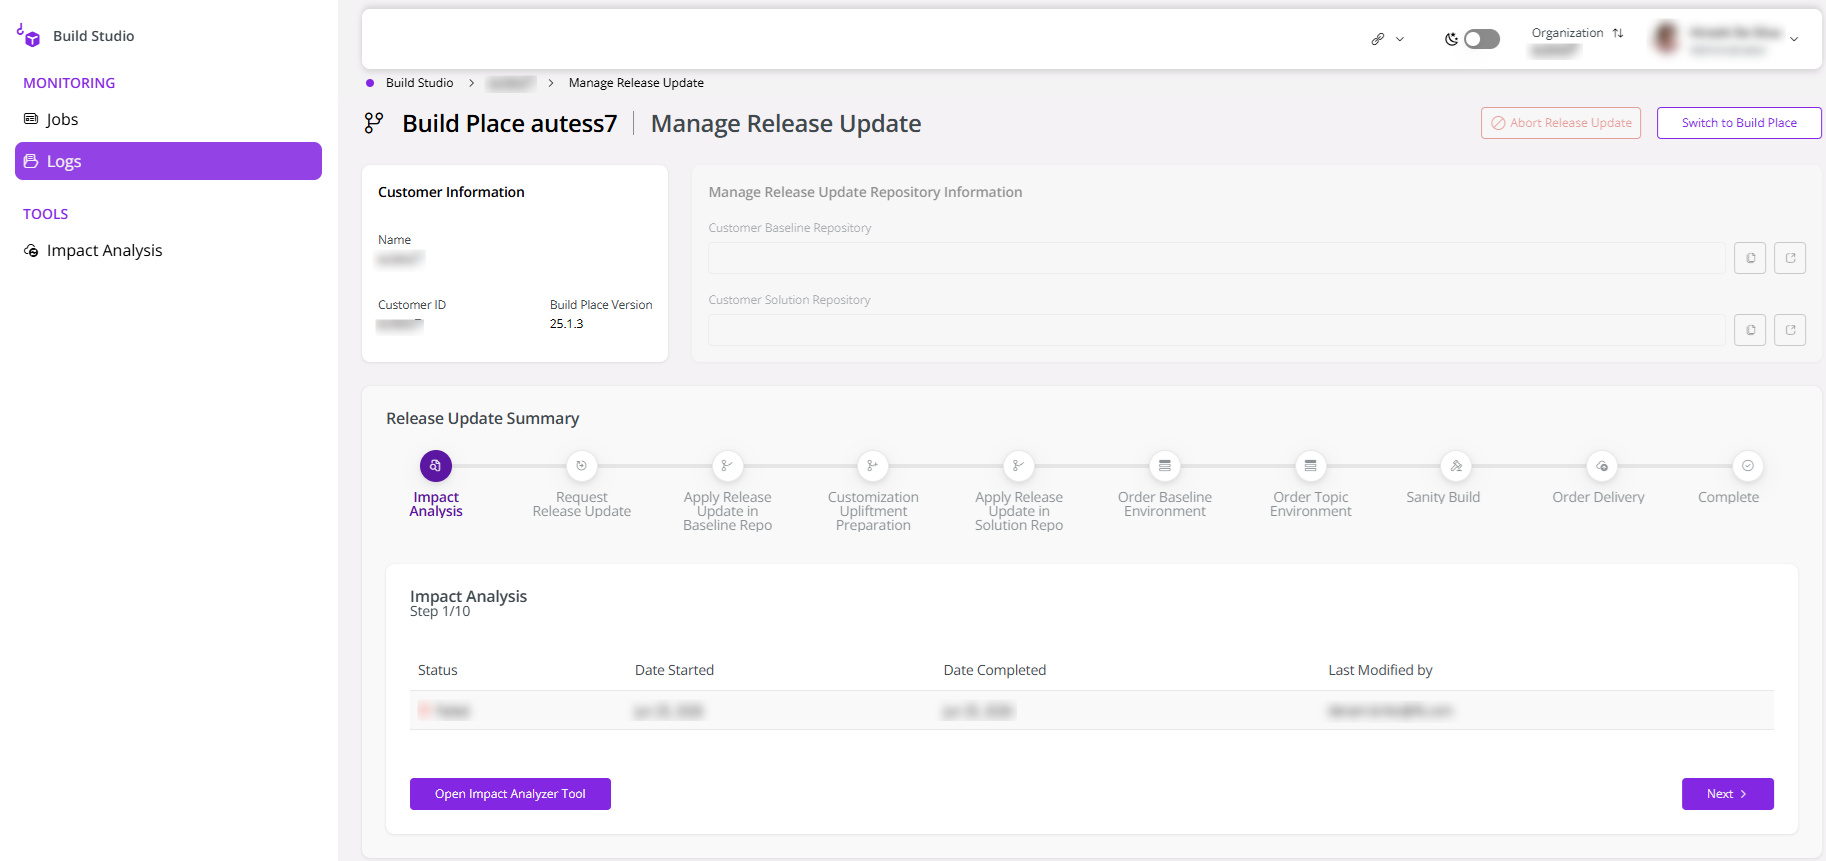 |
|---|
| Figure 21- Logs in Release Update Studio |
Success Logs
The success build logs consist of middle-tier logs (success-mt-logs.zip) and normal logs (success-logs.zip).
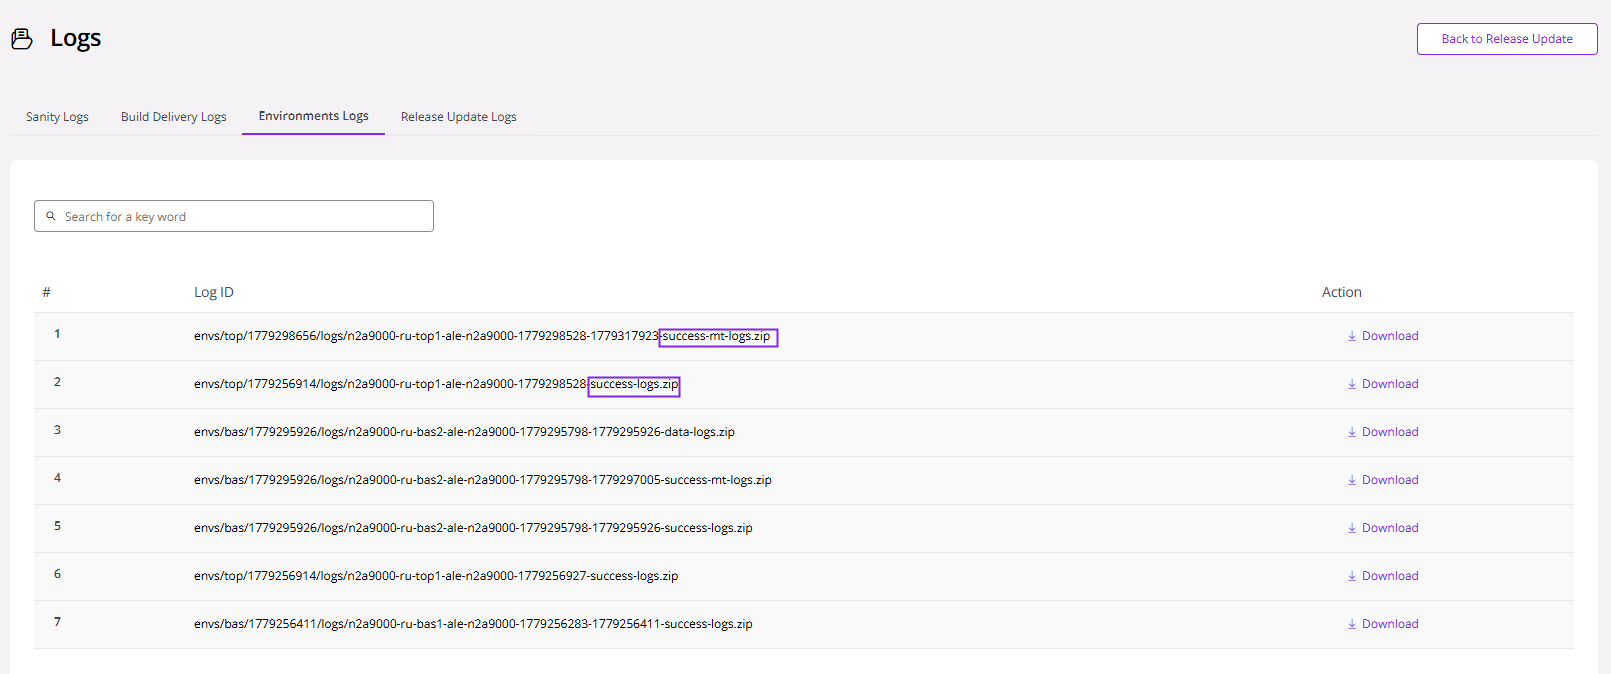 |
|---|
| Figure 22- Success Logs |
Error Logs
Error logs are shown in red text. The download icon can be clicked to download the logs as a zip file.
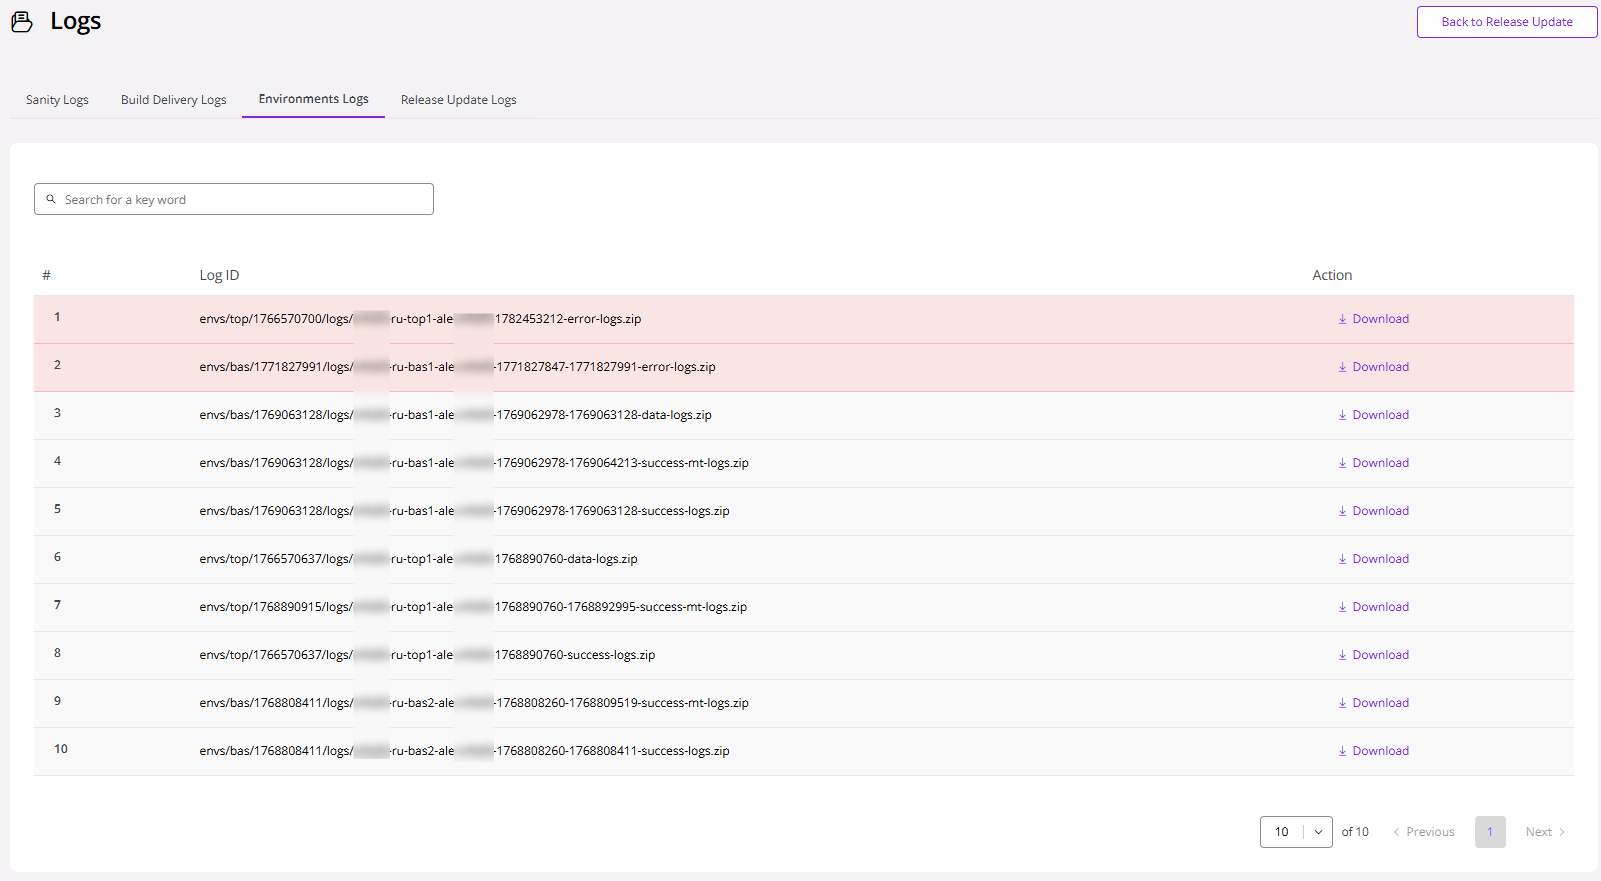 |
|---|
| Figure 23- Error Logs |
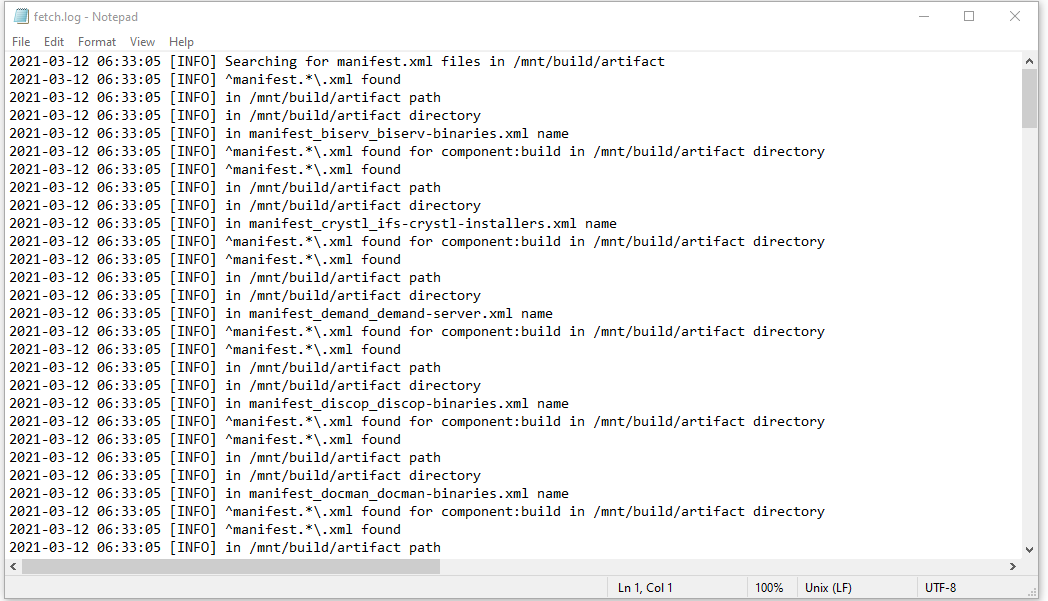
The zip file includes multiple folders, and the user can go through the text file fetch.log to view the log content.
 |
|---|
| Figure 24- Error Log Files |
ICAM customizations related Logs
In an ICAM-enabled Build Place, you can view all the logs related to ICAM operations under Environment Logs.
 |
|---|
| Figure 25- icam Logs |
Troubleshooting with the Job ID
Each operation (job) performed via the Build Studio or Release Update Studio includes a unique ID called the Job ID.
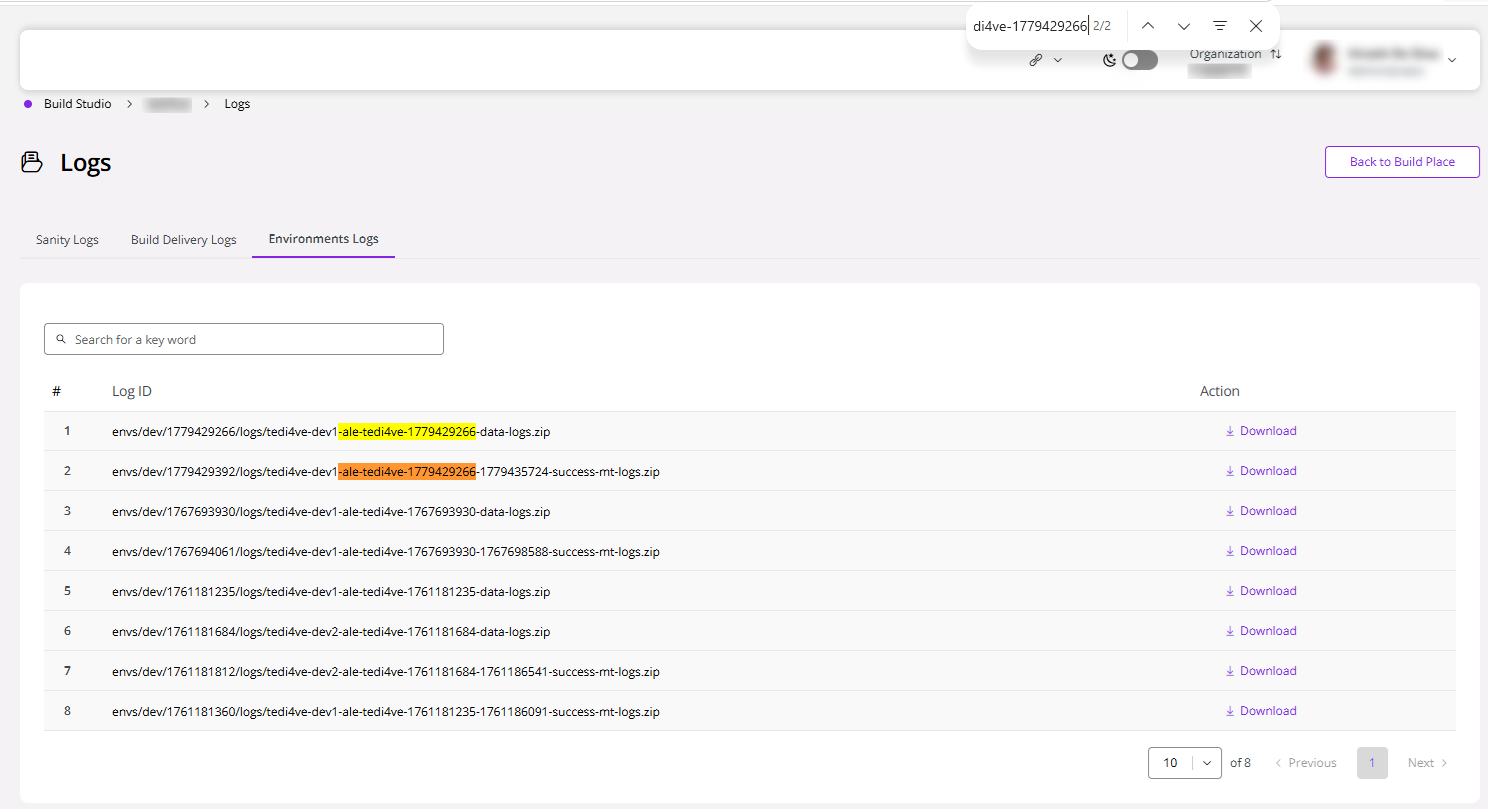
Logs created after the 22R2 release will have this Job ID appended to the log file name so that the relevant log file for each Build Studio or Release Update Studio operation can be easily located for troubleshooting purposes.
Note: This change is applicable for customers who are in any cloud release (21R1, 21R2, 22R1 & 22R2). However, only jobs created after the 22R2 release will have the Job ID included in their logs.
Follow the steps below to easily find the relevant log files:
- Perform an operation in either Build Studio or Release Update Studio.
- Copy the Job ID from the Jobs table.
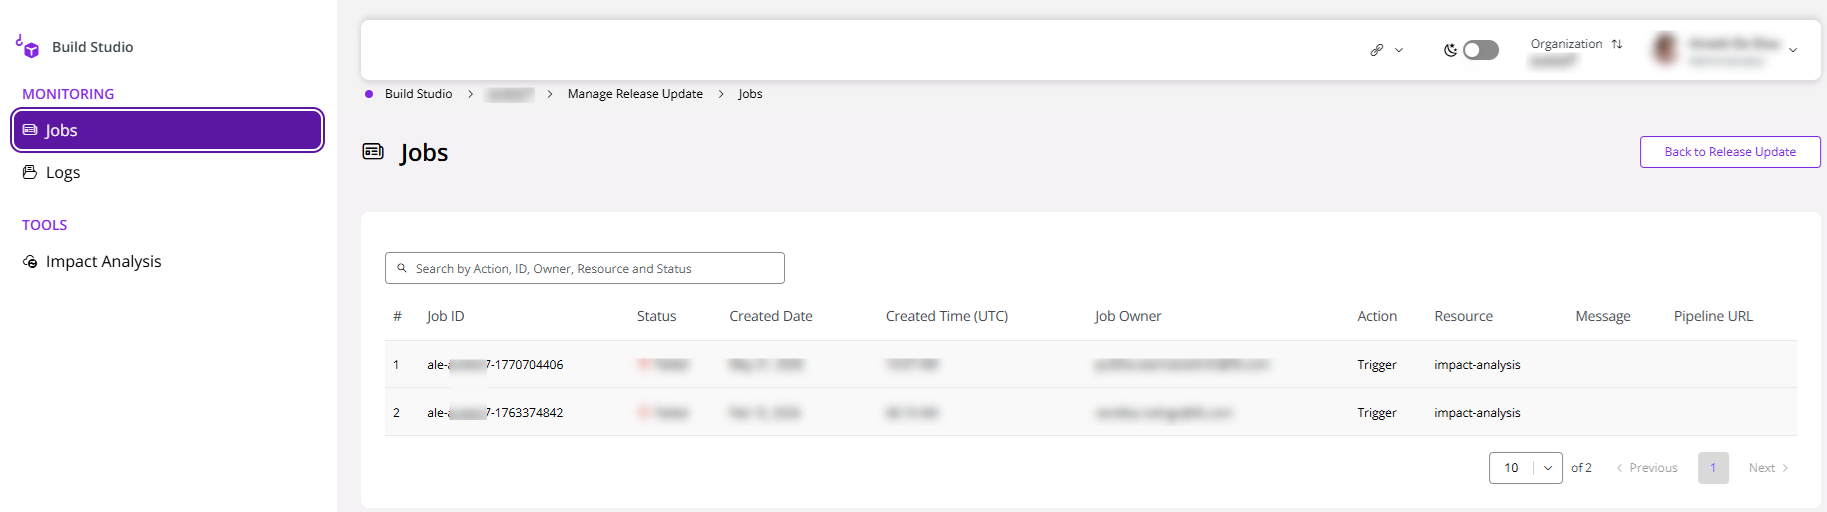 |
|---|
| Figure 26- Jobs View |
- Navigate to the Logs page of the Build Studio or Release Update Studio.
- Use the browser search (ctrl+F) to search the relevant log file.
 |
|---|
| Figure 27- Search Logs |
How to Request an Aurena Certificate Renewal
If a Build Studio environment (DEV, QAS, BAS, TOP, or DEL) displays an alert that the IFS Cloud Web Certificate is about to expire or has expired, as shown in the screenshots below, this indicates that the environment's SSL certificate is approaching its expiration date or is no longer valid.
There are three types of alerts for this scenario:
- If the certificate is to expire in 8-14 days
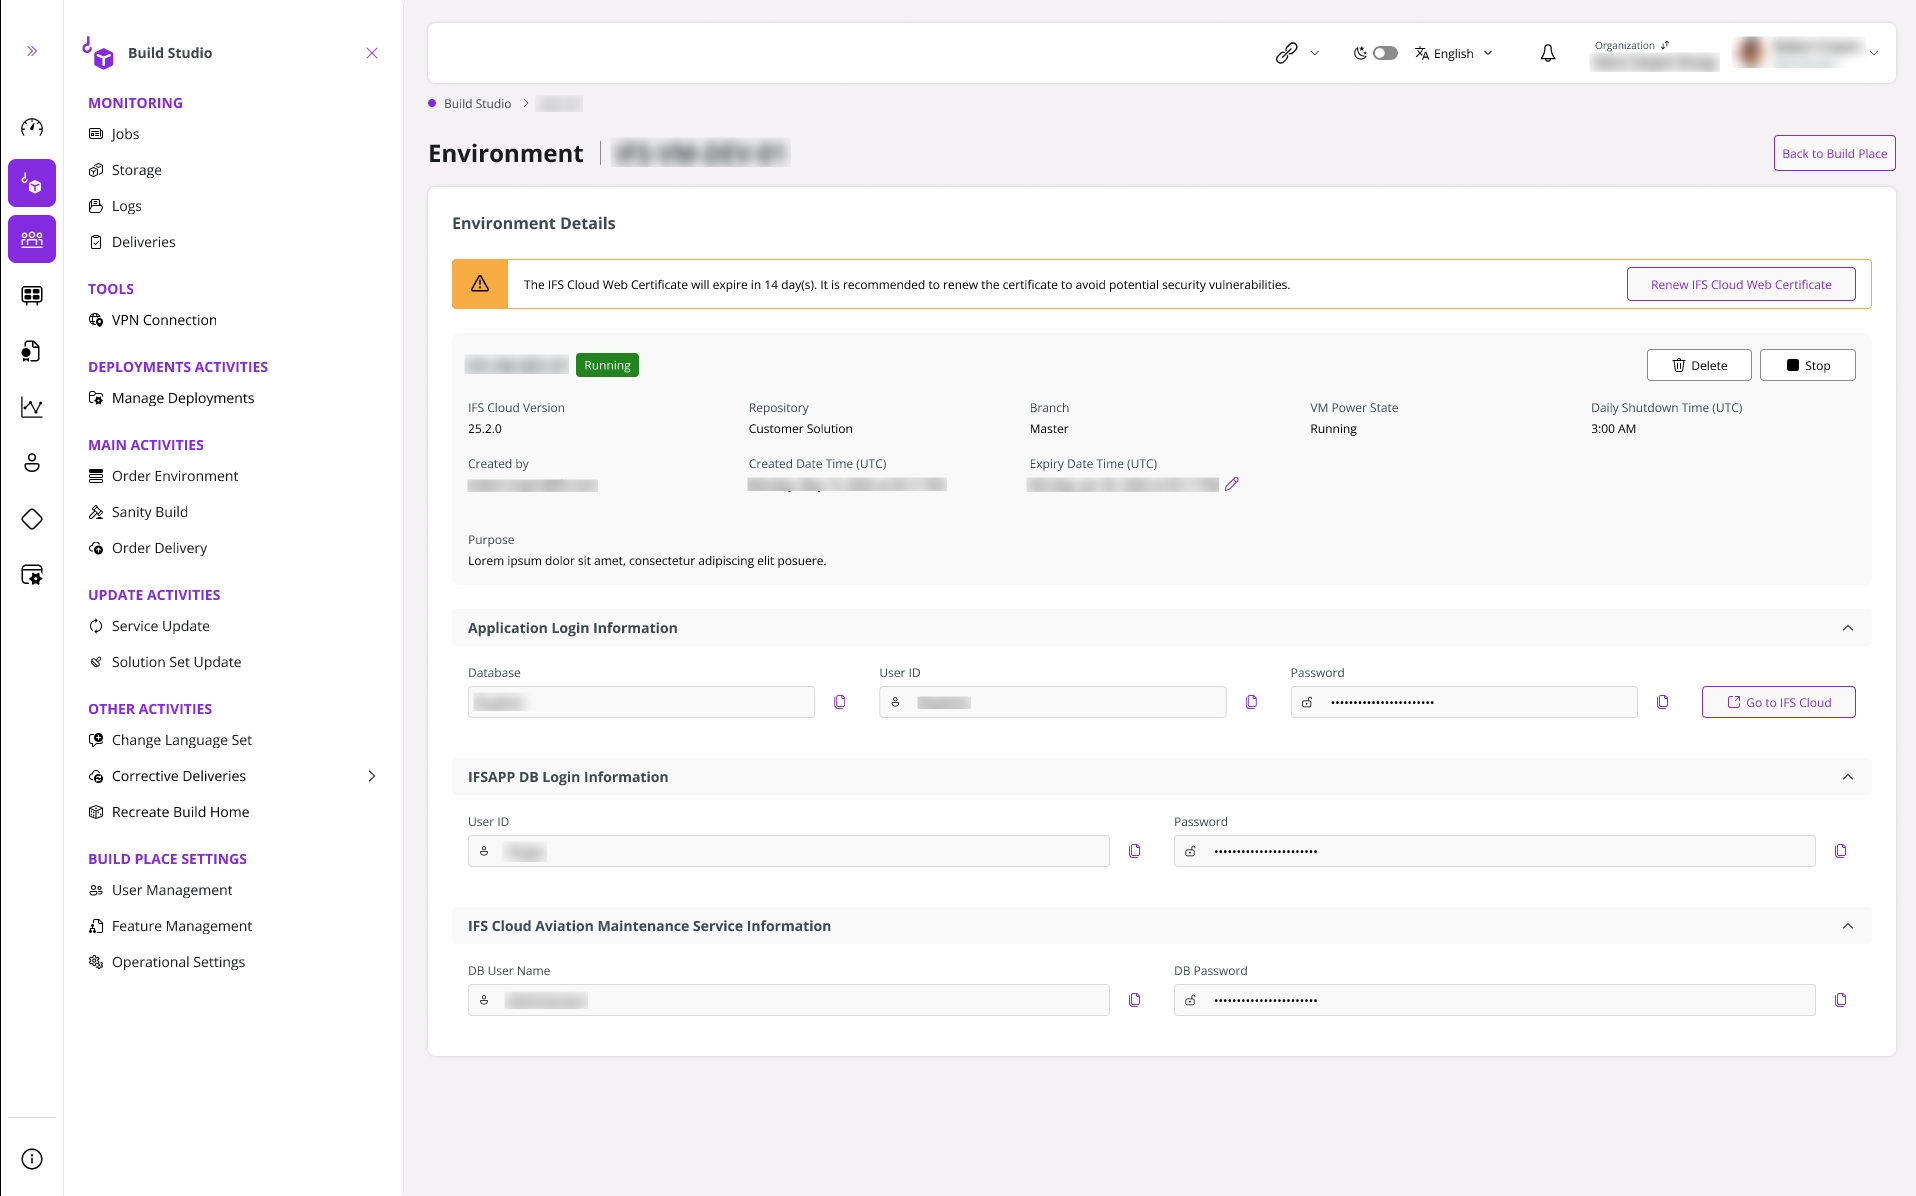 |
|---|
| Figure 28- Expiration Alert - 8 to 14 days |
- If the certificate is to expire in 0-7 days
|
|---|
| Figure 29- Expiration Alert - 0 to 7 days |
- If the certificate has already expired
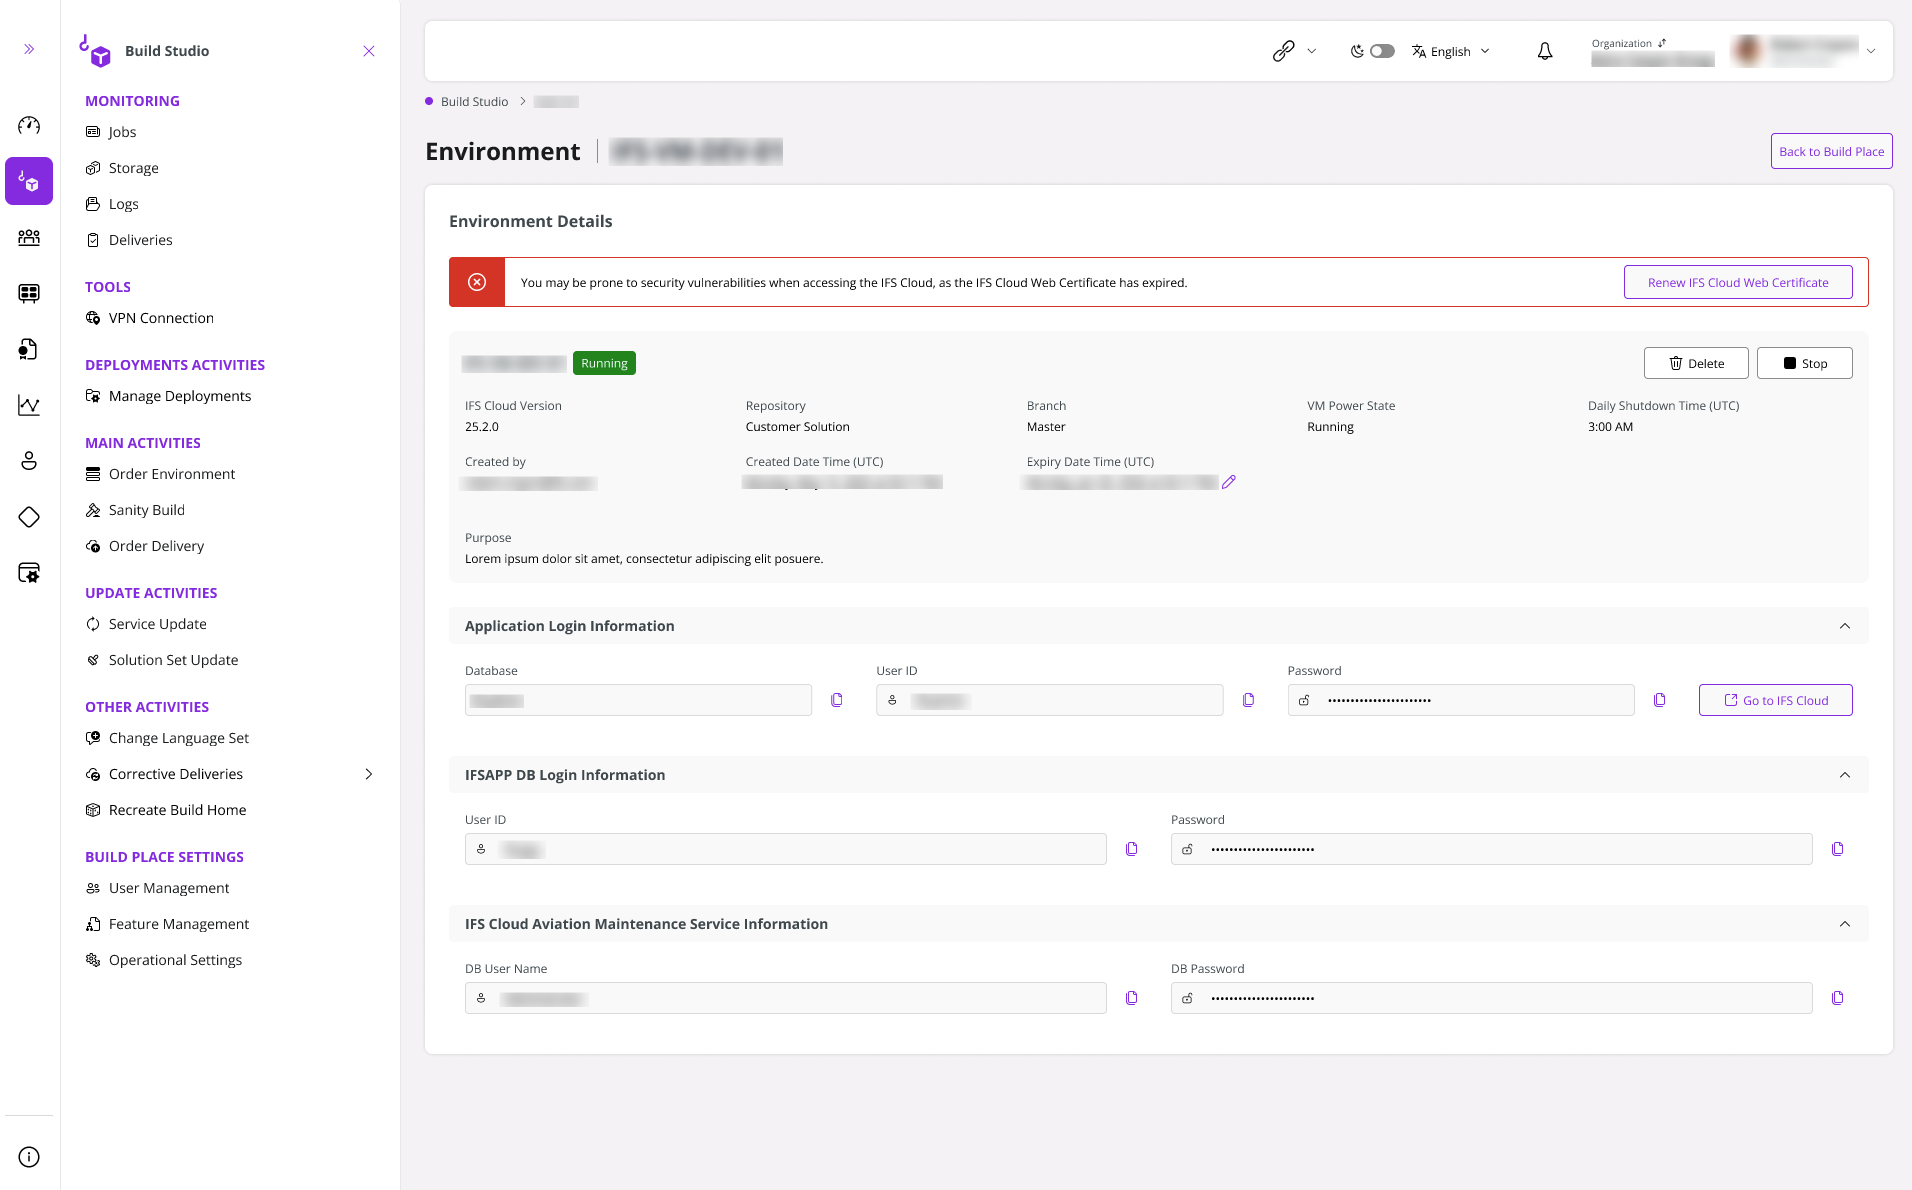 |
|---|
| Figure 30- Expiration Alert - Expired |
In each of these scenarios, an option will be given to renew the certificate, so that the environment can be accessed without renewingthe risk of facing any security issues.
Note
Please make sure that the environment is in the 'Running' state prior to renew the IFS Cloud Web Certificate.
When the hyperlink shown on the alert is clicked, a confirmation pop-up appears. If you wish to proceed, click Confirm.
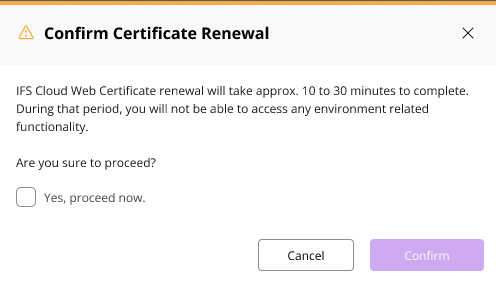 |
|---|
| Figure 31- Confirm Certificate Renewal Popup |
Triggering the certificate update moves the environment to the Updating state. During this period, the environment is inaccessible, and users cannot perform any environment-related operations.
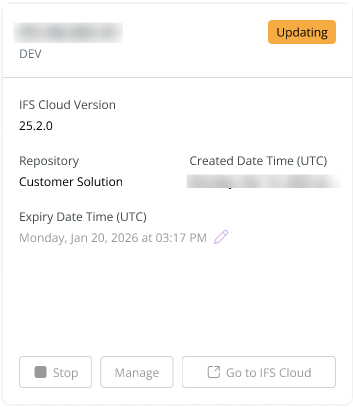 |
|---|
| Figure 32- Environment Updating the Certificate |
It will take approximately 10 minutes - 30 minutes for the certificate to be renewed. Once the operation is completed, the user can continue to proceed with the environment operations without any security vulnerabilities.
Note
Certificate Renewal Feature Availability in Environments
The certificate renewal feature is available for every environment created in the 24R2 release and beyond. Furthermore, the feature is also available in the DEV environments created before the 24R2 release.
Starting or Stopping Operation Failed
If the manual or scheduled starting and stopping operations fail, the environment status will move to Starting Failed or Stopping Failed respectively. At this point, the option to re-trigger the operation is available to the user, and if the operation continues to fail, a support ticket should be raised to get the issue resolved.
 |
|---|
| Figure 33- Environment Status - Starting Failed |
 |
|---|
| Figure 34- Environment Status - Stopping Failed |
Unable to Download Artifacts from Manage Deployments
If the artifacts available on the Manage Deployments page are not available to be downloaded, one of the following options can be followed to resolve the issue:
- Close the browser and load the Lifecycle Experience Center again.
- Open the Lifecycle Experience Center on another browser tab.
- Sign out and sign in to the Lifecycle Experience Center again.
Clear the browser cache. Eg:- Chrome browser cache clearing option

Figure 35- Clear Browser Cache If none of the above steps work, contact the IFS support teams to get the issue resolved.
Accessing the Database to Troubleshoot
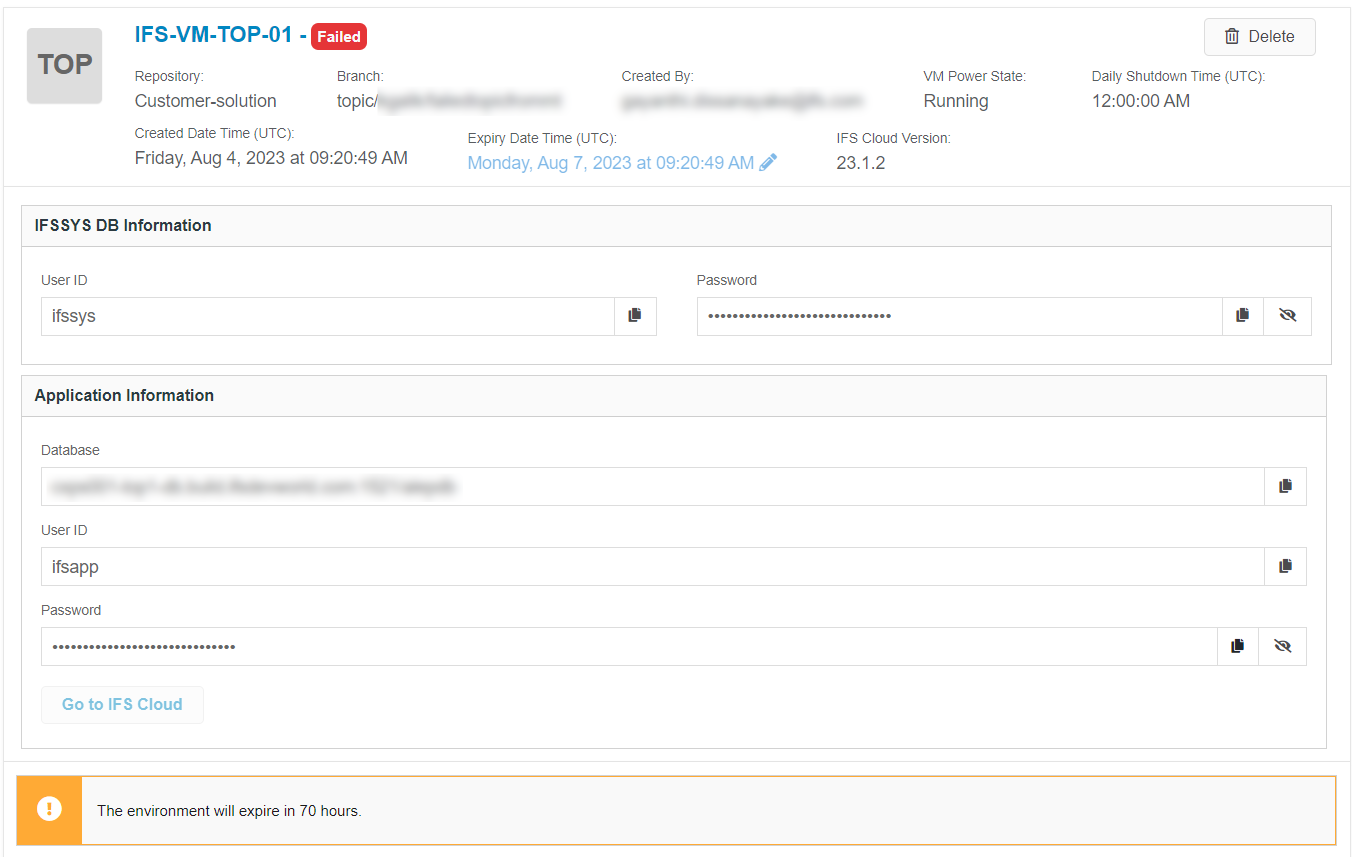
If the generation of delivery and topic environments from the Build Place fails, following a successful database deployment, users will have access to the database credentials. In such scenarios, users can access the database using the credentials provided in the Build Place (IFSSYS DB & Application Information sections will be enabled as shown in the screenshots below) to troubleshoot the issues.
While troubleshooting, if the cause of the environment creation failure is identified as a code deployment issue, the fixes can be done by logging into the database using the credentials. Once done, a new environment can be re-ordered to verify the changes.
However, if the generation of delivery and topic environments from the Build Place fails before or during the database deployment, the database credentials will not be accessible.
 |
|---|
| Figure 36- Access to the Database Failed in Delivery Environment |
 |
|---|
| Figure 37- Access to the Database Failed in Topic Environment |