Service Update 22R2 and Beyond
Apply a Service Update to the Build Place - 22R2 & Beyond
There are three main steps when taking a service update to a Buildplace.
step 1: Apply service update to customer-baseline repository
step 2: Impact Analysis for new customer-baseline repository version
step 3: Apply service update to customer-solution repository
-
Apply Service Update to Customer Baseline Repository
Follow the steps below to fetch a service update to the Customer Baseline repository.
-
Go to IFS Lifecycle Experience Portal and select the BuildPlace you wish to apply the service update.
-
Click on the Service Update button in the BuildPlace view (Figure 1.1).
 |
|---|
| Figure 1.1 - Service Update button |
Upon clicking on the Service Update button, a popup dialog box appears. This dialog box may vary according to the 1. version of the customer baseline and customer solution repositories and 2. the availability of service updates.
According to the two factors mentioned above, there can have four different scenarios when applying a service update to a BuildPlace.
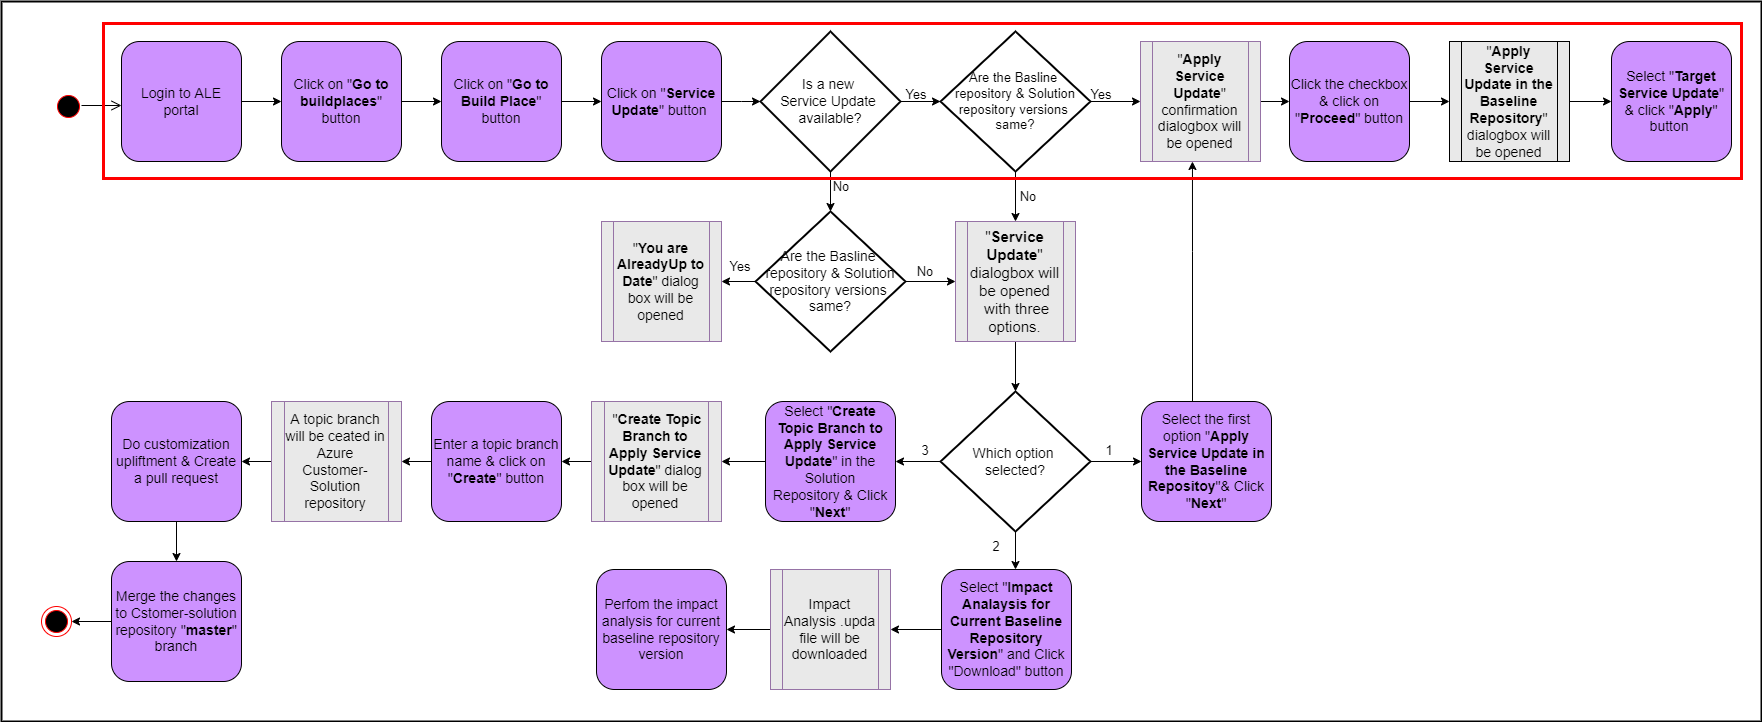
#### Scenario 1: When the versions of customer baseline and customer solution repositories are same and IFS has released a new service update
The highlighted path of the following diagram shows the user flow of applying a service update to Customer Baseline repository(Figure 1.2).
 |
|---|
| Figure 1.2 - Scenario 1 - User flow of applying a service update to Customer-Baseline repository |
A sample scenario with the versions of BuildPlace repositories that matches this scenario is shown in the image below (Figure 1.3).
 |
|---|
| Figure 1.3 - Scenario 1 - Baseline repository version before applying a service update |
-
In this scenario, the below dialog-box appears when clicked on the "Service Update" button in the Buildplace view(Figure 1.4).
-
It contains a warning message recommending finalizing and committing existing customizations prior to applying the service update to avoid merge conflicts.
-
Click the checkbox [1] and click on the Proceed button[2] to proceed with the service update.
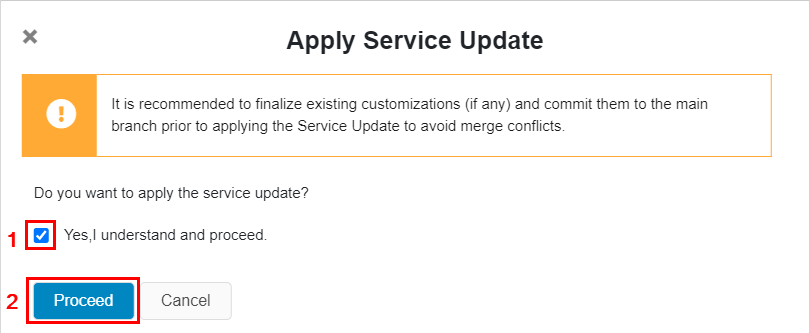
Figure 1.4 - Scenario 1 - Confirmation dialog-box before applying service update to customer-baseline repository -
Upon clicking on the Proceed button a dialog box will appear as below.
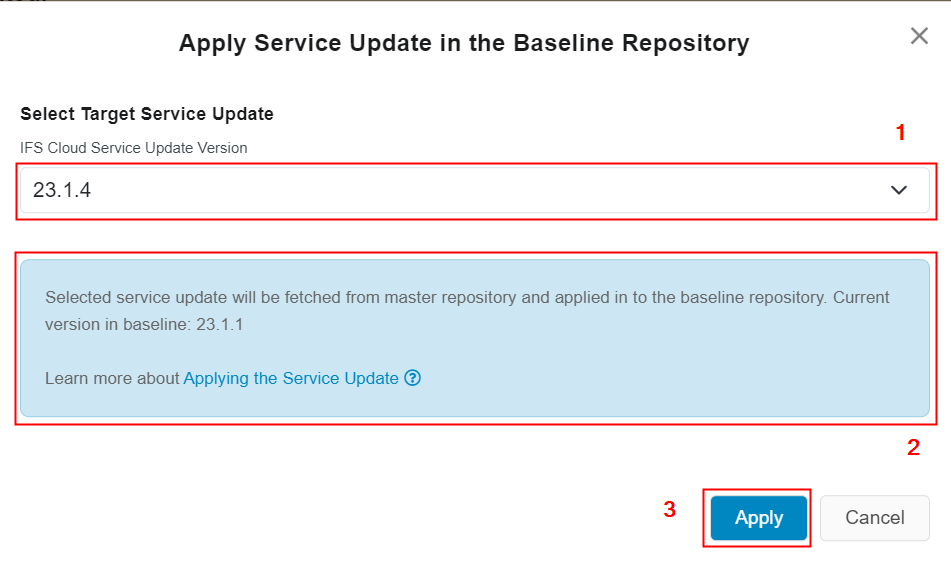
Figure 1.5 - Scenario 1 - Apply service update in the baseline repository popup-box -
Select a later service update version from "IFS Cloud Service Update Version" drop-down list[1].
-
The information panel [2] below the service update version shows the current version of the BuildPlace's customer-baseline repository.
-
Upon clicking on the Apply button [3], the system will start fetching the selected service update to the customer-baseline repository. You will see a Pending status next to the Customer Baseline Repository URL.
-
Finally, click on the Close button [4], to close the dialog box and terminate the process.
 |
|---|
| Figure 1.6 - Scenario 1 - Baseline repository pending tag |
-
The Job table record can be viewed by clicking on the "Jobs" button at the top main menu in the Buildplace view(Figure 1.7).

Figure 1.7 - Jobs button -
Once the pipeline runs successfully, the customer-baseline repository version displayed in the repository information card will be updated with the new version as below (Figure 1.8).
 |
|---|
| Figure 1.8 - Scenario 1 - Baseline repository version after applying a service update |
- Now, continue the process from Impact Analysis for new customer-baseline repository version.
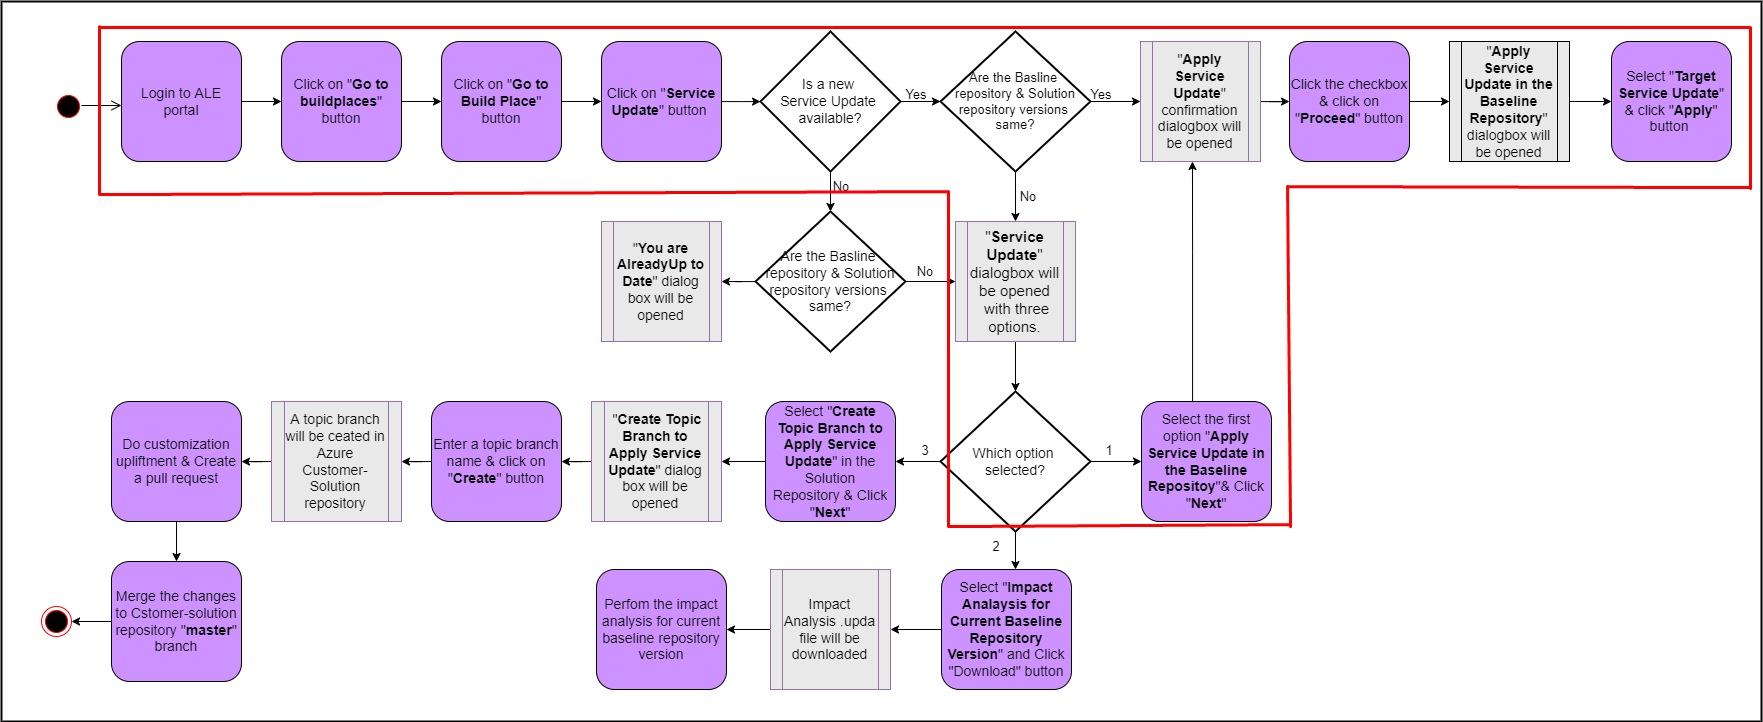
#### Scenario 2: When the versions of customer baseline and customer solution repositories are different and IFS has released a new service update
The highlighted path of the following diagram shows the user flow of applying a service update to Customer Baseline repository(Figure 1.9).
 |
|---|
| Figure 1.9 - Scenario 2 - User flow of applying a service update to Customer-Baseline repository |
A sample scenario with the versions of Buildplace repositories that matches this scenario is shown in the below image(Figure 1.10).
 |
|---|
| Figure 1.10 - Scenario 2 - Baseline repository version before applying a service update |
-
In this scenario, the following dialog box appears when clicking on the Service Update button in the Buildplace view(Figure 1.11).
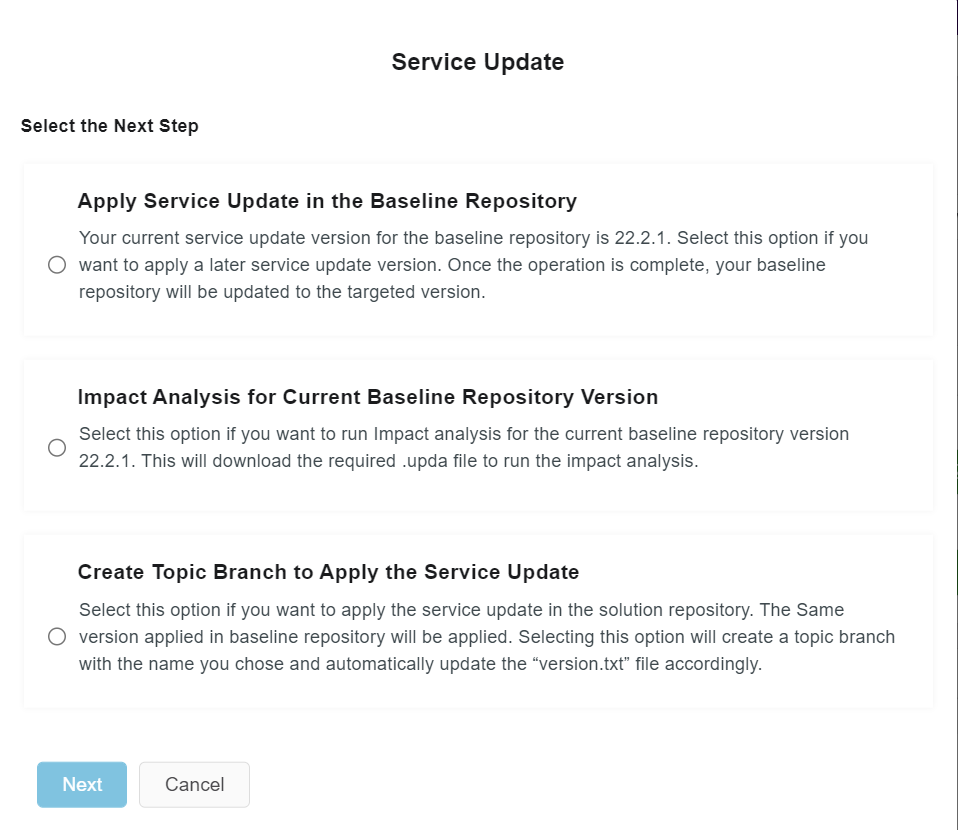
Figure 1.11 - Scenario 2 - Service Update popup-dialog box - Select an option to proceed with the next step. - Choose the first option in the popup-dialog box to apply a later service update to the baseline repository. - Click on the **Next** button to proceed(*Figure 1.12*).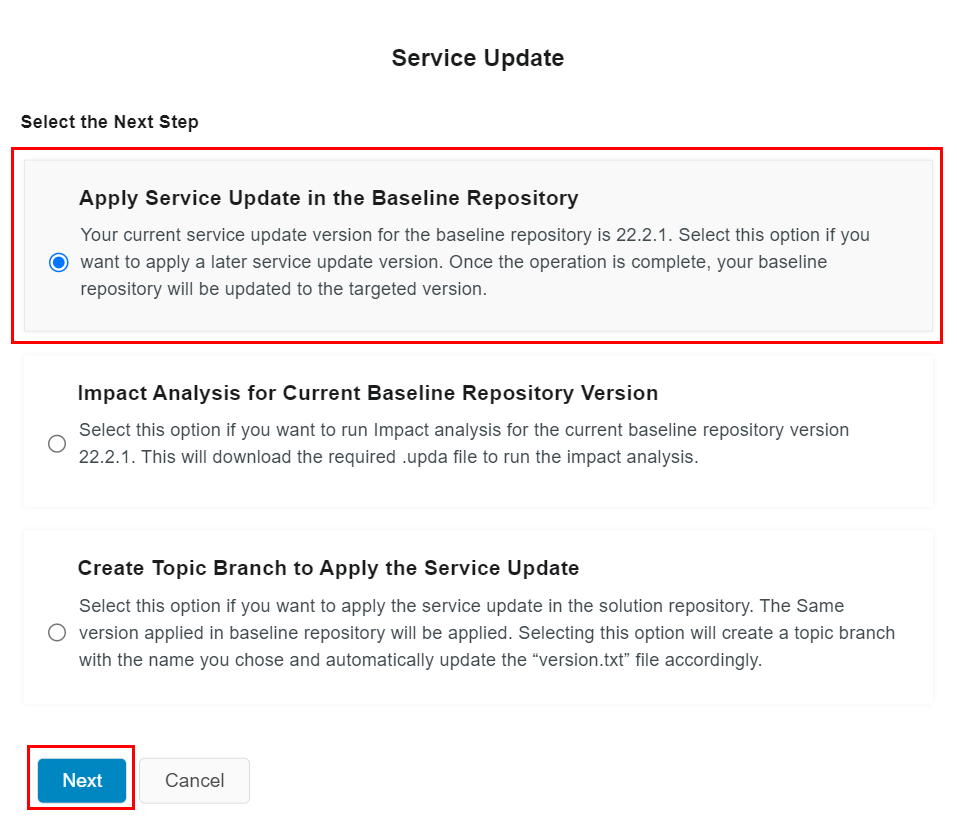
Figure 1.12 - Apply service update in the baseline repository -
Once the Next button is clicked, a confirmation dialog box will be appeared (Figure 1.4).
-
The Apply Service Update in the Baseline Repository dialog box (Figure 1.5) will pop up when clicking on the Proceed button.
-
Upon clicking on the Apply button (Figure 1.6), a new job will be assigned with the status "Pending". During this process, the system will start fetching the selected service update to the customer-baseline repository.
-
The related Job table record can be viewed by clicking on the Jobs button at the top main menu in the Buildplace view (Figure 1.7).
-
Once the pipeline run successfully, the customer-baseline repository version displayed in the repository information card will be updated with the new version as below(Figure 1.12).

Figure 1.12 - Scenario 2 - Baseline repository version after applying a service update -
Now continue the process from Impact Analysis for new customer-baseline repository version.
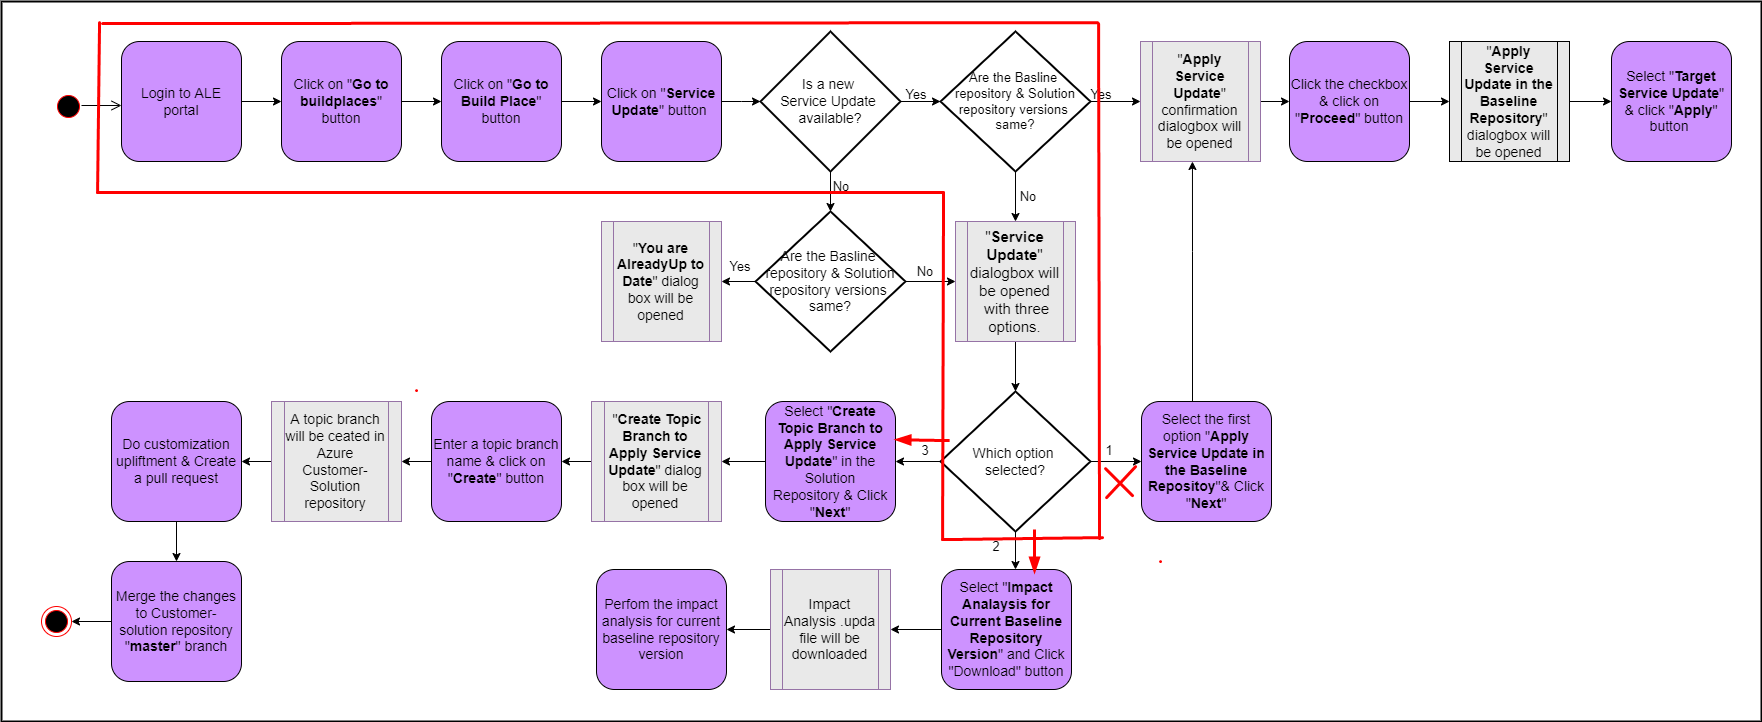
#### Scenario 3: When the versions of customer baseline and customer solution repositories are different and there are no new service updates released by IFS
The highlighted path of the following diagram shows the user flow for this scenario (Figure 1.13).
 |
|---|
| Figure 1.13 - Scenario 3 - User flow of applying a service update |
A sample scenario with the versions of Buildplace repositories that matches to this scenario is shown in the below image(Figure 1.14).
 |
|---|
| Figure 1.14 - Scenario 3 - Baseline repository version before applying a service update |
-
In this scenario, the following dialog box appears when clicking on the Service Update button in the build place view(Figure 1.15).
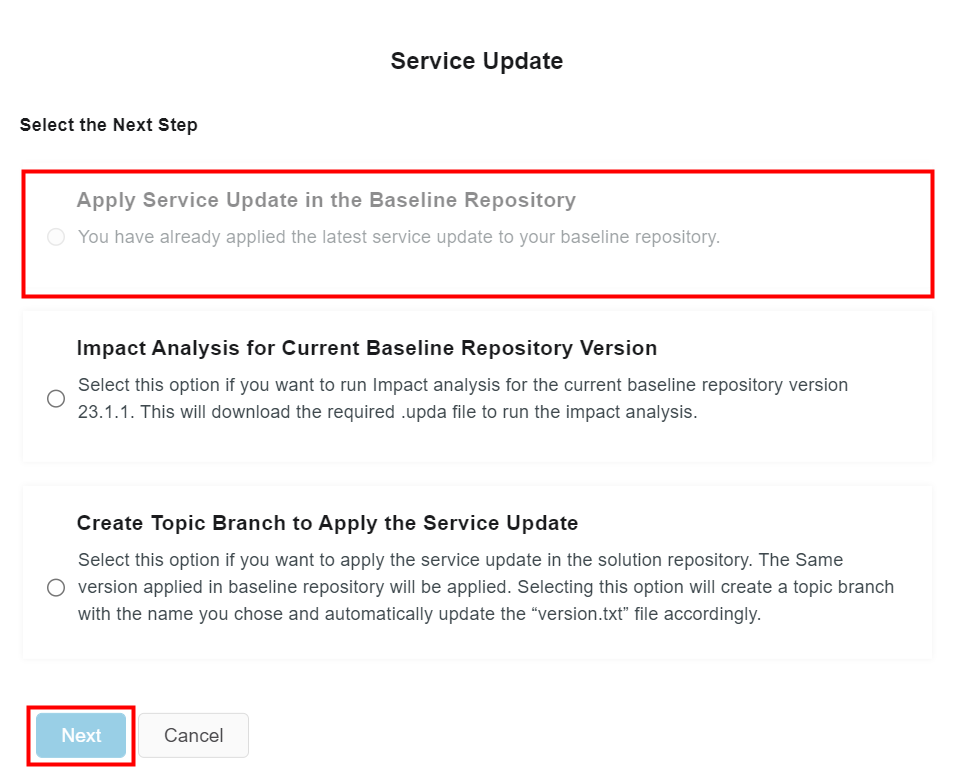
Figure 1.15 - Scenario 3 - Service Update popup-dialog box -
The 1st option Apply Service Update in the Baseline Repository is disabled as there are no later service update versions to be applied to the baseline repository.
-
Select the required option from the list to enable the Next button (Figure 1.15).
-
In this scenario, any of the enabled options can be selected. Choose Impact Analysis for current Baseline Repository Version option, if you want to analyze the impact of the customizations from the version of the current baseline repository(Figure 1.16). Then click on the Download button. For more info: Impact Analysis for new customer-baseline repository version.
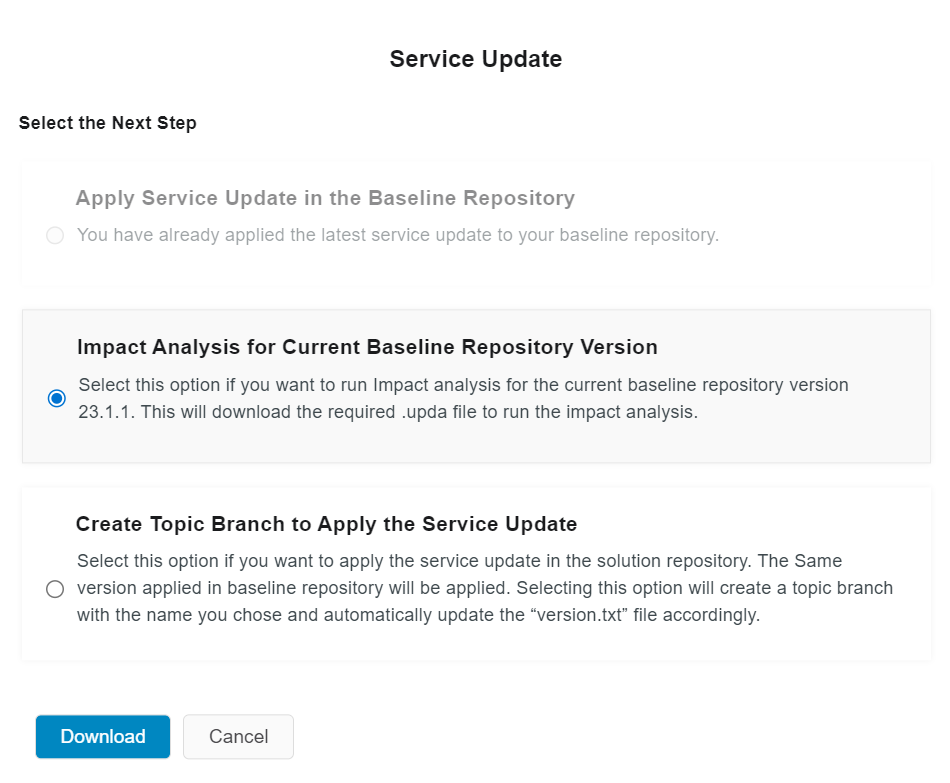
Figure 1.16 - Scenario 3 - Impact analysis for current baseline repository version -
Choose Create Topic Branch to Apply the Service Update option, if you want to apply the version in the current baseline repository to current version of the customer solution repository (Figure 1.17). For more info: Apply service update to customer-solution repository
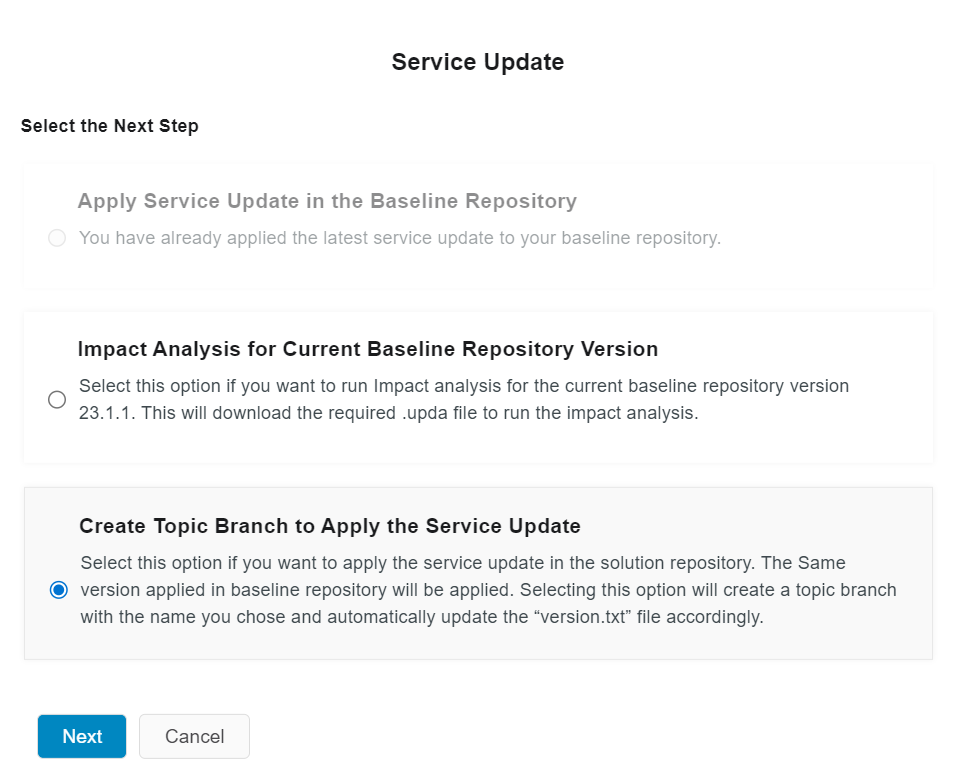
Figure 1.17 - Scenario 3 - Create topic branch to apply the service update
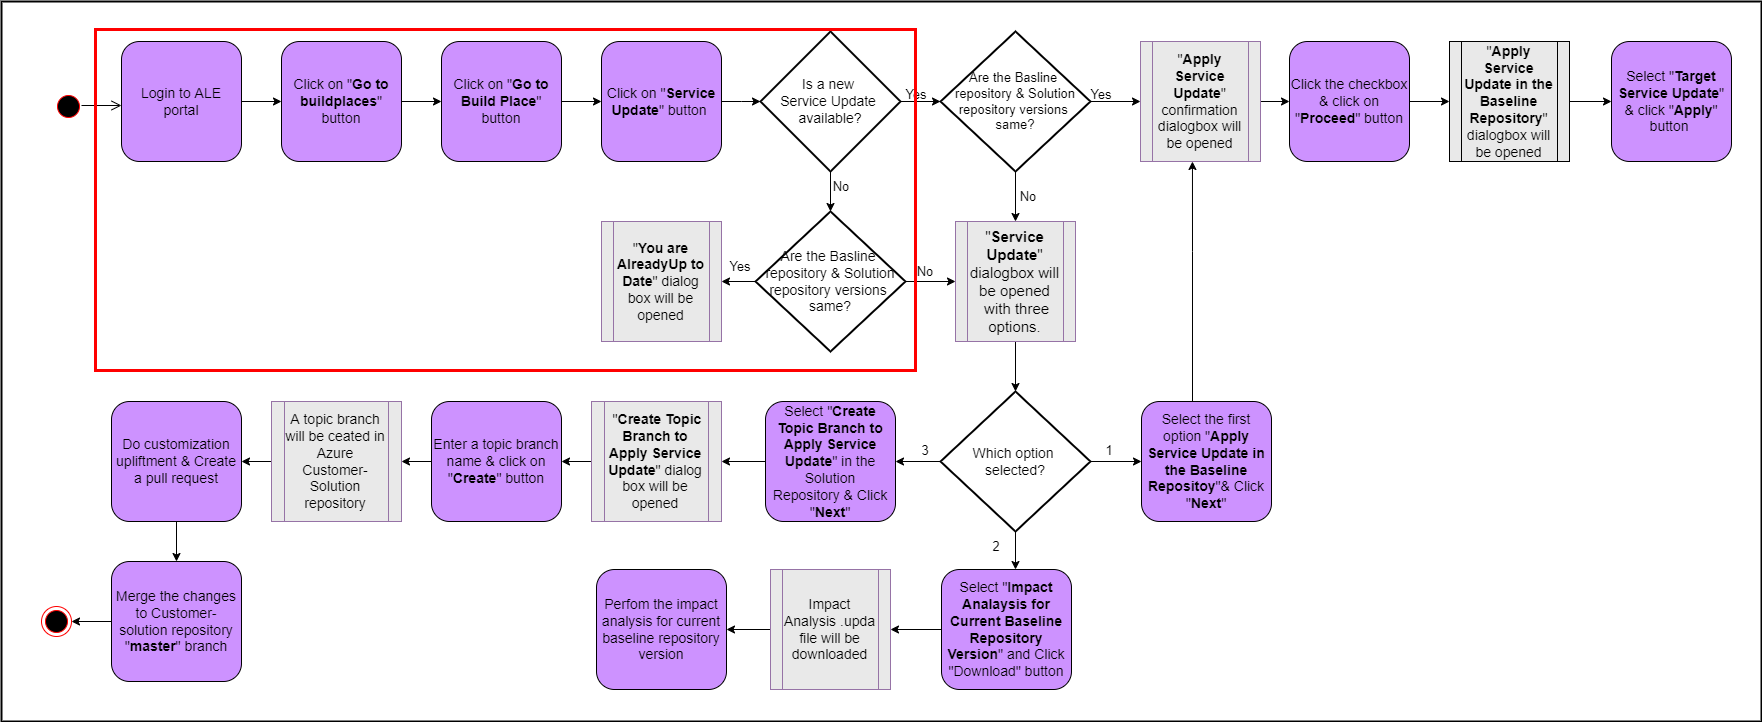
#### Scenario 4: When the versions of customer baseline and customer solution repositories are same and there are no new service updates released by IFS
The highlighted path of the following diagram shows the user flow for this scenario (Figure 1.18).
 |
|---|
| Figure 1.18 - Scenario 4 - User flow when buildplace is already up to date |
A sample scenario with the versions of Buildplace repositories that matches this scenario is shown in the below image(Figure 1.19).
 |
|---|
| Figure 1.19 - Scenario 4 - Create topic branch to apply the service update |
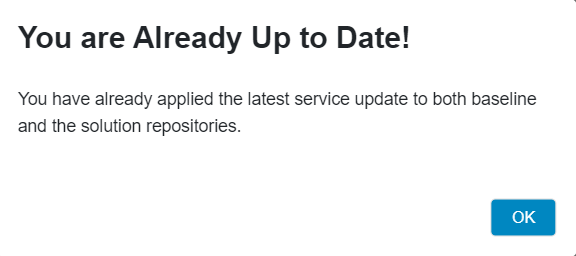
In this scenario, the following dialog-box appears when clicking on the Service Update button in the BuildPlace view(Figure 1.20).
 |
|---|
| Figure 1.20 - Scenario 4 - Already up-to-date popup-dialogbox |
-
Impact Analysis for New Customer Baseline Repository Version
This is the second main step in the process of applying a service update to a BuildPlace. After the Customer Baseline Repository has been updated with the service update, the Update Analyzer tool can be used to analyze the impacts of fetching this update to the Customer Solution which contains the customizations. To do this, follow the steps below;
- Click on the Service Update button in the BuidlPlace view (Figure 1.1).
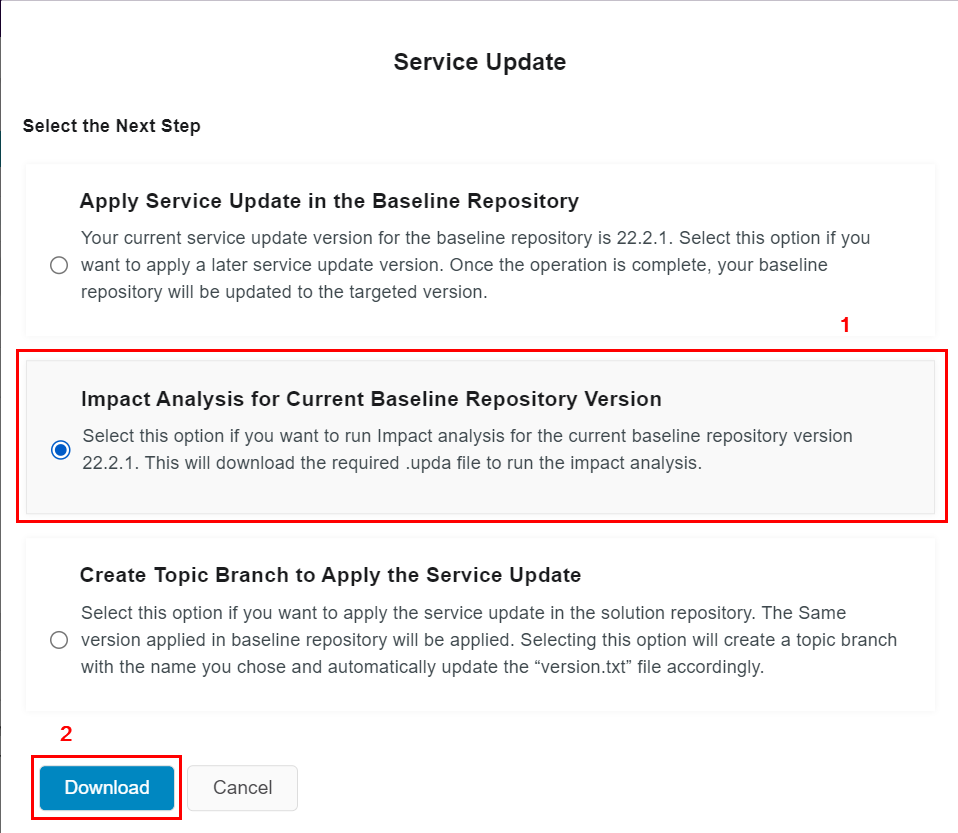
- Select the second option[1] in the dialog box as in the image below (Figure 2.1).
- Click on the Download button[2].
 |
|---|
| Figure 2.1 - Impact analysis option in Service Update popup-dialogbox |
- Once clicked on the Download button, a file with ".upda" extension will be downloaded within two-three seconds to the user's download folder.
Note: To do the impact analysis, the Update Analyzer tool needs to be installed on the user's machine. Please refer "Update Analyzer Installation Steps" section of the Development Guide in the Technical Documentation to find the step-by-step guide on how to install the Update Analyzer Tool.
-
On a machine that has pre-installed Update Analyzer, the file can be opened by double-clicking or by selecting the option Open with Update Analyzer.
-
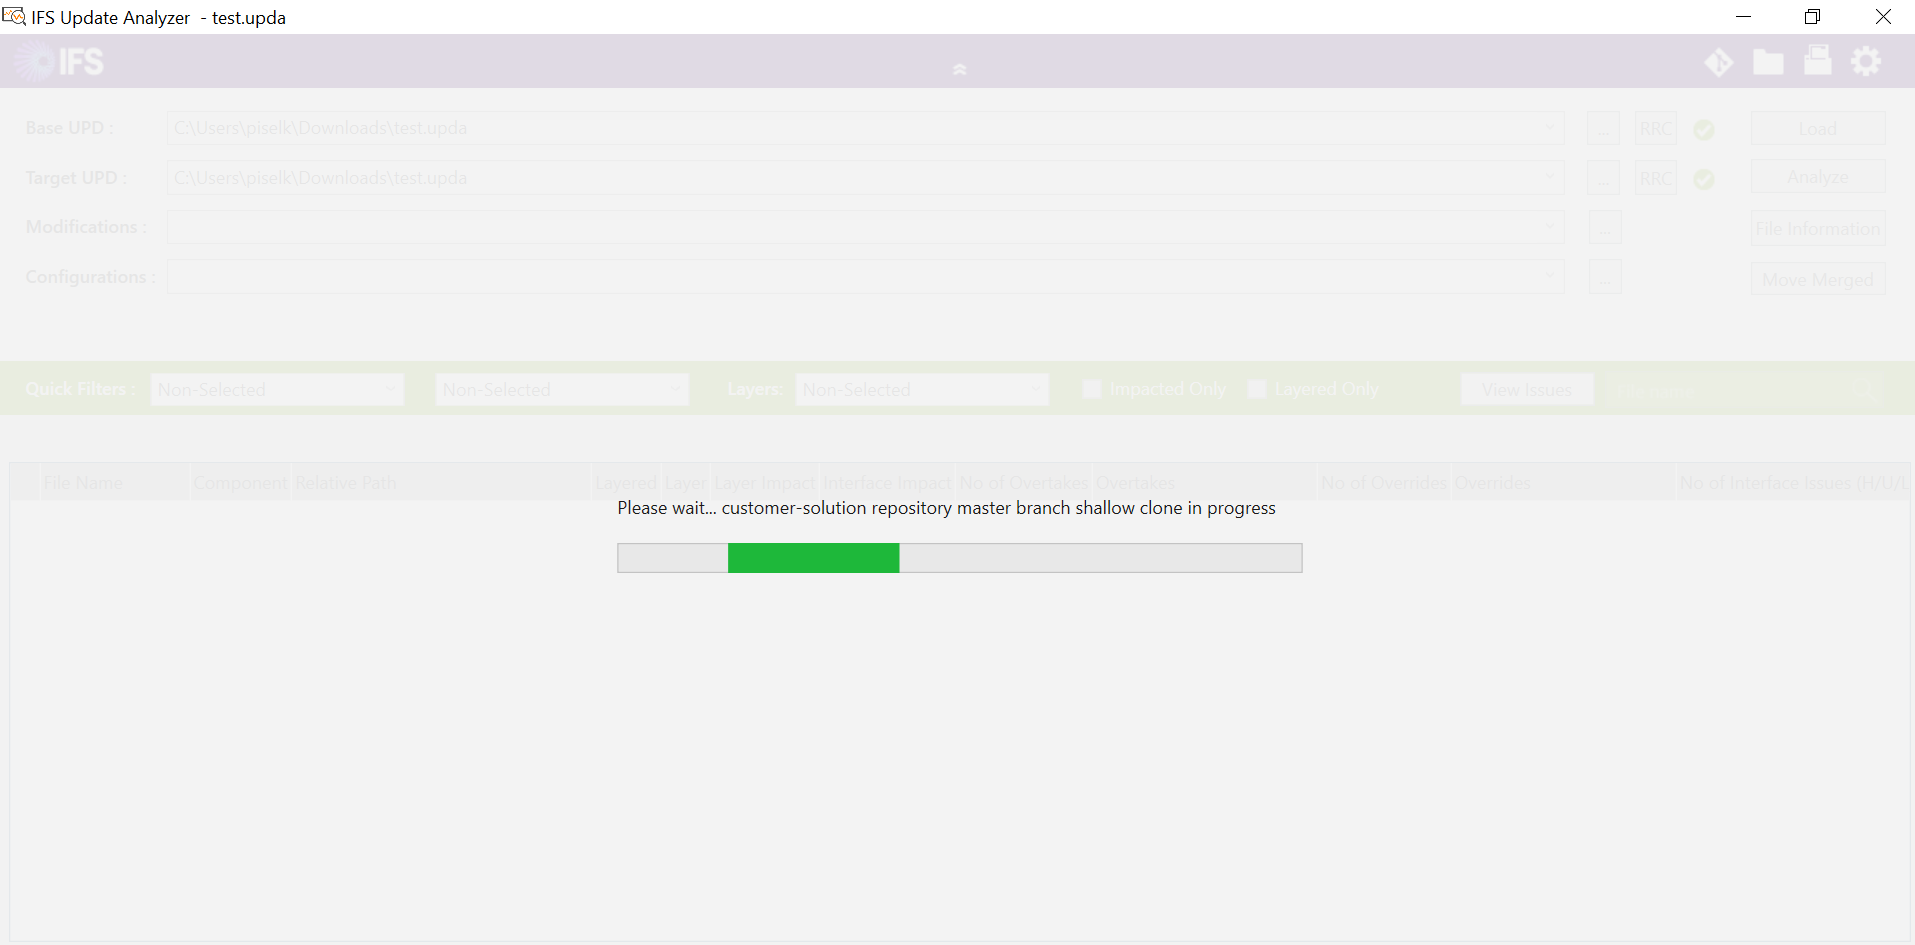
The file will then open in Update Analyzer and will start cloning the repositories and will then run the impact analysis (Figure 2.2). The process will continue for approximately 5-15 minutes and complete.
 |
|---|
| Figure 2.2 - Already up-to-date popup-dialogbox |
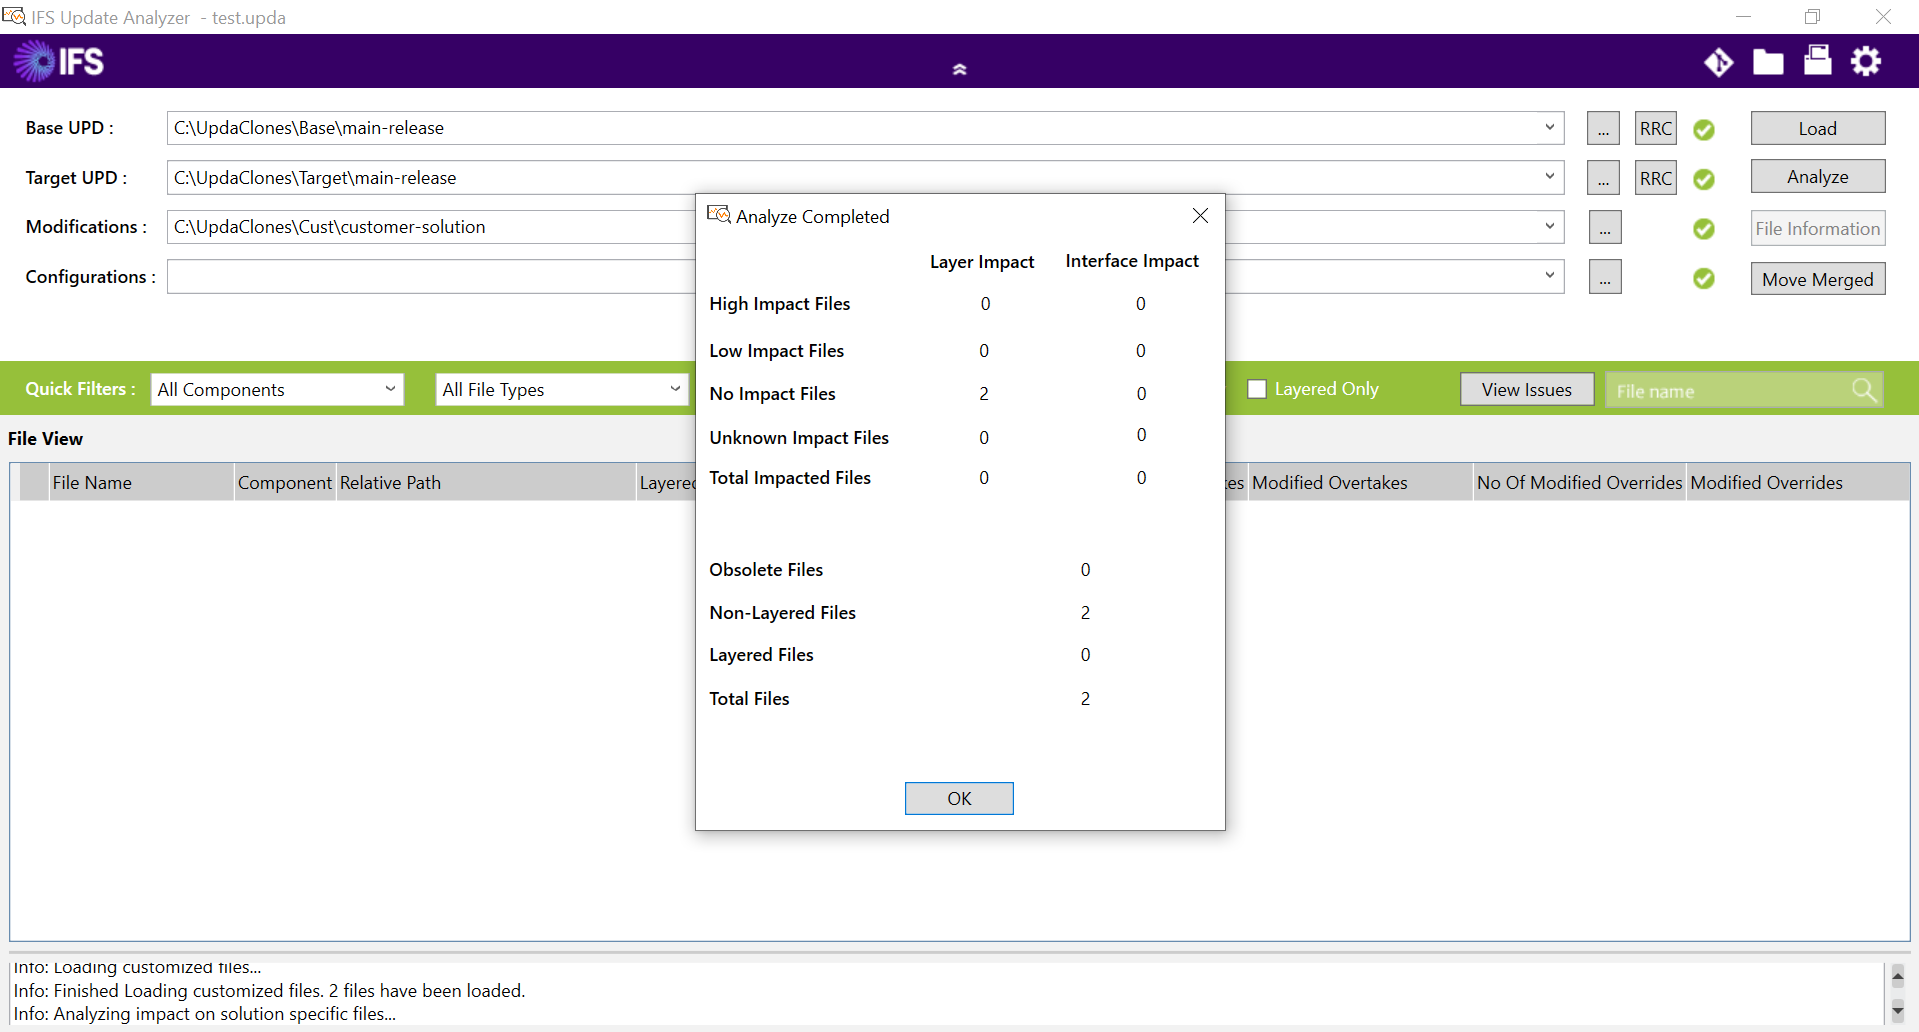
- At the completion of the analysis, a report will be generated with an overview of layer impacts, categorized by the severity of the impacted files as high, low, no, and unknown files (Figure 2.3).
 |
|---|
| Figure 2.3 - Overview of the impacts shown in Update Analyzer |
Further, by clicking on one of the rows, a detailed diff analysis of those files can be viewed. For further details: refer Update Analyzer Analyzing section of the Development Guide in the Technical Documentation.
- Continue from Apply service update to customer-solution repository
Note: Throughout the Apply service update process, you can follow these steps whenever you need to run an impact analysis.
-
Apply Service Update to Customer Solution Repository
This is the third main step in the process of applying a service update to a BuildPlace. After the impact of the service update on the customizations has been identified by the impact analysis step, it is possible to apply the service update to the customer solution repository "master" branch. To do this, follow the steps below:
-
Click on the Service Update button in the BuidlPlace view(Figure 1.1).
-
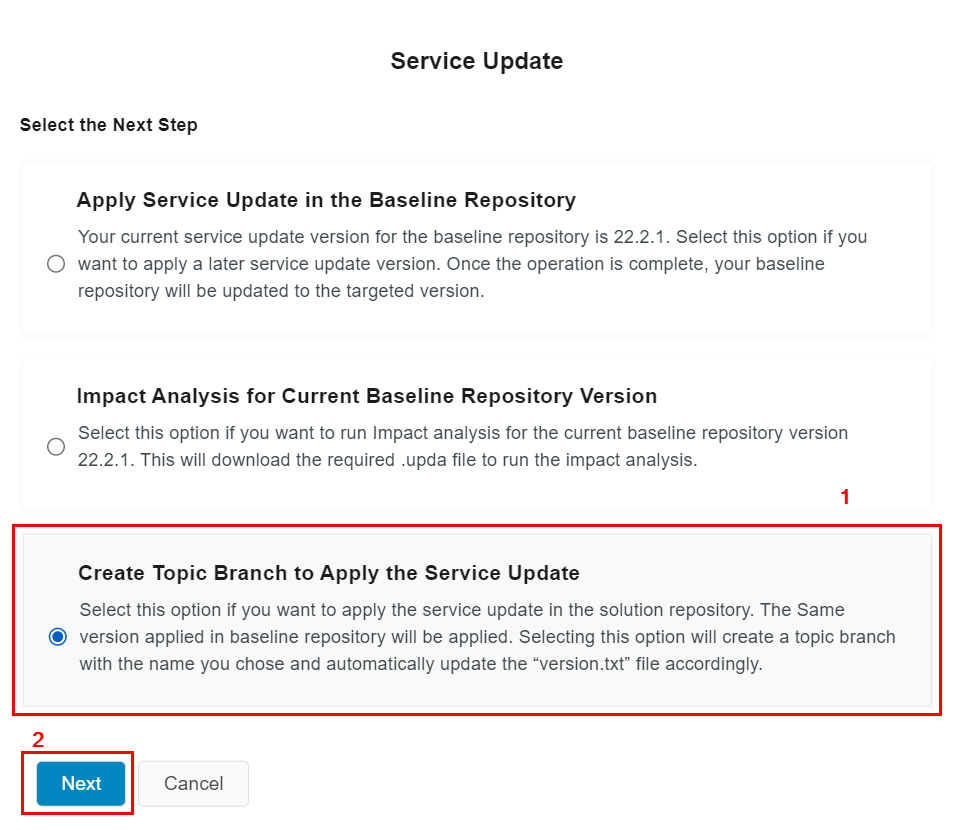
Then select the third option[1] in the popup dialog box as in the image below(Figure 3.1).
 |
|---|
| Figure 3.1 - Create topic branch to apply the service update option |
- Upon clicking the Next button[2] a dialog box will be opened up(Figure 3.2).
The purpose of having this dialog box is to get the topic branch name for the automation pipeline as input, to commit the new_version.txt file as the automation pipeline has partially automated the merging of the version.txt file to the customer-solution repository during a service update. Thereafter, the above-created topic branch should be used for the customization upliftment process.
-
Please note that the topic branch will be created with the name shown in the popup-dialog box.
-
As in the image (Figure 3.3), the topic branch name will be "topic/automation/SU-service-update.22.2.1,0001*" [1,2].
-
If the topic branch name generated already exists in the Customer Solution Azure Repository, the following text that is marked in red[1] will be displayed and the Create[2] button will be disabled. (Figure 3.2).
-
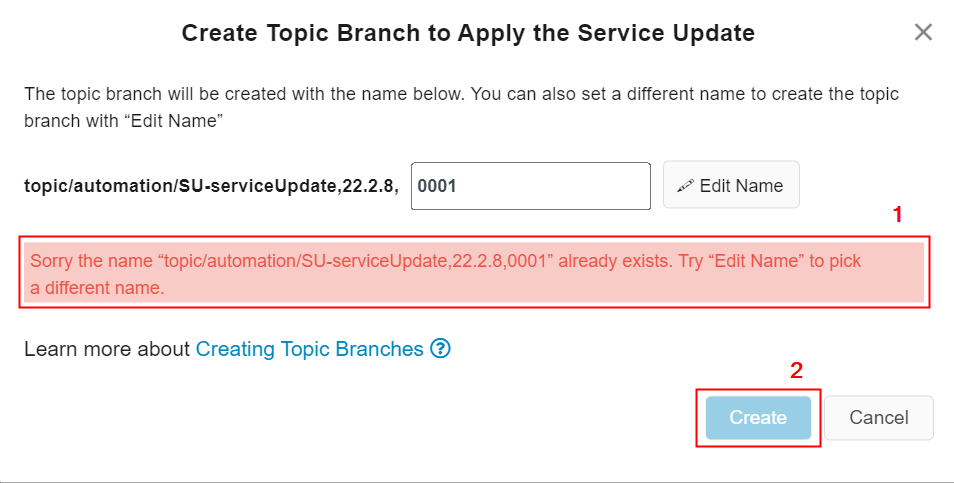 |
|---|
| Figure 3.2 - When the default branch name already exists in the repository |
-
The Edit Name button can be used to edit the placeholder[2] of the generated topic branch name which is a unique, generated number.
- The topic branch name placeholder field[2] is disabled until the Edit Name button is clicked[3].
- By clicking on the Edit Name button, it is possible to edit the generated number if it is required[3].
Note: However, editing the autogenerated branch name is optional. If the user wants to create the branch name in a user-specified way, then click on the Edit Name button to do any modification. However, the autogenerated branch name is unique for each user.
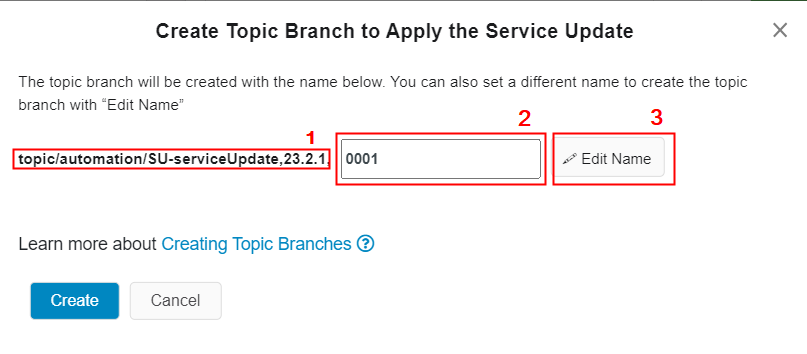 |
|---|
| Figure 3.3 - Create topic branch to apply the service update option |
- When the suffix of the topic branch name is changed[1],
- The Edit Name button text turns in to Check[2].
- The Create button gets disabled.
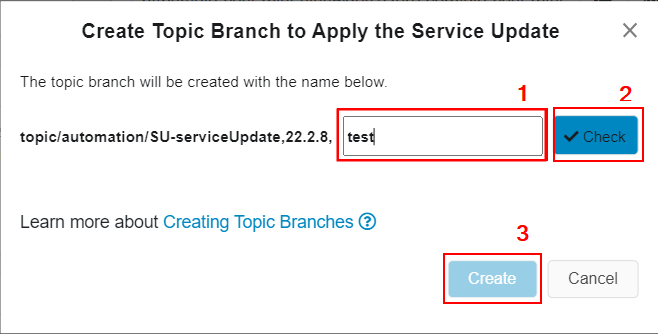 |
|---|
| Figure 3.4 - Create topic branch to apply the service update option |
By clicking on the Check button, it is possible to check if the auto-generated branch name already exists in the customer solution Azure project repository. If the branch already exists in the user's customer solution Azure repository, it is not possible for the automation pipeline to create the topic branch.
-
Click on the Check button. During the time of checking the existence of the edited topic branch name,
-
An information text highlighted in yellow colour will be visible above the buttons as in the image below (Figure 3.4).
-
The Check button then turns in to a spinner as show in (Figure 3.5).
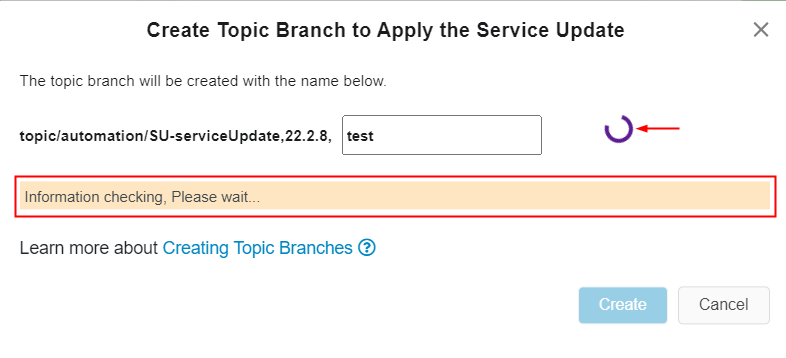
Figure 3.5 - Checking updated topic branch name -
-
Upon the completion of checking the existence of the updated branch name, if the updated branch name does not exist in the customer solution Azure repository as in (Figure 3.6),
-
A text highlighted in green colour[2] will appear.
-
The Check button gets disabled unless the branch name is not changed[1].
-
The Create button is enabled[3].
-
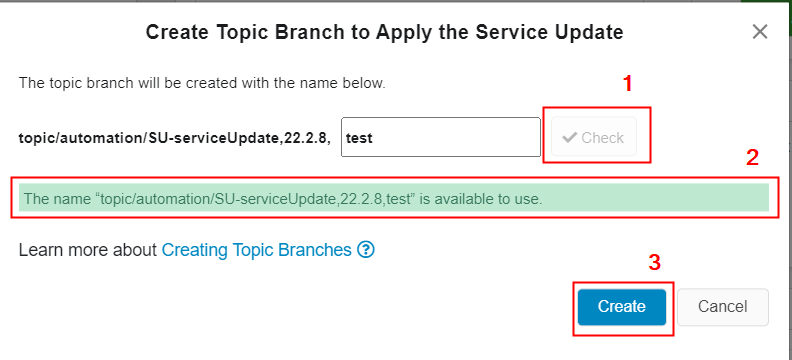 |
|---|
| Figure 3.6 - Valid topic branch name |
-
Upon the completion of checking the existence of the updated branch name, if the updated branch name already exists in the customer solution Azure repository as in (Figure 3.7),
- A text highlighted in red colour[2] will appear.
- The Check button gets disabled unless the branch name is not changed[1].
- The Create button is disabled[3].
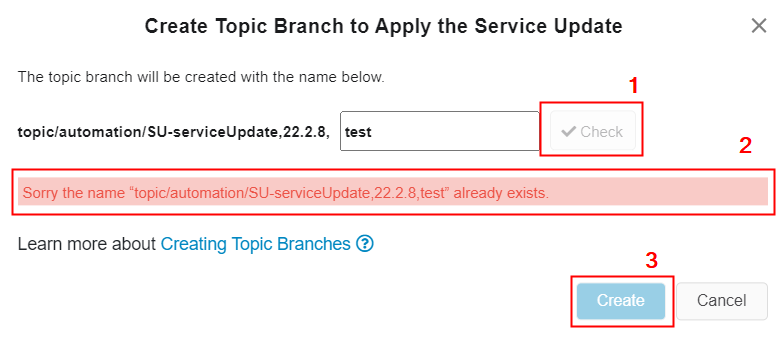 |
|---|
| Figure 3.7 - Already existing topic branch name |
- If the user gets the above output, try using a different branch name by changing the suffix of the branch name (Figure 3.7).
-
If the user gets the output shown in Figure 3.6, click on the Create button to proceed.
-
At this point, a job table record will be created for the topic branch creation by the automation pipeline. The job records can be viewed by navigating to the jobs view by clicking on the Jobs button (Figure 1.5).
-
Once the topic branch creation pipeline is a success, a successful toast message will appear; otherwise it will show a toast message of failure.
-
At this point, the automation pipeline has created a topic branch in the customer solution repository with the name specified and has been pushed the new version.txt file to the branch.
-
Branch details can be checked if you go to the customer solution Azure repository by clicking on the link icon shown in (Figure 3.8) [1].
 |
|---|
| Figure 3.8 - Valid topic branch name |
- To check if the topic branch specified in the previous steps, has been committed (Figure 3.9):
- Go to the Branches [1]
- Select All tab[2]
- Click on the branch name which has been created by the automation pipeline[3]
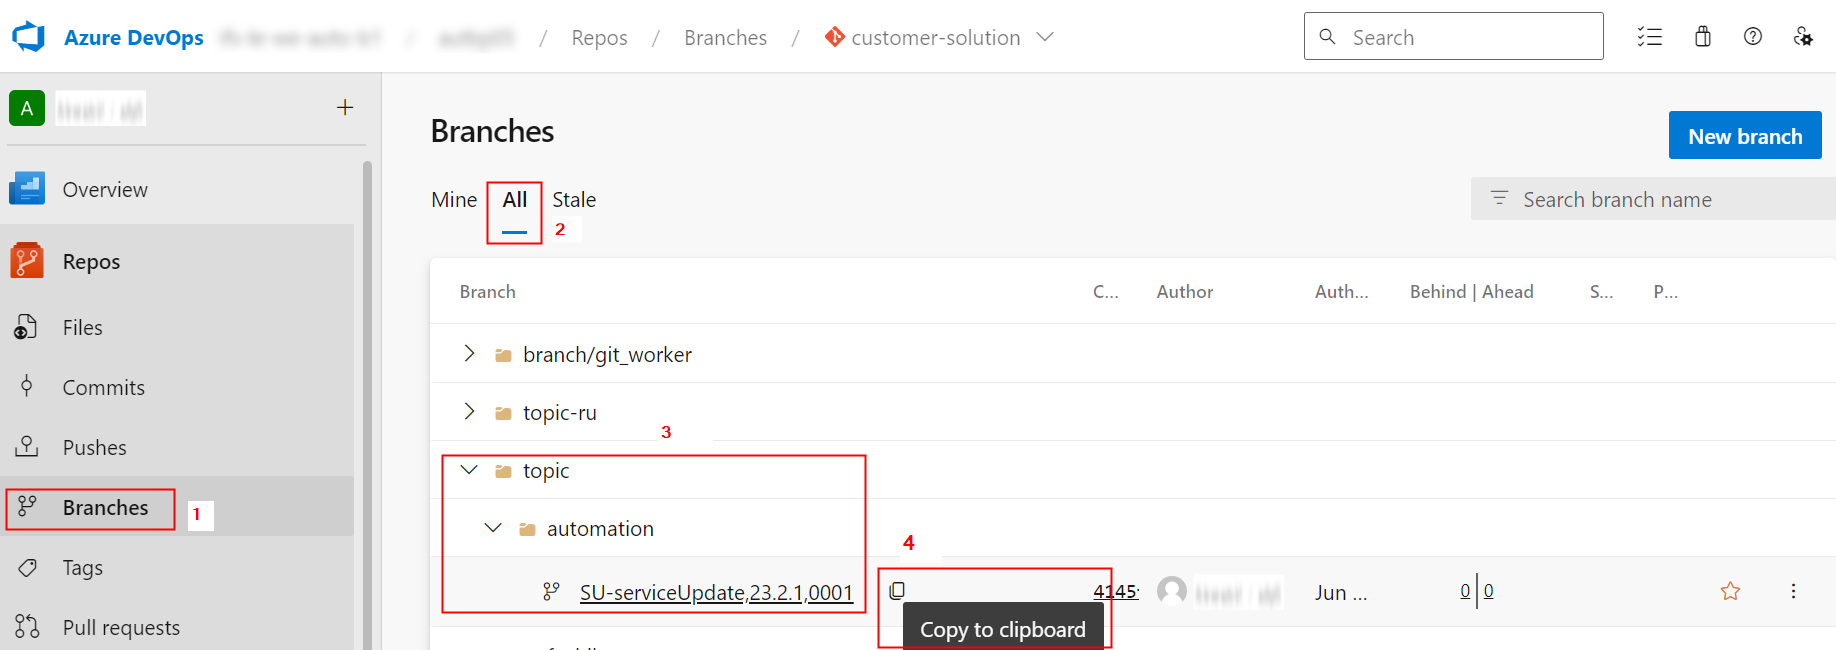 |
|---|
| Figure 3.9 - Valid topic branch name |
- To check if the new version.txt file has been committed to the topic branch (Figure 3.10)
- Go to Files in the customer solution Azure repository [1].
- Select the topic branch name from the drop down list [2].
- Navigate to the folder in "fndbas" => "source" [3].
- Open the version.txt file and check the correct service update version contains there[4].
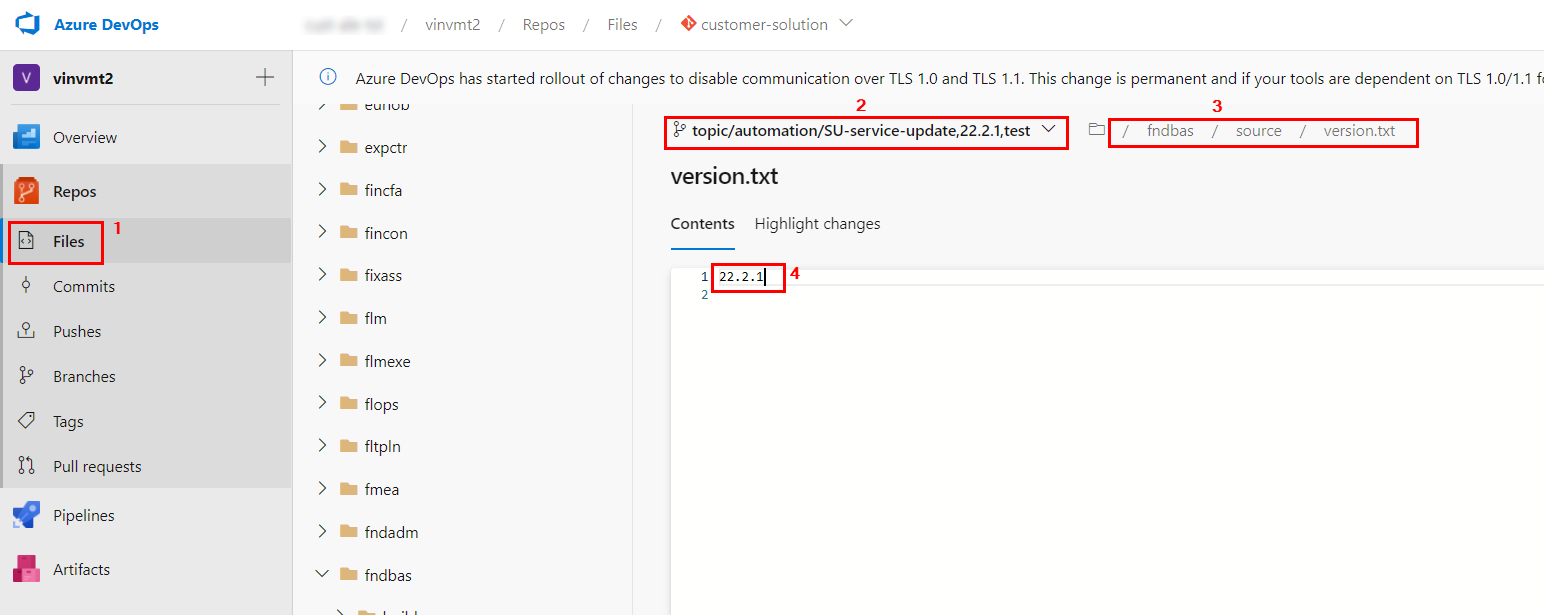 |
|---|
| Figure 3.10 - Updated version.txt file |
- After verifying that the version.txt has been correctly committed to the topic branch, follow the steps below to manually uplift the customizations.
#### If there are customizations in the customer solution repository
-
Create and checkout the topic branch
If you already have the cloned customer-solution repository in your machine, it is recommended to use the existing clone for a better experience, instead of cloning the repository anew for each BuildPlace activity.
###### If the cloned customer-solution repository exists locally on the machine run the following git commands
- Checkout the master branch.
git checkout master- Update the locally existing customer-solution repository with the latest changes in the master branch of the remote repository .
git pull origin master- Checkout the topic branch. The topic branch name can be copied by using the copy icon that appears when hovering over the topic branch in the Azure repository as in Figure 3.8 [4].
Eg:
git checkout topic/automation/SU-serviceUpdate,23.2.1,0001git checkout <topic-branch-name>git pull origin <topic-branch-name>###### If the cloned customer-solution repository does not exist locally on the machine proceed with the following guidelines:
Note: If you do not have the cloned customer-solution repository of the particular BuildPlace in your machine, make sure to clone only the specific branch of the customer-solution repository.
-
To clone the topic branch created by the automation, follow the commands below.
-
The URL can be obtained by clicking on the copy icon as in Figure 3.8 [2].
-
By hovering over the topic branch in the Azure repository as in Figure 3.9 [4], you can copy the name of the topic branch using the copy icon.
E.g:
git clone --branch topic/automation/SU-serviceUpdate,23.2.1,0001 --depth 1 https://org-name@dev.azure.com/org-name/bpname/_git/customer-solutiongit clone --branch <topic-branch-name> --depth 1 <customer-solution-repo-url>- Change the directory to the cloned folder.
cd customer-solution -
Carry out required changes identified by the impact analysis. It is possible to rerun the downloaded .upda file in the Impact Analysis for new customer-baseline repository version step.
Note
If there are non-layered files with customizations, and if you wish to keep the current customizations and disregard any changes from the service update for a specific non-layered file, please do a dummy change in that file (e.g.: Add new line at the end). This is to avoid, non-layered file getting overridden by the changes incoming from the Service Update.
-
There are some existing features in the Update Analyzer tool that can be used to make the process of handling the impacts of non-layered easily. Handling impacts of non-layered files
Note: If there are no conflicts in your customizations, no need to proceed with the next step which is to Git add, commit, and push local changes. You can directly proceed to order a topic environment and then create the pull request if the topic environment is created successfully.
-
Git add, commit and push local changes. (Refer Naming Standards to use when working with GIT for the commit message naming standard)
git add .git commit -m "meaningful commit message"git push origin <branch-name>-
If there are corrections done in core files as a temporary fix for a bug in a core file(s) and the actual fix has been released in the applying service update, refer to this documentation to remove the core files from the customer-solution repository. Refer: When there are fixes done in core files as a temporary fix for a bug in a core file(s)
-
Test the changes using a topic environment. Refer: Environments created from a topic branch for more details.
-
Create a pull request to merge the topic branch to the Customer Solution repository master branch. Refer: Working With Pull Requests for more details.
Note: Make sure to add a meaningful Pull Request description that is relevant to the commits contained in the PR. This will be included in reports generated by the portal.
-
Merge the Pull Request to the Customer Solution repository master branch. Refer: Working With Pull Requests for more details.
-
Delete the local topic branch.
git branch -d <branch-name>- Delete the remote topic branch (Figure 3.11) [1].

Figure 3.11 - Delete remote topic branch - Check if the customer solution repository version has been correctly updated in the Repository Information card in the BuildPlace view.

Figure 3.12 - Customer solution repository version after merging the topic branch - Run a sanity build and proceed with creating delivery
If there are no customizations in the customer solution repository
- Create a pull request to merge the topic branch to the Customer Solution repository master branch. Refer: Working With Pull Requests for more details.
- Merge the Pull Request to the Customer Solution repository master branch. Refer: Working With Pull Requests for more details.
- Delete remote topic branch (Figure 3.11)[1].
- Run a sanity build and proceed with creating delivery
Note:
In case, if the delivery fails and it was identified as a defect in the core files, then the recommended process is to apply the next service update which includes the fix as well. However, there can be a scenario where the customer needs to apply the fix urgently due to business urgency. In such scenarios, refer "Taking temporary fix for a defect in core file" for the process.
Reverting a Service Update
There are improbable scenarios where customers need to revert the service update during the service update process. However, this method is recommended only if the service update process cannot be continued.
Reverting service update from the customer-solution repository
If the Service Update applied to the Customer Solution Repository is to be reverted, follow the steps below:
- Go to the Azure customer solution repository.
- Switch to the correct branch (master).
- Go to the commit you want to reset from your repository (the commit of applying a new service update).
- Click on the icon in the left top corner and select the revert option from the list (Figure 4.1) and confirm.

Figure 4.1 - Reverting a commit - Then a revert Pull Request will be created.
- Get approval for the Pull Request from the authorized user and merge the revert Pull Request to the master branch.
-
Note: It is not possible to revert a Service Update once applied to the Baseline Repository.
Delivering a Service Update in a Corrective Delivery
Note
If a Service Update needs to be delivered as a corrective delivery to solve a critical issue, please follow the steps in Delivering a Service Update in a Corrective Delivery.