Reporting Rules
Content
Overview
For the Report Rule Engine to be available you have to install the FNDRRE component. This will allow you to manipulate the default behavior of the report printing process without carrying out any code modifications.
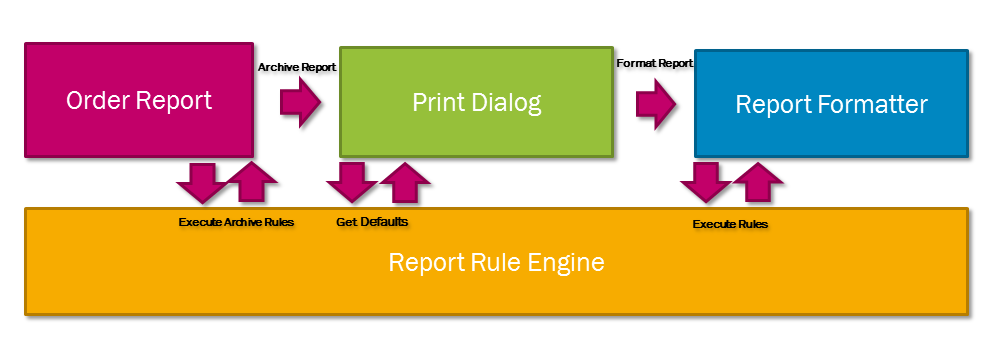
The Rule Engine is activated three time during the report rendering process. First. just after the data has been gathered and it is time to archive it. At this point it is possible to control the archive process. You can for instance distribute the report to more users or add special notes to the archive item that can be used when searching the archive later.
The second time the rules are activated is just before the print dialog is shown. It is here possible to control the behavior of the dialog to speed up the everyday work by reducing the number of clicks required. This can for instance be achieved by making clever default selections that predict what the user would like to do.
The third and last time that the Rule Engine is activated is just before the actual rendering of the report. Here you can forcibly set process parameters and control the printing and output options.
A report rule consist of one or many conditions and one or many actions. You can configure a report rule to be triggered for one specific report, or for all reports that you order. Additionally, one report order might trigger many rules. When many rules are triggered, the rule priority order will decide which rule is executed first.
In a report rule you can have conditions to check for report property values like printed by user, report id, report language etc. It is also possible to use SQL statements results, X-paths values or combination of them. When the condition for a rule is met, the rule will execute a list of actions. Each action can amend the printing process in various ways. It can for instance change printing properties like printing printer, layout, language code, locale, copies, e-mail etc.
Configure Reporting Rules
Report Rule Overview
You can view or create new report rules from the Report Rules Overview page.
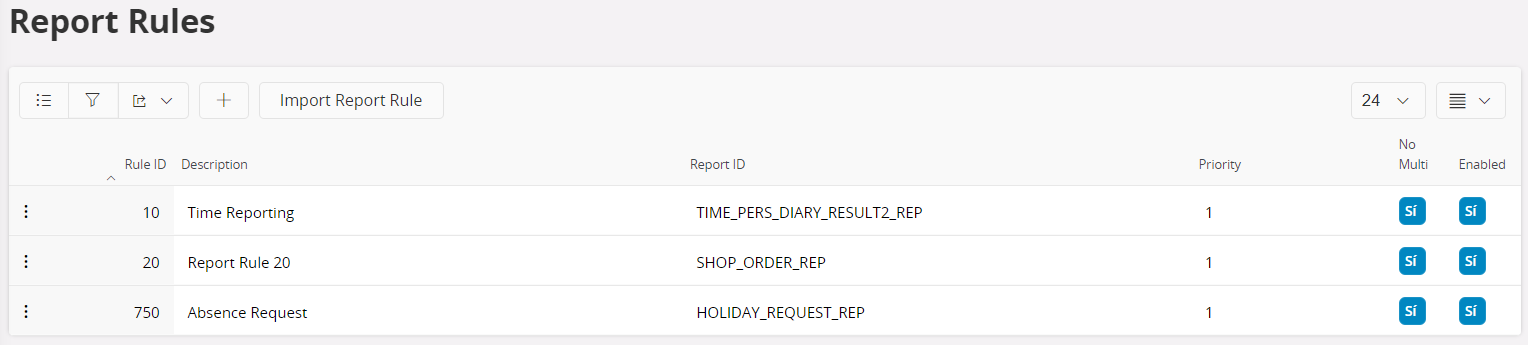
| Rule Id | A unique Id is automatically created when you create a new rule. |
| Description | A display name to the rule which describe what the rule is. |
| Report ID | You can set one Report Id per rule. A rule will execute for all reports if the Report Id is set to blank. |
| Priority | The priority level which will decide in which order a report rule will overrule other rules. Rules with same priority will execute in the order of rule Id. If you have two rules with the same Report Id then the order of execution will be the priority and then the Rule Id. One main thing to note is that the rule with the highest priority will execute last to override other low priority rule outputs. For example if you have 3 rules with priority 1,2,3 the order of execution would be 3,2,1. |
| No Multi | Enabling this will prevent the rule from executing if multiple reports are select for single print job. This is checked by default. Disabling this will execute the report for all reports which meets the conditions and Report Id. Therefore it's essential to make sure that you have no action that would violate the confidentiality of the reports (e.g. Emails sent after printing etc…) |
| Enabled | Enable or disable the report rule. |
Report Rule
Selecting one or more rules from Report Rules overview, you can drill down to more details using details action from the context menus. A report rule has Conditions and Actions. When the Conditions are fulfilled, set Actions will be executed.
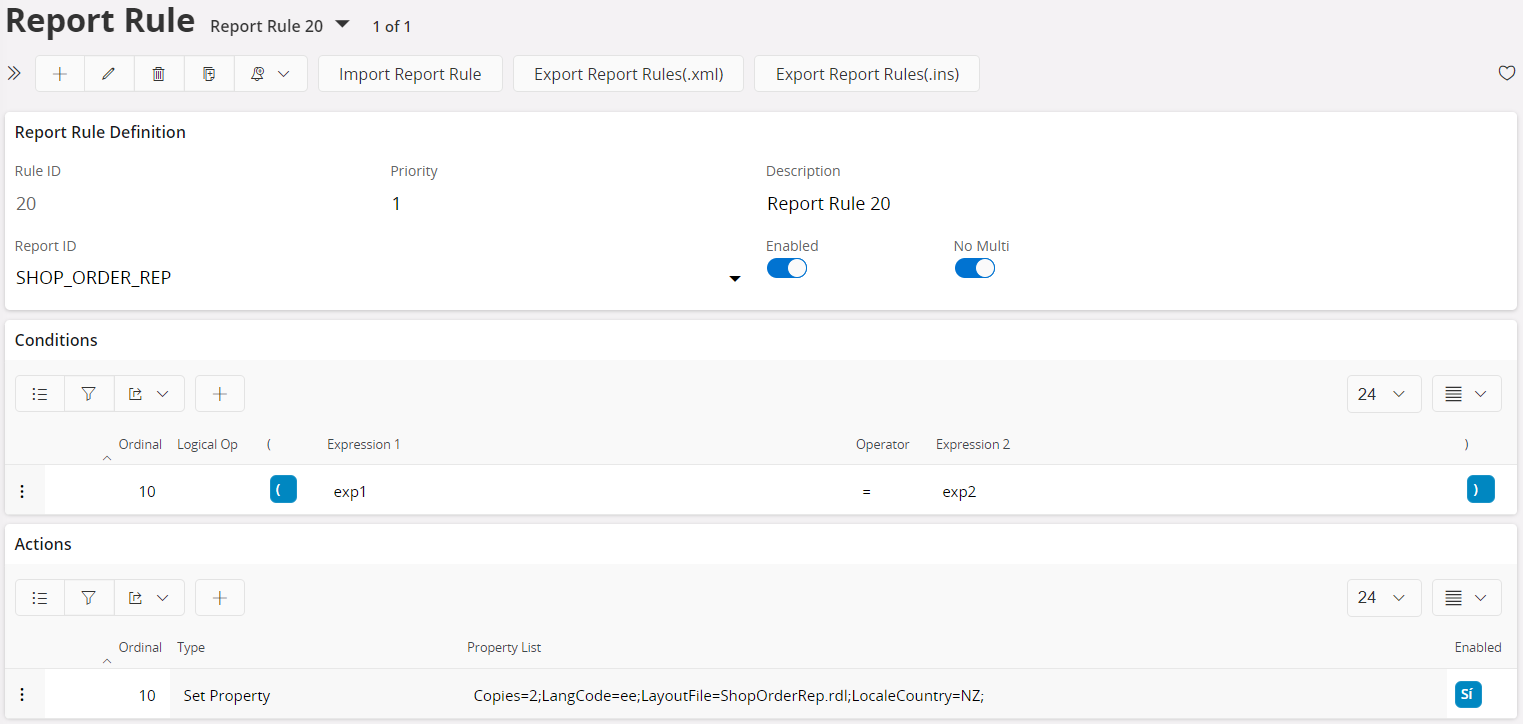
Conditions
The conditions table has Ordinal, Logical operator, Expression 1 and Expression 2, Operator and parenthesis (, ) fields.
| Ordinal | This is a number that would define the ordinal of conditions. You can change the ordinal value to set the order of the condition being interpreted. |
| Logical operator | Sets the logical relationship among conditions. A parenthesis of either (, ) can be used to group conditions with logical operators. |
| Expression 1 Expression 2 | This can be any value including report properties, SQL statements, XPath or any combination of them which would reflect a final value. When you work with expressions, you can get help from Set Expression Dialog. Select Edit Expression 1 and Edit Expression 2 from context menu to get the Set Expression Dialog |
| Operator | Used to evaluate the values of Edit Expression 1 and Edit Expression 2 |
Limitations
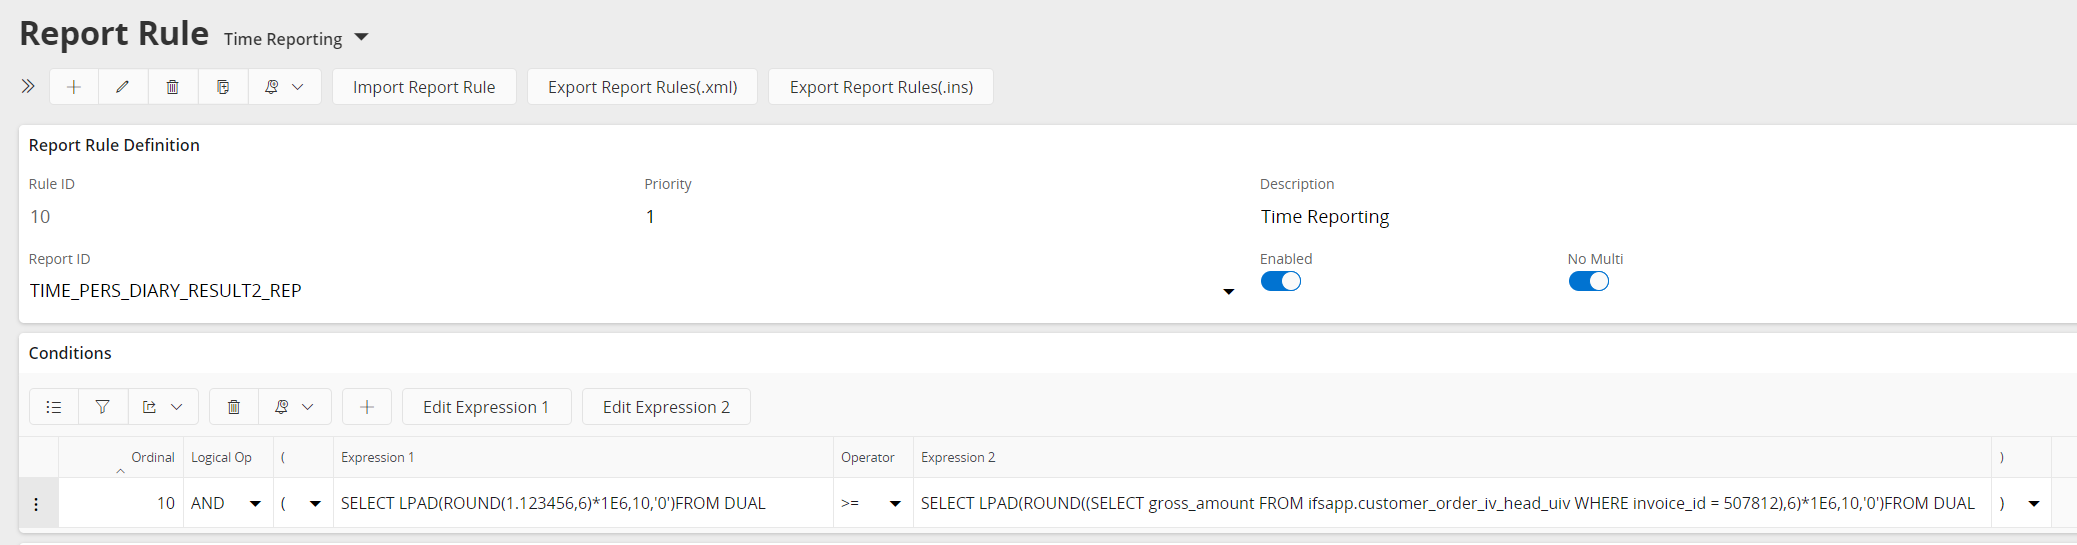
Report Rules uses string comparisons while evaluating the conditions. Therefore when using data types other than Strings, the resultant values should be converted to strings which results in the correct evaluation. For an example, during string evaluations, using the expression 10.123 < 2.123 will be evaluated to TRUE.
The resultant value could be a static value or an output of a SQL.
Numbers 
Should always be formatted to give the exact no of characters without any decimals.
e.g. If the value is 1.123456 and the requirement is to have precision of 6 decimal places, and the maximum expected number is 1E3 (1000).
Use SELECT LPAD(ROUND(1.123456, 6) * 1E6, 10, '0') FROM DUAL to convert the NUMBER to a STRING. This will covert 1.123456 to the string 0001123456
Using ROUND with parameter 6 and multiplying by 1E6 will make sure 6 decimal places are considered. Using LPAD with the parameter 10 (precision + number of digits for max number) will add 3 zeros to the front.
Dates and Timestamps 
Should be formatted properly to include correct precision. Based on the usage pay attention to time zones as well.
e.g. Below formats a date value to precision in seconds. SYSDATE is used as an example.
SELECT TO_CHAR(SYSDATE,'YYYYMMDDHH24MISS') FROM DUAL will convert SYSDATE to a string similar to 20220321154559
e.g. Below formats a timestamp value to millisecond precision. SYSTIMESTAMP used as an example.
SELECT TO_CHAR(SYSTIMESTAMP,'YYYYMMDDHH24MISSFF3') FROM DUAL will convert SYSTIMESTAMP to a string similar to 20220321154608342
Expressions
Expressions in both Conditions and Actions can be of 3 types
- X-Path: Fetch data from the Report XML Data. e.g [@MODULE_REP/MODULES/MODULE]
- Variable: Get typical report process properties. e.g [#PrintedBy]
- SQL: Use PL/SQL functions or simple SELECT statements. e.g [&ARCHIVE_API.Get_Report_Title(‘MODULE_REP’)] as parameters you use to retrieve values from database
You can use this as a programming language where each expression works as a placeholder for some value.
e.g
[&select identity from fnd_user where web_user=’[#CurrentUser]’]
[&ARCHIVE_API.Get_Report_Title(‘[#Reportid]’)]
You can use the "Set Expression " to create these expression with ease.
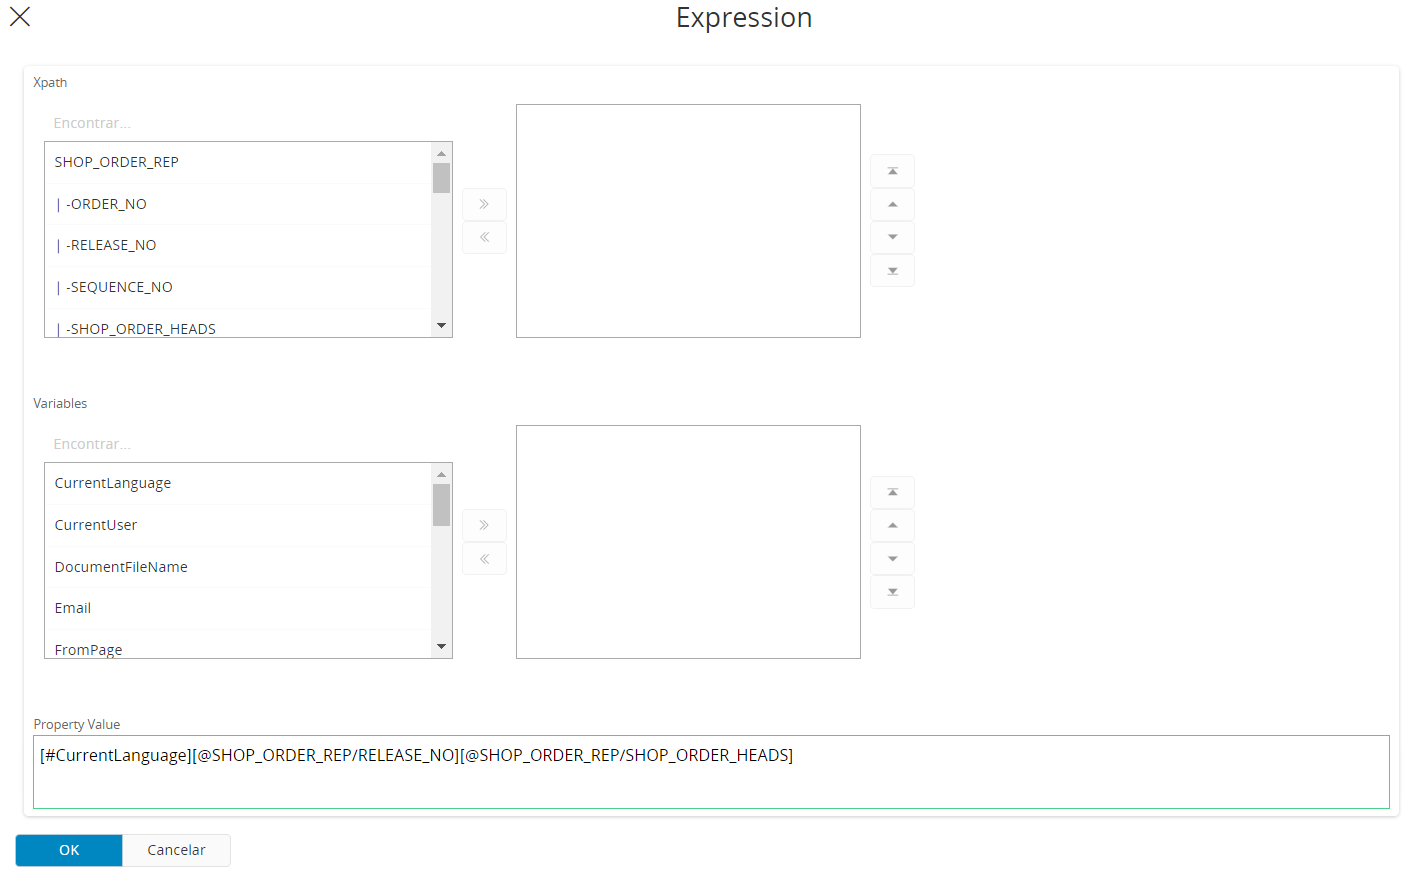
Set Expression Assistant
This assistant is used to select values in the report using XPath from the Report XML or selecting Report Context Variables from the report process. Selecting XPath is only possible if the rule has defined a Report ID. Selecting Variables will set values from the report process to the expression. This assistant is also used to set Action Property attribute values.
Actions
The actions table has Ordinal, Type, Property List, and Enabled fields.
| Ordinal | This is a number that would define the ordinal of actions. You can change the ordinal value to set the order of an action being interpreted. This level will decide in which order, an action will overrule other actions when multiple actions are involved in the same rule. One main thing to note is that the action with the highest priority will be executed to override other low-priority actions (ex: 1st action has more priority than the 2nd action) |
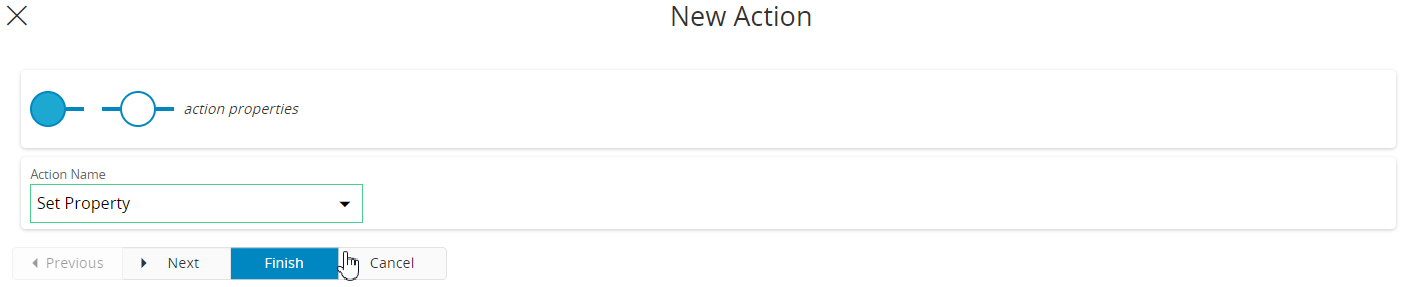
| Type | There are different types of actions. You can select the action type you wish to execute when the respective condition is met. Action types are further described below. |
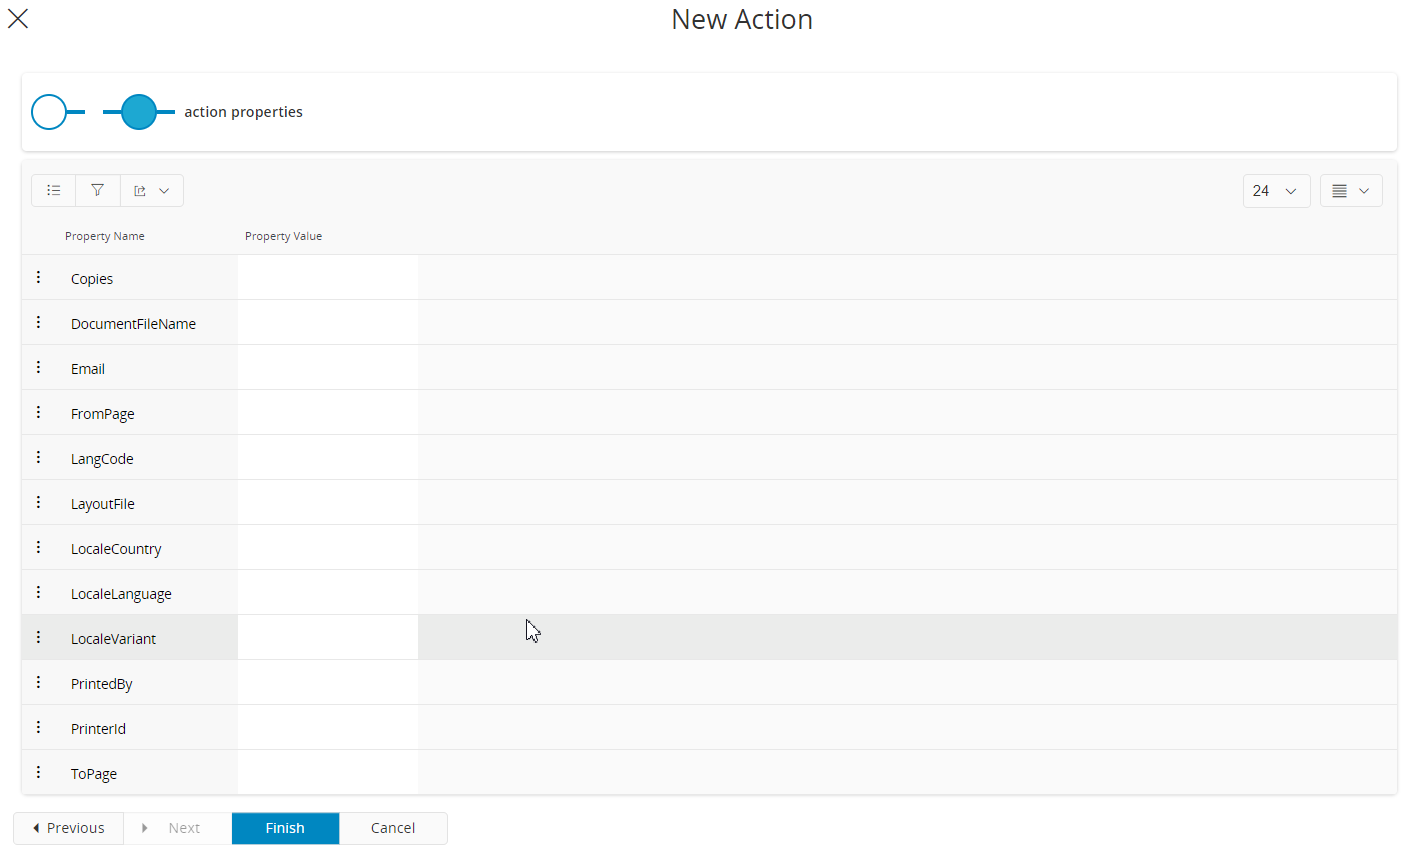
| Property List | Certain action types can have certain properties. You can set values for properties in the Property List field. The New Action assistant will help you to find relevant properties for a selected Action type. Select Edit Action Properties from the context menu to open the Edit Action Properties dialog. The action properties listed in the dialog will vary depending on the action type. You can simply type a value or use the Get Expression action to bring up the Set Expression Assistant to select values. |
| Enabled | Enable or disable the action. |
Note: After you add the action to the report rule you can not change the type of the action anymore. you can only change the property list of the relevant action
Action Types
As mentioned before, the Report Rule Engine is invoked by the Print Dialog. The Print Dialog shows the default properties and forced properties for a print job. There are several levels of setting up these defaults using actions.
- Preselect Property
If you decide to set an action with type Preselect Property, properties of that action will be set in print properties in the Print Dialog by default. - Check In To Document Management
This rule will attach a generated report automatically in to document management.
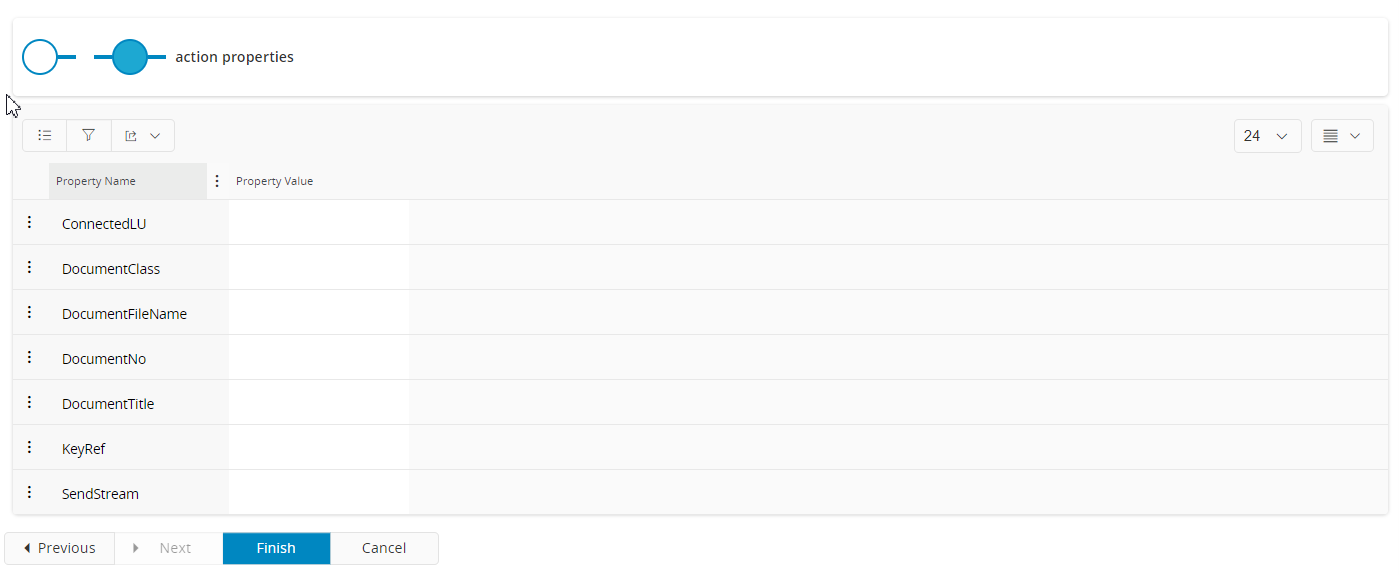
<u>DocumentClass / DocumentNo</u> : You can attach the generated report in to either a predefined document class or a predefined document number that is defined in document management.

<u>DocumentTitle:</u> The title in which the report is archived in to document management.

<u>DocumentFileName</u> : The file name in which the report is archived in to document management.

<u>ConnectedLU / KeyRef:</u> You can specify if the generated report should be attached to an application form as an attachment. In this case you have to specify the LU and key-value pair to uniquely identify an instance in the LU. For example, if you want to attach the 'Invoice' report, in to the 'Customer Invoice' form, you need to specify the LU as 'CustomerOrder"  from the ConnectLU combobox and Invoice\_no as the key and a value for that key. You can hardcode a value or retrieve the value from a xpath.

<u>SendStream:</u> If set to 'YES', you will get a stream notification once the report is archived in to document management. You can preview or navigate to the document by selecting the link in the stream.
-
Set Default Property
If you set an action type of Set Default Property it will set pre-selected properties in the action in the Print Dialog. However when the Report Format request is made, the Report Formatter will also check for the default properties in the action and will apply these settings which would not override any changed settings from the Print Dialog. These settings may come in use when print jobs are directly sent from application without going through the Print Dialog. -
Set Property
If you set an action type to Set Property it will set properties in the Print Dialog with a lock. This way you cannot change the pre-selected values. Further, this means that the Report Formatter will override all the settings if pre-selected. -
Route To Connect
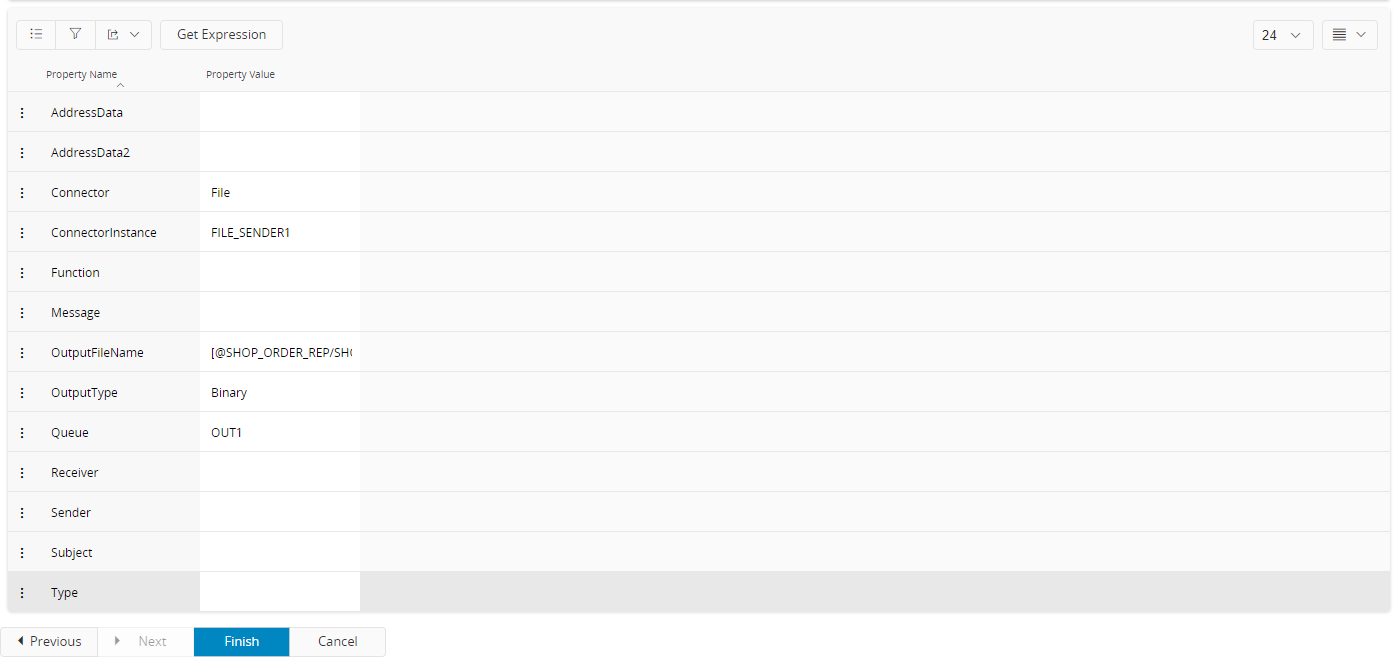
If you want to route any type of application message to IFS Connect, you can use Route To Connect rule action. In order to do this, you will need to define the Connector, Connector Instance and some other IFS Connect properties. There are some concerns when using this action type.
- The Connector and the Connector Instance should be corresponding to each other, if not, the priority will be given to the Connector and the default Connector Instance will be selected.
(Ex: If the Transport Connector is 'File', the Connector Instance should be 'FILE_SENDER1'.)
- Select the preferred output queue as the Queue.
- AddressData represents the real destination. If the Connecter type is File, the AddressData is the output folder. If the Connector type is Mail, the AddressData is the TO field, i.e. the receiver. AddressData2 represents the CC receivers.
- Subject matters only when the type is Mail. This represents the subject of the particular output mail.
- OutputFileName is the resultant document's name. If this is not configured, an automatically generated name will be used.
- OutputType can be either Binary (supports PDF, Xlsx etc), Xml (Only the data xml) or FullXml (Full data xml with header and footer). If this is not selected, it will be defaulted to Binary.
- When sending an email through this action, the Type property should be set to REPORTING.
The following two action property settings indicate two distinct usages of the RouteToConnect action type.

-
Send Email
This Action Type provides the capability to send the resulting PDF over Email. This will not override existing routing e-mail destinations unless you specifically skip the standard job email. -
Print To Logical Printer
This Action Type provides the capability to control the Logical Printer or the Print Agent. Eg: change the Logical printer of print job and redirect the print job to a different Print Agent.
- Change Original Printer: this action property is used to change the current Logial printer of a print job
- Also Print To: if this action property is set, current print job will be cloned with Logical printer set to selected Logical printer value -
Set Print Agent Property
This Action type provides the capability to control the the Print Agent. Eg: change the printer trays, simplex duplex printing. -
Insert PDF
This Action type provides the capability to insert static PDF files into the generated output PDF.
Note: When you insert multiple PDFs, please note that the priority is given according to action ordinal. In that case, the previous action attribute values will be overwritten by the latest action attribute values which will result in inserting only one PDF after executing all available actions.
-
Change System Settings
This action type can temporarily overrule some System Parameter Properties. Namely these are the Report Designer Graphics Path, Make Report Designer PDF/A Compliant, Spooling From Report Formatter and the Breakpoint for XML size for when to format Report Designer reports in memory or using disk storage. -
Sign PDF
With this action it is possible to add a digital signature to the resulting PDF. First, a private key has to be installed using the Keystores page in Solution Manager >>. The signature can either be applied using the key of the current user or by using a defined keystore id.
Optionally, it is also possible to certify the document, which prevents any further changes.
-
Set Archive Property
This action type can be used to change the attributes of an archive item. You can use this property to distribute the executed report among specific users and/or distribution groups, change the default report life span, set a default layout and a preferred language code, add archive notes and to add new archive variables. Please note that the available report parameters for this action type are ReportTitle, ReportId, ResultKey, CurrentUser and CurrentLanguage.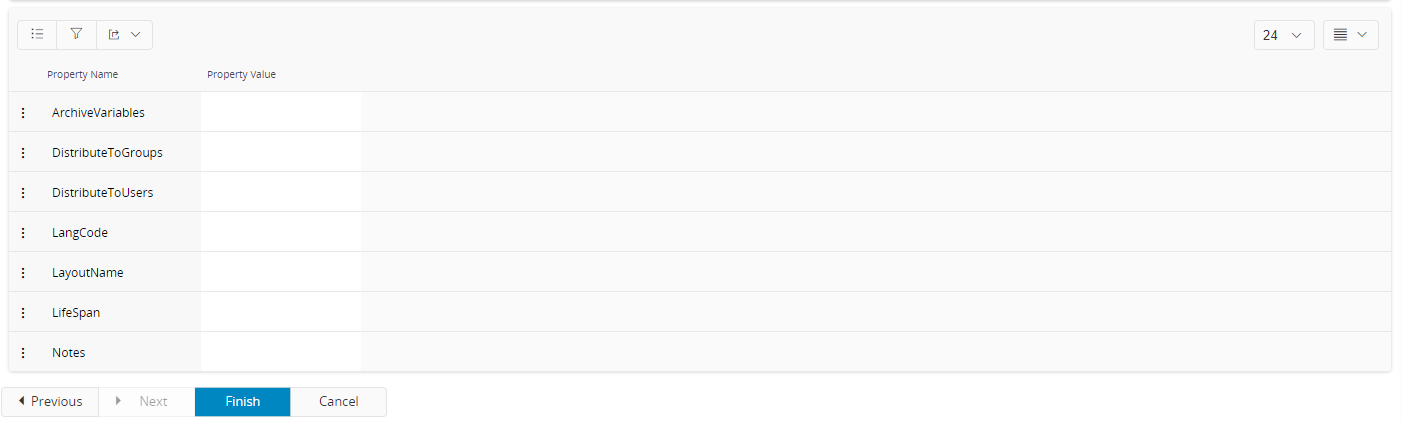 Distributing to users and/or groups
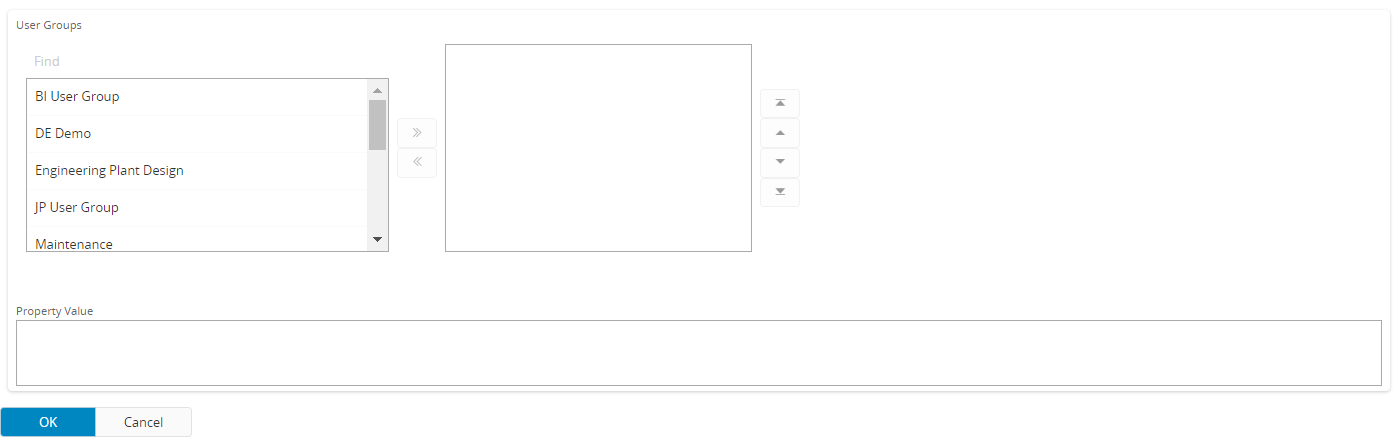 You will see a dialog as show above when you choose to "Distribute To Users" or "Distribute To Groups". You can individually select the users or groups or you can do a multiple select and add then to the list by selecting the "Get Expression" button.
Setting Life Span, Layout, Language Code and Notes
You can simply type the value or choose a xpath or Report Context Variables which contain the value. You can also choose values from the combo box where available.Setting Archive Variables You can add new archive variable with this action property. The format to add a variable is ArchiveVariableName:ArchiveVariableValue:ArchiveVariableType. You can add multiple Archive Variables by separating them by a ',' character.
(e.g. ArchiveVariableName01:ArchiveVariableValue01:ArchiveVariableType01,ArchiveVariableName02:ArchiveVariableValue02:ArchiveVariableType02)
The Archive Variable Type can be string, number or date denoted by S,N or D respectively. When specifying a date value the date format should be in the format of YYYY-MM-DD. You can use xpath or Report Context Variables values to construct your Archive Variable value.
Example: archVar01:Hello World:S,archVar02:1234567890:N,archVar03:2014-05-30:D
Report Rule Log
The Report Rule Log will help you trace rule executions, very useful when designing rules. The log provides information about:
- Conditions evaluation results
- Actions execution
- Any errors occurring in the Rule Engine
You need to set the Report Rule Advance Logging System Parameter to ON to enable Report Rule Logging.
Note: Double click the message field in the log to see multiple text rows. Some information might be hidden from view.
Import/Export Report Rule
You can import/export a rule by selecting Import Report Rules and Export Report Rules context menu option shown in the Report Rule header section. You can select one or many Report Rules from the Report Rules Overview and import/export them from the Import Report Rules and Export Report Rules options in the context menu.
- Import Report Rules: Stores or updates the rule(s) stored the database. Description gives a meaning to the rule. Therefore same description may observe the same rule object without considering it contents.
- Export Report Rules: Writes the rule(s) stored in the database to a XML file in the specified location.
Substitution variables
In addition to IFS standard Context Substitution Variables (CSV), the Report Rule Engine includes a few special variables that represents the different properties and states found in the reporting process. You write them with a leading "[#" followed by the variable name and a trailing "]". Here is a full list of available variables.
Note: Many of these variables only have a value in the formatting context i.e., when the report run just before formatting the report or in the plug-ins. Those variables will be empty when running the Archive action and when retrieving defaults for the Print Dialog.
| Variable | Notes |
|---|---|
| [#Copies] | Formatting context only |
| [#CurrentUser] | |
| [#CurrentLanguage] | |
| [#FromPage] | Formatting context only |
| [#ToPage] | Formatting context only |
| [#Email] | Formatting context only |
| [#LangCode] | Formatting context only |
| [#LayoutFile] | Formatting context only |
| [#LocaleCountry] | Formatting context only |
| [#LocaleLanguage] | Formatting context only |
| [#LocaleVariant] | Formatting context only |
| [#PrinterId] | Formatting context only. Can be either the logical printer or the physical printer |
| [#LogicalPrinterId] | Only when printing to a logical printer |
| [#RoutingPrinter] | Only when using the action Print to Logical Printer |
| [#PrintJobId] | Only when printing to a logical printer |
| [#ReportId] | |
| [#ResultKey] | |
| [#ReportTitle] |