Calendar
Calendars are used to create, visualize, edit and perform operations on any schedule type data. A calendar consists of several views:
- day view
- week view
- workweek view
- month view
- Timeline view
- Timeline work week
- Timeline work weekview view
- Timeline month view
- Agenda view
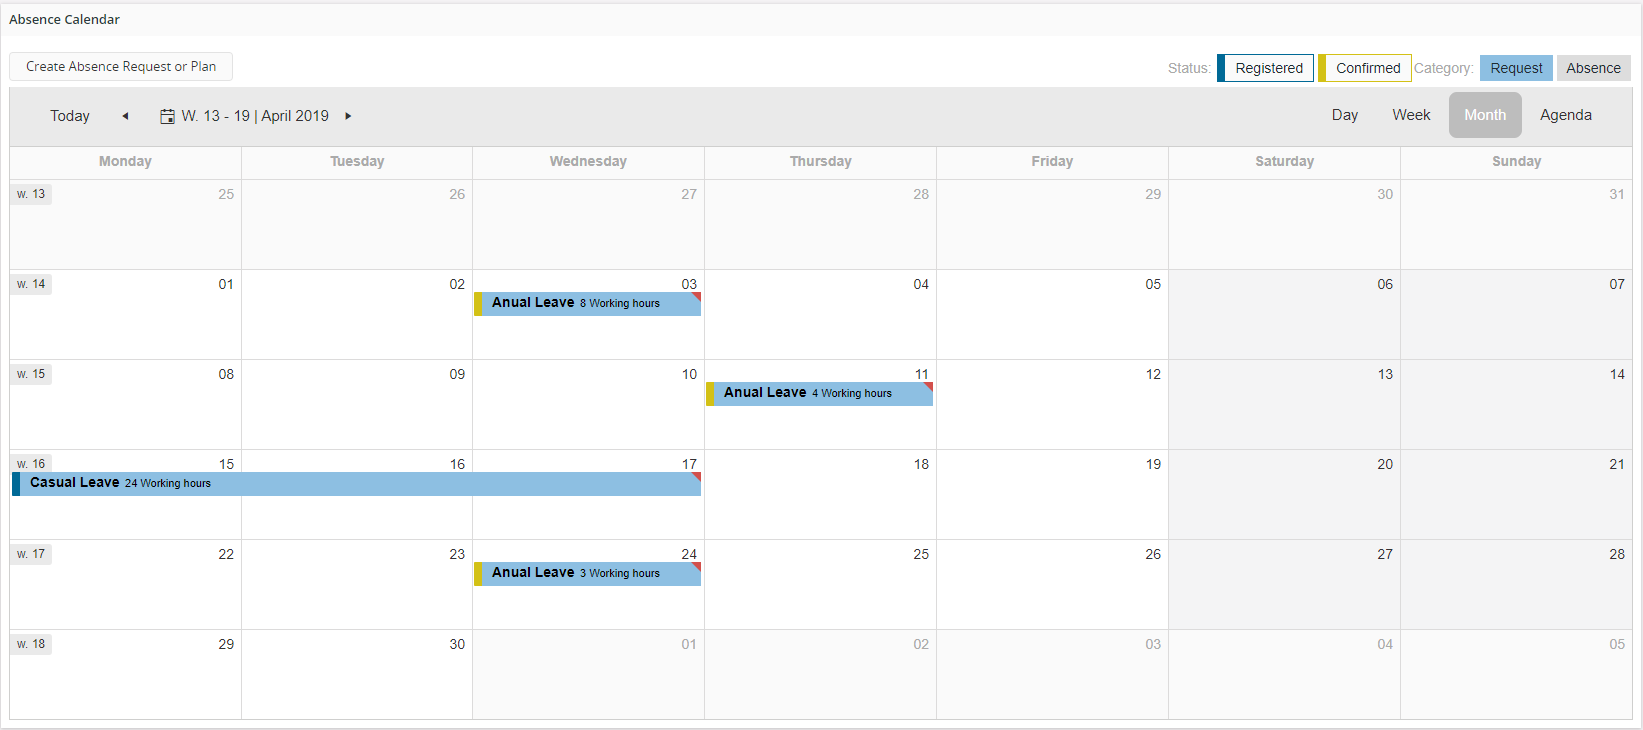
Figure 1 - Calendar Control - Month View

Figure 2 - Calendar Control - Week View
Variations
Year-view control.
When to use
Use the calendar to create, visualize, edit, and perform operations on any schedule type data.
Limitations
None.
How to use
Follow the steps below to add a calendar to a page:
1. Define a calendar
- Define a calendar in the client model file using the examples described below.
-------- Declarative syntax ------------
calendar <calendar_name> for  {
   ...
}
<calendar_name> - Identity of the calendar, always use a meaningful identifier.
<entity_name> - The entity the calendar is based on, see example below:
------- Example code --------
calendar AbsenceCalendar for Absence {
   ...
}
2. Add the calendar to the page
Add the calendar to the page. A calendar gets its values from a data source which is either an entityset or array.
1. Add the calendar with its own entityset
-------- Declarative syntax ------------
page <page_name> {
calendar <calendar_name> using <entityset_for_calendar>;
}
<entityset_for_calendar> - This is the entityset that serves as the datasource from which the calendar gets its values. The entityset must be based on the same entity that was used to define the calendar.
------- Example code Method 1 --------
page CalendarPage {
    calendar AbsenceCalendar using Absences;
2. Add the calendar to use the entityset of the page
-------- Declarative syntax ------------
page <page_name> using <entityset_for_page> {
    calendar <calendar_name>;
}
This method is useful if the purpose of the page is to display a calendar of records. In such instances it is not mandatory to define an entityset for the calendar, since it gets its values from the <entityset_for_page>.
--------- Example code Method 2 ---------
page Calendar using ActiveDetails {
    calendar AbsenceCalendar;
3. Add the calendar to use an array
-------- Declarative syntax ------------
page <page_name> using  {
    calendar <calendar_name>();
 }
<calendar_array> - This is the array defined in the related projection file.
Most of the time an array is connected to a parent record and needs to be updated when the parent record is changed. This pattern is used mostly when schedule time slot information needs to be displayed in the calendar.
-------- Declarative syntax ------------
page <page_name> using <entityset_for_page> {
    selector <selector_name>;
    calendar <calendar_name>(<item_array>,<schedule_data_Array>);
}
---------- Example code Method 3 -----------
page CalendarPageWithSelector using Employees {
    selector EmpSelect using Employees;
    calendar AbsenceCalendar(AbsenceLines, ScheduleLines);
}
3. Set the appropriate properties for the calendar
Set one or more properties for the calendar such as labels, views, resources etc. For a complete list of the properties and how to set them, see the Properties section below.
In addition to Properties you can also add commands to the calendar. The commands need to be defined separately and then added within the definition of the calendar. There are three types of commands which are added to create, edit and delete calendar items.
Command Create The command is displayed on top of the calendar and a + icon appears in each time slot. The command definition needs to contain the word "Create". Example: command CreateAbsence.
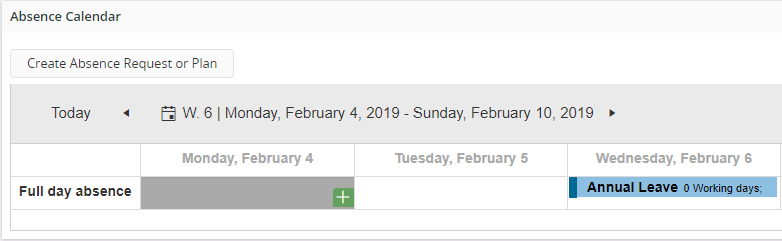
Figure 3 - Calendar Control - create new item
Command Edit Can access the edit command inside the detail card for the calendar item. The command definition needs to contain the word "Edit".
Figure 4 - Calendar Control - Edit item
Command Delete Can access the delete inside the detail card for the calendar item. The command definition needs to contain the word "Delete".
Figure 5 - Calendar Control - Delete item
-- Example code - Adding create command to a calendar --
command CreateAbsence {
    label = "New Absence";
    mode = SingleRecord;
    execute {
        dialog CreateAbsenceDialog(Id, Reason, Explanation, AbsenceStart, AbsenceEnd) into(Id, Reason, Explanation, AbsenceStart, AbsenceEnd) {
            when OK {
                success("Absence created!");
            }
            when CANCEL {
                exit "CANCEL";
            }
        }
    }
}

calendar AbsenceCalendar for Absence {
    // calendar content
    command CreateAbsence;
}
Properties
Below is a list of properties that can be used to customize the calendar control.
allday | alldaylabel | card | customdaterange emphasis | end | enddate | fetchsize | filter | groupby | grouping | label | orientation | ranking | resource | slotsize | start | startdate | timemarker | view | weeknumbers | weekstart | workdayend | workdaystart |
Special Properties
View State properties
Calendar control has several exposed view state properties. These view state properties can be set using the exposed view state variable inside commands. And they can also be set in navigation links. Some properties are readable and writable, some properties are only readable, and some are only writable.
view
| Description | selected view of the calendar. |
| Type | Text |
| Read | true |
| Write | true |
date
| Description | selected date in the calendar. |
| Type | Date |
| Read | true |
| Write | true |
viewstartdate
| Description | The view start date in the current calendar view. |
| Type | Date |
| Read | true |
| Write | false |
viewenddate
| Description | The view end date in the current calendar view. |
| Type | Date |
| Read | true |
| Write | false |
customDateRangeFrom
| Description | The view start date in the custom date range view. |
| Type | Date |
| Read | false |
| Write | true |
customDateRangeTo
| Description | The view end date in the custom date range view. |
| Type | Date |
| Read | false |
| Write | true |
workDayMode
| Description | Whether the calendar is showing 24h or only work hours. |
| Type | Boolean |
| Read | false |
| Write | true |
To write/set view state properties, you can set them in commands using the exposed view state variable,or in the navigation URL.
//Using the exposed view state variable
    set component.AbsenceCalendar.Date = MyDate;
//In navigation URL
   navigate "page/AbsenceCalendar/CalendarDatePage?viewStates={'calendar:AbsenceDateCalendar': { 'view': 'timelineMonth', 'date': '$[AbsenceStart]' }}";
To read/get view state properties, use the syntax component.<ComponentName>.<Property>.
The properties can be used in boolean expressions, for example expressions enclosed by square brackets [], in commands and function parameters.
It is not possible to use the properties in string expressions for labels and similar constructs though. But they can be used as parameters for function and action calls.
    command GetDate {
        label = "Selected Date";
        enabled = [true];
        variable SelectedDate;
        execute {
            call TestViewState(component.AbsenceCalendar.Date) into SelectedDate;
            success("${SelectedDate}");
        }
    }
Example
Below is an example of a calendar with multiple settings.
calendar AbsenceCalendar for Absence {
   label = "Absences in a calendar";
   fetchsize = 1000;
   orientation = Vertical;
   weeknumbers = [false];
   grouping Employee {
      label = "${EmployeeName}";
      card AbsenceCard;

      contactwidget {
         enabled = [true];
         source = Person;
         key = EmployeeName;
      }

      groupby Company {
         label = "${CompanyName}";
      }
      field Reason;
      ranking Rank;
   }

   schedule {
      workdaystart = WorkDayStart;
      workdayend = WorkDayEnd;
      weekstart = StartOfWeek;
   }

   slotsize = Day;

   resource Approved {
      label = "Approved";
      emphasis Complementary1 = [Approved = "APPROVED"];
      emphasis Complementary5 = [Approved = "NOT APPROVED"];
      filter = [true];
      ranking ApprRank;
   }

   events {
      card AbsenceCard;
      start = AbsenceStart;
      end = AbsenceEnd;
      startdate AbsenceStartDate;
      enddate AbsenceEndDate;
      allday = [Name = "Spamissimo"];

      //A small flag will be added to the top right corner of the event.
      emphasis Complementary3 = [Reason = "Medical"];
      emphasis Complementary5 = [Reason = "Casual"];

      view Week, Month {
         field Reason;
         field AbsenceStart;
      }

      view WorkWeek {
         alldaylabel = "whole day";

         field Reason;
         field AbsenceStart {
            visible = [true];
         }
         field AbsenceEnd {
            searchable = false;
            visible = [false];
         }
         field Explanation {
            label = "";
            visible = [Approved = "NOT APPROVED"];
         }
         field Approved;
         timemarker = [false];
      }

      view TimelineMonth {
         customdaterange = [true];
      }
   }

   command Delete;
   command Edit;
   command Create;
}