IFS Data Migration Excel Add-in
This document describes how to install the Data Migration Excel Add-in in a computer.
Prerequisites
-
The 64-bit version of Office 2016 or a later version.
-
Excel 2016 or a later version of the Office client, if you are testing or running an Office Add-in specifically for this Office desktop clients.
| office version | state |
|---|---|
| office on web | supported.Exception : Office on the web will not open in Internet Explorer. |
| Mac(ios) and Android | supported. |
| Office 2013 | Not supported. |
| non-subscription Office 2021 or later (Windows 10, 11) | supported. |
| Office 2016 Perpetual (professional or higher) | supported. |
| Office 2019 Perpetual (professional or higher) | supported. |
| Office 2021 Perpetual (professional or higher) | supported. |
| non-subscription Office 2013 to Office 2019 (Windows 7, 8.1, 10, 11) | Not supported. |
| Office 365 Semi-Annual Channel (Office 365 ProPlus) | supported. |
| office 365 mso (semi annual Enterprise) | supported. |
more information: https://docs.microsoft.com/en-us/office/dev/add-ins/concepts/browsers-used-by-office-web-add-ins
(combinations that has browser as Internet Explorer 11 are not supported platforms)
Installation
Data Migration Microsoft Excel Add-in can be installed in multiple ways. Excel Add-In is a Microsoft Office Add-in and recommends installing in following methods.
- Microsoft 365 admin center
- SharePoint catalog
- Sideloading
More information at Microsoft documentation: https://learn.microsoft.com/en-us/office/dev/add-ins/publish/publish
Installing Data Migration Excel Add-in requires generating a Office Add-In manifest XML file. Following section describe how to generate a Office Add-In manifest XML from IFS Cloud Web. This manifest file can be used to publish Data Migration Excel Add-In in all deployment methods described above.
- Go to Solution Manager >> Data Management >> Data Migration >> Excel Migration >> Generate Manifest, to Generate the Manifest of IFS Excel Add-in.
- Save the file in any name (default name: IFS Excel Add-in.xml)
NOTE: this page is only visible to users with FND_ADMIN permission set.

Sideloading
Sideloading is a way of deploying Data Migration Excel Add-in in absence of SharePoint or Microsoft 365 admin center. Please read Microsoft Documentation for more information.
Authentication of the Excel Add-In functionalities follows standards of IFS Cloud Web. Following describe how a user can use sideloading to publish Excel Add-in.
Upload My Add-in to Excel for the web:
Note: Following option is only visible when the user has admin privileges and in web clients.
- Navigate to Insert >> My Add-ins >> Upload My Add-in and upload the relevant xml file.

Upload as Shared Folder for Microsoft Excel
- Go to MS Excel, File >> Options >> Trust Center >> Trust Center Settings >> Trusted Add-in Catalogs.
- Add Catalog Url to the shared Manifest location.
- Check Show in Menu option and Save changes.

- Restart MS Excel application Navigate to Insert >> My Add-ins >> SHARED FOLDER the IFS Excel Add-in will be loaded.

- Go to MS Excel, File >> Options >> Trust Center >> Trust Center Settings >> Trusted Add-in Catalogs.
Versioning
The version of any given Office Add-In will be as follows,
For example: 21.2.0.2
- 21.2 - Major Release Number
- 0 - SU Number
- 2 - Internal Build Number
Security
When a excel migration job is created a projection will be created to expose data to the excel client. In order to access the migration job for a particular user, the projection should be assigned to a permission set where user has grants. The projection name will be created using the migration job name and appending a suffix MigjobHandling in pascal case.
eg: - Migration job = INVOICE_ITEM_TEST - Projection name = InvoiceItemTestMigjobHandling
Adding Projection to Permission Set
-
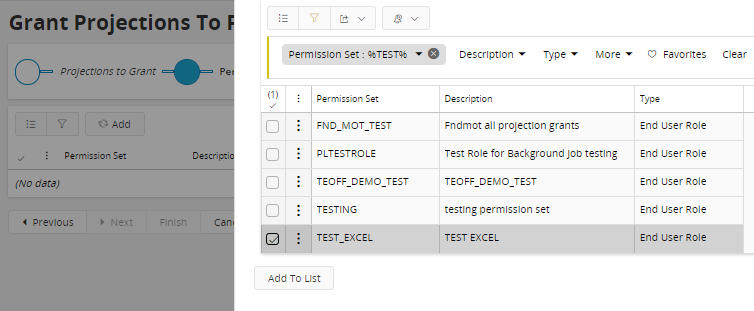
Navigate to page Solution Manager >> Users and Permissions >> Permission Sets >> Grant Projections To Permission Sets
-
Find and add the Excel Migration projection created to the list

-
Next, find and add the permission set where the projection should be assigned.
Note: a projection can be granted to multiple permission sets

- When finished, the created projection is granted to permission set(s) to access.
Uninstalling
Please follow Microsoft documentation for details on uninstalling Data Migration Excel Add-In web app. Following describes uninstalling Excel Add-In for Sideloaded app.
- For Office web client go to internet options and clear all cookies related to excel, clear browsing cache and refresh web client.
- For Office desktop clients clear all contents in folder
C:\Users\<username>\AppData\Local\Microsoft\Office\16.0\Wefand restart MS Excel.