Manage Substitution Fonts
This feature allows you to substitute fonts defined in design time with different fonts at the the time of printing or previewing the report.
Add new fonts in runtime
KNOWN LIMITATION
Please note that due to an implementation constraint, importing of fonts through this page is currently unavailable. Even though you could import the font, when the fonts are substituted with the newly imported fonts it would not be working as expected. When substituted with the newly imported fonts, in most cases the PDF report will be generated with "Time-Roman" font or your will see squares instead of the actual font characters.
As a workaround follow the steps given below to import the fonts to the environment through the delivery process.
1. Create a folder structure like < module >\server\reports\fonts. (e.g. genled\server\reports\fonts)
2. Create a folder called “ttf” inside fonts folder. (e.g. genled\server\reports\fonts\ttf)
3. Copy the custom font files (*.ttf files) inside the “ttf” folder.
4. Apply this as a normal delivery and reconfigure the server. (e.g. Just the same way as you would apply a RDL layout change as a delivery.)
Afterwards, you will see the imported from in the 'Report Fonts" page and you can follow the font substitution the normal way through the page as give below.
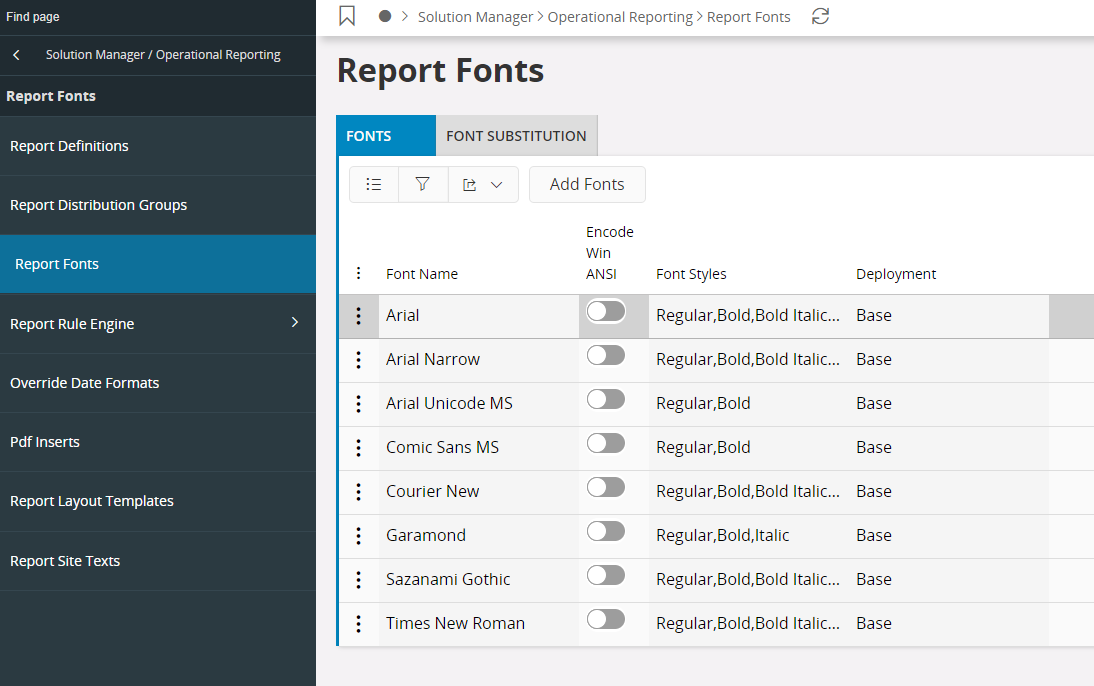
If the font being used as a substitute is not included in the standard installation of Report Designer Layout Tool (see below, for a list of standard fonts) then you must add this new font in to the runtime. Use Solution Manager > Reporting Operational Reporting > Report Fonts > Fonts tab to add new fonts to the runtime.

Select Add Fonts,in the dialog that opens either brwose for the respective file or drag and drop. Finally click Import. If you drag and drop a font family, all fonts and font styles for each font will be installed. Also, if a particular font style is not available then the framework will default to a most suitable available font style. e.g. If Bold is not available but if Bold Italic is available, then the framework will select the Bold Italic font to show Bold fonts.
- Font Name: Installed font family name.
- Encode Win ANSI: The default font encoding is CDI, but you change this to encode in Win ANSI by selecting the checkbox.
- Font Styles: The available font styles for a font family.
- Deployment: This denotes if the font is a standards font or a custom added font. All standard fonts are denoted as "Base" fonts and all custom added font, that you add will be denoted as "Database".
Font Substitution
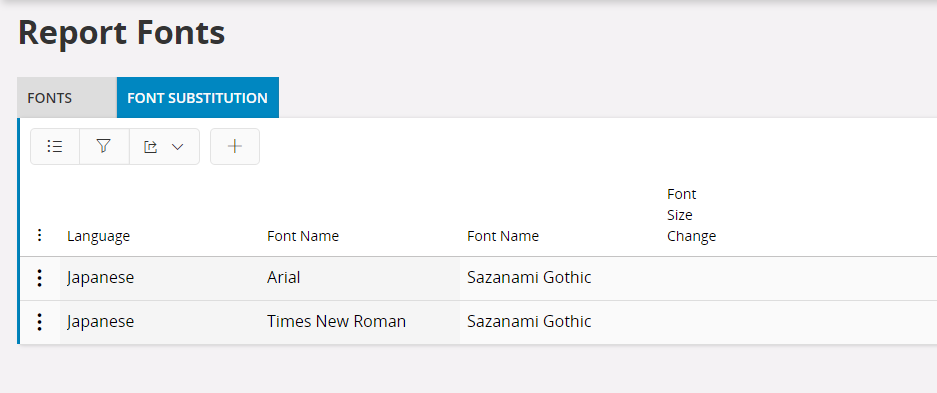
Use Solution Manager > Reporting Operational Reporting > Report Fonts > Font Substitution tab to map fonts in runtime.

The idea behind substituting fonts is that, you can preview/print a report using a different font than what is defined in the layout at design time. That is, you can specify a font that matches the language in which the report is run.
- Language: language in which the report will be previewed or printed. This language should be selected from the print dialog before executing. Use the combo box drop down list, for selecting the language of your choice.
- Font Name: The design time font specified in the layout that needs to be replaced. Select the font name from the combobox drop down list.
- Mapping Font Name: This is the substitute font to be used at runtime. Select the replace font name from the combobox drop down list.
- Font size change: Indicates if the size of the font should be changed, when the report is run. Setting the number to a negative number will decrease the size and using a positive value will increase the size. You can select the size from the combobox drop down list or type your own value.
Following is a list of fonts that comes with the standard installation of the Report Designer framework.
| Font |
|---|
| Arial |
| Arial Narrow |
| Arial Unicode MS (if you have purchased UCFONT component) |
| Comic Sans MS |
| Courier New |
| Garamond |
| Sazanami Gothic (free Japanese font containing over 13,000 characters) |
| Times New Roman |