Authentication using the Authorization Code Flow
Authorization Code Flow provides a graphical way for an end user to log in using the same login experience as would be seen in IFS Aurena or IFS Aurena Native. This section describes how to set up or implement this flow for integration purposes.
Description of Authorization Code Flow
NOTE: This section goes into quite a bit of detail and gets quite technical and complicated, but if it is possible to use an OAuth2 client library or existing OAuth2 support in the software you are trying to integrate much of the complexity can be abstracted away using these methods. Most IFS customers would likely not implement a client with Authorization Code Flow from scratch.
The main way to authenticate against IFS Cloud is to use the Authorization Code Flow to get an access token. During this flow, the OAuth2 client will use a browser (either the system browser or an embedded browser control) to render the login page and perform authentication. This section aims to describe how to handle this flow from a non-IFS client. The process in which an OAuth2 client handles authorization code flow is the following:
- The OAuth2 client constructs an authorization request to the IFS IAM. This URL points to a place on the IFS IAM which exists on any implementation of an authorization server that is known as the authorization endpoint. This has the form of a URL with query parameters that tells the IAM what to do. It then sends this request to a browser control either by opening it using the users's system browser or through the use of an embedded browser control such as an Android WebView. An authorization request has the following format:
<AUTHORIZATION_ENDPOINT>?response_type=code&client_id=<CLIENT_ID>&state=<STATE>&redirect_uri=<REDIRECT_URI>&nonce=<NONCE>&scope=openid microprofile-jwt
The following parameters are needed to construct it (other parameters in the URL above can be considered to be constant): 1. <AUTHORIZATION_ENDPOINT>: This is URL to the authorization endpoint. In order to find this in an environment, see the section on OpenID Connect Discovery. 2. <CLIENT_ID>: The Client ID of the IFS IAM client registration used. See later in this document for more information. 3. <STATE>: A value used for OAuth2 clients in order to correlate different steps within the same flow. A random GUID will suffice. See here for more information. 4. <REDIRECT_URI>: The redirect URI configured in the client registration for use with the client. See later in this document for more information. 5. <NONCE>: Cryptographic nonce as described in the OpenID Connect specification used to mitigate replay attacks. A randomly generated string will suffice but care should be taken that it has sufficient entropy to prevent attackers from guessing values. 6. Optionally, two query parameters called "code_challenge" and "code_challenge_method" may be needed also. See the section on PKCE for more information. 2. The browser will render the login page of the application and perform authentication in whatever manner has been configured. Here, the login experience will be the same as the one that is recognized for IFS Aurena or IFS Aurena Native. All the same features of authentication are available at this point, such as SSO and the use of external Identity Providers. Usually an authorization endpoint implements some kind of login page, but it may also use other methods on top of this such as triggering some MFA process. In some manner, the user completes login. 3. The IFS IAM will redirect the browser to the specified redirect URI with some new query parameters. This either leads to a serverside component that is part of the OAuth2 client software where the code can be consumed, or the client itself has to intercept it. See later in this document for more information on how to handle the redirect URI in a native client or single page app. 4. The OAuth2 client will extract the code query parameter from the URL which the IAM redirected to. This contains a time-limited one use code that can be redeemed for a token. It will then proceed to construct an HTTP POST request to another endpoint on the IAM called the token endpoint. This request posts a form ("x-www-form-urlencoded" content type) that contains a collection of key-value pairs: 1. code: The one-use code retrieved from the redirect. 2. client_id: The Client ID of the IFS IAM client registration used. See later in this document for more information. 3. state: Same random value as was used for the first request to the Authorization Endpoint. 4. grant_type: Should be equal to "code", used to denote the use of Authorization Code Flow. 5. client_secret: In case a confidential client registration is used for this, provide the client secret of the client registration. In some cases this may not be the case and PKCE may be used instead. See the section on PKCE for more information. 6. code_verifier: In case PKCE is used, this parameter will be used instead of a client secret. See the section on PKCE for more information. 5. Whatever part of the OAuth2 client that sent the request gets an access token returned in the body of the response from the POST request to the IAM. The response from the IAM is a JSON string and has the following format:
{
   "access_token":"<INSERT LONG STRING HERE>",
   "id_token":"<INSERT LONG STRING HERE>",
   "token_type":"bearer",
   "expires_in":3600,
   "refresh_token":"<INSERT LONG STRING HERE>"
}
The "access_token" element is extracted and used as the bearer token to access the IFS Cloud backend API:s. Optionally, the refresh_token can be used to refresh access tokens as they expire.
Use-case, advantages and limitations of Authorization Code Flow
Graphical end-user applications usually stand to benefit from the use of Authorization Code Flow both on desktop PCs and mobile devices. The reason for this is that the details of authentication can be outsourced to the system itself, enabling support for all the features of the IFS IAM that are available to IFS Cloud itself. This allows for the use of such features as Single Sign On, multi-factor authentication and the use of external identity services. If it is possible for an app to use Authorization Code Flow to get an access token, then it is likely the better choice.
The downside of Authorization Code Flow is the relative complexity when it comes to implementation and the incomplete support for the protocol in third-party applications. Client applications that support the protocol are increasing in frequency, but some still do not have proper support for the protocol. If attempts are made to set up an application that lacks support for the protocol and lacks a programming interface for such support to be implemented then it may be a challenge to use this way of authenticating. In these cases, another flow may be more appropriate or it may be necessary to deploy some type of integration middleware to handle authentication (such as Dell Boomi).
How to configure client registrations for Authorization Code Flow
When setting up client registrations in Solution Manager for use with Authorization Code Flow, there are some things to take into account. The first is what client capabilities need to be enabled for Authorization Code Flow to work. In order for this flow to be enabled, Direct Access Grants and Service Accounts are not needed and should be kept disabled unless it is the case that you also intend to use the same client registration to perform other flows.
Public or confidential client?
The first thing to distinguish is whether or not to use a public or confidential client registration. This depends on the structure of the OAuth2 client which uses this client registration to authenticate against IFS Cloud. If the OAuth2 client has a way to securely store a secret, then it should be a confidential client and be set up with a client secret. If not, it should be a public client (and likely use PKCE, see the section on PKCE for more information). A piece of software is able to securely store a client secret if it has a serverside component that is used to exchange the one-use code for a token. Natively installed apps and single-page browser apps are not able to securely store a client secret and should as such opt for a public client instead. The diagram below illustrates an OAuth2 client capable of using a confidential client registration and how it may interact with the system.
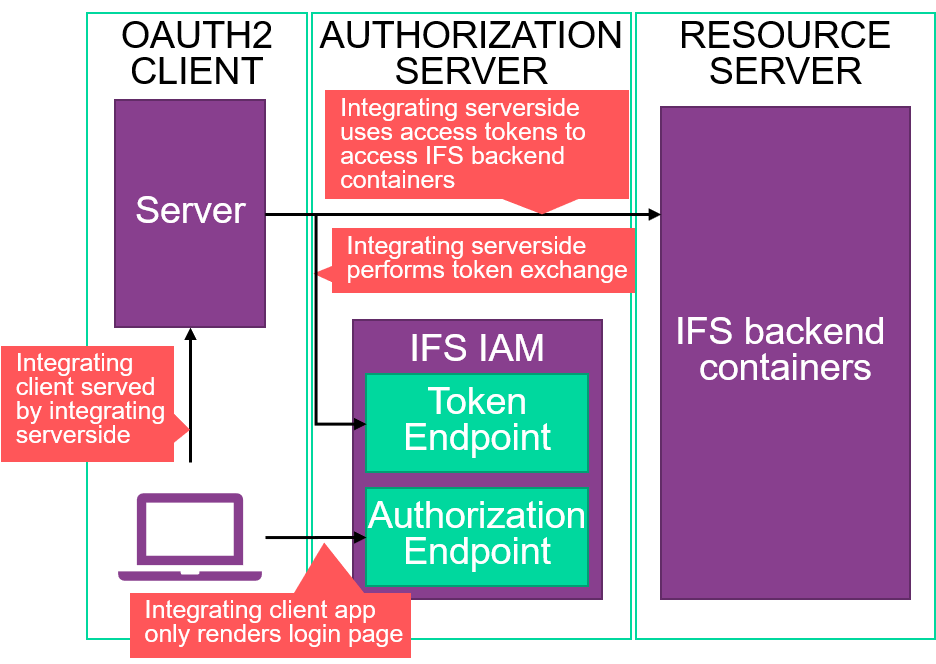
Here, we see an app that directs a client from serverside code. This is common with classic web apps. The communication with IFS Coud is handled from the server part of the integrating software, which is the part of the OAuth2 client that did the request to the token endpoint. The clientside parts of the OAuth2 client are likely to consist of a web app hosted on the server, and the request to the authorization endpoint is likely to be initiated by the server in some way, such as using HTTP redirects.
In contrast, below is an illustration of an OAuth2 client utilizing a public client registration in how it interacts with the system.
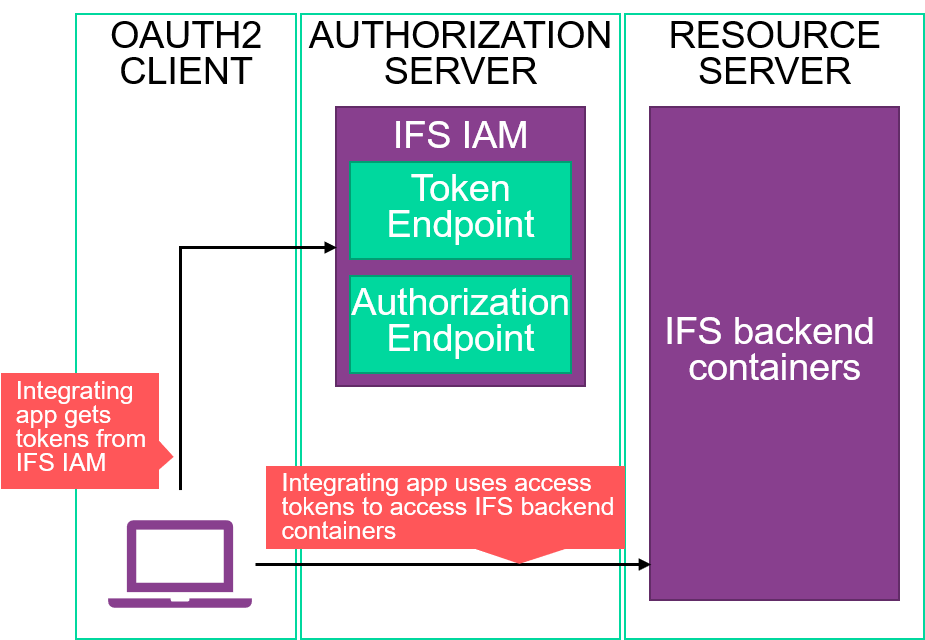
This is likely to be a native app or a single page browser app with a server that does very little except host its static files. For these apps, the entire Authorization Code Flow must run on the client software on the end user's device. In this way, it is not possible to store a client secret securely. As such, a public client should be chosen.
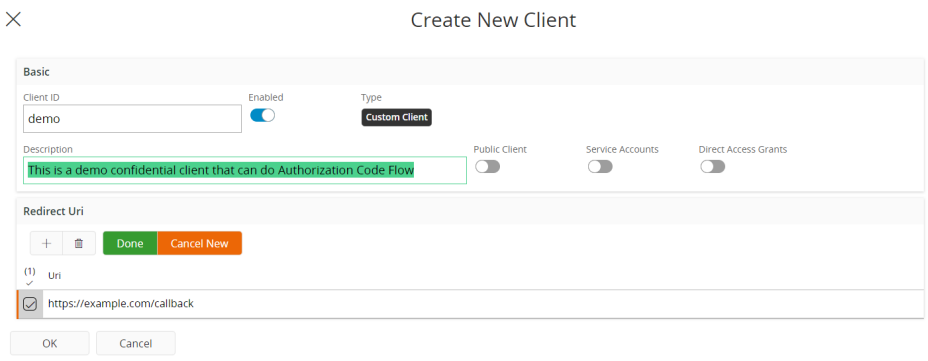
In Solution Manager, a confidential client registration capable of Authorization code flow could be created as shown below. See here for hints on what to put as redirect URI:s. This image displays an example web URI indicative of a callback on a server.
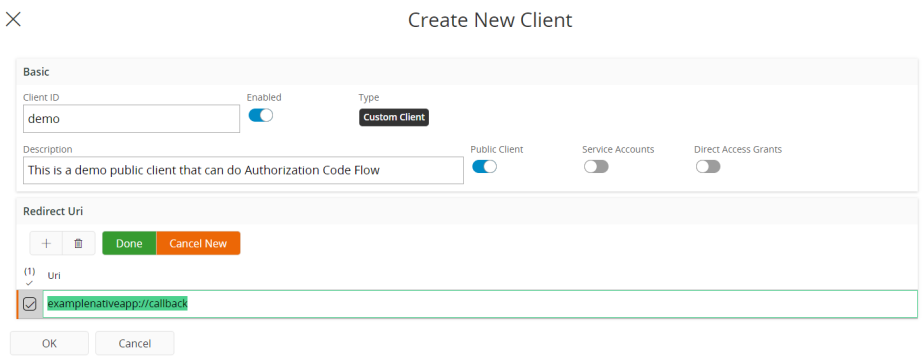
A public client is created as shown below. See here for hints on what to put as redirect URI:s. This client registration shows an example indicative of a native app, with the private URI scheme pattern as described in the OAuth2 for Native Apps specification being used.
On the use of Proof Key for Code Exchange (PKCE)
Since the use of OAuth2 public client registrations means that some OAuth2 clients do not use client secrets to secure the token endpoint, it is highly recommended to use a standard called Proof Key For Code Exchange or PKCE to mitigate this shortcoming. This is an addon to the protocol using a hashing algorithm in order to verify that the request to the authorization endpoint and the request to the token endpoint are sent by the same person. The way to implement this is the following:
- The OAuth2 client generates a random string with at least 43 characters and at most 128 characters. This is known as the code verifier.
- The OAuth2 client uses the hashing algorithm selected to create a hash of the code verifier. This is known as the code challenge. The hashing algorithms available are known as "plain" and "S256". The algorithm "plain" does nothing, so the code challenge will be the same as the code verifier. This is slightly better than not doing PKCE at all, but clients that are in any way capable of using "S256" instead should always opt to do so. The way to implement "S256", as described in the specification, is:
code_challenge = BASE64URL-ENCODE(SHA256(ASCII(code_verifier)))
- The code challenge and chosen hashing algorithm are added as query parameters to the authorization request. The code challenge is added as the query parameter "code_challenge" and the algorithm is added as the parameter "code_challenge_method".
- When the token request is performed, the client adds a POST parameter called "code_verifier" and put the code verifier in it. The IFS IAM will attempt to verify that applying the chosen algorithm to the code verifier produces the code challenge. If this checks out, an access token will be returned.
For more information about PKCE, see the PKCE specification.
How to set up integrations to use Authorization Code Flow
Setting up the integration itself varies depending on the sturcture and architecture of the software that is being integrated. No matter what type of Authorization Code Flow is used, the OAuth2 client will require some information about the IFS IAM. The least amount of things that will be required are the location of the authorization endpoint, the location of the token endpoint, and the client id of the client registration that was created in Solution Manager.
Discovery document location
The details about the client registration are found in solution manager, and to get the endpoints and most other parameters surrounding the IFS IAM it is possible to look at the discovery document. This is a document that exposes OAuth2 and OpenID Connect related metadata in a format specified by the OpenID Connect Discovery specification.
The location of this document is always at the following place:
https://<SYSTEM_URL>/auth/realms/<NAMESPACE>/.well-known/openid-configuration
Replace <SYSTEM_URL> with the system URL of the IFS Cloud instance and replace <NAMESPACE> with the name of the Kubernetes namespace in which it resides.
This endpoint returns a JSON string that contains a lot of information about the IFS IAM. The authorization endpoint location is returned under the key "authorization_endpoint" and the token endpoint is returned as "token_endpoint". Other things may become relevant if some more advanced integration towards the IFS IAM and its capabilities needs to be set up, but just for authentication the authorization endpoint and token endpoint are likely sufficient.
The discovery document is useful for all OAuth2 flows, and not just for Authorization Code Flow.
Application support for OAuth2
It is more and more common that client applications and other systems implement some form of support for OAuth2. In these cases, it is likely beneficial to set up the integration using this way and not implement protocol support while setting up the integration. In this case, follow the documentation of said software to figure out what redirect URLs to register and what kind of client registration it needs. Then extract the appropriate things from the IAM discovery document in order to fill any other parameters it needs. If this is possible then it is the best, easiest and most reliable way to integrate.
Use of OAuth2 client libraries
In case there is no native support in the application that needs to integrate, it may be needed to program OAuth2 support in some way to facilitate the integration. When implementing OAuth2 Authorization Code Flow it is highly recommended to use an established library if possible. Some of these libraries can serve to abstract away all the complexity on the client and allow the implementation to be done easily and quickly.
A large list of available libraries for a multitude of programming languages can be found here.
OAuth2 protocol requirements and redirect URI design patterns
There are some specific behaviors and parameters in the OAuth2 protocol that are specific to IFS Cloud and the specific integration that needs to be set up. These include the what value to use for the scope, if other flows are supported and how to handle the redirect URI:s. Scopes are pre-defined for IFS cloud and the same ones are always needed. In order to successfully get a token in the proper format, the scopes "openid" and "microprofile-jwt" must be requested during the request to the authorization endpoint. As for other flows, use of Implicit Flow as defined in the specification is not supported, and as such the response type should always be requested to be "code", denoting the use of Authorization Code Flow. the response type parameter can therefore also be viewed as constant for IFS Cloud.
Regarding the use of redirect URI:s, this depends more on the actual integration because they are registered to the IFS IAM using Solution Manager when the client registration is created. If there is application support for OAuth2 then the documentation of that support will describe which redirect URI:s will have to be registered. For confidential clients redirect URI:s are handled by pointing it to a location on the serverside parts of the OAuth2 client that is able to consume the one-use code and contact the token endpoint for an access token. For a public client, there may not be a location on the server that can receive the redirection response. If the client is a single page browser app, then it is likely possible to do something very similar to what a confidential app would have done, meaning to have the redirect URI point to a place in the single page app and then have the clientside Javascript handle the request to the token endpoint. If the application is a natively installed app there are other ways to go about it. The specification regarding how to design OAuth2 for native apps has a section that describes different strategies for handling native apps.
If you are able to use a library to implement support in a native app, this library's documentation will likely say what redirect URI to use for the library.
Using the access token
Using the access token to access the API:s is as simple as attaching it as a Bearer token in the HTTP requests. Doing this is as simple as attaching it in the Authorization HTTP header in the following format:
Bearer <INSERT TOKEN HERE>
This format is further specified in this specification. How to use the access token is the same for all different OAuth2 flows, and not just Authorization Code Flow.
More information on Authorization Code Flow
These specifications are relevant for the use of Authorization code flow:
- The OAuth2 specification
- The PKCE specification
- The OAuth2 for Native Apps specification
- The Bearer Token Usage specification
In addition to this, the OAuth2 website links to further resources that may be helpful.