Adding Commands
Custom Actions provide the possibility to expose PL/SQL methods in IFS Cloud through Aurena Pages and Commands provides the functionality to execute Custom Actions, navigate between application pages and navigate to external URLs. The navigations can be done with parameters if required.
Contents
- Commands
- Command Groups
- Custom Actions & Commands Examples
- Adding an ExecuteAction type Command
- Adding a NavigationLink type Command
- Adding an ExternalNavigationLink type Command
- Adding an ExecuteQuickReport type Command
- Adding an ExecuteOperationalReport type Command
Commands
Commands are added as buttons to pages and can be added to the top header or above lists and group sections.
Commands are added to Aurena Pages using the Page Designer. There are five types of Commands that can be added to pages:
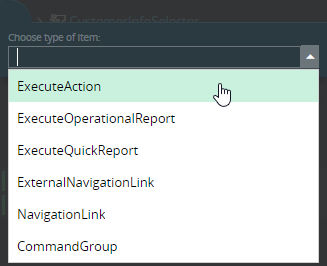
- Execute Action - Call an existing Method in IFS Cloud
- Navigation Link - Provides the functionality to navigate between pages with or without parameters.
- External Navigation Links - Provides the functionality to navigate to an external URL, with or without parameters.
- Execute Quick Report - Provides the capability to execute a quick report
- Execute Operational Report - Provides the capability to execute an operational report
Command Groups
All commands are placed in a command group. Where the command group can contain a single command, multiple commands or even structures where a command group contains command groups. The main elements for which commands can be added are pages and lists. The top attribute for commands structure on these elements are the optional attribute Command Groups. This attribute is optional so it is not always present on a page or a list. If that is the case, expand optional attributes by clicking on (...) With command groups available, click (+) to add a command or command group.
There are two ways to add a command.
- Directly on Command Groups. Click (+) on the command groups node and select the command type to be added. This will create a wrapper command group together with the command.
- To an existing command group. If a command should be added to an existing command group. Expand the command group and click (+) on the command group content node and select command type to be added. This way only the command will be added directly to the chosen command group.
Command Group display label
Command groups in Page Designer are displayed with alternative labels. This is a limited consolidation of the content to increase the readability in the list of command groups. It is quite common that command groups only act as containers for single commands where the group itself have no name or label. A list of nodes displayed as "Command Group" is not very helpful when trying to locate a specific command.

Display label of the command group in the designer will fallback like this.
- Show label of the command group if set
- Show label of first child command or command group if set. If the label comes from a child it is indicated as such by placing it within parentheses. e.g. ( Copy Customer )
- Show name of the command group if set
- Show static Command Group if none of the above.
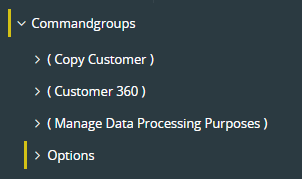
This is how the command groups in the toolbar example toolbar above will be presented in the designer.
- Copy Customer and View End Customer Connections are children to first command group. The group display the label of the first child.
- Customer 360 and Manage Data Processing Purposes are single commands in separate groups
- Options is displayed without parentheses which means that it is the name or label of the actual group.
Custom Actions & Commands Example
Custom Actions can be added to a Projection either in the New Projection Configuration assistant or by modifying an existing Projection Configuration in Projection Configuration Page.
Adding a ExecuteAction Type Command
- Navigate to the Page where Commands should be added and open the page designer.
- If the Active Page group does not show Command Groups attribute click (...) to show optional attributes.
- Add command by clicking (+) on the Command Groups node.
- Select command type to be created. I.e. Execute Action
- Enter a label for the command. e.g. Test Action
- From the Action drop down select the action to be executed.
Note: It is only possible to execute actions provided by the page projection
-
Choose method, this attribute only makes a difference is the command is executed on a list with multiple records selected. For single record pages method action is the typical choice. This attribute is optional and will default to action if left empty. 1.Action: states that each record in the selection will be treated individually and one server call per record will be performed. With action method each successful call is committed so an error occurring will only roll back the record with the error.
2.Bulk Action: All selected records will be collected and called in one bulk execute. The server will perform the loop over the records and call the action for each record. With a bulk execute an error cause the server to rollback all changes made during the transaction.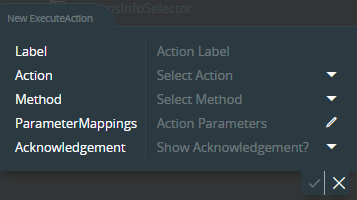
If the action to be executed has parameters then values needs to be mapped. In order to map the parameters click on the edit icon in front of the Parameter Mappings and Edit Key Values. The values assigned (mapped) can either be record attributes values or static. Use the drop down for a list of the available attributes for the record.
If an acknowledgement for the successful action execution is required, set Acknowledgement to true. Default is false. Once set, after successful execution, a success toast will be shown to the end user.
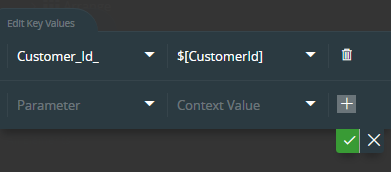
Once the Configurations are done, close the dialog
ExecuteAction type Command is created and will be listed down as below.
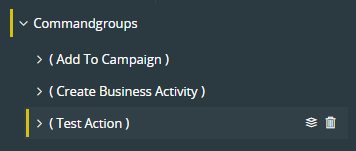
Added Commands will be listed with other Commands in the page. Since the Command was added to the top level of active page it will be listed on top of the Page. It is possible to add Commands inside a list of group sections as well.

Adding a NavigationLink type Command
- Open the Aurena Page Designer and under the Active Page add the Command by clicking '+' icon right next to Commandgroups. Select the NavigationLink option as below
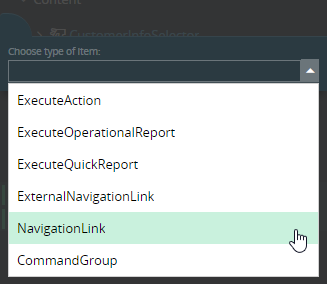
- Set a Label to the Command and choose the Path to the Page that should be navigated to.
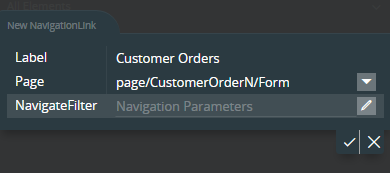
- If any parameters should be added, map the parameters in order to navigate to the target page with filtered results for the selected record. In order to map the parameters: click on the edit icon in front of the Parameter Mappings and Edit Key Values. Submit all the information and the created Command will be displayed under the Commandgroups as below.
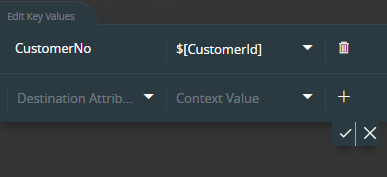
- Added Command will be listed with other Commands in the page. Since the Command was added to the active page it will be listed on top of the Page. It is possible to add Commands inside list or group sections as well. Once the Command button is clicked it will be redirected to Page that needs to be navigated with the filtered records.

Adding an ExternalNavigationLink type Command
- Open the Aurena Page Designer and under the Active Page add the Command by clicking '+' icon right next to Commandgroups. Select the ExternalNavigationLink option as below:
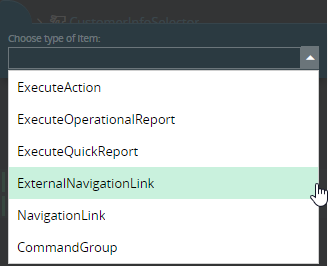
- Set a Label to the Command and write the URL that should be navigated to.
Current supported protocols are: http:// and https://
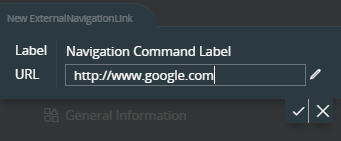
- If any parameters should be added, provide an URL with the parameters (one or several) included in the URL field and then and then click on the edit icon to the right of the URL field.
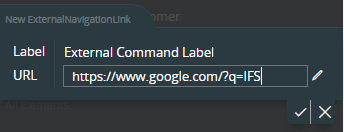
- Clicking on the edit icon will take you to an editor where parameters can be edited. To use multiple parameters, these needs to be included in the URL in Step 3. \
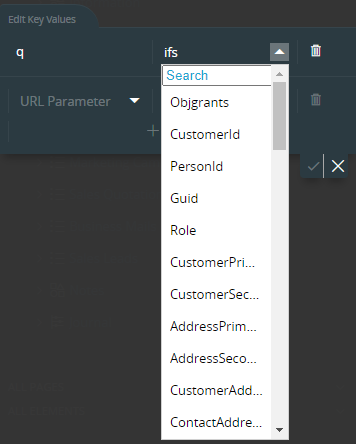
Confirming and closing will update the URL.
Note that the URL with its parameters can be defined manually without using the Edit Key Values editor. 5. An added Command will be listed with other Commands in the page. Since the Command was added to the active page it will be listed on top of the Page. It is possible to add Commands inside list or group sections as well. Once the Command button is clicked it will navigate to the URL defined in the configuration setup.
Adding an ExecuteQuickReport type Command
- Open the Aurena Page Designer and under the Active Page add the Command by clicking '+' icon right next to Commandgroups. Select the ExecuteQuickReport option as below
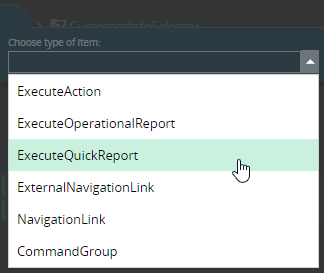
- Fill in the dialog.
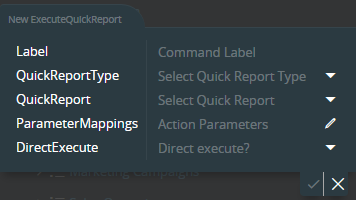
| Field | Description |
|---|---|
| Label | The Custom Command label. |
| QuickReportType | All installed Quick Report types are listed in the dropdown menu. This value is taken as a filter for the QuickReport field values. |
| QuickReport | All available Quick Reports of the selected Quick Report type. If the Quick Report type is not selected it will display all available Quick Reports for this instance. |
| ParameterMappings | The key value editor allows the end user to map context values as report parameters. Currently this is available for SQL Quick Reports only. Once the parameters are mapped, the report parameter dialog will be shown with parameter values pre populated |
| DirectExecute | Setting this value to true will execture the report without promting the parameter dialog. Example: for an SQL Quick Report where the user have mapped the context parameters they can set this to true. And the report will directly display the result. |
Adding an ExecuteOperationalReport type Command
- Open the Aurena Page Designer and under the Active Page add the Command by clicking '+' icon right next to Commandgroups. Select the ExecuteOperationReport option as below
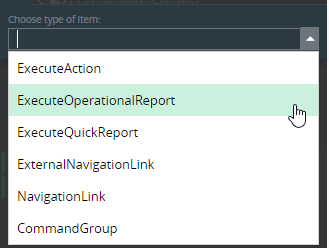
- Fill in the dialog.
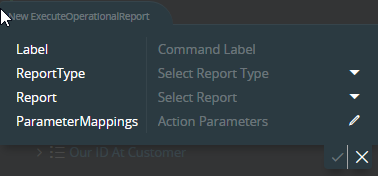
| Field | Description |
|---|---|
| Label | The Custom Command label. |
| ReportType | Select "Operational" |
| Report | All available Operational Reports are listed here. Select the desired report from this list |
| ParameterMappings | The key value editor allows the end user to map context values as report parameters. All mandatory parameters have to be mapped in order to save the command. |
NOTE: Once added, only some attributes of the command (example: label) can be edited. To edit other attributes, remove existing command and re-create it with desired values.